Here’s how to mask a photo with any Microsoft Office shape or icon and do it with full control over what appears from the original image.
We’ve already explained two simple ways to crop a photo to a shape or fill a shape with some options to move and resize each element.
This method has more steps but lets you move the picture and shape around to get exactly the look you want.
-
Make a Shape or Icon
- Try an icon or SVG
- Fill Color and Outline
- Outline
-
Save as Picture
- Non-transparent picture format
- Make Shape picture Transparent
- In front of text
- Position over picture and tweak to suit
-
One final tip ….
- Make a fixed image by taking a screen shot.
In short: convert a shape to picture, then use ‘Set Transparent Color’ to make part of the shape transparent. Finally overlay the shape/picture on the image you want to mask. There’s a few tricks and traps along the way …
Make a Shape or Icon
Start by inserting a shape Insert | Illustrations | Shapes where you’ll see the same/similar choices that are in Crop to Shape.

Try an icon or SVG
Microsoft 365, Office 2021/2019 Icons or other SVG graphic can also be used.
Edit options for SVG Icons in Microsoft 365, Office 2021/2019
Fill Color and Outline
Insert a Shape with a faint solid fill color that will blend with the picture you’ll be masking. A faint color because Office’s ‘Set Transparent Color’ doesn’t completely convert the shape to transparency. The edge that’s left will (hopefully) not show on the masked image.
Here’s the light-blue colored shape (left) compared to the picture we’ll be masking (right).

OR: Use the Shape Fill color: White, Background 1, Darker 5% (just below full white on the color selector. That’s so faint that it all but disappears when converted to Transparent.

Outline
Choose an outline for the shape, if you wish. Use a very different color to the fill so Office can easily tell the difference between the fill (to become transparent) and the outline you want to keep.
Choose the Outline and color first then a much different fill color. The outline color will be visible in the final result, but the fill color (mostly) will not.
Save as Picture
Now save the Shape as a Picture. Make the shape large (larger than you’ll need in the final masked image), right-click and choose Save as Picture.
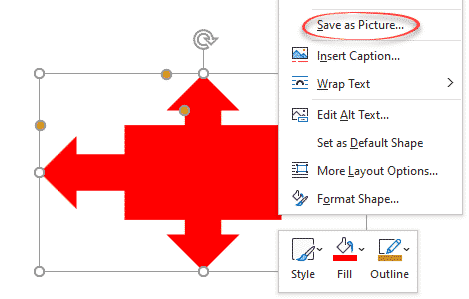
That will save the shape as an image on your computer. Larger dimensions for the image give you more resizing options later without losing quality.
Non-transparent picture format
It’s VITAL to select an image format that does NOT support transparency. Select JPG or BMP not the default PNG.

Why? The surround of a shape is transparent. It looks white because the doc/slide background is usually white. We need a truly white color around the shape. Do that is saving to a non-transparent format. That converts the transparent surround of the shape into plain white color.
Make Shape picture Transparent
Insert the picture you just made, back into the document or slide.
The reason for converting to a picture is to get Office’s ‘Set Transparent Color’ option, which is only available for images, not shapes. ‘Set Transparent Color’ changes a selected color in the image into a transparent area.
Go to Picture Format | Adjust | Color | Set Transparent Color. (don’t choose the nearby ‘Transparency’ option, which applies to the entire image).

Use the Eyedropper pointer to select the shape fill color and make it transparent.
Transparency Color problem and fix for Microsoft Office
In front of text
Next, change the picture layout to ‘In front of text’.

As you can see, even with no shape outline, some of the fill color remains around the edges. That’s why we recommended a fill color similar to the colors in the picture you’ll be masking.
Position over picture and tweak to suit
Now drag the shape/picture over the image you want to mask. This is where all the preparation pays off.
There’s full control over the positioning and size of both the underlying picture and shape. The kind of control not available with ‘Crop to Shape’ or Shape Fill with Picture’ options.
The Shape (now image) can be resized and moved to show exactly what you want.
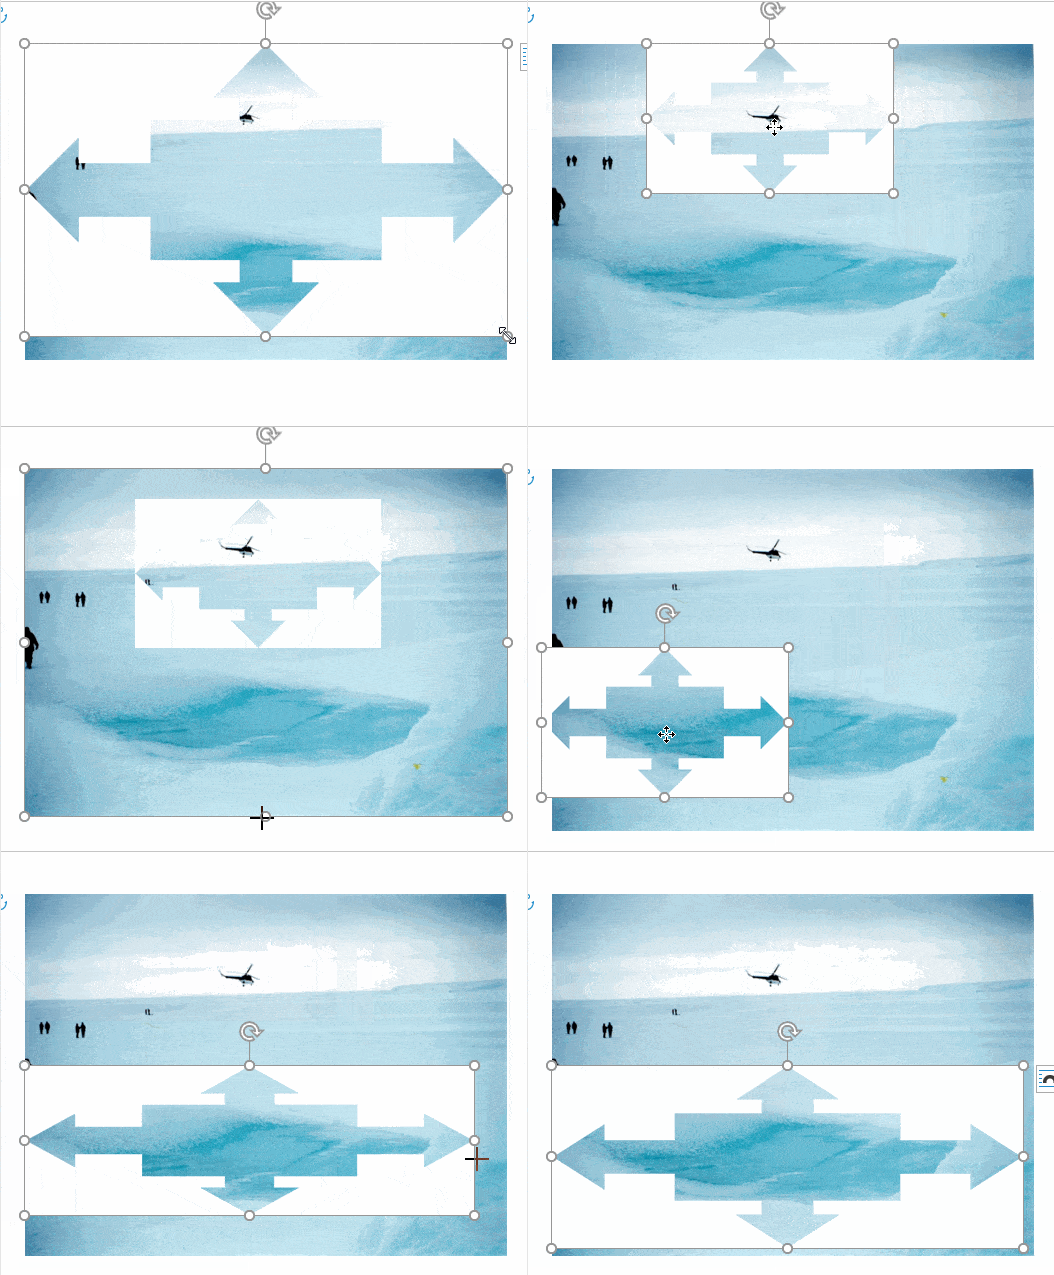
If necessary, click on the picture and resize as necessary. Here we’ve sized and moved both pictures around, so the people and helicopter are in view.

Here’s an animation that shows a little of what’s possible by moving or resizing both the shape and underlying image.
One final tip ….
It might be tempting to make your shape with image fill and leave it at that.
Don’t do it! You’ve done a lot of work to make that custom picture with mask, don’t throw it away.
Instead make a fixed image of your masked image. Use that image in your document, sheet or slide.
Why? Here’s a few reasons:
- A fixed image is less likely to be accidentally changed or moved. That’s an extra worry for collaborated documents. The fixed image is also smaller, if that’s a concern.
- The fixed image can be resized etc without affecting the source image & mask combo.
- The image & mask pair can be revisited to make changes. You won’t have to go though the whole ‘Save as Picture…’ process again; just pick up where you left off.
Make a fixed image by taking a screen shot.
Use Insert | Illustrations | Screen Shot or whatever screen capture system you prefer. Windows 10/11 has Win + Shift + S, Mac has Command + Shift + 4.
Taking screenshots, your guide for Windows, Mac, iPhone, iPad and more
Keep the original picture with transparent image overlay separate. Either a separate document or a hidden slide.
Three ways to crop a picture with an Office shape
Set your own Shape default settings in Office
Put text around a shape, square or circle in Microsoft Word
Make simple changes to SVG graphics
Загрузить PDF
Загрузить PDF
Возможность замостить рисунок в Microsoft Word является довольно полезной, когда нужно создать статью и рекламные бюллетени, добавить водяной знак или логотип на задний план важных документов. Чтобы замостить рисунок в Word, вставьте изображение как один из способов заливки.
Шаги
-
1
Откройте документ Word, в котором нужно замостить рисунок.
-
2
Откройте вкладку «Разметка страницы» или «Дизайн», затем выберите раздел «Фон страницы».
-
3
Нажмите на «Способы заливки», чтобы открыть соответствующее меню.
-
4
Откройте вкладку «Рисунок», затем нажмите «Рисунок…».[1]
-
5
Выберите рисунок или изображение, которое хотите замостить, и нажмите «Вставить». Изображение появится в окне предварительного просмотра.
-
6
Нажмите «ОК». Теперь изображение будет использовано в качестве фона документа Word.
-
7
Передвиньте ползунок «Масштаб» влево или вправо, чтобы изменить размер фрагментов по своему усмотрению.
-
8
Нажмите «Файл» и выберите «Параметры». Откроется окно «Параметры Word».
-
9
Нажмите «Экран» в левой части окна «Параметры Word».
-
10
Установите флажок рядом с параметром «Печать фоновых цветов и рисунков» и нажмите «OK». Теперь фоновый рисунок будет напечатан на заднем плане документа Word.[2]
Реклама
Советы
- Если вас не устраивает размер и количество фрагментов в документе, попробуйте изменить размер исходного изображения. Microsoft Word автоматически распределяет фрагменты в документе на основании исходного размера изображения. Размер изображения можно изменить с помощью Microsoft Paint или других бесплатных онлайн-инструментов, таких как PicMonkey Photo Editor или PicResize.
Реклама
Об этой статье
Эту страницу просматривали 7144 раза.
Была ли эта статья полезной?
Когда вы вставляете изображение, вы можете заметить, что его трудно переместить точно там, где вы хотите. Это связано с тем, что по умолчанию обтекание картинки текстом в ворде установлено значение «В тексте». Если вы хотите свободно перемещать изображение или изменить обтекание картинки текстом, вам нужно выбрать другой параметр обтекания текста.
Как сделать обтекание картинки текстом
- Выберите картинку, для которой вы хотите задать обтекание текстом. В правой части ленты появится вкладка «Формат».
Обтекание картинки текстом в Word – Выбор картинки
- На вкладке «Формат» выберите команду «Обтекание текстом» в группе «Упорядочение». Появится раскрывающееся меню.
- Наведите указатель мыши на различные варианты обтекания картинки текстом в ворде. В документе появится предварительный просмотр обтекания текста. Когда вы найдете параметр обтекания текста, который хотите использовать, щелкните его. Кроме того, вы можете выбрать «Дополнительные параметры разметки…» для точной настройки макета.
Обтекание картинки текстом в Word – Выбор типа обтекания текста
- Текст будет обтекать картинку. Теперь вы можете перемещать изображение, как хотите. Просто нажмите, удерживайте и перетащите его в нужное место. Когда вы его перемещаете, появятся направляющие выравнивания, которые помогут вам выровнять изображение на странице.
Обтекание картинки текстом в Word – Перемещение картинки
Если направляющие выравнивания не отображаются, выберите вкладку «Макет» и нажмите команду «Выровнять». В раскрывающемся меню выберите «Использовать направляющие».
Обтекание картинки текстом в Word – Использовать направляющие
Также вы можете получить доступ к параметрам обтекания картинки текстом в ворде, выбрав изображение и нажав кнопку «Параметры разметки».
Обтекание картинки текстом в Word – Параметры разметки, обтекание текстом
Использование встроенных параметров обтекания текста
Встроенные параметры обтекания текста в ворде позволяют перемещать изображение в определенное место на странице.
- Выберите изображение, которое хотите переместить. Активируется режим «Работы с картинками» и появится вкладка «Формат».
Обтекание картинки текстом в Word – Вкладка Формат, режим работы с рисунками
- На вкладке «Формат» выберите команду «Положение» в группе «Упорядочение».
- Появится раскрывающееся меню с встроенными позициями и обтеканиями изображения. Выберите нужную позицию изображения. Картинка будет размещена на странице в документе, с соответствующим обтеканием текста.
Обтекание картинки текстом в Word – Размещение и обтекание картинки текстом
Вот такими способами вы можете задать обтекание картинки текстом в ворде.
No special graphics software necessary
Updated on January 15, 2022
What to Know
- Insert and select the image. Then, go to the Picture Format or Format tab > Remove Background.
- Select Keep Changes if the background has been satisfactorily removed (indicated by magenta highlight).
- Select Mark Areas to Keep or Mark Areas to Remove to outline areas to keep or remove. Repeat as needed.
This article explains how to remove the background of an image in Microsoft Word without any other graphic editing programs. Instructions apply to Word for Office365, Word 2019, Word 2016, Word 2013, Word 2010, and Word for Mac.
How to Use the Remove Background Feature in Word
After you insert an image into Microsoft Word, which you can do from the Insert > Pictures menu (or Insert > Picture in Word 2010), open the formatting menu to delete the background image.
-
Select the image.
-
Go to the Picture Format tab and select Remove Background. In Word 2016 and older, go to the Format tab.
If you don’t see the Picture Format or Format tab, the image isn’t selected or multiple images are selected. This tab is only available when one picture is selected.
-
Decide if the area marked in magenta is the area that you want to delete.
-
To remove the magenta highlight from a section of the image that you want to keep, select Mark Areas to Keep, then select the parts of the magenta area that should not be removed. In Word for Mac, click What to keep.
-
To highlight a section of the image that should be deleted, select Mark Areas to Remove, then select the parts of the image that should be removed. In Word for Mac, click What to remove.
You may need to switch back and forth between the keep and remove tools to highlight the background area to be removed.
-
When the parts of the image that you want to delete are highlighted in magenta, select Keep Changes.
-
The modified image appears on the document canvas.
-
If you’re not satisfied with the final image, go to the Picture Format tab, select Remove Background, then keep or remove parts of the image.
Not all images are set up in a way that makes removing the background easy. If there are lots of complex colors and shapes, it may take several attempts to choose which parts to delete and which parts to keep.
How the Remove Background Tool Works in Word
When you erase an image background in Word, you can delete objects or people in a photo, or remove solid colors that don’t work well with the other colors in the document. Removing the fill increases flexibility and creativity when designing documents, can make certain objects pop out of an image, and expands text-wrapping options.
Much like a regular image editing application, you choose which parts of the image to delete and which parts to keep. The initial background removal process usually doesn’t catch exactly what you want to delete or keep, so use the additional keep and remove tools to customize the picture.
FAQ
-
How do I remove a background from a picture in Photoshop?
You’ll need to unlock the primary layer of the image. In Layers, right-click the main layer and select Layer from Background. You can use the Magic Wand, Lasso, or Quick Mask tool to select and delete the background.
-
How do I remove a background from a picture in Canva?
Select an image in Canva and click on Edit Image. Next, select BG Remover, then select Erase.
Thanks for letting us know!
Get the Latest Tech News Delivered Every Day
Subscribe
При вставке картинок в текстовый документ Word вы можете столкнуться с тем, что картинки будут располагаться только одна над другой или рядом. А при попытке наложить одну картинку на другую они будут просто меняться местами и получить наложение изображений не получится. К счастью, такое поведение картинок можно изменить с помощью настроек. Сейчас мы рассмотрим сразу два способа, как наложить картинку на картинку в Word. Статья будет актуальной для современных версий Word, таких как Word 2007, 2010, 2013, 2016 и 2019.
Как наложить картинки с помощью функции «Обтекание текстом»
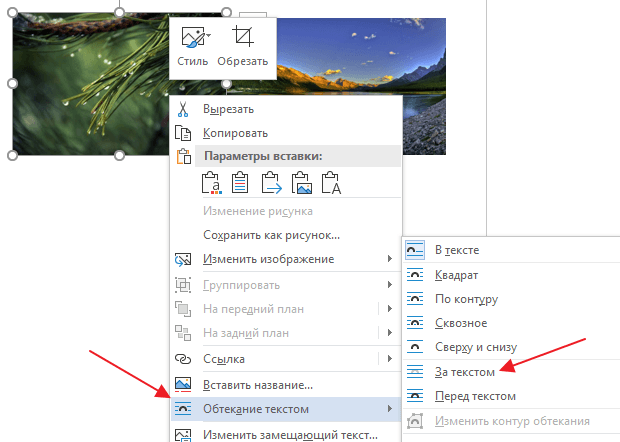
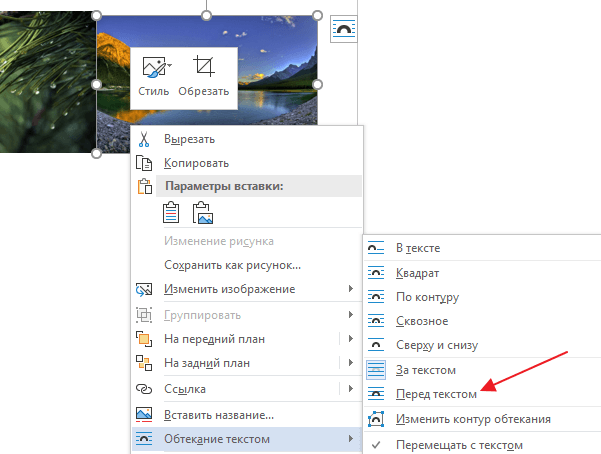
Для того чтобы наложить одну картинку на другую можно использовать функцию «Обтекание текстом». Для этого нужно кликнуть правой кнопкой мышки по одному из изображений, открыть меню «Обтекание текстом» и выбрать вариант «За текстом». Это позволит разместить эту картинку на нижнем слое.
Дальше повторяем эту же процедуру для второй картинки, только в этот раз выбираем вариант «Перед текстом». Это позволит разместить данное изображение на верхнем слое.
Также вы можете выбрать способ обтекания текстом на вкладке «Формат». Для этого нужно выделить изображение, открыть вкладку «Формат» и нажать на кнопку «Обтекание текстом».
После того как обтекание текстом будет настроено для обеих картинок вы сможете свободно перемещать по текстовому документу Word.
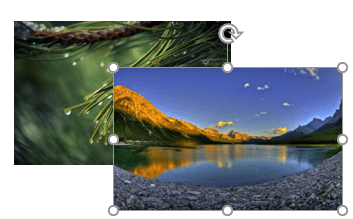
При этом первая картинка всегда будет накладываться на вторую.
Как наложить картинки с помощью функции «Надпись»
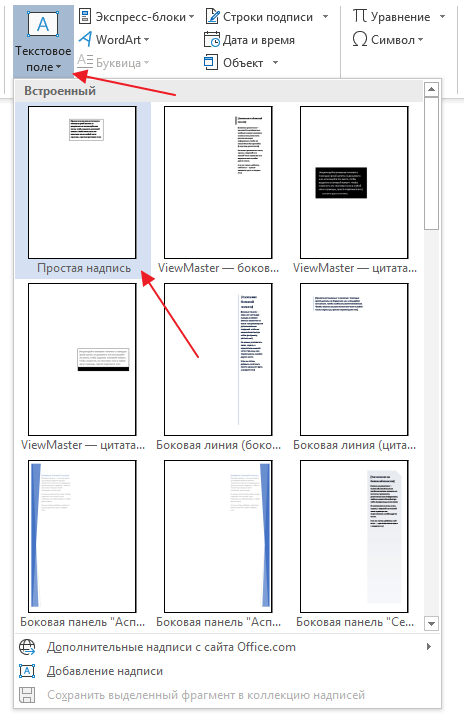
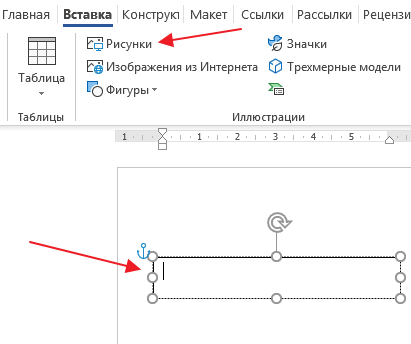
Альтернативный способ наложения одной картинки на другую предполагает использование функции «Надпись». Для этого нужно перейти на вкладку «Вставка», нажать там на кнопку «Текстовое поле» и выбрать вариант «Простая надпись» («Текстовое поле» — это название кнопки в Word 2016, если у вас более старая версия Word, то вам нужно искать кнопку «Надпись»).
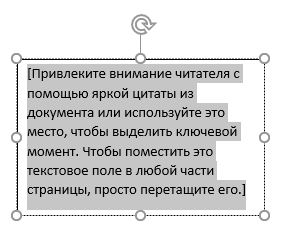
После этого у вас на странице должна появиться плавающая рамка с текстом. Особенность данной рамки в том, что ее можно разместить в любом месте документа. Это позволяет наложить картинку на картинку.
Текст, который присутствует в рамке, нужно удалить и вместо него вставить картинку. Для этого можно воспользоваться комбинациями клавиш Ctrl-C/Ctrl-V или кнопкой «Рисунки» на вкладке «Вставка».
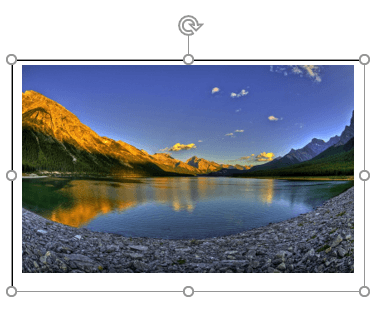
В результате вы получите плавающую рамку с изображением. Теперь, тоже самое нужно повторить для второй картинки.
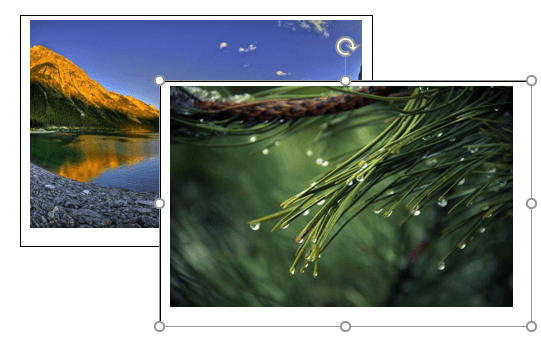
Имея две такие плавающие рамки с изображениями, вы сможете накладывать их друг на друга.
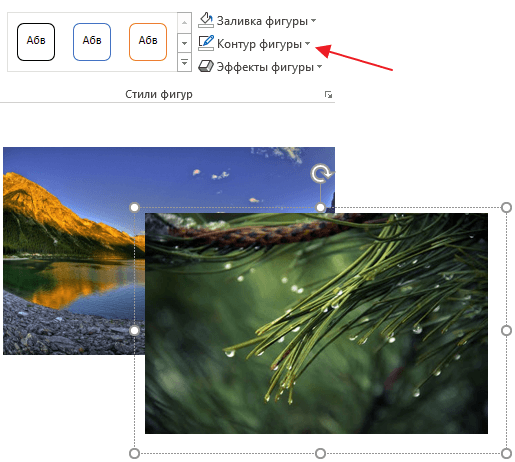
Если нужно скрыть рамку и белые поля вокруг изображения, то выделите рамку и перейдите на вкладку «Формат». Здесь можно убрать контур и белую заливку с помощью кнопок «Контур фигуры» и «Заливка фигуры».
В результате вы получите примерно такое наложение картинок, как на скриншоте внизу.
Посмотрите также:
- Как картинку сделать фоном в Word
- Как наложить текст на картинку в Word
- Как вставить картинку в Word
- Как свободно перемещать картинку в Word
- Как уменьшить размер файла Word с картинками
Автор
Александр Степушин
Создатель сайта comp-security.net, автор более 2000 статей о ремонте компьютеров, работе с программами, настройке операционных систем.
Остались вопросы?
Задайте вопрос в комментариях под статьей или на странице
«Задать вопрос»
и вы обязательно получите ответ.


