
-
Go to File > Options > Display.
-
Under Always show these formatting marks on the screen, select the check box for each formatting mark that you always want to display regardless if the Show/Hide
 button is turned on or off. Clear any check boxes for ones you don’t want always displayed.
 button is turned on or off. Clear any check boxes for ones you don’t want always displayed.
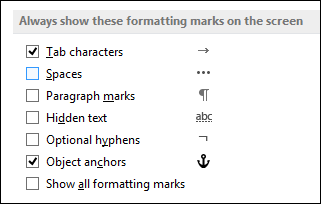
-
Go to File > Help > Options > Display.
-
Under Always show these formatting marks on the screen, select the check box for each formatting mark that you always want to display regardless if the Show/Hide
button is turned on or off. Clear any check boxes for ones you don’t want always displayed.
-
Go to Word > Preferences > View.
-
Under Show Non-Printing Characters, select the check box for each formatting mark that you always want to display regardless if the Show/Hide
button is turned on or off. Clear any check boxes for ones you don’t want always displayed.

Those strange ¶ symbols are called pilcrow signs or paragraph signs and they show the end of paragraphs. They’re useful to see when you’re formatting and editing e-books and don’t print at all, but could be distracting.
Fortunately, there’s an easy way to remove them.
- Click the top menu item Tools->Options
- Click View
- Look for ‘Formatting Marks’, and uncheck the option ‘All’
- Click OK
Or for newer versions…
- Click the top menu item ‘Review’
- Look for ‘Show Markup’ and click
- Look for ‘Formatting’ and uncheck
OR
- Click View
- Move down to Toolbars and choose Standard, for standard toolbar
- You should see a Pilcrow icon on the toolbar that you can click to either show or hide
Finally, Windows 10 makes it much easier to find. Just click the ‘Home’ tab, and you should see the Pilcrow icon somewhere near the top middle. You can click it to turn it off and click it again to turn it on.
Hope this helps 🙂
Reader Interactions
Click File > Options to open the Word Options dialog box. 2. In the Word Options dialog box, please click Display in left bar, and then check Paragraph marks option in the Always show these formatting marks on the screen section.
Contents
- 1 How do I see formatting in Word?
- 2 How do I display non printing formatting marks?
- 3 Which button do you click to show formatting marks in a document?
- 4 How do you show paragraph marks in Word for Mac?
- 5 How do you right align italicized paragraphs?
- 6 What is the shortcut to view non-printing characters in Word?
- 7 Does Word have Reveal Codes?
- 8 How do I show vertical and horizontal rulers in Word?
- 9 Why is the paragraph symbol showing in Word?
- 10 How do you turn on invisibles in Word?
- 11 How do I fix Paragraph spacing in Word?
- 12 How do I fix Paragraph alignment in Word?
- 13 How does using justified paragraphs change the look of a document?
- 14 What is Ctrl F11?
- 15 What does Ctrl F12 do?
- 16 What is Alt F10?
- 17 What are non printing characters What are the different marks that writer uses for displaying non printing character?
- 18 How do I view special characters?
- 19 How do I see characters in Word?
- 20 How do I reveal codes in Word 2010?
How do I see formatting in Word?
If you always want to see the formatting marks in your Word documents, there’s a setting for that.
- Click File.
- Click Options.
- Click Display.
- Check the formatting marks you want always shown.
- Click OK.
How do I display non printing formatting marks?
To show non-printing characters in Word, click the “Home” tab in the Ribbon. Then click the “Show/Hide Non-Printing Characters” button in the “Paragraph” button group. The face of the button looks like the paragraph mark (“¶”).
Which button do you click to show formatting marks in a document?
Show/Hide formatting marks.
- In the Paragraph group on the Home Tab, click the Show/Hide button.
- Formatting marks appear in the document. Paragraph formatting marks show the end of each paragraph, and raised dots show spaces.
- Click the Show/Hide button again.
- The formatting marks are now hidden.
How do you show paragraph marks in Word for Mac?
Word for Mac OS X
- From the Word menu, select Preferences….
- Select View.
- In the section titled “Nonprinting characters”, check or uncheck the appropriate boxes to view the marks of your choice. Check All to see all formatting marks.
- To save your changes, click OK.
How do you right align italicized paragraphs?
Align the text left or right
- Select the text that you want to align.
- On the Home tab, in the Paragraph group, click Align Left or Align Right .
What is the shortcut to view non-printing characters in Word?
The display of nonprinting characters may be toggled in either of two ways: With a shortcut key. This is Ctrl+* (Ctrl+Shift+8 on U.S. keyboards).
Does Word have Reveal Codes?
The closest you can get to the reveal codes is to display the complete formatting information that Word is applying to a character or paragraph. You can do this by following these steps: Press Shift+F1. (You can also choose What’s This? from the Help menu.)
How do I show vertical and horizontal rulers in Word?
To see both horizontal and vertical rulers, you must be in Print Layout view.
- To make sure you’re in Print Layout view, click Print Layout on the View tab.
- Select the Ruler check box.
Why is the paragraph symbol showing in Word?
Also known as a pilcrow or paragraph mark, the paragraph symbol (¶) is a type of formatting mark in Microsoft Word. When you have paragraph marks switched on, a paragraph symbol appears at the end of each paragraph when you hit return. They won’t appear on your document when you print it.
How do you turn on invisibles in Word?
First a definition: those characters are the invisible, non-printing characters that make your document readable. You can toggle them on and off by clicking Home Paragraph Show/Hide. You can see what the button looks like turned on and off in the next image.
How do I fix Paragraph spacing in Word?
To format paragraph spacing:
- Select the paragraph or paragraphs you want to format.
- On the Home tab, click the Line and Paragraph Spacing command. Click Add Space Before Paragraph or Remove Space After Paragraph from the drop-down menu.
- The paragraph spacing will change in the document.
How do I fix Paragraph alignment in Word?
How to Adjust Paragraph Alignment in Word
- Click anywhere in a paragraph you want to align, or select multiple paragraphs.
- Click an alignment option in the Paragraph group. Shortcuts: To align left, press Ctrl + L. To align right, press Ctrl + R. To align center, press Ctrl + C. To justify, Ctrl + J.
How does using justified paragraphs change the look of a document?
Compared to left-aligned text, justification gives text a cleaner, more formal look. Justification works by adding white space between the words in each line so all the lines are the same length. This alters the ideal spacing of the font, but in paragraphs of reasonable width it’s usually not distracting.
What is Ctrl F11?
Ctrl+F11: Lock a field so it cannot be edited.
What does Ctrl F12 do?
Ctrl+F12 opens a document in the Word. Shift+F12 saves the Microsoft Word document (like Ctrl+S). Ctrl+Shift+F12 prints a document in the Microsoft Word.
What is Alt F10?
“Alt + F10” is a set of shortcut keys to help users of Acer computer to quickly enter into recovery environment of Acer eRecovery Management.
What are non printing characters What are the different marks that writer uses for displaying non printing character?
Answer: A commonly used “Non-printing characters” are Space character, Non-breaking space character, Line break, Tab character, etc. Explanation: The “non-printing character” or “formatting marks” are used for content designing in the word processors.
How do I view special characters?
You can display these special characters, which Word refers to as nonprinting characters, by following these steps:
- Display the Word Options dialog box.
- Click Display at the left side of the dialog box.
- In the Always Show These Formatting Marks On the Screen section, select the characters you want Word to display.
How do I see characters in Word?
How to get a character count in a Microsoft Word document
- You can get a character count in a Word document by selecting the “Review” tab and clicking “Word Count.”
- You can find both the number of characters with spaces and the character count not including spaces.
How do I reveal codes in Word 2010?
But, when you select some text in Word and press Shift + F1, the Reveal Formatting pane displays. Word shows you, in list format, how the selected text is formatted with respect to the Font, Paragraph, and Section.
Hide Paragraph Marks (¶) and Other Nonprinting Symbols in Microsoft Word
by Avantix Learning Team | Updated April 5, 2021
Applies to: Microsoft® Word® 2010, 2013, 2016, 2019 and 365 (Windows)
You can show or hide paragraph marks (¶) or symbols and other nonprinting characters (such as tabs, spaces and soft returns) in your Microsoft Word documents using the Ribbon or a keyboard shortcut. It’s generally a good idea to display paragraph marks and other formatting symbols when working on Word documents. Formatting symbols display only on screen and do not print.
Recommended article: How to Quickly Remove Hard Returns in Word Documents
A paragraph in Word is anything with a hard return after it (you have pressed Enter or Return).
The following symbols are typically displayed when you turn on formatting symbols :
Paragraph – 
Space (dot) – .
Tab – →
In the following sample Word document, Show/Hide ¶ is turned on:

Hiding paragraph marks and other nonprinting symbols using the Ribbon
To show or hide paragraph marks and other nonprinting symbols in Word using the Ribbon:
- Click the Home tab in the Ribbon.
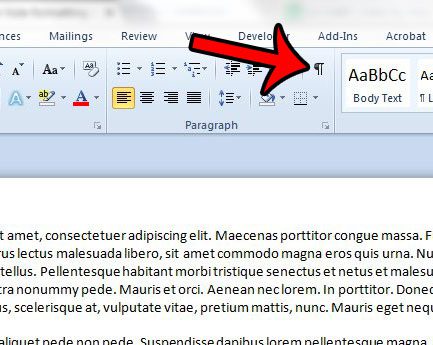
- In the Paragraph group, click ¶ (Show/Hide ¶).
Below is the Paragraph group in the Ribbon:

Hiding paragraph marks and other nonprinting symbols using a keyboard shortcut
To show or hide paragraph marks and other nonprinting symbols in Word using a keyboard shortcut, press Ctrl + Shift + 8 (the asterisk key at the top of the keyboard).
When you display formatting symbols, Word will also display manual page breaks and section breaks in your document.
Subscribe to get more articles like this one
Did you find this article helpful? If you would like to receive new articles, join our email list.
More resources
How to Insert a Watermark in Word (like DRAFT)
How to Insert Today’s Date in Word (with Shortcut)
14 Shortcuts to Quickly Select Text in MIcrosoft Word
How to Find and Replace in Word (and Use Wildcards)
How to Keep Text Together in Word (Paragraphs, Lines or Word)
Related courses
Microsoft Word: Intermediate / Advanced
Microsoft Excel: Intermediate / Advanced
Microsoft PowerPoint: Intermediate / Advanced
Microsoft Visio: Introduction
VIEW MORE COURSES >
Our instructor-led courses are delivered in virtual classroom format or at our downtown Toronto location at 18 King Street East, Suite 1400, Toronto, Ontario, Canada (some in-person classroom courses may also be delivered at an alternate downtown Toronto location). Contact us at info@avantixlearning.ca if you’d like to arrange custom instructor-led virtual classroom or onsite training on a date that’s convenient for you.
Copyright 2023 Avantix® Learning
Microsoft, the Microsoft logo, Microsoft Office and related Microsoft applications and logos are registered trademarks of Microsoft Corporation in Canada, US and other countries. All other trademarks are the property of the registered owners.
Avantix Learning |18 King Street East, Suite 1400, Toronto, Ontario, Canada M5C 1C4 | Contact us at info@avantixlearning.ca
Many of the settings in Microsoft Word will only apply to the current document unless you choose to apply a setting to the default template. But there is one specific setting that can hide or show formatting marks in a document, and that setting will remain even after you close a document in Microsoft Word.
Your Microsoft Word 2010 document includes a lot of information behind the scenes that dictates how elements appear within that document. You can choose to show that information by enabling an option that will display formatting marks. However, these marks can be difficult to work with if you are unfamiliar with them, so you might decide that editing a document is simpler when they are hidden.
Fortunately, you can hide those formatting marks by changing a setting in Word 2010. You can also go into the Word Options menu to turn off any formatting marks that had previously been configured to display on their own.
Tip: You can add a comment to a document in Microsoft Word so that other document editors can evaluate an idea or potential change before you decide to make it.
How to Stop Formatting Marks from Appearing in a Word 2010 Document
- Open Word 2010.
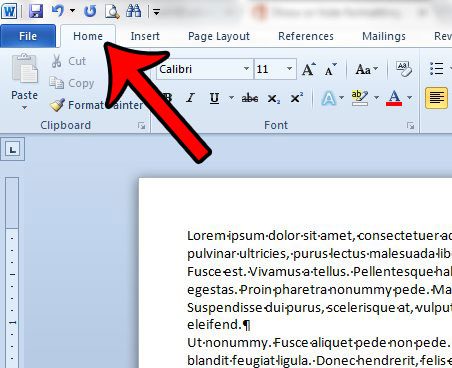
- Click the Home tab at the top of the window.
- Click the Show/Hide button in the Paragraph section of the ribbon.
Our guide continues below with additional information on hiding formatting marks in Word 2010, including pictures of these steps.
You can read our how to add check mark in Word article for a simple method on how to include a check marks in the documents you create.
How to Turn Off Formatting Marks in Word 2010 (Guide with Pictures)
The steps in this section were performed in Microsoft Word 2010, but will also work in other versions of Microsoft Office, such as Word 2013 or Word for Office 365.
The first three steps in this guide show you where to find the button that lets you show/hide formatting marks in Word, while the remainder of the guide discusses enabling or disabling specific formatting symbols.
Step 1: Open Microsoft Word 2010.
Step 2: Click the Home tab above the ribbon.
Step 3: Click the Show/Hide button in the Paragraph section of the ribbon.
If there are still some formatting marks showing, then you will need to change the formatting mark setting in another location.
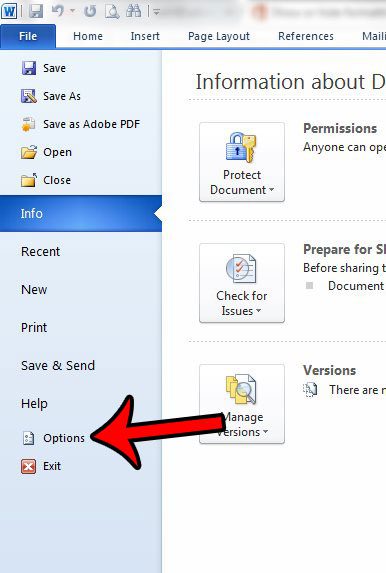
Step 4: Click the File tab at the top-left corner of the window.
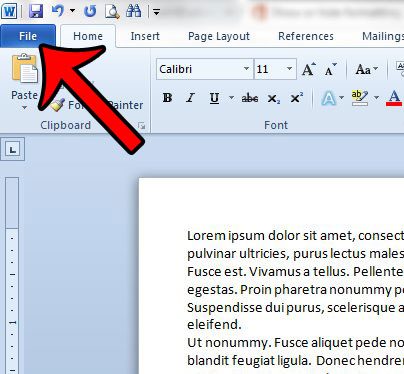
Step 5: Click Options in the column at the left side of the window.
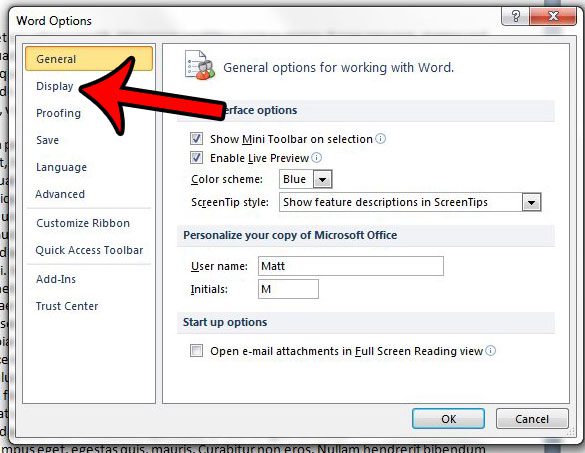
This is going to open a new window called Word Options.
Step 6: Click the Display tab in the left column of the Word Options window.
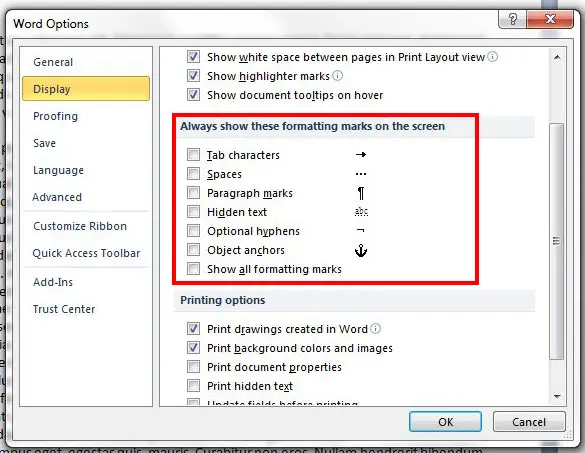
Step 7: Uncheck each option in the Always show these formatting marks on the screen section.
You can then click the OK button at the bottom of the window to save and apply your changes.
Our tutorial continues below with more discussion on working with Microsoft Word formatting marks.
If you are using formatting marks to remove some breaks, then visit our how to delete section break in Word tutorial for more information.
More Information on How to Hide Formatting Marks in Word 2010
The second part of our guide above directs you to the Word Options menu where you can specify which formatting marks you want Microsoft Word to display. For example, you might want to be able to see hidden text, but you may wish to turn off paragraph marks in Word 2010. By customizing the options in the “Always show these formatting marks on screen” section you can make that configuration happen.
If you see the paragraph mark, tab characters, object anchors, or other symbols in your Word document then it means that Word is currently set up to display formatting marks. If you click the Show/Hide button in the Paragraph group of the ribbon then it is going to hide the formatting marks for the current document and future documents regardless of the marks that you enabled in the Word Options menu. Those marks will only display when you click the Show/Hide button again.
Some of the formatting marks that you can see in Microsoft Word include:
- Tab characters
- Spaces
- Paragraph marks
- Hidden text
- Optional hyphens
- Object anchors
If you are often toggling the formatting mark display on and off then you may wish to familiarize yourself with its keyboard shortcut. if you press Ctrl + Shift + 8 on your keyboard then it will either show or hide the paragraph marks.
Any changes that you make to the formatting display setting will apply to the entire document.
Are you trying to copy and paste from a different location on your computer, such as a Web browser, or a different document, but the font is wrong, or the wrong color? Learn how to paste into Word 2010 without formatting and save yourself some time and frustration.
Additional Sources

Matthew Burleigh has been writing tech tutorials since 2008. His writing has appeared on dozens of different websites and been read over 50 million times.
After receiving his Bachelor’s and Master’s degrees in Computer Science he spent several years working in IT management for small businesses. However, he now works full time writing content online and creating websites.
His main writing topics include iPhones, Microsoft Office, Google Apps, Android, and Photoshop, but he has also written about many other tech topics as well.
Read his full bio here.