
-

1
Open the Word document. You can double-click the document’s name to open it in Word. Alternatively, open Word (it’s in the Windows menu on a PC and the Applications folder on a Mac), click File, click Open, then select the document.
-
2
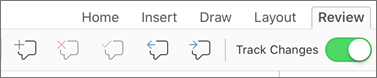
Click the Review tab. It’s at the top of the screen.
Advertisement
-
3
Click Track Changes. It’s also at the top of the screen. Look for the sheet of paper icon with a yellow pencil. Now all future changes to the document will appear as colored markup.
- For example, if you delete something you’ve typed, it won’t actually disappear. Instead, it’ll will appear crossed-out. Newly typed text will be underlined.[1]
- Click Track Changes again to turn off further markups.
- For example, if you delete something you’ve typed, it won’t actually disappear. Instead, it’ll will appear crossed-out. Newly typed text will be underlined.[1]


Advertisement
Ask a Question
200 characters left
Include your email address to get a message when this question is answered.
Submit
Advertisement
Thanks for submitting a tip for review!
About This Article
Article SummaryX
1. Open the document.
2. Click Review.
3. Click Track Changes.
Did this summary help you?
Thanks to all authors for creating a page that has been read 66,523 times.
Is this article up to date?
Track changes in Word
Note: If a document has been shared with you for review, you may not be able to turn off Track Changes. If you want to edit the document without tracking changes, you’ll need to either save a copy or ask the person who sent it to you to share it again with review mode turned off.

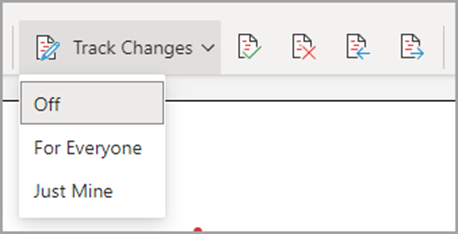
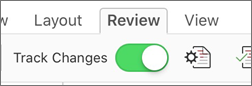
Turn Track Changes on and off
On the Review tab, select Track Changes.
-
When Track Changes is on, the section is highlighted. Deletions are marked with a strikethrough, and additions are marked with an underline. Different authors’ changes are indicated with different colors.
-
When Track Changes is off, the section is not highlighted. Word stops marking changes, but the colored underlines and strikethroughs are still in the document.
Tip: You also can add a Track Changes indicator to the status bar. Right-click the status bar and select Track Changes.
View tracked changes
Note: When a document is in Editing or Reviewing mode, you can select a tracked change to view a collaborator’s full, suggested change in a card that displays. Hover over the Accept or Reject button to see a preview of what that action would do to your final document.
Choose whose changes to track
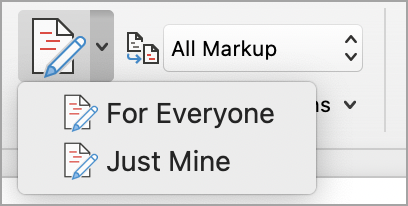
You can choose to track only your own changes or everyone’s changes.
-
To track only your own changes — On the Review tab, select Track Changes > Just Mine.
-
To track everyone’s changes — On the Review tab, select Track Changes > For Everyone.
Tip: to use a password to keep others from turning off Track Changes — On the Review tab, select Track Changes > Lock Tracking.
Choose how you would like to see the changes in the document
You can choose the type of markup you want to see.
-
On the Review tab, select Tracking.
-
Select All Markup for the drop-down list to display.
-
Select one of the following options.
-
Simple Markup displays tracked changes with a red line in the margin.
-
All Markup displays tracked changes with different colors of text and lines for each reviewer
-
No Markup hides the markup to show the document with changes incorporated
-
Original displays the original document without tracked changes and comments showing. However, any tracked changes or comments in the document that have not been accepted, rejected, or deleted remain in the document.
Choose the way track changes display
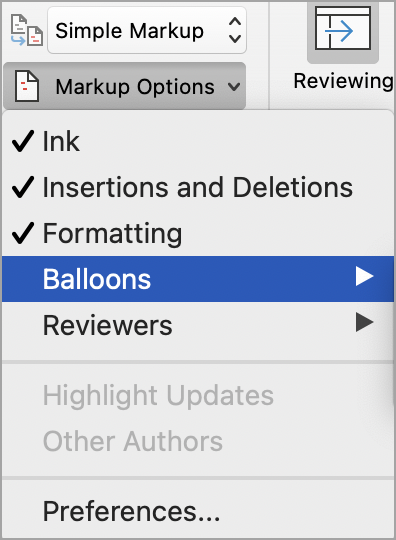
You can choose the types of revisions that display and the way they display. If you choose to show revisions as balloons, they display in the margins of the document. If you choose to display them directly within the document in line. In line revisions display all deletions with strikethroughs instead of inside balloons.
-
On the Review tab, select Track > Show Markup.
-
Select Balloons and then select the type of display you want.
-
Show Revisions in Balloons
-
Show All Revisions Inline
-
Show Only Formatting in Balloons
Note: If you want to see tracked changes in balloons, you must be in Print Layout view or Web Layout view.
Display changes by type of edit
-
On the Review tab, select Track Changes > Show Markup.
-
Select the type of edit.
-
Insertions and Deletions
-
Formatting
The check mark next to the item indicates that it’s selected.
Note: Even if you hide a type of markup by clearing it on the Show Markup menu, the markup automatically displays each time the document is opened by you or a reviewer.
Display changes by reviewer(s)
-
In Review > Tracking, select Show Markup.
-
Select Specific People.
-
Select to clear all check boxes except the ones next to the names of the reviewers whose changes you want to show.
Note: To select or clear all check boxes for all reviewers in the list, select All Reviewers.
Navigate tracked changes in Changes menu section
You can navigate from one tracked change to another.
-
In Review > Changes, select Next to view the next tracked change.
-
In Review > Changes, select Previous to view the previous tracked change.
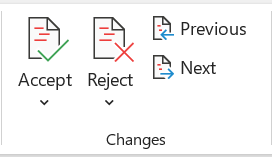
Accept or Reject tracked changes
There are multiple ways to address tracked changes. The most proficient method is to identify the commentor and respond to the tracked change is through the card display when you click the marked change. The card displays the commentor name and the option to accept or reject the suggestion.

Accept or reject tracked changes in sequence using the main menu
You can resolve teach tracked change from the beginning of the document to the end of the document in sequence.
-
Select Review > Changes > Next.
-
Select Accept or Reject. The next sequential tracked change is highlighted for your review and action.
Note: You can also accept or reject individual tracked changes using the main menus’ drop-down menus. This method is often used as a methodical approach to reviewing tracked changes.
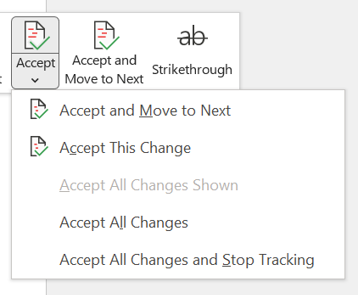
Accept changes using the main menu
-
In Review > Changes, select Accept.
-
Select one of the options.
-
Accept and Move to Next
-
Accept This Change
-
Accept All Changes
-
Accept All Changes and Stop Tracking
Reject changes using the main menu
-
In Review > Changes, select > Reject.
-
Select one of the options.
-
Reject and Move to Next
-
Reject This Change
-
Reject All Changes
-
Reject All Changes and Stop Tracking
Accept or reject changes within a document with a right click
Working within a document, you can right-click on a tracked change to accept or reject the change. Using the right-click method displays a banner menu option and a drop-down menu option.
Accept changes in-line with the right-click banner option
-
Right-click a tracked change in the document to review a single suggestion.
-
On the banner, select one of the following.
-
Accept > Accept and Move to Next
-
Accept > Accept This Change
-
Accept > Accept All Changes
-
Accept > Accept All Changes and Stop Tracking
-
Accept and Move to Next
Accept changes in-line with the right-click drop-down menu option
-
Right-click a tracked change in the document to review a single suggestion.
-
In the drop-down menu, select one of the following.
-
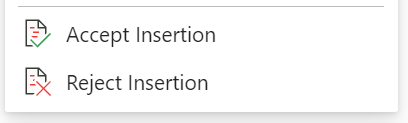
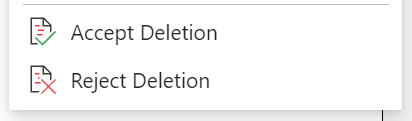
Accept Insertion (or Accept Deletion)
-
Reject Insertion (or Reject Deletion)
Accept or reject all tracked changes at once on the main menu
Accept all tracked changes
-
In Review > Changes, select Accept.
-
Select one of the options.
-
Accept All Changes Shown
-
Accept All Changes
-
Accept All Changes and Stop Tracking
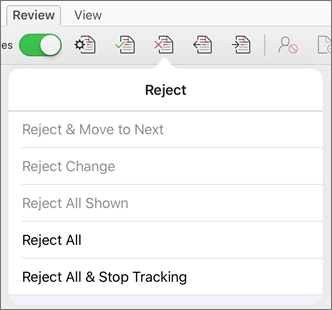
Reject all tracked changes
-
In Review > Changes, select Reject.
-
Select one of the options.
-
Reject All Changes Shown
-
Reject All Changes
-
Reject All Changes and Stop Tracking
Note: When Review>Tracking>Show Markup>Specific People>All Reviewers is selected, the Accept All Changes Shown and Reject All Changes Shown options do not display.
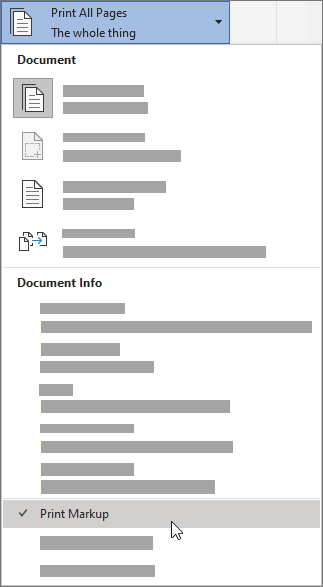
Hide tracked changes and comments when printing
Hiding changes doesn’t remove them from the document. You must use the Accept and Reject commands in the Changes group to remove markup from your document.
-
Go to File > Print > Settings > Print All Pages.
-
Under Document Info, select Print Markup to clear the check mark.
View all your changes in a summary list on the Reviewing Pane
-
In Review > Tracking, select Reviewing Pane.
-
Choose if you want to see the Reviewing Pane next to or below your document.
-
Select Reviewing Pane Vertical to see a list of all changes next to your document.
-
Select Reviewing Pane Horizontal to see a list of all changes below your document.
You can use the Reviewing Pane as a handy tool for to check that all tracked changes have been removed from your document so that they show up to others who might view your document. The summary section at the top of the Reviewing Pane displays the exact number of visible tracked changes and comments that remain in your document.
The Reviewing Pane also allows you to review long comments that don’t fit within a comment bubble.
Note: The Reviewing Pane, unlike the document or the comment balloons, is not the best tool for making changes to your document. Instead of deleting text or comments or making other changes in the Reviewing Pane, make all editorial changes in the document. The changes will then be visible in the Reviewing Pane.
Important: Comments are no longer part of the Track Changes function.
Turn on Track Changes
You can set Word for the Web to track changes for all users who are collaborating on the document or to track only your changes.
-
On the Review tab, select Track Changes.
-
In the Track Changes drop-down list, select one of the following:
-
To track only the changes that you make to the document, select Just Mine.
-
To track changes to the document made by all users, select For Everyone.
-
Turn off Track Changes
-
On the Review tab, select Track Changes.
-
In the Track Changes drop-down list, select Off.
Select the Markup view
-
On the Review tab, select Markup view.
-
Select one of the markup options.
-
Markup in margin (Simple Markup) — See suggestions in the margin
-
Markup on page (All Markup) — See suggestions on the page
Review, accept, or reject changes
Accept or reject tracked changes in sequence
You can review each tracked change in sequence and decide whether to accept or reject the change.
-
Click or tap at the beginning of the document.
-
On the Review tab, select Track Changes.
-
Select Accept or Reject. As you accept or reject changes, Word will move to the next change.
Tip: To move through changes in the document without accepting or rejecting them, select Next or Previous.
-
Repeat until you’ve reviewed all of the changes in your document.
Accept or reject a single change
Rather than move through changes in sequence, you can accept or reject a single change. When you accept or reject the change, Word will not move to the next change in the document.
-
Click the change.
-
Select the option to accept or reject it.
When tracked changes are turned on, Word marks any changes made by any authors of the document. This is useful when you’re collaborating with other authors because you can see which authors made a particular change.
Turn Track Changes on
-
On the Review tab, select Track Changes.
-
Select to track only your own changes or everyone’s change.
-
To track only your own changes — On the Review tab, select Track Changes > Just Mine.
-
To track everyone’s changes — On the Review tab, select Track Changes > For Everyone.
Note: To turn Track Changes off, select Track Changes again.
Accept or reject all tracked changes at once on the main menu
Accept all tracked changes
-
Select Reviewing > Accept.
-
Select one of the options.
-
Accept All Changes Shown
-
Accept All Changes
-
Accept All Changes and Stop Tracking
Reject all tracked changes
-
Select Reviewing > Reject.
-
Select one of the options.
-
Reject All Changes Shown
-
Reject All Changes
-
Reject All Changes and Stop Tracking
Word shows changes in the document by displaying a line in the margin. If you switch to All Markup view, you’ll see changes inline and in balloons.
Anytime someone adds a comment, it’ll show up in a balloon.
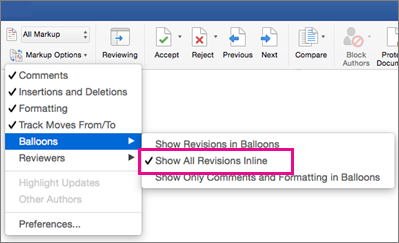
Review changes inline
To see changes inline instead of in balloons, do the following:
-
On the Review Tab, select Markup Options
-
Point to Balloons and select Show All Revisions Inline.
Keep Track Changes on
To prevent others from turning off Track Changes, lock Track Changes on with a password.
Important: Be sure to remember the password so you can turn Track Changes off when you’re ready to accept or reject the changes.
Lock Track Changes with a password
-
On the Review tab, select Protect > Protect Document.
-
In the Password box, enter a password.
-
Re-enter your password and select OK.
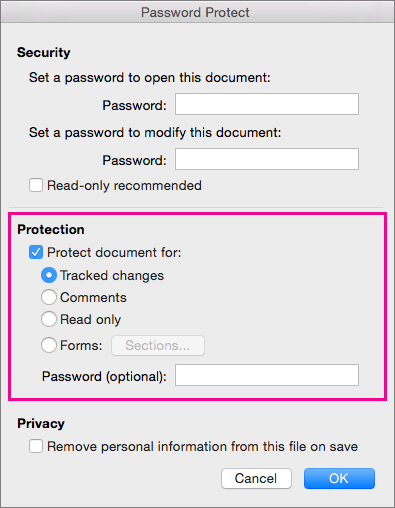
While tracked changes are locked, you can’t turn off change tracking, and you can’t accept or reject changes.
Unlock Track Changes
-
On the Review tab, select Protect > Protect Document.
-
Under Protection, uncheck Protect document for.
-
Enter your password and select OK.
For more info, see
remove the tracked changes and comments.
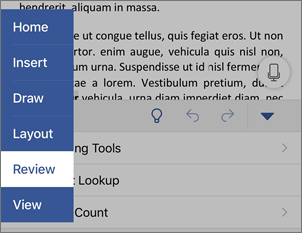
Turn Track Changes on or off (Word for iPad)
-
Tap the Review tab.
-
Tap the control next to Track Changes to turn Track Changes on or off.
Show or hide markup (Word for iPad)
-
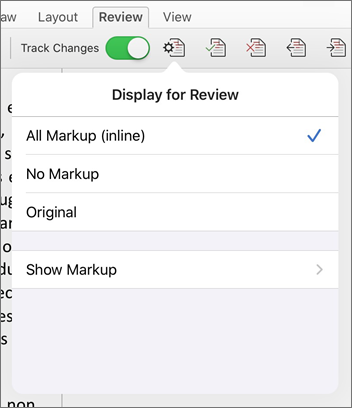
On the Review tab, tap the Display for Review icon.
-
In the Display for Review list, tap the option you want:
-
All Markup (inline) shows the final document with tracked changes visible inline
-
No markup shows the final document without tracked changed
-
Original shows the original document with no tracked changes
-
Show tracked changes by type (Word for iPad)
-
On the Review tab, tap the Display for Review icon.
-
In the Display for Review list, tap Show Markup.
-
In the Show Markup list, tap the option you want:
-
Ink shows or hides any marks made by digital inking in the document.
-
Insertions & Deletions shows or hides inserted or deleted text.
-
Formatting shows or hides formatting changes.
-
Show Revisions in Balloons shows changes in balloons in the right margin.
-
Show Only Formatting in Balloons shows only formatting changes in balloons and keeps the other changes as inline tracking.
-
Show tracked changes by reviewer (Word for iPad)
If there are multiple reviewers for the document, Word will show all changes by default. However, you can choose to show only changes made by specific viewers.
-
On the Review tab, tap the Display for Review icon.
-
In the Display for Review list, tap Show Markup.
-
In the Show Markup list, tap Reviewers.
-
In the Other Authors list, tap the names of the reviewers whose changes you want to see or tap All Reviewers.
Accept changes (Word for iPad)
-
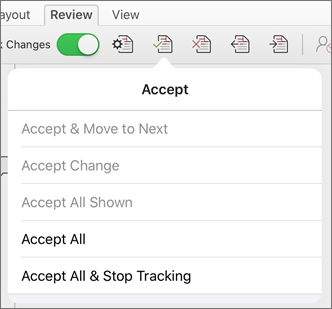
Tap twice on a change in the document to select it.
-
On the Review tab, tap the Accept icon.
-
Do one of the following:
-
Tap Accept & Move to Next to accept the change and move to the next change in the document.
-
Tap Accept Deletion, Accept Insertion, or Accept Change to accept the selected change, identified contextually by type, and not move to the next change in the document.
-
Tap Accept All Shown to accept all changes that are visible, but not changes that are hidden. For example, if you’re viewing only changes made by a specific reviewer, tapping Accept All Shown accepts only the changes made by that reviewer.
-
Tap Accept All to accept all changes in the document.
-
Tap Accept All & Stop Tracking to accept all changes in the document and turn off Track Changes.
-
-
To move to another change without accepting or rejecting it, tap the Previous or Next icon.
Reject changes (Word for iPad)
-
Tap twice on a change in the document to select it.
-
On the Review tab, tap the Reject icon.
-
Do one of the following:
-
Tap Reject & Move to Next to reject the change and move to the next change in the document.
-
Tap Reject Deletion, Reject Insertion, or Reject Change to reject the selected change, identified contextually by type, and not move to the next change in the document.
-
Tap Reject All Shown to reject all changes that are visible, but not changes that are hidden. For example, if you’re viewing only changes made by a specific reviewer, tapping Reject All Shown rejects only the changes made by that reviewer.
-
Tap Reject All to reject all changes in the document.
-
Tap Rejects All & Stop Tracking to reject all changes in the document and turn off Track Changes.
-
-
To move to another change without accepting or rejecting it, tap the Previous or Next icon.
Delete comments (Word for iPad)
-
Tap twice on a comment in the document to select it.
-
Tap the Review tab.
-
Tap the Delete icon to delete the comment or press and hold the Delete icon until the Delete list appears, and then do one of the following:
-
Tap Delete to delete only the selected comment.
-
Tap Delete All to delete all comments in the document.
-
-
To move to another comment without deleting it, tap the Previous or Next icon.
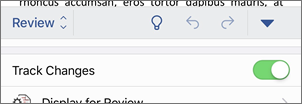
Turn Track Changes on or off (Word for iPhone)
-
Tap the pen icon at the top to open the ribbon.
-
Tap the Review tab.
-
Tap the control next to Track Changes to turn Track Changes on or off.
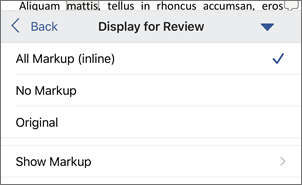
Show or hide markup (Word for iPhone)
-
On the Review tab, tap Display for Review.
-
Tap the option you want:
-
All Markup (inline) shows the final document with tracked changes visible inline
-
No markup shows the final document without tracked changed
-
Original shows the original document with no tracked changes
-
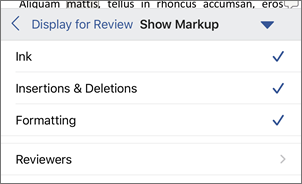
Show tracked changes by type (Word for iPhone)
-
On the Review tab, tap Display for Review.
-
Tap Show Markup.
-
In the Show Markup list, tap the option you want:
-
Ink shows or hides any marks made by digital inking in the document.
-
Insertions & Deletions shows or hides inserted or deleted text.
-
Formatting shows or hides formatting changes.
-
Show tracked changes by reviewer (Word for iPhone)
If there are multiple reviewers for the document, Word will show all changes by default. However, you can choose to show only changes made by specific viewers.
-
On the Review tab, tap Display for Review.
-
Tap Show Markup.
-
Tap Reviewers.
-
In the Other Authors list, tap the names of the reviewers whose changes you want to see or tap All Reviewers.
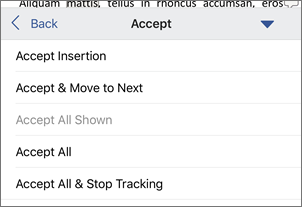
Accept changes (Word for iPhone)
-
Tap twice on a change in the document to select it.
-
On the Review tab, tap Accept.
-
Do one of the following:
-
Tap Accept & Move to Next to accept the change and move to the next change in the document.
-
Tap Accept Deletion, Accept Insertion, or Accept Change to accept the selected change, identified contextually by type, and not move to the next change in the document.
-
Tap Accept All Shown to accept all changes that are visible, but not changes that are hidden. For example, if you’re viewing only changes made by a specific reviewer, tapping Accept All Shown accepts only the changes made by that reviewer.
-
Tap Accept All to accept all changes in the document.
-
Tap Accept All & Stop Tracking to accept all changes in the document and turn off Track Changes.
-
Reject changes (Word for iPhone)
-
Tap twice on a change in the document to select it.
-
On the Review tab, tap Reject.
-
Do one of the following:
-
Tap Reject & Move to Next to reject the change and move to the next change in the document.
-
Tap Reject Deletion, Reject Insertion, or Reject Change to reject the selected change, identified contextually by type, and not move to the next change in the document.
-
Tap Reject All Shown to reject all changes that are visible, but not changes that are hidden. For example, if you’re viewing only changes made by a specific reviewer, tapping Reject All Shown rejects only the changes made by that reviewer.
-
Tap Reject All to reject all changes in the document.
-
Tap Reject All & Stop Tracking to reject all changes in the document and turn off Track Changes.
-

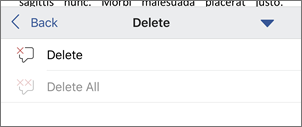
Delete comments (Word for iPhone)
-
Tap twice on a comment in the document to select it.
-
One the Review tab, tap Delete, and then do one of the following:
-
Tap Delete to delete only the selected comment.
-
Tap Delete All to delete all comments in the document.
-
-
To move to another comment without deleting it, tap the Previous or Next icon
Need more help?
Want more options?
Explore subscription benefits, browse training courses, learn how to secure your device, and more.
Communities help you ask and answer questions, give feedback, and hear from experts with rich knowledge.
Find solutions to common problems or get help from a support agent.
Martin Holmes
mholmes [at] uvaix.uvic.ca
http://ikra.call.uvic.ca/LangCen/Special/Martin.htm
The University of Victoria English Language Centre
As more and more of our students’ work is submitted in word-processed form, it seems logical that we begin to develop tools to mark and annotate written assignments quickly and clearly using word-processors. This article describes some tools which I have developed for marking electronic documents using a word-processor, and discusses some of the advantages and drawbacks revealed by my early trials of the system. The macros and templates I have developed for MS Word 7 and WordPerfect 6.1 for Windows can be downloaded from links in the article.
1. The Need for Computerized Marking
Twelve or fifteen years ago, the vast majority of written work produced by EFL or ESL students was handwritten; only in very high-level Academic English courses was it normal to expect students to hand in type-written work. The increasing ubiquity of the computer in educational environments, along with the growth in sophistication and ease-of-use of word-processing packages, has changed the situation dramatically, however, and students at many levels and in many types of courses are now encouraged to hand in word-processed work — indeed, many of us now teach word-processing skills as part of ESL and EFL courses, and the word-processor is beginning to be exploited as an effective tool in developing writing skills.
Teachers now routinely take in word-processed work from their students, but what do we do with it when we get it? Generally speaking, most of us do what we have always done with student work — we annotate it, correct it or mark it using coloured pens, cryptic abbreviations, circles, arrows and squashed-up paragraphs of comment in minuscule handwriting. The work we return to students is often dauntingly messy, and many students do not have the patience to decipher our responses. It is also, surely, rather ironic that we now demand that our students use computer technology to achieve higher standards of presentation in their written work, while our marking remains as illegible as ever. This article presents one method which I developed for computer-marking the literature essays of my students in the University Admission Preparation Program at the University of Victoria. I have included some screen-shots of the system in action, and links to down-loadable files which will enable you to try out and modify the technique for yourself.
I piloted the system with two student volunteers during the April-July semester this year, and despite a few initial technical problems, it proved successful. Other students in the same group also began to submit their work electronically, some voluntarily and others as a result of my policy of accepting late submissions only in electronic format. Informal feedback from students suggests that most preferred electronic marking, although some of the less computer-literate were sometimes frustrated by technical difficulties, and some preferred to print out their marked work rather than reading it on the screen. I intend to do a larger-scale trial during the coming fall semester.
2. The System in Action
My students produce their written work using a variety of word-processing packages for both the PC and the Macintosh. The only requirement for the purposes of the electronic marking system is that the application has the capability to save files in Rich Text Format (with the filename extension «.rtf»). Rich Text is a format created by Microsoft to enable sharing of word-processed documents between different applications and platforms, and it works a little like an HTML file, by encoding all the formatting information in ASCII text codes along with the text. Most recent word-processing packages will support Rich Text (see the results of my brief survey of some of the most common applications to see if your word-processor will handle it well).
The students then attach the file to an e-mail message and send it to me. The use of e-mail ensures that I can receive files from both PCs and Macintoshes, whichever platform I happen to be working on. I can then open the file in my word-processor, and call up a special marking toolbar. Each button on the toolbar is linked to a macro which inserts an annotation. This is what a marking toolbar looks like.
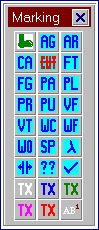 The example here is from MS Word 7. I have created a similar system for WordPerfect 6.1.
Annotating and commenting the text is then a simple matter of using the buttons. For example, a spelling error would be dealt with as follows:
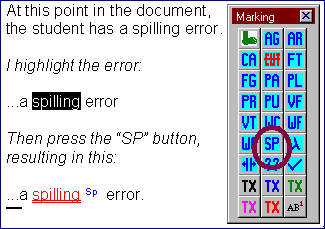 The problem text is red and double-underlined, and the annotation is in blue superscript. Specific error-types I commonly want to diagnose have their own buttons («AG» = subject-verb agreement, for example); for the mysterious or incomprehensible, there is a «??» annotation. Some buttons, such as the «Missing Word» button, simply insert annotations at the cursor. Other buttons redline text to be cut, or simply change the colour of text. For comments on content, I use green footnotes; pressing the «Green Foot» button at the beginning of the session ensures that all footnotes, and footnote numbers in the text, will be in green. A marked text ends up looking something like this:

The file is then saved in Rich Text Format, and e-mailed back to the student. It can be opened in any word-processor that can read RTF files. The student may use it as the basis for another draft, cutting and emending where necessary, if this is part of a process writing exercise. The document can also be printed; the use of superscript and double-underlining ensures that the annotations remain clear even when printed on a monochrome printer.
3. Advantages over Conventional Marking Practices
There are a number of obvious pedagogical advantages to using a system like this. Firstly, annotations are always clear, especially in colour, and there is always enough space for them, because the document expands to accommodate them. This is particularly valuable when you wish to make extensive comments on content, as I do with the work of my literature students. I can insert lengthy footnotes with ease. Secondly, the system to some extent enforces consistency in diagnosing and classifying errors; though most of us do our best to stick to fairly consistent marking systems, we often stray in the heat of marking, or fall back on the simpler option of simply correcting an error when a suitable diagnostic sign does not come quickly to mind. Thirdly, this system is much faster than marking by hand, especially if, like me, you can type faster than you can write. For the student, receiving an electronically-marked document like this encourages the editing process; students can correct their marked work directly on the screen. It was also clear from my trial of the system that those students who used it regularly learned a lot more about word-processing and e-mail than their classmates.
For the teacher, there are administrative benefits too. Each essay received electronically can easily be archived, both in its original and its marked form. A database of past student essays can be remarkably useful in standardizing marking practices among teachers. It can also be searched very simply if, for example, you suspect that a student has plagiarized work previously submitted by someone else. We should no longer need to photocopy and file students’ essays — in fact, we can dispense with paper altogether if we wish.
A system like this also has great potential value for those of us working on distance learning courses, which are increasingly taking up residence online. Students can submit their work from anywhere in the world and receive clear marked copy back quickly.
4. Technological Requirements
a) Students
In order to use this system, students will need to have access to a PC or Macintosh running a recent release of a major word-processing package. Among those which are suitable are MS WORD 5.1a and above for the Macintosh, and WordPerfect 6.1, Ami Pro 3.0, and MS Word 6.0 and above for the Windows PC. Students will also need access to an e-mail account which allows files to be attached to messages.
b) Instructors
Anyone with a little knowledge of macro programming can create a marking system for their own preferred word-processing package. So far, I have created toolbar and macro packages for Word 7 and for WordPerfect 6.1, and you are welcome to download these. Each package includes instructions for installing the special toolbar, as well as hints on how to customize it to reflect your own preferences and priorities when marking. The two systems differ slightly.
5. Packages to Download
Each package contains a readme.txt file with instructions for installing, using and modifying the system, along with a set of macros and a template file containing the toolbar. The MS Word package contains the macros inside the template file; for WordPerfect, the macros are all separate files.
Download MS Word 7 Zipfile (Word for Windows 95 only)
Download WordPerfect 6.1 Zipfile (WordPerfect 6.1 for Windows, running on Win 3.1 or Windows 95)
6. Learner Training
A certain amount of learner training has proved essential in implementing this system with my students. Since my initial trials have been with a small number of students, I have dealt with these problems on an individual basis, but it would probably be more effective to produce a handout and teach a session on the system at the beginning of each semester. Generally, students have faced problems in the following areas:
a) Producing a Suitable Document
Students who are not very proficient with a word-processor are often able to produce adequate printed copy by treating it as a typewriter, using spaces instead of tabs, and putting hard returns at the end of every line. If the resulting document is opened in another application, the result is untidy and takes a long time to clean up even when you have macros to automate the process. It pays dividends, therefore, to ensure that students are familiar with the basic techniques of formatting a document correctly in whatever word-processor they choose to use.
b) Saving the Document in a Suitable Format
In order to allow students to use a variety of word-processors, this marking system relies on Rich Text Format documents, and students will often have to be taught how to choose this format from the «Save As» dialog box.
c) Transmitting and Receiving the Document
Students will need to know how to attach a file to an e-mail message using an appropriate encoding method (MIME is standard), and where to find an attachment which is sent to them (usually in the «attachments» directory of their e-mail application). Initially, some of my students inserted their essays as text into their e-mail messages, and while this is not disastrous, since you can cut and paste the text into a word-processor, the result is inconveniently full of hard carriage returns, and font-formatting features such as italics and underlining are lost.
7. Disadvantages
One major disadvantage of using a system like this is that some students do not take to it easily, and can require extensive support. During my small-scale trial, I received several documents in the wrong format; those created with PC applications I was able to open anyway, but opening Macintosh files on a PC requires special software. Sometimes essays were included in the body of e-mail messages, and I had to clean them up by running macros to strip out the hard carriage returns. Once or twice, documents seemed to disappear in transit — backups are essential. Another technical problem that my students had was in attempting to print marked essays in our CALL laboratory. Printing documents containing colour text on the networked monochrome laser-printer resulted in garbage, and they were forced to select the whole of the text and change it to black before printing. The same documents printed well on monochrome printers in other contexts, though.
These technical glitches led to some resistance among the more computer-phobic of my students.
8. Similar Alternative Systems
a) MS Word’s Document Revision Tools
MS Word 7 includes a range of tools for sharing, annotating and revising a document. These allow multiple readers to add their own distinct annotations and to highlight text in a range of colours. Where it is practical for a whole class to standardize on one word-processing package, using these tools (which are intended for the office environment) would seem to be a viable alternative, and would eliminate the need to use Rich Text Format as a document standard. This would also allow students to work together on writing projects.
b) Using HTML
Roy Bowers has been developing a procedure for marking student work submitted in the form of HTML files. This enables student errors to be automatically linked to relevant explanations in a grammar database; students view their marked essays in a web browser and click on the errors to see the relevant portion of a help file displayed in another frame of the browser window. HTML, like RTF, is independent of platform and application, and students can access very detailed help files using this procedure. One disadvantage is that students submit their work in the form of text files rather than word-processor files, so they lose some of the formatting flexibility provided by a word-processor.
References
- Bowers, Roy. «Using HTML for online editing». http://www.tnis.net/rbowers/demo.html (10 Aug 1996).
- Holmes, M. «Rich Text Format Survey». http://ikra.call.uvic.ca/LangCen/Special/Richtext.htm (10 Aug 1996).
- Werner, S. «Creating Hypertext Responses to Student Writing». http://www.rain.org/~swerner/hyper.html (10 Aug 1996).
The Internet TESL Journal, Vol. II, No. 9, September 1996
http://iteslj.org/
http://iteslj.org/Articles/Holmes-ComputerMarking/
Как сделать маркированный список в Ворде
![]()
Автор:
Обновлено: 01.06.2018
Маркеры структурируют текст, облегчают задачу восприятия. С маркированным списком материал становится визуально легче для прочтения. Как сделать маркированный список в Ворде?

Как сделать маркированный список в Ворде
Содержание
- Как создать маркированный список?
- Видео — Делаем маркированный список в Microsoft Word
- Создание маркированного списка в автоматическом режиме
- Как создать нумерованный список?
- Создание нумерованного списка в автоматическом режиме
- Многоуровневый список: способы создания
- Как сделать список из готового текста?
- Сортировка списков в Word
- Видео — Как сделать маркированный, нумерованный и многоуровневый список в Ворде
Как создать маркированный список?
Инструменты списков обычно находятся на общей панели инструментов в программе.
Начало работы с маркерами:
- Убедитесь, что курсор находится в начале строки.

Ставим курсор в начале строки
- Нажмите кнопку «Маркеры».
Нажимаем на кнопку «Маркеры»
- Чтобы продолжить перечисление, введите нужные данные в первом пункте и нажмите «Enter». Программа по умолчанию проставит следующий элемент списка.

Вводим текст, нажимаем «Enter»

Программа по умолчанию проставит следующий элемент списка


Внешний вид маркеров можно менять в зависимости от стиля текста:
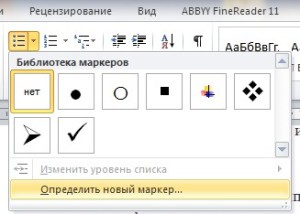
- Нажмите стрелку рядом с кнопкой «Маркеры».

Нажимаем стрелку рядом с кнопкой «Маркеры»
- Выберите нужный символ из библиотеки.

В разделе «Библиотека маркеров» выбираем нужный вид маркера, щелкаем по нему
- Если среди символов нет нужного, создайте свой стиль маркеров. Для этого ниже библиотеки нажмите кнопку «Определить новый маркер».

Если маркеры из библиотеки не понравились, нажимаем на кнопку «Определить новый маркер»
- Нажмите кнопку «Символ» или «Рисунок» и выберите элемент из выпавшего списка.

Нажимаем кнопки «Символ» или «Рисунок», выбираем нужный маркер, нажимаем «ОК»


На заметку! Необязательно нажимать на все стили для выбора между ними. При наведении курсора на 1 из вариантов, он отражается на списке в режиме предварительного просмотра.
Для отмены функции список с последующим сохранением текста выделите всю информацию списка и зажмите кнопку «Маркеры» сортировка удалится, а информация останется.

Выделяем всю информацию списка и зажимаем кнопку «Маркеры»

После нажатия кнопки «Маркеры» останется только текст
Чтобы удалить список вместе с содержимым, выделите текст в списке и зажмите кнопку «Delete», после чего нажмите кнопку «Маркеры».

Выделяем текст, нажимаем кнопку «Delete»
Важно! Перечисленные действия возможны в программе, установленной на операционной системе Windows.
Создание списка в программе на Mac требует другого алгоритма действий:
- Поставьте курсор в начале строчки.

Устанавливаем курсор вначале строчки
- В разделе «Главная» нажмите на стрелку рядом с маркерами.

В разделе «Главная» нажимаем на стрелку рядом с маркерами
- Найдите нужный стиль и начните работу.

Выбираем нужный маркер, щелкаем на него

Вводим текст, после каждой строчки нажимаем «Enter»


Форматирование перечня также предполагает возможность изменения расстояния между элементами списка.
- Выделите все пункты списка.

Выделяем все пункты списка
- На панели инструментов выберите «Абзац».

На панели инструментов в разделе «Абзац» щелкаем на стрелочку с дополнительным меню
- Во вкладке «Отступы и интервалы» всплывшего окна выберите значение интервалов из стандартных или введите необходимые параметры.

Во вкладке «Отступы и интервалы» выставляем свои параметры или оставляем по умолчанию, нажимаем «ОК»


На заметку! Кроме того, увеличить отступ можно сняв флажок в графе «Не добавлять интервал между абзацами одного стиля» в этой же вкладке.

Снимаем флажок с пункта «Не добавлять интервал между абзацами одного стиля», нажимаем «ОК»
Видео — Делаем маркированный список в Microsoft Word
Создание маркированного списка в автоматическом режиме
Читайте также подробную информацию в новой статье — «Как работать в Word для начинающих».
Автоматическая функция маркирования упрощает задачу писателю, экономит время на выполнение лишних действий.
Настройка включения/выключения автоматической функции:
- Нажмите кнопку «Файл» и выберите параметры. В версии Word 2007 года вместо «Файл» находится кнопка «Office».
Нажимаем на кнопку «Файл» или «Office», переходим в «Параметры Word»
- Во вкладке «Правописание» нажмите на «Параметры автозамены».
Во вкладке «Правописание» нажимаем на «Параметры автозамены»
- Найдите раздел «Применять при вводе» и выберите стили маркированных списков.
Находим раздел «Применять при вводе», ставим галочки на нужные параметры, нажимаем «ОК»
- Подтвердите действие нажатием «ОК».


Для начала автоматического списка:
- Установите курсор на месте будущего списка.
Ставим курсор в начале строки
- Поставьте пробел или звездочку.
Ставим пробел или звездочку
- Нажмите пробел.

Единоразовая отмена функции возможна при нажатии выпадающей панели «Параметры автозамены».
Как создать нумерованный список?
Для пошагового перечисления действий, выделения важности, очередности вместо маркированного используется нумерованный список.
Работа с числовыми перечнями полностью повторяет оформление маркеров. Разница заключается только в кнопке, которая запускает данную функцию. Она называется «Нумерация» и находится справа от маркеров.

Ставим курсор вначале строки, нажимаем на кнопку «Нумерация»
Как изменить номер в списке:
- Нажмите на стрелку справа от «Нумерации».

Нажимаем на стрелку справа от «Нумерации»
- Выберите определение нового формата чисел.

Выбираем пункт «Определить новый формат номера»
- Измените настройки в нужной строке, после чего нажмите «ОК».

Меняем настройки в нужной строке, после чего нажимаем «ОК»


Важно! Внешний вид номеров (их цвет, шрифт, начертание) можно менять независимо от текста в списке. Для этого нужно нажать на одно из чисел, чтобы выделить все, и выбрать необходимые параметры на панели инструментов.
Создание нумерованного списка в автоматическом режиме
Настройка автоматического режима нумерованного списка аналогична работе с маркированным.
Для ввода числового перечня:
- Поставьте курсор в начале строки.
Устанавливаем курсор вначале строчки
- Установите 1.
Пишем в строчке цифру 1
- Подтвердите действие пробелом.

После нажатия пробела, цифра 1 автоматически станет началом нумерованного списка


Многоуровневый список: способы создания
Многоуровневый список позволяет разделить информацию по иерархии, разбить данные по категориям и подкатегориям.
Чтобы начать работу над многоуровневым перечислением, достаточно нажать стрелку справа от кнопки «Многоуровневый список» и выбрать нужный стиль маркеров или нумерации.

Щелкаем на стрелку рядом с кнопкой «Многоуровневый список»

В «Библиотеке списков» выбираем подходящий список
Одноуровневый перечень также можно разбить на несколько уровней:
- Правой кнопкой мыши выберите маркер или номер пункта, уровень которого нужно сменить.
Правой кнопкой мыши выбираем маркер или номер пункта, уровень которого нужно сменить
- Нажмите стрелку возле кнопки «Маркер» или «Нумерация» в соответствии с типом обозначения.
Нажимаем на стрелку справа от «Нумерации»
- Нажмите на графу «Изменить уровень списка» и в выпавшем окне выберите новый стиль обозначения.
Нажимаем на графу «Изменить уровень списка» и в выпавшем окне выбираем новый стиль обозначения


На заметку! Еще один вариант изменения уровня графы в списке – установить курсор в начале текста графы и нажать кнопку «Tab». Чем ниже уровень вам нужен, тем больше раз нужно нажимать данную кнопку. Чтобы вернуть необходимую графу на уровень выше, нажмите кнопку «Backspace».
В уже существующем списке из нескольких категорий легко сменить стиль обозначений:
- Щелкните по стрелке возле кнопки «Многоуровневый список».

Щелкаем по стрелке возле кнопки «Многоуровневый список»
- Из выпавшего меню выберите нужный стиль и нажмите на него.

Выбираем другой стиль, щелкаем по нему

Текст с новым стилем многоуровневого списка
- Если в библиотеке нет подходящего списка, можно создать свой, выбрав графу «Определить новый многоуровневый список». Во всплывшем окне выберите нужное значение для каждой категории.

Для выбора нового списка нажимаем «Определить новый многоуровневый»

Во всплывшем окне выбираем нужное значение для каждой категории, нажимаем «ОК»


На заметку! Примечательно, что в одном многоуровневом списке могут присутствовать как символы, так и числа.
Чем различаются схожие команды «Определить новый многоуровневый список» и «Определить новый стиль списка»? Первая подходит для работы с единичными перечнями или в случаях, когда список точно не будет подвергаться изменениям. Вторая нужна для внесения правок в уже существующий стиль – это может отразиться на многоуровневых списках по всему документу.
Как сделать список из готового текста?
Готовый текст при необходимости легко преобразовать в список:
- Убедитесь, что все элементы будущего перечня находятся на разных строках.
Все элементы будущего перечня размещаем в разных строках
- Выделите строки с нужной информацией.
Выделяем строки с нужной информацией
- Нажмите кнопку «Маркеры».
Нажимаем кнопку «Маркеры»


Работа со списком завершается двумя нажатиями кнопки «Enter».
Сортировка списков в Word
Сортировка пунктов списка в алфавитном порядке упрощает задачу поиска нужной графы. Особенно, если список обширный, вроде оглавления или списка использованной литературы в научных материалах.
- Выделите все элементы перечня.
Выделяем все элементы перечня
- Нажмите на кнопку «Сортировка» на панели инструментов.

Нажимаем на кнопку «Сортировка» на панели инструментов
- Во всплывшем окне введите параметры сортировки. В зависимости от того, каким образом должен быть представлен алфавит – в прямом или обратном порядке, выберите «по возрастанию» или «по убыванию».

Во всплывшем окне вводим параметры сортировки, нажимаем «ОК»
В зависимости от того, каким образом должен быть представлен алфавит, ставим галочку на подходящий вариант «по возрастанию» или «по убыванию»


Читайте также статью — «Как сделать нумерацию страниц в Ворде с 3 страницы».
Видео — Как сделать маркированный, нумерованный и многоуровневый список в Ворде
Рекомендуем похожие статьи
Как использовать маркеры в ворде?
Когда при работе с текстовым редактором Microsoft Wordнам нужно выделить какие – либо отдельные кусочки текста, например когда мы пишем о видах чего – либо, перечисляем что — либо или просто выделяем определенный абзац и по каким – либо причинам не хотим использовать циферную нумерацию можно использовать маркеры в ворде.
Что такое маркеры? Это в принципе то же самое, что циферная нумерация, только в место цифр, здесь используются разнообразные миниатюрные графические иконки. Маркеры как и циферная нумерация ставится сразу около нового абзаца и могут ставится до бесконечности, то есть у вас, если это нужно, может быть хоть весь документ в маркерах.
Как вставить маркеры в ворде?
Это делается очень просто и быстро. Вам нужно открыть документ, в котором нужны маркеры, набрать в этом документе абзацы для маркировки, выделить этот текст и перейти в верхнее меню программы (см. скриншот) и выбрать нужный вам маркер (я открыл меню маркеров, чтобы вы могли увидеть их все), как только вы нажмете на маркер, текст будет промаркирован.

Как сделать свой маркер в word?
Как вы видите, маркеров доступно слишком ограниченное количество. То есть каких – то особых символов в списке нет, но они там и не нужны. Каждый пользователь может сам определить себе символ, который будет служить маркером. (Также вы этом меню вы можете определить, где будет находится ваш маркер, слева как обычно, по центру или даже справа). Для этого вы опять открываете меню маркеров и находите там пункт, который называется «определить новый маркер».
 Перед вами появится окошечко настройки нового маркера. Здесь вы можете определить новый символ в библиотеке символов ворда для маркера или выбрать новый рисунок опять – же из библиотеки рисунков ворда.

Если нужного вам графического изображения не нашлось, вы можете загрузить изображение маркера с вашего компьютера в этом же меню. (Это находится в «Рисованный маркер»-«Импорт»).
Старайтесь использовать маркеры в тексте там, где это возможно и уместно, так вы сделаете свой текст намного более читаемым и понятным.
Посмотрите также

Как удалить пустую страницу в ворде?
Сегодня многие пользуются ПК. Однако далеко не все знают как правильно им пользоваться. Эта умная …