
Word для Microsoft 365 Word для Microsoft 365 для Mac Word 2021 Word 2021 для Mac Word 2019 Word 2019 для Mac Word 2016 Word 2016 для Mac Word 2013 Word 2010 Word 2007 Word для Mac 2011 Еще…Меньше
Списки в Word можно делать более интересными, используя графические маркеры или собственные символы. Если вам нравится стиль маркеров в чужом документе, вы можете добавить его в библиотеку маркеров.
Примечание: Настраиваемые маркеры в Word в Интернете. Если у вас есть классическая версия Word, откройте ее, чтобы настроить маркеры. Вы также можете попробовать или купить последнюю версию Office.
Символы и стили графических маркеров находятся в библиотеке маркеров. Если вы не видите нужный стиль в библиотеке, можно определить новый стиль маркера.
-
Щелкните список, к которому нужно применить графические маркеры или символы.
Для изменения всего уровня в многоуровневом списке щелкните один маркер или число на этом уровне.
-
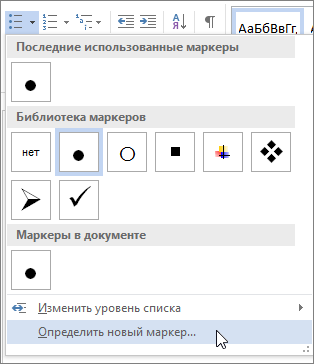
На вкладке Главная в группе Абзац щелкните стрелку рядом с кнопкой Маркеры и выберите пункт Определить новый маркер.

-
В Word для Windows
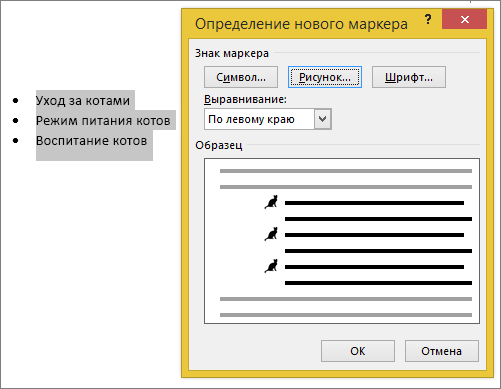
Нажмите кнопку Символ или Рисунок и выберите нужный символ или изображение.
-
В Word 2013 и Word 2016 можно добавить файл изображения с компьютера, найти его в Интернете или вставить из внешней службы, например OneDrive или Flickr.
-
В Word 2007 и Word 2010, можно добавить рисунок с компьютер (нажмите кнопку Импорт) или найти его (поддерживается поиск в Office Online).
В Word для Mac
Нажмите кнопку Маркер (чтобы вставить символ) или Рисунок (чтобы использовать изображение, которое хранится на компьютере).
-
-
Нажмите кнопку Вставить или ОК для предварительного просмотра нового маркера в диалоговом окне Определение нового маркера (в Windows) или Настроить маркированный список (в Mac OS), а затем нажмите кнопку ОК.
После создания элемента маркированного списка новый стиль маркера станет доступен в списке «Маркеры в документе».
Если вы получили документ с понравившимся вам стилем маркера, его можно добавить в библиотеку маркеров, чтобы использовать в своих документах.
Примечание: В Word для Mac пользовательские стили маркеров автоматически добавляются в библиотеку.
-
Откройте документ, содержащий маркер, который вы хотите добавить в библиотеку маркеров.
-
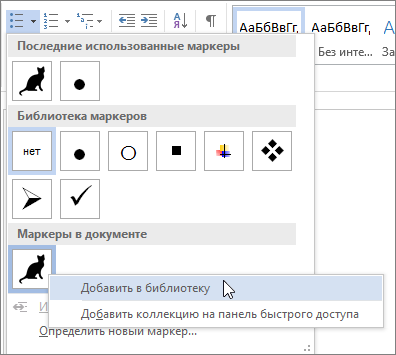
На вкладке Главная в группе Абзац щелкните стрелку рядом с кнопкой Маркеры, а затем в группе Маркеры в документе щелкните правой кнопкой мыши нужный стиль маркера и выберите команду Добавить в библиотеку.
Примечание: В Word для Mac пользовательские стили маркеров невозможно удалить из библиотеки. Эти инструкции относятся только к Word для Windows.
-
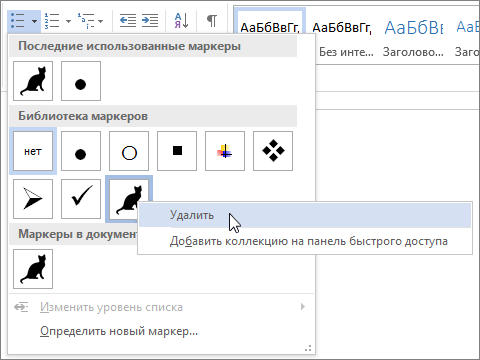
На вкладке Главная в группе Абзац щелкните стрелку рядом с кнопкой Маркеры, а затем в группе Библиотека маркеров щелкните правой кнопкой мыши стиль маркера и выберите команду Удалить.
Примечания:
-
Маркеры в документе всегда можно добавить в библиотеку маркеров.
-
Если маркер был удален из библиотеки маркеров, но доступен в области Маркеры в документе, его можно снова добавить в библиотеку маркеров.
Дополнительные сведения
Создание списка с маркерами или номерами в Word для Mac
Вставка флажка или другого символа
Нужна дополнительная помощь?
33
33 people found this article helpful
Annotating an Image in Microsoft Word
How to add arrows and text
Updated on October 25, 2019
If your Word document has images, add annotations to make images easier to understand. Adding annotations to these images directs your audience to a specific area of the graphic, and you can add text descriptions, too. Annotating images also helps you create professional presentations and documents for work and school. Here’s how to add annotations to images in a Word document.
Instructions in this article apply to Word for Microsoft 365, Word 2019, Word 2016, Word 2013, and Word 2010.
Get Started With Annotations
To annotate an image in Word, insert the image in a document, then draw a shape over the image.
-
Go to the Insert tab and select Pictures.
To find and download a picture from the internet, select Online Pictures and search for an image.
-
In the Insert Picture dialog box, select the file folder that contains the image.
-
Choose the image, then select Insert.
-
Select the image in the document, go to the Insert tab, then choose Shapes.
-
Choose one of the Callout balloon shapes. The cursor turns into a plus sign.
-
Drag across the image to create the shape in the position and size you want.
-
Select the shape and enter the annotated text.
Basic Themes and Customization of Appearance
To customize the formatting of the text (such as the font, font size, and font style), highlighting the text and select an option from the mini toolbar. Use settings on the Home tab to make other formatting changes to the annotated text.
You can also customize the fill and outline colors. To change the fill color, hover over the edge of the annotation balloon shape so it turns into a crosshair symbol, then right-click and choose Fill.
Choose the color you want (Theme or Standard). Or, to choose a custom color, select More Fill Colors. Then, experiment with different features such as Gradient, Texture, and Picture.
To change the outline color, right-click the edge of the annotation balloon shape and choosing Outline. Then, choose a color (Theme or Standard), No Outline, or Select Outline Colors for more color options. Change the weight of the solid line or turn it into dashes.
Reposition and Resize Annotations
To reposition the annotation balloon shape, hover over the edge of the shape so that the cursor turns into a crosshair, then drag the annotation balloon shape to a new location.
You may need to relocate the annotation balloon arrow as well. Hover over the annotation balloon shape to display the crosshair, select the annotation balloon, then move the cursor over the diamond-shaped handle so the cursor turns into an arrow. Drag the handle to relocate it.
You can use the other handles to resize the annotation balloon shape. Hover over a handle to turn it into a double-ended arrow, then drag the resize handle.
Thanks for letting us know!
Get the Latest Tech News Delivered Every Day
Subscribe
Мы перечисляем вещи в Word, используя маркеры. В Microsoft Word имеются основные маркеры в виде чисел, символов и т. Д. Мы можем использовать числа, точки и обычные символы в качестве маркеров в Word. Когда вы готовите проектный документ или представляете какой-либо семинар, это будет очень впечатляющим, если вы используете «маркированный список». Вы можете настроить или изменить способ использования маркеров в Word, чтобы документ выглядел привлекательно и впечатлил вашего начальника или коллегу. Вы когда-нибудь задумывались об использовании картинок в качестве маркеров в Word ? Здесь я не говорю о стандартных изображениях, которые предоставляет Word.

Предположим, у вас есть корпоративный логотип или хорошая картинка, которая соответствует содержанию вашего документа, и вы хотите использовать эту картинку в качестве маркеров в Word? Если так, то эта статья позволит вам узнать, как использовать картинки в качестве маркеров. Помимо предоставленных изображений по умолчанию, мы можем даже импортировать изображения с нашего рабочего стола и использовать их в качестве маркеров. Мы уже знаем, как изменить нумерованный список по умолчанию в Word, и теперь давайте посмотрим, как создать список с картинками в Word.
Создать иллюстрированный список маркеров в Microsoft Word
Чтобы использовать изображения в качестве маркеров в Word, сначала выберите контент, для которого вы хотите изменить маркеры. На вкладке «Главная» нажмите на выпадающий список «Пули» в разделе «Абзац».

Он показывает недавно использованные маркеры, библиотеку маркеров и маркеры, которые использовались в этом документе. Вы можете использовать любой из них, и это то, что мы делаем обычно. Если вы хотите использовать картинку в качестве маркера, нажмите «Определить новый маркер».

Он показывает вам диалоговое окно «Определение новой марки». Под «Bullet Character» нажмите на кнопку «Изображение».

Откроется диалоговое окно Picture Bullet. По умолчанию он показывает вам несколько картинок, и они могут быть использованы в Word. Если вы хотите использовать картинку с рабочего стола, нажмите кнопку «Импорт».

В диалоговом окне перейдите к месту, где вы сохранили изображение. Выберите изображение и нажмите «Добавить».

Вы можете видеть, что выбранное изображение добавлено в маркированный список. Выберите изображение из списка и нажмите «ОК». Он показывает предварительный просмотр этой картинки в виде маркера, и если вы согласны с ней, нажмите «ОК». В противном случае выберите еще одно изображение на рабочем столе и повторите те же действия.

Теперь вы можете видеть, что выбранный маркерный список в виде картинок, т.е. предыдущие пули были заменены картинками.

Не все картинки будут работать как пули. Изображения должны быть прозрачными и иметь хороший фон, чтобы они выглядели очень эффектно в вашем документе.
Также прочитайте, как обернуть текст вокруг изображений и изображений в Microsoft Word.
Вы когда-нибудь использовали картинки в качестве маркеров в Word? Если это так, пожалуйста, поделитесь с нами через комментарии.
Microsoft Word allows you to add many small touches, such as watermarks, to improve your document’s appearance. However, there is no built-in watermark option for photos you insert into Word documents. As a workaround, place an image inside of a shape, then adjust the image’s transparency to use it as a watermark over any photo in your document.
Placing a Shape
-
Open the Word Document with the Image
-
Open the Word document with the image you want to place a watermark on.
-
Locate Image
-
Locate the image and click the «Insert» tab near the top of the window.
-
Choose Rectangle Shape
-
Click the «Shapes» option in the Illustrations group and choose the rectangle shape from the drop-down menu.
-
Place Rectangle Over Photo
-
Click and drag to form a rectangle over your photo. It doesn’t have to be the exact size of your photo; you can adjust the size later.
Formatting the Shape
-
Choose Options for the Rectangle
-
Click on the rectangle, then click on the «Shape Outline» option in the Shape Styles group, located in the Format tab, to open a drop-down menu; click the «No Outline» option in that menu.
-
Select Watermark Image
-
Click the «Shape Fill» option, also located in the Shape Styles group, to open a drop-down menu; click «Picture» in that menu and use the window that appears to navigate to and select your watermark image file.
-
Right-Click the Shape
-
Right-click the shape, which now has your watermark in it.
-
Select «Colors and Lines» Tab
-
Click «Format Shape» and select the «Colors and Lines» tab in the window that appears.
-
Adjust Transparency
-
Adjust the slider below the word «Transparency» to change how transparent your image will be. The exact transparency you want depends on your specific watermark, so you may need to experiment a bit until you find the right setting. Alternatively, type in a percentage in the box by the word «Transparency.»
-
Click «OK»
-
Click «OK» when you’ve selected the transparency setting you want. The image is now partially transparent over your photo, giving it the appearance of a watermark.
Tip
When you insert your watermark into the rectangle shape, its aspect ratio will probably be incorrect, so it will appear stretched. One solution for this is to manually adjust the shape by dragging its corners. Another approach is to type in the height and width, in inches, in the Format tab’s Size group (within Picture Tools).
The rectangle may be too large or small, but once the aspect ratio is correct, click the dialog box launcher in the lower right corner of the Size group, then, in the dialog box’s Size tab, check the «Lock aspect ratio» option. This allows you to freely adjust the watermark’s size without stretching it.
Lesson 19: Formatting Pictures
/en/word2013/pictures-and-text-wrapping/content/
Introduction
There are a variety of ways to format pictures in your document. Depending on how the images are used and where they are placed, you can use Word’s picture tools to personalize and modify them in interesting ways.
Optional: Download our practice document.
To crop an image:
When you crop an image, a part of the picture is removed. Cropping may be helpful when a picture has a lot of content and you want to focus on only part of it.
- Select the image you want to crop. The Format tab appears.
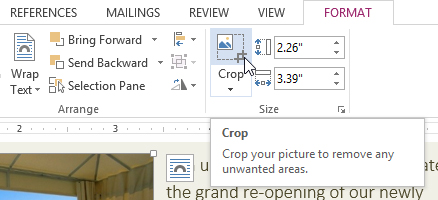
- On the Format tab, click the Crop command.
 Clicking the Crop command
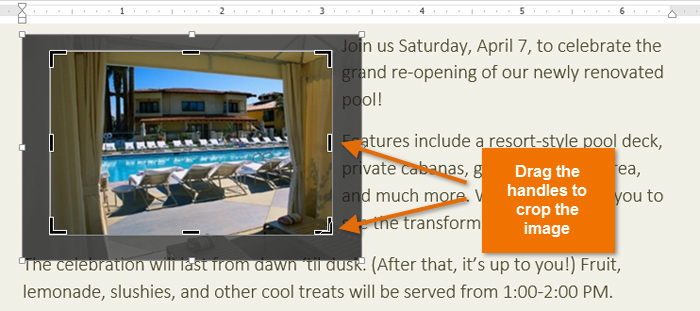
 - Cropping handles will appear around the image. Click, hold, and drag a handle to crop the image.
 Cropping an image
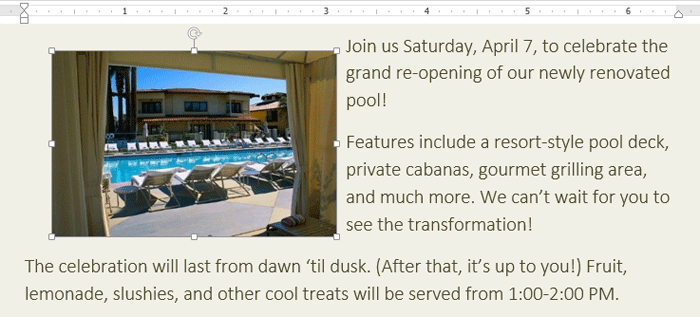
 - Click the Crop command again. The image will be cropped.
 The cropped image
The corner handles are useful for simultaneously cropping the image horizontally and vertically.
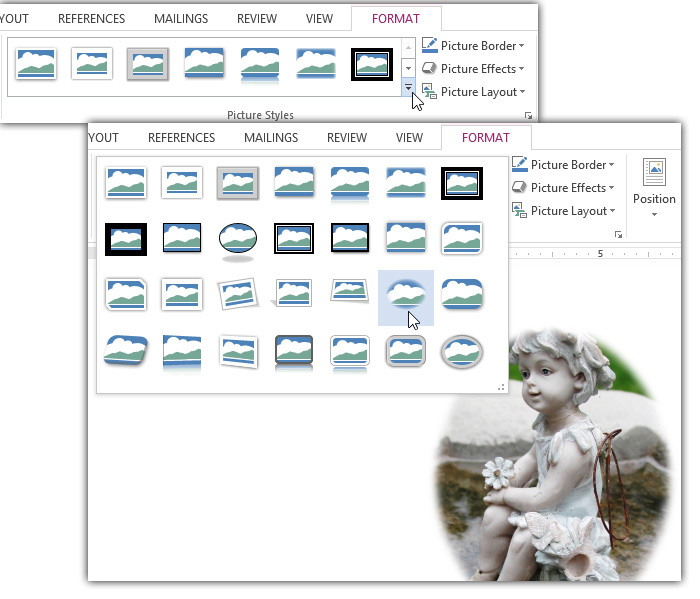
To crop an image to a shape:
- Select the image you want to crop, then click the Format tab.
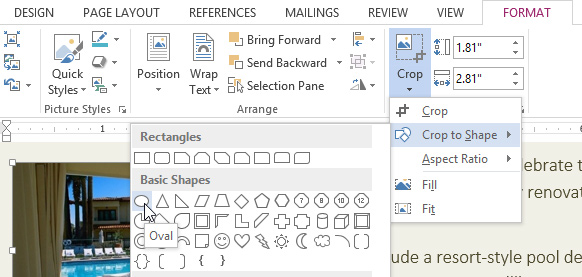
- Click the Crop drop-down arrow. Hover the mouse over Crop to Shape, then select the desired shape from the drop-down menu that appears.
 Selecting a shape
 - The image will appear formatted as the shape.
 The image cropped to a shape
To add a border to a picture:
- Select the picture you want to add a border to, then click the Format tab.
- Click the Picture Border command. A drop-down menu will appear.
- From here, you can select a color, weight (thickness), and whether or not the line is dashed.
 Changing the picture border
 - The border will appear around the image.
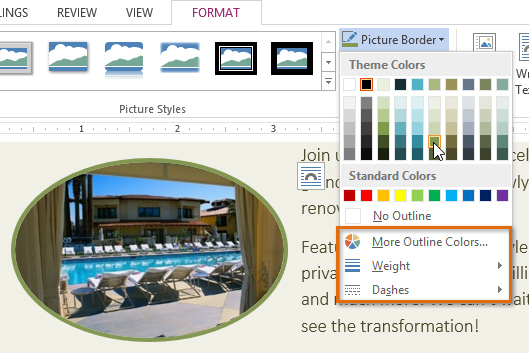
Image adjustments
Word offers several options for changing the way images appear in your document. For example, you can add a frame, make image corrections, change the image’s color or brightness, and even add some stylish artistic effects. These options are located in the Adjust and Picture Styles groups on the Format tab.
 Image Adjustment Options
When you’re ready to make adjustments or experiment with the look of an image, select the picture and choose one of these options from the Format tab:
- Corrections: This command is located in the Adjust group. From here, you can sharpen or soften the image to adjust how blurry or clear it appears. You can also adjust the brightness and contrast, which controls how light or dark the picture appears.
 The Corrections command
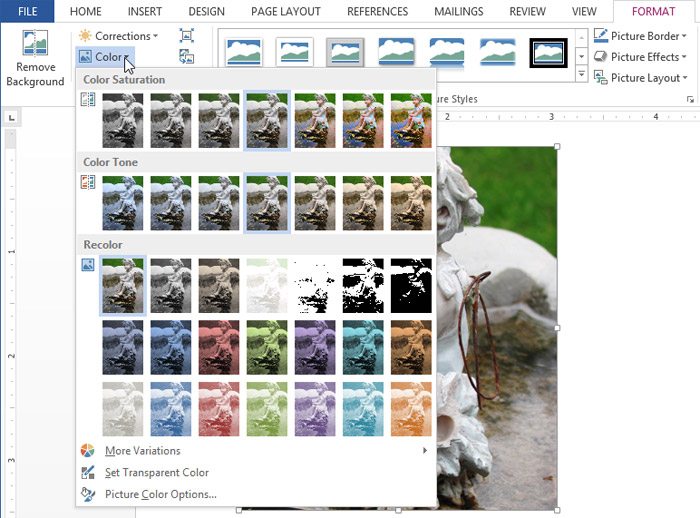
 - Color: This command is located in the Adjust group. From here, you can adjust the image’s saturation (how vivid the colors are), tone (the temperature of the image from cool to warm), and coloring (changing the overall color of the image).
 The Adjust Color command
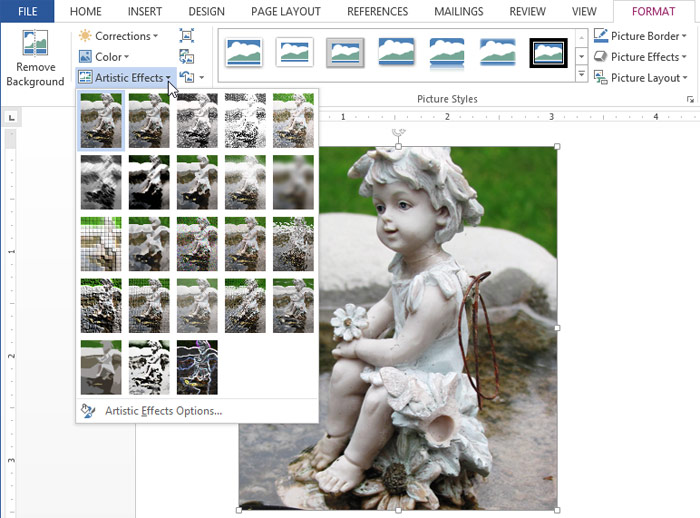
 - Artistic Effects: This command is located in the Adjust group. From here, you can add artistic effects such as pastels, watercolors, and glowing edges.
The Artistic Effects command
- Picture Styles Group: This group contains a variety of styles you can apply to your picture, such as frames, borders, and soft edges.
 The Picture Styles drop-down menu

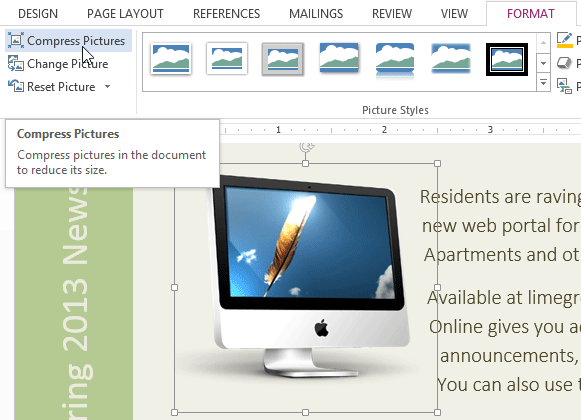
Compressing pictures
If you intend to email a document that contains pictures, you’ll need to monitor its file size. Large high-resolution pictures can quickly cause your document to become very large, which may make it difficult or impossible to attach to an email. Additionally, cropped areas of pictures are saved with the document by default, which can add to the file size. Word can reduce the file size by compressing pictures, which will lower their resolution and delete cropped areas.
To compress a picture:
- Select the picture you want to compress, then click the Format tab.
- Click the Compress Pictures command.
 Clicking the Compress Pictures command
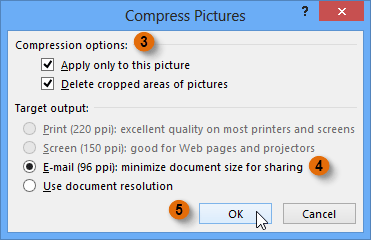
 - A dialog box will appear. Place a check mark next to Delete cropped areas of pictures. You can also choose whether to apply the settings to this picture only or to all pictures in the document.
- Choose a Target output. If you are emailing your document, you may want to select Email, which produces the smallest file size.
- Click OK.
 The Compress Pictures dialog box
Removing the background from an image
Removing the background from an image can give it a cleaner appearance. If you’re printing your document, it can also save ink.
About Background Removal
With Background Removal, Word uses special algorithms to determine which parts of the image are the background and then removes these areas from the image.
 Before
 After
After
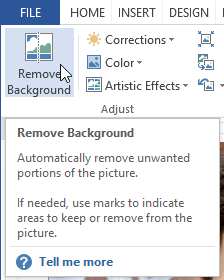
To remove the background from an image:
- Select the desired image, then click the Format tab.
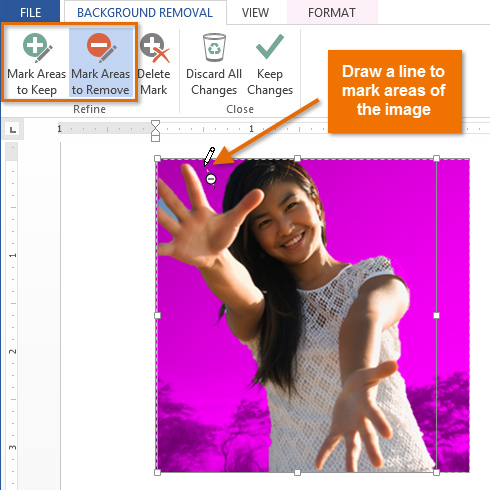
- Click the Remove Background command.
 Clicking Remove Background
 - Word will try to guess which part of the image to remove and mark the background with a magenta fill. It will also place a box with selection handles around the image.
 Background areas are marked with magenta
 - Drag the selection handles until all of the foreground is inside the box. After you do this, Word may readjust the background.
- At this point, you may need to help Word decide which parts of the image are in the foreground and which parts are in the background. You can do this by using the Mark Areas to Keep and Mark Areas to Remove commands:
- If Word has marked part of the foreground magenta, click Mark Areas to Keep and draw a line in that region of the image.
- If part of the background has not been marked with magenta, click Mark Areas to Remove and draw a line in that region of the image.
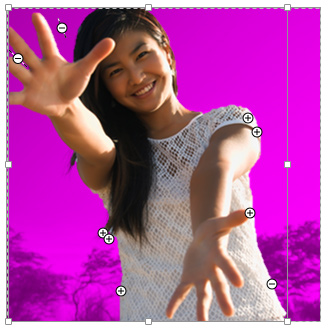
 Marking areas to remove
 - After you add your marks, Word will readjust the image.
 After adding marks
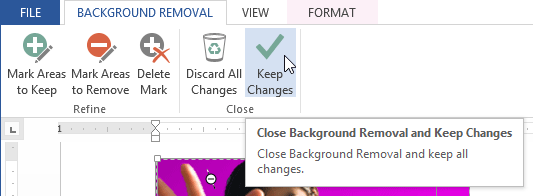
 - When you’re satisfied with the image, click Keep Changes.
 Clicking Keep Changes
 - The background will be removed. You can adjust the image at any time by clicking the Remove Background command again.
 The finished image

Challenge!
- Create a new Word document. If you want, you can use our practice document.
- Insert an image from a file into the document.
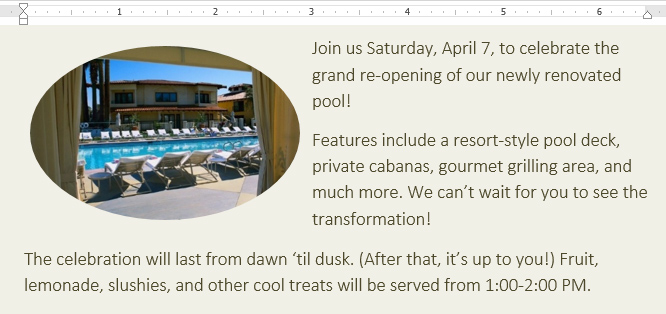
- Crop the image. If you’re using the example, crop the image in the Pool Re-Opening & Celebration section into the shape of your choosing.
- Experiment with different image corrections and color settings.
- Add an Artistic Effect to the image. If you’re using the example, add an artistic effect to the image in the New Online Resident Portal section.
- Try compressing an image. If you’re using the example, compress the image in Memorial Day Barbecue section.
- Remove the background from the image. If you’re using the example, remove the background of the image in the Important Contact Info section.
/en/word2013/shapes/content/