
MS-Word / General Formatting
If a particular topic is discussed for several pages in your document, you
might want to create an index entry that marks a range of pages (for example,
26-29) rather than each page individually (26, 27, 28, 29).
Unfortunately, the procedure for marking page ranges isn’t as slick as it
could be. You have to mess around with the Word doohickey known as a
bookmark. A bookmark is a name you can assign to a selection of text. You
usually use bookmarks to mark locations in your document so that you
can return to them later, but they have all sorts of more interesting uses.
Marking a range of pages for an index is just one.
To use a bookmark to create a range of pages in an index, follow these steps
(this process gets tricky, so hang on to your hat):
- Highlight the entire range of text you want included in the index entry’s page range.
A long discussion of a single topic could go on for pages, so be prepared. - Open the Insert tab on the Ribbon and click the Bookmark button,
found in the Links group. (This button is shown in the margin.)
The Bookmark dialog box appears. - Type a bookmark name to identify the bookmark.
Bookmark names can be as long as 40 characters and can consist of any
combination of letters and numbers. Spaces aren’t allowed, but you can use an underscore to double as a space. - Click Add to create the bookmark.
- Position the insertion point at the beginning of the bookmark and press Alt+Shift+X.
The Mark Index Entry dialog box appears. - Type the text you want to appear in the index in the Main Entry field.
- Select the Page Range option.
- Select the bookmark you just created from the Bookmark drop-down list box.
All bookmarks in the current document appear in this drop-down list. - Click the Mark button to create the index entry.
After you create the bookmark and an index entry naming the bookmark, the
index includes the range of page numbers for the entry.
The location of various bookmarks in your document can be indicated by
large brackets in the text. To activate these brackets, open the Word Options
dialog box by clicking File → Options. Then select the Show Bookmarks
option in the Show Document Content section of the Advanced tab.
Tip: Make the bookmark name as close to identical to the index entry text as you
can. Use underscore characters rather than spaces: master_document for master document, for example.
-

1
Open the Word document. You can double-click the document’s name to open it in Word. Alternatively, open Word (it’s in the Windows menu on a PC and the Applications folder on a Mac), click File, click Open, then select the document.
-
2
Click the Review tab. It’s at the top of the screen.
Advertisement
-
3
Click Track Changes. It’s also at the top of the screen. Look for the sheet of paper icon with a yellow pencil. Now all future changes to the document will appear as colored markup.
- For example, if you delete something you’ve typed, it won’t actually disappear. Instead, it’ll will appear crossed-out. Newly typed text will be underlined.[1]
- Click Track Changes again to turn off further markups.
- For example, if you delete something you’ve typed, it won’t actually disappear. Instead, it’ll will appear crossed-out. Newly typed text will be underlined.[1]


Advertisement
Ask a Question
200 characters left
Include your email address to get a message when this question is answered.
Submit
Advertisement
Thanks for submitting a tip for review!
About This Article
Article SummaryX
1. Open the document.
2. Click Review.
3. Click Track Changes.
Did this summary help you?
Thanks to all authors for creating a page that has been read 66,523 times.
Is this article up to date?
Remove the page number from the first page
-
Go to Insert > Header or Footer > Edit Header or Edit Footer.
-
Select Different First Page.
Note:
Different first page can be applied to the first page of any section in your document, not just the very first page. -
In the header or footer area, you should see a label on the first page that says First Page Header. Select the page number and press Delete.
-
Select Close Header and Footer or press Esc to exit.
Tip: If you want your second page to start at 1 rather than 2, go to Insert > Page Number > Format Page Numbers, and set Start at under Page Numbering to 0, rather than 1.
Start page numbering on Page 3 — double-sided printing
If the first page of your document is a cover page, the second page is a table of contents, and you want the third page to show “Page 1”, see Start page numbering on Page 3 — double-sided printing.
Choose the scenario that most closely matches what you want to do:
You don’t want a page number to appear on your title page, but you want the second page to show «Page 2.»
-
Go to Insert > Header or Footer > Edit Header or Edit Footer.
-
Select Different First Page.
Note:
Different first page can be applied to the first page of any section in your document, not just the very first page. -
In the header or footer area, you should see a label on the first page that says First Page Header. Select the page number to highlight it and press Delete.
-
Select Close Header and Footer or press Esc to exit.

Start page numbering on Page 3 — double-sided printing
If the first page of your document is a cover page, the second page is a table of contents, and you want the third page to show “Page 1”, see Start page numbering on Page 3 — double-sided printing.
Remove the page number from the first page
-
Go to Insert > Header & Footer.
-
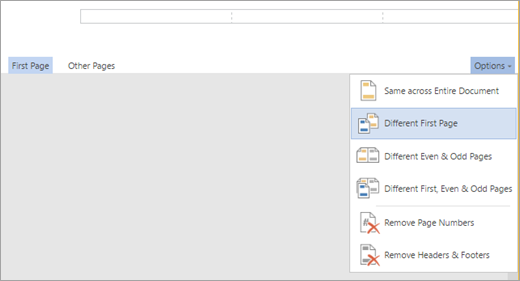
SelectOptions on the right side, and then select Different First Page.
-
Select Options again, and then select Remove Page Numbers.
-
To see your page numbers and confirm deletion of the number from the first page, go to View > Reading View.
-
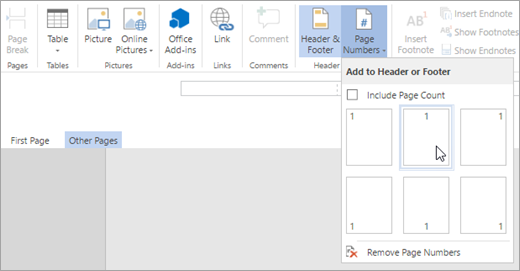
If all page numbers are deleted, go to Insert > Header & Footer and select Other Pages on the left side,. Go to Insert > Page Number and choose a number placement.
When we insert a header or a footer on any page in a Word document, it automatically appears on all the pages. But sometimes, we need to insert headers and footers to some specific pages except the entire Word document. This tutorial will show you how to insert Headers and Footers on specific pages in Microsoft Word.

How do you put a Header on only certain pages in Word?
To insert a Header on only a certain page, say page 7 in Word, first, you have to insert a Next Page Section Break to the end of its previous page, page 6, and its next page, page 8. After that, insert your Header on the targeted page (page 7) and deselect the Link to Previous option. Now, delete the Header from the previous page (page 6) and the next page (page 8). This will put the Header on only the specific page. We have explained the entire process in detail in this article.
The steps to insert Headers and Footers to some specific pages in Microsoft Word are listed below:
- Launch Microsoft Word.
- Enable the Formatting Marks.
- Go to the page on which you want to insert Header or Footer.
- Insert a Section Break at the end of the page just before the targeted page.
- Insert Header and Footer on the targeted page.
- Unlink Header and Footer on the targeted page from the previous pages.
- Delete Header and Footer from the page just before the targeted page.
- Insert a Section Break at the end of the targeted page.
- Select Header and Footer on the page next to the targeted page and unlink them from the previous pages.
- Delete Header and Footer from the page next to the targeted page.
Let’s see all these steps in detail.
1] Launch Microsoft Word.

2] Select the Home tab and click on the Show/Hide Formatting Marks button to enable formatting marks (as shown in the above screenshot). The formatting marks will show you all the formatting that you do in your Word document. Hence, it will be helpful when you insert a Section Break.
3] Now, go to the page on which you want to insert Header and Footer, and add a Section Break to its previous page. Let’s say, if you want to insert the Header on page 5 in your document, you have to add Section Break on page number 4.

4] To add a Section Break, click at the end of that page (according to our example, it is page 4), and go to “Layout > Breaks > Section Break.” Now, select Next Page.
5] Now, go to the page where you want to insert a Header or a Footer. In the example that we have taken here, it is page 5. To insert Header and Footer, double-click at the top and bottom of that page respectively. Alternatively, you can insert the Header and the Footer from the Insert menu. Simply, go to the Insert menu and then click on the Header or the Footer drop-down menu to select the format of Header and Footer you want to insert into your document.

6] Type your Header and Footer on the targeted page. After that, click on the Design tab and deselect the Link to Previous option. When you are done, click on the Close Header and Footer button.
Read: How to use Header, Footer, and Footnote in Google Docs.
7] After inserting the Header and Footer, you will see that the Header and the Footer have automatically been added to all the pages in the document. To remove the Header and the Footer from all the previous pages, simply select them on the previous page (the page just before the targeted page), and press Delete. This will delete the Header and the Footer from all the pages before the targeted page.
8] To remove Header and Footer from the pages after the targeted page, add Section Break at the end of the targeted page. Let’s understand it with the help of the example that we have taken here. Our targeted page is 5. Therefore, to remove Header and Footer from all the pages after page 5, we have to insert the Section Break at the end of page 5.
To do this, go to “Layout > Breaks > Section Break” and select Next Page. Now, select Header and Footer on the page next to the targeted page (in our case, it is page 6) and deselect the Link to Previous option in the Design menu. After that, delete Header and Footer from the page next to the targeted page (page 6).
Now, your Header and Footer have successfully been inserted into a specific page in a Microsoft Word document. Save your document.
By following the above process, you can also add different Headers and Footers to different pages in a Word document.
How do I start a Header and a Footer on page 3 in Word?
To insert a Header and a Footer on page 3 in Word, first, you have to unlink the Header and Footer on page 3 from the previous pages (page 1 and page 2). For this, click at the end of page 2, go to “Layout > Breaks > Section Break,” and select Next Page. This will insert a Section Break after page 2. Now, insert Header and Footer on page 3. After that, click on the Design tab and then deselect the Link to Previous option.
Go to page 2 and delete Header and Footer from there. This will remove Header and Footer from the first two pages in your Word document.
Hope this helps.
Read next: How to add Header and Footer in Excel spreadsheet.
Insert or Delete Page Breaks in a Word Document
by Avantix Learning Team | Updated January 10, 2021
Applies to: Microsoft® Word® 2010, 2013, 2016, 2019 or 365 (Windows)
You can add or remove page breaks in Microsoft Word in a number of ways. It’s important to understand that there are both manual page breaks and automatic page breaks in Word. Automatic page breaks are inserted by Word based on settings in the file (such as font size, paragraph spacing, page size and margins). You can delete manual page breaks by selecting them and deleting them. However, if page breaks are automatic, you can’t remove them, you can only adjust where they occur by editing the document (such as changing margins, paragraph spacing and font size).
If you are a keyboard only user, check out our article No Mouse? Using Keyboard Only Navigation in Microsoft Office.
Recommended article: How to Quickly Remove All Page Breaks in a Word Document
Do you want to learn more about Microsoft Word? Check out our virtual classroom or live classroom Word courses >
Viewing page breaks
To view manual page breaks, paragraph marks and other non-printing characters in Microsoft Word:
- Click the Home tab in the Ribbon.
- Click Show/Hide ¶ in the Paragraph group Paragraph marks, tabs, spacing and manual page breaks will display but will not print.
Removing unnecessary blank paragraphs
If a user has pressed Enter multiple times to create a new page (which is not good practice), you should delete the extra blank paragraphs or hard returns. Word will then create automatic page breaks or you can insert a manual page break if necessary.
To delete unnecessary blank paragraphs:
- If necessary, click the Home tab in the Ribbon and then click Show/Hide ¶.
- Select the blank paragraphs (hard returns).
- Press Backspace or Delete to delete blank paragraphs.
Inserting a manual page break
To insert a manual page break using the Ribbon:
- If necessary, click the Home tab in the Ribbon and then click Show/Hide ¶.
- Place the insertion point where you want the manual break to appear.
- Click the Page Layout or Layout tab in the Ribbon.
- In the Page Setup group, click Breaks. A drop-down menu appears.
- Click Page under Page Breaks. A page break will appear with a dotted line and the word Page Break.
Below is the Breaks drop-down menu:

To insert a manual page break using a keyboard:
- If necessary, click the Home tab in the Ribbon and then click Show/Hide ¶.
- Place the insertion point where you want the break to appear.
- Press Ctrl + Enter. A page break will appear with a dotted line and the word Page Break.
Ensuring Track Changes is off
You can’t delete manual page breaks when Track Changes is turned on.
To turn off Track Changes:
- Click the Review tab in the Ribbon.
- Click Track Changes in the Tracking group.
- From the drop-down menu, select Track Changes to turn tracking off.
You can also press Ctrl + Shift + E to turn off Track Changes.
Deleting a manual page break
Manual page breaks are hidden by default. If you want to delete a manual page break easily, turn on Show/Hide ¶.
To delete a break:
- If necessary, click the Home tab and then click Show/Hide ¶.
- Double-click the break to select it or drag over it.
- Press Backspace or Delete to delete the break.
Removing page breaks created with paragraph formatting
Page breaks may have been created by a user where specific paragraph settings have been selected.
If a page break is occurring and you do not see a manual page break with Show/Hide ¶ on, check the paragraph options:
- Select the first paragraph on the page following the page break.
- Click the Home tab in the Ribbon.
- Click the Paragraph dialog box launcher on the bottom right corner in the Paragraph group. A dialog box appears.
- Click the Line and Page Breaks tab.
- Check to see whether one of the following three pagination options is selected:
Page break before – inserts a page break before a paragraph.
Keep with next – prevents a page break between the current and following paragraphs.
Keep lines together – prevents a page break within a paragraph. - Select the desired pagination option.
- Click OK.
Below is the Paragraph dialog box:
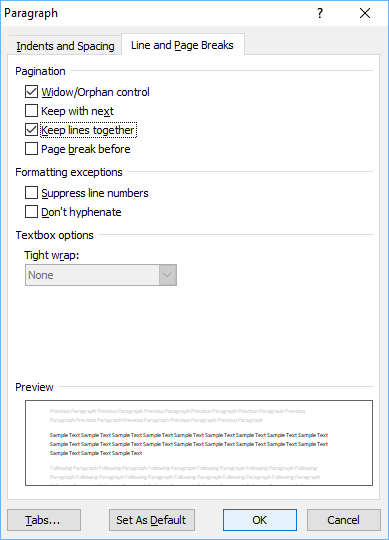
Note: The above paragraph formatting options may have been included in a style such as Heading 1. If that is the case, you will need to edit the style and change the pagination options in the style.
Page breaks can be troublesome and learning how they are created will help in removing them.
Subscribe to get more articles like this one
Did you find this article helpful? If you would like to receive new articles, join our email list.
More resources
How to Create a Table of Contents in Word
3 Strikethrough Shortcuts in Microsoft Word
How to Add Page Numbers in Word (Step by Step)
14+ Word Selection Shortcuts to Quickly Select Text
How to Find and Replace in Word (and Use Wildcards)
Related courses
Microsoft Word: Intermediate / Advanced
Microsoft Word: Designing Dynamic Word Documents Using Fields
Microsoft Word: Long Documents Master Class
Microsoft Word: Accessible Word Documents
Microsoft Excel: Intermediate / Advanced
Microsoft PowerPoint: Intermediate / Advanced
VIEW MORE COURSES >
Our instructor-led courses are delivered in virtual classroom format or at our downtown Toronto location at 18 King Street East, Suite 1400, Toronto, Ontario, Canada (some in-person classroom courses may also be delivered at an alternate downtown Toronto location). Contact us at info@avantixlearning.ca if you’d like to arrange custom instructor-led virtual classroom or onsite training on a date that’s convenient for you.
Copyright 2023 Avantix® Learning
Microsoft, the Microsoft logo, Microsoft Office and related Microsoft applications and logos are registered trademarks of Microsoft Corporation in Canada, US and other countries. All other trademarks are the property of the registered owners.
Avantix Learning |18 King Street East, Suite 1400, Toronto, Ontario, Canada M5C 1C4 | Contact us at info@avantixlearning.ca