
Map Excel Data to Create an Interactive Map
A lot of mapping tools are cumbersome, complicated, or expensive to use. Our elegant Excel mapping software makes data visualization simple and fast for everyone. Upload a list of addresses in spreadsheet format and create a map within minutes. Plot addresses on a Google map by uploading your excel file.
Follow the steps below to get started with Maptive. Once complete, each spreadsheet column will be represented by a marker on the map, making it easy to start analyzing and discovering new opportunities buried in your data.
4 Steps to Create a Map from Excel Data:
Create a map using your Exel spreadsheet data in just a few steps:
Step 1: Sign up for the free trial of Maptive. (Remember when we told you how free it was? You don’t even need to give us your credit card details.)
Step 2: Click the “create your first map” button. Give it a name, click “Continue,” and you’re ready to start.
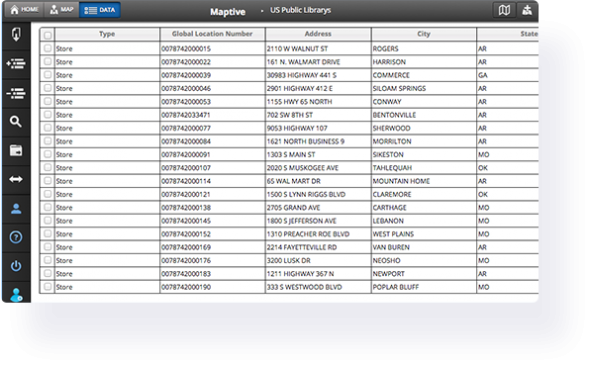
Step 3: Upload your Excel or Google Sheets spreadsheet into our platform. We’ll do the heavy lifting and generate an interactive, customizable Google Map for you within seconds.
Or choose one of these alternative methods to create your map:
- Use our API to connect your data directly to your map for real-time updates.
- Connect your Google Spreadsheet data to our platform. Any changes made on your Google Spreadsheet will automatically be reflected on your map.
- Start with a blank map and add your locations manually, one at a time.
Step 4: Select the columns in your spreadsheet that contain location data. We’ll automatically match most of them for you automatically so you can do this step in your sleep.
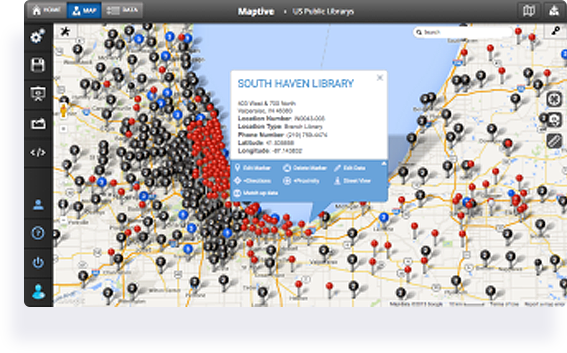
Congratulations! You now have an exquisite map awaiting your personal touch.
Once your initial map is created, use the many tools in our software to customize it and discover new opportunities hiding in your data.
Share your maps, embed them in a blog post, save them, or keep them to yourself — it’s up to you. You can be sure that using our powerful software will open up a new world of ways to analyze your data.
What Can Maptive’s Excel Maps Do?
Maptive provides hundreds of features that let you view your spreadsheet data in completely new ways. Below is just a sampling of what is possible. If you have a specific type of map you want, feel free to view all our features or ask us a question using the button at the bottom right-hand corner of the screen.
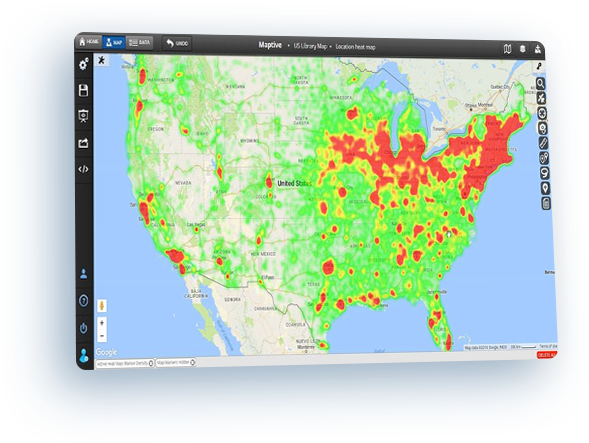
Heat Map Excel Data
Generate a heat map based on the geographic location of each row of data. Additionally, if you want to add weight to the locations in your spreadsheet, you can select a column such as sales or clients. The resulting heat map will be darker where there are more total sales and lighter where there are few or none.
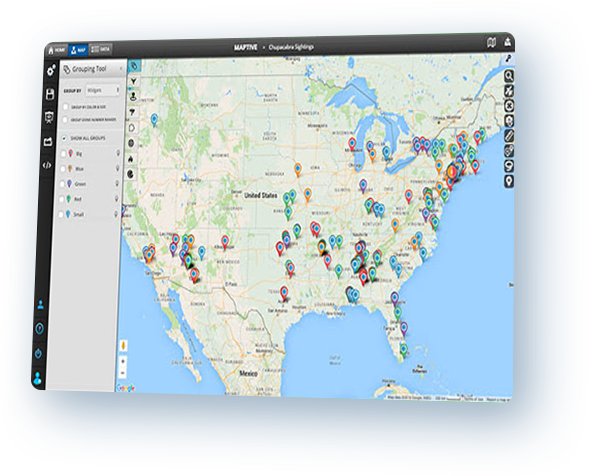
Group spreadsheet data on a map
Select a column in your Excel data and Maptive will automatically find all of the unique values in that column. Then we’ll place a colored marker on the map for each row in your spreadsheet. Each color in the map area will represent one of the unique values from the grouping column.
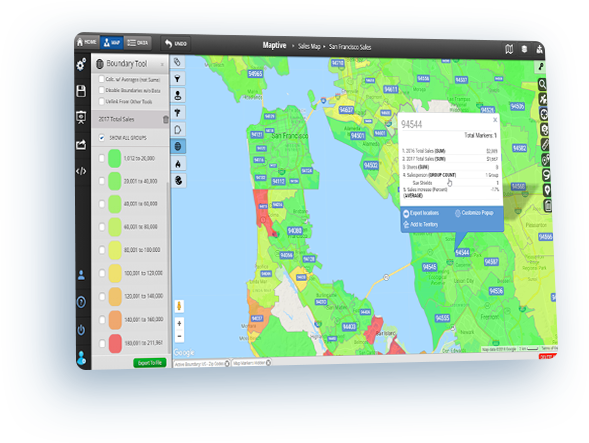
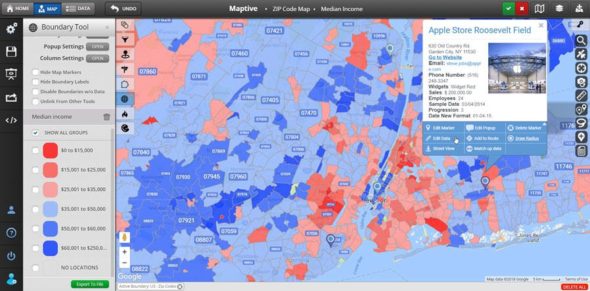
Map zip codes based on your data
The boundary tool incorporates a US zip code map that displays the borders of the approximately 43,000 zip codes in the United States. In moments, you can combine your own data with the comprehensive information – including the latest census data – provided by Maptive. Plus, shade zip codes with different colors based on the data within them to quickly analyze your map. Also, postal codes for countries such as Canada, the UK, and Australia are available.
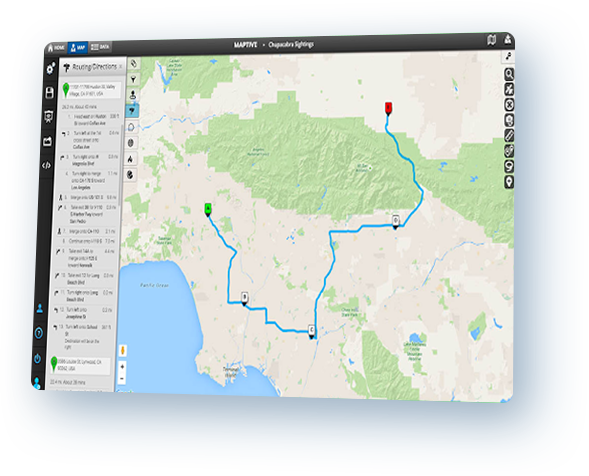
Plan multi-stop driving routes
Input your spreadsheet data into Maptive and, very quickly, you’ll be able to map street addresses from Excel. Maptive also creates an optimized route for you that will reduce your travel time and get you where you need to be quicker.
Start Your Free, No Risk, 10 Day Trial
No credit card required. No surprises. Just Results.
START MAPPING NOW
Maptive uses cookies to improve your experience with our software and websites. By clicking “Accept”, or continuing to navigate the site, you consent to our use of cookies.
Excel for Microsoft 365 Excel for Microsoft 365 for Mac Excel 2021 Excel 2021 for Mac Excel 2019 Excel 2019 for Mac Excel for iPad Excel for iPhone Excel for Android tablets Excel for Android phones Excel Mobile More…Less
You can use a map chart to compare values and show categories across geographical regions. Use it when you have geographical regions in your data, like countries/regions, states, counties or postal codes.

Download our examples
You can download a workbook with several map chart examples like the ones in this article.
Map charts can display both values and categories, and they each have different ways of displaying color. Values are represented by slight variations of two to three colors. Categories are represented by different colors.
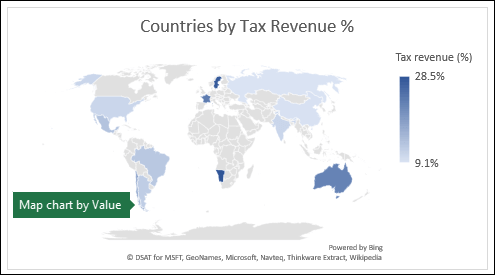
For example, the Countries by Tax Revenue % chart below uses values. The values represent tax revenue in each country with each portrayed using a gradient spectrum of two colors. The color for each region is dictated by where along the spectrum its value falls. By default, the higher the value is, the darker its corresponding color will be.
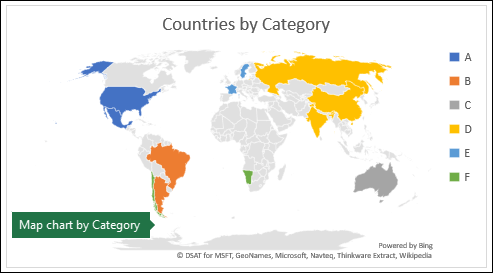
In the following example, Countries by Category, the categories are displayed using a standard legend to show groups or affiliations. Each country is represented by a different color.
Create a Map chart with Data Types
-
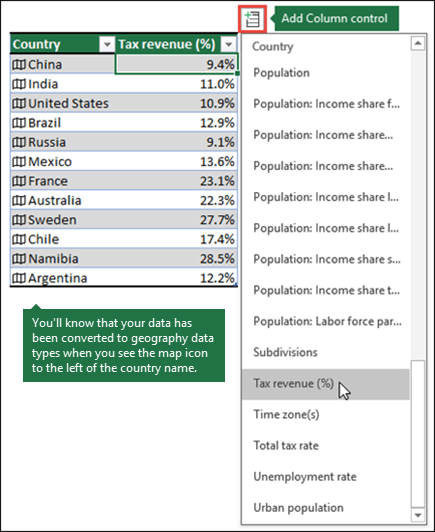
Map charts have gotten even easier with geography data types. Simply input a list of geographic values, such as country, state, county, city, postal code, and so on, then select your list and go to the Data tab > Data Types > Geography. Excel will automatically convert your data to a geography data type, and will include properties relevant to that data that you can display in a map chart. In the following example, we’ve converted a list of countries to geography data types, then selected the Tax revenue (%) field from the Add Column control to use in our map.

-
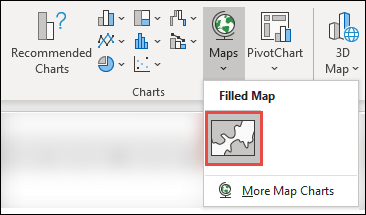
Now it’s time to create a map chart, so select any cell within the data range, then go to the Insert tab > Charts > Maps > Filled Map.
-
If the preview looks good, then press OK. Depending on your data, Excel will insert either a value or category map.
Tip: If your data is set up as an Excel table, and then you add a country to the list, Excel will automatically update it as a geography data type and update the linked map chart. Similarly, if you remove a country, then Excel will also remove it from the chart.
Formatting your Map chart
Once your map chart has been created you can easily adjust its design. Just click on the map, then choose from the Chart Design or Format tabs in the ribbon. You can also double-click the chart to launch the Format Object Task Pane, which will appear on the right-hand side of the Excel window. This will also expose the map chart specific Series options (see below).
Notes:
-
There are several map chart specific Series options, however they are not supported in Android devices or Excel Mobile. If you need some of the map Series options, then you can build your chart in Excel for Windows or Mac and view it on an Android device or Excel Mobile.
-
-
Learn more about Formatting Map Charts.
-
Map projections — Change the map’s projection style. By default, Excel will display the most efficient style.
-
Map area — Change the map’s Zoom level, ranging from a state/province view, all the way to the world view.
-
Map labels — Show geographic names for your countries/regions. Chose to show names based on fit, or show all labels.
Frequently Asked Questions
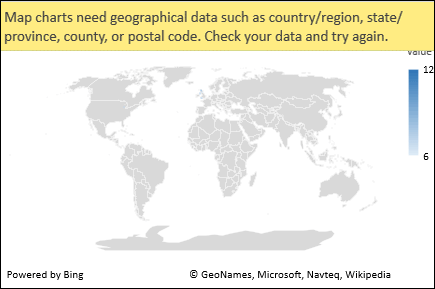
Question: When I use certain text-based locations, I end up with a blank map and an error, or some of my points map in other countries.
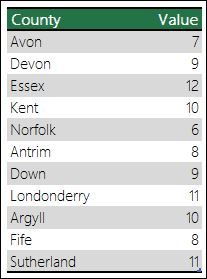
Answer: If you use data where there might be more than one similar location in the world, map charts can’t necessarily tell the difference without more guidance. If possible, add a higher-level detail column to your data. For example, the following locations won’t necessarily map the way you expect since there are many places in the world where these are valid county names:
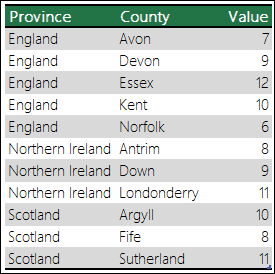
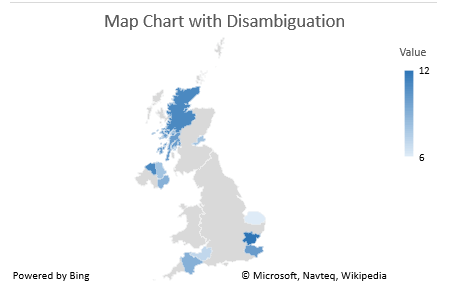
But the data should map correctly if you add another column for higher-level detail, in this case, Province – This is called Disambiguation:
When there are multiple levels of geographic details, you must separate each level into its own cell/column. For example, “Washington, United States” (State, Country) will not successfully generate a map. In this instance, the data will map successfully when placing “Washington” and “United States” into separate columns.

Data that won’t map (State and Country are combined)

Data that will create a map of Washington State
Limitations
-
Map charts can only plot high-level geographic details, so latitude/longitude, and street address mapping isn’t supported. Map charts also support one-dimensional display only, but if you need multi-dimensional detail you can use Excel’s 3D Map feature.
-
Creating new maps, or appending data to existing maps requires an online connection (to connect to the Bing Map service).
-
Existing maps can be viewed without an online connection.
-
There is a known issue where Map Charts which make use of Geography Data Types can sometimes map incorrectly. Please try to include Admin Fields, such as Province or Country when attempting to plot these until the problem is fixed.
Need more help?
You can always ask an expert in the Excel Tech Community or get support in the Answers community.
Need more help?
Содержание
- Create a Map chart in Excel
- Download our examples
- Create a Map chart with Data Types
- Formatting your Map chart
- Frequently Asked Questions
- Limitations
- Need more help?
- Mapping Excel Data
- Visualize Your Customer Base
- Create a Summary Map By Province
- Driving Directions
- Excel Data Mapping to Update Existing Documents
Create a Map chart in Excel
You can use a map chart to compare values and show categories across geographical regions. Use it when you have geographical regions in your data, like countries/regions, states, counties or postal codes.
Note: This feature is available on Windows or Mac if you have Office 2019, or if you have a Microsoft 365 subscription. If you are a Microsoft 365 subscriber, make sure you have the latest version of Office.
Download our examples
Map charts can display both values and categories, and they each have different ways of displaying color. Values are represented by slight variations of two to three colors. Categories are represented by different colors.
For example, the Countries by Tax Revenue % chart below uses values. The values represent tax revenue in each country with each portrayed using a gradient spectrum of two colors. The color for each region is dictated by where along the spectrum its value falls. By default, the higher the value is, the darker its corresponding color will be.
In the following example, Countries by Category, the categories are displayed using a standard legend to show groups or affiliations. Each country is represented by a different color.
Create a Map chart with Data Types
Map charts have gotten even easier with geography data types. Simply input a list of geographic values, such as country, state, county, city, postal code, and so on, then select your list and go to the Data tab > Data Types > Geography. Excel will automatically convert your data to a geography data type, and will include properties relevant to that data that you can display in a map chart. In the following example, we’ve converted a list of countries to geography data types, then selected the Tax revenue (%) field from the Add Column control to use in our map.
Now it’s time to create a map chart, so select any cell within the data range, then go to the Insert tab > Charts > Maps > Filled Map.
 Charts > Maps > select the Filled Map icon.» loading=»lazy»>
If the preview looks good, then press OK. Depending on your data, Excel will insert either a value or category map.
Tip: If your data is set up as an Excel table, and then you add a country to the list, Excel will automatically update it as a geography data type and update the linked map chart. Similarly, if you remove a country, then Excel will also remove it from the chart.
Formatting your Map chart
Once your map chart has been created you can easily adjust its design. Just click on the map, then choose from the Chart Design or Format tabs in the ribbon. You can also double-click the chart to launch the Format Object Task Pane, which will appear on the right-hand side of the Excel window. This will also expose the map chart specific Series options (see below).
There are several map chart specific Series options, however they are not supported in Android devices or Excel Mobile. If you need some of the map Series options, then you can build your chart in Excel for Windows or Mac and view it on an Android device or Excel Mobile.
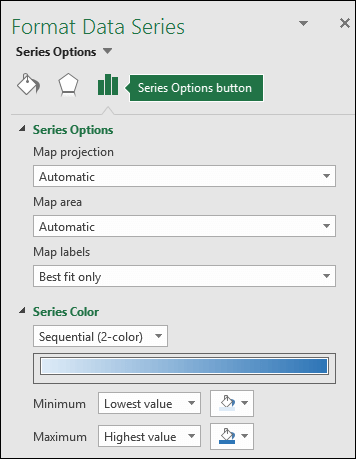
Map projections — Change the map’s projection style. By default, Excel will display the most efficient style.
Map area — Change the map’s Zoom level, ranging from a state/province view, all the way to the world view.
Map labels — Show geographic names for your countries/regions. Chose to show names based on fit, or show all labels.
Frequently Asked Questions
Question: When I use certain text-based locations, I end up with a blank map and an error, or some of my points map in other countries.
Answer: If you use data where there might be more than one similar location in the world, map charts can’t necessarily tell the difference without more guidance. If possible, add a higher-level detail column to your data. For example, the following locations won’t necessarily map the way you expect since there are many places in the world where these are valid county names:
But the data should map correctly if you add another column for higher-level detail, in this case, Province – This is called Disambiguation:
When there are multiple levels of geographic details, you must separate each level into its own cell/column. For example, “Washington, United States” (State, Country) will not successfully generate a map. In this instance, the data will map successfully when placing “Washington” and “United States” into separate columns.
Data that won’t map (State and Country are combined)
Data that will create a map of Washington State
Limitations
Map charts can only plot high-level geographic details, so latitude/longitude, and street address mapping isn’t supported. Map charts also support one-dimensional display only, but if you need multi-dimensional detail you can use Excel’s 3D Map feature.
Creating new maps, or appending data to existing maps requires an online connection (to connect to the Bing Map service).
Existing maps can be viewed without an online connection.
There is a known issue where Map Charts which make use of Geography Data Types can sometimes map incorrectly. Please try to include Admin Fields, such as Province or Country when attempting to plot these until the problem is fixed.
Need more help?
You can always ask an expert in the Excel Tech Community or get support in the Answers community.
Источник
Mapping Excel Data
To try this tip on your own computer, download and unzip CFH259.zip.
Many manager’s eyes glaze over when they are presented with a report full of numbers. If your Excel data has any geographic component, you can use Microsoft MapPoint to plot the data on a map. MapPoint is a separate program that you can buy from Microsoft. The program has a $299 list price, but Microsoft has a habit of making these available to I.T. managers for attending conferences, so you can usually find gently used versions at Amazon for significantly less.
Visualize Your Customer Base
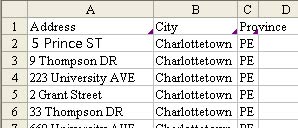
Do you have an Excel mailing list of the customers who shop in your store? Why not see where they live. Start with data in Excel. The data should have headings such as Name, Address, City, Province, Postal Code. You can get buy with a minimum of address, city, and province.
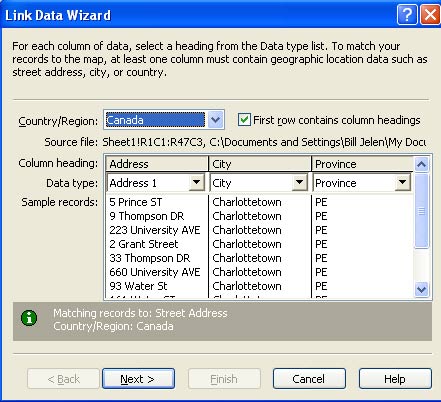
Select your data range (including the headings) and press the MapPoint button on the standard toolbar. In a few seconds, you will be presented with the Link Data Wizard dialog. If necessary, change the country from the United States to Canada.
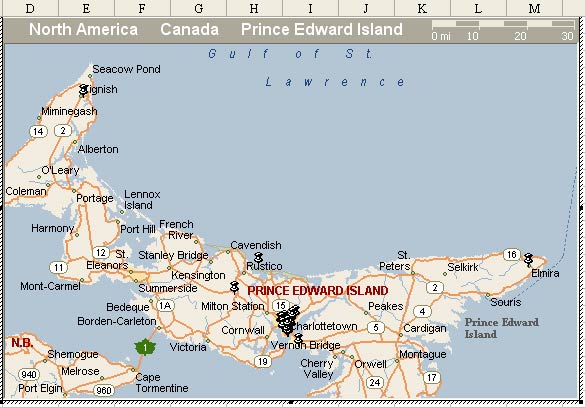
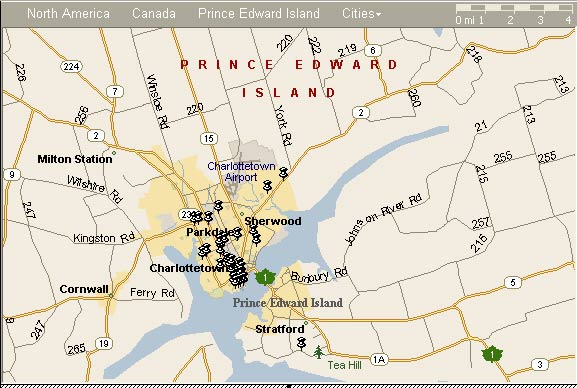
The initial map in Excel will be zoomed in to encompass your records. Initially, we have customers from Tignish to Elmira, so the map is showing all of Prince Edward Island.
While the map is active, Excel displays a MapInfo toolbar. Make sure that the Select icon (to the left of the hand) is active.
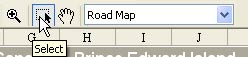
With the select icon, draw a rectangle around the core of your customers.
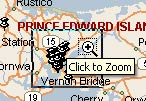
Click inside the rectangle to zoom.
You can keep on zooming for a more detailed view. Double click any pushpin to see the details for that address.
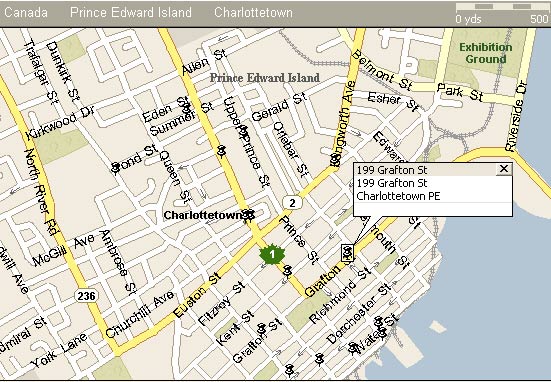
When you click outside of the map, the current zoom level is saved and your map will print with the rest of the Excel document.
Create a Summary Map By Province
In this dataset, you have 1000+ records and would like Excel to sum up a column by province.
For this example, I saved the Excel file to a workbook and opened MapPoint. From MapPoint, I chose Data — Import Data Wizard. Select the proper Excel file and choose Open. In the next screen, specify tht your data is from Canada. If you have useful headings, MapPoint will correctly map them to the right fields. Click Finish.

If there are addresses which are typed wrong, MapPoint will offer you a list of close matches.

Instead of a pushpin map, use a Shaded Area Map.
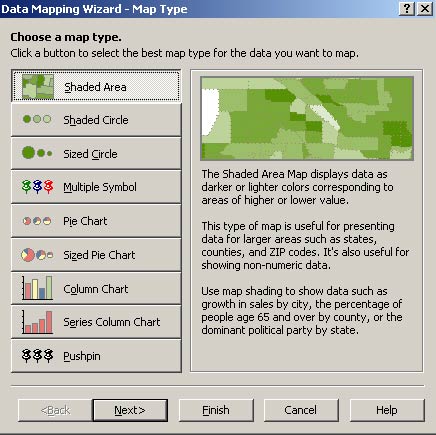
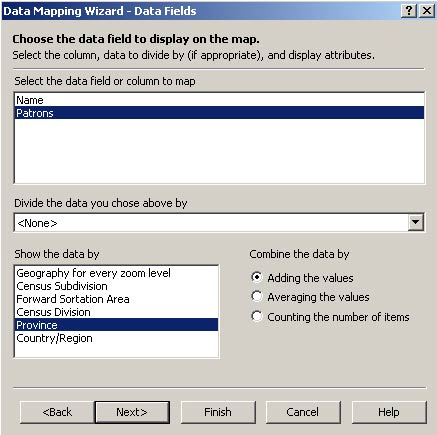
On the next screen, choose that you want to add the Patrons data and sum it by province.
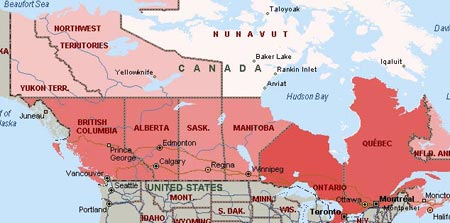
On the final screen, choose a color scheme.

MapPoint will color the provinces. Darker red indicates more patrons and white indicates few patrons.
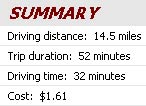
Driving Directions
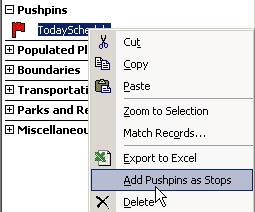
Import an Excel file with your driving itinerary for the day. Include your office as the first or last address. Import this data as pushpins using Data — Import Data Wizard. Once the items are imported, right-click on the pushpin symbol in the Legend and Overview section of the window. From the right-click menu, choose add Pushpins as Stops.
From the main menu, select Route — Route Planner. In the Route Planner pane, choose Calculate Route.
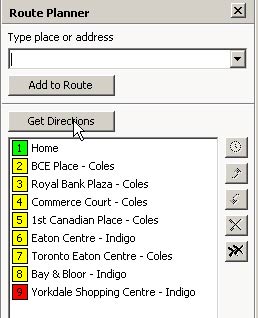
MapPoint will calculate the driving route.
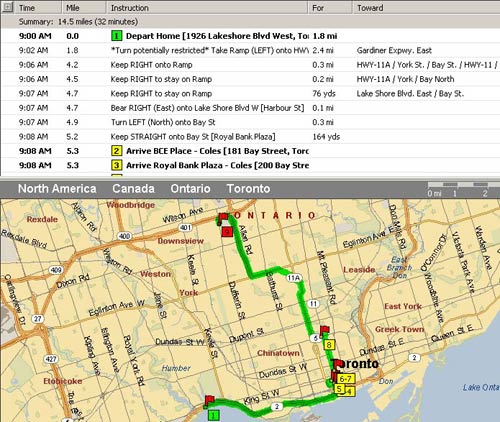
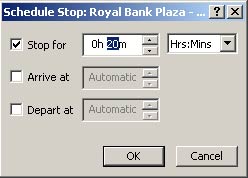
Click on any stop in the Route Planner and choose the clock icon.

You can specify how long you will stop at that customer.
At the bottom of the driving directions, you can see a summary of total driving time, estimated fuel usage, and total elapsed time.
To make the summary information more useful, change driving speeds and fuel costs in the Route — More Options dialog.
Источник
Excel Data Mapping to Update Existing Documents

Excel began life as a simple spreadsheet tool. Over time, support for rich text styling options, built-in charts, and copy and paste formatting features has led many enterprises to create reports in Excel documents. This can cause difficulty when data changes and existing documents need to be manually updated for distribution to a wide audience in the familiar report style.
Altova MapForce, the award-winning, graphical data mapping tool for any-to-any conversion and integration, supports Excel data mapping to convert data to existing Excel documents while preserving styles and formulas in the original.
This feature lets you write directly to nicely formatted Excel files to update data at runtime: any designated worksheets, rows, and cells from the specified file will be replaced with data from the mapping and all formatting in the existing file will be preserved as-is. To protect functionality in the existing spreadsheet, cells with formulas are not overwritten.
Let’s look at an example of how to map Excel data.

Of course, MapForce lets you use Excel files as the data source or target for data mapping with XML, JSON, databases, text files, EDI, XBRL and more. In this post we’ll look at mapping to an Excel target while preserving existing formatting in the spreadsheet.
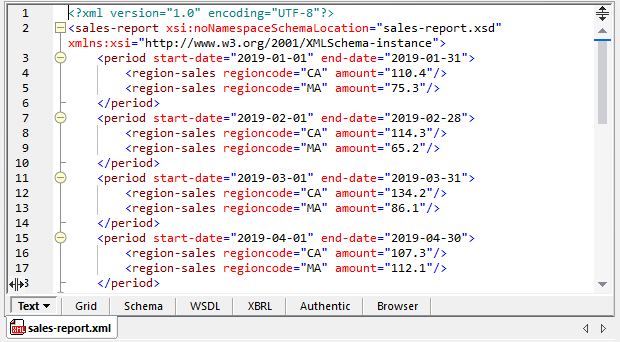
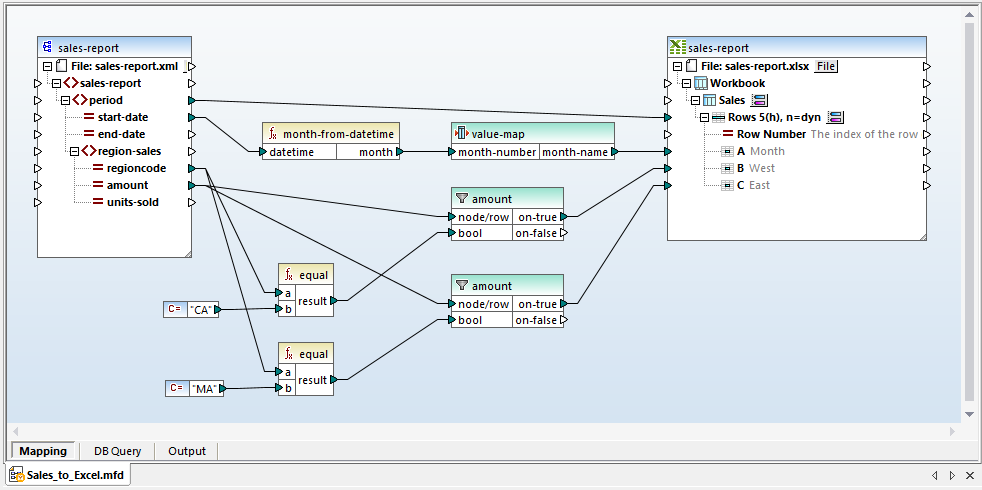
Among the samples included with MapForce is a data mapping example called Sales_to_Excel.mfd with all supporting files to map data from an XML document containing monthly sales volume into an existing Excel spreadsheet that includes rich formatting and several formulas.
The image below shows the XML source:
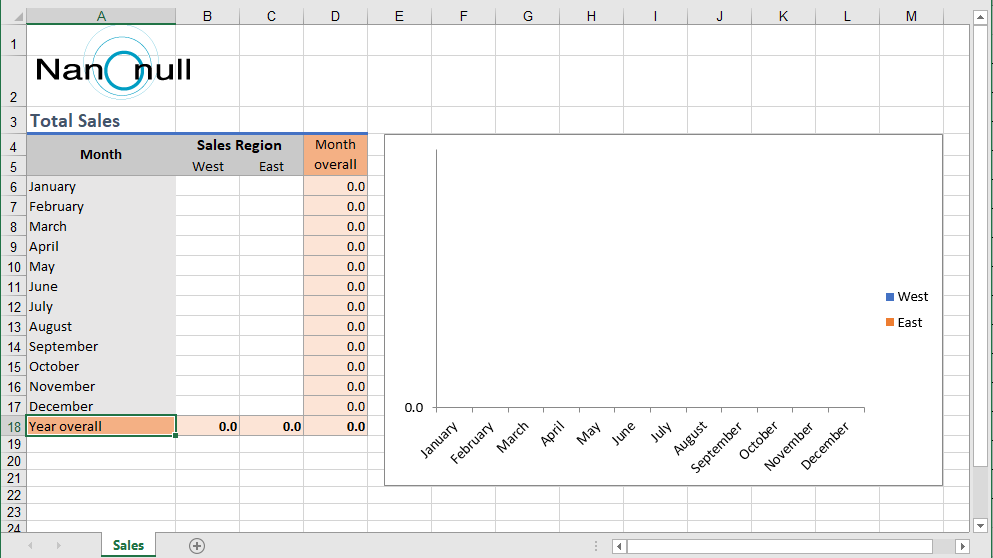
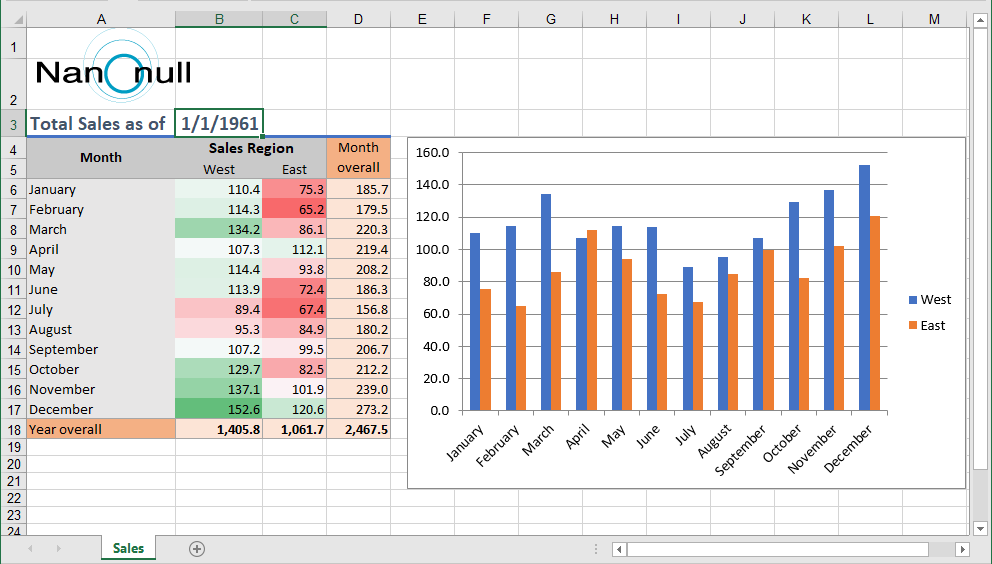
And here is the existing output target spreadsheet:
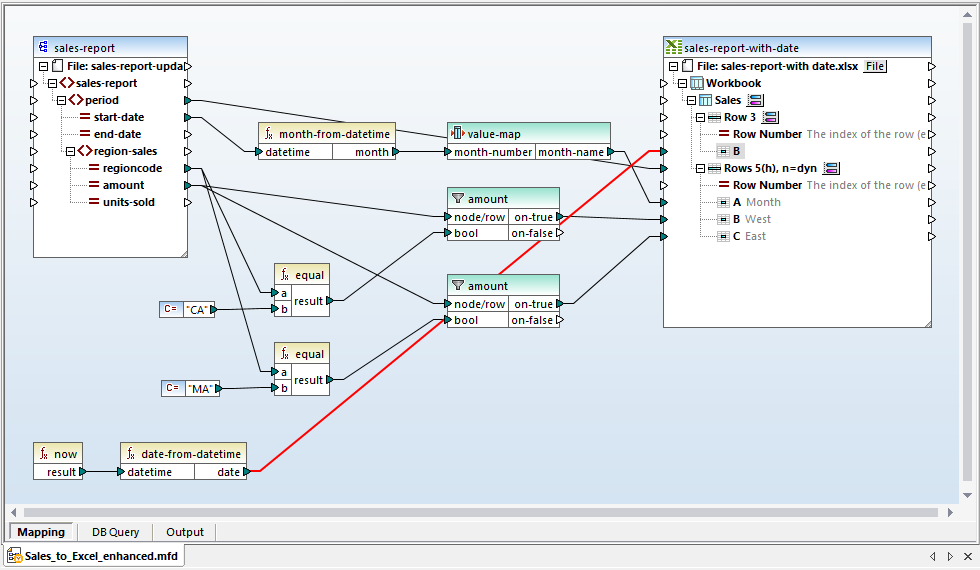
The example Excel data mapping applies functions from the MapForce function library, a value map to generate month names from numbers, and filters separate sales totals by region:
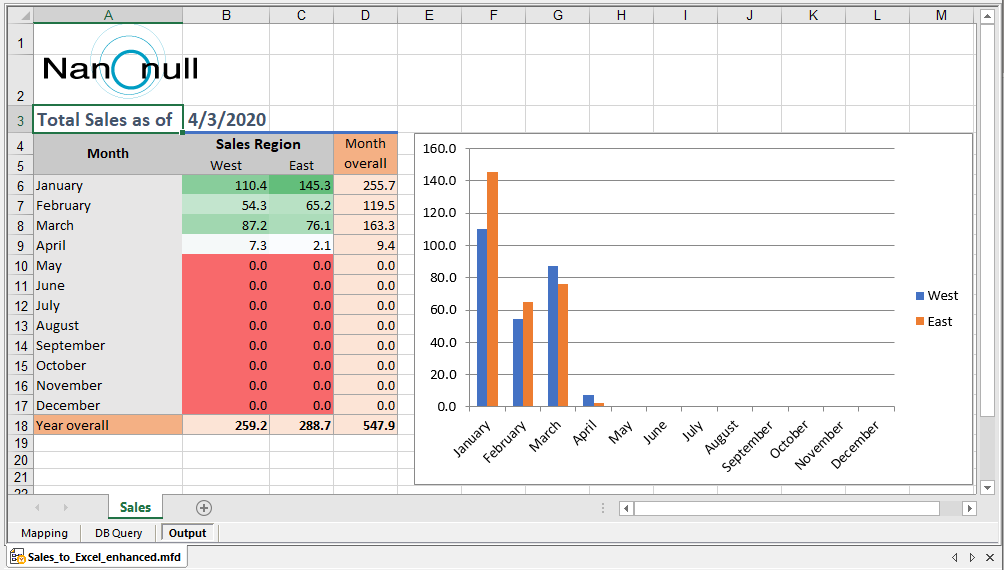
Clicking the Output button at the bottom of the mapping window executes the data mapping and the result is displayed in the MapForce output preview window:
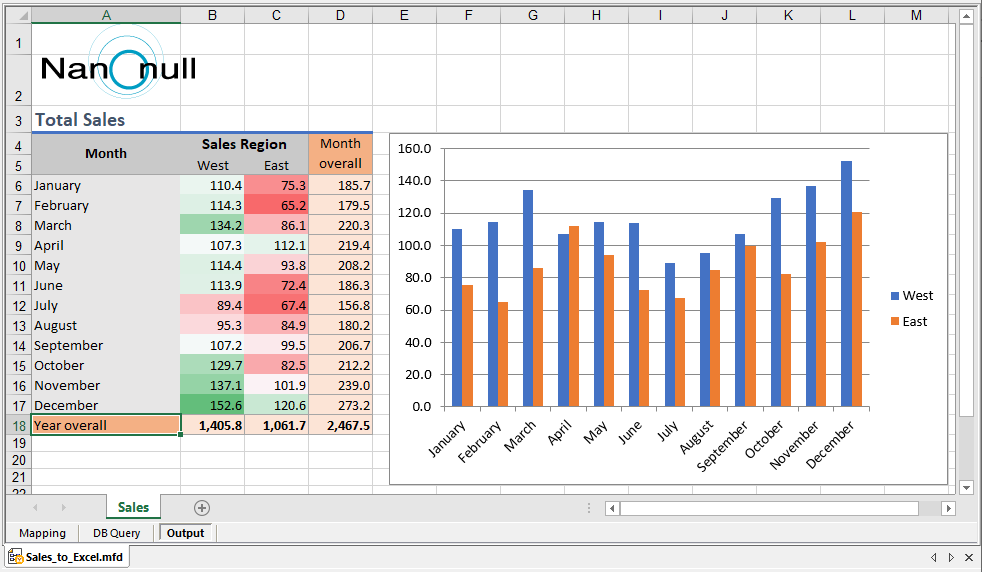
We can see in the Output preview above that only the data cells were overwritten by the mapping execution. The Year overall sums at the bottom row of the table, cell colors, and the graph were all generated based on formulas and formatting already defined in the spreadsheet.
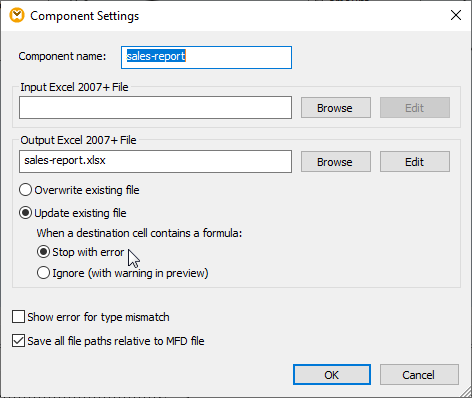
This mapping instructed MapForce to only overwrite cells containing data. You can refine mapping behavior and error handling in the Component Settings dialog:
In a real-world application, sales management and company executives might want to receive a report like this on a regular schedule, maybe even every day. We can edit the source data and re-execute the mapping to simulate an updated version of the report.
First, let’s add a date cell to the spreadsheet and generate the date in the Excel data mapping to identify the report version:
We can use the built-in MapForce now function to capture the execution date and time, and map the date into cell B3:
After editing the source data to simulate sales during a year-to-date period, we can re-execute the mapping to see the updated report:
We can save the mapping as a MapForce Server execution file for automated processing by MapForce Server or deploy it directly to FlowForce Server to generate a new sales report every day.
Download a free trial including Tutorials, Help, and many more examples to get started with your own project for Excel data mapping or other data mapping, conversion, and transformation needs!
Источник
How do I map data using Excel spreadsheets?
This video explains how to work with Excel spreadsheets in ZeeMaps:
How do I map data from other spreadsheets?
ZeeMaps provides a flexible and easy way to map data from spreadsheets. You can upload your spreadsheet onto a map, copy a table and paste it into a form in ZeeMaps, or attach a Google Drive spreadsheet to a map.
To upload a spreadsheet, select ‘Additions’ from the menu on your map, then ‘Add (Upload) Multiple Markers’. Choose the ‘Upload Spreadsheet’ option. You will get a dialog to browse and select your spreadsheet. If you want, you can also use the ‘Copy-and-Paste Table’ option, or the ‘Cloud Drive Spreadsheet’ option.

Your spreadsheet should have information on it that allows us to determine the location for each row, e.g., a post code, zip code, city, state, etc. Additionally, you can have as many columns as you need. Some columns, such as the ‘Name’ column, will be utilized as one of the “standard” columns, while others will add fields to your markers.
Spreadsheets can also contain street address, city, and state. You can provide latitude, longitude columns as well. The more information you provide, the better we’ll be able to position the pins.
When you upload your spreadsheet, ZeeMaps uses the header row to determine how to use the data in each column. The standard columns names that ZeeMaps uses are described below. As noted above, you do not need to provide all columns. Just enough information for ZeeMaps to locate your entries. For example, you can provide just Name and Postal Code columns, or Name and City columns.
What are the standard columns?
- Address Street: Street location, e.g, 1 Apple Loop. Can also be full location address.
- City: City, e.g, Cupertino
- State: State, e.g, CA or California
- Country: Country, e.g, US, UK, USA
- Post Code: Zip code or postal code, e.g., 95014 or
- Name: Title for the entry. If you do not provide a Name column, your entries will be called “Anonymous”
- Category: Grouping of your entry into different categories, e.g., Gold, Silver, Platinum. Each category will show as a different colored marker. ZeeMaps will also automatically create a legend based on the categories, in the order that they appeared in the spreadsheet. You can re-order them by selecting ‘Map’ then ‘Legend’ from the menu. We support up to 31 categories.
- Latitude: In decimals, e.g., 34.23
- Longitude: In decimals, e.g., -121.05
- Photo URL: If you want, you can specify a photo URL for each entry
- Photo width: Width of the photo element for an entry in pixels
- Photo height: Height in pixels
- YouTube: Specify a YouTube video ID for your entry. (Note that this is just the video ID and not the full URL).
- Video width: Width in pixels
- Video height: Height in pixels
When you upload your Excel spreadsheet – or another spreadsheet – ZeeMaps will ask you to make assignments for the standard columns to your spreadsheet columns. You do not need to have all the columns, just enough information that we can figure out the location for your markers. All columns from your spreadsheet that do not get mapped to a standard column will be used as custom fields of information attached to each marker. You can use these fields later to search on your map.
Can I ignore data?
Yes. If you have more columns in your spreadsheet than you’d like to upload, you can use the ‘Ignore’ tab in the spreadsheet uploader. Just select all the columns that you don’t want to see on the map.
Excel began life as a simple spreadsheet tool. Over time, support for rich text styling options, built-in charts, and copy and paste formatting features has led many enterprises to create reports in Excel documents. This can cause difficulty when data changes and existing documents need to be manually updated for distribution to a wide audience in the familiar report style.
Altova MapForce, the award-winning, graphical data mapping tool for any-to-any conversion and integration, supports Excel data mapping to convert data to existing Excel documents while preserving styles and formulas in the original.
This feature lets you write directly to nicely formatted Excel files to update data at runtime: any designated worksheets, rows, and cells from the specified file will be replaced with data from the mapping and all formatting in the existing file will be preserved as-is. To protect functionality in the existing spreadsheet, cells with formulas are not overwritten.
Let’s look at an example of how to map Excel data.
Of course, MapForce lets you use Excel files as the data source or target for data mapping with XML, JSON, databases, text files, EDI, XBRL and more. In this post we’ll look at mapping to an Excel target while preserving existing formatting in the spreadsheet.
Among the samples included with MapForce is a data mapping example called Sales_to_Excel.mfd with all supporting files to map data from an XML document containing monthly sales volume into an existing Excel spreadsheet that includes rich formatting and several formulas.
The image below shows the XML source:
And here is the existing output target spreadsheet:
The example Excel data mapping applies functions from the MapForce function library, a value map to generate month names from numbers, and filters separate sales totals by region:
Clicking the Output button at the bottom of the mapping window executes the data mapping and the result is displayed in the MapForce output preview window:
We can see in the Output preview above that only the data cells were overwritten by the mapping execution. The Year overall sums at the bottom row of the table, cell colors, and the graph were all generated based on formulas and formatting already defined in the spreadsheet.
This mapping instructed MapForce to only overwrite cells containing data. You can refine mapping behavior and error handling in the Component Settings dialog:
In a real-world application, sales management and company executives might want to receive a report like this on a regular schedule, maybe even every day. We can edit the source data and re-execute the mapping to simulate an updated version of the report.
First, let’s add a date cell to the spreadsheet and generate the date in the Excel data mapping to identify the report version:
We can use the built-in MapForce now function to capture the execution date and time, and map the date into cell B3:
After editing the source data to simulate sales during a year-to-date period, we can re-execute the mapping to see the updated report:
We can save the mapping as a MapForce Server execution file for automated processing by MapForce Server or deploy it directly to FlowForce Server to generate a new sales report every day.
Download a free trial including Tutorials, Help, and many more examples to get started with your own project for Excel data mapping or other data mapping, conversion, and transformation needs!