
При обработке данных Excel файлов используя Python, бывают ситуации, когда необходимо запустить с помощью Python макрос VBA, написанный ранее в Excel. В этой статье мы разберемся как это сделать с применением библиотеки Xlwings.
Для нашего учебного примера давайте создадим Excel файл и в нем макрос:
Sub SampleMacro()
MsgBox («VBA макрос запущен при помощи Python»)
End Sub

Сохраните Excel файл c поддержкой макросов под именем «vba_python.xlsm». Кстати, если вы позабыли, как создавать VBA макросы, то прочитайте нашу статью «
Как удалить скрытые имена в Excel
», в ней подробно мы разбирали этот вопрос.
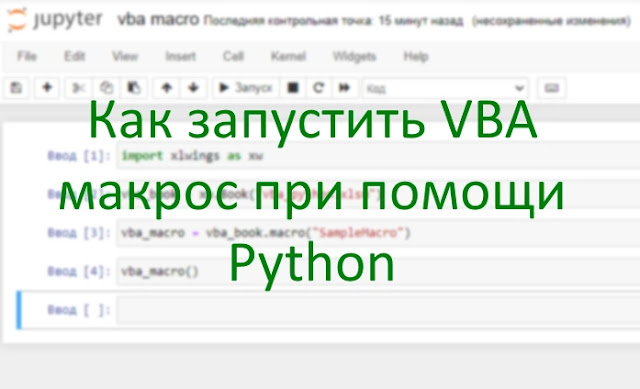
Теперь запускаем Python и импортируем библиотеку Xlwings:
import xlwings as xw
Следующим этапом открываем Excel файл, который создали ранее:
vba_book = xw.Book(«vba_python.xlsm»)
Воспользуемся встроенным в Xlwings методом macro(), который как раз и предназначен для запуска VBA макросов. В качестве параметра в метод передается названия созданного ранее VBA макроса.:
vba_macro = vba_book.macro(«SampleMacro»)
Теперь запускаем макрос:
vba_macro()
Итого общий код нашего минипроекта выглядит следующим образом:

Выполнив этот код, мы получим следующий результат в Excel файле:

Отлично, все работает!
Хотел бы обратить ваше внимание, что ваше знание Python и Excel очень поможет в освоении новой, перспективной и востребованной профессии «Data Scientist». Если хотите узнать об этом побольше, запишитесь на курс «
Data Scientist с нуля до Junior
» от Skillbox.
Спасибо за внимание, жду ваших вопросов в комментариях.
Introduction
Microsoft Excel’s ubiquity in the corporate workplace in large part derives from the ability to extend its functionality through VBA macros and user-defined functions, for automating complex procedures and for use in cell formulas. VBA however, is an old-fashioned language with a lot of subtle idiosyncracies and today is rarely used outside the restricted domain of Office automation. Python, on the other hand, is a widely used modern scripting language, whose greatest strength is the vast available range of mature, open-source libraries for performing all kinds of computing tasks.
ExcelPython is an Excel add-in which makes it incredibly easy to write user-defined functions and macros in Python, without having to touch VBA at all!
Background
A year ago, I wrote an article showing how to call Python code from Excel using an early version of ExcelPython. Since then, the library has come a long way! Back then, it was necessary to write VBA wrapper code to call Python. With the latest versions of ExcelPython, this is all done for you automatically by the add-in, making it quicker and easier than ever to write your UDFs and macros directly in Python.
In this tip, I present some of the new features of ExcelPython which make it incredibly quick and easy to write functions and macros in Python and use them from Excel.
The tip will skim over the various features quickly to show what is possible. For more details, you can follow the in-depth tutorials.
Getting Set Up
To use ExcelPython, you must have Excel and Python installed. ExcelPython is compatible with Python versions 2.6 to 3.4. Also, it is necessary to have installed the PyWin32 library for whichever version of Python you have.
To get set up, get the latest release of ExcelPython and follow these instructions on how to install it.
Writing a User-defined Function in Python
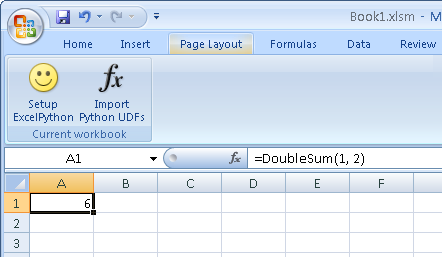
Once you have installed the ExcelPython add-in, save a blank workbook in a new folder as Book1.xlsm (i.e., as a macro-enabled workbook) and click Setup ExcelPython on the ExcelPython toolbar tab. Then open up the file Book1.py which will have been created in the same folder as the workbook and enter the following code:
from xlpython import *

@xlfunc
def DoubleSum(x, y):
    '''Returns twice the sum of the two arguments'''
    return 2 * (x + y)
Switch back to Excel and click Import Python UDFs to pick up the new code. Then in a blank cell, you can type the following formula:
=DoubleSum(1, 2)
and you should get the correct result displayed in the cell!
Other features, which you can learn more about from the tutorials, include automatic conversion to and from common Python data types such as dictionaries, NumPy arrays as well as dimensionality manipulation and automatic function and parameter documentation.
Writing a Macro in Python
In addition to writing user-defined functions for use in cell formulas, VBA is typically used for defining macros to automate Excel. ExcelPython makes it easy to code these in Python as well.
For example, the following code shows how to write a simple macro which sets the Excel status bar (at the bottom of the window) to the current date and time.
@xlsub
@xlarg("app", vba="Application")
def my_macro(app):
  from datetime import datetime
  app.StatusBar = str(datetime.now())
Once you add this code to Book1.py, all you need to do is click Import Python UDFs again and the macro will be ready to use from Excel, for example you can associate it with a button control.
)
Workbooks, sheets and ranges can also be manipulated from Python just as you can from VBA. The following sets the value of cell A1 in the active worksheet:
@xlsub
@xlarg("sheet", vba="ActiveSheet")
def my_macro_two(sheet):
    sheet.Range("A1").Value ="Hello World!"
Finally, to facilitate writing macros, ExcelPython integrates seamlessly with xlwings, an excellent Python library which wraps up the Excel object model and makes it even easier to read and write cell values by automatically converting widely-used data types like NumPy arrays and Pandas DataFrames.
from xlwings import *

@xlsub(xlwings=True):
def my_macro_three():
    Range("A1").value = [ 1, 2, 3 ]
Conclusion
In this tip, I exposed some of the main features of ExcelPython. There are however many more! For example:
- It is easy to target a specific (even portable) Python distribution.
- Distributing the worksheet and Python code is as easy as zipping up the containing folder, which contains the ExcelPython runtime itself — no typelib registration or admin rights required!
- It is possible to manipulate Python objects directly from VBA code, just like in previous versions, allowing you to use the extensive range of Python libraries directly from VBA.
If you like ExcelPython, please get in touch and let me know what you are using it for!
This member has not yet provided a Biography. Assume it’s interesting and varied, and probably something to do with programming.
Время на прочтение
6 мин
Количество просмотров 349K
Добрый день, уважаемые читатели.
В сегодняшней статье я хотел бы, как можно подробнее, рассмотреть интеграцию приложений Python и MS Excel. Данные вопрос может возникнуть, например, при создании какой-либо системы онлайн отчетности, которая должна выгружать результаты в общепринятый формат ну или какие-либо другие задачи. Также в статье я покажу и обратную интеграцию, т.е. как использовать функцию написанную на python в Excel, что также может быть полезно для автоматизации отчетов.
Работаем с файлами MS Excel на Python
Для работы с Excel файлами из Python мне известны 2 варианта:
- Использование библиотек, таких как xlrd, xlwt, xlutils или openpyxl
- Работа с com-объектом
Рассмотрим работу с этими способами подробнее. В качестве примера будем использовать готовый файл excel из которого мы сначала считаем данные из первой ячейки, а затем запишем их во вторую. Таких простых примеров будет достаточно для первого ознакомления.
Использование библиотек
Итак, первый метод довольно простой и хорошо описан. Например, есть отличная статья для описания работы c xlrd, xlwt, xlutils. Поэтому в данном материале я приведу небольшой кусок кода с их использованием.
Для начала загрузим нужные библиотеки и откроем файл xls на чтение и выберем
нужный лист с данными:
import xlrd, xlwt
#открываем файл
rb = xlrd.open_workbook('../ArticleScripts/ExcelPython/xl.xls',formatting_info=True)

#выбираем активный лист
sheet = rb.sheet_by_index(0)
Теперь давайте посмотрим, как считать значения из нужных ячеек:
#получаем значение первой ячейки A1
val = sheet.row_values(0)[0]

#получаем список значений из всех записей
vals = [sheet.row_values(rownum) for rownum in range(sheet.nrows)]
Как видно чтение данных не составляет труда. Теперь запишем их в другой файл. Для этого создам новый excel файл с новой рабочей книгой:
wb = xlwt.Workbook()
ws = wb.add_sheet('Test')
Запишем в новый файл полученные ранее данные и сохраним изменения:
#в A1 записываем значение из ячейки A1 прошлого файла
ws.write(0, 0, val[0])

#в столбец B запишем нашу последовательность из столбца A исходного файла
i = 0
for rec in vals:
    ws.write(i,1,rec[0])
    i =+ i

#сохраняем рабочую книгу
wb.save('../ArticleScripts/ExcelPython/xl_rec.xls')
Из примера выше видно, что библиотека xlrd отвечает за чтение данных, а xlwt — за запись, поэтому нет возможности внести изменения в уже созданную книгу без ее копирования в новую. Кроме этого указанные библиотеки работают только с файлами формата xls (Excel 2003) и у них нет поддержки нового формата xlsx (Excel 2007 и выше).
Чтобы успешно работать с форматом xlsx, понадобится библиотека openpyxl. Для демонстрации ее работы проделаем действия, которые были показаны для предыдущих библиотек.
Для начала загрузим библиотеку и выберем нужную книгу и рабочий лист:
import openpyxl
wb = openpyxl.load_workbook(filename = '../ArticleScripts/ExcelPython/openpyxl.xlsx')
sheet = wb['test']
Как видно из вышеприведенного листинга сделать это не сложно. Теперь посмотрим как можно считать данные:
#считываем значение определенной ячейки
val = sheet['A1'].value

#считываем заданный диапазон
vals = [v[0].value for v in sheet.range('A1:A2')]
Отличие от прошлых библиотек в том, что openpyxl дает возможность отображаться к ячейкам и последовательностям через их имена, что довольно удобно и понятно при чтении программы.
Теперь посмотрим как нам произвести запись и сохранить данные:
#записываем значение в определенную ячейку
sheet['B1'] = val

#записываем последовательность
i = 0
for rec in vals:
    sheet.cell(row=i, column=2).value = rec
    i =+ 1

# сохраняем данные
wb.save('../ArticleScripts/ExcelPython/openpyxl.xlsx')
Из примера видно, что запись, тоже производится довольно легко. Кроме того, в коде выше, можно заметить, что openpyxl кроме имен ячеек может работать и с их индексами.
К недостаткам данной библиотеки можно отнести, то что, как и в предыдущем примере, нет возможности сохранить изменения без создания новой книги.
Как было показано выше, для более менее полноценной работы с excel файлами, в данном случае, нужно 4 библиотеки, и это не всегда удобно. Кроме этого, возможно нужен будет доступ к VBA (допустим для какой-либо последующей обработки) и с помощью этих библиотек его не получить.
Однако, работа с этими библиотеками достаточно проста и удобна для быстрого создания Excel файлов их форматирования, но если Вам надо больше возможностей, то следующий подпункт для Вас.
Работа с com-объектом
В своих отчетах я предпочитаю использовать второй способ, а именно использование файла Excel через com-объект с использованием библиотеки win32com. Его преимуществом, является то, что вы можете выполнять с файлом все операции, которые позволяет делать обычный Excel с использованием VBA.
Проиллюстрируем это на той же задаче, что и предыдущие примеры.
Для начала загрузим нужную библиотеку и создадим COM объект.
import win32com.client
Excel = win32com.client.Dispatch("Excel.Application")
Теперь мы можем работать с помощью объекта Excel мы можем получить доступ ко всем возможностям VBA. Давайте, для начала, откроем любую книгу и выберем активный лист. Это можно сделать так:
wb = Excel.Workbooks.Open(u'D:\Scripts\DataScience\ArticleScripts\ExcelPython\xl.xls')
sheet = wb.ActiveSheet
Давайте получим значение первой ячейки и последовательности:
#получаем значение первой ячейки
val = sheet.Cells(1,1).value

#получаем значения цепочки A1:A2
vals = [r[0].value for r in sheet.Range("A1:A2")]
Как можно заметить, мы оперируем здесь функциями чистого VBA. Это очень удобно если у вас есть написанные макросы и вы хотите использовать их при работе с Python при минимальных затратах на переделку кода.
Посмотрим, как можно произвести запись полученных значений:
#записываем значение в определенную ячейку
sheet.Cells(1,2).value = val

#записываем последовательность
i = 1
for rec in vals:
    sheet.Cells(i,3).value = rec
    i = i + 1

#сохраняем рабочую книгу
wb.Save()

#закрываем ее
wb.Close()

#закрываем COM объект
Excel.Quit()
Из примера видно, что данные операции тоже довольно просто реализовываются. Кроме этого, можно заметить, что изменения мы сохранили в той же книге, которую открыли для чтения, что достаточно удобно.
Однако, внимательный читатель, обратит внимание на переменную i, которая инициализируется не 0, как принято python, а 1. Это связано с тем, что мы работаем с индексами ячеек как из VBA, а там нумерация начинается не с 0, а с 1.
На этом закончим разбор способов работы с excel файлами в python и перейдем к обратной задаче.
Вызываем функции Python из MS Excel
Может возникнуть такая ситуация, что у вас уже есть какой-либо функция, которая обрабатывает данные на python, и нужно перенести ее функциональность в Excel. Конечно же можно переписать ее на VBA, но зачем?
Для использования функций python в Excel есть прекрасная надстройка ExcelPython. С ее помощью вы сможете вызывать функции написанные на python прямо из Excel, правда придется еще написать небольшую обертку на VBA, и все это будет показано ниже.
Итак, предположим у нас есть функция, написанная на python, которой мы хотим воспользоваться:
def get_unique(lists):
    sm = 0
    for i in lists:
        sm = sm + int(i.pop())
    return sm
На вход ей подается список, состоящий из списков, это одно из условий, которое должно выполняться для работы данной функции в Excel.
Сохраним функцию в файле plugin.py и положим его в ту же директорию, где будет лежать наш excel файл, с которым мы будем работать.
Теперь установим ExcelPython. Установка происходит через запуск exe-файла и не вызывает затруднений.
Когда все приготовления выполнены, открываем тестовый файл excel и вызовем редактор VBA (Alt+F11). Для работы с вышеуказанной надстройкой необходимо ее подключить, через Tools->References, как показано на рисунке:

Ну что же, теперь можно приступить к написанию функции-обертки для нашего Python-модуля plugin.py. Выглядеть она будет следующим образом:
Function sr(lists As Range)
    On Error GoTo do_error
        Set plugin = PyModule("plugin", AddPath:=ThisWorkbook.Path)
        Set result = PyCall(plugin, "get_unique", PyTuple(lists.Value2))
        sr = WorksheetFunction.Transpose(PyVar(result))
        Exit Function
do_error:
        sr = Err.Description
End Function
Итак, что же происходит в данной функции?
Для начала, с помощью PyModule, мы подключаем нужный модуль. Для этого в качестве параметров ей передается имя модуля без расширения, и путь до папки в которой он находится. На выходе работы PyModule мы получаем объект для работы с модулем.
Затем, с помощью PyCall, вызываем нужную нам функцию из указанного модуля. В качестве параметров PyCall получает следующее:
- Объект модуля, полученный на предыдущем шаге
- Имя вызываемой функции
- Параметры, передаваемые функции (передаются в виде списка)
Функция PyTuple, получает на вход какие-либо значения и преобразует их в объект tuple языка Python.
Ну и, соответственно, PyVar выполняет операцию преобразования результата функции python, к типу понятному Excel.
Теперь, чтобы убедиться в работоспособности нашей связки, вызовем нашу свежеиспеченую функцию на листе в Excel:

Как видно из рисунка все отработало правильно.
Надо отметить, что в данном материале используется старая версия ExcelPython, и на GitHub’e автора доступна новая версия.
Заключение
В качестве заключения, надо отметить, примеры в данной статье самые простые и для более глубоко изучения данных методов, я рекомендую обратиться к
документации по нужным пакетам.
Также хочу заметить, что указанные пакеты не являются единственными и в статье опущено рассмотрение, таких пакетов как xlsxwriter для генерации excel файлов или xlwings, который может работать с Excel файлами «на лету», а также же PyXLL, который выполняет аналогичные функции ExcelPython.
Кроме этого в статье я попытался несколько обобщить разборасанный по сети материал, т.к. такие вопросы часто фигурируют на форумах и думаю некоторым будет полезно иметь, такую «шпаргалку» под рукой.
Before you read this article and learn automation in Python….let’s watch a video of Christian Genco (a talented programmer and an entrepreneur) explaining the importance of coding by taking the example of automation.
You might have laughed loudly after watching this video and you surely, you might have understood the importance of automation in real life as well. Let’s come to the topic now…
We all know that Python is ruling all over the world, and we also know that Python is beginner’s friendly and it’s easy to learn in comparison to other languages. One of the best things you can do with Python is Automation.
Consider a scenario that you’re asked to create an account on a website for 30,000 employees. How would you feel? Surely you will be frustrated doing this task manually and repeatedly. Also, this is going to take too much time which is not a smart decision.
Now just imagine the life of employees who are into the data entry jobs. Their job is to take the data from tables such as Excel or Google Sheet and insert it somewhere else. They browse different websites and magazine, they collect the data from there, and then they insert it into the database. They also need to do the calculations for the entries.
Generally, the income is based on the performance in this job. More entries, higher salary (of course everyone wants a higher salary in their job).
But don’t you think that it’s boring to do the same kind of stuff repeatedly?
Now the question is….“How can I do it fast?”, “How can I automate my work?”
Instead of doing these kinds of tasks manually, just spend an hour coding and automate these kinds of stuff to make your life easier. You can automate your tedious task by just writing fewer lines of code in Python.
In this blog, we will create a small project to learn automation in Python. If you’re a beginner then you may prefer to watch some videos to learn the automation in Python and reading this blog might be a boring task for you but here we will go through step by step to explain everything in detail and to make things easier for you.
It will be great if you already know the core concept of Python. We will take an example of an Excel sheet with some entries, and we will learn the automation process. We are going to write a Python program that can process thousands of spreadsheets in under a second. Excited??? Let’s get started…
Intro of The Task
Processing or updating thousands of spreadsheets manually will take too much time. It may take hours, days, or even months. We will write a Python program to automate this task. We will work on a spreadsheet given in the below picture.
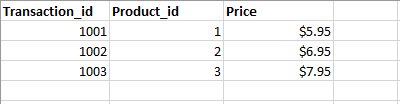
In this spreadsheet, we have the record for all kinds of transactions, but let’s say due to an error (human error or system error), the price for the product listed in the third column is wrong. Let’s say we need to decrease the price by 10% (multiply the price by 0.9 and recalculate the value). You can do this task manually by using a mathematical formula in the fourth column but it will take too much time (maybe 1 week or two weeks) if there are thousands of records.
We will write a python program to automate this process. Also, we will add a chart to it. Our python program will do this task for us in a matter of seconds.
Let’s Get Into The Coding Zone
To work on this Excel sheet we are going to use a library openpyxl. Create a folder in your directory, give it a name and install the openpyxl package by executing the following command in your terminal.
pip install openpyxl
Now we can import this package to work on our spreadsheet. Before that add the spreadsheet in your project folder. Now create a file app.py in your folder and write down the code given below.
Python
import openpyxl as xl
from openpyxl.chart import BarChart, Reference
wb = xl.load_workbook('python-spreadsheet.xlsx')
sheet = wb['Sheet1']
for row in range(2, sheet.max_row + 1):
    cell = sheet.cell(row, 3)
corrected_price = float(cell.value.replace('$','')) * 0.9
corrected_price_cell = sheet.cell(row, 4)
corrected_price_cell.value = corrected_price
values = Reference(sheet, min_row=2, max_row=sheet.max_row, min_col=4, max_col=4)
chart = BarChart()
chart.add_data(values)
sheet.add_chart(chart, 'e2')
wb.save('python-spreadsheet2.xlsx')
Let’s Understand the Above Code
We are going to explain the code step by step written above to understand the complete process.
Step 1. To work on our spreadsheet import openpyxl package (we have used xl alias to make our code cleaner and shorter). Also, to add a chart to our spreadsheet, we need to import two classes BarChart and Reference.
import openpyxl as xl from openpyxl.chart import BarChart, Reference
Step 2. Now we need to load the Excel workbook python-spreadhsheet.xlsx. Write down the code given below. wb returns the object and with this object, we are accessing Sheet1 from the workbook.
wb = xl.load_workbook('python-spreadsheet.xlsx')
sheet = wb['Sheet1']
Step 3. To access the entries from rows 2 to 4 in the third column (entry for price column) we need to add a for loop in it. We are saving this entry in a variable cell.
for row in range(2, sheet.max_row + 1):
cell = sheet.cell(row, 3)
Step 4. Now we need to calculate the corrected prices. So we are multiplying the values saved in the cell variable with 0.9. Once the calculation is done we need to add all the corrected prices in a new column (column 4). To add a new column we will get a reference to the cell in the given row but in the fourth column. Once the cell is created, we need to set the corrected price values in this cell (fourth column).
corrected_price = float(cell.value.replace('$','')) * 0.9
corrected_price_cell = sheet.cell(row, 4)
corrected_price_cell.value = corrected_price
Step 5. Half of the work is done. We have calculated the updated price, and we have added that in the fourth column. Now we need to add a chart to the current sheet. To create a chart we need to select a range of values.
In this project, we will select the values in the fourth column (updated prices) and we will use that in our chart (we just need a bunch of numbers to create a chart, so we have taken the example of the fourth column. This value can be anything as per requirement).
We need to use the reference class to select a range of values. We are going to add five arguments to this constructor. The first argument is the sheet we are working on. The next two arguments min_row = 2, and max_row= sheet.max_row will select the cells from row 2 to row 4. To select the entries from only column fourth we need to pass another two arguments min_col=4 and max_col=4. Store the result in the variable ‘values’.
values = Reference(sheet, min_row=2, max_row=sheet.max_row, min_col=4, max_col=4)
Step 6. Now we are ready to create a chart. We will create an instance ‘chart’ for the class BarChart. Once this is created add the values in this chart. After that add this chart to the sheet into row 2 and column 5 (e2).
chart = BarChart() chart.add_data(values) sheet.add_chart(chart, 'e2')
Step 7. Now we need to save all updated entries and the chart we have created in the above code. We will save this in a new file python-spreadsheet2.xlsx because we don’t’ want to accidentally overwrite the original file in case our program has a bug.
Run your program and you’re good to go. A newly updated file python-spreadhsheet2.xlsx will be created for you with updated prices and charts. Below is the screenshot for the same.

Step 8. Our program is complete but if you use the above code then it’s not going to automate the process of thousands of spreadsheets. This program is only relying on a specific file that is python-spreadsheet.xlsx.
To make it work for several spreadsheets we will reorganize this code, and we will move the code inside a function. This function will take the name of the file as an input and it will execute the process. Below is the updated code for the same.
Python
import openpyxl as xl
from openpyxl.chart import BarChart, Reference
def process_workbook(filename):
wb = xl.load_workbook(filename)
sheet = wb['Sheet1']
for row in range(2, sheet.max_row + 1):
cell = sheet.cell(row, 3)
corrected_price = float(cell.value.replace('$', '')) * 0.9
corrected_price_cell = sheet.cell(row, 4)
corrected_price_cell.value = corrected_price
values = Reference(sheet, min_row=2, max_row=sheet.max_row, min_col=4, max_col=4)
chart = BarChart()
chart.add_data(values)
sheet.add_chart(chart, 'e2')
wb.save(filename)
Github Link for the Code with Spreadsheet Attached: Python Automation
Final Thought
That was just one example of using Python to automate repetitive boring tasks. But remember that automation is not just about Excel spreadsheets. There are so many things we can automate. You can search on various sites such as Github and you can automate a lot of things with Python.
I’ve recently taken it as a project to teach myself how to program in Python. Overall, I must say that I’m impressed with it.
In the past I’ve typically stuck to programming in VBA mostly for MS Excel (but also a bit in MS Access and Word) and have struggled to find ways to make it do things that Python can easily do with a single command.
I was wondering if there were a reasonable way to harness the programming power and ease of Python while at the same time make use of the various tools in Office (mostly Excel)?
![]()
ZygD
21k39 gold badges77 silver badges98 bronze badges
asked Jan 26, 2010 at 19:23
![]()
7
Yes, absolutely. You want to use win32com module, which is part of pywin32 (get it here).
I’ve found you can really simplify Python integration by writing a macro in VBA for Python to use, and then just have Python call the macro. It will look something like this:
from win32com.client import Dispatch as comDispatch

xl = comDispatch('Excel.Application')
xl.Workbooks.Open("Macros.xls", False, True)
xl.Run("Macros.xls!Macro_1")
I’m sure there are plently of examples on SO… Like this one.
![]()
answered Jan 26, 2010 at 19:26
![]()
Jason CoonJason Coon
17.5k10 gold badges41 silver badges50 bronze badges
There is a set of cross platform Python utilities — called xlrd, xlwt, and xlutils — for reading & writing Excel files. There are some limitations (e.g. I don’t think they can process macros), but they do allow you to work with Excel files on non-Windows platforms, if that’s of use to you. See: http://www.python-excel.org/
Also, there are SO questions already dealing with this sort of topic, including this:
Is there a better way (besides COM) to remote-control Excel?
![]()
answered Jan 26, 2010 at 21:23
![]()
GreenMattGreenMatt
18.1k7 gold badges53 silver badges79 bronze badges
Or have a look at IronPython. IPy is a native .NET implementation of Python 2.6, you can find it at http://www.codeplex.com/ironpython.
We have used it for several projects. You can use it «from the outside» using COM or — as we do — write a Excel AddIn with a ScriptHost, which calls out to IronPython code giving you an environment similar to VBA.
Being a .NET dll, IPy integrates extremely well into the modern Windows .NET stack.
answered Jan 26, 2010 at 21:14
![]()
2
The xlrd, xlwt, and xlutils packages mentioned above can only read and write .xls files which have size limitations of 65,000 rows and 256 columns. Aside from that it is a good tool.
But I have moved on to another python-excel package, OpenPyXL, which can read and write .xlsx files. Also I find it easy to use and the documentation is good.
OpenPyXL: http://packages.python.org/openpyxl/index.html
answered Sep 26, 2011 at 17:10
![]()
sequoiasequoia
2,9858 gold badges32 silver badges41 bronze badges
here is a useful link:
http://continuum.io/using-excel
-
Try Pyvot – A Python to/from Excel Connector from Microsoft:
http://pytools.codeplex.com/wikipage?title=Pyvot
I also really like PTVS from the same dev. team, which provides best debugging in Python that I experienced so far.
2.
What you can do with VBA + Python is following:
Compile your py scripts that take inputs and generate outputs as text files or from console. Then VBA will prepare input for py, call the pre-compiled py script and read back its output.
3.
Consider OpenOffice or LibreOffice which support Python scripts.
This is assuming that available options with COM or MS script interfaces do not satisfy your needs.
4.
This is not free approach, but worth mentioning (featured in Forbes and New York Times):
https://datanitro.com
5.
This is not free for commercial use:
PyXLL — Excel addin that enables functions written in Python to be called in Excel.
answered Oct 13, 2013 at 14:43
![]()
denfromufadenfromufa
5,97612 gold badges77 silver badges138 bronze badges
This is a question from a long time ago, but I’m putting it here so others can point to it in their search.
One option not discussed here, which I use all the time, is to create a COM server from Python and call it from VBA in any Office application. There is a good tutorial of doing COM server with Python at: http://timgolden.me.uk/pywin32-docs/html/com/win32com/HTML/QuickStartServerCom.html
What you end up with is a COM server (don’t forget to make it In Process) that can be created by a call to CreateObject() in VBA. You then call the methods on it as you do with an COM object created with CreateObject(). You can’t single step in your Python script, but you can intercept logging with win32traceutil from Pywin32 distribution. Works flawlessly.
![]()
ZygD
21k39 gold badges77 silver badges98 bronze badges
answered Apr 7, 2015 at 20:11
![]()