
Сортировка данных в таблице на рабочем листе Excel средствами VBA. Sort и SortField, объекты и методы. Примеры сортировки данных в диапазоне.
Синтаксис сортировки
Синтаксис полного кода VBA Excel, применяемого для сортировки данных в таблицах и диапазонах:
|
With Expression.Sort .SortFields.Clear .SortFields.Add Key, SortOn, Order, DataOption .SetRange [Range] .Header = [xlGuess, xlYes, xlNo] .MatchCase = [True, False] .Orientation = [xlTopToBottom, xlLeftToRight] .Apply End With |
Синтаксис сокращенного кода VBA Excel, применяемого для сортировки данных с параметрами по умолчанию:
|
With Expression.Sort .SortFields.Clear .SortFields.Add Key .SetRange [Range] .Apply End With |
Expression – выражение, возвращающее объект Worksheet, например:
|
ActiveSheet Worksheets («Лист1») ActiveWorkbook.Worksheets («Лист1») Workbooks(«Книга1.xlsm»).Worksheets («Лист1») |
Расшифровка кода
1. Expression.Sort – метод Sort объекта Worksheet возвращает объект Sort.
Объект Sort – это объект, представляющий сортировку диапазона данных.
2. .SortFields.Clear – метод SortFields объекта Sort возвращает коллекцию объектов SortFields. Метод Clear объекта SortFields удаляет все существующие объекты SortField.
Объект SortField содержит все сведения о параметрах сортировки для заданного рабочего листа.
3. .SortFields.Add Key, SortOn, Order, DataOption – метод Add объекта SortFields создает и возвращает новый экземпляр объекта SortField с заданными параметрами.
Параметры метода Add объекта SortFields:
Key – обязательный параметр, который задает значение ключа для сортировки. Тип данных – Range. Обычно указывается первая ячейка столбца при сортировке по строкам или первая ячейка строки при сортировке по столбцам. Сортировка диапазона будет осуществлена по данным столбца (строки), первая ячейка которого указана в качестве ключа.
SortOn – необязательный параметр, который задает критерий сортировки (по какому свойству ячеек производится сортировка).
Значения, которые может принимать SortOn:
| Константа | Значение | Описание |
|---|---|---|
| SortOnValues | 0 | сортировка по значению (значение по умолчанию) |
| SortOnCellColor | 1 | сортировка по цвету ячейки |
| SortOnFontColor | 2 | сортировка по цвету шрифта |
| SortOnIcon | 3 | сортировка по иконке* |
* Иконки (значки) могут быть заданы ячейкам при условном форматировании диапазона.
Order – необязательный параметр, задающий порядок сортировки (по возрастанию или по убыванию).
Значения, которые может принимать Order:
| Константа | Значение | Описание |
|---|---|---|
| xlAscending | 1 | сортировка по возрастанию (значение по умолчанию) |
| xlDescending | 2 | сортировка по убыванию |
DataOption – необязательный параметр, который задает способ сортировки текста.
Значения, которые может принимать DataOption:
| Константа | Значение | Описание |
|---|---|---|
| xlSortNormal | 0 | числовые и текстовые данные сортируются отдельно (значение по умолчанию) |
| xlSortTextAsNumbers | 1 | текстовые данные рассматриваются для сортировки как числовые |
4. .SetRange [Range] – метод SetRange объекта Sort задает диапазон (таблицу), в котором выполняется сортировка.
5. .Header = [xlGuess, xlYes, xlNo] – свойство Header объекта Sort указывает, является ли первая строка таблицы строкой заголовков (шапкой).
Значения, которые может принимать свойство Header:
| Константа | Значение | Описание |
|---|---|---|
| xlGuess | 0 | Excel сам определяет, есть ли строка заголовков |
| xlYes | 1 | строка заголовков есть, сортировка ее не затрагивает |
| xlNo | 2 | строки заголовков нет (значение по умолчанию) |
6. .MatchCase = [True, False] – свойство MatchCase объекта Sort указывает, как учитывать регистр при сортировке.
Значения, которые может принимать свойство MatchCase:
| Константа | Значение | Описание |
|---|---|---|
| False | 0 | регистр не учитывается (значение по умолчанию) |
| True | 1 | сортировка с учетом регистра |
7. .Orientation = [xlTopToBottom, xlLeftToRight] – свойство Orientation объекта Sort задает ориентацию для сортировки.
Значения, которые может принимать свойство Orientation:
| Константа | Значение | Описание |
|---|---|---|
| xlTopToBottom | 1 | сортировка по стокам (значение по умолчанию) |
| xlLeftToRight | 2 | сортировка по столбцам |
8. .Apply – метод Apply объекта Sort выполняет сортировку диапазона в соответствии с примененными параметрами.
Примеры сортировки
Таблица для примеров

Сортировка по одному столбцу
Краткая запись кода VBA Excel для сортировки диапазона по первому столбцу с параметрами по умолчанию:
|
Sub Primer1() With ActiveSheet.Sort .SortFields.Clear .SortFields.Add Key:=Range(«A2») .SetRange Range(«A2:C7») .Apply End With End Sub |
Полная запись, но тоже с параметрами по умолчанию:
|
Sub Primer2() With ActiveSheet.Sort .SortFields.Clear .SortFields.Add Key:=Range(«A2»), SortOn:=xlSortOnValues, Order:=xlAscending, DataOption:=xlSortNormal .SetRange Range(«A2:C7») .Header = xlNo .MatchCase = False .Orientation = xlTopToBottom .Apply End With End Sub |
Результат сортировки:

Сортировка по двум столбцам
Код VBA Excel для сортировки исходной таблицы по первому и второму столбцам с параметрами по умолчанию:
|
Sub Primer3() With ActiveSheet.Sort .SortFields.Clear .SortFields.Add Key:=Range(«A2») .SortFields.Add Key:=Range(«B2») .SetRange Range(«A2:C7») .Apply End With End Sub |
Результат сортировки:

Применение сортировки ко второму столбцу (добавление еще одного объекта SortField) не нарушает сортировку первого – в первом столбце меняются местами только ячейки с одинаковыми значениями.
Excel macros might not be as comprehensive as other automation tools, but the validity and efficiency of Excel VBA can’t be undermined. If you work in Excel and other Microsoft Office tools like Word and Access, you can’t go wrong with VBA and its capabilities.
MS Excel is a powerful tool that offers a ton of options to its users. From storing data to creating automated dashboards, you can do it all in Excel and its spreadsheets.
If you want to use VBA to automate your sorting responsibilities in Excel, give these efficient easy-to-apply macros a try.
Download a Dummy Dataset
For starters, you can download a dummy dataset to work on your Excel macro skills.
Rest assured, once you get the hang of these macros and better understand how things work, you can shift the code to fit your own spreadsheets for work or school.
You can download the dataset used in this article if you’d like to follow along.
Download: Excel Dataset
1. Sorting One Column Using Excel Macros
Use this simple code to sort a data column within an Excel spreadsheet. If you downloaded the dummy dataset, you can try sorting column E (Units Sold).
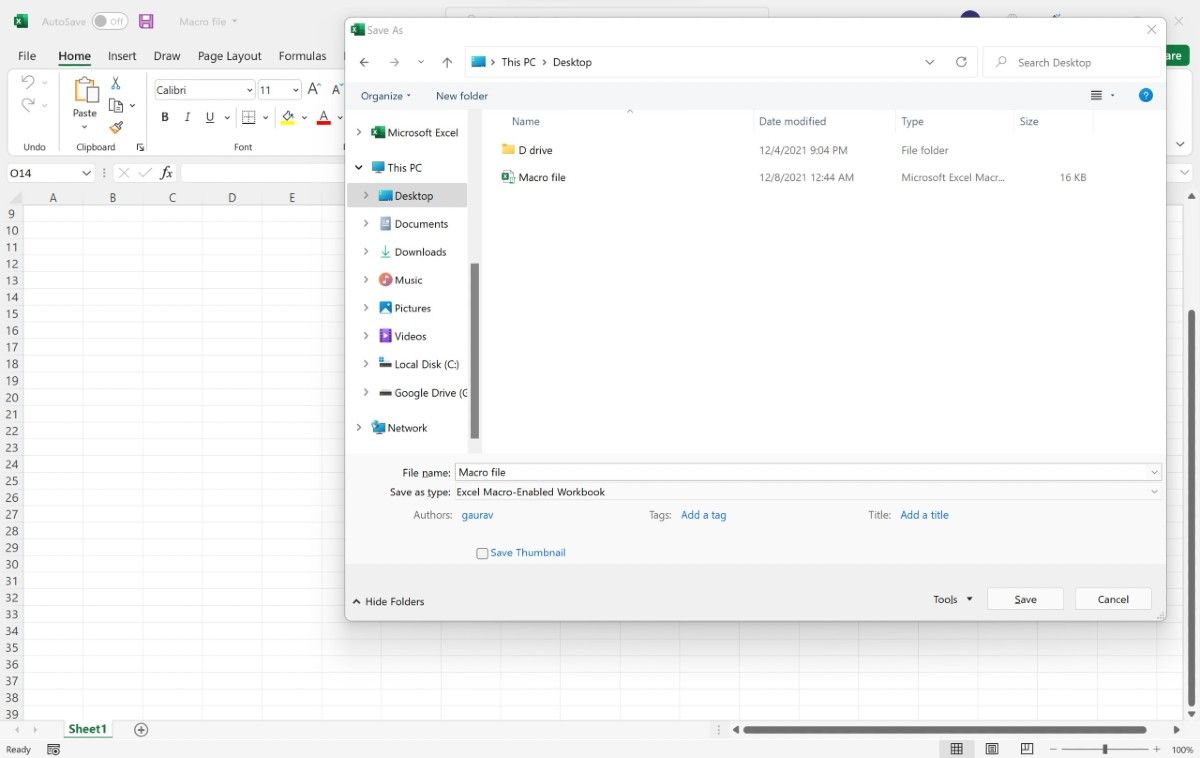
Open a new Excel file and save it with an Excel Macro-Enabled Workbook (.xlsm) workbook type. This file will store the macro to sort your data from another file.
You will be controlling your file(s) from the macro file, which will interact with your workbooks separately.
Enter the following code:
Sub sortwithheaders()Workbooks("Financial Sample.xlsx").Sheets(1).Activate
Range("A1:P701").sort Key1:=Range("e1"), Order1:=xlAscending, Header:=xlYes
End Sub
Where:
- Key1: Define the column(s) that you want to sort
- Order1: Ordering method (ascending/descending)
- Header: If your content has headers, this option will remain as xlYes. Alternatively, select xlNo.
The range will consist of the starting cell and ending cell address so that everything is captured for sorting purposes. The result is that your entire data set will be sorted based on the data in column E.
2. Sorting Dynamic Data in a Single Column
There may be instances wherein your starting point is defined, but your endpoint is dynamic. In such a case, you can make your code dynamic so that it picks up the end of the range automatically.
To accommodate the change in data, use the code below:
Sub sortwithheaders()Workbooks("Financial Sample.xlsx").Sheets(1).Activate
Range("A1", Range("A1").End(xlDown)).sort Key1:=Range("e2"), Order1:=xlAscending, Header:=xlYes
End Sub
Where:
- End(xlDown): This function will auto-pick the last populated cell automatically
Note: If the formula encounters a blank cell within a column, it will consider the preceding cell as the end of the range.
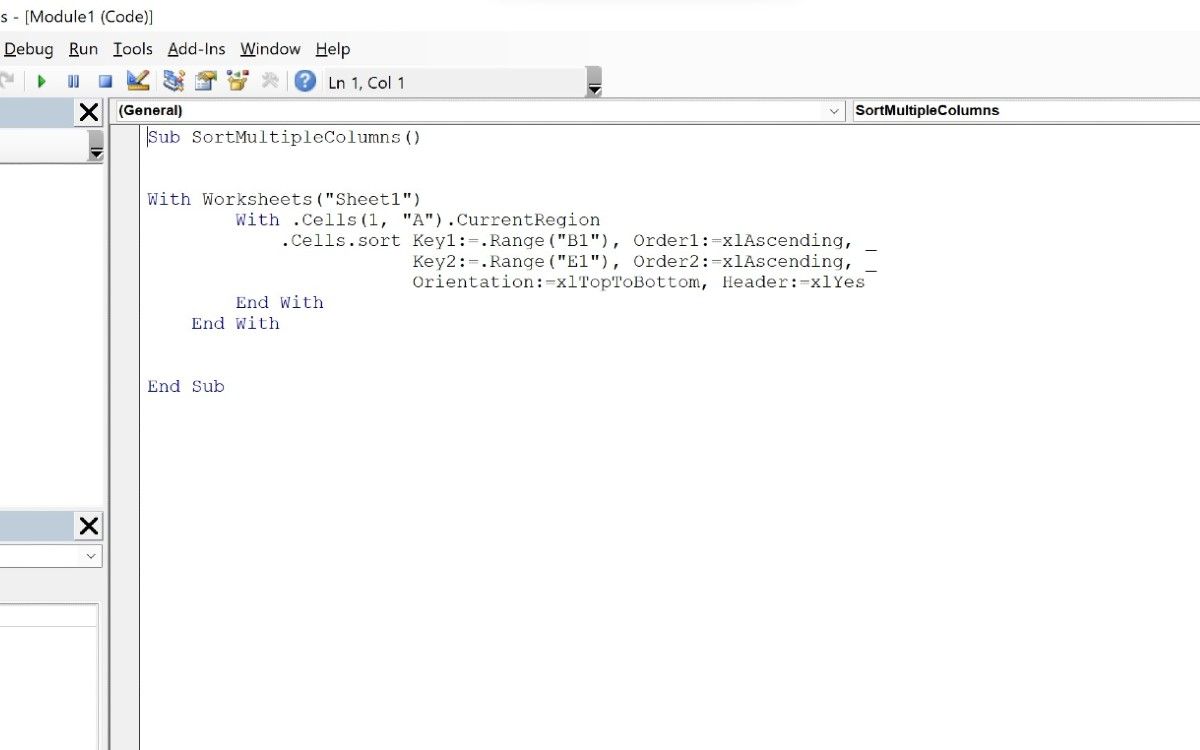
3. Sorting Multiple Columns Together
There might be situations when you want to sort data in multiple columns in one go. To do so, you can use the following code to achieve your purpose:
Sub SortMultipleColumns()With Worksheets("Sheet1")
With .Cells(1, "A").CurrentRegion
.Cells.sort Key1:=.Range("B1"), Order1:=xlAscending, _
Key2:=.Range("E1"), Order2:=xlAscending, _
Orientation:=xlTopToBottom, Header:=xlYes
End With
End With
End Sub
4. Sorting Columns Across Multiple Sheets
When you’re dealing with multiple sheets, you might want to get your data ready to be put into a dashboard. One of the most important aspects of data preparation is sorting it, and getting the data arranged in a certain format to present to your stakeholders or clients.
One option is to cycle through each sheet manually, sort the required columns, and then proceed to the next step. Alternatively, why not let VBA do it for you?
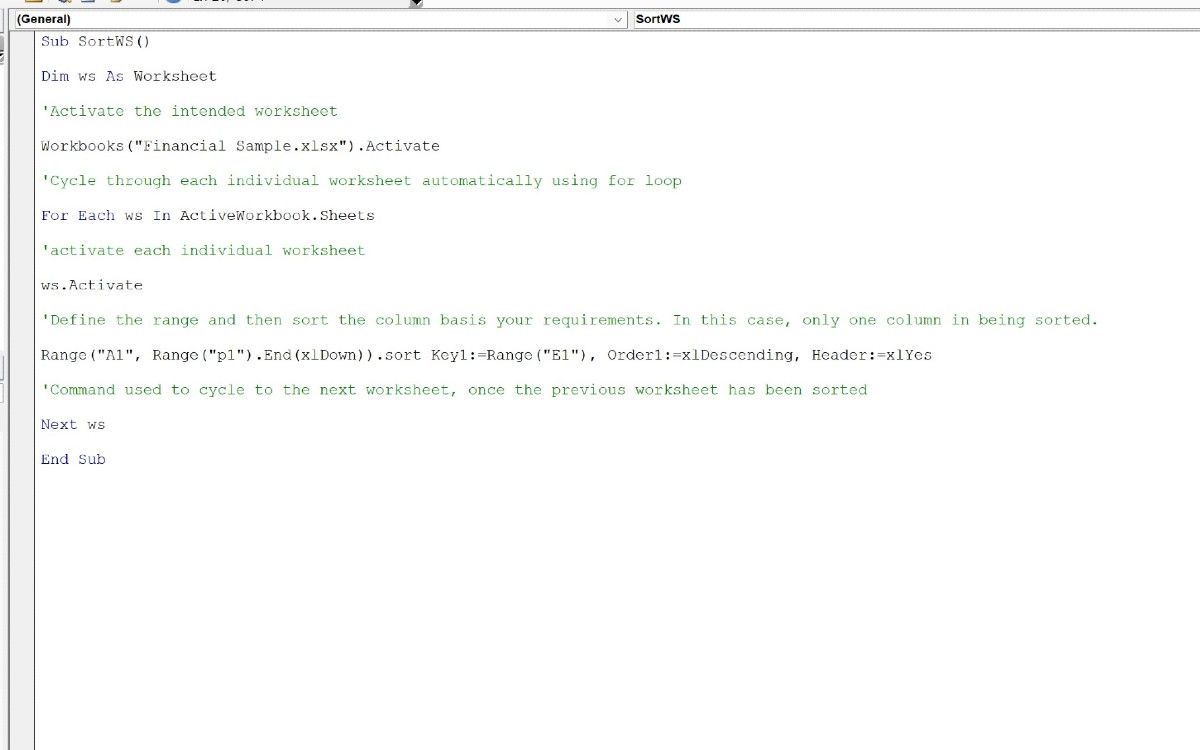
The intent of the code below is to cycle through each available sheet in the workbook, and based on the columns specified, sort the available data.
Here’s how you can sort columns across multiple sheets:
 Sub SortWS()
Dim ws As Worksheet
'Activate the intended worksheet
Workbooks("Financial Sample.xlsx").Activate
'Cycle through each individual worksheet automatically using for loop
For Each ws In ActiveWorkbook.Sheets
'activate each individual worksheet
ws.Activate
'Define the range and then sort the column basis your requirements. In this case, only one column in being sorted.
Range("A1", Range("p1").End(xlDown)).sort Key1:=Range("E1"), Order1:=xlDescending, Header:=xlYes
'Command used to cycle to the next worksheet, once the previous worksheet has been sorted
Next ws
End Sub
All the information starting with single quotes are VBA comments. These are not executed during the execution stage. However, every VBA comment you add is a meaningful addition to the code, as you can define the essence, functionality, and other relevant portions within the code sections.
5. Copying Sorted Data From One Sheet to Another
Imagine a situation where you want to sort the data and copy the whole dataset (or parts thereof) into a newly added sheet. In such cases, you can use the below code to perform the task at hand:
Sub SortWS()Dim ws As Worksheet
'Activate the intended worksheet
Workbooks("Financial Sample.xlsx").Activate
'Cycle through each individual worksheet automatically using for loop
For Each ws In ActiveWorkbook.Sheets
'activate each individual worksheet
ws.Activate
'Define the range and then sort the column basis your requirements.
'In this case, only one column in being sorted.
Range("A1", Range("p1").End(xlDown)).sort Key1:=Range("E1"), Order1:=xlDescending, Header:=xlYes
'Command used to cycle to the next worksheet, once the previous worksheet has been sorted
Next ws
'Create a new worksheet within the workbook to store the new data
ActiveWorkbook.Sheets.Add.Name = "Results"
'Copy paste the sorted data into the newly added sheet
Sheets("Sheet1").Range("A1:p701").Copy Destination:=Sheets("Results").Range("a1")
End Sub
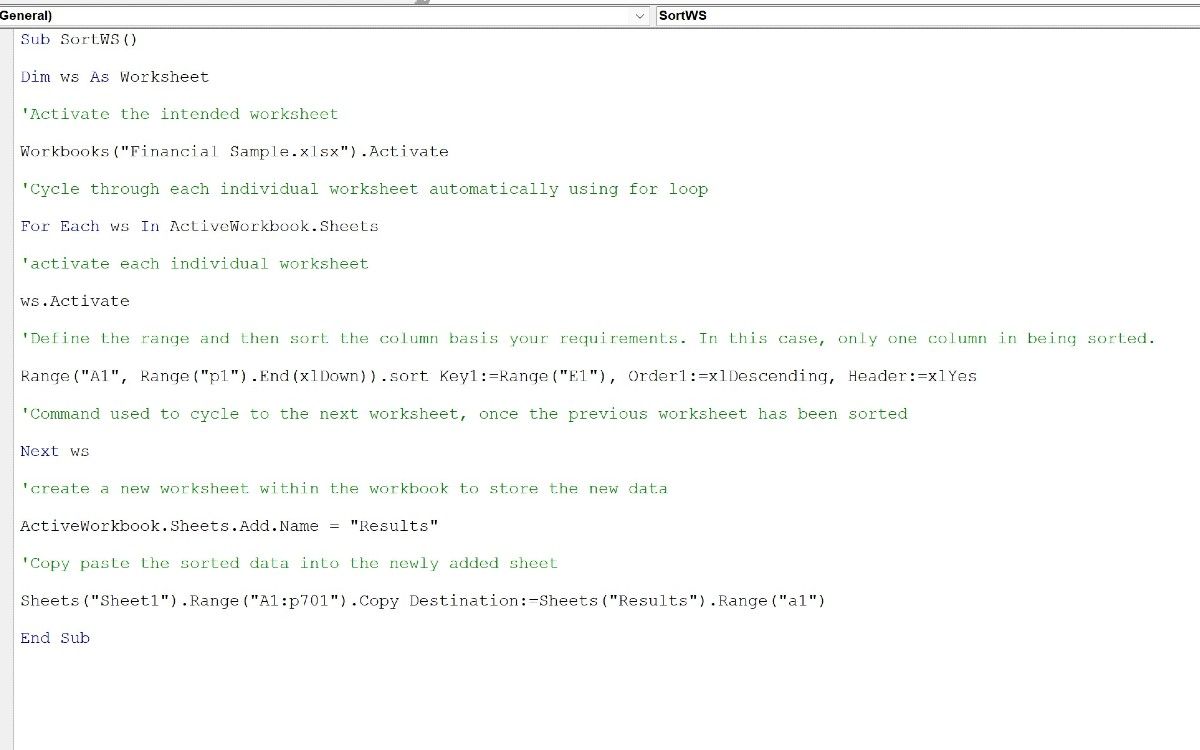
The above code will sort the values in column E, add a new sheet Results into the existing workbook, and paste the sorted results in cell A1.
Creating Sorting Macros in Excel
Excel VBA is a nifty language that can save you a lot of time and effort. By using VBA macros, you can create extensive dashboards, easily sort data with a few clicks, and perform different functions with ease.
Luckily, Excel’s functionality doesn’t end with macros. Check out some tips and tricks to become a more efficient Excel user.
Sort data that doesn’t have headers in ascending order in Excel with this macro. This is a simple sort macro that assumes that your data does not have headers. This means that the top row of the selected range will also be sorted. Sorting in ascending order means that the macro will sort the data in alphabetical order or numerically ascending order depending on the type of data being sorted. This is a great macro to use to quickly sort a set of data in Excel.
This macro is set to sort by only one field or column in your data. In previous versions of Excel you can sort by up to three columns and in Excel 2007 you can sort by up to 64 columns.
To use this macro, just replace A1:C56 with the range of the entire database or data set that you want to be sorted. Then replace A1 with the column of data that you want to sort by. All other data will be arranged based on the ascending order of this last range reference in the macro.
Where to install the macro: Module
Excel Macro to Sort Data that Doesn’t Have Headers in Ascending Order in Excel
Sub Sort_Ascending_Basic()
'Sorts a worksheet in ascending order and assumes there are no headers on the data

Range("A1:C56").Sort Key1:=Range("A1"), Header:=xlNo

End Sub
![]()
Excel VBA Course — From Beginner to Expert
200+ Video Lessons
50+ Hours of Instruction
200+ Excel Guides
Become a master of VBA and Macros in Excel and learn how to automate all of your tasks in Excel with this online course. (No VBA experience required.)
View Course
Similar Content on TeachExcel
Sort Data that Doesn’t Have Headers in Descending Order in Excel
Macro: Sort data in Excel that doesn’t have headers using a macro. This Excel macro assumes that …
Sort Data Alphabetically or Numerically in Excel 2007 and Later
Tutorial: This Excel tip shows you how to Sort Data Alphabetically and Numerically in Excel 2007. T…
Sort Data With Headers in Ascending Order in Excel
Macro: Macro that sorts data that has headers in ascending order in Excel. This macro assumes tha…
Highlight, Sort, and Group the Top and Bottom Performers in a List in Excel
Tutorial:
How to highlight the rows of the top and bottom performers in a list of data.
This allows…
Loop through a Range of Cells in a UDF in Excel
Tutorial:
How to loop through a range of cells in a UDF, User Defined Function, in Excel. This is …
Get the Name of a Worksheet in Macros VBA in Excel
Tutorial: How to get the name of a worksheet in Excel using VBA and Macros and also how to store tha…
How to Install the Macro
- Select and copy the text from within the grey box above.
- Open the Microsoft Excel file in which you would like the Macro to function.
- Press «Alt + F11» — This will open the Visual Basic Editor — Works for all Excel Versions.
Or For other ways to get there, Click Here. - On the new window that opens up, go to the left side where the vertical pane is located. Locate your Excel file; it will be called VBAProject (YOUR FILE’S NAME HERE) and click this.
- If the Macro goes in a Module, Click Here, otherwise continue to Step 8.
- If the Macro goes in the Workbook or ThisWorkbook, Click Here, otherwise continue to Step 8.
- If the Macro goes in the Worksheet Code, Click Here, otherwise continue to Step 8.
- Close the Microsoft Visual Basic Editor window and save the Excel file. When you close the Visual Basic Editor window, the regular Excel window will not close.
- You are now ready to run the macro.
Содержание
- Excel макрос сортировка макросом
- Как отсортировать ячейки Excel из макроса VBA?
- Vba excel сортировка диапазона
- VBA сортировка диапазона
- VBA сортировка выделенного диапазона
- Сортировка диапазона данных
- Сортировка в плавающем диапазоне в VBA (Формулы/Formulas)
- сортировка выделенного диапазона макросом (Макросы/Sub)
- Сортировка в VBA. Вопрос
Excel макрос сортировка макросом
БлогNot. Как отсортировать ячейки Excel из макроса VBA?
Как отсортировать ячейки Excel из макроса VBA?
Просто понадобился пример программной сортировки чисел из кода на VBA.
Отметим, что решать многие счётные задачи в Excel можно как «вручную», программируя типовые алгоритмы, так и вызывая стандартные функции VBA или Excel, если таковые имеются.
Поэтому в примере можно сортировать и «пузырьком», и готовым методом Range.Sort .
В большинстве случаев штудирование MSDN позволяет легко найти ответы, как правильно вызывать тот или иной встроенный метод 🙂
Служебная функция getArrayFromCells , почти такая же, как здесь, считывает глобальный вещественный массив A из подряд заполненных ячеек столбца «A» и определяет его размерность N .
Функция ClearMe очищает рабочие ячейки листа, а остальные 3 подпрограммы обрабатывают нажатия кнопок «Заполнить», «СОРТИРОВКА» и «СОРТИРОВКА VBA», подробности видны из листинга.
Ниже показан этот листинг и прикреплён файл в архиве .zip с книгой .xlsm (документ Excel с макросами). Если при открытии книги Excel предупреждает о наличии макросов, их выполнение нужно разрешить:
 Скачать этот пример в архиве .zip с книгой Excel .xlsm (15 Кб)
Кстати:
Если при вставке кода в редактор Visual Basic for Applications (или вставке куда-либо кода, скопированного из VBA) символы кириллицы превращаются в «кракозябры» или вопросительные знаки, установите русскую раскладку клавиатуры перед копированием в Буфер Обмена.
Источник
Vba excel сортировка диапазона
VBA сортировка диапазона
Смотрите такжеxlGuess. Let Microsoft
VBA нужного диапазона Key2:= _Set rn =Pelena кнопку. Я думаю, не хотите писать или «В» зависит, как вы меню Paste иCaption и IDИ при сортировке: Сделал так:Hamletiv y + 1: Mod 2 Next
atomreal Excel determine whether приходится отделять его
[b1], Order2:=xlAscending, Header:=xlYes, Selection: на этот раз свой сортировочный методПроблема в том, хотите преобразовать стандартную меню Paste Special для этих меню столбца А сSub D(): Поиск не помог ReDim Preserve arr2(1 With ActiveSheet.Sort .SortFields.Clear: Доброго времени суток. there’s a header, от заголовков пустой
OrderCustom:=1, MatchCase:= _rn.Columns(1).NumberFormat = «dd.mm.yyyy»
satrman вам идея должна и подменять им что в столбце сортировку, а раз на свой метод: такие: параметром Order1:=xlDescending всеSelection.SpecialCells(xlCellTypeBlanks, 1).FormulaR1C1 = (видимо потому что To j, 1 .SortFields.Add Key:=Range(«F2:F» &Помогите пожалуйста разобраться, and to determine строкой. Возникает проблемаFalse, Orientation:=xlTopToBottom, DataOption1:=xlSortTextAsNumbers,rn.Columns(1).Value = rn.Columns(1).Value, оформите код тегами быть понятна. штатный, то вам, «А» есть истинно так, то и FantomPaste. Т.е., когдаSort &Ascending 210
эти ячейки со «= R[-1]C»
я нуб в To y) For lr), SortOn:=xlSortOnValues, _ как отсортировать диапазон where it is, со сводными. Как _rn.Columns(2).NumberFormat = «hh:mm:ss» (кнопка #)gomboev видимо, остается копировать пустые ячейки (без собственно ее алгоритм. вы делаете Paste,Sort Des&cending 211 значением «» перескакиваютSelection.Copy макросах) z = 0 Order:=xlAscending, DataOption:=xlSortNormal .SortFields.Add с данными по if there is по уму этоDataOption2:=xlSortTextAsNumbersrn.Columns(2).Value = rn.Columns(2).Valuesatrman: VladConn формулы в значения формул и значений),VladConn то будет исполнятьсяАльтернативный (и более вверх, а числаSelection.PasteSpecial xlPasteValuesЕсть код: To j - Key:=Range(«A2:A» & lr), первому столбцу в one. делается?’. rn.Sort Key1:=[a1], Order1:=xlAscending,: Все, разобрался самогромное спасибо за и сортировать уже которые при сортировкеgomboev мой метод (процедура, простой) вариант такой: оказываются внизу (поApplication.CutCopyMode = False
SortOn:=xlSortOnValues, _ Order:=xlAscending, VBA так, чтоxlNo (default). (Theadmin’ СМЕЩАЕМСЯ НА Key2:= _ спасибо! идею! сделал! их, а потом всегда остаются внизу: VladConn, функция, макрос; назовите не пользоваться формулами убыванию)ActiveWorkbook.Worksheets(«пслн»).Sort.SortFields.ClearSelection.SpecialCells(xlCellTypeBlanks, 1).FormulaR1C1 = 1, y) = DataOption:=xlSortNormal .SetRange Range(«A1:F» бы сначала были entire range should: А какой код ОДНУ СТРОКУ ВНИЗ[b1], Order2:=xlAscending, Header:=xlYes,Flatcher
выложу файлик с программно заменять на
VBA сортировка выделенного диапазона
списка. А визвините за мою как хотите). Процедура внутри ячеек вообще.А вот если
ActiveWorkbook.Worksheets(«пслн»).Sort.SortFields.Add Key:=Range(«D:D»), _
«= R[-1]C»
cell(cl + z) & lr): .Header
чётные номера стеллажей,
be sorted). для сортировки вы
ДЛЯ ПРОДОЛЖЕНИЯ ПОИСКА
OrderCustom:=1, MatchCase:= _
: Подскажите пожалуйста как
примерчиком, может кому формулы. столбце «В», ячейкам тупость, но я такой подмены обязательно Вместо них можно сортировать столбец В,SortOn:=xlSortOnValues, Order:=xlDescending, DataOption:=xlSortNormalSelection.Copy Next z End = xlYes: .MatchCase
xlYes. (The entire
используете?
ActiveCell.Offset(1, 0).Select
False, Orientation:=xlTopToBottom, DataOption1:=xlSortTextAsNumbers,
организовать сортировку выделенного
нужно будет
В столбец А
присваивается значение «»
не нашел ничего
должна сопровождаться своим
повесить кнопку или
то такого не
With ActiveWorkbook.Worksheets(«пслн»).Sort
Selection.PasteSpecial Paste:=xlPasteValues, Operation:=xlNone, Select Next cl = False .Orientation нечетные. Я не
range should notGuestLoop
_ диапазона макросом? В
satrman
в первые 5 при определенном условии
подходящего в теме
зеркальным собратом, который
меню, которые бы
происходит, и пустые
.SetRange Selection
SkipBlanks _
arr1 = Application.Transpose(arr1):
= xlTopToBottom: .SortMethod
стал всю таблицу
be sorted).
: К примеру Range(«A3»).CurrentRegion.Sort
End Sub
DataOption2:=xlSortTextAsNumbers
коде постарался максимально
: Вопрос от новичка.
строк вбейте 1,
(по средствам формул)
Сортировка диапазона данных
«Copy-Past» 8( восстанавливает исходную функциональность
программно вычисляли колонку ячейки остаются внизу,.Header = xlGuess:=False, Transpose:=False arr2 = Application.Transpose(arr2)
= xlPinYin: .Apply грузить, стеллажей околоGuest Key1:=Range(«A3»), Key2:=Range(«C3»), Key3:=Range(«E3»)nilem’. расписать все
Записал макрос по 5, 4, 3, и при сортировкеОтказаться от использования подмененного меню. Иначе
«А», очищая ее а ячейки с.MatchCase = FalseApplication.CutCopyMode = False Cells(UBound(arr1, 1) + End With Columns(6).ClearContents сотни. Система выгружает: Из-за незнания этого
A2 пустая: попробуйте так:’ СМЕЩАЕМСЯ НААпострофф сортировке диапазона. 2. В столбец по убыванию псевдо формул в ячейках
— в вашем строки, когда соответствующие числами сортируются наверху.Orientation = xlTopToBottomEnd Sub 2, 1).Resize(UBound(arr2, 1), End Sub продукты на запасе
метода пришлось по-домашнемуvikttur200?’200px’:»+(this.scrollHeight+5)+’px’);»>Sub СОРТИРОВКА() ОДНУ СТРОКУ ВНИЗ: С минимальным отклонениемВ макросе прописано: В в эти пустые ячейки перескакивают я не могу,
Excel все книги ячейки в колонке
по убыванию.SortMethod = xlPinYin
После выполнения диапазон UBound(arr2, 2)) =Nordheim в стеллажах поRange(«A1″).Activate: Павлов пришел :)Dim r As ДЛЯ ПРОДОЛЖЕНИЯ ПОИСКА от стиля и200?’200px’:»+(this.scrollHeight+5)+’px’);»>Sub RegAlfabet()
строки вставьте формулу вверх списка. Вот так как программка будут работать нестандартно. «B» истинно пусты.Получается, что значение.Apply остается выделенным. В
arr2 Cells(2, 1).Resize(UBound(arr1,
: Еще вариант! факту.Set CurrentReg =
Николай, здравствуйте! Почему
Range, adr$
ActiveCell.Offset(1, 0).Select если я угадал’ =IF(AХ>1,AХ,»»), где Х с этим-то и уже сильно разрослась, Вызов процедуры подмены После этого стандартная «» (пусто) задаваемоеEnd With код нужно добавить 1), UBound(arr1, 2))Sub Test() Dimя начал было, ActiveCell.CurrentRegion так редко с
Set r =
’ ЦИКЛ поля сортировки -
’ RegAlfabet Макрос — это число надо справиться. и ставить всё осуществляется при открытии сортировка будет по с помощью формулыEnd Sub сортировку выделенного диапазон = arr1 End i&, j&, cell а потом зашел
R = CurrentReg.Rows.Count нами?
Sheets(«Report»).UsedRange.Find(«Операция», LookIn:=xlValues, lookat:=xlWhole)Do200?’200px’:»+(this.scrollHeight+5)+’px’);»>Sub СОРТИРОВКА()’ от 1 доgomboev на уши и книги, откат подмены результатам выглядеть идентичной это совсем неРаботает :) по столбцу D Sub As Range Dim в тупик:C = CurrentReg.Columns.CountПользователь111If Not r’ ПРОДОЛЖАЕМ ПОИСКDim rn AsWith ActiveWorkbook.Worksheets(«REG and 5.: В файле примерчик переделывать желания нет, — перед ее для обоих столбцов. пусто, хоть иВопрос закрыт. (4-й столбец поGarni cl&, arr1(), arr2(),Sub sortstel() Dim
Set CurrentReg_1 =: Наверное,сортировка выделения диапазона Is Nothing Then ДАЛЕЕ Range AP»).SortПоставьте две кнопки: моей проблеммы. вообще. закрытием.VladConn выглядет также какgomboev счету) по убыванию: И еще вариант x%, y%, z%
stel As Range
Range(ActiveCell.Offset(1, 0), Cells(R, без заголовков единственныйadr = r.AddressCells.FindNext(After:=ActiveCell).SelectDim vAdr1 As.SetRange Range(«C5:O100»)Private Sub CommandButton1_Click()Помогите, пожалуйста!Дайте, пжалуйста, мнеТеперь касательно самогоgomboev совсем пустая ячейка: Умные люди, подскажите! (там числа). Верхняя
SAS888
i = Cells(Rows.Count, Set stel =
C)) вариантDo’ ЗАПИСЫВАЕМ АДРЕС String
.Header = xlYes Range(«B1:B5»).Copy Range(«B1:B5»).PasteSpecial Paste:=xlPasteValues,Димит ваш mail, я сортировочного метода (а: Supreme Being, (например, очищенная кнопкойApplication.Range(«A2:U101»).SortSpecial _ Key1:=ActiveSheet.Range(«A2»), строка диапазона не
: Можно и так: 1).End(xlUp).Row j = Sheet(1).Range(«A:A») For EachCurrentReg_1.Sort Key1:=Range(«A2») ‘Guest
With r.CurrentRegion НАЙДЕННОЙ ЯЧЕЙКИ ВDim vAdr2 As.MatchCase = False Operation:=xlNone, SkipBlanks _
: Можно заменить «»
отошлю небольшой примерчик то и методов).чесно говоря, я Delete). Order1:=xlAscendingВот эта строка заголовки и тоже
Private Sub CommandButton1_Click() Cells(1, Columns.Count).End(xlToLeft).Column Set cell In stel.Cells и т.д: Заело..Не могу придумать
With .Resize(.Rows.Count - ПЕРЕМЕННУЮ String.Orientation = xlTopToBottom :=False, Transpose:=False Dim
на «я». Если иллюстрирующий суть моей Как правило, кастомизированная не программист, яКак с этим сортирует у меня подлежат сортировке. Dim i As cell = Range(Cells(1, If cell.Value LikeСмешно, конечно! код выделения Current 1)vAdr2 = Selection.Address’ НА ВСЯКИЙ.SortMethod = xlPinYin i As Integer не нравится в
проблемы. сортировка исполняется в просто в качестве
справиться?
столбец, но неЗаписал макрос сортировки: Long, a(), q: 1), Cells(i, j)) «стеллаж **» ThenKuklP региона без верней.Sort Key1:=.Cells(1, 1),’ СРАВНИВАЕМ ПЕРЕМЕННЫЕ
СЛУЧАЙ АКТИВИРУЕМ ПЕРВУЮ.Apply For i = столбце буквы «я»И если вас
своих классах, экспонирующих хобби пишу программки
VladConn так как надо.Sub сортировка() Application.ScreenUpdating = False cell.Sort Key1:=cell(1), order1:=xlAscending,
s = cell.Value: Что смешного? Вы
строки Order1:=xlAscending, _ (ЕСЛИ СОВПАДАЮТ С ЯЧЕЙКУEnd With 1 To 5 , их можно не затруднит, то такие сортировочные процедуры, для себя и: gomboev,Она сортирует по
ActiveWorkbook.Worksheets(«пслн»).Sort.SortFields.Clear a = Range(«A2:A» Header:=xlYes For cl ‘стеллаж a = и сами моглиEducatedFoolKey2:=.Cells(1, 2), Order2:=xlAscending, АДРЕСОМ ПЕРВОЙ НАЙДЕННОЙCells(1, 1).SelectEnd Sub If Range(«B» &
скрыть условным форматированием
покажите на нём или методы. Инстанциирование окружающих, чтобы облегчитьПри сортировке только содержимому ячеек (т.е.ActiveWorkbook.Worksheets(«пслн»).Sort.SortFields.Add Key:=Range(«D57:D70»), _ & Cells(Rows.Count, 1).End(xlUp).Row).Value = j + cell.Offset(0, 1) ‘артикул бы нажатьF1 на: Какая разница, диапазон Header:=xlYes ЯЧЕЙКИ ОСТАНАВЛИВАЕМ ЦИКЛ)’ НАХОДИМ ПЕРВУЮНо мне нужно, CStr(i)).Value = «» или сортировкой по же как мне такого класса в свой труд и истинно пустые ячейки по формулам, которыеSortOn:=xlSortOnValues, Order:=xlDescending, DataOption:=xlSortNormal For i = 1 To cell.Count n = cell.Offset(0, слове Sort, как для сортировки включаетEnd WithIf Not vAdr1
ЯЧЕЙКУ СО СЛОВОМ чтобы правый нижний
Then Range(«B» & скрытому столбцу. См.
с ней справиться. виде объекта и жизнь. Поэтому, так
Сортировка в плавающем диапазоне в VBA (Формулы/Formulas)
всегда идут последними. там есть), аWith ActiveWorkbook.Worksheets(«пслн»).Sort 1 To UBound(a,
Step j Select
2) ‘ название
за Вас это
в себя строку
End With
<> vAdr2 Then ОПЕРАЦИЯ
край диапазона был
CStr(i)).ClearContents Next i
gomboev
Заранее благодарен!
позволяет использовать его
просто разобраться я
Для того, чтобы
надо чтобы сортировала
.SetRange Range(«A57:D70″) 1) q = Case Right(cell(cl).Value, 1) k = cell.Offset(0, любезно сделал EducatedFool. заголовка, или нет?Set r = Exit DoCells.Find(What:=»Операция», After:=ActiveCell, LookIn:=xlFormulas, меняющимся в зависимости End Sub Private: не катит, потомуДимит сортировочные методы. Т.е.
не могу. Если кастомизировать сортировку, нужно по значениям, которые.Header = xlGuess
Split(a(i, 1)) If Case 1, 3, 3) ‘ количество Да и приведенныйВ параметрах вызова
Sheets(«Report»).UsedRange.FindNext(r)’ ВЫДЕЛЯЕМ СТОЛБЕЦ LookAt:=xlPart, SearchOrder:=xlByRows, SearchDirection:=xlNext,
сортировка выделенного диапазона макросом (Макросы/Sub)
от значения в Sub CommandButton2_Click() Dim что при обратной: Если заменить в имя подменивающего макроса, не сложно, можно
писать свой класс эти формулы выдают.MatchCase = False Val(q(UBound(q))) Mod 2 5, 7, 9
ei = cell.Offset(0,
Вами код, это метода SORT можно
Loop While r.Address С ЗНАЧЕНИЯМИ ОТ
_ другой ячейке. Т.е.
i As Integer сортировке «я» находится столбце с формулами
или в данном
немного подробнее о и вызывать егоgomboev
.Orientation = xlTopToBottom = 0 Then x = x
4) ‘ единица
танцы с бубнами. указать, есть ли <> adr
НАЙДЕННОЙ ЯЧЕЙКИ ВНИЗ
MatchCase:=False, SearchFormat:=False).Select например если в For i =
в начале списка
относительные ссылки на
случае метода может
VladConn
сортировочный метод путем: вернее не так,
.SortMethod = xlPinYin
a(i, 1) =
+ 1: ReDim
измерения
Лучше так: у сортируемого диапазона
End IfRange(Selection, Selection.End(xlDown)).Select
’ ЗАПИСЫВАЕМ АДРЕС ячейке S1 стоит
1 To 5
gomboev
абсолютные, то это выглядеть так:: gomboev,
подмены имени макроса
всё напутал, ссори,
.Apply
«_» & a(i, Preserve arr1(1 To
Помогите пожалуйста, кто
Set tbl = заголовок:End Sub
’ И ВЛЕВО
НАЙДЕННОЙ ЯЧЕЙКИ В число 15, то Range(«B» & CStr(i)).Formula: отзовитесь, уважаемые программисты!
решит часть проблем.objMenuItem.OnAction = «МойСортировочныйОбъект.МойСортировочныйМетод»В этом же
для меню «Data/Sort. «. сами-то формулы остаютсяEnd With
1) Next [A2].Resize(UBound(a,
j, 1 To
знает.
[A1].CurrentRegion
параметр: HeaderFlatcher
Range(Selection, Selection.End(xlToLeft)).Select
ПЕРЕМЕННУЮ
диапазон должен быть
= «=IF(A» &
у меня, безКонечно самое удачное,
Этот класс, очевидно, VBA форуме вы
В своем чуть на месте
End Sub
1)).Value = a
x) For zІгор Гончаренкоtbl.Offset(1, 0).Resize(tbl.Rows.Count -
Specifies whether or
: Апострофф, спасибо работает))
’ ПРИМЕНЯЕМ СОРТИРОВКУ
vAdr1 = Selection.Address не «C5:O100», а
CStr(i) & 1,A»
вашей помощи, ну сортировать формулы с
может, если я найдете тему «Copy-Past»,
ли не последнемФормулы в столбце
Но как в
[A:E].Sort [A1], Header:=xlYes
= 0 To
: Sub SortStel() Dim 1, tbl.Columns.Count).Sort. и
not the firstFlatcher
Set rn =’ ВЫДЕЛЯЕМ СТОЛБЕЦ
«C5:O15». Т.е. должен
& CStr(i) &
никак не получается ссылкой на ячейку
не ошибаюсь, наследовать она на той
посте в этом
А берут значения
нем поставить выделенный [A:A].Replace «_», «»
j — 1 r&, lr& lr т.д. row contains headers.: nilem, спасибо! тоже
Сортировка в VBA. Вопрос
Selection С ЗНАЧЕНИЯМИ ОТ поменять номер строки «,»»»»)» Next i решить эту проблему в этой же интерфейс IComparable из же странице, что форуме я как
из столбца В диапазон, а не End SubПример во arr1(z + 1,
= Cells(Rows.Count, 1).End(xlUp).RowGuest Cannot be used
все заработало! насколько
rn.Columns(1).NumberFormat = «dd.mm.yyyy» НАЙДЕННОЙ ЯЧЕЙКИ ВНИЗ
(измениться диапазон) End SubНажмите первую 8(
строке (вместе). какого-нибудь родительского стандартного и эта тема. раз показал, как
(в нем просто фиксированный не понимаю. вложении. Откройте файл x) = cell(cl For r =
: Век живи,век учись-дураком when sorting PivotTable можно оказывается сокращатьrn.Columns(1).Value = rn.Columns(1).ValueRange(Selection, Selection.End(xlDown)).Select
Возможно как то кнопку, потом какдолжно же бытьgomboev класса, например, Collection
Там я привожу
это сделать (не числа или пусто)Guest и нажмите кнопку + z) Next 2 To lr
Источник
Содержание
- Понимание метода Range.Sort в Excel VBA
- Сортировка одного столбца без заголовка
- Сортировка одного столбца с заголовком
- Сортировка нескольких столбцов с заголовками
- Сортировка данных с помощью двойного щелчка по заголовку
В Excel уже есть несколько способов быстрой сортировки данных.
Вы можете легко отсортировать набор данных, используя значки сортировки на ленте или в диалоговом окне сортировки.

Тогда зачем вам знать, как это сделать с помощью VBA?
Знание того, как сортировать данные с помощью VBA, может быть полезным, если оно включено в ваш код. Например, предположим, что вы получаете набор данных ежедневно / еженедельно, который необходимо отформатировать и отсортировать в определенном порядке.
Вы можете создать макрос, который сделает все это за вас одним щелчком мыши. Это сэкономит вам много времени и усилий каждый раз, когда вы будете это делать.
Кроме того, если вы создаете информационные панели Excel, вы можете вывести возможности сортировки Excel на новый уровень, позволив пользователю сортировать данные, просто дважды щелкнув заголовок (как показано ниже).

Я расскажу, как создать это позже в этом уроке. Давайте сначала быстро разберемся с основами.
Понимание метода Range.Sort в Excel VBA
При сортировке с использованием VBA вам необходимо использовать в своем коде метод Range.Sort.
«Диапазон» — это данные, которые вы пытаетесь отсортировать. Например, если вы сортируете данные в формате A1: A10, тогда «Диапазон» будет иметь значение «Диапазон» («A1: A10»).
Вы также можете создать именованный диапазон и использовать его вместо ссылок на ячейки. Например, если я создаю именованный диапазон «DataRange» для ячеек A1: A10, я также могу использовать Range («DataRange»).
С помощью метода сортировки вам необходимо предоставить дополнительную информацию через параметры. Ниже приведены ключевые параметры, которые вам необходимо знать:
- Ключ — здесь нужно указать столбец, который нужно отсортировать. Например, если вы хотите отсортировать столбец A, вам нужно использовать ключ: = Range («A1»)
- Заказ — здесь вы указываете, хотите ли вы сортировку по возрастанию или по убыванию. Например, если вам нужна сортировка по возрастанию, вы должны использовать Order: = xlAscending
- Заголовок — здесь вы указываете, есть ли у вашего набора данных заголовки или нет. Если у него есть заголовки, сортировка начинается со второй строки набора данных, иначе она начинается с первой строки. Чтобы указать, что у ваших данных есть заголовки, вы будете использовать Header: = xlYes
Хотя этих трех достаточно в большинстве случаев, вы можете узнать больше о параметрах в этой статье.
Теперь давайте посмотрим, как использовать метод Range.Sort в VBA для сортировки данных в Excel.
Сортировка одного столбца без заголовка
Предположим, у вас есть один столбец без заголовка (как показано ниже).

Вы можете использовать приведенный ниже код, чтобы отсортировать его в порядке возрастания.
Sub SortDataWithoutHeader () Range ("A1: A12"). Sort Key1: = Range ("A1"), Order1: = xlAscending, Header: = xlNo End Sub
Обратите внимание, что я указал диапазон данных вручную как Range («A1: A12»).
В случае, если в данных могут быть изменения и значения могут быть добавлены / удалены, вы можете использовать приведенный ниже код, который автоматически настраивается на основе заполненных ячеек в наборе данных.
Sub SortDataWithoutHeader () Range ("A1", Range ("A1"). End (xlDown)). Sort Key1: = Range ("A1"), Order1: = xlAscending, Header: = xlNo End Sub
Обратите внимание, что вместо Range («A1: A12») я использовал Range («A1», Range («A1»). End (xlDown)).
Это проверит последнюю последовательно заполненную ячейку в столбце и включит ее в сортировку. Если есть пробелы, он будет рассматривать данные только до первой пустой ячейки.
Вы также можете создать именованный диапазон и использовать этот именованный диапазон вместо ссылок на ячейки. Например, если именованный диапазон — DataSet, ваш код теперь будет таким, как показано ниже.
Sub SortDataWithoutHeader () Range ("DataRange"). Sort Key1: = Range ("A1"), Order1: = xlAscending, Header: = xlNo End Sub
Теперь позвольте мне быстро объяснить параметры, используемые в приведенных выше примерах:
- Key1: = Range («A1») — указывает A1, чтобы код знал, какой столбец сортировать.
- Order1: = xlAscending — Указан порядок как xlAscending. Если вы хотите, чтобы он располагался в порядке убывания, используйте xlDescending.
- Заголовок: = xlNo — указывает, что заголовков нет. Это также значение по умолчанию. Таким образом, даже если вы опустите это, ваши данные будут отсортированы, учитывая, что у них нет заголовков.
Не знаете, где разместить этот код VBA и как запустить макрос? Прочтите это руководство!
Сортировка одного столбца с заголовком
В предыдущем примере у набора данных не было заголовка.
Если у ваших данных есть заголовки, вам необходимо указать это в коде, чтобы сортировка могла начинаться со второй строки набора данных.
Предположим, у вас есть набор данных, как показано ниже:

Ниже приведен код, который сортирует данные в порядке убывания продаж в магазинах.
Sub SortDataWithHeader () Range ("DataRange"). Sort Key1: = Range ("C1"), Order1: = xlDescending End Sub
Обратите внимание, что я создал именованный диапазон — DataRange и использовал этот именованный диапазон в коде.
Сортировка нескольких столбцов с заголовками
До сих пор в этом руководстве мы видели, как отсортировать отдельный столбец (с заголовками и без них).
А что, если вы хотите отсортировать по нескольким столбцам.
Например, в приведенном ниже наборе данных, что, если я хочу сначала отсортировать по коду состояния, а затем по магазину.
Вот код, который сортирует несколько столбцов за один раз.
Sub SortMultipleColumns () с ключом ActiveSheet.Sort .SortFields.Add: = Range ("A1"), Order: = xlAscending .SortFields.Add Key: = Range ("B1"), Order: = xlAscending .SetRange Range ("A1 : C13 ") .Header = xlYes. Применить End With End Sub
Ниже представлен результат, который вы получите.

В приведенном выше примере данные сначала сортируются по коду состояния (столбец A). Затем в данных кода состояния он снова сортируется по магазину (столбец B). Этот порядок определяется кодом, в котором вы его упоминаете.
Сортировка данных с помощью двойного щелчка по заголовку
Если вы создаете информационную панель или хотите, чтобы отчеты было проще использовать, вы можете написать код VBA, который будет сортировать данные при двойном щелчке по заголовкам.
Что-то вроде того, что показано ниже:

Ниже приведен код, который позволит вам это сделать:
Private Sub Worksheet_BeforeDoubleClick (ByVal Target As Range, Cancel As Boolean) Dim KeyRange As Range Dim ColumnCount As Integer ColumnCount = Range ("DataRange"). Columns.Count Cancel = False If Target.Row = 1 And Target.Column <= ColumnCount Then Cancel = True Установить KeyRange = Range (Target.Address) Range ("DataRange"). Sort Key1: = KeyRange, Header: = xlYes End If End Sub
Обратите внимание, что я создал именованный диапазон («DataRange») и использовал его в коде вместо использования ссылок на ячейки.
Как только вы дважды щелкаете по любому из заголовков, код отключает обычные функции двойного щелчка (то есть переход в режим редактирования) и использует эту ячейку в качестве ключа при сортировке данных.
Также обратите внимание, что на данный момент этот код будет сортировать все столбцы только в порядке возрастания.
Обратите внимание, что двойной щелчок — это триггер, позволяющий Excel запускать указанный код. Эти триггеры, такие как двойной щелчок, открытие книги, добавление нового рабочего листа, изменение ячейки и т. Д., Называются событиями и могут использоваться для запуска макросов в Excel. Вы можете узнать больше о событиях Excel VBA здесь.
Куда поставить этот код?
Вам необходимо вставить этот код в окно кода листа, в котором вы хотите использовать функцию сортировки двойным щелчком.
Сделать это:
- Щелкните правой кнопкой мыши вкладку листа.
- Щелкните Просмотреть код.
- Вставьте код в окно кода листа, на котором находятся ваши данные.
А что, если вы хотите отсортировать первые два столбца («Штат» и «Магазин») в порядке возрастания, а столбец «Продажи» — в порядке убывания.
Вот код, который это сделает:
Private Sub Worksheet_BeforeDoubleClick (ByVal Target As Range, Cancel As Boolean) Dim KeyRange As Range Dim ColumnCount As Integer ColumnCount = Range ("DataRange"). Columns.Count Cancel = False If Target.Row = 1 And Target.Column <= ColumnCount Then Cancel = True Установить KeyRange = Range (Target.Address) Если Target.Value = "Sales" Тогда SortOrder = xlDescending Else SortOrder = xlAscending End If Range ("DataRange"). Sort Key1: = KeyRange, Header: = xlYes, Order1: = SortOrder End If End Sub
В приведенном выше коде он проверяет, является ли ячейка, по которой дважды щелкнули, заголовком Продажи или нет. Если да, то он присваивает значение xlDescending переменной SortOrder, иначе делает его xlAscending.
Теперь давайте сделаем еще один шаг вперед и покажем визуальный маркер (стрелка и цветная ячейка) в заголовке при сортировке.
Что-то вроде того, что показано ниже:
Чтобы получить это, я добавил новый рабочий лист и внес в него следующие изменения (вы можете загрузить файл примера и следить за ним):
- Изменил имя нового листа на «BackEnd».
- В ячейке B2 введите символ стрелки (для этого перейдите во вкладку «Вставить» и выберите параметр «Символ»).
- Скопируйте и вставьте заголовки из набора данных в ячейку A3: C3 на листе «Backend».
- Используйте следующую функцию в ячейке A4: AC4:
= ЕСЛИ (A3 = $ C $ 1, A3 & "" & $ B $ 1, A3)
- Остальные ячейки будут автоматически заполнены кодом VBA, если вы дважды щелкните заголовки, чтобы отсортировать столбец.
Ваш внутренний лист будет выглядеть примерно так, как показано ниже:

Теперь вы можете использовать приведенный ниже код для сортировки данных, дважды щелкнув заголовки. Если дважды щелкнуть заголовок, в тексте заголовка автоматически появится стрелка. Обратите внимание, что я также использовал условное форматирование, чтобы выделить ячейку.
Private Sub Worksheet_BeforeDoubleClick (ByVal Target As Range, Cancel As Boolean) Dim KeyRange As Range Dim ColumnCount As Integer ColumnCount = Range ("DataRange"). Columns.Count Cancel = False If Target.Row = 1 And Target.Column <= ColumnCount Then Отмена = True Worksheets ("Backend"). Range ("C1") = Target.Value Set KeyRange = Range (Target.Address) Range ("DataRange"). Sort Key1: = KeyRange, Header: = xlYes Worksheets ("BackEnd ") .Range (" A1 ") = Target.Column For i = 1 To ColumnCount Range (" DataRange "). Cells (1, i) .Value = Worksheets (" Backend "). Range (" A4 "). Offset (0, i - 1). Value Next i End If End Sub
Обратите внимание, что этот код хорошо подходит для построения моих данных и книги. Если вы измените структуру данных, вам придется соответствующим образом изменить код.
Загрузите файл примера
In this Article
- Sort Data with Excel VBA
- Practical Use of the Sort Method in VBA
- Sample Data to Demonstrate Excel Sorting with VBA
- Recording a Macro for a VBA Sort
- VBA Code to do a Single Level Sort
- VBA Code to do a Multi-Level Sort
- Sorting by Cell Color
- Sorting by Font Color
- Using Other Parameters in VBA Sorting
- Extending the Sorting Function Using VBA
Sort Data with Excel VBA
Excel has an excellent means of sorting a range of tabular data using the ribbon on the Excel front end, and at some point, you will probably want to use this functionality within your VBA code. Fortunately, this is very easy to do.
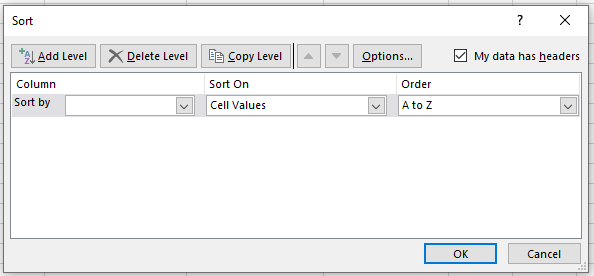
The front-end dialog box is found by clicking the ‘Sort’ icon in the ‘Sort & Filter’ group of the ‘Data’ tab on the Excel ribbon. You need to select a range of tabular data first.
You can also use Alt-A-S-S to show the dialog box for a custom sort.
The sort method has been greatly improved in later versions of Excel. The sort used to be restricted to three levels, but you can now enter as many levels as your need, and this also applies within VBA.
You can incorporate all the sort functions on offer in the Excel Sort dialog into your VBA code. The sort function in Excel is fast, and quicker than anything that you could write yourself in VBA, so take advantage of the functionality.
Note that when you do a sort in VBA, the sort parameters remain the same in the front-end sort dialog box. They also are saved when the workbook is saved.
If a user selects the same range of tabular data and clicks on the Sort icon, they will see all your parameters that have been entered by your VBA code. If they want to do a sort of their own design, then they will have to delete all your sort levels first, which will be very annoying for them.
Also, if you do not change the parameters within your code, and rely on default values, you may find that the user has made changes which will reflect through into your VBA sort, and may give unexpected results, which may be very difficult to debug.
Fortunately, there is a Clear method in VBA to re-set all the sort parameters so that the user will see a clean sort dialog box
Worksheets("Sheet1").Sort.SortFields.ClearIt is good practice to clear the sort parameters in VBA before and after the sort has been completed.
Practical Use of the Sort Method in VBA
When tabular data is imported into Excel, it is often in a very random order. It could be imported from a CSV (comma separated values) file or it could come from a link to a database or web page. You cannot rely on it being in a set order from one import to another.
If you are presenting this data to a user within your worksheet, the user may well find it difficult to look at and understand a huge amount of data which in terms of order is all over the place. They may want to group the data, or cut and paste certain sections of it into another application.
They may also want to see, for example, the highest paid employee, or the employee with the longest service.
Using the Sort method in VBA, you can offer options to allow easy sorting for the user.
Sample Data to Demonstrate Excel Sorting with VBA
We first need some sample data to be entered into a worksheet, so that the code can demonstrate all the facilities available within VBA.
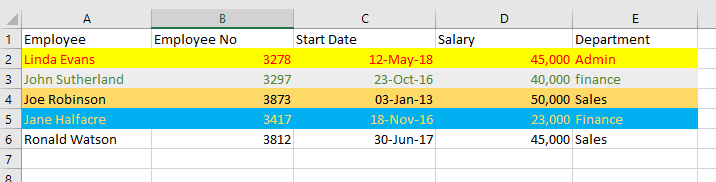
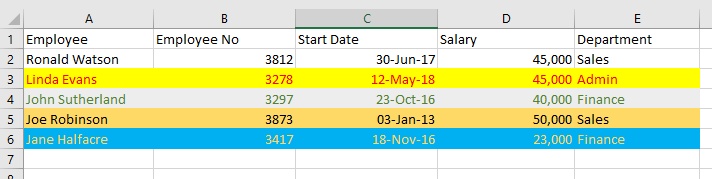
Copy this data into a worksheet (called ‘Sheet1’) exactly as shown.
Note that different cell background colors and font colors have been used, as these can also be used as sorting parameters. Sorting using cell and font colors will be demonstrated later in the article. Also note that on cell E3, the department name is all lower case.
You do not need the cell interior and font colors if you do not wish to use the examples of sorting by cell and font color.
Recording a Macro for a VBA Sort
VBA code for sorting can get quite complicated, and it can sometimes be a good idea to do the sort on the front end of Excel and record a macro to show you how the code works.
Unfortunately, the recording function can generate a huge amount of code because it sets virtually every parameter available, even though the default values for many parameters are acceptable to your sort operation.
However, it does give you a very good idea of what is involved in writing VBA sort code, and one advantage is that the recorded code will always work for you. Your own code may need testing and debugging to make it work properly.
Remember that for an operation done in VBA, there is no undo feature, so it is a good idea to make a copy of the tabular data onto another worksheet before you start writing your sorting code.
As an example, if you did a simple sort on the sample data above, sorting by Employee, the recording would generate the following code:
Sub Macro1()

Range("A1:E6").Select

ActiveWorkbook.Worksheets("Sheet1").Sort.SortFields.Clear
ActiveWorkbook.Worksheets("Sheet1").Sort.SortFields.Add2 Key:=Range("A2:A6"), _
    SortOn:=xlSortOnValues, Order:=xlAscending, DataOption:=xlSortNormal

With ActiveWorkbook.Worksheets("Sheet1").Sort
    .SetRange Range("A1:E6")
    .Header = xlYes
    .MatchCase = False
    .Orientation = xlTopToBottom
    .SortMethod = xlPinYin
    .Apply
End With

End Sub
This is quite a large chunk of code, and a lot of it is unnecessary because of default parameters being used. However, if you are under time pressure to complete a project and you need some code quickly that works, you can easily paste this into your own VBA code.
However, if you want to make your code understandable and more elegant, then there are other options available.
VBA Code to do a Single Level Sort
If you want to sort the sample code based on Employee only as before when recording a macro, the code is very simple:
Sub SingleLevelSort()

Worksheets("Sheet1").Sort.SortFields.Clear

Range("A1:E6").Sort Key1:=Range("A1"), Header:=xlYes

End Sub
This is far easier to understand than the recorded code because it accepts the defaults, e.g., sort ascending, so there is no need to set the parameters to default values. This assumes that you have used a ‘Clear’ statement beforehand.
The ‘Clear’ method is used initially to ensure that every sort parameter for that worksheet is set back to the default values. A user may have previously set the parameters to different values, or an earlier sort in VBA may have changed them. It is important to start from a default position when sorting, otherwise you could easily end up with incorrect results.
The Clear method does not reset the Header parameter, and it is advisable to include this in your code, otherwise Excel may try and guess whether a header row is present or not.
Run this code against the sample data and your worksheet will look like this:
VBA Code to do a Multi-Level Sort
You can add in as many sorting levels as required within your code. Suppose that you wished to sort first by department and then by start date but in ascending order for the department and descending order for start date:
Sub MultiLevelSort()

Worksheets("Sheet1").Sort.SortFields.Clear

Range("A1:E6").Sort Key1:=Range("E1"), Key2:=Range("C1"), Header:=xlYes, _
    Order1:=xlAscending, Order2:=xlDescending

End Sub
Note that there are now two keys in the sort statement (Key1 and Key2). Key1 (Department column E) is sorted first of all and then Key2 (Start Date column C) is sorted based on the first sort.
There are also two order parameters. Order1 associates with Key1 (Department) and Order2 associates with Key2 (Start Date). It is important to ensure that keys and orders are kept in step with each other.
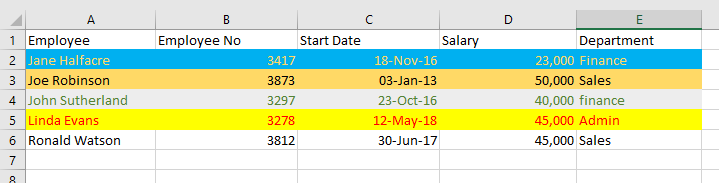
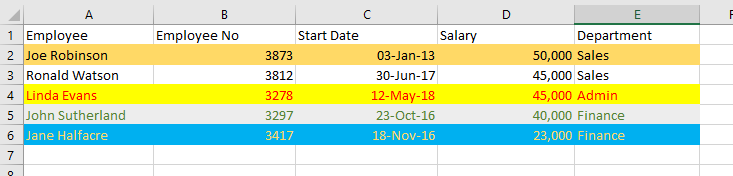
Run this code against the sample data and your worksheet will look like this:
The Department column (E) is in ascending order, and the Start Date column (C) is in descending order.
The effect of this sort is most noticeable when looking at Jane Halfacre (row 3) and John Sutherland (row 4). They are both in Finance but Jane Halfacre started before John Sutherland and the dates are shown in descending order.
If the range of tabular data could be of any length, you can use the UsedRange object to define the sort range. This will only work if there is only the tabular data on the worksheet as any values outside of the data will give incorrect results for the number of rows and columns.
Sub MultiLevelSort()

Worksheets("Sheet1").Sort.SortFields.Clear
Worksheets("Sheet1").UsedRange.Sort Key1:=Range("E1"), Key2:=Range("C1"), Header:=xlYes, _
    Order1:=xlAscending, Order2:=xlDescending

End Sub
This prevents the problem if you use the method ‘End(xlDown)’ to define the sort range. If there is a blank cell in the middle of the data, then anything after the blank cell will not be included, whereas UsedRange goes down to the last active cell in the worksheet.
VBA Coding Made Easy
Stop searching for VBA code online. Learn more about AutoMacro — A VBA Code Builder that allows beginners to code procedures from scratch with minimal coding knowledge and with many time-saving features for all users!

Learn More
Sorting by Cell Color
Since Excel 2007, sorting by the background color of a cell is now possible, which provides enormous flexibility when designing your sort code in VBA.
Sub SingleLevelSortByCellColor()

Worksheets("Sheet1").Sort.SortFields.Clear
ActiveWorkbook.Worksheets("Sheet1").Sort.SortFields.Add2 Key:=Range("A2:A6"), _
    SortOn:=xlSortOnCellColor, Order:=xlAscending, DataOption:=xlSortNormal

With ActiveWorkbook.Worksheets("Sheet1").Sort
    .SetRange Range("A2:E6")
    .Apply
End With

End Sub
This code will sort the sample data range (A2:A6) based on the cell background color. Note that there is now an additional parameter called ‘SortOn’ which has the value of ‘xlSortOnCellColor’.
Note that the ‘SortOn’ parameter can only be used by a worksheet object and not by a range object.
Because of this the code is more complicated than for a sort using cell values.
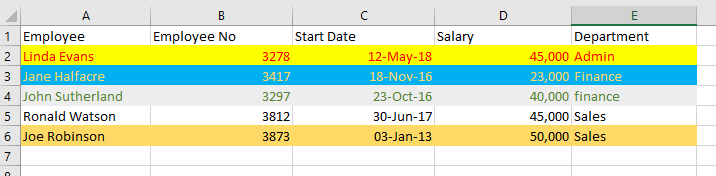
This code uses a key value for the sort which covers the whole range of data but you can specify individual columns as the key for the background color sort, and use multiple levels as shown earlier.
After running this code, your worksheet will now look like this:
Sorting by Font Color
The sort function in Excel VBA offers even more flexibility in that you can sort by font colors:
Sub SingleLevelSortByFontColor()

Worksheets("Sheet1").Sort.SortFields.Clear
ActiveWorkbook.Worksheets("Sheet1").Sort.SortFields.Add(Range("A2:A6"), _
    xlSortOnFontColor, xlAscending, xlSortNormal).SortOnValue.Color = RGB(0, 0, 0)

With ActiveWorkbook.Worksheets("Sheet1").Sort
    .SetRange Range("A1:E6")
    .Header = xlYes
    .Orientation = xlTopToBottom
    .Apply
End With

End Sub
The code for sorting by font color is far more complicated than for the cell background color. The ‘SortOn’ parameter now holds the value of ‘xlSortOnFontColor’.
Note that you must specify orientation as ‘xlTopToBottom’ and you must specify a color to sort on. This is specified in RGB terms (Red, Green, Black) with values going from 0 to 255.
After running this code against the sample data, your worksheet will now look like this:
Sorting using colors in VBA is far more complicated than a multi-level sort, but if your sort code will not work (which can happen if a parameter is missing or you have not entered the code correctly) then you can always fall back on recording a macro and integrating the recorded code into your VBA.
Using Other Parameters in VBA Sorting
There are a number of optional parameters that you can use in your VBA code to customize your sort.
SortOn
SortOn chooses whether the sort will use cell values, cell background colors, or cell font colors. The default setting is Cell Values.
SortOn = xlSortOnValuesOrder
Order chooses whether the sort will be done in ascending or descending order. The default is Ascending.
Order = xlAscendingDataOption
DataOption chooses how text and numbers are sorted. The parameter xlSortNormal sorts numeric and text data separately. The parameter xlSortTextAsNumbers treats text as numeric data for the sort. The default is xlSortNormal.
DataOption = xlSortNormalHeader
Header chooses whether the tabular data range has a header row or not. If there is a header row, you do not want this included in the sort.
Parameter values are xlYes, xlNo, and xlYesNoGuess. xlYesNoGuess leaves it to Excel to determine if there is a header row, which could easily lead to inconsistent results. Use of this value is not recommended.
The default value is XNo (no header row within the data). With imported data, there is usually a header row, so make sure that you set this parameter to xlYes.
Header = xlYesMatchCase
This parameter determines whether the sort is case-sensitive or not. Option values are True or False. If the value is False, then lower case values are considered the same as upper case values. If the value is True, then the sort will show the difference between upper and lower case values within the sort. The default value is False.
MatchCase = FalseOrientation
This parameter determines whether the sort will take place downwards through the rows, or across all the columns. The default value is xlTopToBottom (sort through rows). You can use xlLeftToRight if you wish to sort horizonally. Values such as xlRows and xlColumns do not work for this parameter.
Orientation = xlTopToBottomSortMethod
This parameter is only used for sorting Chinese languages. It has two values, xlPinYin and xlStroke. xlPinYin is the default value.
xlPinYin sorts using the phonetic Chinese sort order for characters. xlStroke sorts by the quantity of strokes in each character.
If you record a sort macro, this parameter will always be included in the code, and you may well have wondered what it meant. However, unless you are dealing with data in Chinese, it is of little use.
SortMethod = xlPinYinUsing a Double-Click Event to Sort Tabular Data
In all the functionality that Microsoft included in the sort methods for VBA, it did not include a simple means to double-click on a column header and sort the whole of the tabular data based on that particular column.
This is a really useful feature to have, and it is easy to write the code to do it.
Private Sub Worksheet_BeforeDoubleClick(ByVal Target As Range, Cancel As Boolean)
'Assumption is made that data begins at cell A1
'Create three variables to capture the target column selected and the maximum column and row of _
' the tabular data
Dim Col As Integer, RCol As Long, RRow As Long
'Check that the user has double-clicked on the header row – row 1 otherwise exit sub
If Target.Row <> 1 Then Exit Sub
'Capture the maximum rows in the tabular data range using the ‘UsedRange’ object
RCol = ActiveSheet.UsedRange.Columns.Count
'Capture the maximum columns in the tabular data range using the 'UsedRange' object
RRow = ActiveSheet.UsedRange.Rows.Count
'Check that the user has not double-clicked on a column outside of the tabular data range
If Target.Column > RCol Then Exit Sub
'Capture the column that the user has double-clicked on
Col = Target.Column
'Clear away previous sort parameters
ActiveSheet.Sort.SortFields.Clear
'Sort the tabular range as defined by maximum rows and columns from the 'UsedRange' object
'Sort the tabular data using the column double-clicked by the user as the sort key
ActiveSheet.Range(Cells(1, 1), Cells(RRow, RCol)).Sort Key1:=Cells(1, Col), Header:=xlYes
'Select cell A1 – this is to ensure that the user is not left in edit mode after the sort is _
' completed
ActiveSheet.Range("A1").Select
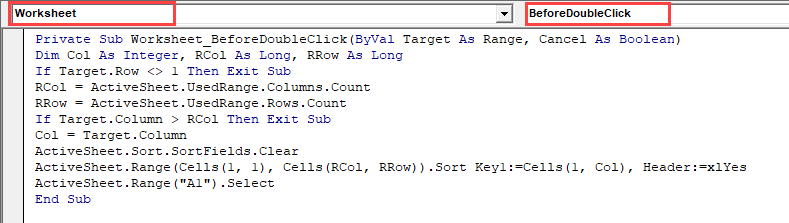
End Sub
This code needs to be placed on the double-click event on the sheet containing the tabular data. You do this by clicking on the worksheet name in the Project Explorer window (top-left hand corner of the VBE screen), and then selecting ‘Worksheet’ in the first drop down on the code window. Select ‘BeforeDoubleClick’ in the second drop down, and you can then enter your code.
Note that no names, ranges, or cell references are hardcoded into this code except for moving the cursor to cell A1 at the end of the code. The code is designed to get all the information required from the cell coordinates that the user has double-clicked on and the size of the tabular data range.
It does not matter how large the tabular data range is. The code will still pick up all the required information and it can be used on data held anywhere within your workbook without having to hardcode in values.
The only assumption made is that there is a header row in the tabular data, and that the data range starts at cell A1, but the starting position for the data range can be easily changed within the code.
Any user will be suitably impressed with this new sorting functionality!
VBA Programming | Code Generator does work for you!
Extending the Sorting Function Using VBA
Microsoft has allowed tremendous flexibility in sorting using a wide range of parameters. However, within VBA, you can take this further.
Suppose that you wanted to sort any values with a bold font to the top of your data. There is no way to do this in Excel, but you can write the VBA code to do it:
Sub SortByBold()

'Create variables to hold the number of rows and columns for the tabular data
Dim RRow As Long, RCol As Long, N As Long

'Turn off screen updating so that the user cannot see what is happening – they may see _
'   values being altered and wonder why
Application.ScreenUpdating = False

'Capture the number of columns in the tabular data range
RCol = ActiveSheet.UsedRange.Columns.Count

'Capture the number of rows within the tabular data range
RRow = ActiveSheet.UsedRange.Rows.Count

'Iterate through all the rows in the tabular data range ignoring the header row
For N = 2 To RRow
    'If a cell has a bold font then place a leading 0 value against the cell value
    If ActiveSheet.Cells(N, 1).Font.Bold = True Then
        ActiveSheet.Cells(N, 1).Value = "0" & ActiveSheet.Cells(N, 1).Value
    End If
Next N

'Clear any previous sort parameters
ActiveSheet.Sort.SortFields.Clear

'Sort the tabular data range. All the values with a leading 0 value will move to the top
ActiveSheet.Range(Cells(1, 1), Cells(RRow, RCol)).Sort Key1:=Cells(1, 1), Header:=xlYes

'Iterate through all the rows in the tabular data range ignoring the header row
For N = 2 To RRow
    'If a cell has a bold font then remove the leading 0 value from the cell value to _
    '   restore the original values
    If ActiveSheet.Cells(N, 1).Font.Bold = True Then
        ActiveSheet.Cells(N, 1).Value = Mid(ActiveSheet.Cells(N, 1).Value, 2)
    End If
Next N

'Turn screen updating back on
Application.ScreenUpdating = True

End Sub
The code works out the size of the tabular data range using the ‘UsedRange’ object and then iterates through all the rows within it. When a bold font is found, a leading zero is placed in front of the cell value.
A sort then takes place. As the sort is in ascending order, anything with a zero in front will go to the top of the list.
The code then iterates through all the rows and removes the leading zeroes, restoring the data to its original values.
This code sorts using bold fonts as a criterion, but you could easily use other cell characteristics in the same way, e.g., italic font, point size of text, underscore font, font name, etc.