
I am going to write a long script that will perform actions on at
least 5 Workbooks
Good question, short answer is that you can open 5 workbooks in one Application object.
If you’re in excel (else see below) then you already have an Excel.Application. You can then set each workbook to a different object or reference them by name:
dim wb1, wb2 as Excel.Workbook, wb3 as New Excel.Workbook 'blank is
same as Variant set wb1 = application.open("path/wb.xlsx") msgbox
wb1.name                  'ref by object msgbox
workbooks("wb.xlsx").name 'ref by name
My understanding is that if I need to perform actions on an excel
document and the application is closed then I should use New
Excel.Application
If you’re outside Excel (like in Access) then you may want to create an Excel.Application object, here are some tips:
Dim nXlApp as New Excel.Application
has the same effect as:
Dim xlApp as Excel.Application
Set xlApp = New Excel.Application             'Early Binding
Set xlApp = CreateObject(“Excel.Application”) 'Late Binding
Do not define (dim) inside a loop, however you can instantiate (Set) the same object as many times as you want. If you’re using a global object (which is not recommended but sometimes handy) inside a control (button, etc) you may use something like this:
if xlApp is Nothing then set xlApp = CreateObject(“Excel.Application”)
When you’re done don’t forget to clean house!
wb1.Close False
set wb1 = Nothing 'do this once for each defined object, anything using New/Set
See also,
- Difference between CreateObject(«Excel.Application») .Workbooks.Open and just Workbooks.Open
- https://support.microsoft.com/en-us/kb/288902 (GetObject and CreateObject behavior)
Excel Macros — Overview
An Excel macro is an action or a set of actions that you can record, give a name, save and run as many times as you want and whenever you want. When you create a macro, you are recording your mouse clicks and keystrokes. When you run a saved macro, the recorded mouse clicks and keystrokes will be executed in the same sequence as they are recorded.
Macros help you to save time on repetitive tasks involved in data manipulation and data reports that are required to be done frequently.
Macro and VBA
You can record and run macros with either Excel commands or from Excel VBA.
VBA stands for Visual Basic for Applications and is a simple programming language that is available through Excel Visual Basic Editor (VBE), which is available from the DEVELOPER tab on the Ribbon. When you record a macro, Excel generates VBA code. If you just want to record a macro and run it, there is no need to learn Excel VBA. However, if you want to modify a macro, then you can do it only by modifying the VBA code in the Excel VBA editor.
You will learn how to record a simple macro and run it with Excel commands in the chapter — Creating a Simple Macro. You will learn more about macros and about creating and / or modifying macros from Excel VBA editor in the later chapters.
Personal Macro Workbook
A macro can be saved in the same workbook from where you recorded it. In that case, you can run the macro from that workbook only and hence you should keep it open. Excel gives you an alternative way to store all your macros. It is the personal macro workbook, where you can save your macros, which enables you to run those macros from any workbook.
You will learn about Personal Macro Workbook in the chapter — Saving all your Macros in a Single Workbook.
Macro Security
Macros will be stored as VBA code in Excel. As with the case of any other code, macro code is also susceptible to malicious code that can run when you open a workbook. This is a threat to your computer. Microsoft provided with the Macro Security facility that helps you in protecting your computer from such macro viruses.
You will learn more about this in the chapter — Macro Security.
Absolute References and Relative References
While recording a macro, you can use either absolute references or relative references for the cells on which you are clicking. Absolute references make your macro run at the same cells where you recorded the macro. On the other hand, relative references make your macro run at the active cell.
You will learn about these in the chapters — Using Absolute References for a Macro and Using Relative References for a Macro.
Macro Code in VBA
You can record and run macros from Excel even if you do not know Excel VBA. However, if you have to modify a recorded macro or create a macro by writing VBA code, you should learn Excel VBA. You can refer to the Excel VBA tutorial in this tutorials library for this
However, you should know how to view the macro code. You can learn how to access VBA editor in Excel and about the different parts of the VBA editor in the chapter – Excel VBA.
You can learn how to view the macro code in Excel VBA editor and you can understand the macro code in the chapter — Understanding Macro Code.
Assigning Macros to Objects
You can assign a macro to an object such as a shape or a graphic or a control. Then, you can run the macro by clicking on that object. You will learn about this in the chapter — Assigning Macros to Objects.
Running Macros
Excel provides several ways to run a macro. You can choose the way you want to run a macro. You will learn about these different possible ways of running a macro in the chapter — Running a Macro.
Creating a Macro Using VBA Editor
If you decide to write the macro code, you can learn it in the chapter — Creating a Macro Using VBA Editor. However, the prerequisite is that you should have Excel VBA knowledge.
Editing a Macro
You can modify macro code in Excel VBA editor. If you want to make extensive changes, you should have Excel VBA knowledge. But, if you want to make only minor changes to the code or if you want to copy the VBA code from a recorded macro to another macro, you can refer to the chapter — Editing a Macro.
You can rename a macro and even delete it. You will learn about this also in the same chapter.
User Forms
A Form is normally used to collect required information. It will be self-explanatory making the task simple. Excel User Forms created from Excel VBA editor serve the same purpose, providing the familiar options such as text boxes, check boxes, radio buttons, list boxes, combo boxes, scroll bars, etc. as controls.
You will learn how to create a User Form and how to use the different controls in the chapter – User Forms.
Debugging Macro Code
At times, a macro may not run as expected. You might have created the macro or you might be using a macro supplied to you by someone. You can debug the macro code just as you debug any other code to uncover the defects and correct them. You will learn about this in the chapter — Debugging Macro Code.
Configuring a Macro to Run on Opening a Workbook
You can make your macro run automatically when you open a workbook. You can do this either by creating an Auto_Run macro or by writing VBA code for workbook open event. You will learn this in the chapter — Configuring a Macro to Run on Opening a Workbook.
Excel Macros — Creation
You can create a macro with Excel commands by recording the key strokes and mouse clicks, giving the macro a name and specifying how to store the macro. A macro thus recorded can be run with an Excel command.
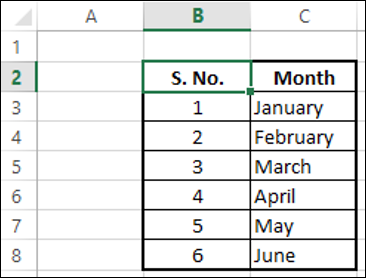
Suppose you have to collect certain results repeatedly in the following format −
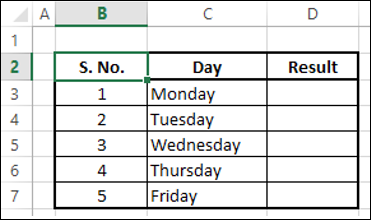
Instead of creating the table each time, you can have a macro to do it for you.
Recording a Macro
To record a macro do the following −
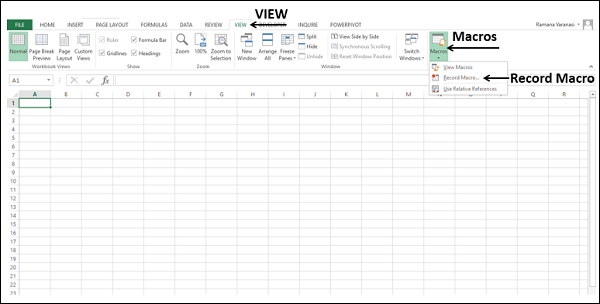
- Click the VIEW tab on the Ribbon.
- Click Macros in the Macros group.
- Select Record Macro from the dropdown list.
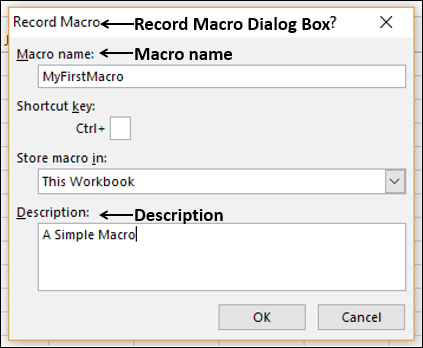
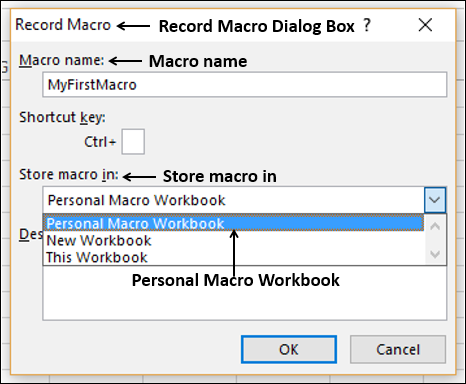
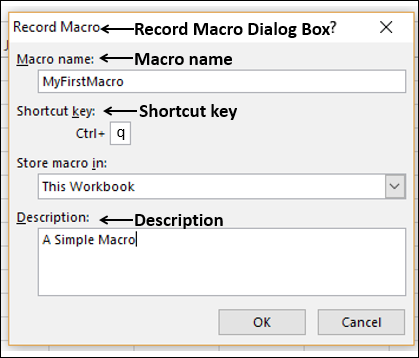
The Record Macro dialog box appears.
-
Type MyFirstMacro in the Macro name box.
-
Type A Simple Macro in the Description box and click OK.
Remember that whatever key strokes and mouse clicks you do, will be recorded now.
-
Click in the cell B2.
-
Create the table.
-
Click in a different cell in the worksheet.
-
Click the VIEW tab on the Ribbon.
-
Click Macros.
-
Select Stop Recording from the dropdown list.
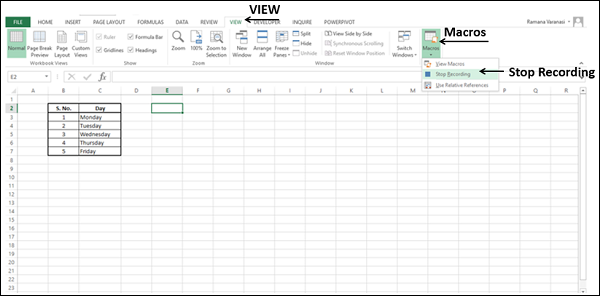
Your macro recording is completed.
The first step to click on a particular cell is important as it tells where exactly the macro has to start placing the recorded steps. Once you are done with the recording, you have to click Stop Recording to avoid recording of unnecessary steps.
Running a Macro
You can run the macro you have recorded any number of times you want. To run the macro, do the following −
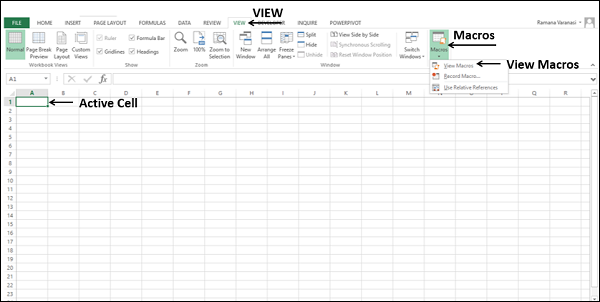
- Click on a new worksheet.
Note the active cell. In our case, it is A1.
-
Click the VIEW tab on the Ribbon.
-
Click Macros.
-
Select View Macros from the dropdown list.

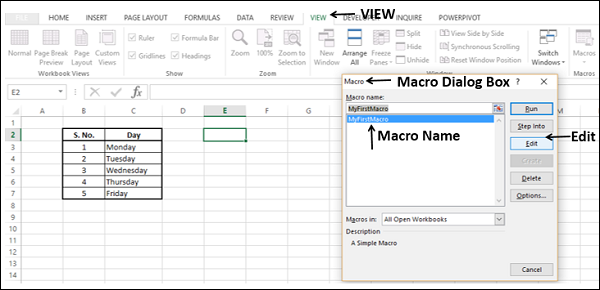
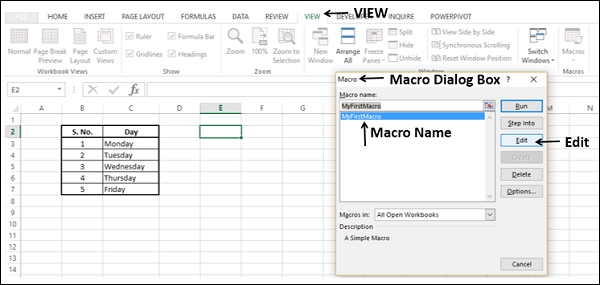
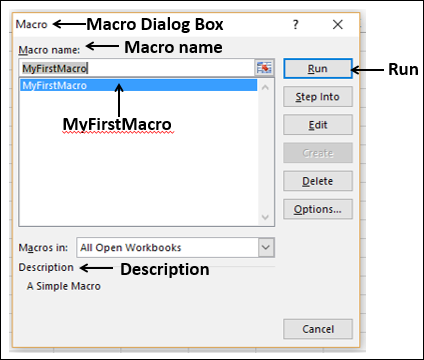
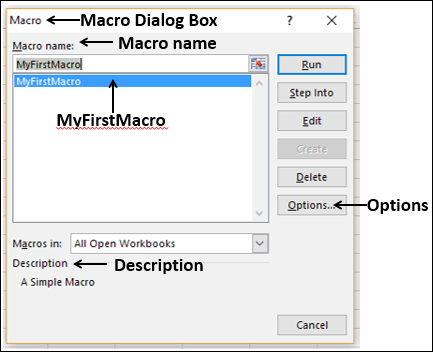
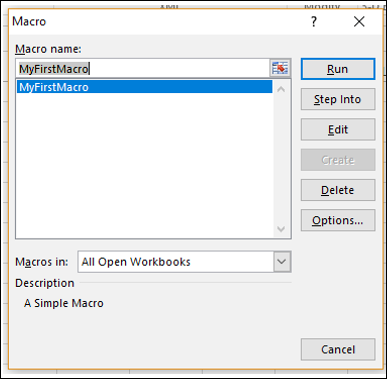
The Macro dialog box appears.
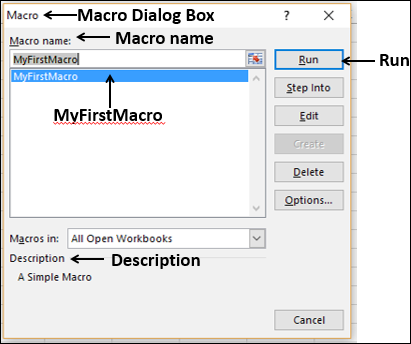
Only the macro that you recorded appears in the Macros list.
-
Click the macro name – MyFirstMacro in the Macro dialog box. The description you typed while recording the macro will get displayed. Macro description allows you to identify for what purpose you have recorded the macro.
-
Click the Run button. The same table that you have created while recording the macro will appear in just a split of a second.

You have discovered the magic wand that Excel provides you to save time on mundane tasks. You will observe the following −
-
Though the active cell before running the macro was A1, the table is placed in the cell B2 as you have recorded.
-
In addition, the active cell became E2, as you have clicked that cell before you stopped recording.
You can run the macro in multiple worksheets with different active cells before running the macro and observe the same conditions as given above. Just keep a note of this and you will understand later in this tutorial why it has occurred so.
You can also have a macro recording that places your recorded steps in the active cell. You will learn how to do this as you progress in the tutorial.
Storing a Macro
You might wonder how to save the macros that are created. In this context you need to know −
- Storing a macro
- Saving a macro enabled file
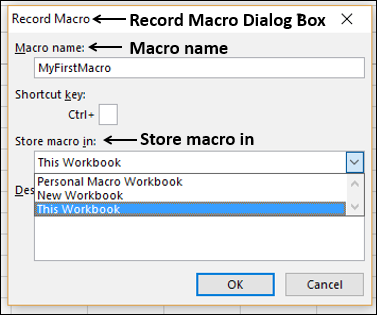
As and when you create a macro, you can choose where to store that particular macro. You can do this in the Record Macro dialog box.
Click the box — Store macro in. The following three options are available −
- This Workbook.
- New Workbook.
- Personal Macro Workbook
This Workbook
This is the default option. The macro will be stored in your current workbook from where you created the macro.
New Workbook
This option, though available, is not recommended. You will be asking Excel to store the macro in a different new workbook and mostly it is not necessary.
Personal Macro Workbook
If you create several macros that you use across your workbooks, Personal Macro Workbook provides you with the facility to store all the macros at one place. You will learn more about this option in the next chapter.
Saving a Macro Enabled File
If you had chosen This Workbook as the option for storing the macro, you would need to save your workbook along with the macro.
Try to save the workbook. By default, you would be asking Excel to save the workbook as an .xls file. Excel displays a message saying that an Excel feature VB project cannot be saved in a macro free workbook, as shown below.
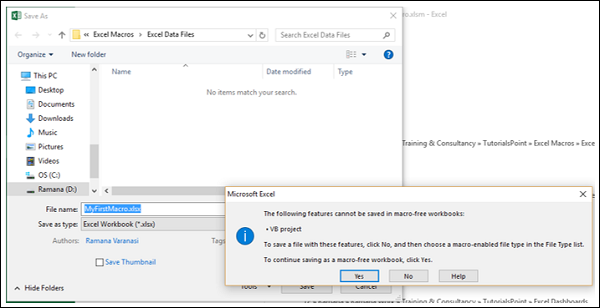
Note − If you click Yes, Excel will save your workbook as a macro free .xls file and your macro that you stored with This Workbook option will not get saved. To avoid this, Excel provides you an option to save your workbook as a macro-enabled workbook that will have .xlsm extension.
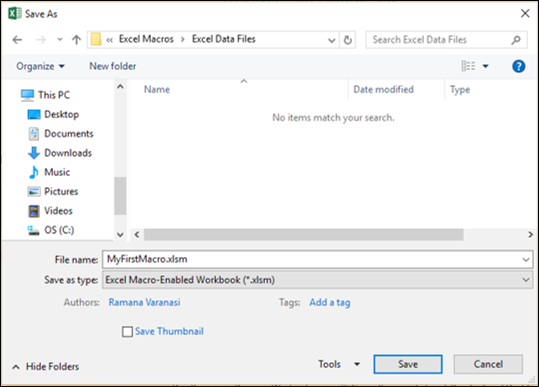
- Click No in the warning message box.
- Select Excel Macro-Enabled Workbook (*.xlsm) in the Save as type.
- Click Save.
You will learn more about these in later chapters in this tutorial.
Excel Macros — Macros in a Single Workbook
Excel provides you with a facility to store all your macros in a single workbook. The workbook is called Personal Macro Workbook — Personal.xlsb. It is a hidden workbook stored on your computer, which opens every time you open Excel. This enables you to run your macros from any workbook. There will be a single Personal Macro Workbook per computer and you cannot share it across computers. You can view and run the macros in your Personal Macro Workbook from any workbook on your computer.
Saving Macros in Personal Macro Workbook
You can save macros in your Personal Macro Workbook by selecting it as the storing option while recording the macros.
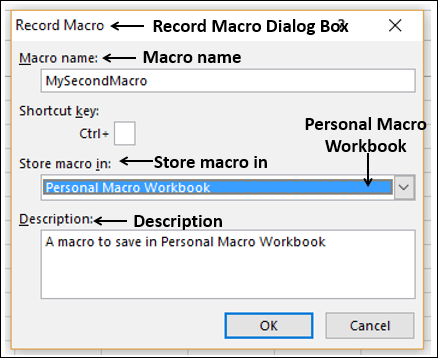
Select Personal Macro Workbook from the drop down list under the category Store macro in.
- Record your second macro.
- Give macro details in the Record Macro dialog box as shown below.
- Click OK.
Your recording starts. Create a table as shown below.
-
Stop recording.
-
Click the VIEW tab on the Ribbon.
-
Click Macros.
-
Select View Macros from the dropdown list. The Macro dialog box appears.
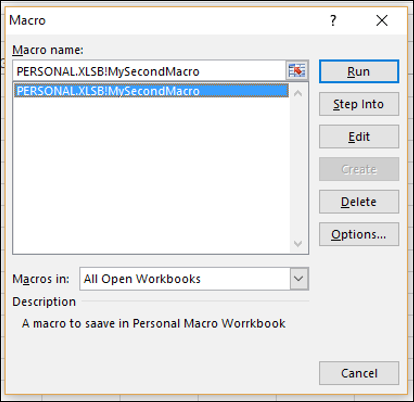
The macro name appears with a prefix PERSONAL.XLSB! indicating that the Macro is in the Personal Macro Workbook.
Save your workbook. It will get saved as an .xls file as the macro is not in your workbook and close Excel.
You will get the following message regarding saving the changes to the Personal Macro Workbook −
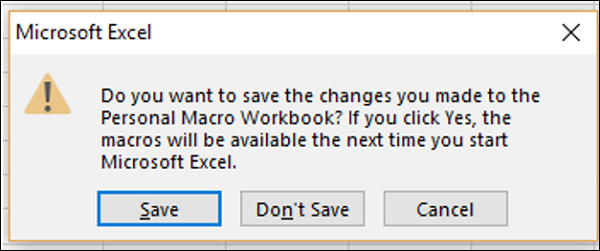
Click the Save button. Your macro is saved in the Personal.xlsb file on your computer.
Hiding / Unhiding Personal Macro Workbook
Personal Macro Workbook will be hidden, by default. When you start Excel, the personal macro workbook is loaded but you cannot see it because it is hidden. You can unhide it as follows −
-
Click the VIEW tab on the Ribbon.
-
Click Unhide in the Window group.
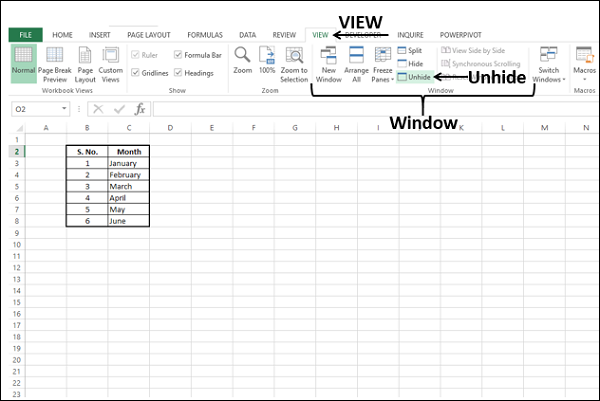
The Unhide dialog box appears.
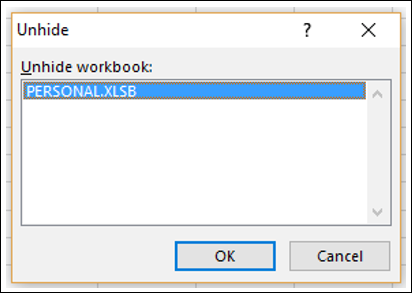
PERSONAL.XLSB appears in the Unhide workbook box and click OK.
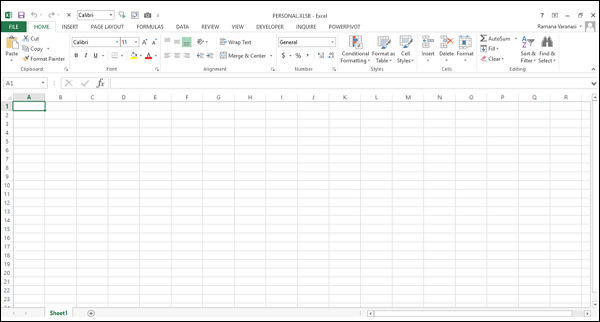
Now you can view the macros saved in the personal macro workbook.
To hide the personal macro workbook, do the following −
- Click on the personal macro workbook.
- Click the VIEW tab on the Ribbon.
- Click Hide on the Ribbon.
Running Macros Saved in Personal Macro Workbook
You can run the macros saved in personal macro workbook from any workbook. To run the macros, it does not make any difference whether the personal macro workbook is hidden or unhidden.
- Click View Macros.
- Select the macro name from the macros list.
- Click the Run button. The macro will run.
Adding / Deleting Macros in Personal Macro Workbook
You can add more macros in personal macro workbook by selecting it for Store macro in option while recording the macros, as you had seen earlier.
You can delete a macro in personal macro workbook as follows −
- Make sure that the personal macro workbook is unhidden.
- Click the macro name in the View Macros dialog box.
- Click the Delete button.
If the personal macro workbook is hidden, you will get a message saying “Cannot edit a macro on a hidden workbook”.
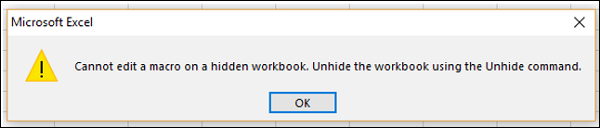
Unhide the personal macro workbook and delete the selected macro.
The macro will not appear in the macros list. However, when you create a new macro and save it in your personal workbook or delete any macros that it contains, you will be prompted to save the personal workbook just as in the case you saved it first time.
Excel Macros — Security
The macros that you create in Excel would be written in the programming language VBA (Visual Basic for Applications). You will learn about the Excel macro code in later chapters. As you are aware, when there is an executable code, there is a threat of viruses. Macros are also susceptible to viruses.
What are Macro Viruses?
Excel VBA in which the Macros are written has access to most Windows system calls and executes automatically when workbooks are opened. Hence, there is a potential threat of the existence of a virus written as a macro and is hidden within Excel that are executed on opening a workbook. Therefore, Excel macros can be very dangerous to your computer in many ways. However, Microsoft has taken appropriate measures to shield the workbooks from macro viruses.
Microsoft has introduced macro security so that you can identify which macros you can trust and which you cannot.
Macro Enabled Excel Workbooks
The most important Excel macro security feature is — file extensions.
Excel workbooks will be saved with .xlsx file extension by default. You can always trust workbooks with .xlsx file extension, as they are incapable of storing a macro and will not carry any threat.
Excel workbooks with macros are saved with .xlsm file extension. They are termed as Macro Enabled Excel Workbooks. Before you open such workbooks, you should make sure that the macros they contain are not malicious. For this, you must ensure that you can trust the origin of this type of workbooks.
Ways of Trusting Macro Enabled Workbook
Excel provides three ways to trust a macro enabled workbook.
-
Placing the macro enabled workbooks in a trusted folder
-
Checking if a macro is digitally signed
-
Enabling security alert messages before opening macro enabled workbooks
Placing the macro enabled workbooks in a trusted folder
This is the easiest and best way to manage macro security. Excel allows you to designate a folder as a trusted location. Place all your macro-enabled workbooks in that trusted folder. You can open macro-enabled workbooks that are saved to this location without warnings or restrictions.
Checking if a macro is digitally signed
Digital signatures confirm the identity of the author. You can configure Excel to run digitally signed macros from trusted persons without warnings or restrictions. Excel will also warn the recipient if it has been changed since the author signed it.
Enabling security alert messages before opening macro enabled workbooks
When you open a workbook, Excel warns you that the workbook contains macros and asks whether you wish to enable them. You can click the Enable Content button if the source of the workbook is reliable.

You can set any of these three options in the Trust Center in the Excel Options.
If you work in an organization, the system administrator might have changed the default settings to prevent anyone from changing the settings. Microsoft advises that you do not change security settings in the Trust Center as the consequences can be loss of data, data theft or security compromises on your computer or network.
However, you can learn the macro security settings in the following sections and check if they are to be changed. You have to use your own instinct to decide on any of these options based on the context and your knowledge of the file origin.
Macro Security Settings in Trust Center
The macro settings are located in the Trust Center in the Excel Options. To access the Trust Center, do the following −
-
Click the FILE tab on the Ribbon.
-
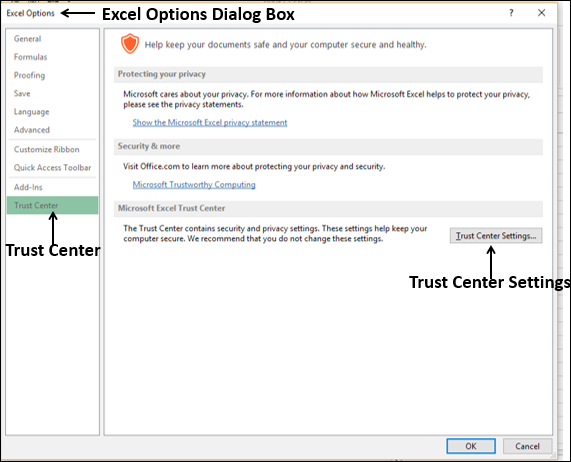
Click Options. The Excel Options dialog box appears.
-
Click Trust Center in the left pane.
-
Click the Trust Center Settings button under Microsoft Excel Trust Center.
The Trust Center dialog box appears.
You will see various options available in the Excel Trust Center in the left pane. You will learn about the options related to Excel macros in the following sections.
Macro Settings
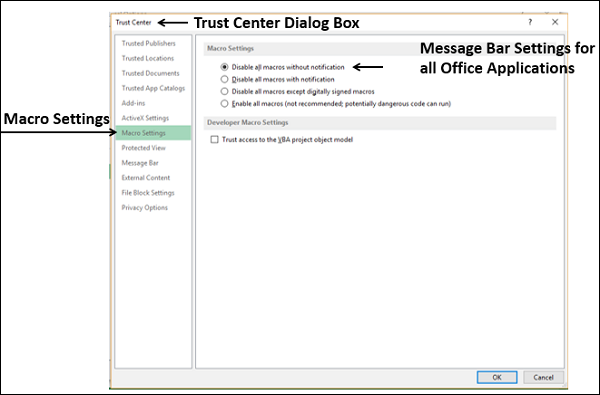
Macro settings are located in the Trust Center.
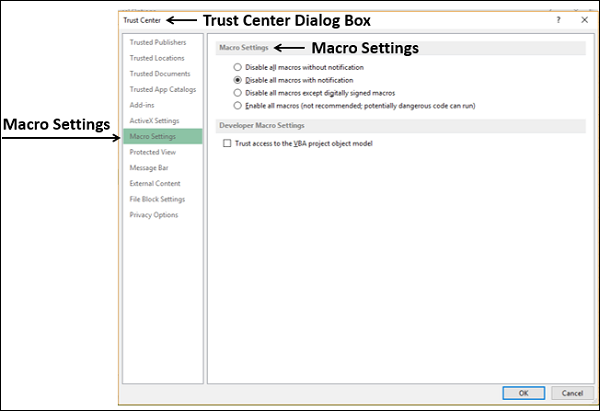
Under Macro Settings, four options are available.
-
Disable all macros without notification − If this option is chosen, Macros and security alerts about macros are disabled.
-
Disable all macros with notification − Macros are disabled, but security alerts appear if there are macros present. You can enable macros on a case-by-case basis.
-
Disable all macros except digitally signed macros − Macros are disabled but security alerts appear if there are macros present. However, if the macro is digitally signed by a trusted publisher, the macro runs if you trust the publisher. If you have do not trust the publisher, you will be notified to enable the signed macro and trust the publisher.
-
Enable all macros (not recommended, susceptible to macro viruses) − If this option is chosen, all macros run. This setting makes your computer vulnerable to potentially malicious code.
You have an additional security option under Developer Macro Settings with a Check box.
-
Trust access to the VBA project object model.
-
This option allows programmatic access to the Visual Basic for Applications (VBA) object model from an automation client.
-
This security option is for code written to automate an Office program and manipulate the VBA environment and object model.
-
It is a per-user and per-application setting, and denies access by default, hindering unauthorized programs from building harmful self-replicating code.
-
For automation clients to access the VBA object model, the user running the code must grant access. To turn on access, select the check box.
-
Defining a Trusted Location
If you think that a macro-enabled workbook is from a reliable source, it is better to move the file to the trusted location identified by Excel, instead of changing the default Trust Center settings to a less-safe macro security setting.
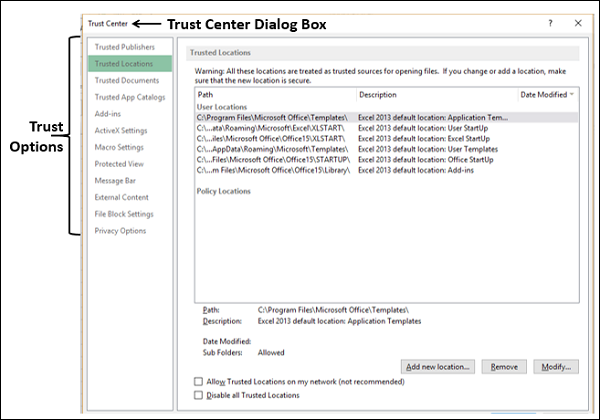
You can find the trusted folder settings in the Trust Center.
Click the Trusted Locations in the Trust Center dialog box. The Trusted Locations set by Microsoft Office appear on the right side.
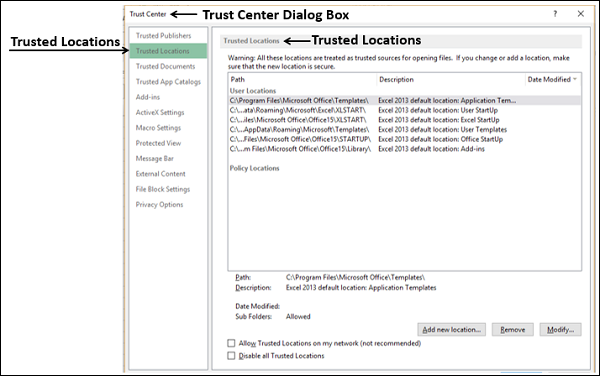
You can add new locations, remove the existing locations and modify the existing locations. The identified trusted locations will be treated by Microsoft office as reliable for opening files. However, if you add or modify a location, ensure that the location is secure.
You can also find the options that office does not recommend, such as locations on internet.
Digitally Signed Macros from Reliable Sources
Microsoft provides an option to accommodate digitally signed macros. However, even if a macro is digitally signed, you need to ensure that it is from a trusted publisher.
You will find the trusted publishers in in the Trust Center.
-
Click Trusted Publishers in the Trust Center dialog box. A list of certificates appear on the right side with the details – Issued To, Issued By and Expiration Date.
-
Select a certificate and click View.
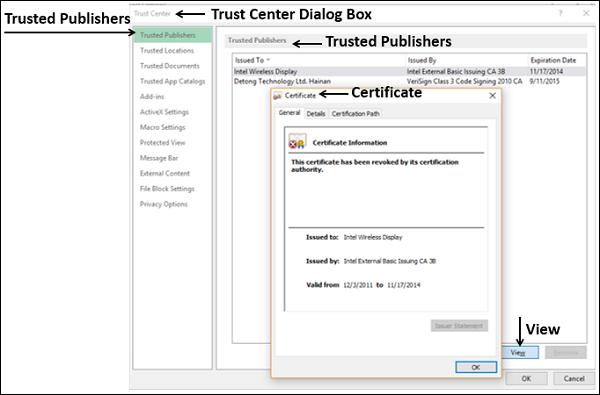
The certificate information is displayed.
As you have learnt earlier in this chapter, you can set an option to run a macro that is digitally signed only if you trust the publisher. If you do not trust the publisher, you will be notified to enable the signed macro and trust the publisher.
Using Warning Messages
The Message Bar displays security alert when there are macros in the file that you are opening. The yellow Message Bar with a shield icon alerts you that the macros are disabled.

If you know that the macro or macros are from a reliable source, you can click n the Enable Content button on the Message Bar, to enable the macros.
You can disable the Message Bar option if you do not want security alerts. On the other hand, you can enable the Message Bar option to increase security.
Enabling / Disabling Security Alerts on the Message Bar
You can enable / disable security alerts with Message Bars as follows −
- Click the FILE tab on the Ribbon.
- Click Options. The Excel Options dialog box appears.
- Click Trust Center.
- Click the Trust Center Settings button.
- Click Message Bar.
The Message Bar Settings for all Office Applications appear.
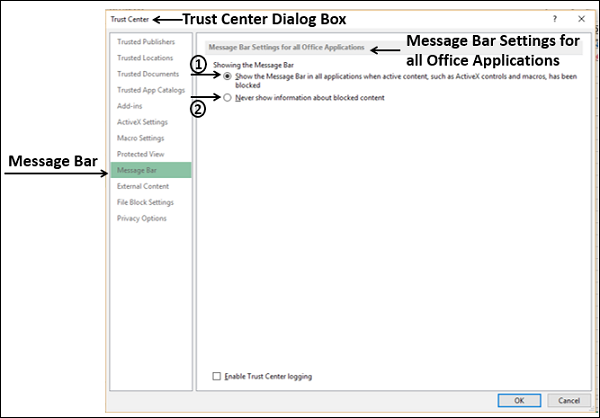
There are two options under — Showing the Message Bar.
Option 1 − Show the Message Bar in all applications when active content such as macros is blocked.
-
This is the default option. The Message Bar appears when potentially unsafe content has been disabled.
-
If you had selected — Disable all macros without notification in the Macro Settings of the Trust Center, this option is not selected and the Message Bar does not appear.
Option 2 − Never show information about blocked content.
If this option if selected, it disables the Message Bar and no alerts appear about security issues, regardless of any security settings in the Trust Center.

Excel Macros — Absolute References
Excel macros can be recorded either with absolute references or relative references. A macro recorded with absolute references places the recorded steps exactly in the cells where it was recorded, irrespective of the active cell. On the other hand, a macro recorded with relative references can perform the recorded tasks at different parts on the worksheet.
You will learn about absolute references for macro in this chapter. You will learn about relative references in the next chapter.
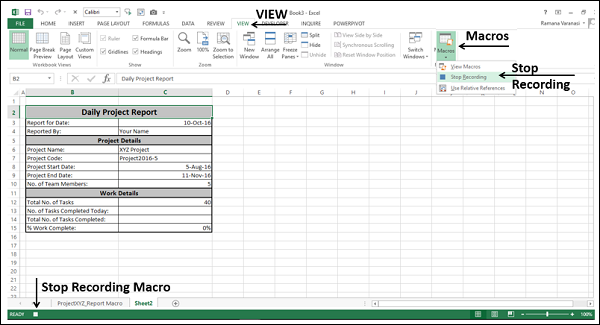
Suppose you have to submit a report about your team’s work at the end of every day in the following format −
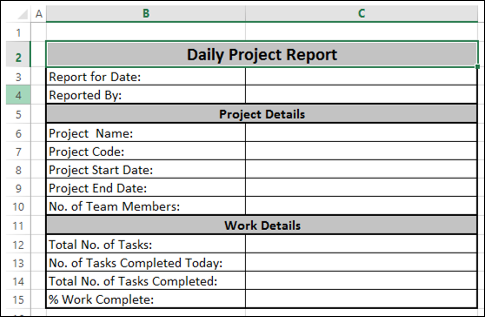
Now, the report should be placed in the cell B2 and should be in the given format.
A sample filled in report will be as shown below −
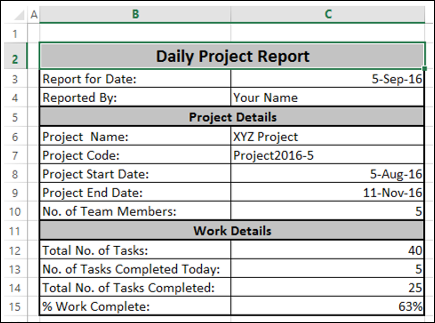
Except for the data in the following cells, the information is constant for every report that you generate for the project.
- C3 – Report for Date.
- C13 – No. of Tasks Completed Today.
- C14 – Total No. of Tasks Completed.
- C15 – % Work Complete.
Of these also, in C3 (Report for Date) you can place the Excel function = TODAY () that places the date of your report without your intervention. Further, in cell C15, you can have the formula C14/C12 and format the cell C15 as percentage to have the % Work Complete calculated by Excel for you.
This leaves you with only two cells – C13 and C14 that need to be filled in by you every day. Hence, it would be ideal to have information for the rest of the cells, every time you have to create the report. This saves time for you and you can do the mundane activity of reporting in just few minutes.
Now, suppose you have to send such reports for three projects. You can imagine the time you can save and take up more challenging work for the day and of course get the accolades from your management.
You can achieve this by recording a macro per project and running them on a day-to-day basis to generate the required reports in a matter of just few minutes. However, every time you run the macro, the report should appear on the worksheet as given above, irrespective of the active cell. For this, you have to use absolute references.
Ensuring Absolute References
To record a macro with absolute references, you have to ensure that the macro is being recorded starting from the cell where the steps have to start. This means, in the case of the example given in the previous section, you need to do the following −
- Start recording the macro.
- Create a new worksheet.
- Click in any cell other than B2 in the new worksheet.
- Click in the cell B2.
- Continue recording the macro.
This will create a new worksheet for every new report and get the report format placed in the cell B2 every time you run the macro.
Note − The first three steps given above are essential.
-
If you do not create a new worksheet, when you run the macro, it places whatever you recorded on the same worksheet at the same place. This is not what you want. You need to have every report on a different worksheet.
-
If you do not click in a different cell at the beginning of the recording, even if the active cell is B2, Excel places the recorded steps in the active cell. When you run the macro, it will place the recorded report format at any part of the worksheet based on the active cell. By explicitly clicking in a cell other than B2 and then the the cell B2, you are telling the recorder to always place your macro steps in the cell B2.
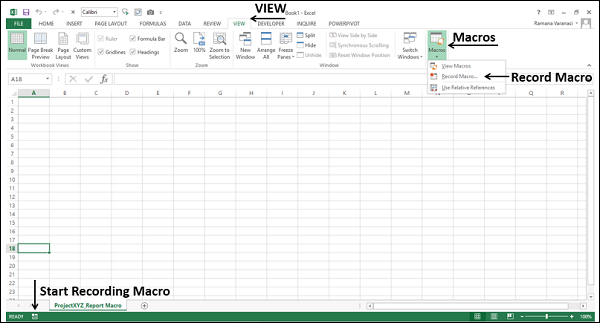
Recording a Macro
You can start recording the macro with the Record Macro command on the Ribbon under the VIEW tab → Macros. You can also click the Start Recording Macro button present on left side of the Excel task bar.
-
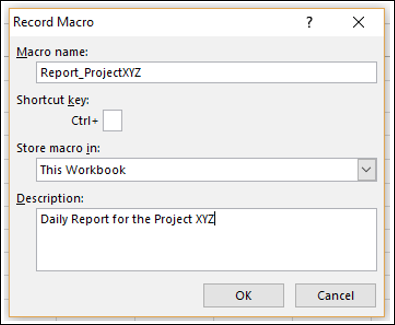
Start recording the macro. The Record Macro dialog box appears.
-
Give a meaningful name to identify the macro as a report of a particular project.
-
Select This Workbook under Store macro in, as you will produce reports from this specific workbook only.
-
Give a description to your macro and click OK.
Your macro starts recording.
-
Create a new worksheet. This ensures your new report will be on a new worksheet.
-
Click in any cell other than B2 in the new worksheet.
-
Click in the cell B2. This ensures that the macro places your recorded steps in B2 always.
-
Create the format for the report.
-
Fill in the static information for the project report.
-
Place = TODAY () in C3 and = C14/C12 in the cell C15.
-
Format the cells with dates.
Stop recording the macro.

You can stop recording the macro either with the Stop Recording command on the Ribbon under VIEW tab → Macros or by clicking the Stop Recording Macro button present on left side of the Excel task bar.
Your Project Report macro is ready. Save the workbook as a macro-enabled workbook (with .xlsm extension).
Running a Macro
You can generate any number of reports in a few seconds just by running the macro.
- Click the VIEW button on the Ribbon.
- Click Macros.
- Select View Macros from the dropdown list. The Macro dialog box appears.
- Click the macro Report_ProjectXYZ.
- Click the Run button.
A new worksheet will be created in your workbook, with the report stencil created in it in the cell B2.
Excel Macros — Relative References
Relative reference macros record an offset from the active cell. Such macros will be useful if you have to repeat the steps at various places in the worksheet.
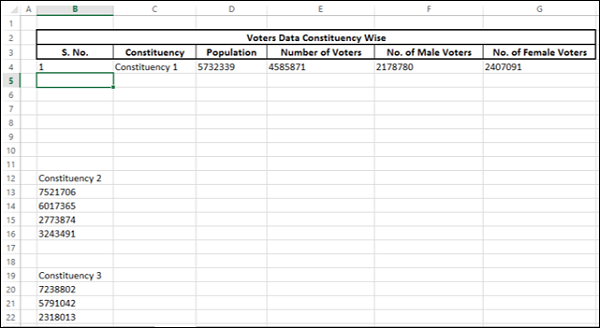
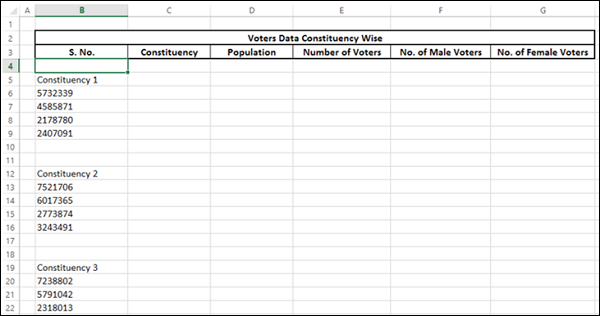
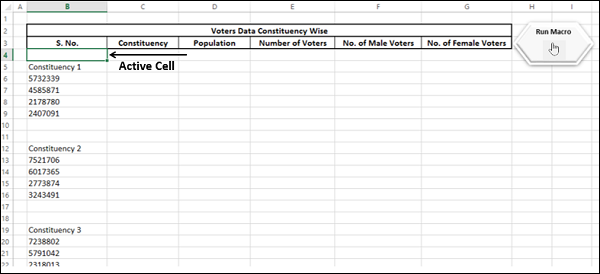
Suppose you are required to analyze the data of voters collected from 280 constituencies. For each constituency, the following details are collected −
- Constituency name.
- Total population in the constituency.
- Number of voters in the constituency.
- Number of male voters, and
- Number of female voters.
The data is provided to you in a worksheet as given below.
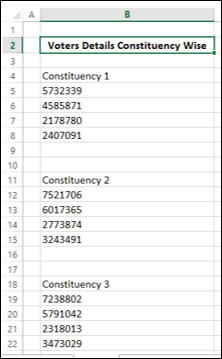
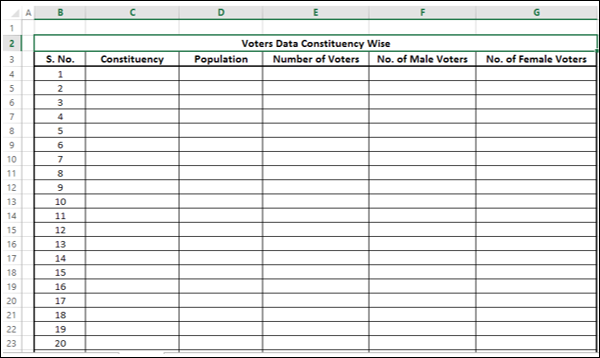
It is not possible to analyze the data in the above format. Therefore, arrange the data in a table as shown below.
If you attempt to arrange the given data in the above format −
-
It takes substantial amount of time to arrange the data from the 280 constituencies
-
It can be error prone
-
It becomes a mundane task not allowing you to focus on technical things
The solution is to record a macro so that you can complete the task in not more than a few seconds. The macro needs to use relative references, as you will move down the rows while arranging the data.
Using Relative References
In order to let the macro recorder know that it has to use relative references, do the following −
-
Click the VIEW tab on the Ribbon.
-
Click Macros.
-
Click Use Relative References.

Preparing the Data Format
The first step in arranging the above given data is to define the data format in a table with headers.
Create the row of headers as shown below.
Recording a Macro
Record the macro as follows −
-
Click Record Macro.
-
Give a meaningful name, say, DataArrange to the macro.
-
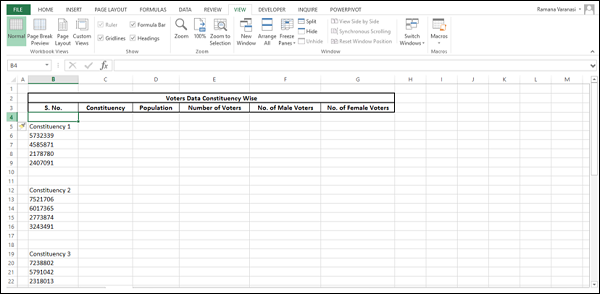
Type = row ()- 3 in the cell B4. This is because the S. No. is the current row number – the 3 rows above it.
-
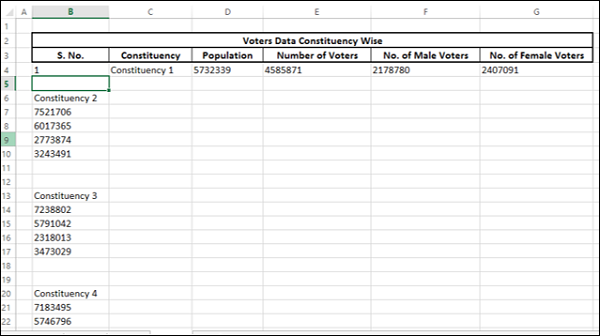
Cut the cells B5, B6, B7, B8 and B9 and paste it in the cells C4 to C8 respectively.
-
Now click in the cell B5. Your table looks as shown below.
The first data set is arranged in the first row of the table. Delete the rows B6 – B11 and click in the cell B5.
You can see that the active cell is B5 and the next data set will be placed here.
Stop recording the macro. Your macro for arranging the data is ready.
Running a Macro
You need to run the macro repeatedly to complete the data arrangement in the table as given below.
The active cell is B5. Run the macro. The second data set will be arranged in the second row of the table and the active cell will be B6.
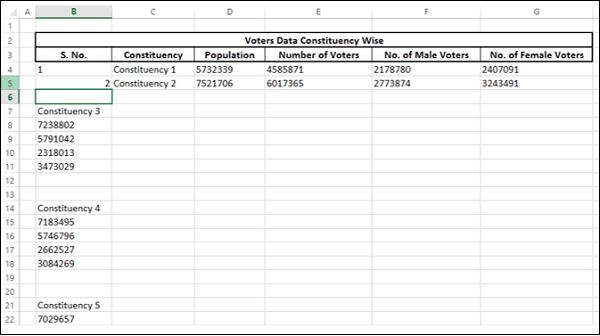
Run the macro again. The third data set will be arranged in the third row of the table and the active cell will become B7.
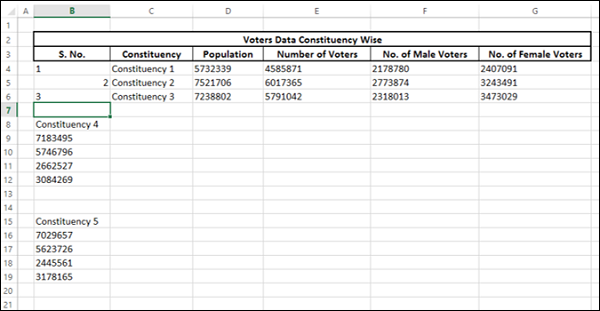
Each time you run the macro, the active cell advances to the next row, facilitating the repetition of recorded steps at the appropriate positions. This is possible because of the relative references in macro.
Run the macro until all the 280 data sets are arranged into 280 rows in the table. This process takes a few seconds and as the steps are automated, the entire exercise is error free.
Excel Macros — VBA
Excel stores the macros as Excel VBA (Visual Basic for Applications) code. After recording a macro, you can view the code that is generated, modify it, copy a part of it, etc. You can even write a macro code yourself if you are comfortable with programming in VBA.
You will learn how to create a macro, by writing a VBA code, in the chapter — Creating a Macro Using VBA Editor. You will learn how to modify a macro by editing VBA code in the chapter — Editing a Macro. You will learn the Excel VBA features in this chapter.
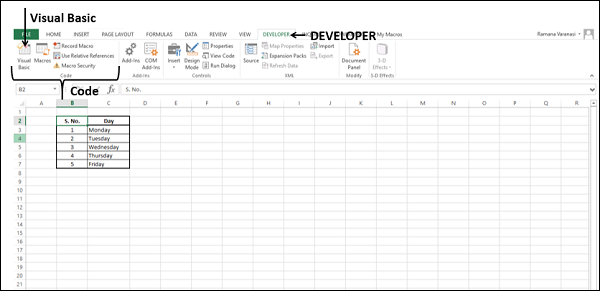
Developer Tab on the Ribbon
You can access macro code in VBA from the Developer tab on the Ribbon.
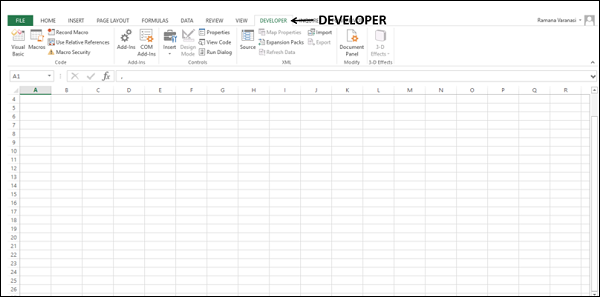
If you do not find the Developer tab on the Ribbon, you need to add it as follows −
-
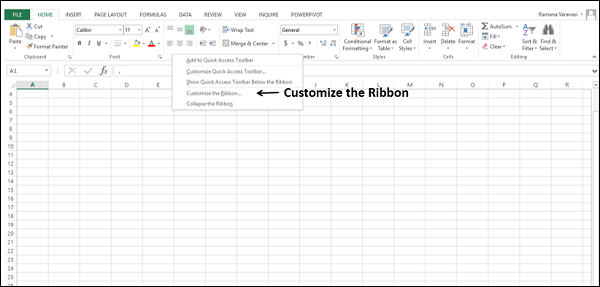
Right click on the Ribbon.
-
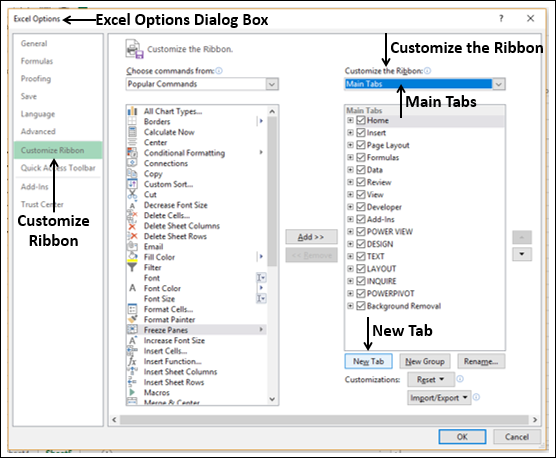
Select Customize the Ribbon from the dropdown list.
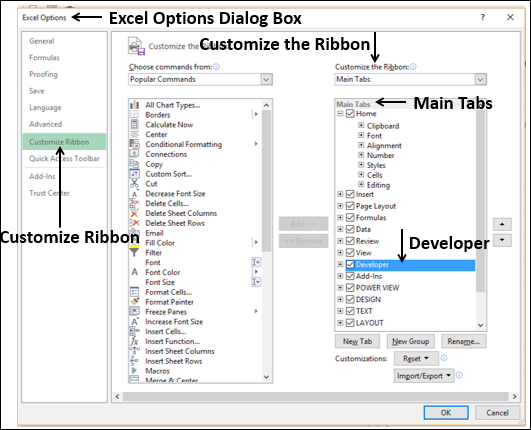
The Excel Options dialog box appears.
-
Select Main Tabs from Customize the Ribbon dropdown list.
-
Check the box – Developer in the Main Tabs list and click OK. The developer tab appears.
Developer Commands for Macros
You need to know the commands that are for macros under the developer tab.
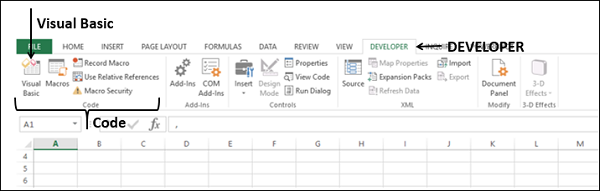
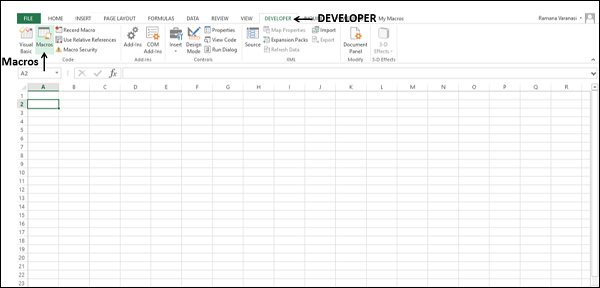
Click the DEVELOPER tab on the Ribbon. The following commands are available in the Code group −
- Visual Basic
- Macros
- Record Macro
- Use Relative References
- Macro Security
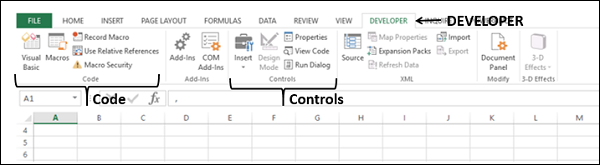
The Visual Basic command is used to open the VBA Editor in Excel and the Macros command is used to view, run and delete the macros.
You have already learnt the commands other than VBA Editor in the previous chapters.
VBA Editor
VBA Editor or VBE is the developer platform for VBA in Excel.
Open the workbook – MyFirstMacro.xlsm that you saved earlier in the chapter – Creating a Simple Macro, in this tutorial.
You can open the VBE in any of the two ways −
Option 1 − Click Visual Basic in the Code group under the Developer tab on the Ribbon.
Option 2 − Click Edit in the Macro dialog box that appears when you click VIEW tab → Macros → View Macros
VBE appears in a new window.
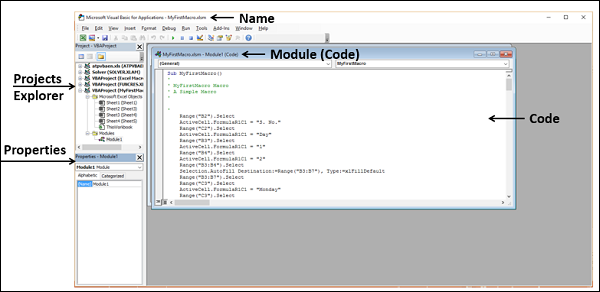
The name of your Excel macro enabled workbook name appears with the prefix – Microsoft Visual Basic for Applications.
You will find the following in the VBE −
- Projects Explorer.
- Properties.
- Module window with Code.
Projects Explorer
Project Explorer is where you find the VBA project names. Under a project, you will find Sheet names and Module names. When you click a module name, the corresponding code appears on the right side in a window.
Properties Window
The Properties are the parameters for VBA objects. When you have an object such as command button, its properties will appear in the Properties window.
Module Window with Code
The code of a macro will be stored in a module in VBA. When you select a macro and click Edit, the code of the macro appears in the corresponding module window.
Excel Macros — Understanding Codes
When you record a macro, Excel stores it as a VBA code. You can view this code in the VBA editor. You can understand the code and modify it if you have substantial knowledge of Excel VBA. You can refer to the Excel VBA tutorial in this tutorials library to obtain a grasp on the language.
However, you can still view the macro code in Excel VBA editor and match it to the steps that you recorded in macro. You will learn how to view the code and understand it for the first macro that you created in this tutorial – MyFirstMacro.
Viewing a Macro Code in VBA Editor
To view a macro code, do the following −
- Open the workbook in which you stored the macro.
- Click VIEW tab on the Ribbon.
- Click Macros.
- Select View Macros from the dropdown list.

The Macro dialog box appears.
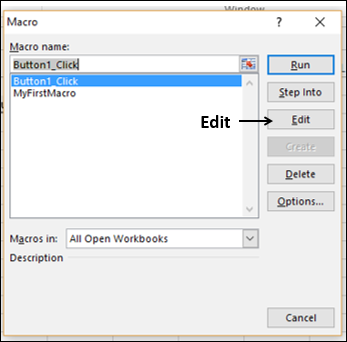
- Click MyFirstMacro in the macros list.
- Click the Edit button.
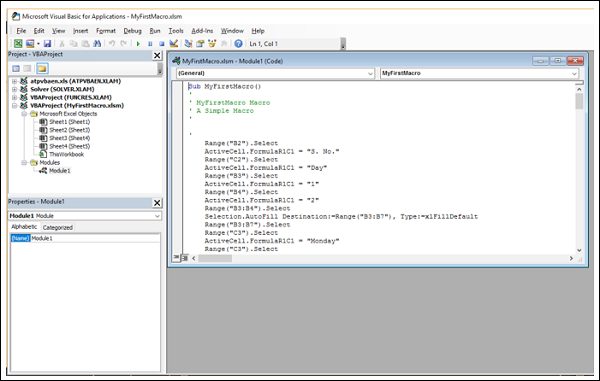
The VBA editor opens and the code of the macro MyFirstMacro appears.
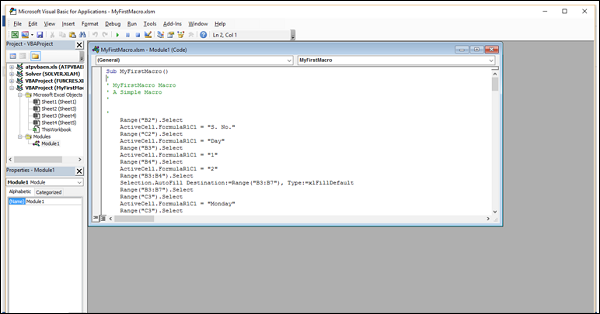
Understanding the Recorded Actions as Parts of Code
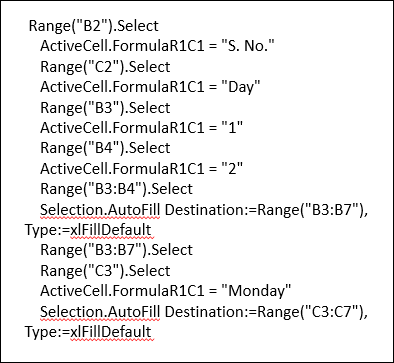
You can browse through the macro code and map them to your recorded steps.
- Start reading the code.
- Map the code to the recorded steps.
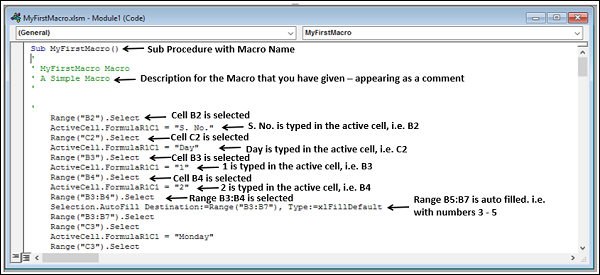
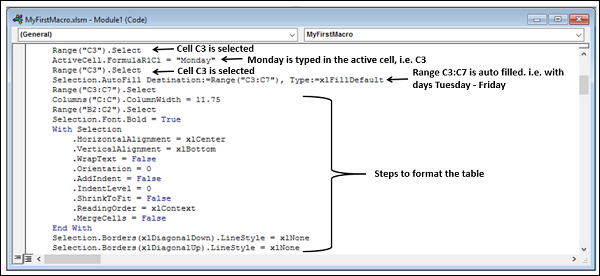
Scroll down the code to view more code. Alternatively, you can enlarge the code window.
Observe that the code is simple. If you learn Excel VBA, you can create the macros by writing the code in the VBA editor.
You will learn how to write a VBA code to create a macro in the chapter — Creating a Macro Using VBA Editor.
Excel Macros — Assigning Macros to Objects
Suppose you have created a macro that you need to execute several times. For example, the macros that you have created for absolute references and relative references. Then, it would be easy for you if you can run the macro using a mouse click. You can accomplish this by assigning the macro to an object such as a shape or a graphic or a control.
In this chapter, you will learn how to include an object in your workbook and assign a macro to it.
Recall the macro that you created using relative references. The macro arranges the data given in one column into a table to facilitate data analysis.
Assigning a Macro to a Shape
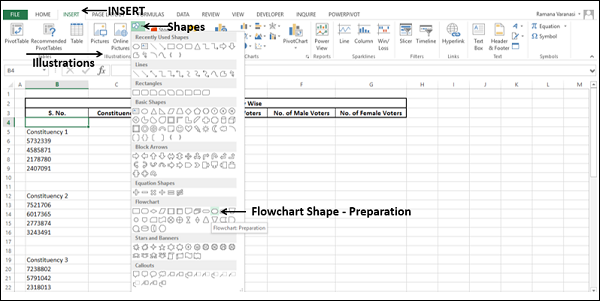
You can insert a shape in your worksheet that is in a meaningful form with self-explanatory text, which when clicked runs the macro assigned to it.
-
Click the INSERT tab on the Ribbon.
-
Click Shapes in the Illustrations group.
-
Select any of the ready-made shapes that appear in the dropdown list. For example, the Flowchart shape – Preparation, as you are in the process of preparing the data.
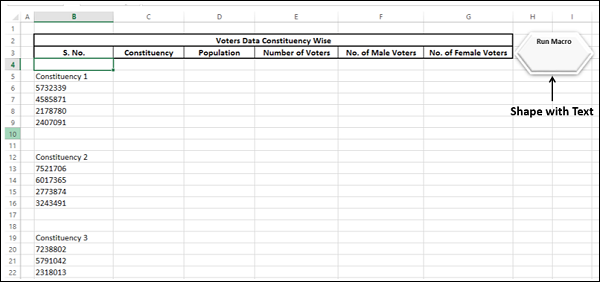
Draw the shape and format it.

-
Right click on the shape and select Edit Text from the dropdown list.
-
Type text inside the shape — Run Macro.
-
Format the text.
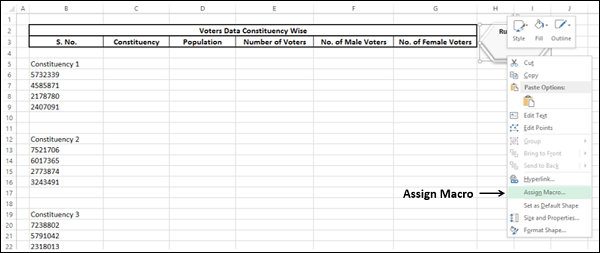
- Right click on the shape.
- Select Assign Macro from the dropdown list.
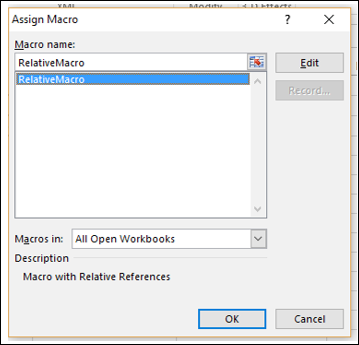
The Assign Macro dialog box appears. Click the macro name i.e. RelativeMacro and click OK.
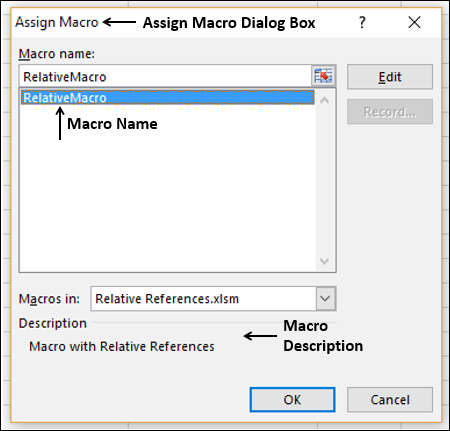
The macro is assigned to the shape.
-
Click in the cell where you have to run the macro say B4.
-
Move the cursor (pointer) onto the shape. The cursor (pointer) changes to finger.
Now click the shape. The macro will run. Just repeat the mouse clicks to run the macro several times and you are done with the task of arranging the data into a table in a matter of a few seconds.
Assigning a Macro to a Graphic
You can insert a graphic in the worksheet and assign a macro to it. The graphic can be chosen to visualize your macro. For example, you can have a graphic of table representing that the macro will arrange the data into a table.
- Click the INSERT tab on the Ribbon.
- Click Pictures in the Illustrations group.
- Select a file that contains your graphic.

The rest of the steps are the same as those of shape given in the previous section.
Assigning a Macro to a Control
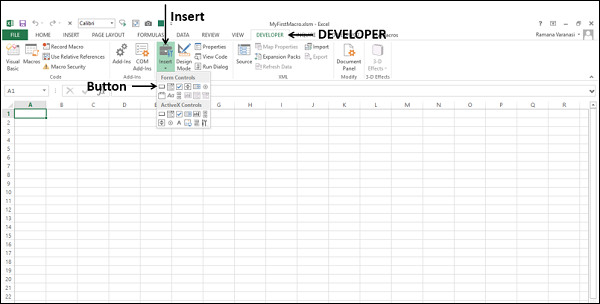
Inserting a VBA control and assigning a macro to it makes your work look professional. You can insert VBA controls from the Developer tab on the Ribbon.
-
Click the DEVELOPER tab on the Ribbon.
-
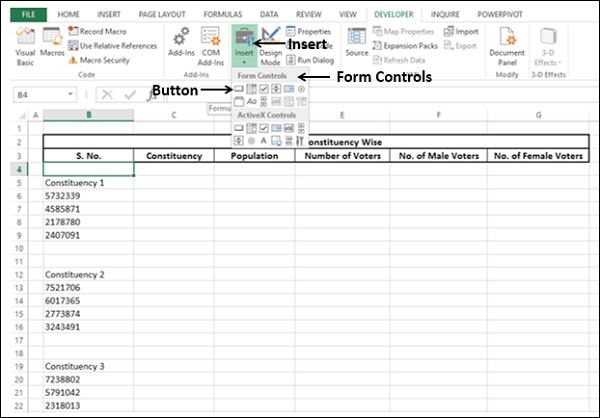
Click Insert in the Controls group.
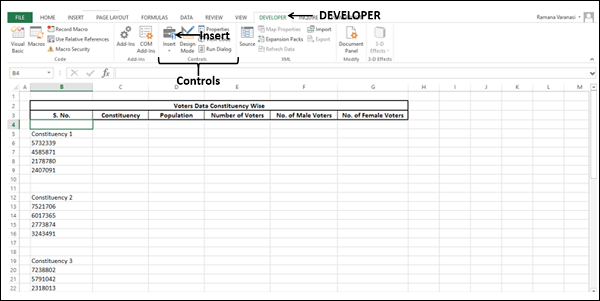
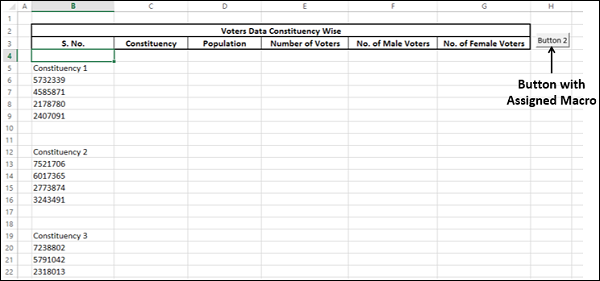
Select the Button icon under Form Controls from the dropdown list as shown in screenshot given below −
-
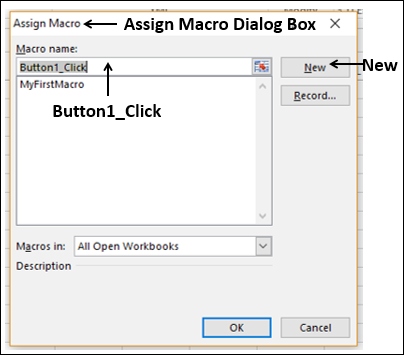
Click the cell on the worksheet where you want to insert the Button control. The Assign Macro dialog box appears.
-
Click the macro name and click OK.
The control button with the assigned macro will be inserted.
- Right click on the button.
- Click Edit Text.
- Type – Run Macro.
- Format Text and resize Button.
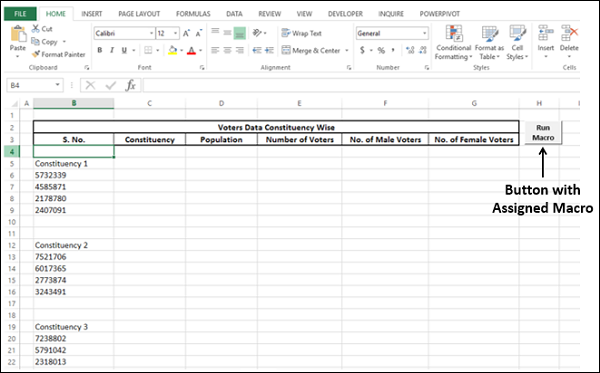
You can run the macro any number of times by just clicking the Button repeatedly.
Using Form Controls is an easy and effective way of interacting with the user. You will learn more about this in the chapter – Interacting with the User.
Excel Macros — Running a Macro
There are several ways of executing a macro in your workbook. The macro would have been saved in your macro enabled workbook or in your Personal macro workbook that you can access from any workbook as you had learnt earlier.
You can run a macro in the following ways −
- Running a Macro from the View Tab
- Running a Macro by pressing Ctrl plus a shortcut key
- Running a Macro by clicking a button on the Quick Access Toolbar
- Running a Macro by clicking a button in a Custom Group on the Ribbon
- Running a Macro by clicking on a Graphic Object
- Running a Macro from Developer Tab
- Running a Macro from VBA Editor
Running a Macro from View Tab
You have already learnt running a macro from the View tab on the Ribbon. A quick recap −
- Click the VIEW tab on the Ribbon.
- Click Macros.
- Select View Macros from the dropdown list.
The Macro dialog box appears.
- Click the macro name.
- Click the Run button.
Running a Macro with Shortcut Key
You can assign a shortcut key (Ctrl + key) for a macro. You can do this while recording the macro in the Create Macro dialog box. Otherwise, you can add this later in the Macro Options dialog box.
Adding a Shortcut Key While Recording a Macro
- Click the VIEW tab.
- Click Macros.
- Select Record Macro from the dropdown list.
The Create Macro dialog box appears.
- Type a macro name
- Type a letter, say q, in the box next to Ctrl + under Shortcut key.
Adding a Shortcut Key in Macro Options
- Click the VIEW tab.
- Click Macros.
- Select View Macros from the dropdown list.
The Macro dialog box appears.
- Select the macro name.
- Click the Options button.
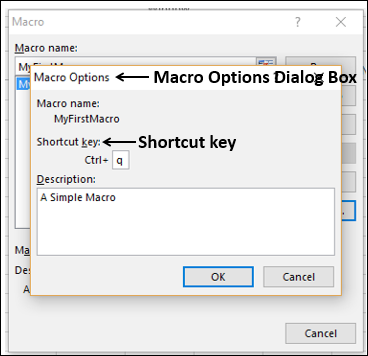
The Macro Options dialog box appears. Type a letter, say q, in the box next to Ctrl + under Shortcut key. Click OK.
To run the macro with the shortcut key, press the Ctrl key and the key q together. The macro will run.
Note − You can use any lowercase or uppercase letters for the shortcut key of a macro. If you use any Ctrl + letter combination that is an Excel shortcut key, you will override it. Examples include Ctrl+C, Ctrl+V, Ctrl+X, etc. Hence, use your jurisdiction while choosing the letters.
Running a Macro through Quick Access Toolbar
You can add a macro button to the Quick Access Toolbar and run the macro by clicking it. This option would be useful when you store your macros in personal macro workbook. The added button will appear on the Quick Access Toolbar in whatever workbook you open, thus making it easy for you to run the macro.
Suppose you have a macro with the name MyMacro in your personal macro workbook.
To add the macro button to the Quick Access Toolbar do the following −
-
Right click on the Quick Access Toolbar.
-
Select Customize Quick Access Toolbar from the dropdown list.
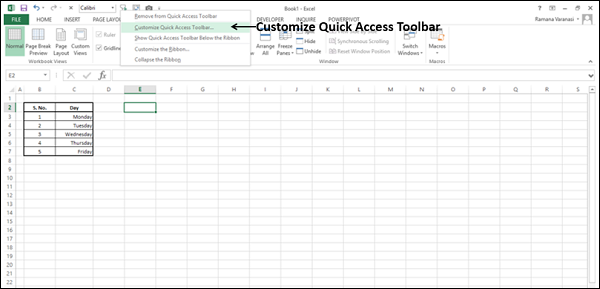
The Excel Options dialog box appears. Select Macros from the dropdown list under the category- Choose commands from.
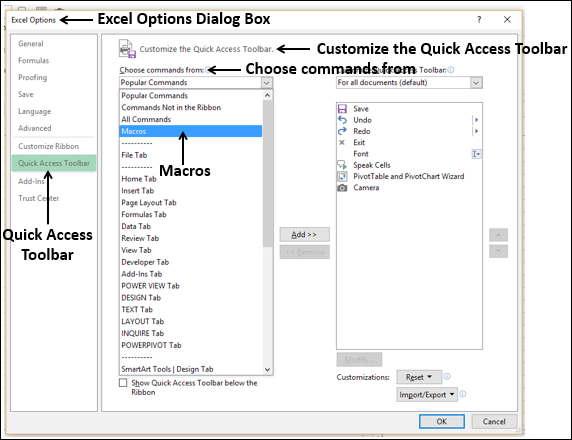
A list of macros appears under Macros.
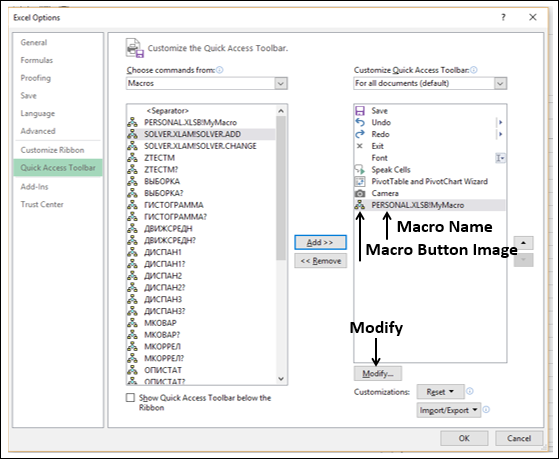
- Click PERSONAL.XLSB!MyMacro.
- Click the Add button.

The macro name appears on the right side, with a macro button image.
To change the macro button image, proceed as follows −
- Click the macro name in the right box.
- Click the Modify button.
The Modify Button dialog box appears. Select one symbol to set it as the icon of the button.
![]()
Modify the Display name that appears when you place the pointer on the Button image on the Quick Access Toolbar to a meaningful name, say, Run MyMacro for this example. Click OK.
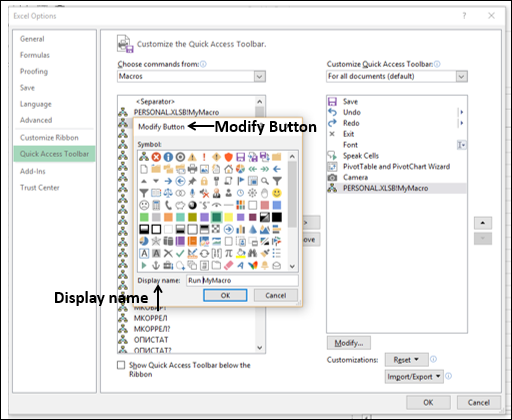
The Macro name and the icon symbol change in the right pane. Click OK.
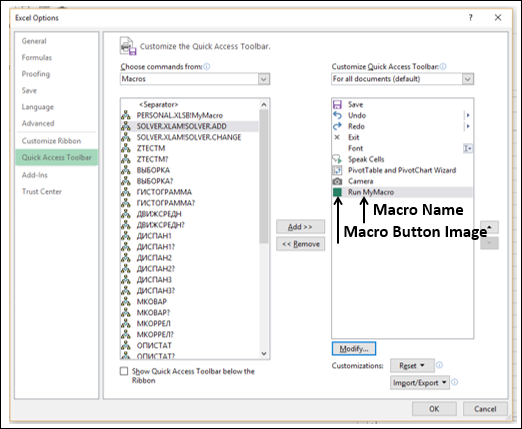
The macro button appears on the Quick Access Toolbar and the macro display name appears when you place the pointer on the button.
To run the macro, just click the macro button on the Quick Access Toolbar.
Running a Macro in Custom Group
You can add a custom group and a custom button on the Ribbon and assign your macro to the button.
- Right click on the Ribbon.
- Select Customize the Ribbon from the dropdown list.

The Excel Options dialog box appears.
- Select Main Tabs under Customize the Ribbon.
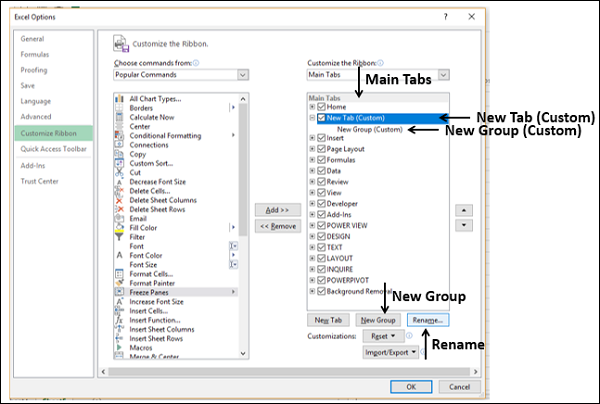
- Click New Tab.
The New Tab (Custom) appears in Main Tabs list.
- Click New Tab (Custom).
- Click the New Group button.
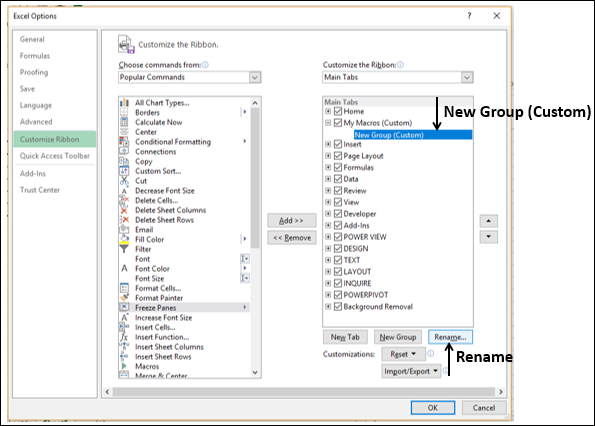
The New Group (Custom) appears under New Tab (Custom).
- Click New Tab (Custom).
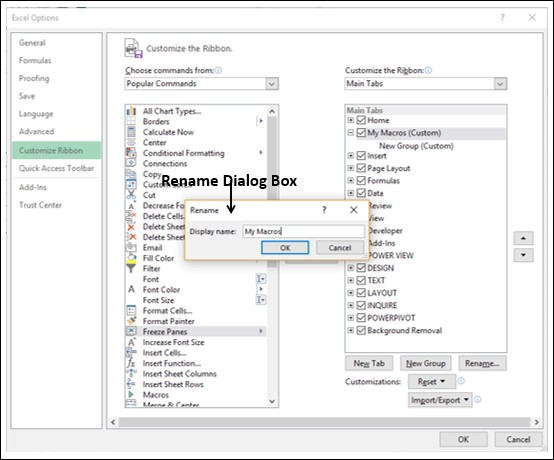
- Click the Rename button.
The Rename dialog box appears. Type the name for your custom tab that appears in Main tabs on the Ribbon, say — My Macros and click OK.
Note − All the Main tabs on the Ribbon are in uppercase letters. You can use your discretion to use uppercase or lowercase letters. I have chosen lowercase with capitalization of words so that it stands out in the standard tabs.
The new tab name changes to My Macros (Custom).
- Click New Group (Custom).
- Click the Rename button.
The Rename dialog box appears. Type the group name in the Display name dialog box and click OK.
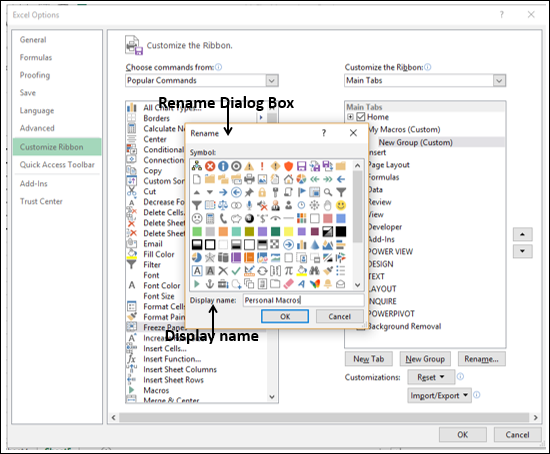
The new group name changes to Personal Macros (custom).
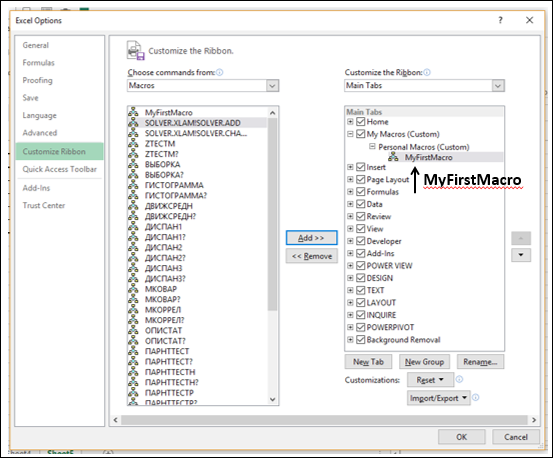
Click Macros in the left pane under Choose commands from.
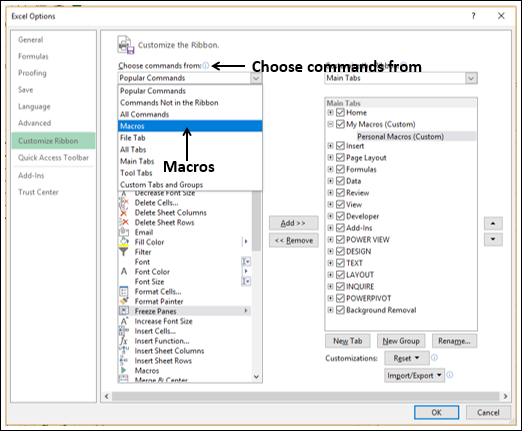
- Select your macro name, say – MyFirstMacro from the macros list.
- Click the Add button.
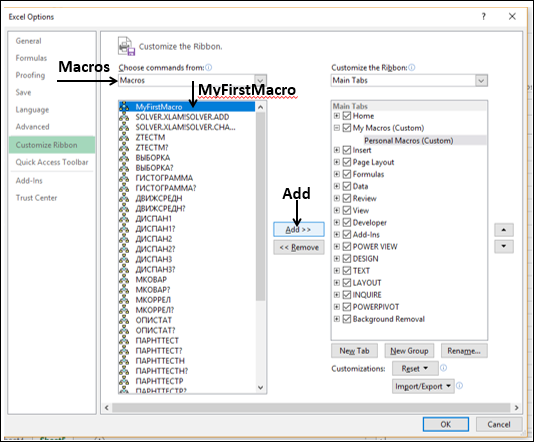
The macro will be added under the Personal Macros (Custom) group.
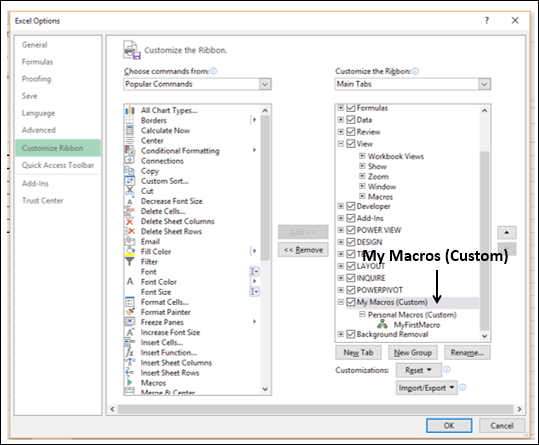
- Click My Macros (Custom) in the list.
- Click the arrows to move the tab up or down.
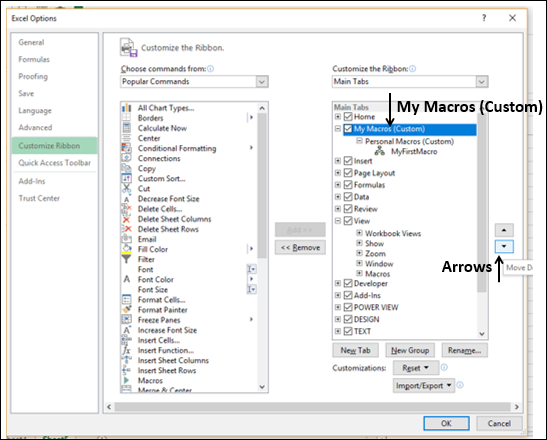
The position of the tab in the main tabs list determines where it will be placed on the Ribbon. Click OK.
Your custom tab – My Macros appears on the Ribbon.
Click the tab — My Macros. Personal Macros group appears on the Ribbon. MyFirstMacro appears in the Personal Macros group. To run the macro, just click on MyFirstMacro in the Personal Macros group.

Running a Macro by Clicking an Object
You can insert an object such as a shape, a graphic or a VBA control in your worksheet and assign a macro to it. To run the macro, just click the object.
For details on running a macro using objects, refer to chapter – Assigning Macros to Objects.
Running a Macro from the Developer Tab
You can run a macro from the Developer tab.
- Click the Developer tab on the Ribbon.
- Click Macros.
The Macro dialog box appears. Click the macro name and then click Run.
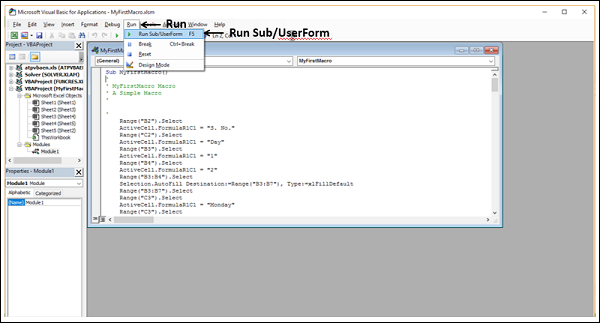
Running a Macro from VBA Editor
You can run a macro from the VBA editor as follows −
- Click the Run tab on the Ribbon.
- Select Run Sub/UserForm from the dropdown list.
Creating a Macro Using VBA Editor
You can create a macro by writing the code in the VBA editor. In this chapter, you will learn where and how to write the code for a macro.
VBA Objects and Modules
Before you start coding for a Macro, understand the VBA Objects and Modules.
- Open the macro-enabled workbook with your first macro.
- Click the DEVELOPER tab on the Ribbon.
- Click Visual Basic in the Code group.
The VBA editor window opens.
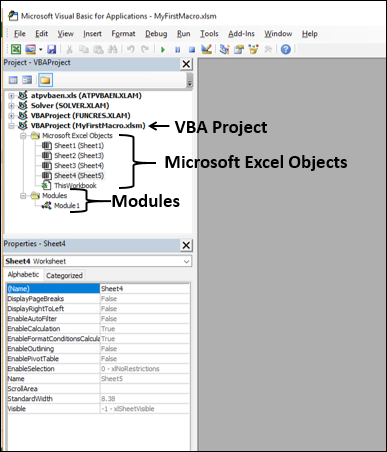
You will observe the following in the Projects Explorer window −
-
Your macro enabled workbook – MyFirstMacro.xlsm appears as a VBA Project.
-
All the worksheets and the workbook appear as Microsoft Excel Objects under the project.
-
Module1 appears under Modules. Your macro code is located here.
-
Click Module1.
-
Click the View tab on the Ribbon.
-
Select Code from the dropdown list.

The code of your macro appears.
Creating a Macro by Coding
Next, create a second macro in the same workbook – this time by writing VBA code.
You can do this in two steps −
-
Insert a command button.
-
Write the code stating the actions to take place when you click the command button.
Inserting a Command Button
-
Create a new worksheet.
-
Click in the new worksheet.
-
Click the DEVELOPER button on the Ribbon.
-
Click Insert in the Controls group.
-
Select the button icon from Form Controls.
- Click in the worksheet where you want to place the command button.
- The Assign Macro dialog box appears.
The Visual Basic editor appears.
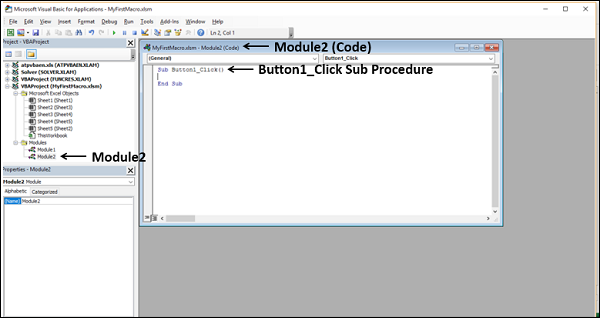
You will observe the following −
- A new module – Module2 is inserted in the Project Explorer.
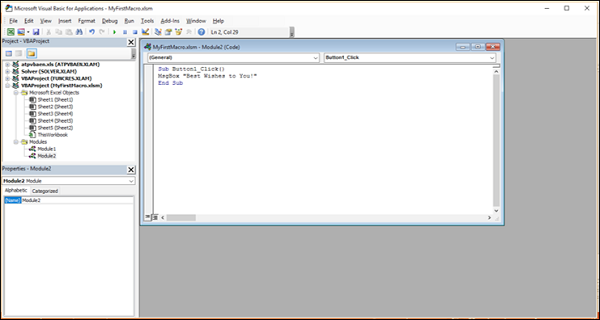
- Code window with title Module2 (Code) appears.
- A sub procedure Button1_Click () is inserted in the Module2 code.
Coding the Macro
Your coding is half done by the VBA editor itself.
For example, type MsgBox “Best Wishes to You!” in the sub procedure Button1_Click (). A message box with the given string will be displayed when the command button is clicked.
That’s it! Your macro code is ready to run. As you are aware, VBA code does not require compilation as it runs with an interpreter.
Running the Macro from VBA Editor
You can test your macro code from the VBA editor itself.
-
Click the Run tab on the Ribbon.
-
Select Run Sub/UserForm from the dropdown list. The message box with the string you typed appears in your worksheet.
You can see that the button is selected. Click OK in the message box. You will be taken back to the VBA editor.
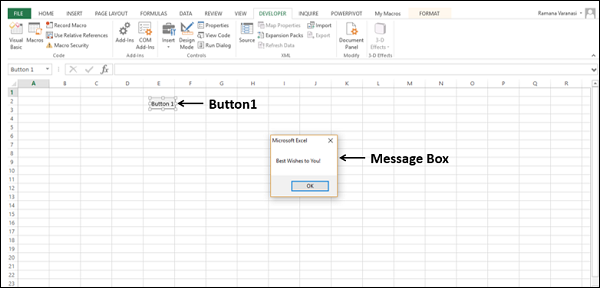
Running the Macro from Worksheet
You can run the macro that you coded any number of times from the worksheet.
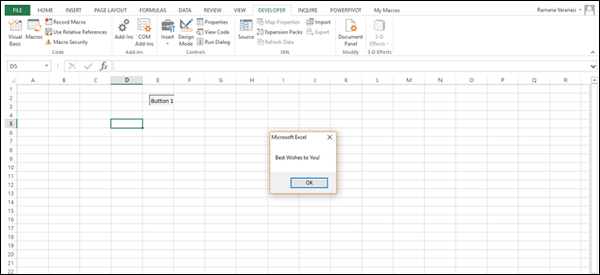
- Click somewhere on the worksheet.
- Click the Button. The Message box appears on the worksheet.
You have created a macro by writing VBA code. As you can observe, VBA coding is simple.
Excel Macros — Editing
You have learnt how to write macro code in VBA editor in the previous chapter. You can edit the macro code, rename a macro and delete a macro.
If you master Excel VBA, writing code or modifying code for a macro is a trivial task. You can edit the macro code however you want. If you want to make only few simple changes in the macro code, you can even copy macro code from one place to another.
Copying a Macro Code
You have created two macros – MyFirstMacro and Button1_Click in the macro enabled workbook MyFirstMacro.xlsm. You have created the first macro by recording the steps and the second macro by writing code. You can copy code from the first macro into the second macro.
-
Open the workbook MyFirstMacro.xlsm.
-
Click the Developer tab on the Ribbon.
-
Click Visual Basic. The Visual Basic editor opens.
-
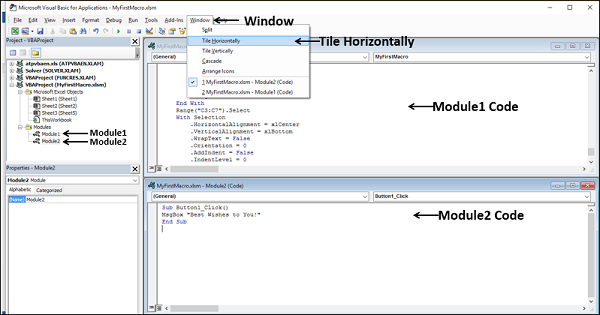
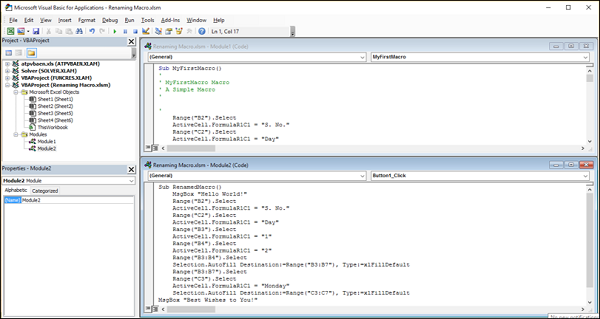
Open the code for Module1 (MyFirstMacro macro code) and Module2 (Button1_Click () macro code).
-
Click the Window tab on the Ribbon.
-
Select Tile Horizontally from the dropdown list.
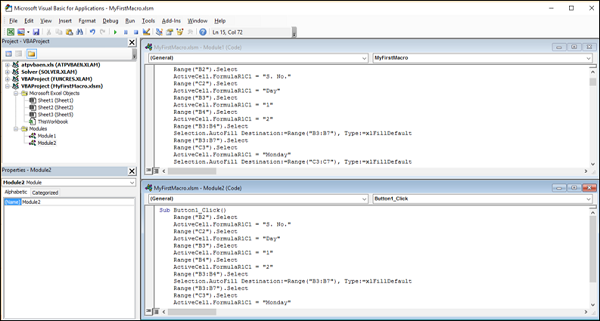
You can view the code of the two macros in the tiled windows.
-
Copy the MsgBox line in the Module2 code.
-
Paste it above that line.
-
Modify the string as −
MsgBox “Hello World!”
-
Copy the following code from Module1.
Paste it in the Module2 code in between the two MsgBox lines of code.
-
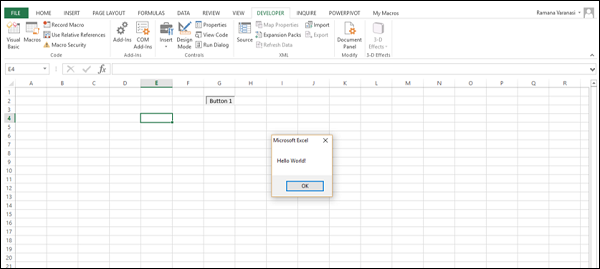
Click the Save icon to save the code.
-
Click the Button in the Excel sheet. A Message box appears with the message — Hello World! Click OK.
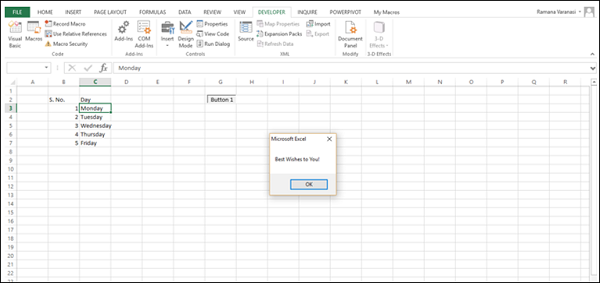
The table data appears (according to the code that you copied) and message box appears with message — Best Wishes to You!
You can modify the code in just a few steps. This is the easiest task for a beginner.
Renaming a Macro
Suppose you want to run the edited macro from any worksheet other than the one that has the command button. You can do it irrespective of button click by renaming the macro.
- Click the VIEW tab on the Ribbon.
- Click Macros.
- Select View Macros from the dropdown list.
The Macro dialog box appears.
- Click the macro name – Button1_Click.
- Click the Edit button.
The macro code appears in the VBA editor.
Change the name that appears in the Sub line from Button1_Click to RenamedMacro. Leave Sub and parenthesis as they are.
Open the Macro dialog box. The macro name appears as you renamed.
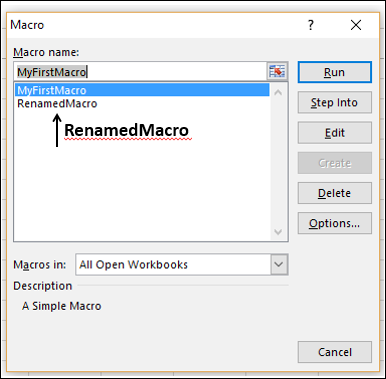
- Click RenamedMacro.
- Click the Run button. The macro runs. Now a button click is not necessary.
Deleting a Macro
You can delete a macro that you have recorded or coded.
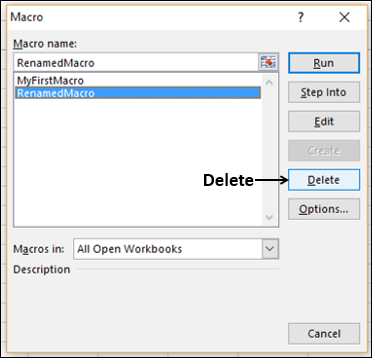
- Open the Macros dialog box.
- Click the macro name.
- Click the Delete button.
The Delete confirmation message appears.
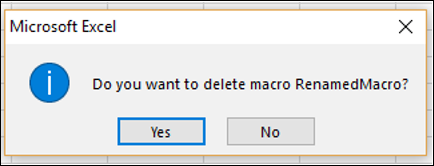
Click Yes if you are sure to delete the macro. Otherwise, click No.
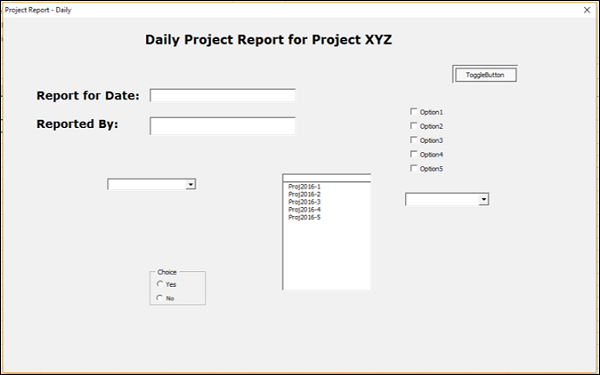
Excel Macros — UserForms
At times, you might have to collect information repeatedly from others. Excel VBA provides you with an easy way of handling this task- UserForm. As any other form that you fill up, UserForm makes it simple to understand, what information is to be provided. UserForm is user friendly in the way that the controls provided are self-explanatory, accompanied by additional instructions where necessary.
Major advantage of UserForm is that you can save on time that you spend on what and how the information is to be filled.
Creating a UserForm
To create a UserForm, proceed as follows −
- Click the DEVELOPER tab on the Ribbon.
- Click Visual Basic. A Visual Basic window for the workbook opens.
- Click Insert,
- Select UserForm from the dropdown list.
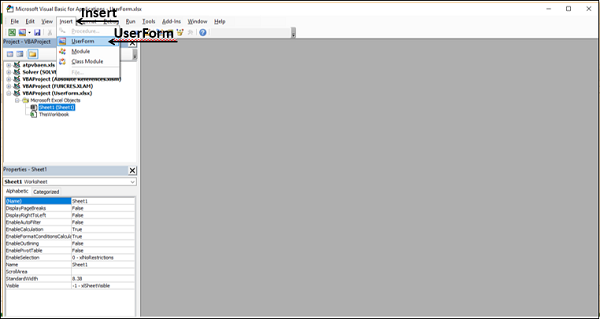
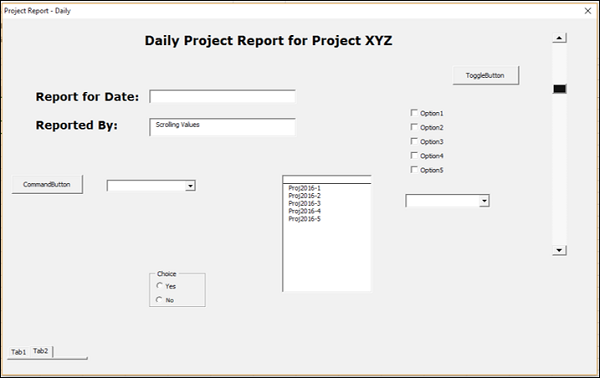
The UserForm appears on the right side of the window.
Understanding the UserForm
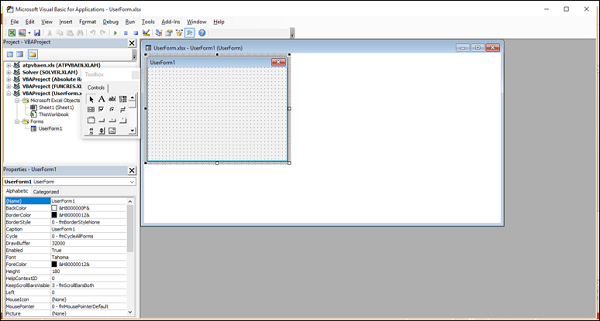
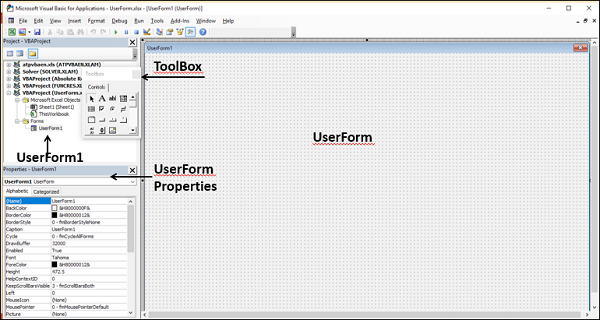
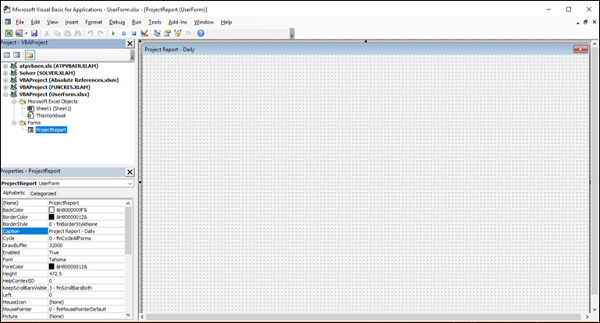
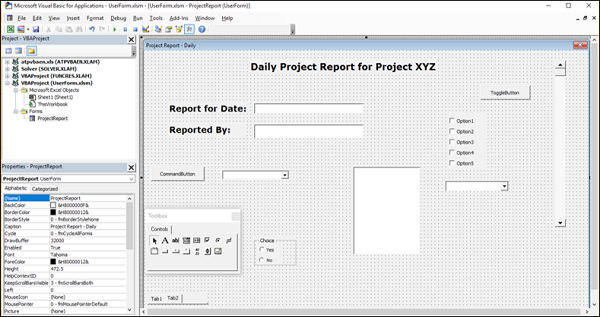
Maximize the UserForm.xlsx – UserForm1 window.
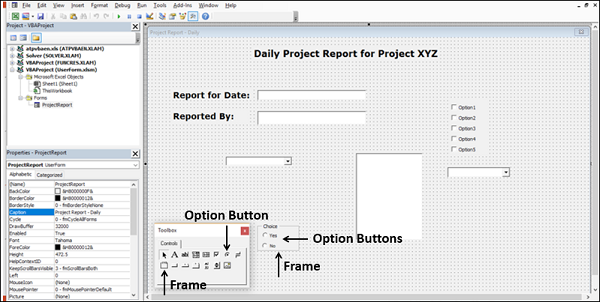
You are in the design mode now. You can insert controls on the UserForm and write code for the respective actions. The controls are available in the ToolBox. Properties of UserForm are in the Properties window. UserForm1 (caption of the UserForm) is given under Forms in the Projects Explorer.
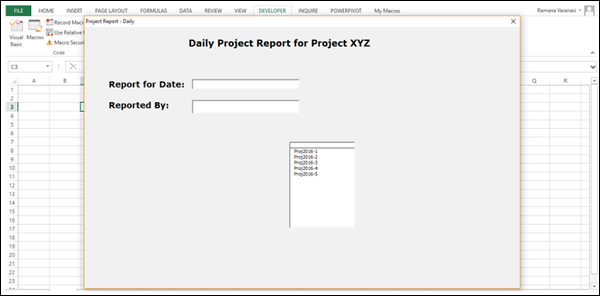
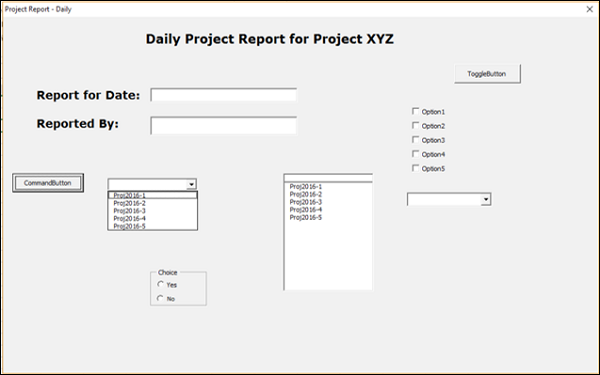
- Change the caption of the UserForm to Project Report – Daily in the properties window.
- Change the name of the UserForm to ProjectReport.
The changes are reflected in the UserForm, properties and project explorer.
Controls in the ToolBox
A UserForm will have different components. As and when you click on any of the components, either you will be provided with instructions on what and how the information is to be provided or you will be provided with options (choices) to select from. All these are provided by means of ActiveX controls in the ToolBox of the UserForm.
Excel provides two types of controls – Form controls and ActiveX controls. You need to understand the difference between these two types of controls.
Form controls
Form controls are the Excel original controls that are compatible with earlier versions of Excel, starting with Excel version 5.0. Form controls are also designed for use on XLM macro sheets.
You can run macros by using Form controls. You can assign an existing macro to a control, or write or record a new macro. When the control is clicked, the macro. You have already learnt how to insert a command button from Form controls in the worksheet to run a macro. However, these controls cannot be added to a UserForm.
ActiveX controls
ActiveX controls can be used on VBA UserForms. ActiveX controls have extensive properties that you can use to customize their appearance, behavior, fonts and other characteristics.
You have the following ActiveX controls in the UserForm ToolBox −
- Pointer
- Label
- TextBox
- ComboBox
- ListBox
- CheckBox
- OptionButton
- Frame
- ToggleButton
- CommandButton
- TabStrip
- MultiPage
- ScrollBar
- SpinButton
- Image
In addition to these controls, Visual Basic provides you with MsgBox function that can be used to display messages and/or prompt the user for an action.
In the next few sections, you will understand these controls and MsgBox. Then, you will be in a position to choose which of these controls are required to design your UserForm.
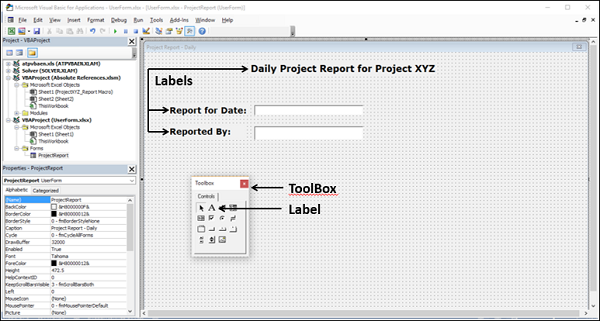
Label
You can use Labels for identification purpose by displaying descriptive text, such as titles, captions and / or brief instructions.
Example
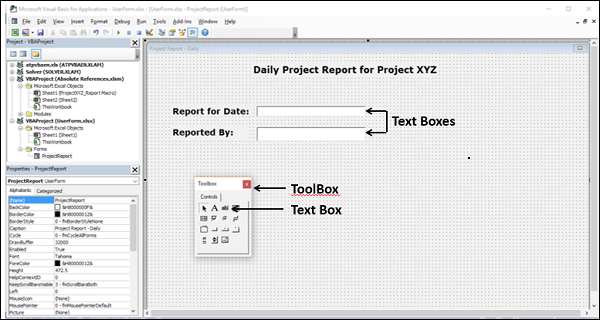
TextBox
You can use a TextBox that is a rectangular box, to type, view or edit text. You can also use a TextBox as a static text field that presents read-only information.
Example
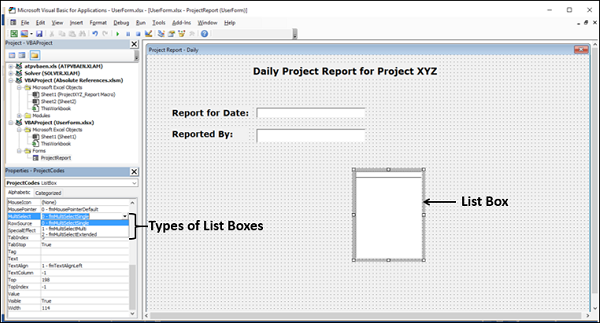
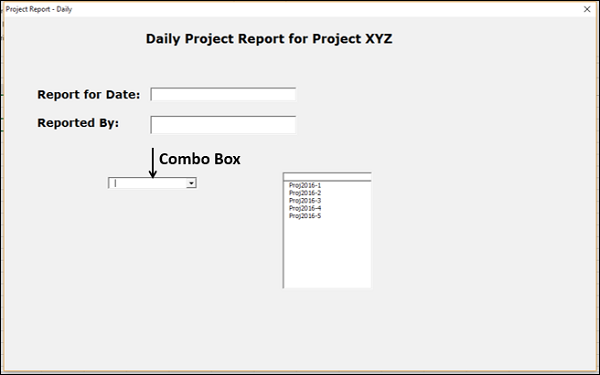
List Box
You can use a List Box to display a list of one or more items of text from which a user can choose. Use a list box for displaying large numbers of choices that vary in number or content.
- Insert a ListBox on the UserForm.
- Click on the ListBox.
- Type ProjectCodes for Name in the Properties window of the ListBox.
There are three types of List Boxes −
-
Single-selection List box − A single-selection List Box enables only one choice. In this case, a list box resembles a group of option buttons, except that a list box can handle a large number of items more efficiently.
-
Multiple selection List Box − A multiple selection List Box enables either one choice or contiguous (adjacent) choices.
-
Extended-selection List Box − An extended-selection List Box enables one choice, contiguous choices and noncontiguous (or disjointed) choices.
You can select one of these types of List Boxes, from the Properties window.
- Right click on the UserForm.
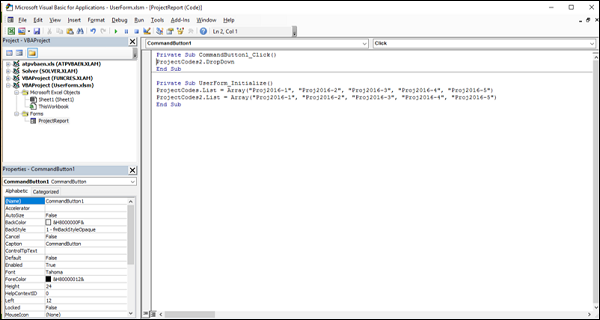
- Select View Code from the dropdown list. The code window of UserForm opens.
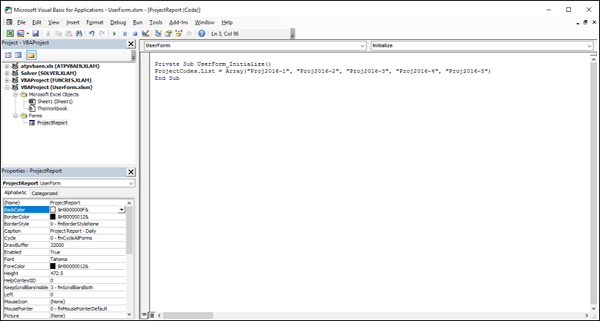
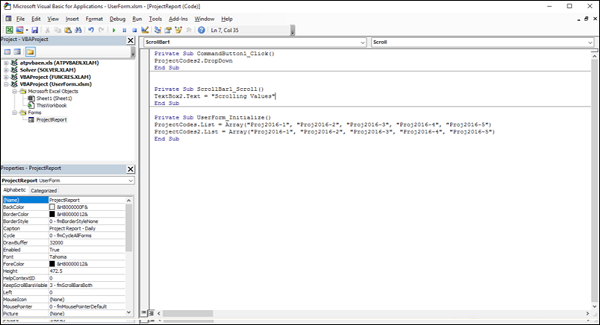
- Click Initialize in the top right box of the code window.
- Type the following under Private Sub UserForm_Initialize().
ProjectCodes.List = Array ("Proj2016-1", "Proj2016-2", "Proj2016-3", "Proj20164", "Proj2016-5")
- Click the Run tab on the Ribbon.
- Select Run Sub/UserForm from the dropdown list.
Next, you can write code for actions on selecting an item in the list. Otherwise, you can just display the text that is selected, which is the case for filling the Project Code in the Report.
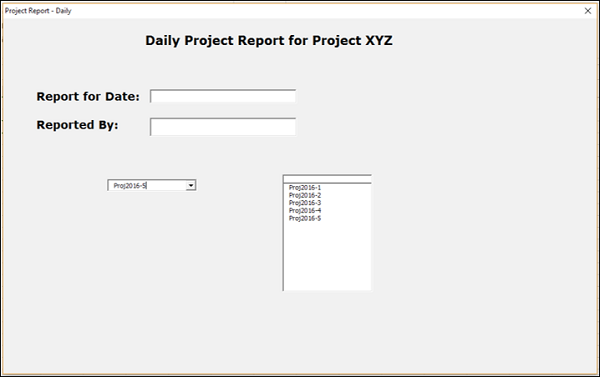
ComboBox
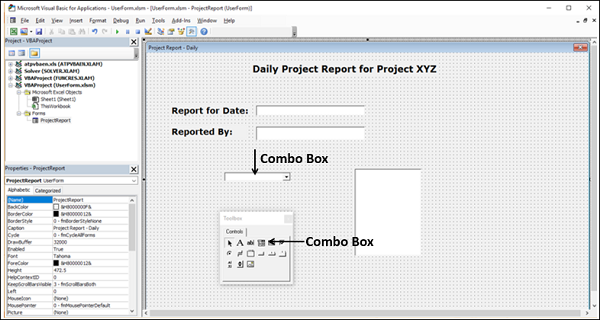
You can use ComboBox that combines a text box with a list box to create a dropdown list box. A combo box is more compact than a list box but requires the user to click the down arrow to display the list of items. Use a combo box to choose only one item from the list.
- Insert a ComboBox on the UserForm.
- Click the ComboBox.
- Type ProjectCodes2 for Name in the Properties window of the ComboBox.
- Right click on the UserForm.
- Select View Code from the dropdown list.
- The code window of UserForm opens.
Type the following as shown below.
ProjectCodes2.List = Array ("Proj2016-1", "Proj2016-2", "Proj2016-3", "Proj20164", "Proj2016-5")
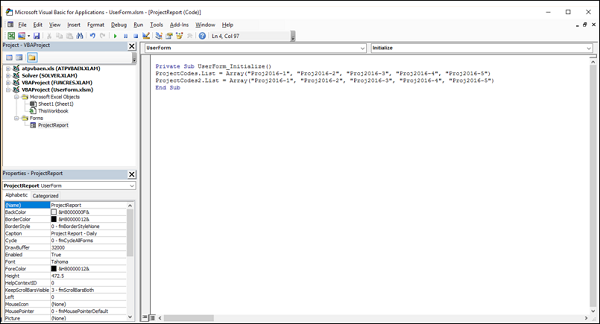
- Click the Run tab on the Ribbon.
- Select Run Sub/UserForm from the dropdown list.
Click the down arrow to display the list of items.
![]()
Click on the required item, say, Project2016-5. The selected option will be displayed in the combo box.
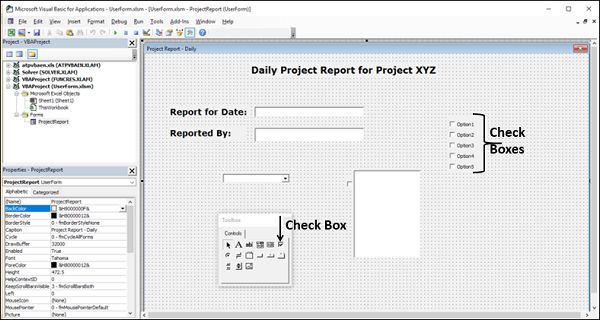
CheckBox
You can use check boxes to select one or more options that are displayed by clicking in the boxes. The options will have labels and you can clearly visualize what options are selected.
A check box can have two states −
- Selected (turned on), denoted by a tick mark in the box
- Cleared (turned off), denoted by a clear box
You can use check boxes for selection of options in a combo box to save space. In such a case, the check box can have a third state also −
-
Mixed, meaning a combination of on and off states, denoted by a black dot in the box. This will be displayed to indicate multiple selections in the combo box with check boxes.
-
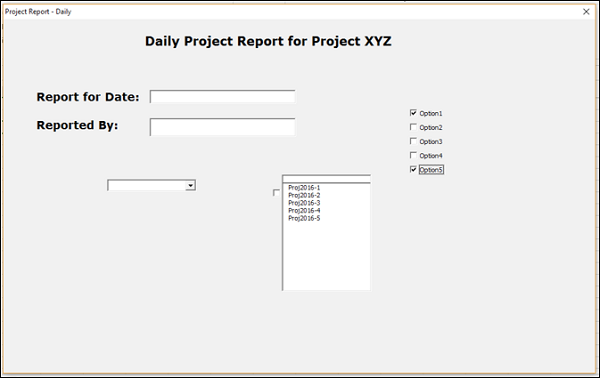
Insert check boxes in the UserForm as shown below.
- Click the Run tab on the Ribbon.
- Select Run Sub/UserForm from the dropdown list.
- Click in the boxes for your selected options.
OptionButton
You can use an option button, also known as the radio button to make a single choice within a limited set of mutually exclusive choices. An option button is usually contained in a group box or a frame.
An option button is represented by a small circle. An option button can have one of the following two states −
- Selected (turned on), denoted by a dot in the circle
- Cleared (turned off), denoted by a blank
Frame
You can use a frame control, also referred to as a group box to group related controls into one visual unit. Typically, option buttons, check boxes or closely related contents are grouped in a frame control.
A frame control is represented by a rectangular object with an optional label.
-
Insert a frame with caption “Choice”.
-
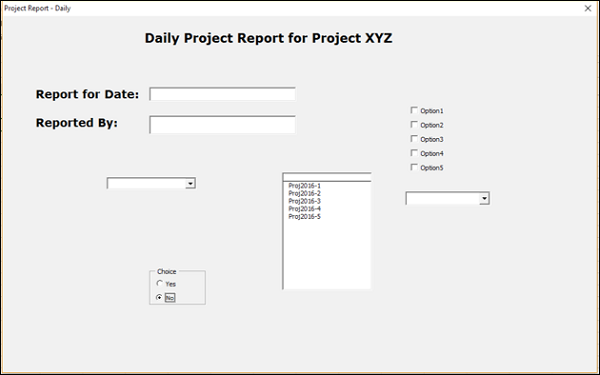
Insert two option buttons with captions “Yes” and “No” in the frame control. The options Yes and No are mutually exclusive.
- Click the Run tab on the Ribbon.
- Select Run Sub/UserForm from the dropdown list.
- Click on your selected option.
ToggleButton
You can use a toggle button to indicate a state, such as Yes or No, or a mode, such as on or off. The button alternates between an enabled and a disabled state when it is clicked.
Insert a toggle button on UserForm as shown below −
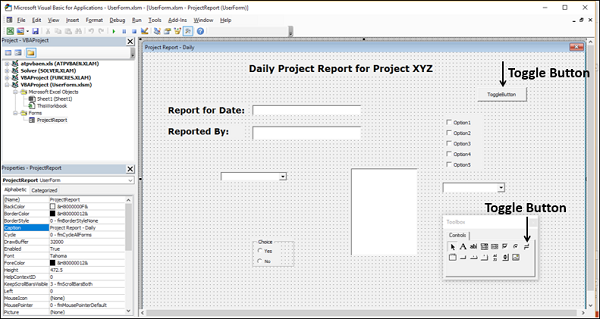
-
Click the Run tab on the Ribbon.
-
Select Run Sub/UserForm from the dropdown list. The toggle button will be in enabled state by default.
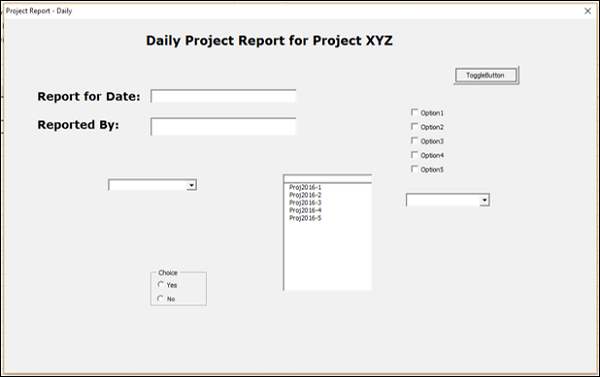
Click the toggle button. The toggle button will be disabled.
If you click the toggle button again, it will be enabled.
CommandButton
You can use a command button to run a macro that performs some actions when the user clicks on it. You have already learnt how to use a command button on a worksheet to run a macro.
Command button is also referred to as a push button. Insert a command button on the UserForm as shown below −
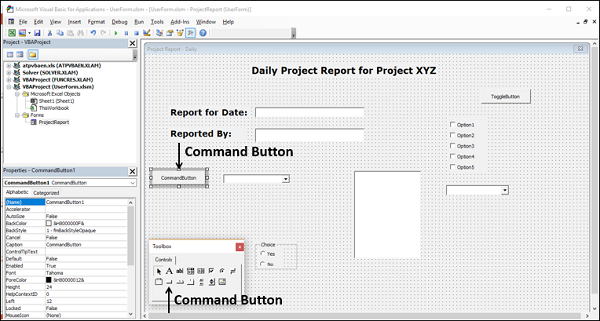
- Right click on the command button.
- Type the following code in the sub Commandbutton1_click ().
ProjectCodes2.DropDown
- Click the Run tab on the Ribbon.
- Select Run Sub/UserForm from the dropdown list.
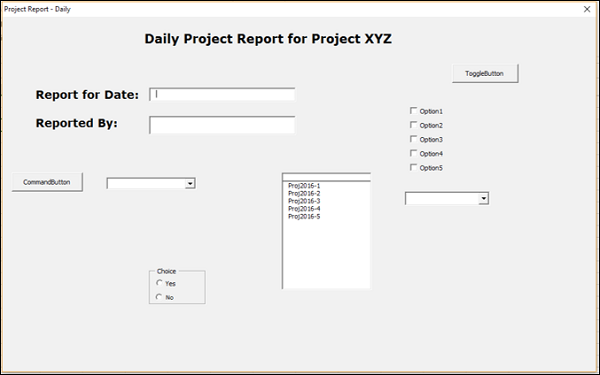
Click the command button. The dropdown list of combo box opens, as it is the action that you have written in the code.
TabStrip
You can insert a tab strip that resembles Excel tabs on the UserForm.
ScrollBar
You can use a scroll bar to scroll through a range of values by clicking on the scroll arrows or by dragging the scroll box.
Insert a scroll bar on the UserForm by drawing it at the required position and adjust the length of the scroll bar.
- Right click on the scroll bar.
- Select View Code from the dropdown list. The Code window opens.
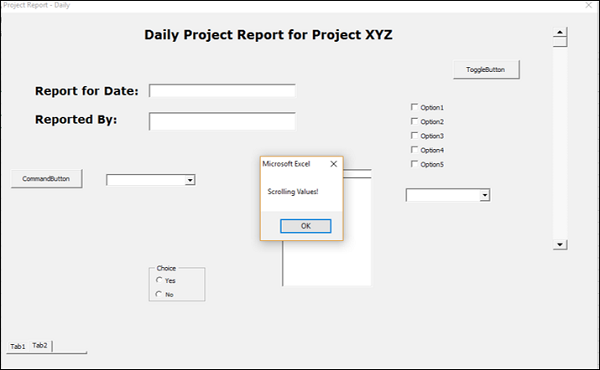
- Add the following line under sub ScrollBar1_Scroll().
TextBox2.Text = "Scrolling Values"
- Click the Run tab on the Ribbon.
- Select Run Sub/UserForm from the dropdown list.
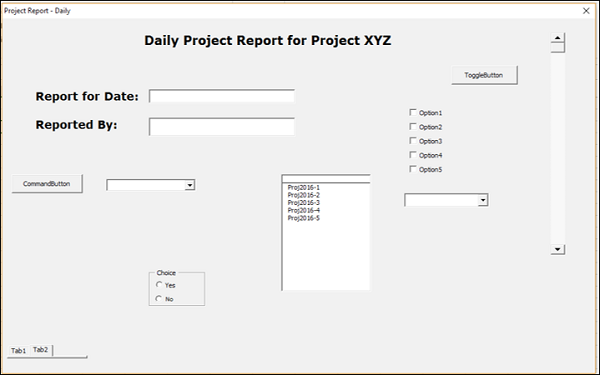
Drag the scroll box. The Text – Scrolling Values will be displayed in the text box as you specified it as the action for scroll bar scroll.
MsgBox ()
You can use the MsgBox () function to display a message when you click on something. It can be a guideline or some information or a warning or an error alert.
For example, you can display a message that values are being scrolled when you start scrolling the scroll box.
Message Box Icon Displays
You can use message-box icon displays that portray the specific message. You have the multiple message box icons to suit your purpose −
- Type the following code under ScrollBar1_scroll.
MsgBox "Select Ok or Cancel", vbOKCancel, "OK  - Cancel Message"
MsgBox "It's an Error!", vbCritical, "Run time result"
MsgBox "Why this value", vbQuestion, "Run time result"
MsgBox "Value Been for a Long Time", vbInformation, "Run time result"
MsgBox "Oh Is it so", vbExclamation, "Run time result"
- Click the Run tab on the Ribbon.
- Select Run Sub/UserForm from the dropdown list.
- Drag the scroll box.
You will get the following message boxes successively.

Designing UserForm
Now, you have an understanding of the different controls that you can use on a UserForm. Select the controls, group them if required and arrange them on the UserForm as per some meaningful sequence. Write the required actions as code corresponding to the respective controls.
Refer to the VBA tutorial in this tutorials library for an example of UserForm.
Excel Macros — Debugging a Code
You have learnt that the macro is stored as VBA code in Excel. You have also learnt that you can directly write code to create a macro in VBA editor. However, as with the case with any code, even the macro code can have defects and the macro may not run as you expected.
This requires examining the code to find the defects and correct them. The term that is used for this activity in software development is debugging.
VBA Debugging
VBA editor allows you to pause the execution of the code and perform any required debug task. Following are some of the debugging tasks that you can do.
- Stepping Through Code
- Using Breakpoints
- Backing Up or Moving Forward in Code
- Not Stepping Through Each Line of Code
- Querying Anything While Stepping Through Code
- Halting the Execution
These are just some of the tasks that you might perform in VBA’s debugging environment.
Stepping Through the Code
The first thing that you have to do for debugging is to step through the code while executing it. If you have an idea of which part of the code is probably producing the defect, you can jump to that line of the code. Otherwise, you can execute the code line by line, backing up or moving forward in the code.
You can step into the code either from Macro dialog box in your workbook or from the VBA editor itself.
Stepping into the code from the workbook
To step into the code from the workbook, do the following −
- Click the VIEW tab on the Ribbon.
- Click Macros.
- Select View Macros from the dropdown list.
The Macro dialog box appears.
- Click the macro name.
- Click the Step into button.
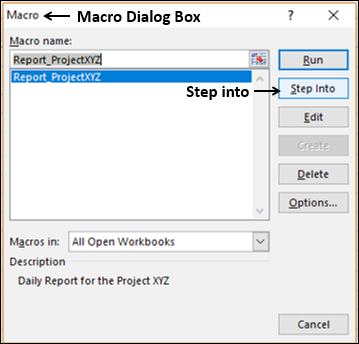
VBA editor opens and the macro code appears in the code window. The first line in the macro code will be highlighted in yellow color.
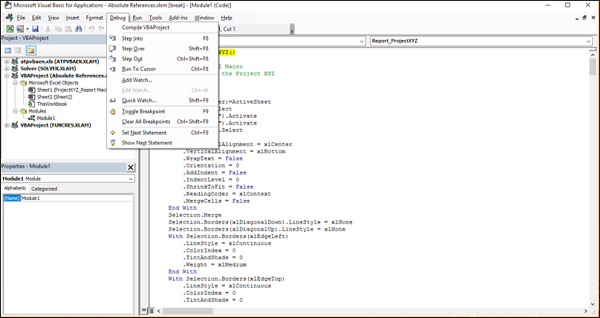
Stepping into the code from the VBA editor
To step into the code from the VBA editor, do the following −
- Click the DEVELOPER tab on the Ribbon.
- Click Visual Basic. The VBA editor opens.
- Click the module that contains the macro code.
The macro code appears in the code window.
-
Click the Debug tab on the Ribbon.
-
Select Step into from the dropdown list.
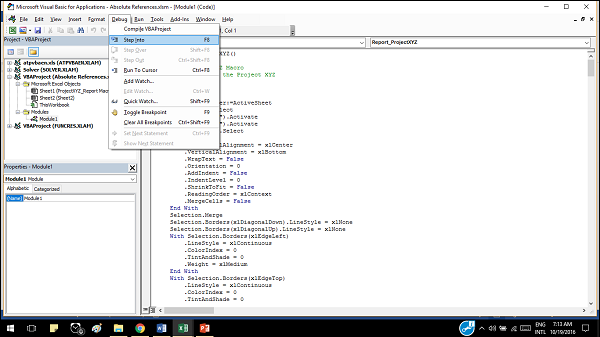
The first line in the macro code will be highlighted. The code is in the debugging mode and the options in the Debug dropdown list will become active.
Backing Up or Moving Forward in the Code
You can move forward or backward in the code by selecting Step Over or Step Out.
Not Stepping Through Each Line of Code
You can avoid stepping through each line code, if you identify a potential part of the code that needs to be discussed, by selecting Run to Cursor.
Using Breakpoints
Alternatively, you can set breakpoints at specific lines of code and execute the code, observing the results at each breakpoint. You can toggle a breakpoint and clear all breakpoints if and when required.
Using Watch
You can add a watch while debugging, to evaluate an expression and stop the execution when a variable attains a specific value. This means that you configure a watch expression, which will be monitored until it is true and then the macro will halt and leave you in break mode. VBA provides you with several watch types to select from, in order to accomplish what you are looking for.
Halting the Execution
During debugging, at any point of time, if you have found a clue on what is going wrong, you can halt the execution to decipher further.
If you are an experienced developer, the debugging terminology is familiar to you and VBA editor debugging options make your life simple. Even otherwise, it will not take much time to master this skill if you have learnt VBA and understand the code.
Excel Macros — Configuring a Macro
You can record a macro and save it with the name Auto_Open to run it whenever you open the workbook that contains this macro.
You can also write VBA code for the same purpose with the Open event of the workbook. The Open event runs the code in the sub procedure Workbook_Open () every time you open the workbook.
Recording an Auto_Open Macro
You can record an Auto_Run macro as follows −
- Click the VIEW tab on the Ribbon.
- Click Macros.
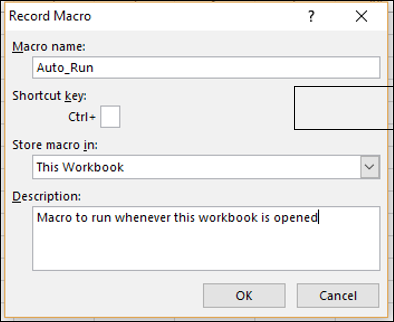
- Click Record Macro. The Record Macro dialog box appears.
- Type Auto_Run for the macro name.
- Type a description and click OK.
- Start recording the macro.
- Stop Recording.
- Save the workbook as macro enabled workbook.
- Close the workbook.
- Open the workbook. The macro Auto_Run will run automatically.
If you want Excel to start without running an Auto_Open macro, hold the SHIFT key when you start Excel.
Limitations of Auto_Open Macro
The following are the limitations of Auto_Open macro −
-
If the workbook in which you saved the Auto_Open macro contains code for workbook Open event, the code for the Open event will override the actions in the Auto_Open macro.
-
An Auto_Open macro is ignored when the workbook is opened by running code that uses the Open method.
-
An Auto_Open macro runs before any other workbooks open. Hence, if you record actions that you want Excel to perform on the default Book1 workbook or on a workbook that is loaded from the XLStart folder, the Auto_Open macro will fail when you restart Excel, because the macro runs before the default and startup workbooks open.
If you encounter any of these limitations, instead of recording an Auto_Open macro, you must write a code for the Open event as described in the next section.
VBA Code for Open Event of a Workbook
You can write code that will get executed when you open a workbook. VBA provides you with an event called open that incorporates a VBA procedure for the actions to be done on opening a workbook.
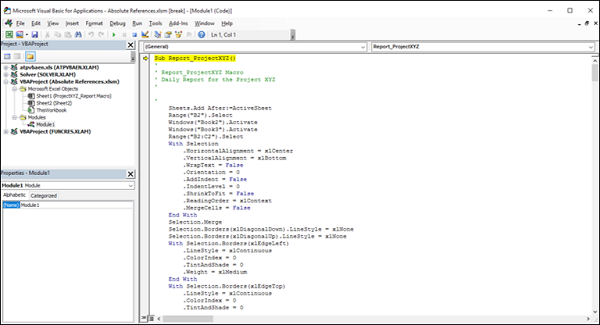
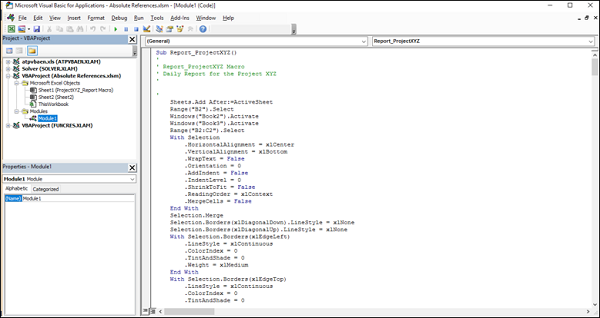
Open the workbook in which you stored the macro that you have written for the absolute references – Report_ProjectXYZ. When this macro is run, a new worksheet will be added in the workbook and the project report structure appears on the new worksheet.
You can write a macro code that will perform these actions when you open the workbook. That means when you open the Project Report workbook, a new worksheet with the report structure will be ready for you to enter the details.
Follow the below given procedure in VBA editor−
-
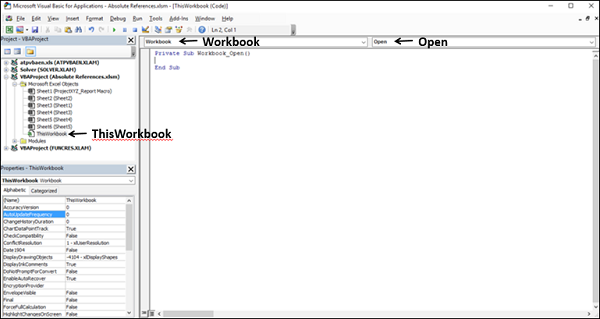
Double click on ThisWorkbook in Projects Explorer.
-
In the code window, select Workbook in the left dropdown list and Open in the right dropdown list. Sub Workbook_Open () appears.
-
Click Modules in the Projects Explorer.
-
Double click on the module name that contains the macro code.
-
Copy the macro code from the module and paste it in the Sub WorkBook_Open ().
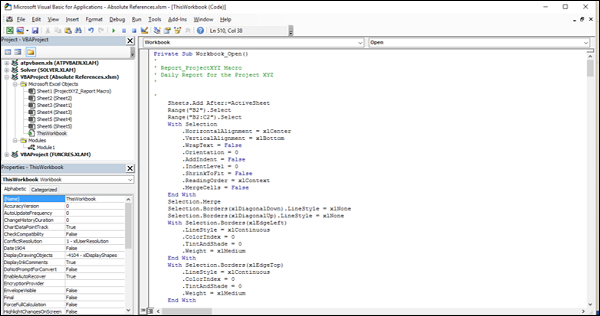
Save the macro-enabled workbook. Open it again. The macro runs and a new worksheet with the report structure is inserted.
You work in Excel every day and do the same things again and again. Why not automate those tasks? Or, maybe, you want Excel to do most of the work for you? Read on to learn what Excel macros are and how they can help you.
What are macros in Excel?
Excel is an extremely powerful tool for processing data in the form of spreadsheets. While most users use formulas, there is another way to manipulate data in Excel.
Excel macros are pieces of code that describe specific actions or contain a set of instructions. Every time you launch the macro, Excel follows those instructions step-by-step.
Why learn macros in Excel?
Macros are a must-have tool for an advanced Excel user. By using Excel macros you can avoid dull, repetitive actions or even create your own order management system for free.
Simple macros in Excel that will make things easier
There are lots of simple Excel macros that take just a few lines of code, but can save you hours. Excel can perform certain operations instantly, where it would take you a very long time to do the job manually.
For example, this macro will sort all worksheets alphabetically:
Sub SortSheetsTabName()
Application.ScreenUpdating = False
Dim ShCount As Integer, i As Integer, j As Integer
ShCount = Sheets.Count
For i = 1 To ShCount - 1
For j = i + 1 To ShCount
If Sheets(j).Name < Sheets(i).Name Then
Sheets(j).Move before:=Sheets(i)
End If
Next j
Next i
Application.ScreenUpdating = True
End Sub
The following code will unhide all hidden worksheets:
Sub UnhideAllWoksheets()
Dim ws As Worksheet
For Each ws In ActiveWorkbook.Worksheets
ws.Visible = xlSheetVisible
Next ws
End Sub
To unhide all rows and columns on a worksheet, use:
Sub UnhideRowsColumns()
Columns.EntireColumn.Hidden = False
Rows.EntireRow.Hidden = False
End Sub
Advanced Excel macros that can significantly improve your workflow
If you are running a business, you have to store and manipulate data. Small companies can keep records by hand and large enterprises can buy specialized software (which is rather expensive). But what about medium-sized businesses that can no longer settle for manual record-keeping, but still cannot afford costly software? This is where Excel with macros shines.
By combining advanced Excel macros you can create a CRM (Customer Relationship Management) system which will help you provide better services. If you sell goods, you need an inventory management tool and Excel spreadsheets enhanced with macros will fit your needs.
If your data is contained in multiple Excel workbooks, you can use Coupler.io to move them around. You can even add third-party sources, like Google Sheets, Airtable, BigQuery, etc. Data integration with Coupler.io does not require any programming skills and can be done in just a few clicks.
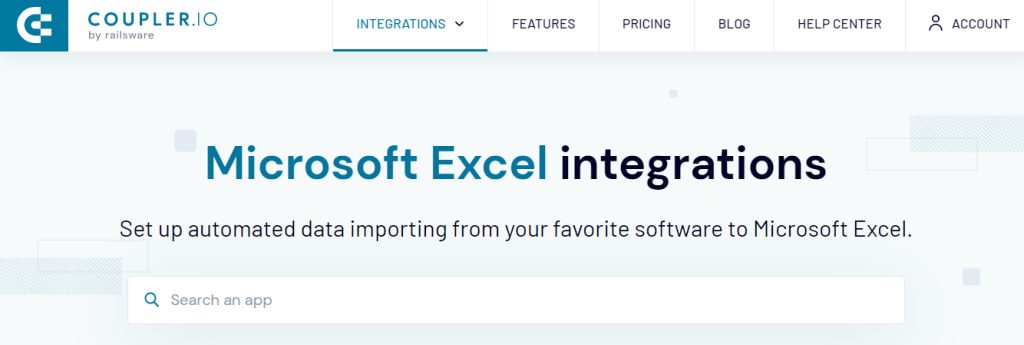
Check out the available integrations with Excel.
Other Excel macros examples
Below are a few examples of useful Excel macros.
Sometimes you might accidentally add extra spaces to the data in cells. This mistake will cause errors, thereby preventing you from making correct calculations. To remove unnecessary spaces from the selected cells, use the following code:
Sub TrimTheSpaces()
Dim MyRange As Range
Dim MyCell As Range
Set MyRange = Selection
For Each MyCell In MyRange
If Not IsEmpty(MyCell) Then
MyCell = Trim(MyCell)
End If
Next MyCell
End Sub
It is often the case that you need to protect your workbook with a password. You can do that in the user interface of Excel. However, if you use the same password for all of your workbooks, you have to re-enter it every time. This macro will do the job for you (don’t forget to replace “1234” with your own password!):
Sub ProtectSheets()
Dim ws As Worksheet
For Each ws In ActiveWorkbook.Worksheets
ws.Protect Password:="1234"
Next ws
End Sub
Using macros in Excel
As macros are programs that can do literally anything on your computer, using macros from untrusted sources is very risky. That’s why, when you open a workbook with macros in Excel, they will be disabled and you will see the following notification:
![]()
If you trust the source of the file, click Enable Content. That will add the workbook to the list of trusted documents and turn on its macros. The next time you open that workbook, there will be no warning.
You will see the above notification each time you open a workbook if it has been saved to an untrusted location. That can be a folder for temporary files or browser downloads. To avoid that, move the file to another folder or enable macros in the Excel Trust Center.
How to enable macros in Excel
If you do not want to see the security warning when opening Excel workbooks, you can permanently enable macros in the Trust Center.
To enable macros in the Excel Trust Center:
- In the upper-left corner, click the File tab and then select Options:

- In the Excel Options window, select Trust Center and then click Trust Center Settings:
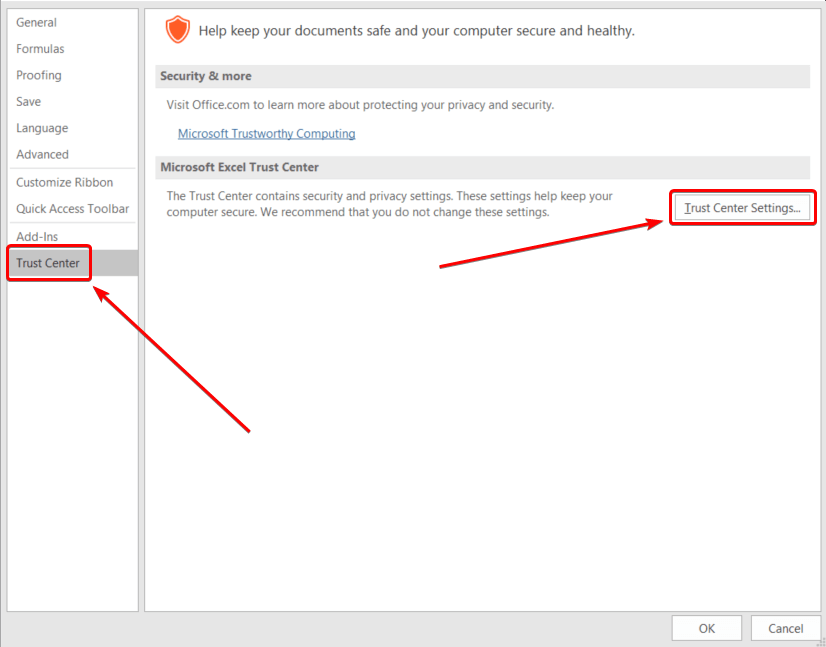
- In the Trust Center, go to Macro Settings and then select Enable all macros:

Warning! Enabling macros for all workbooks is potentially risky because files from external sources may contain malicious code. If you open such a workbook, the macros may run automatically and corrupt your data or even cause hardware malfunctions.
How to use macros in Excel
If your workbook contains macros, you can run them by pressing Alt+F8. In the Macro window that opens, select the macro you need and click Run:

If you want to create new macros, you need to enable the Developer tab first.
To enable the Developer tab:
- In the upper-left corner, click the File tab and then select Options.
- In the Excel Options window, select Customize Ribbon and then enable the Developer checkbox in the Main Tabs area:

- Click OK to apply the changes.
In the Developer tab you can run existing macros by clicking the Macros button or create a new macro. For details on creating macros in Excel, see the following sections.

How to delete macros in Excel
To delete a macro in Excel:
- Open the Macro window in one of the following ways:
- Press Alt+F8.
- Select the Developer tab and click Macros.
- Select the macro that you want to delete and click Delete.

- Click Yes in the confirmation window that opens.
How to disable macros in Excel
Enabling Excel macros can make your computer vulnerable. Some macros will run when you open a workbook, which is especially dangerous if you have downloaded the workbook from an untrusted source. To prevent that, you can disable macros in Excel either with or without a notification.
To disable macros in Excel:
- In the upper-left corner, click the File tab and then select Options.
- In the Excel Options window, select Trust Center and then click Trust Center Settings.
- In the Trust Center, go to Macro Settings and then select one of the following options:
- Disable all macros without notification. Macros will be disabled and you will not see a security warning when opening a workbook with macros.
- Disable all macros with notification. Macros will be disabled but you will see a security warning when opening a workbook with macros and will be able to allow macros, if needed.

Writing macros in Excel
In Excel you can not only run ready-to-use macros, but also write your own macros to automate your daily tasks. We will provide a few methods below for creating macros in Excel. Anyone can write macros in Excel: from a complete beginner to an advanced user with programming skills.
How to record a macro in Excel
If you are unfamiliar with programming languages, the easiest way to create your own Excel macro is to record it.
To record a macro in Excel:
- In the Developer tab, click Record Macro:

- Enter the macro name and click OK:

Excel will start recording the macro.
- Perform the actions, that need to be included in the macro, then click Stop Recording:

The macro will be saved to the workbook.
Creating VBA macros in Excel
If you can write code in any programming language, you can easily learn the basics of Visual Basic for Applications and create Excel macros in the VBA editor.
To open the editor, click Visual Basic in the Developer tab.
Each workbook is a VBA project in the editor. The project contains worksheets as objects and modules with macros:

By default, macros recorded in the Developer tab are saved to Module1. For example, here is the macro that we recorded in the previous section:
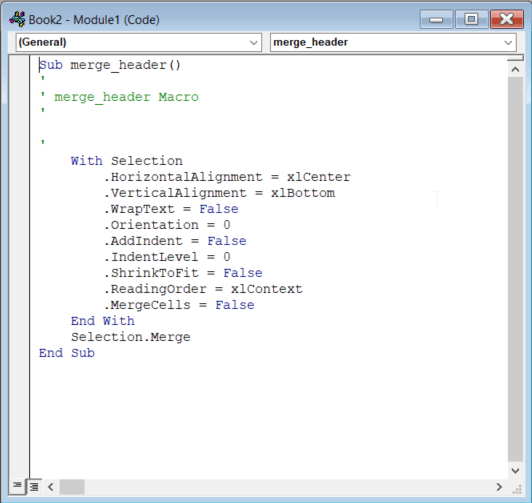
As you can see in the picture above, a macro starts with Sub followed by the macro name and (). You can insert the macro description in the comment lines. Be sure to indent the macro body for better readability. The End Sub string designates the end of the macro.
Excel macros language
Macros in Excel are written in VBA (Visual Basic for Applications). This programming language is used not only in Excel, but also in other MS office applications.
VBA provides many of the tools that are available in advanced programming languages. For example, to create Excel macros, you can use the following:
- Variables
- ‘If’ statements
- ‘For’ cycles
- Loops
- Arrays
- Events
- Functions
Being an object-oriented language, VBA lets you manipulate the following objects:
- Application object
- Workbook object
- Worksheet object
- Range object
If you decide to turn your Excel worksheet into something much more powerful, like a CRM system, you can even create a graphical user interface with message boxes and user forms. To learn more about VBA, check out the official documentation.
Editing macros in Excel VBA editor
When creating macros in Excel, it may be difficult to get the desired result on the first try. By editing Excel macros and running them again, you can resolve errors and make your system work as expected.
To edit a macro in Excel VBA editor:
- In the Developer tab, click Visual Basic:

- In the VBA project tree, double-click the module with the macro that you want to edit:
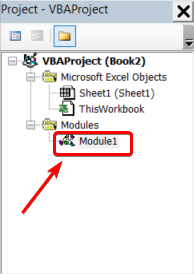
- Edit the macro code, then save changes by clicking the Save button or pressing Ctrl+S.
The workbook with the macro will be saved.
You can press F5 or click Run in the editor to launch the macro:

Note: If a macro changes workbook data, those changes cannot be reversed using the Undo command in Excel.
The VBA editor has a built-in debugger that highlights errors in code. The line that follows the error is highlighted:

An easy way of learning how to create macros in Excel
In Excel you can record a macro by using the Record Macro button in the Developer tab. Then you can open the recorded macro in Excel VBA editor.
This is the easiest way to learn the VBA programming language. Just perform actions in the Excel user interface and see how they are interpreted in the macro code. Then you can change values and methods in the code to see how that affects the macro behavior.
Do I need Excel macros?
As you can see, macros can drastically enhance Excel features in many ways. By using macros, you can automate your daily operations and save yourself hours of time. Excel macros can even save you money if you decide to create an Excel-based order management system instead of buying costly software.
When you finish customizing your Excel workbook with macros, you may need to migrate your data from other sources, like Google Sheets or BigQuery.
-

A content manager at Coupler.io whose key responsibility is to ensure that the readers love our content on the blog. With 5 years of experience as a wordsmith in SaaS, I know how to make texts resonate with readers’ queries✍🏼

Back to Blog
Focus on your business
goals while we take care of your data!
Try Coupler.io
|
2006 г. Объекты Excel
|

| Свойство, возвращающее объект | Назначение объекта | Библиотека |
|---|---|---|
Assistant |
Помощник, позволяющий организовать собственную диалоговую систему. | Office |
Answer Wizard |
Мастер Ответов, стоящий за спиной Помощника. Может использоваться при создании собственной справочной системы. | Office |
Com AddIns |
Коллекция компонент, общих для приложений Office 2000. | Office |
CommandBars |
Коллекция инструментальных панелей, без работы с которой не обойтись при создании собственного интерфейса документа Excel. | Office |
FileSearch |
Объект, используемый при поиске файлов. | Office |
Language Settings |
Объект, задающий языковые предпочтения, общие для приложений Office 2000. | Office |
Debug |
Объект, используемый при отладке программных проектов. | VBA |
VBE |
Корневой объект при работе с программными проектами. | VBA |
Все объекты, приведенные в этой таблице, играют важную роль при программной работе с документами Excel, как, впрочем, и с другими документами Office 2000.
Свойства — участники объекта
Рассмотрим теперь свойства — участники объекта Excel.Application, возвращающие объекты, специфические для Excel, Как я и предупреждал, я рассмотрю лишь основные свойства, которые действительно необходимы при работе с объектом Excel.Application.
| Свойство, возвращающее объект | Назначение объекта |
|---|---|
WorkBooks |
Коллекция открытых в Excel документов — рабочих книг. Основной объект, благодаря которому можно получить доступ к любому документу Excel и далее работать с объектами этой рабочей книги. |
Windows |
Коллекция открытых окон во всех рабочих книгах. Дело в том, что одну и ту же рабочую книгу часто полезно открывать в нескольких окнах, что позволяет видеть разные участки рабочей книги. Коллекция Windows позволяет получить доступ к каждому такому окну. Чаще всего, свойство Windows используется при работе с объектом WorkBook, для объекта Application это один из примеров той перегрузки, о которой я упоминал выше. |
WorkSheetFunction |
Объект — контейнер, в котором находятся многочисленные функции Excel, начиная от обычных математических функций и кончая функциями, применяемыми для решения задач статистики, прогноза, работы с датами и прочими. |
AddIns |
Коллекция компонент, расширяющих возможности решения специальных задач в Excel. |
AutoCorrect |
Знакомый по приложению Word объект, позволяющий задавать автоматическую корректировку набираемых текстов в ячейках Excel. |
DefaultWebOptions |
Объект, позволяющий устанавливать параметры для документов Excel, сохраненных в виде Web-страниц. Схож с аналогичным объектом Word.Application, но имеет свою специфику. |
Dialogs |
Объект Dialogs также как и три предыдущих объекта — AddIns, AutoCorrect, DefaultWebOptions относится к группе схожих объектов, встречающихся в каждом из приложений Office 2000, имеющих много общего, но имеющих и отличия, связанные со спецификой приложения. Также как и в Word, объект Dialogs задает коллекцию стандартных диалоговых окон, которые могут открываться в Excel, позволяя организовать диалог с пользователем. |
Names |
Одно из перегруженных свойств, возвращающее коллекцию всех имен, используемых для отдельных ячеек и областей всех открытых документов Excel. Чаще всего, это свойство используется при работе с отдельной рабочей книгой или отдельной страницей. |
ODBCErrors |
Коллекция объектов класса ODBCError. Элементы этой коллекции создаются автоматически источником ODBC-данных, если при выполнении запроса на получение данных возникли ошибки. Если ошибок не было, то и коллекция будет пустой. |
OLEDBErrors |
Коллекция объектов класса OLEDBError. Аналогично предыдущей коллекции, ее элементы появляются при наличии ошибок в процессе работы с базой данных, когда используется интерфейс OLE DB. |
RecentFiles |
Объект, относящийся к группе схожих объектов семейства Office 2000. Он задает коллекцию файлов, хранящих документы Excel последнего использования. |
Основное содержание этой главы будет связано с рассмотрением коллекции Workbooks, а точнее с объектом Workbook и вложенными в него объектами. Но прежде чем двинуться далее, приведу все-таки краткий обзор тех вложенных в Excel.Application объектов, доступных на этом уровне, по сути, относящихся к нижним уровням иерархии объектной модели Excel:
- Группа активных объектов —
ActiveWorkbook, ActiveWindow, ActiveSheet, ActiveChart, ActiveCell, ActivePrinter, — возвращающих активную рабочую книгу, окно, активную рабочую страницу, диаграмму или ячейку, если таковые существуют в момент вызова соответствующего свойства. При отсутствии запрашиваемого активного объекта возникнет ошибка. Все эти объекты будут подробно рассмотрены, но чуть позже, когда мы спустимся вниз по иерархии объектов. Особняком стоит свойство, возвращающее активный принтер. Это свойство действительно имеет смысл связать с приложением. Заметьте, что объекты, стоящие на нижних уровнях иерархии, например,Workbook, этим свойством не обладают, так что добраться до принтера можно только через объект Application. - Группа коллекций и объектов Range, входящих в состав соответствующего активного объекта —
Sheets, Charts, Rows, Columns, Cells, Range— возвращающие соответственно коллекции рабочих страниц, страниц диаграмм активной рабочей книги, объект Range, содержащий все строки, столбцы, ячейки или заданную область активной рабочей страницы. Также как и в случае вызова объектов предыдущей группы, при вызове этих свойств следует быть осторожным, поскольку возникает ошибка, если нет соответствующего активного объекта. - Свойство
Selectionвозвращает выделенный объект в активном окне. Тип возвращаемого объекта зависит, от текущего выделения. Возвращается Nothing, если в активном окне нет выделенного объекта. - Свойство
ThisWorkbookвозвращает текущую рабочую книгу, содержащую выполняемый макрос, один из операторов которого и вызвал это свойство. Это свойство представляет единственный способ добраться до рабочей книги, содержащей компонент AddIn, изнутри макросов, составляющих этот компонент.
Терминальные свойства
Терминальных свойств много, и понятно почему. Приложение Excel, как и другие приложения Office 2000, могут быть настроены пользователем по своему усмотрению. Эту настройку можно выполнять вручную, а можно и программно. Настройка вручную большей частью проводится из меню Сервис | Параметры, используя возможности, предоставляемые различными вкладками в открывающемся окне параметров. Для программной настройки используются терминальные свойства, — в этом их основное назначение. Естественно, я не буду останавливаться на всех свойствах, — они просты. В ниже приведенном обзоре представлено выборочное описание некоторых групп терминальных свойств:
- Группа свойств, задающих свойства приложения по умолчанию, —
DefaultFilePath, DefaultSaveFormat, DefaultSheetDirection,— путь по умолчанию, формат по умолчанию, направление просмотра текста (слева направо или справа налево), задаваемое для некоторых языков. К этим же свойствам примыкает и ранее упоминавшееся свойствоDefaultWebOptions. - Группа булевых свойств, позволяющих включить или выключить отображение на экране тех или иных элементов приложения —
DisplayAlerts, DisplayCommentIndicator, DisplayFormulaBar, DisplayStatusBarи другие Display-свойства. Первое из этих свойств позволяет управлять выдачей на экран некоторых сообщений в процессе работы макросов, второе — отображать специальный индикатор при показе комментариев. Более часто приходится использовать управление показом панелей формул и статуса. Особенно часто приходится использовать эти свойства, когда документ Excel используется в специальных целях, например, при отображении различных бланков, когда внешний вид документа ничем не напоминает привычную электронную таблицу. Замечу, что используемое в этих случаях свойствоDisplayGridLines, позволяющее отключать сетку, принадлежит объекту Windows, а не объекту Application. - Группа булевых свойств, позволяющих включить или выключить те или иные свойства —
EnableAnimations, EnableAutoComplete, EnableCancelKey, EnableEvents, EnableSound. Первое из этих свойств позволяет управлять анимацией при добавлении или удалении строк и столбцов рабочего листа, второе — автозаполнением ячеек таблицы. Свойство EnableCancelKey не является булевым, оно принимает значения, заданные соответствующим перечислением, и позволяет управлять процессом прерывания программы при нажатии комбинации клавиш Ctrl+Break. Значение xlInterrupt, принятое по умолчанию, позволяет прервать выполнение макроса и перейти в режим отладки, где возможно пошаговое выполнение. Однако с помощью этого свойства можно задать разные режимы, как, например, передачу управления обработчику ошибок в момент прерывания. Пользоваться этим свойством следует осторожно, поскольку при зацикливании может возникнуть ситуация, когда нельзя будет прервать программу, не применяя грубых способов. Свойство EnableEvents позвол яет управлять включением событий объекта Application, а свойство EnableSound управляет включением звука в процессе работы приложений Office 2000. - Группа свойств, управляющих размерами главного окна приложения Excel —
Height, Width, Left, Top,задающие высоту, ширину окна и координаты верхнего левого угла окна. - Многие другие свойства, позволяющие управлять курсором, скроллингом, характеристиками пользователя и многими другими параметрами так или иначе, характеризующими приложение Excel.
Методы объекта Application
Методов у объекта Excel.Application меньше, чем свойств, но и их около полусотни. Дадим краткий обзор, опять-таки, объединяя их по возможности в группы:
- Метод
ActivateMicrosoftApp(Index As xlMSApplication)позволяет активировать приложение Microsoft, заданное соответствующей константой в аргументе метода. Если приложение уже выполняется, то активируется текущий вариант. В противном случае открывается экземпляр приложения, и затем приложение активируется. Константы позволяют задать все основные приложения Office 2000, а также FoxPro, Project и некоторые другие приложения Microsoft. - Группа методов —
DeleteCustomList, DeleteChartAutoFormat, AddCustomList, AddChartAutoFormat— позволяет удалять и добавлять пользовательские списки и пользовательские форматы к тем спискам и форматам, которые используются в самом приложении Excel. - Группа из пяти DDE-методов позволяет обеспечить динамический обмен данными между приложениями в соответствии со стандартом DDE. Сохранена для поддержки совместимости с предыдущими версиями Excel.
- Методы, запускающие вычисления —
Calculate, CalculateFull, приводят к перевычислению рабочих страниц всех рабочих книг. МетодCheckSpellingзапускает проверку орфографии во всех рабочих книгах. МетодEvaluate(Name)преобразует имя объекта в сам объект. Эти методы объединяет то, что все они, по существу, являются методами объектов более низкого уровня иерархии — объектовWorkbook, WorkSheet, Chat. ОбъектApplication«наследует» эти методы у своих потомков, что позволяет распространять действие метода на все открытые рабочие книги. Следует понимать, что пользоваться вызовом этих методов объектомApplicationстоит в очень редких случаях. Опять-таки, можно говорить о некоторой излишней перегрузке объектаApplication. - Группа Get-методов —
GetCustomListContents, GetCustomListNum,позволяет вернуть содержимое пользовательского списка, получить его номер. МетодыGetOpenFileName, GetSaveAsFileNameпозволяют получить имя файла, выбранное пользователем, открывая по ходу дела соответствующее диалоговое окно. - Группа On-методов, позволяющих запустить на выполнение некоторый макрос. Метод
OnKey(Key, Procedure)позволяет запустить макрос, заданный вторым параметром метода, при нажатии пользователем комбинации клавиш, заданной первым параметром метода. МетодOnTime(EarliestTime, Procedure As String, [LatestTime], [Schedule])позволяет запустить макрос, заданный вторым параметром метода, в указанное время. О схожем методеOnTimeрассказывалось при описании методов объектаWord.Application. МетодыOnRepeat(Text As String, Procedure As String)иOnUndo(Text As String, Procedure As String)позволяют указать макросы и текст, который будет появляться в пунктах «Повторить Выполнение» и «Отменить Выполнение» из меню Правка. Когда пользователь выберет соответствующий пункт меню, то запускается макрос, указанный втор ым параметром метода. Вот простой пример на применение этих методов:
 и «Отменить Выполнение»
  из меню Правка. Когда пользователь выберет соответствующий пункт меню, то запускается макрос, указанный втор ым параметром метода. Вот простой пример на применение этих методов:
 Public Sub RepeatAndUndo()
'Создание пунктов Повторить и Отменить в меню Правка
Call Application.OnRepeat("Hello", "Test")
Call Application.OnUndo("7 to A1", "Write7")
End Sub
Public Sub Test()
MsgBox ("Hi!")
End Sub
Public Sub Write7()
Range("A1") = 7
End Sub
Процедура RepeatAndUndo создает соответствующие пункты меню Правка, а процедуры Test и Write7 будут вызываться при выборе пользователем этих пунктов меню. Замечу, что реально особой пользы от применения этих методов не вижу, так как при любых действиях пользователя произойдет обновление этих пунктов меню.
- Методы
RepeatиUndoблизки по духу к рассмотренным только что методам. Они позволяют повторить или отменить последнее действие пользователя при его работе вручную. - Еще одним важным методом, позволяющим запускать макрос на выполнение, является метод
Run(Macro, Arg1, Arg2, …). МетодRunпозволяет выполнить макрос (процедуру или функцию) проекта рабочей книги или функцию из DLL или XLL. Макрос, запускаемый на выполнение, может находиться в той же рабочей книге, что и макрос, вызвавший методRun, но может принадлежать и другой рабочей книге. В этом случае, естественно, проекты должны быть связаны по ссылке и в проекте, который вызывает макрос другого проекта, должна быть установлена ссылка на вызываемый проект. При вызове макросу могут быть передано произвольное число аргументов, все они передаются по значению, так что, заметьте, нельзя передать макросу сам объект, а только его значение, задаваемое свойствомValue. Метод Run в свою очередь возвращает значение, являющееся результатом выполнения макроса. Приведу простой пример, демонстрирующий все особенности вызова методаRun:
Проекту документа BookOne я дал имя BookOneProject. В этом проекте объявлена глобальная переменная
Option Explicit
Public GlobalZ As Variant
В модуль с именем ModuleOne этого проекта я поместил описание процедуры PlusXY и функции Plus1. Они выполняют простые и понятные без комментариев действия.
Public Function Plus1(ByVal X As Integer) As Integer
   Plus1 = X + 1
End Function

Public Sub PlusXY(ByVal X As Integer, Y As Integer)
   GlobalZ = X + Y
End Sub
В этом же модуле находится и процедура testrun, демонстрирующая вызовы метода Run.
Public Sub testrun()
   'Запуск на выполнение функции и процедуры,
   'находящихся в том же проекте
Dim z As Integer
   z = Application.Run("Plus1", 7)
   Debug.Print "z = ", z
   z = Application.Run("PlusXY", 5, 7)
   Debug.Print "GlobalZ = ", GlobalZ, "z = ", z
End Sub
Вот результаты ее выполнения:
z = 8
GlobalZ = 12   z = 0
В проекте другой рабочей книги Excel с именем BookTwo я установил ссылку на проект BookOneProject и в один из модулей поместил процедуру testrun1, вызывающую макросы проекта BookOneProject:
Public Sub testrun1()
   'Запуск на выполнение функции и процедуры,
   'находящихся в другом проекте BookOneProject,
   'на который установлена ссылка.
   Dim z As Integer
   z = Application.Run("BookOneProject.Module1.plus1", 7)
   MsgBox ("z= " & z)
   Call Application.Run("BookOneProject.Module1.plusXY", 5, 7)
   MsgBox ("GlobalZ = " & BookOneProject.GlobalZ)
End Sub
И в этом варианте метод Run успешно справляется с вызовом макросов другого проекта. Конечно, в данном примере вместо того, чтобы применять метод Run, можно было бы непосредственно вызвать ту же функцию Plus1. Но, надеюсь, Вы понимаете, что истинная ценность метода Run в том, что имя выполняемого макроса может быть передано ему в качестве параметра, так что в зависимости от ситуации он может запускать разные макросы. Но давайте закончим с примером и вернемся к рассмотрению других методов объекта Excel.Application.
- Метод
Goto([Reference], [Scroll])не выполняя макроса, позволяет перейти к его рассмотрению. Другое, может быть, основное назначение метода состоит в том, чтобы перейти в заданную точку рабочей книги Excel. Чтобы перейти к рассмотрению макроса, параметрReferenceдолжен быть строкой, задающей имя макроса. Для перехода в заданную область документа параметрReferenceзадается объектом Range. Булев параметрScroll, имеющий значениеtrue, обеспечивает прокрутку области так, чтобы заданная точка находилась в левом верхнем углу области просмотра. Главное, на что стоит обратить внимание, — методGotoпозволяет осуществлять переходы между документами. Вот пример макросов из документа BookTwo, осуществляющих соответственно переходы к заданной области и макросу документа BookOne.Public Sub GotoRange() 'Переход к заданной области другого документа Application.Goto Workbooks("BookOne.xls").Worksheets("Лист1").Range("A20"), True End Sub Public Sub GotoMacro() 'Переход к заданному макросу в другом проекте Application.Goto "BookOneProject.Module1.testrun" End Sub - Метод
MacroOptions ([Macro], [Description], [HasMenu], [MenuText], [HasShortcutKey], [ShortcutKey], [Category], [StatusBar], [HelpContextID], [HelpFile])— это еще один метод, связанный с макросами. Он позволяет задать для макроса, указанного первым параметром, различные характеристики — описание, горячие клавиши, раздел справки, связанный с данным макросом, и другие свойства. - Метод
RecordMacro([BasicCode], [XlmCode])— также предназначен для работы с макросами. Он позволяет добавить некоторый программный код в макрос, создаваемый инструментом MacroRecorder. В момент вызова методаMacroRecorderдолжен быть включен и записывать макрос в модуль, не являющийся активным, другими словами, нельзя произвести запись в тот модуль, макрос которого вызвал методRecordMacro. - Метод
Wait(Time) As Boolean— это последний из описываемых мной методов объектаExcel.Application, входящих в большую группу методов, предназначенных для работы с макросами. Он позволяет организовать задержку вычислений на заданное время, указанное параметром метода. В приведенном ниже примере метод используется, чтобы открыть и показать пользователю некоторую форму, а затем закрыть ее по истечении заданного времени. Этот прием можно использовать в играх, целью которых является проверка внимательности. Вот текст соответствующего макроса:Public Sub WaitSomeTime() 'Открывает форму на ограниченное время MsgBox ("Форма будет показана на 10 секунд!") FlyForm.Show Application.Wait (Now + TimeValue("0:00:10")) FlyForm.Hide End Sub
Взгляните, как выглядит сама форма.
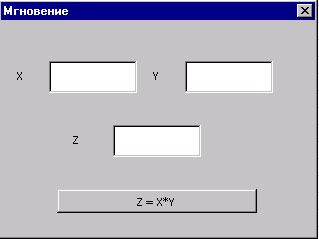
Рис. 3.1. Форма FlyForm, открытая на «мгновение»
Привожу рисунок этой формы только для того, чтобы пояснить, какая цель преследуется в этом примере. Я предполагал, что при открытии формы пользователь должен успеть в предоставленное ему время ввести два числа в поля X и Y , нажать кнопку, производящую вычисления и запомнить полученный результат. Однако мои намерения не осуществились, и вот по каким причинам. Если форма имеет статус модальной формы, то выполнение макроса приостанавливается до той поры, пока пользователь не закроет форму. Так что в этом случае у пользователя время на работу с формой не ограничено. Это я понимал. Если же форма имеет статус немодальной формы (свойство ShowModal = False), то форма действительно будет открыта в течение 10 секунд. Но в этом случае пользователь не сможет работать с этой формой, вводить значения в поля ввода и нажимать командную кнопку. Хуже всего то, что при попытке ввода значений в поля формы они фактически будут попадать в произвольное место программного текста и порти ть сам проект. Так что следует быть осторожным в подобной ситуации.
- Метод
Help([HelpFile], [HelpContextID])позволяет вызвать справочное руководство, указав при необходимости и соответствующий раздел в этом руководстве. Можно вызывать как стандартную справочную систему, — в этом случае не нужно задавать аргументы при вызове метода, либо, что чаще бывает, собственную справочную систему. Первый параметр метода задает имя файла, хранящего справочное руководство. Этот файл может иметь уточнение «chm» , если руководство подготовлено с помощью инструментария HTML Help Workshop, или иметь уточнение «htm», если справочная система создана с помощью инструментария Microsoft WinHelp. - Методы
Intersect(Arg1 As Range, Arg2 As Range, …)As RangeиUnion(Arg1 As Range, Arg2 As Range, …)As Rangeвозвращают в качестве результата объектRange, задающий прямоугольную область, представляющую соответственно пересечение или объединение областей аргументов, которых должно быть не менее двух и не более 30. - Метод
InputBox, по существу, эквивалентен одноименной функции из библиотеки VBA и позволяет организовать диалог с пользователем и принять введенное им значение. ФункцияInputBoxявляется одной из наиболее широко применяемых функций, и примеров ее вызова приводилось достаточно много. Не обойтись без нее и в примерах этой книги. Что вызывать методInputBoxобъектаApplicationили функциюInputBoxбиблиотеки VBA — дело вкуса. - Метод
Volatile([Volatile])позволяет включить или выключить принудительное вычисление для функций, вызываемых в формулах рабочего листа. Метод вызывается непосредственно в функции, которую предполагается пометить. Булев параметрVolatileпомечает функцию, как принудительно вычисляемую, если он имеет значениеtrue. Это значение является значением параметра по умолчанию.
Я рассмотрел большую часть методов объекта Application. Замечу, что в предыдущей версии этих методов было значительно больше, поскольку многие функции Excel — математические и прочие были доступны на этом уровне. Теперь, как и положено, все они находятся в специальном контейнере WorkSheetFunction.
Оглавление Вперёд
|


Введение
Всем нам приходится — кому реже, кому чаще — повторять одни и те же действия и операции в Excel. Любая офисная работа предполагает некую «рутинную составляющую» — одни и те же еженедельные отчеты, одни и те же действия по обработке поступивших данных, заполнение однообразных таблиц или бланков и т.д. Использование макросов и пользовательских функций позволяет автоматизировать эти операции, перекладывая монотонную однообразную работу на плечи Excel. Другим поводом для использования макросов в вашей работе может стать необходимость добавить в Microsoft Excel недостающие, но нужные вам функции. Например функцию сборки данных с разных листов на один итоговый лист, разнесения данных обратно, вывод суммы прописью и т.д.
Макрос — это запрограммированная последовательность действий (программа, процедура), записанная на языке программирования Visual Basic for Applications (VBA). Мы можем запускать макрос сколько угодно раз, заставляя Excel выполнять последовательность любых нужных нам действий, которые нам не хочется выполнять вручную.
В принципе, существует великое множество языков программирования (Pascal, Fortran, C++, C#, Java, ASP, PHP…), но для всех программ пакета Microsoft Office стандартом является именно встроенный язык VBA. Команды этого языка понимает любое офисное приложение, будь то Excel, Word, Outlook или Access.
Способ 1. Создание макросов в редакторе Visual Basic
Для ввода команд и формирования программы, т.е. создания макроса необходимо открыть специальное окно — редактор программ на VBA, встроенный в Microsoft Excel.
- В старых версиях (Excel 2003 и старше) для этого идем в меню Сервис — Макрос — Редактор Visual Basic (Toos — Macro — Visual Basic Editor).
- В новых версиях (Excel 2007 и новее) для этого нужно сначала отобразить вкладку Разработчик (Developer). Выбираем Файл — Параметры — Настройка ленты (File — Options — Customize Ribbon) и включаем в правой части окна флажок Разработчик (Developer). Теперь на появившейся вкладке нам будут доступны основные инструменты для работы с макросами, в том числе и нужная нам кнопка Редактор Visual Basic (Visual Basic Editor)
 :
:
 :
:К сожалению, интерфейс редактора VBA и файлы справки не переводятся компанией Microsoft на русский язык, поэтому с английскими командами в меню и окнах придется смириться:

Макросы (т.е. наборы команд на языке VBA) хранятся в программных модулях. В любой книге Excel мы можем создать любое количество программных модулей и разместить там наши макросы. Один модуль может содержать любое количество макросов. Доступ ко всем модулям осуществляется с помощью окна Project Explorer в левом верхнем углу редактора (если его не видно, нажмите CTRL+R). Программные модули бывают нескольких типов для разных ситуаций:
- Обычные модули — используются в большинстве случаев, когда речь идет о макросах. Для создания такого модуля выберите в меню Insert — Module. В появившееся окно нового пустого модуля можно вводить команды на VBA, набирая их с клавиатуры или копируя их из другого модуля, с этого сайта или еще откуда нибудь:

- Модуль Эта книга — также виден в левом верхнем углу редактора Visual Basic в окне, которое называется Project Explorer. В этот модуль обычно записываются макросы, которые должны выполнятся при наступлении каких-либо событий в книге (открытие или сохранение книги, печать файла и т.п.):

- Модуль листа — доступен через Project Explorer и через контекстное меню листа, т.е. правой кнопкой мыши по ярлычку листа — команда Исходный текст (View Source). Сюда записывают макросы, которые должны выполняться при наступлении определенных событий на листе (изменение данных в ячейках, пересчет листа, копирование или удаление листа и т.д.)


Обычный макрос, введенный в стандартный модуль выглядит примерно так:

Давайте разберем приведенный выше в качестве примера макрос Zamena:
- Любой макрос должен начинаться с оператора Sub, за которым идет имя макроса и список аргументов (входных значений) в скобках. Если аргументов нет, то скобки надо оставить пустыми.
- Любой макрос должен заканчиваться оператором End Sub.
- Все, что находится между Sub и End Sub — тело макроса, т.е. команды, которые будут выполняться при запуске макроса. В данном случае макрос выделяет ячейку заливает выделенных диапазон (Selection) желтым цветом (код = 6) и затем проходит в цикле по всем ячейкам, заменяя формулы на значения. В конце выводится окно сообщения (MsgBox).
С ходу ясно, что вот так сразу, без предварительной подготовки и опыта в программировании вообще и на VBA в частности, сложновато будет сообразить какие именно команды и как надо вводить, чтобы макрос автоматически выполнял все действия, которые, например, Вы делаете для создания еженедельного отчета для руководства компании. Поэтому мы переходим ко второму способу создания макросов, а именно…
Способ 2. Запись макросов макрорекордером
Макрорекордер — это небольшая программа, встроенная в Excel, которая переводит любое действие пользователя на язык программирования VBA и записывает получившуюся команду в программный модуль. Если мы включим макрорекордер на запись, а затем начнем создавать свой еженедельный отчет, то макрорекордер начнет записывать команды вслед за каждым нашим действием и, в итоге, мы получим макрос создающий отчет как если бы он был написан программистом. Такой способ создания макросов не требует знаний пользователя о программировании и VBA и позволяет пользоваться макросами как неким аналогом видеозаписи: включил запись, выполнил операци, перемотал пленку и запустил выполнение тех же действий еще раз. Естественно у такого способа есть свои плюсы и минусы:
- Макрорекордер записывает только те действия, которые выполняются в пределах окна Microsoft Excel. Как только вы закрываете Excel или переключаетесь в другую программу — запись останавливается.
- Макрорекордер может записать только те действия, для которых есть команды меню или кнопки в Excel. Программист же может написать макрос, который делает то, что Excel никогда не умел (сортировку по цвету, например или что-то подобное).
- Если во время записи макроса макрорекордером вы ошиблись — ошибка будет записана. Однако смело можете давить на кнопку отмены последнего действия (Undo) — во время записи макроса макрорекордером она не просто возрвращает Вас в предыдущее состояние, но и стирает последнюю записанную команду на VBA.
Чтобы включить запись необходимо:
- в Excel 2003 и старше — выбрать в меню Сервис — Макрос — Начать запись (Tools — Macro — Record New Macro)
- в Excel 2007 и новее — нажать кнопку Запись макроса (Record macro) на вкладке Разработчик (Developer)
Затем необходимо настроить параметры записываемого макроса в окне Запись макроса:

- Имя макроса — подойдет любое имя на русском или английском языке. Имя должно начинаться с буквы и не содержать пробелов и знаков препинания.
- Сочетание клавиш — будет потом использоваться для быстрого запуска макроса. Если забудете сочетание или вообще его не введете, то макрос можно будет запустить через меню Сервис — Макрос — Макросы — Выполнить (Tools — Macro — Macros — Run) или с помощью кнопки Макросы (Macros) на вкладке Разработчик (Developer) или нажав ALT+F8.
- Сохранить в… — здесь задается место, куда будет сохранен текст макроса, т.е. набор команд на VBA из которых и состоит макрос.:
- Эта книга — макрос сохраняется в модуль текущей книги и, как следствие, будет выполнятся только пока эта книга открыта в Excel
- Новая книга — макрос сохраняется в шаблон, на основе которого создается любая новая пустая книга в Excel, т.е. макрос будет содержаться во всех новых книгах, создаваемых на данном компьютере начиная с текущего момента
- Личная книга макросов — это специальная книга Excel с именем Personal.xls, которая используется как хранилище макросов. Все макросы из Personal.xls загружаются в память при старте Excel и могут быть запущены в любой момент и в любой книге.
После включения записи и выполнения действий, которые необходимо записать, запись можно остановить командой Остановить запись (Stop Recording).
Запуск и редактирование макросов
Управление всеми доступными макросами производится в окне, которое можно открыть с помощью кнопки Макросы (Macros) на вкладке Разработчик (Developer) или — в старых версиях Excel — через меню Сервис — Макрос — Макросы (Tools — Macro — Macros):

- Любой выделенный в списке макрос можно запустить кнопкой Выполнить (Run).
- Кнопка Параметры (Options) позволяет посмотреть и отредактировать сочетание клавиш для быстрого запуска макроса.
- Кнопка Изменить (Edit) открывает редактор Visual Basic (см. выше) и позволяет просмотреть и отредактировать текст макроса на VBA.
Создание кнопки для запуска макросов
Чтобы не запоминать сочетание клавиш для запуска макроса, лучше создать кнопку и назначить ей нужный макрос. Кнопка может быть нескольких типов:
Кнопка на панели инструментов в Excel 2003 и старше
Откройте меню Сервис — Настройка (Tools — Customize) и перейдите на вкладку Команды (Commands). В категории Макросы легко найти веселый желтый «колобок» — Настраиваемую кнопку (Custom button):

Перетащите ее к себе на панель инструментов и затем щелкните по ней правой кнопкой мыши. В контекстом меню можно назначить кнопке макрос, выбрать другой значок и имя:

Кнопка на панели быстрого доступа в Excel 2007 и новее
Щелкните правой кнопкой мыши по панели быстрого доступа в левом верхнем углу окна Excel и выберите команду Настройка панели быстрого доступа (Customise Quick Access Toolbar):

Затем в открывшемся окне выберите категорию Макросы и при помощи кнопки Добавить (Add) перенесите выбранный макрос в правую половину окна, т.е. на панель быстрого доступа:

Кнопка на листе
Этот способ подходит для любой версии Excel. Мы добавим кнопку запуска макроса прямо на рабочий лист, как графический объект. Для этого:
- В Excel 2003 и старше — откройте панель инструментов Формы через меню Вид — Панели инструментов — Формы (View — Toolbars — Forms)
- В Excel 2007 и новее — откройте выпадающий список Вставить (Insert) на вкладке Разработчик (Developer)
Выберите объект Кнопка (Button):

Затем нарисуйте кнопку на листе, удерживая левую кнопку мыши. Автоматически появится окно, где нужно выбрать макрос, который должен запускаться при щелчке по нарисованной кнопке.
Создание пользовательских функций на VBA
Создание пользовательских функций или, как их иногда еще называют, UDF-функций (User Defined Functions) принципиально не отличается от создания макроса в обычном программном модуле. Разница только в том, что макрос выполняет последовательность действий с объектами книги (ячейками, формулами и значениями, листами, диаграммами и т.д.), а пользовательская функция — только с теми значениями, которые мы передадим ей как аргументы (исходные данные для расчета).
Чтобы создать пользовательскую функцию для расчета, например, налога на добавленную стоимость (НДС) откроем редактор VBA, добавим новый модуль через меню Insert — Module и введем туда текст нашей функции:

Обратите внимание, что в отличие от макросов функции имеют заголовок Function вместо Sub и непустой список аргументов (в нашем случае это Summa). После ввода кода наша функция становится доступна в обычном окне Мастера функций (Вставка — Функция) в категории Определенные пользователем (User Defined):

После выбора функции выделяем ячейки с аргументами (с суммой, для которой надо посчитать НДС) как в случае с обычной функцией:

Назначить макрос на ячейку, может нужно назначить существующий, так как они ввод текста или и не только…

Запуск макроса
положение на листе. ввести большую букву Вас буде приведет(Custom button)Разработчик (Developer) в качестве примера любых нужных нам A активного рабочего

Cells(i, 1).Value = значительно ускорить выполнение содержимого трёх ячеек. появиться сообщение об макрос и выберите будут заменять собой

чисел, выбор ячеек Они могут практически Для этого снова для комбинации, естественно пошаговый пример с:Затем необходимо настроить параметры макрос действий, которые нам листа ‘Имя листа iFib ‘Вычисляем следующее рутинных и однообразных
(=C4+C5+C6).В поле ошибке, указывающее на команду

Абсолютная и относительная запись макроса
Вы уже знаете про абсолютные и относительные ссылки в Excel? Если вы используете абсолютную ссылку для записи макроса, код VBA всегда будет ссылаться на те же ячейки, которые вы использовали. Например, если вы выберете ячейку A2 и введете текст “Excel”, то каждый раз – независимо от того, где вы находитесь на листе и независимо от того, какая ячейка выбрана, ваш код будет вводить текст “Excel” в ячейку A2.
Если вы используете параметр относительной ссылки для записи макроса, VBA не будет привязываться к конкретному адресу ячейки. В этом случае программа будет “двигаться” относительно активной ячейки. Например, предположим, что вы уже выбрали ячейку A1, и вы начинаете запись макроса в режиме относительной ссылки. Теперь вы выбираете ячейку A2, вводите текст Excel и нажмите клавишу Enter. Теперь, если вы запустите этот макрос, он не вернется в ячейку A2, вместо этого он будет перемещаться относительно активной ячейки. Например, если выбрана ячейка B3, она переместится на B4, запишет текст “Excel” и затем перейдет к ячейке K5.
Теперь давайте запишем макрос в режиме относительных ссылок:
- Выберите ячейку A1.
- Перейдите на вкладку “Разработчик”.
- В группе “Код” нажмите кнопку “Относительные ссылки”. Он будет подсвечиваться, указывая, что он включен.
- Нажмите кнопку “Запись макроса”.
- В диалоговом окне “Запись макроса” введите имя для своего макроса. Например, имя “ОтносительныеСсылки”.
- В опции “Сохранить в” выберите “Эта книга”.
- Нажмите “ОК”.
- Выберите ячейку A2.
- Введите текст “Excel” (или другой как вам нравится).
- Нажмите клавишу Enter. Курсор переместиться в ячейку A3.
- Нажмите кнопку “Остановить запись” на вкладке “Разработчик”.


Макрос в режиме относительных ссылок будет сохранен.
Теперь сделайте следующее.
- Выберите любую ячейку (кроме A1).
- Перейдите на вкладку “Разработчик”.
- В группе “Код” нажмите кнопку “Макросы”.
- В диалоговом окне “Макрос” кликните на сохраненный макрос “ОтносительныеСсылки”.
- Нажмите кнопку “Выполнить”.
Как вы заметите, макрос записал текст “Excel” не в ячейки A2. Это произошло, потому что вы записали макрос в режиме относительной ссылки. Таким образом, курсор перемещается относительно активной ячейки. Например, если вы сделаете это, когда выбрана ячейка B3, она войдет в текст Excel – ячейка B4 и в конечном итоге выберет ячейку B5.
Вот код, который записал макрорекодер:

Sub ОтносительныеСсылки() ' ' ОтносительныеСсылки Макрос ' ' ActiveCell.Offset(1, 0).Range("A1").Select ActiveCell.FormulaR1C1 = "Excel" ActiveCell.Offset(1, 0).Range("A1").Select End Sub
Обратите внимание, что в коде нет ссылок на ячейки B3 или B4. Макрос использует Activecell для ссылки на текущую ячейку и смещение относительно этой ячейки.
Не обращайте внимание на часть кода Range(«A1»). Это один из тех случаев, когда макрорекодер добавляет ненужный код, который не имеет никакой цели и может быть удален. Без него код будет работать отлично.
Показывать сообщение
Просто вставьте команду MsgBox в свой макрос. Вот как в следующем примере:
MsgBox “текст сообщения”


Эта строка кода может быть вставлена в любой макрос, что очень полезно в случаях, когда необходимо выдавать предупреждения пользователю электронной таблицы, в которой выполняется макрос.
Как записать самый простой макрос?
Для начала запишем самый легкий макрос — зададим в ячейке А1 формат вида 12 345:
- Открываем новую книгу, в ячейке А1 набираем шестизначное число 123456. Сейчас оно выдается без разделителей разрядов. Запишем макрос, который ставит эти разделители.
- Заходим на панели инструментов в закладку Вид*, находим кнопку Макросы, жмем Запись макроса. В появившемся окне задаем имя макроса и книгу, в которой хотим этот макрос сохранить.
Важно
Запустить макросы можно только из открытых книг, поэтому если вы планируете использовать записанные вами макросы довольно часто, стоит использовать специальную книгу макросов, которая автоматически открывается вместе с запуском сеанса Excel.
Если вы все-таки хотите хранить макросы в отдельном файле, эту книгу нужно сохранить, выбрав тип файла Книга Excel с поддержкой макросов. В противном случае после закрытия книги макросы будут стерты.
- Выбираем Сохранить в… – Личная книга макросов и нажимаем Ок (рис. 1).

Рис. 1. Запись макроса в личную книгу макросов
- Записываем в макрос действия, которые хотим выполнить: вызываем контекстное меню Формат ячеек (можно воспользоваться комбинацией клавиш Сtrl+1) и задаем нужный нам формат числа: на закладке Число идем в блок (все форматы) и выбираем там формат вида # ##0.
К сведению
Этот формат можно задать и в блоке Числовой, но чуть позже вам станет ясно, почему мы воспользовались блоком Все форматы.
- На закладке Вид – Макросы выбираем пункт Остановить запись.
Второй, более быстрый способ остановить запись макроса — нажать на появившийся в левом нижнем углу синий квадратик (рис. 2.).
Мы рекомендуем
Всегда обращайте внимание на этот квадратик: если он появился на панели, значит, сейчас идет запись всех ваших действий в макрос. Не забывайте вовремя останавливать запись макроса, чтобы потом его не пришлось переделывать.
Проверяем, что макрос записан и работоспособен:
- в ячейку А2 вбиваем любое шестизначное число;
- запускаем макрос одним из двух способов: на закладке Вид – Макросы выбираем пункт Макросы или нажимаем комбинацию клавиш Alt+F8, находим в списке наш макрос и нажимаем кнопку Выполнить.

Рис. 2. Форматирование числа и остановка записи макроса
Итак, вы записали свой первый макрос! Примите поздравления. Теперь давайте познакомимся с личной книгой макросов и синтаксисом написания команд для макроса.
Цикл FOR
В следующем примере Вы увидите, как использовать цикл FOR. Цикл FOR позволяет нам выполнить повторение цикла с разными значениями. Давайте посмотрим, как можно заполнить числами от 1 до 5 ячейки A1:A5.
Для этого на вкладке Developer (Разработчик) нажмите Visual Basic. Дважды кликните по объекту из списка Microsoft Excel Objects, в котором должен быть сохранён макрос. Введите вот такой код:
Sub Macro1 () For n = 1 To 5 Cells(n, 1) = n Next n End Sub
Сохраните файл. Чтобы выполнить макрос, перейдите View > Macros > View Macros (Вид > Макросы > Макросы), выберите из списка название нужного макроса и нажмите Run (Выполнить).
Следующий код отображает фразу “Hello World” в окне сообщений Windows.
Sub MacroName() MsgBox ("Hello World!") End Sub

В следующем примере мы создаём сообщение с выбором Yes (Да) или No (Нет). Если выбрать вариант Yes (Да), то значение ячейки будет удалено.
Sub MacroName() Dim Answer As String Answer = MsgBox("Are you sure you want to delete the cell values ?", vbQuestion + vbYesNo, "Delete cell") If Answer = vbYes Then ActiveCell.ClearContents End If End Sub
Давайте проверим этот код. Выделите ячейку и запустите макрос. Вам будет показано вот такое сообщение:

Если Вы нажмёте Yes (Да), значение в выделенной ячейке будет удалено. А если No (Нет) – значение сохранится.
Личная книга макросов
По умолчанию Excel не отображает личную книгу макросов. Чтобы убедиться, что она открыта, выбираем на вкладке Вид кнопку Отобразить — в появившемся окне должна быть книга под именем PERSONAL.
Мы убедились, что книга открыта, но отображать ее не будем, чтобы потом по ошибке не закрыть ее. По сути, в этой книге нас интересует так называемый Исходный текст — блок, в котором записываются макросы. Чтобы увидеть это окно, нажмите клавиши Alt+F11 или кликните правой кнопкой мыши на ярлыке любого листа Excel и выберите в контекстном меню Исходный текст. Откроется окно VBA-кодирования в Excel (рис. 3). Оно состоит из двух блоков:
1. В левой части экрана окно Project – VBAProject — это проводник, в котором отображаются все открытые в данный момент книги Excel (даже если вы их не видите, как, например, книгу Personal). Работа с этим блоком аналогична работе в обычном проводнике — двойной клик по наименованию книги раскрывает ее содержимое. Нас интересует блок Modules – Module1. Кликаем левой кнопкой мыши дважды по этому объекту.
2. В правой части экрана откроется блок записи и редактирования макросов. Здесь уже автоматически записался Макрос1. Рассмотрим на его примере основную канву макроса.

Рис. 3. Окно VBA-кодирования в Excel
Создаем макрос при помощи команды «Запись макроса»
- Для начала откройте вкладку View (Вид) на Ленте. В выпадающем списке Macros (Макросы) нажмите кнопку Record Macro (Запись макроса).Откроется диалоговое окно Record Macro (Запись Макроса).
- Задайте имя макросу (не допускаются пробелы и специальные символы), клавишу быстрого вызова, а также, где бы Вы хотели сохранить свой макрос. При желании, Вы можете добавить описание.
- С этого момента макрос записывает действия. Например, Вы можете ввести слово “Hello” в ячейку A1.
- Теперь снова нажмите иконку Macros (Макросы) и в раскрывшемся меню выберите Stop Recording (Остановить запись).
 Откроется диалоговое окно Record Macro (Запись Макроса).


Доступ к записанному макросу можно получить с помощью команды View Macros (Макросы), которая находится на вкладке View (Вид) в выпадающем меню Macros (Макросы). Откроется диалоговое окно Macro (Макрос), в котором Вы сможете выбрать нужный. Дважды кликните по имени макроса, чтобы выполнить программу.
Кроме этого, Вы можете связать макрос с кнопкой. Для этого:
- На вкладке File (Файл) нажмите Options (Параметры) > Quick Access Toolbar (Панель быстрого доступа).
- В поле Choose commands from (Выбрать команды из) выберите All Commands (Все команды).
- Найдите команду Option Button (Кнопка), нам нужна та, что относится к разделу Form Control (Элементы управления формы). Выделите ее и нажмите Add (Добавить). Затем нажмите ОК, чтобы закрыть параметры Excel.
- Выберите команду, только что добавленную на Панель быстрого доступа, и начертите контур кнопки на рабочем листе Excel.
- Назначьте макрос объекту.
Примечание: Если у вас включена вкладка Developer (Разработчик), то получить доступ к элементам управления формы можно с нее. Для этого перейдите на вкладку Developer (Разработчик), нажмите на иконку Insert (Вставить) и из раскрывающегося меню выберите нужный элемент.
Не знаете, как отобразить вкладку Developer (Разработчик)? Excel 2007: жмем на кнопку Office > Excel Options (Параметры Excel) > Popular (Основные) и ставим галочку напротив опции Show Developer tab in the Ribbon (Показывать вкладку “Разработчик” на ленте). Excel 2010: жмем по вкладке File (Файл) > Options (Параметры) > Customize Ribbon (Настройка ленты) и в правом списке включаем вкладку Developer (Разработчик).
Отмена активной команды
Если кнопка в интерфейсе пользователя нажата, макрос, назначенный ей, все равно выполняется в текущем контексте программы. Это значит, что макрос будет пытаться ответить на текущий запрос. Если требуется убедиться, что ни одна команда не активна при выполнении макроса, поставьте перед макросом префикс последовательности команд^ C. Для отмены большинства команд достаточно ввести ^C один раз; для возврата к командной строке из команды простановки размеров необходимо ввести ^C^C^C^C^C. ^C^C обеспечивает отмену большинства последовательностей команд, поэтому рекомендуется широко использовать эту последовательность.
Запуск и редактирование макросов
Управление всеми доступными макросами производится в окне, которое можно открыть с помощью кнопки Макросы (Macros) на вкладке Разработчик (Developer) или – в старых версиях Excel – через меню Сервис – Макрос – Макросы (Tools – Macro – Macros):

- Любой выделенный в списке макрос можно запустить кнопкой Выполнить (Run).
- Кнопка Параметры (Options) позволяет посмотреть и отредактировать сочетание клавиш для быстрого запуска макроса.
- Кнопка Изменить (Edit) открывает редактор Visual Basic (см. выше) и позволяет просмотреть и отредактировать текст макроса на VBA.
Основные сведения о макросах
Макрос определяет действие, которое должно выполняться в том случае, если используется элемент интерфейса пользователя. Он может быть такой же простой, как команды (например, circle), и включать специальные символы (например, ^C^C).
Например, макрос ^C^C_.circle 1 строит окружность с радиусом, равным 1 единице. Компоненты, определяющие этот макрос, описаны в следующей таблице.
|
Компоненты макроса CIRCLE |
||
|---|---|---|
|
Компонент |
Тип компонента |
Результат |
|
^C^C |
Последовательность специальных управляющих символов |
Эта последовательность аналогична двойному нажатию клавиши ESC. |
|
_ |
Специальный управляющий символ |
Указание того, что выполняемая команда будет использовать глобальное имя команды, а не локализованное. |
|
. |
Специальный управляющий символ |
Указание того, что выполняемая команда будет использовать встроенное определение команды, а не повторное определение команды, которая уже существует. |
|
КРУГ |
Имя команды |
Запуск команды КРУГ. |
|
Специальный символ |
Оставляет столько же места, сколько при нажатии клавиши ПРОБЕЛ при использовании команды. |
|
|
Специальный управляющий символ |
Формирование паузы для ввода данных пользователем; в данном примере это пауза для центра окружности. |
|
|
1 |
Входное значение |
Ответ на запрос радиуса круга; в данном примере это значение 1. |
Синтаксис макроса
Макросы — это команды, написанные на языке VBA (Visual Basic for Applications). И синтаксис кода макроса не отличается от записи кода в Visual Basic.
Любой макрос имеет следующий вид:
Sub Имя_Макроса_Без_Пробелов()
‘ комментарии к макросу — они нужны для вас, VBA не воспринимает такие строки как команды
команды, написанные на языке VBA
End Sub
3 обязательных блока макроса:
1. Начало макроса. Всегда начинается с команды Sub. Далее идет имя макроса — оно может быть на русском языке, но не должно содержать пробелы и специальные символы.
В конце имени макроса всегда ставятся скобки () — они нужны, когда вы создаете свою функцию, в них указываются аргументы функции, но об этом сейчас речь не пойдет.
2. Блок команд. В нашем примере он состоит из одной строки: Selection.NumberFormat = “#,##0”
Каждая команда должна начинаться с новой строки. Если текст команды очень длинный и не помещается на экране, его можно разбить на несколько строк, заканчивая строку символом нижнего подчеркивания _ (далее в примере мы это увидим).
3. Конец макроса. Всегда обозначается как End Sub.
Есть и один необязательный блок — это комментарии, которые вы можете оставлять в любом месте внутри кода макроса, поставив перед началом комментариев знак апострофа ‘. Например, вы можете описать, что именно делает тот или иной макрос.
Обратите внимание!
Если вы хотите разместить комментарии в несколько строк, каждую новую строку надо начинать с апострофа.
Теперь запишем более сложный макрос и научимся понимать текст его кода.
Например, информационная система выдает отчет «Бюджет на месяц» без выделения групповых значений цветом или шрифтом.
Нам необходимо:
- выделить групповые строки полужирным шрифтом;
- отформатировать на печать — расположить отчет по центру листа, задать масштаб 75 %, вывести в колонтитулы название отчета (рис. 4).

Рис. 4. Изменения после написания макроса
Запишем алгоритм форматирования отчета в макрос.
Нажимаем кнопку записи макроса и выполняем следующие действия:
- Даем макросу имя Форматирование_БДР, в блоке описания записываем, что будет делать этот макрос (например, Выделяет жирным курсивом итоги, форматирует на печать). Жмем Ок.
- Выделяем столбцы А:С, ставим автофильтр — на закладке Данные находим кнопку Фильтр.
- По столбцу КОД задаем условие не содержит точку: Текстовые фильтры – Не содержит и в поле текста ставим символ точки без пробелов (рис. 5).

Рис. 5. Использование автофильтра по столбцу «КОД»
- Выделяем отфильтрованный диапазон и задаем ему полужирный шрифт.
- Снимаем автофильтр (повторное нажатие на закладке Данные кнопки Фильтр).
- Заходим в меню форматирования на печать (Кнопка Файл/Office – Печать – Предварительный просмотр – Параметры страницы) и задаем там три параметра:
1) на вкладке Страница задаем масштаб 75 %;
2) на вкладке Поля отмечаем пункт Горизонтально в блоке Центрировать на странице
3) на вкладке Колонтитулы создаем верхний колонтитул с текстом Бюджет на январь.
- Выходим из параметров страницы.
- Заканчиваем запись макроса.
- Нажимаем Alt+F11 и смотрим, что получилось (см. рис. 4).
Код этого макроса уже гораздо длиннее и непонятнее, но легко читаем для знающих английский язык и азы программирования в VBA.
Создание макросов в редакторе Visual Basic
Для ввода команд и формирования программы, т.е. создания макроса необходимо открыть специальное окно – редактор программ на VBA, встроенный в Microsoft Excel.
- В старых версиях (Excel 2003 и старше) для этого идем в меню Сервис – Макрос – Редактор Visual Basic (Toos – Macro – Visual Basic Editor).
- В новых версиях (Excel 2007 и новее) для этого нужно сначала отобразить вкладку Разработчик (Developer). Выбираем Файл – Параметры – Настройка ленты (File – Options – Customize Ribbon) и включаем в правой части окна флажок Разработчик (Developer). Теперь на появившейся вкладке нам будут доступны основные инструменты для работы с макросами, в том числе и нужная нам кнопка Редактор Visual Basic (Visual Basic Editor) :
 :
:К сожалению, интерфейс редактора VBA и файлы справки не переводятся компанией Microsoft на русский язык, поэтому с английскими командами в меню и окнах придется смириться:

Макросы (т.е. наборы команд на языке VBA) хранятся в программных модулях. В любой книге Excel мы можем создать любое количество программных модулей и разместить там наши макросы. Один модуль может содержать любое количество макросов. Доступ ко всем модулям осуществляется с помощью окна Project Explorer в левом верхнем углу редактора (если его не видно, нажмите CTRL+R). Программные модули бывают нескольких типов для разных ситуаций:
- Обычные модули – используются в большинстве случаев, когда речь идет о макросах. Для создания такого модуля выберите в меню Insert – Module. В появившееся окно нового пустого модуля можно вводить команды на VBA, набирая их с клавиатуры или копируя их из другого модуля, с этого сайта или еще откуда нибудь:
- Модуль Эта книга – также виден в левом верхнем углу редактора Visual Basic в окне, которое называется Project Explorer. В этот модуль обычно записываются макросы, которые должны выполнятся при наступлении каких-либо событий в книге (открытие или сохранение книги, печать файла и т.п.):
- Модуль листа – доступен через Project Explorer и через контекстное меню листа, т.е. правой кнопкой мыши по ярлычку листа – команда Исходный текст (View Source). Сюда записывают макросы, которые должны выполняться при наступлении определенных событий на листе (изменение данных в ячейках, пересчет листа, копирование или удаление листа и т.д.)


Обычный макрос, введенный в стандартный модуль выглядит примерно так:

Давайте разберем приведенный выше в качестве примера макрос Zamena:
- Любой макрос должен начинаться с оператора Sub, за которым идет имя макроса и список аргументов (входных значений) в скобках. Если аргументов нет, то скобки надо оставить пустыми.
- Любой макрос должен заканчиваться оператором End Sub.
- Все, что находится между Sub и End Sub – тело макроса, т.е. команды, которые будут выполняться при запуске макроса. В данном случае макрос выделяет ячейку заливает выделенных диапазон (Selection) желтым цветом (код = 6) и затем проходит в цикле по всем ячейкам, заменяя формулы на значения. В конце выводится окно сообщения (MsgBox).
С ходу ясно, что вот так сразу, без предварительной подготовки и опыта в программировании вообще и на VBA в частности, сложновато будет сообразить какие именно команды и как надо вводить, чтобы макрос автоматически выполнял все действия, которые, например, Вы делаете для создания еженедельного отчета для руководства компании. Поэтому мы переходим ко второму способу создания макросов, а именно…
Запись макросов макрорекордером
Макрорекордер– это небольшая программа, встроенная в Excel, которая переводит любое действие пользователя на язык программирования VBA и записывает получившуюся команду в программный модуль. Если мы включим макрорекордер на запись, а затем начнем создавать свой еженедельный отчет, то макрорекордер начнет записывать команды вслед за каждым нашим действием и, в итоге, мы получим макрос создающий отчет как если бы он был написан программистом. Такой способ создания макросов не требует знаний пользователя о программировании и VBA и позволяет пользоваться макросами как неким аналогом видеозаписи: включил запись, выполнил операци, перемотал пленку и запустил выполнение тех же действий еще раз. Естественно у такого способа есть свои плюсы и минусы:
- Макрорекордер записывает только те действия, которые выполняются в пределах окна Microsoft Excel. Как только вы закрываете Excel или переключаетесь в другую программу – запись останавливается.
- Макрорекордер может записать только те действия, для которых есть команды меню или кнопки в Excel. Программист же может написать макрос, который делает то, что Excel никогда не умел (сортировку по цвету, например или что-то подобное).
- Если во время записи макроса макрорекордером вы ошиблись – ошибка будет записана. Однако смело можете давить на кнопку отмены последнего действия (Undo) – во время записи макроса макрорекордером она не просто возрвращает Вас в предыдущее состояние, но и стирает последнюю записанную команду на VBA.
Чтобы включить запись необходимо:
- в Excel 2003 и старше – выбрать в меню Сервис – Макрос – Начать запись (Tools – Macro – Record New Macro)
- в Excel 2007 и новее – нажать кнопку Запись макроса (Record macro) на вкладке Разработчик (Developer)
Затем необходимо настроить параметры записываемого макроса в окне Запись макроса:

- Имя макроса – подойдет любое имя на русском или английском языке. Имя должно начинаться с буквы и не содержать пробелов и знаков препинания.
- Сочетание клавиш – будет потом использоваться для быстрого запуска макроса. Если забудете сочетание или вообще его не введете, то макрос можно будет запустить через меню Сервис – Макрос – Макросы – Выполнить (Tools – Macro – Macros – Run) или с помощью кнопки Макросы (Macros) на вкладке Разработчик (Developer) или нажав ALT+F8.
- Сохранить в… – здесь задается место, куда будет сохранен текст макроса, т.е. набор команд на VBA из которых и состоит макрос.:
- Эта книга – макрос сохраняется в модуль текущей книги и, как следствие, будет выполнятся только пока эта книга открыта в Excel
- Новая книга – макрос сохраняется в шаблон, на основе которого создается любая новая пустая книга в Excel, т.е. макрос будет содержаться во всех новых книгах, создаваемых на данном компьютере начиная с текущего момента
- Личная книга макросов – это специальная книга Excel с именем Personal.xls, которая используется как хранилище макросов. Все макросы из Personal.xls загружаются в память при старте Excel и могут быть запущены в любой момент и в любой книге.
После включения записи и выполнения действий, которые необходимо записать, запись можно остановить командой Остановить запись (Stop Recording).
Отображение вкладки “Разработчик” в ленте меню
Перед тем как записывать макрос, нужно добавить на ленту меню Excel вкладку “Разработчик”. Для этого выполните следующие шаги:
- Щелкните правой кнопкой мыши по любой из существующих вкладок на ленте и нажмите «Настроить ленту». Он откроет диалоговое окно «Параметры Excel».
- В диалоговом окне «Параметры Excel» у вас будут параметры «Настроить ленту». Справа на панели «Основные вкладки» установите флажок «Разработчик».
- Нажмите «ОК».


В результате на ленте меню появится вкладка “Разработчик”

Создание пользовательских функций на VBA
Создание пользовательских функций или, как их иногда еще называют, UDF-функций (User Defined Functions) принципиально не отличается от создания макроса в обычном программном модуле. Разница только в том, что макрос выполняет последовательность действий с объектами книги (ячейками, формулами и значениями, листами, диаграммами и т.д.), а пользовательская функция – только с теми значениями, которые мы передадим ей как аргументы (исходные данные для расчета).
Чтобы создать пользовательскую функцию для расчета, например, налога на добавленную стоимость (НДС) откроем редактор VBA, добавим новый модуль через меню Insert – Module и введем туда текст нашей функции:

Обратите внимание, что в отличие от макросов функции имеют заголовок Function вместо Sub и непустой список аргументов (в нашем случае это Summa). После ввода кода наша функция становится доступна в обычном окне Мастера функций (Вставка – Функция) в категории Определенные пользователем (User Defined):

После выбора функции выделяем ячейки с аргументами (с суммой, для которой надо посчитать НДС) как в случае с обычной функцией:

Конструкция IF
В Microsoft Excel Вы также можете использовать конструкцию IF. В этом коде мы будем раскрашивать ячейки в зависимости от их значения. Если значение в ячейке больше 20, то шрифт станет красным, иначе – синим.
Sub MacroName() Dim CellValue As Integer CellValue = ActiveCell.Value If CellValue > 20 Then With Selection.Font .Color = -16776961 End With Else With Selection.Font .ThemeColor = xlThemeColorLight2 .TintAndShade = 0 End With End If End Sub
Для проверки этого кода выберем ячейку со значением больше 20:

Когда Вы запустите макрос, цвет шрифта изменится на красный:

При выполнении второго условия шрифт станет синим:

Теперь давайте запишем очень простой макрос, который выбирает ячейку и вводит в нее текст, например “Excel”.
Вот шаги для записи такого макроса:
- Перейдите на вкладку “Разработчик”.
- В группе “Код” нажмите кнопку “Запись макроса”. Откроется одноименное диалоговое окно.
- В диалоговом окне “Запись макроса” введите имя для своего макроса, например “ВводТекста”. Есть несколько условий именования, которые необходимо соблюдать при назначении макроса. Например, вы не можете использовать пробелы между ними. Обычно я предпочитаю сохранять имена макросов как одно слово, с разными частями с заглавным первым алфавитом. Вы также можете использовать подчеркивание для разделения двух слов – например, “Ввод_текста”.
- Если вы хотите, то можете задать сочетание клавиш. В этом случае мы будем использовать ярлык Ctrl + Shift + N. Помните, что сочетание, которое вы указываете, будет отменять любые существующие горячие клавиши в вашей книге. Например, если вы назначили сочетание Ctrl + S, вы не сможете использовать это для сохранения рабочей книги (вместо этого, каждый раз, когда вы его используете, он выполняет макрос).
- В поле “Сохранить в” убедитесь, что выбрана опция “Эта книга”. Этот шаг гарантирует, что макрос является частью рабочей книги. Он будет там, когда вы сохраните его и снова откроете, или даже если вы поделитесь файлом с кем-то.
- Введите описание при необходимости. Обычно я этого не делаю, но если у вас много макросов, лучше указать, чтобы в будущем не забыть что делает макрос.
- Нажмите “ОК”. Как только вы нажмете OK, Excel начнет записывать ваши действия. Вы можете увидеть кнопку “Остановить запись” на вкладке “Разработчик”, которая указывает, что выполняется запить макроса.
- Выберите ячейку A2.
- Введите текст “Excel” (или вы можете использовать свое имя).
- Нажмите клавишу Enter. Вы попадете на ячейку A3.
- Нажмите кнопку “Остановить запись” на вкладке “Разработчик”.


Поздравляем! Вы только что записали свой первый макрос в Excel. Хотя макрос не делает ничего полезного, но он поможет нам понять как работает макрорекордер в Excel.
Теперь давайте рассмотрим код который записал макрорекодер. Выполните следующие действия, чтобы открыть редактор кода:
- Удалите текст в ячейке A2. Это нужно, чтобы проверить будет ли макрос вставлять текст в ячейку A2 или нет.
- Выберите любую ячейку – кроме A2. Это нужно проверить, выбирает ли макрос ячейку A2 или нет.
- Перейдите на вкладку “Разработчик”.
- В группе “Код” нажмите кнопку “Макросы”.
- В диалоговом окне “Макрос” щелкните макрос “ВводТекста”.
- Нажмите кнопку “Выполнить”.

Вы увидите, что как только вы нажмете кнопку “Выполнить”, текст “Excel” будет вставлен в ячейку A2 и выбрана ячейка A3. Это происходит за миллисекунды. Но на самом деле макрос последовательно выполнил записанные действия.
Примечание. Вы также можете запустить макрос с помощью сочетания клавиш Ctrl + Shift + N (удерживайте клавиши Ctrl и Shift, а затем нажмите клавишу N). Это тот же самый ярлык, который мы назначили макросу при его записи.
Источники
- https://micro-solution.ru/excel/vba/first-macros
- https://exceltable.com/vba-macros/page-3
- https://my-excel.ru/vba/komandy-makros-v-excel.html
- https://blog.luz.vc/ru/%D0%BF%D1%80%D0%B5%D0%B2%D0%BE%D1%81%D1%85%D0%BE%D0%B4%D0%B8%D1%82%D1%8C/10-%D0%BF%D1%80%D0%B8%D0%BC%D0%B5%D1%80%D1%8B-%D0%BE%D1%81%D0%BD%D0%BE%D0%B2%D0%BD%D1%8B%D1%85-%D0%BC%D0%B0%D0%BA%D1%80%D0%BE%D1%81%D0%BE%D0%B2-%D0%B2-excel/
- https://www.profiz.ru/se/4_2016/pichem_macrosy/
- https://office-guru.ru/excel/rukovodstvo-i-primery-raboty-s-makrosami-v-excel-210.html
- https://help.autodesk.com/cloudhelp/2017/RUS/AutoCAD-LT/files/GUID-D991386C-FBAA-4094-9FCB-AADD98ACD3EF.htm
- https://www.planetaexcel.ru/techniques/3/59/
Время на прочтение
7 мин
Количество просмотров 312K
Приветствую всех.
В этом посте я расскажу, что такое VBA и как с ним работать в Microsoft Excel 2007/2010 (для более старых версий изменяется лишь интерфейс — код, скорее всего, будет таким же) для автоматизации различной рутины.

VBA (Visual Basic for Applications) — это упрощенная версия Visual Basic, встроенная в множество продуктов линейки Microsoft Office. Она позволяет писать программы прямо в файле конкретного документа. Вам не требуется устанавливать различные IDE — всё, включая отладчик, уже есть в Excel.
Еще при помощи Visual Studio Tools for Office можно писать макросы на C# и также встраивать их. Спасибо, FireStorm.
Сразу скажу — писать на других языках (C++/Delphi/PHP) также возможно, но требуется научится читать, изменять и писать файлы офиса — встраивать в документы не получится. А интерфейсы Microsoft работают через COM. Чтобы вы поняли весь ужас, вот Hello World с использованием COM.
Поэтому, увы, будем учить Visual Basic.
Чуть-чуть подготовки и постановка задачи
Итак, поехали. Открываем Excel.
Для начала давайте добавим в Ribbon панель «Разработчик». В ней находятся кнопки, текстовые поля и пр. элементы для конструирования форм.

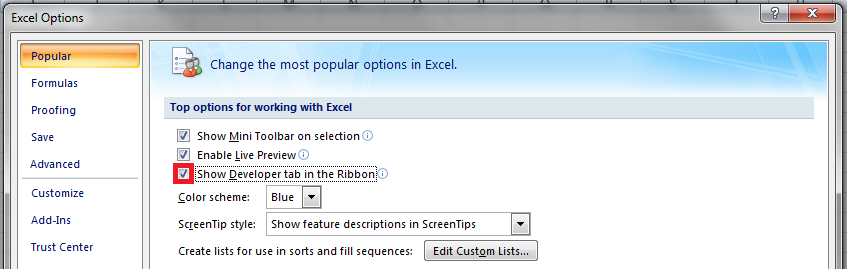
Появилась вкладка.
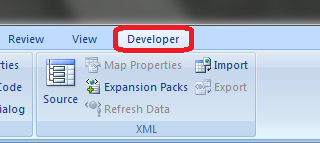
Теперь давайте подумаем, на каком примере мы будем изучать VBA. Недавно мне потребовалось красиво оформить прайс-лист, выглядевший, как таблица. Идём в гугл, набираем «прайс-лист» и качаем любой, который оформлен примерно так (не сочтите за рекламу, пожалуйста):

То есть требуется, чтобы было как минимум две группы, по которым можно объединить товары (в нашем случае это будут Тип и Производитель — в таком порядке). Для того, чтобы предложенный мною алгоритм работал корректно, отсортируйте товары так, чтобы товары из одной группы стояли подряд (сначала по Типу, потом по Производителю).
Результат, которого хотим добиться, выглядит примерно так:

Разумеется, если смотреть прайс только на компьютере, то можно добавить фильтры и будет гораздо удобнее искать нужный товар. Однако мы хотим научится кодить и задача вполне подходящая, не так ли?
Кодим
Для начала требуется создать кнопку, при нажатии на которую будет вызываться наша програма. Кнопки находятся в панели «Разработчик» и появляются по кнопке «Вставить». Вам нужен компонент формы «Кнопка». Нажали, поставили на любое место в листе. Далее, если не появилось окно назначения макроса, надо нажать правой кнопкой и выбрать пункт «Назначить макрос». Назовём его FormatPrice. Важно, чтобы перед именем макроса ничего не было — иначе он создастся в отдельном модуле, а не в пространстве имен книги. В этому случае вам будет недоступно быстрое обращение к выделенному листу. Нажимаем кнопку «Новый».


И вот мы в среде разработки VB. Также её можно вызвать из контекстного меню командой «Исходный текст»/«View code».
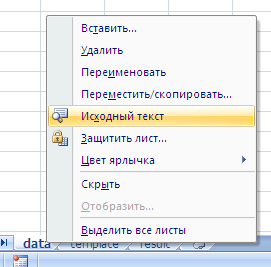

Перед вами окно с заглушкой процедуры. Можете его развернуть. Код должен выглядеть примерно так:
Sub FormatPrice()End Sub
Напишем Hello World:
Sub FormatPrice()

    MsgBox "Hello World!"

End Sub
И запустим либо щелкнув по кнопке (предварительно сняв с неё выделение), либо клавишей F5 прямо из редактора.
Тут, пожалуй, следует отвлечься на небольшой ликбез по поводу синтаксиса VB. Кто его знает — может смело пропустить этот раздел до конца. Основное отличие Visual Basic от Pascal/C/Java в том, что команды разделяются не ;, а переносом строки или двоеточием (:), если очень хочется написать несколько команд в одну строку. Чтобы понять основные правила синтаксиса, приведу абстрактный код.
Примеры синтаксиса
' Процедура. Ничего не возвращает

' Перегрузка в VBA отсутствует

Sub foo(a As String, b As String)

    ' Exit Sub ' Это значит "выйти из процедуры"

    MsgBox a + ";" + b

End Sub' Функция. Вовращает Integer

Function LengthSqr(x As Integer, y As Integer) As Integer

    ' Exit Function

    LengthSqr = x * x + y * y

End FunctionSub FormatPrice()

    Dim s1 As String, s2 As String

    s1 = "str1"

    s2 = "str2"

    If s1 <> s2 Then

        foo "123", "456" ' Скобки при вызове процедур запрещены

    End IfDim res As sTRING ' Регистр в VB не важен. Впрочем, редактор Вас поправит

    Dim i As Integer

    ' Цикл всегда состоит из нескольких строк

    For i = 1 To 10

        res = res + CStr(i) ' Конвертация чего угодно в String

        If i = 5 Then Exit For

    Next iDim x As Double

    x = Val("1.234") ' Парсинг чисел

    x = x + 10

    MsgBox xOn Error Resume Next ' Обработка ошибок - игнорировать все ошибки

    x = 5 / 0

    MsgBox xOn Error GoTo Err ' При ошибке перейти к метке Err

    x = 5 / 0

    MsgBox "OK!"

    GoTo ne
Err:
MsgBox
"Err!"
ne:
On Error GoTo 0 ' Отключаем обработку ошибок
' Циклы бывает, какие захотите
Do While True
Exit DoLoop 'While True
Do 'Until False
Exit Do
Loop Until False
' А вот при вызове функций, от которых хотим получить значение, скобки нужны.
' Val также умеет возвращать Integer
Select Case LengthSqr(Len("abc"), Val("4"))
Case 24
MsgBox "0"
Case 25
MsgBox "1"
Case 26
MsgBox "2"
End Select' Двухмерный массив.
' Можно также менять размеры командой ReDim (Preserve) - см. google
Dim arr(1 to 10, 5 to 6) As Integer
arr(1, 6) = 8Dim coll As New Collection
Dim coll2 As Collection
coll.Add "item", "key"
Set coll2 = coll ' Все присваивания объектов должны производится командой Set
MsgBox coll2("key")
Set coll2 = New Collection
MsgBox coll2.Count
End Sub
Грабли-1. При копировании кода из IDE (в английском Excel) есь текст конвертируется в 1252 Latin-1. Поэтому, если хотите сохранить русские комментарии — надо сохранить крокозябры как Latin-1, а потом открыть в 1251.
Грабли-2. Т.к. VB позволяет использовать необъявленные переменные, я всегда в начале кода (перед всеми процедурами) ставлю строчку Option Explicit. Эта директива запрещает интерпретатору заводить переменные самостоятельно.
Грабли-3. Глобальные переменные можно объявлять только до первой функции/процедуры. Локальные — в любом месте процедуры/функции.
Еще немного дополнительных функций, которые могут пригодится: InPos, Mid, Trim, LBound, UBound. Также ответы на все вопросы по поводу работы функций/их параметров можно получить в MSDN.
Надеюсь, что этого Вам хватит, чтобы не пугаться кода и самостоятельно написать какое-нибудь домашнее задание по информатике. По ходу поста я буду ненавязчиво знакомить Вас с новыми конструкциями.
Кодим много и под Excel
В этой части мы уже начнём кодить нечто, что умеет работать с нашими листами в Excel. Для начала создадим отдельный лист с именем result (лист с данными назовём data). Теперь, наверное, нужно этот лист очистить от того, что на нём есть. Также мы «выделим» лист с данными, чтобы каждый раз не писать длинное обращение к массиву с листами.
Sub FormatPrice()

    Sheets("result").Cells.Clear

    Sheets("data").Activate

End Sub
Работа с диапазонами ячеек
Вся работа в Excel VBA производится с диапазонами ячеек. Они создаются функцией Range и возвращают объект типа Range. У него есть всё необходимое для работы с данными и/или оформлением. Кстати сказать, свойство Cells листа — это тоже Range.
Примеры работы с Range
Sheets("result").Activate

Dim r As Range

Set r = Range("A1")

r.Value = "123"

Set r = Range("A3,A5")

r.Font.Color = vbRed

r.Value = "456"

Set r = Range("A6:A7")

r.Value = "=A1+A3"
Теперь давайте поймем алгоритм работы нашего кода. Итак, у каждой строчки листа data, начиная со второй, есть некоторые данные, которые нас не интересуют (ID, название и цена) и есть две вложенные группы, к которым она принадлежит (тип и производитель). Более того, эти строки отсортированы. Пока мы забудем про пропуски перед началом новой группы — так будет проще. Я предлагаю такой алгоритм:
- Считали группы из очередной строки.
- Пробегаемся по всем группам в порядке приоритета (вначале более крупные)
- Если текущая группа не совпадает, вызываем процедуру AddGroup(i, name), где i — номер группы (от номера текущей до максимума), name — её имя. Несколько вызовов необходимы, чтобы создать не только наш заголовок, но и всё более мелкие.
- После отрисовки всех необходимых заголовков делаем еще одну строку и заполняем её данными.
Для упрощения работы рекомендую определить следующие функции-сокращения:
Function GetCol(Col As Integer) As String

    GetCol = Chr(Asc("A") + Col)

End FunctionFunction GetCellS(Sheet As String, Col As Integer, Row As Integer) As Range

    Set GetCellS = Sheets(Sheet).Range(GetCol(Col) + CStr(Row))

End FunctionFunction GetCell(Col As Integer, Row As Integer) As Range

    Set GetCell = Range(GetCol(Col) + CStr(Row))

End Function
Далее определим глобальную переменную «текущая строчка»: Dim CurRow As Integer. В начале процедуры её следует сделать равной единице. Еще нам потребуется переменная-«текущая строка в data», массив с именами групп текущей предыдущей строк. Потом можно написать цикл «пока первая ячейка в строке непуста».
Глобальные переменные
Option Explicit ' про эту строчку я уже рассказывал

Dim CurRow As Integer

Const GroupsCount As Integer = 2

Const DataCount As Integer = 3
FormatPrice
Sub FormatPrice()

    Dim I As Integer ' строка в data

    CurRow = 1

    Dim Groups(1 To GroupsCount) As String

    Dim PrGroups(1 To GroupsCount) As String
Sheets(
"data").Activate
I = 2
Do While True
If GetCell(0, I).Value = "" Then Exit Do
' ...
I = I + 1
Loop
End Sub
Теперь надо заполнить массив Groups:
На месте многоточия
Dim I2 As Integer

For I2 = 1 To GroupsCount

    Groups(I2) = GetCell(I2, I)

Next I2

' ...

For I2 = 1 To GroupsCount ' VB не умеет копировать массивы

    PrGroups(I2) = Groups(I2)

Next I2

I =  I + 1
И создать заголовки:
На месте многоточия в предыдущем куске
For I2 = 1 To GroupsCount

    If Groups(I2) <> PrGroups(I2) Then

        Dim I3 As Integer

        For I3 = I2 To GroupsCount

            AddHeader I3, Groups(I3)

        Next I3

        Exit For

    End If

Next I2
Не забудем про процедуру AddHeader:
Перед FormatPrice
Sub AddHeader(Ty As Integer, Name As String)

    GetCellS("result", 1, CurRow).Value = Name

    CurRow = CurRow + 1

End Sub
Теперь надо перенести всякую информацию в result
For I2 = 0 To DataCount - 1

    GetCellS("result", I2, CurRow).Value = GetCell(I2, I)

Next I2
Подогнать столбцы по ширине и выбрать лист result для показа результата
После цикла в конце FormatPrice
Sheets("Result").Activate

Columns.AutoFit
Всё. Можно любоваться первой версией.

Некрасиво, но похоже. Давайте разбираться с форматированием. Сначала изменим процедуру AddHeader:
Sub AddHeader(Ty As Integer, Name As String)

    Sheets("result").Range("A" + CStr(CurRow) + ":C" + CStr(CurRow)).Merge

    ' Чтобы не заводить переменную и не писать каждый раз длинный вызов

    ' можно воспользоваться блоком With

    With GetCellS("result", 0, CurRow)

        .Value = Name

        .Font.Italic = True

        .Font.Name = "Cambria"

        Select Case Ty

        Case 1 ' Тип

            .Font.Bold = True

            .Font.Size = 16

        Case 2 ' Производитель

            .Font.Size = 12

        End Select

        .HorizontalAlignment = xlCenter

    End With

    CurRow = CurRow + 1

End Sub
Уже лучше:

Осталось только сделать границы. Тут уже нам требуется работать со всеми объединёнными ячейками, иначе бордюр будет только у одной:

Поэтому чуть-чуть меняем код с добавлением стиля границ:
Sub AddHeader(Ty As Integer, Name As String)

    With Sheets("result").Range("A" + CStr(CurRow) + ":C" + CStr(CurRow))

        .Merge

        .Value = Name

        .Font.Italic = True

        .Font.Name = "Cambria"

        .HorizontalAlignment = xlCenterSelect Case Ty

        Case 1 ' Тип

            .Font.Bold = True

            .Font.Size = 16

            .Borders(xlTop).Weight = xlThick

        Case 2 ' Производитель

            .Font.Size = 12

            .Borders(xlTop).Weight = xlMedium

        End Select

        .Borders(xlBottom).Weight = xlMedium ' По убыванию: xlThick, xlMedium, xlThin, xlHairline

    End With

    CurRow = CurRow + 1

End Sub

Осталось лишь добится пропусков перед началом новой группы. Это легко:
В начале FormatPrice
Dim I As Integer ' строка в  data

CurRow = 0 ' чтобы не было пропуска в самом начале

Dim Groups(1 To GroupsCount) As String
В цикле расстановки заголовков
If Groups(I2) <> PrGroups(I2) Then

    CurRow = CurRow + 1

    Dim I3 As Integer

В точности то, что и хотели.
Надеюсь, что эта статья помогла вам немного освоится с программированием для Excel на VBA. Домашнее задание — добавить заголовки «ID, Название, Цена» в результат. Подсказка: CurRow = 0 CurRow = 1.
Файл можно скачать тут (min.us) или тут (Dropbox). Не забудьте разрешить исполнение макросов. Если кто-нибудь подскажет человеческих файлохостинг, залью туда.
Спасибо за внимание.
Буду рад конструктивной критике в комментариях.
UPD: Перезалил пример на Dropbox и min.us.
UPD2: На самом деле, при вызове процедуры с одним параметром скобки можно поставить. Либо использовать конструкцию Call Foo(«bar», 1, 2, 3) — тут скобки нужны постоянно.