
This tutorial shows how to use tags in Microsoft Word. Specifically, we’ll look at three ways to add tags to Word documents:
1. Add Tags through the Backstage View
2. Add Tags through Advanced Properties
3. Add Tags through Save As
Then, we’ll look at how to delete tags in Word documents.
The final section shows how to search for known and unknown tags through the File Explorer in Windows.
Please note that the images below are from Microsoft Word for Microsoft 365. These steps also apply to Word 2021, Word 2019, Word 2016, and Word 2013.
This tutorial is available as a YouTube video showing all the steps in real time.
Watch more than 150 other writing-related software tutorials on my YouTube channel.
Before we begin, let’s tackle an important question …
What Are Tags in Word?
In Windows, tags are custom keywords attached to Word documents and other files that help with search and organization.
Tags can be any word, phrase, or number string related to the file, such as product names, item numbers, internal filing codes, or project nicknames—basically anything that may help you locate the file later.
The following five steps show how to add tags to Word files through the Backstage view.
1. Select the File tab in the ribbon.

2. Select the Info tab in the Backstage view. (You’ll probably already be in the Info tab by default.)

3. Select Add a tag in the Properties section. The text will become a text box.

4. Type your tag or multiple tags separated by semicolons in the text box.

Important Note: If you separate tags with commas instead of semicolons, Windows will view them as one tag and won’t provide an accurate file search.
5. Save the file in order to save your new tag or tags.
The following eight steps show how to add tags to Word files through the Advanced Properties dialog box.
1. Select the File tab in the ribbon (see figure 1).
2. Select the Info tab in the Backstage view (see figure 2).
3. Select the Properties heading.

4. Select Advanced Properties in the drop-down menu.

5. Select the Summary tab in the Advanced Properties dialog box.

6. Type your tag or multiple tags separated by semicolons in the Keywords text box. (The term keywords means tags in this dialog box.)

7. Select the OK button to close the Advanced Properties dialog box.

Notice that the tags now appear in the Properties section of the Backstage view.

8. Save the file in order to save your new tag or tags.
The following six steps show how to add tags to Word documents through the Save As dialog box in Windows.
1. Select the File tab in the ribbon (see figure 1).
2. Select the Save As tab in the Backstage view.

Pro Tip: You can also use the shortcut F12 (or Fn + F12) to open the Save As dialog box from anywhere in Windows, including from Word’s main view.
3. Select the More Options link.

4. Type your tag or tags separated by semicolons in the Tags text box in the Save As dialog box.

5. Name your file and select the destination where you want to save the file, if you haven’t already done so.

6. Select the Save button.

The following four steps show how to delete tags attached to Word files. These steps should work regardless of the method used to add the tags. However, these steps won’t work on files marked as Read Only or similarly protected.
1. Select the File tab in the ribbon (see figure 1).
2. Select the Info tab in the Backstage view (see figure 2).
3. Delete the unwanted tag or tags in the Properties section (see figure 4).
4. Save the file in order to save your deletions.
We’ll begin by looking at how to search for tags when you know the tag or tags specifically. Then, we’ll look at how to search for tags when you don’t know the exact tag or tags you want to search for.
Method One: Searching for Known Tags
The following two steps show how to search for known tags attached to Word files and other files using the File Explorer in Windows.
1. Press the Window key + E on your keyboard to open the File Explorer.
2. Type tag: followed by the tag name in the File Explorer search box. The results will appear as you type.

Method Two: Search for Unknown Tags
The following five steps show how to search for unknown tags attached to Word files and other files using the File Explorer in Windows.
1. Press the Window key + E on your keyboard to open the File Explorer.
2. Navigate to the folder containing the files you want to search in the File Explorer.
3. Right-click on the column heading section and select Tags from the drop-down menu if the Tags column isn’t already displayed.

4. Select the menu arrow on the right side of the Tags column header.
![]()
5. Select the tag or tags you want to search for from the drop-down menu. The results will appear as soon as you make your selection.

Recommended Reading: How to Change Your User Name for Track Changes in Word
Updated April 28, 2022
124
124 people found this article helpful
How to Organize Word Documents With Tags
Tags make finding and organizing your documents easier
Updated on January 14, 2021
Add tags, or keywords, to Microsoft Word documents to make documents easier to find. By default, when you save a Word document, there are no tags saved along with it, but you can add your own before or after you make the document.
Instructions in this article apply to Word 365, Word 2019, Word 2016, Word 2013, and Word 2010.
Tags are useful when you have several related documents in a single folder or on a flash drive, for example, and each document has a non-descriptive or nearly identical file name like project.docx, otherproject.docx, and otherproject1.docx. To quickly find related files in a folder, categorize each file by applying a tag. Then, search the folder for a specific tag to find documents with that tag.
Here’s how to add tags to a Microsoft Word document:
-
Go to File > Save As.
-
Select Browse.
In Word 2010, skip this step.
-
Choose where to save the document and enter a name for the file.
-
In the Tags text box, enter the desired keywords. Word automatically places a semi-colon at the end so you can add multiple tags.
Word might recommend tags as you type. Select an autosuggestion, if one matches your needs, and use your custom tags.
-
Save the document.
How to Add Tags Using Windows Explorer
You can add tags to a Word document even if you don’t have the app installed. Here’s how:
-
Open Windows Explorer and find the Word document.
-
Right-click the file and choose Properties.
-
Go to the Details tab.
-
In the Tags text box, enter the keywords.
-
Select OK to save the tags and close the dialog box.
How to Edit or Remove Word Document Tags
Once you’ve added tags, edit or remove tags using the method described above. You can also choose to remove all tags from a Word file using the following steps:
-
Locate the document in Windows Explorer.
-
Right-click the file, then choose Properties.
-
Go to the Details tab.
-
Select Remove Properties and Personal Information.
-
Select Remove the following properties from this file.
-
Select the Tags check box.
-
Select OK to save the changes and close the dialog box.
Thanks for letting us know!
Get the Latest Tech News Delivered Every Day
Subscribe
Word for Microsoft 365 Word for Microsoft 365 for Mac Word 2021 Word 2021 for Mac Word 2019 Word 2019 for Mac Word 2016 Word 2016 for Mac Word 2013 Word 2010 More…Less
Create and print a page of different labels
-
Go to Mailings > Labels.
-
Select the label type and size in Options.
If you don’t see your product number, select New Label and configure a custom label.
-
Select New Document.
-
Word opens a new document that contains a table with dimensions that match the label product.
-
If gridlines are not displayed, go to Layout > View Gridlines to turn gridlines on.
-
Type the information you want in each label.
-
Go to File > Print and select the Print button.
You can save the document for future use.
Create and print a page of different labels
-
Go to Mailings > Labels.
-
Leave the Address box blank.
-
Select the label type and size in Options.
If you don’t see your product number, select New Label and configure a custom label.
-
Select Full page of the same label.
-
Select New Document.
Word opens a new document that contains a table with dimensions that match that label product.
-
If gridlines aren’t displayed, go to Layout > View Gridlines to turn gridlines on.
-
Type the text that you want in each label, and make any color or formatting changes using the options on the Home and Page Layout tabs.
-
Save or print the labels like any other document in Word.
Create and print a page of different labels
-
Go to Mailings > Labels.
-
Select Options.
-
Select the type of printer you’re using.
-
Select your label brand in Label products.
-
Select the label type in Product number.
If you don’t see your product number, select New Label and configure a custom label.
-
Select OK.
-
Select OK in the Labels dialog box.
Word opens a new document that contains a table with dimensions that match that label product.
-
Type the information you want in each label.
If gridlines are not displayed, go to Layout > View Gridlines to turn gridlines on.
-
Go to Print > File, and then select Print.
-
Save the document for future use.
Word for the web doesn’t support directly creating labels. However you can create labels from a template. For label templates, select More templates when you create a new document in Word for the web.
You can also go to templates.office.com, and search for label.
-
Select a label template and open in Word for the web.
-
For a sheet of identical labels, fill out one label, and then copy/paste for the rest.
Tip: Print your labels to a sheet of paper before loading labels into the printer to make sure the text aligns with the labels.
See also
To create a page of the same labels, see Create and print labels
To create a page of labels with graphics, see Add graphics to labels
To print one label on a partially used sheet, see Print one label on a partially used sheet
To create labels with a mailing list, see Print labels for your mailing list
Need more help?
Want more options?
Explore subscription benefits, browse training courses, learn how to secure your device, and more.
Communities help you ask and answer questions, give feedback, and hear from experts with rich knowledge.
На чтение 3 мин. Просмотров 4.4k. Опубликовано 25.06.2019
Содержание
- Теги Microsoft Word упрощают поиск и организацию документов
- Как вставить теги в файлы Word
- Как редактировать тэги Word Document
Теги Microsoft Word упрощают поиск и организацию документов
Вы можете добавить теги или ключевые слова в документы Microsoft Word, чтобы их было легче найти позже. По умолчанию, когда вы сохраняете документ Word, вместе с ним не сохраняются теги, но вы можете добавить свои собственные теги до или после создания документа.
Теги полезны в документах Microsoft Word, поэтому, когда вы ищете документ на своем компьютере, вам не нужно надеяться, что вы ищете те же слова, которые вы выбрали в качестве имени файла. Вместо этого, если вы выбрали соответствующие теги, найти один документ среди всех остальных так же просто, как поиск одного из слов тега.
Например, возможно, у вас есть два десятка исследовательских проектов на флэш-диске, каждый из которых имеет неописательные или почти идентичные имена файлов, такие как project.docx , otherdocument.docx , otherdocument1.docx и т. д. Если вам нужно быстро найти тот, который предназначен для вашего урока биологии, вы можете найти в этой папке биология , чтобы найти помеченные вами документы со словом «биология».
Как вставить теги в файлы Word
Вы можете пометить документ Microsoft Word, введя слова или фразы тега в области Теги диалогового окна «Сохранить как».
Эти шаги действительны для Word 2016, 2013 и 2010. Microsoft Word Online не поддерживает добавление тегов.
-
Перейдите в Файл > Сохранить как > Обзор .
Word 2010 должен перейти в Файл > Сохранить как .
-
Выберите, где сохранить документ и напишите его название.
-
Нажмите Добавить тег под именем файла и настройками формата.
-
Напишите тег в отведенном месте.
Чтобы написать несколько тегов для одного документа Word, поставьте точку с запятой в конце каждого тега. Например, биология; школа; проект .
MS Word может порекомендовать вам теги при вводе. Вы можете выбрать их и/или написать свои собственные теги.
-
Нажмите Сохранить .
Еще один способ добавить теги в документ Word – открыть вкладку Подробности в File/Windows Explorer. Вы можете сделать это, даже если у вас не установлен Microsoft Word.
-
Найдите документ Word.
-
Нажмите его правой кнопкой мыши и выберите Свойства .
-
Откройте вкладку Подробности .
-
Нажмите рядом с Тегами и введите ключевые слова.
-
Нажмите ОК .
Как редактировать тэги Word Document
Есть несколько способов отредактировать теги, которые вы добавили в документ Word. Вы можете повторить один из описанных выше способов или найти и отредактировать те же теги на панели Информация в Microsoft Word.
Эти шаги идентичны для Word 2016, 2013 и 2010.
-
Откройте документ Word.
-
Перейдите в Файл > Информация .
-
Нажмите один из тегов в области «Свойства» справа.
-
Отредактируйте теги.
-
Нажмите Сохранить в боковом меню слева.
Вы также можете удалить все теги в файле Word, не выполняя вышеуказанные шаги. Просто откройте свойства файла и выберите удалить все теги.
-
Найдите документ в File/Windows Explorer.
-
Нажмите правой кнопкой мыши файл и выберите Свойства .
-
Нажмите Удалить свойства и личную информацию на вкладке Подробности .
-
Нажмите Удалить следующие свойства из этого файла .
-
Поставьте флажок в поле рядом с Тегами .
-
Нажмите ОК .
- Choose your shape. Beginning with a blank document, click on the “Insert” tab, select “Shapes,” and choose the desired shape for your label.
- Adjust your outline and fill settings.
- Add a layer, if desired.
- Add your text.
- “Group” your label.
Contents
- 1 How do you create a tag sheet?
- 2 How do I create Avery labels in Word?
- 3 What should I write on a gift tag?
- 4 How do you make name tags?
- 5 What size is a gift tag?
- 6 Does Microsoft Word have a label template?
- 7 How do I create Avery 5162 labels in Word?
- 8 How do I use Avery 5266 labels in Word?
- 9 How do you write a gift note?
- 10 How do you write a surprise message?
- 11 How do you put a name tag on a border in Word?
- 12 How do you make a gift tag on Google Docs?
- 13 Is Canva free to use?
- 14 What size is a #8 tag?
- 15 What size are Christmas tags?
- 16 What size are Christmas gift tags?
- 17 What Microsoft program makes labels?
- 18 How do I make labels in Word from Excel?
- 19 What is the number for Avery file folder labels?
How do you create a tag sheet?
To create a sheet of identical tags, use the navigator on the right-hand side. Click Edit All and any image or text changes will be made to all tags at once. To create different tags on the same sheet, use the navigator on the right-hand side. Click Edit One and enter custom text for each tag.
How do I create Avery labels in Word?
Get started with Microsoft® Word
- With your Word document open, go to the top of screen and click Mailings > Labels > Options.
- Select Avery US Letter from the drop-down menu next to Label Vendors.
- If you want all your labels to have the same information, type it into the address box and click New Document.
What should I write on a gift tag?
What to Write on a Christmas Gift Tag
- Merry Christmas and a happy new year.
- Glad tidings for the festive season.
- Wishing you a happy Christmas.
- Have a happy holiday.
- Christmas wishes with love.
How do you make name tags?
Create and print a page of different labels
- Go to Mailings > Labels.
- Select Options.
- Select the type of printer you’re using.
- Select your label brand in Label products.
- Select the label type in Product number.
- Select OK.
- Select OK in the Labels dialog box.
- Type the information you want in each label.
What size is a gift tag?
What size are gift tags? Standard gift tags come in 3-5 x 2.5 inches. Small gift tags are usually around 2 x 1 inches, and are great for smaller gifts. You can find larger gift tags, as big as 9 x 4 inches, for gifts or projects that require them.
Does Microsoft Word have a label template?
Open a blank document in Word, click on the “Mailings” tab at the top of the page, and click on “Labels”.Click on the “Options” button to create a new label template. This opens another box titled “Label Options”. Click on “New Label”, which opens a further box titled “Label Details”.
How do I create Avery 5162 labels in Word?
mail label – avery 5162
- Open Word.
- Click on ‘Mailings’ in Ribbon and click on ‘Labels’.
- In the ‘Envelopes and Labels’ Window, select ‘Single Label’.
- Click on ‘Options’ and in the next window, select label vendor (Avery) and product number (5162).
- Click on the ‘Details and you can change the size of the margins.
How do I use Avery 5266 labels in Word?
how do I get a template for Avery 5266 file folder labels
- Click tools, point to Letters and mailings, and then click Envelopes and.
- In the Envelopes and Labels dialog box, click Options.
- Ensure that Avery standard appears in the Label products box.
- Click 5266 in the Product number list, and then click OK.
How do you write a gift note?
Personalize your thank you note by acknowledging the specific gift you received or the good deed or favor that someone did for you. Use words like Generous, Generosity, Useful, Perfect, Thoughtful, Appreciate, Grateful, Much Needed, Always Treasure. Thanks for all your help. I owe you big time.
How do you write a surprise message?
To Simply Convey Affection with a Gift:
- You are special and the one we adore. So, sending this little box of surprise for you…!
- Someone special like you deserves the best. Tried a bit to give you a little yet best surprise with this gift!
- Love and affection fonder with little jovial moments!
How do you put a name tag on a border in Word?
How to Make a Border for Name Tags in Word
- Open Word.
- Select “Mailings,” then click “Create” and “Labels” to open the Label options dialog box.
- Select a product number that corresponds with your name tag sheets.
- Click “OK” to close the dialog.
- Select “Print” to open the Print dialog box.
How do you make a gift tag on Google Docs?
In Google Docs, click on the “Add-ons” menu, then select “Create & Design Labels”. If you don’t have the add-on yet, make sure to install it first.
Is Canva free to use?
Can I use Canva for free? Yes! Canva is always free to use for everyone. You can choose to upgrade to Canva Pro or Canva for Enterprise for access to premium tools and content.
What size is a #8 tag?
Tag Size: 6 1/4″ x 3 1/8″.
What size are Christmas tags?
DIMENSIONS: Each tag measures 2.375 x 3.5 inches.
| Color | Kraft Brown |
|---|---|
| Brand | Juvale |
What size are Christmas gift tags?
Dimensions: Each gift tag measures 1.8 x 3.2 inches.
What Microsoft program makes labels?
Microsoft Word
If you’re looking to make customized labels, look no further than Microsoft Word.
How do I make labels in Word from Excel?
Templates: from Excel to Word in a Mail Merge
- Select Document Type. Select “Labels”!
- Select Starting Document. If you have a compatible template code select “Change document layout”, then click “Label options”.
- Select Recipients.
- Arrange Your Labels.
- Preview Your Labels.
- Print Your Labels.
What is the number for Avery file folder labels?
Avery® File Folder Labels with TrueBlock® Technology, Permanent Adhesive, 2/3″ x 3-7/16″, Laser/Inkjet, 750 Labels (8366) | Avery.com.
 Please Note:
This article is written for users of the following Microsoft Word versions: 2007, 2010, 2013, 2016, 2019, Word in Microsoft 365, and 2021. If you are using an earlier version (Word 2003 or earlier), this tip may not work for you. For a version of this tip written specifically for earlier versions of Word, click here: Adding Tags to Text.
![]()
Written by Allen Wyatt (last updated March 5, 2022)
This tip applies to Word 2007, 2010, 2013, 2016, 2019, Word in Microsoft 365, and 2021
If you love working in HTML, you know that it is created by simply adding tags to regular text. Tags do nothing more than describe how a browser should display the text. HTML can be created by hand or automatically, by program. You can even use Word to create your HTML for you.
What if you don’t want Word to do the HTML automatically, but you want to use Word’s tools to help you in your HTML creation? For instance, you might want to search for italicized text within a document and then surround it with the HTML tags that signify the text should be displayed in italics. You can do this by following these steps:
- Press Ctrl+H. Word displays the Replace tab of the Find and Replace dialog box.
- Click on the More button, if it is available. (See Figure 1.)
- With the insertion point in the Find What box, click the Format button and choose Font. Word displays the Find Font dialog box. (See Figure 2.)
- In the Font Style list, choose Italic.
- Click on OK to dismiss the Find Font dialog box.
- In the Replace With box, enter «<em>^&</em>» (without the quote marks). Both <em> and </em> are HTML tags for italic, and ^& is the special code for the Find What text. In other words, you want to replace what you find with what you found, but make sure it is surrounded by the HTML tags for italic.
- With the insertion point still in the Replace With box, click the Format button and choose Font to again display the Find Font dialog box.
- Scroll down in the Font Style list and choose Not Italic. You want to do this so that when the find and replace operation is done, not only have you added the proper HTML tags, but you are turning off the italics attribute of the found text. This is important so that if you later run the same macro on the same document, you don’t get large numbers of nested HTML tags.
- Click on OK to dismiss the Find Font dialog box.
- Click on Replace All to process the entire document or use the other buttons in the Find and Replace dialog box to step through the occurrences of italic text one at a time.
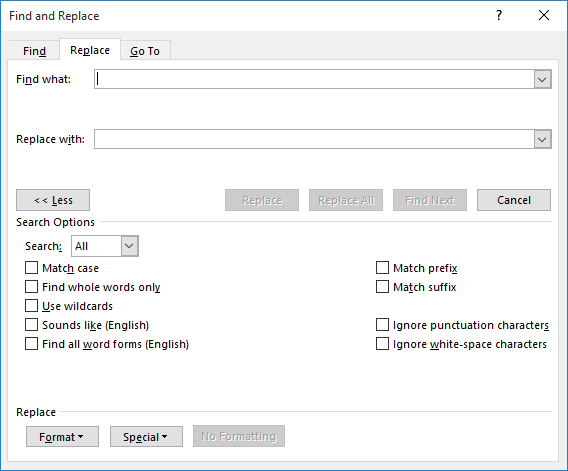
Figure 1. The Replace tab of the Find and Replace dialog box.
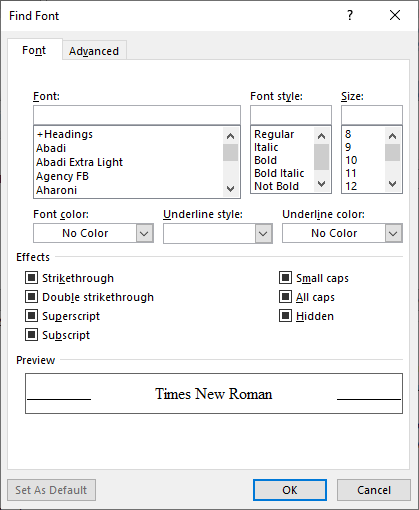
Figure 2. The Find Font dialog box.
The same find and replace technique can be used to add other HTML tags, as desired. For instance, you could add the tags for bold text, <strong> and </strong> by searching for Bold in step 4, using the proper tags in step 6, and replacing with Not Bold in step 8.
WordTips is your source for cost-effective Microsoft Word training.
(Microsoft Word is the most popular word processing software in the world.)
This tip (12991) applies to Microsoft Word 2007, 2010, 2013, 2016, 2019, Word in Microsoft 365, and 2021. You can find a version of this tip for the older menu interface of Word here: Adding Tags to Text.
Author Bio
With more than 50 non-fiction books and numerous magazine articles to his credit, Allen Wyatt is an internationally recognized author. He is president of Sharon Parq Associates, a computer and publishing services company. Learn more about Allen…
MORE FROM ALLEN
Changing Directories in a Macro
When a macro works with files, it often has to change between different directories on your disk drive. This is done …
Discover More
Converting Coded Dates into Real Dates
Sometimes the format in which you receive data is not the same format that would be optimal for Excel. For instance, you …
Discover More
Determining If a Cell is Bold
Want to figure out if the text in a cell is bold? The best approach is to use your own user-defined function, as …
Discover More
More WordTips (ribbon)
Easily Spotting Found Text
The color used by Word to draw your attention to «found text» when using Find and Replace can vary, based on a number of …
Discover More
Removing HTML Tags from Text
HTML tags are great when you want to display information on a web page. They are not so great when you have them in a …
Discover More
Pay Attention to Case when Searching for ASCII Codes
Word allows you to search for specific ASCII codes in a document. If you use codes to search for alphabetic characters, …
Discover More
Introduction: Easy Signs & Tags in Word
I’m getting ready for a show and can’t get InDesign to load. But never fear, I can use Word to do simple projects in a pinch. Here is how I made some very nice show signs and labels, quickly and easily, with Word.
Step 1: Start
Open a new Word document. Then type in a few of the things you want to promote. Make them one line each so you have plenty of space to work with.
Step 2: Try Fonts
Next, try different fonts to see what you like. Remember to pick the styles that go with the items you’re labeling. These are some of the fonts I tried that didn’t work for me. They were mostly too messy or too hard to read.
I wanted something casual, but that would look nice with my jewelry.
Step 3: Simple Design
I settled on Baystyle, a really nice typeface from Creative Market.
Baystyle Typeface
Now make each little sign aesthetically pleasing in your chosen font. For example, SALE in all caps doesn’t read well , so I only used upper and lower case letters. Word doesn’t have extensive design tools, but you can still do enough to make your signs look good. You can change the font sizes. You can make the most important parts of a label or sign a larger font size. You can center or align type by hand, by adding spaces.
Think about whether you need extra room on the top or bottom of your labels and space accordingly. Better to have too much space around your type than too little.
I used one additional font that went well with Baystyle for my large sale sign.
Step 4: Cut & Finish
Next, print on card stock.
You can change the colors of your type or use colored paper if you want.
Cut out your signs and labels with a paper cutter or X-Acto knife and straight edge.
Note: Another nice thing to do is use decorative shears to make fancy edges on your signs. If you want to attach any with string, use a hole puncher to make a hole.
Now you’re ready to display!
Be the First to Share