
Place your cursor in the file at the spot where you want to insert the symbol. Go to Insert > Symbol. Pick a symbol, or choose More Symbols. Scroll up or down to find the symbol you want to insert.
Contents
- 1 How do I make a sign template in Word?
- 2 How do I make a sign template?
- 3 How do I create a banner in Word?
- 4 How do I create an online sign?
- 5 How do I sign a document in Word 2010?
- 6 How do you make symbols on a laptop?
- 7 Is there an app for making signs?
- 8 What app do you use to make signs?
- 9 How do I make a printable banner in Word?
- 10 How can I make a sign online for free?
- 11 What is signage used for?
- 12 What is an example of signage?
- 13 Can you insert signature in Word?
- 14 How do I digitally sign a Word document?
- 15 How do I type é on my keyboard?
- 16 How do I get symbols on my keyboard Windows 10?
- 17 How do I type ñ?
- 18 How do I type a symbol?
- 19 How do you write capital letters on a laptop?
- 20 What is a symbol on the keyboard?
How do I make a sign template in Word?
How to Make Signs With Microsoft Word
- Start Microsoft Word.
- Type “sign” into the “Microsoft Online” option under “Templates.” Press the “Enter” key.
- Click on a sign template to preview it.
- Right-click an image on the sign and select “Change Picture” to change it.
How do I make a sign template?
How to Make Sign Templates for DIY Home Decor Signs
- Step 1: Go to Canva.com.
- Step 2: Click “Create New Design”
- Step 3: Select “Custom Dimensions”
- Step 4: Select the “Text” icon to add text.
- Step 5: Add another text box for more text in a different place or different font.
- Step 6: Add another page if needed.
Create a banner
Click File > New and select Installed and Online Templates under Available Templates. Select the Banners category, then click the banner design that you want — for example, Baby Congratulations. Under Customize and Options, select any options you want. Click Create.
How do I create an online sign?
CustomSigns.com is your go-to destination for making signs online.
- Choose your material/style.
- Pick your size, choose the template you want, or start from scratch.
- Customize with your text and/or images.
- Complete your order.
How do I sign a document in Word 2010?
Microsoft Office 2010
In Microsoft Word, Excel, or PowerPoint, open the document that you want to sign. In the selected Microsoft application, click File. Click Protect Document > Add a Digital Signature. Click Protect Workbook > Add a Digital Signature.
How do you make symbols on a laptop?
How to Make Signs on the Computer
- Choose between a horizontal or vertical format by selecting your page’s orientation.
- Create borders on your pages.
- Add color and texture to your sign.
- Type the words that will go on your sign.
- Select a typeface and point size for your text.
- Make a PDF file to send to the print shop.
Is there an app for making signs?
SmartDraw helps you make signs quickly and easily, even if you’re not a professional designer.Next, easily customize your sign or poster by dragging-and-dropping one of our thousands of ready-made, presentation quality symbols—or add your own logo, picture, or map!
What app do you use to make signs?
Image Creation Tools
- Canva. Canva is a tool that “enables anyone to become a designer.” Free to use and popular among designers and non-designers alike, Canva’s features are great for creating digital signage content:
- Adobe Spark.
- BeFunky Graphic Designer.
- Fotor.
- Pixlr.
- Animaker.
- iMovie.
- VideoShop.
Creating a Banner from a Template
Access Word templates via the “File” menu. Click “New” and search for the keyword “banner” in the search box. Choose a relevant template from the displayed list. You can then edit the banner in any way you wish, changing the preset headings, the font style, or colors.
How can I make a sign online for free?
How To Generate a Signature Online
- Open up this blank signature template with our online tool.
- Click ‘Tools’ (the colorful icon, top right corner) and choose ‘Sign.
- On the next page, click ‘Create Signature.
- Draw, type, or upload your signature, as you please.
- Click ‘Create Signature’ and drag it onto the document.
What is signage used for?
Aside from wayfinding, signage is most commonly used for advertising and marketing purposes. They are used by companies and businesses to advertise their brands, which help increase their presence to customers.
What is an example of signage?
Signage is a term that is defined as all of the visual graphics (public advertisements, billboards, etc.) or groups of graphics that communicate information to the public. A row of billboards along a roadway advertising beer companies, insurance companies, lawyers and nearby restaurants is an example of signage.
Can you insert signature in Word?
To add a signature line to your Word document, click Insert > Signature Line. This icon is usually included in the “Text” section of your Word ribbon menu bar. In the “Signature Setup” box that appears, fill out your signature details. You can include the name, title, and email address of the signer.
How do I digitally sign a Word document?
Open your document and click the File tab. Click Info and then click Protect Document. From the Protect Document drop-down menu, click Add a Digital Signature. Select a Commitment Type, such as created and approved this document, and then click Sign.
How do I type é on my keyboard?
é: Press Ctrl and type “‘” (apostrophe). Release both keys and type “e”. à-è-ù: Press Ctrl and type “`” key (left-hand side, top of the keyboard).
These accents are:
- L’accent aigu (é)
- L’accent grave (à, è, ù)
- L’accent circonflexe or “chapeau” (â, ê, î, ô, û)
- La cédille (ç)
- Le tréma (ë, ï, ü)
How do I get symbols on my keyboard Windows 10?
To insert symbols or kaomoji on Windows 10, use these steps:
- Open a text file, document, or email.
- Use the Windows key + (period) or Windows key + (semicolon) keyboard shortcut to open the emoji panel.
- Click the Omega button to access the symbols.
- Select the symbols you want to insert.
How do I type ñ?
If your keyboard has a numeric keypad, you can type Ñ/ñ by following these steps:
- Enable the numeric keypad by turning on the Num lock key.
- Hold the Alt key then type 164 on the numeric keypad to create a lowercase ñ. For the uppercase Ñ, hold the Alt key then type 165.
How do I type a symbol?
Inserting ASCII characters
To insert an ASCII character, press and hold down ALT while typing the character code. For example, to insert the degree (º) symbol, press and hold down ALT while typing 0176 on the numeric keypad. You must use the numeric keypad to type the numbers, and not the keyboard.
How do you write capital letters on a laptop?
For capital letters, hold down the ‘shift’ key and hold and type the letter. For symbols at the top of a number key, press down the symbol key and then type the symbol. You can use the ‘shift’ key to type any symbol at the top of a key. The ‘caps lock’ key allows you to write in capital letters.
What is a symbol on the keyboard?
Computer keyboard key explanations
| Key/symbol | Explanation |
|---|---|
| & | Ampersand, epershand, or and symbol. |
| * | Asterisk, mathematical multiplication symbol, and sometimes referred to as star. |
| ( | Open or left parenthesis. |
| ) | Close or right parenthesis. |
Create Signs using Word, no Stencils are needed. Hand-painted signs are still popular, creating them is as easy as using your Microsoft Word Program. I show you how step by step.
My Harvest sign tutorial is one of my most popular. When I create signs using WORD it is much less expensive than using stencils or fancy cutting machines.
I figured you would like to know how to create your own signs too.
(I updated this post for newer versions of WORD)

There are a lot of screenshots for you to follow as I attempted to make this as comprehensive as possible.
Get Started
Start by opening the Microsoft Word program and choose Blank Document. (note: I am working with Word 2007)
I have the subscription for the Microsoft Office from here. I have had it a few years and it has paid for itself 10 times over. Broken out over a year it is less that $5 per month.
I am now using a new Word program, this tutorial works for the newer Word too but for one detail which is noted at the end of this post.
Start in the Home tab of Word.
Fonts
Now choose your Font. Click the arrow next to the font box and a drop down menu appears I have many extra fonts that I have found by searching around for free fonts and I have some on my Fonts Pinterest board.
For this Demo I chose Calligrapher, it was a font I found online for free.
You can also get weekly free fonts from Creative Market. Just sign up for their emails and they have freebies each week.

Wording or Lettering for your DIY sign
Type the word you wish for your sign. If you don’t like the font you chose then highlight the word, (left-click on the mouse and drag the cursor over the word) and change it.

Obviously, this is not big enough for a large sign so now you need to enlarge the font size.
Making sure the word is highlighted go up to the size box and highlight the number in the box.

Make the Font Bigger
Note the drop-down menu only goes to 72 and that just won’t cut it so that is why we highlight the number in the box and then type in a larger number.
I keep testing numbers until I find one that I think is large enough. I know my paper is 8.5 x 11 so I eyeball what the letters will actually be.
To use as much of the page size as I can I adjust the margins…

Go to the Page Layout tab in Word and open Margins. It will give you several choices and I pick Narrow, which is half an inch all the way around.
There is a custom margins option but for some reason, I have not been successful in getting it to do what I want so I stick with the Narrow option.
If I want the lettering to be wider than tall I switch the page Orientation to landscape.

The Orientation tab is right next to the Margins tab in your toolbar.
Budget Friendly
Since I am frugal and don’t want to waste a ton of black ink by printing solid letters (especially when all I want is an outline), I make sure to change that.

The sign word should still be highlighted, right click your mouse as you hover over the first letter of the word and this menu should drop down.
The 4th choice down is Font, click on that and it will open up another menu for you.

You will note I clicked on two of the boxes, one is Outline and the other is Shadow.
Design Options
Use Shadow if you want to add dimension to your lettering by painting a shadow on your sign but this is optional, you can just click Outline and the letters of your word should turn white with just a narrow outline. (which obviously uses much less ink than solid letters)

Print your DIY sign wording / lettering
Now you are ready to print. Preview your pages to get an idea of what it will look like, some of the letters could be cut off and it is better to find out now rather than after printing. Adjust the size of your font to make it fit the paper.

It happens and if I want that particular size I just fudge in the rest of a letter when I paint the sign or I choose a smaller font, print the word then enlarge it by scanning and using the enlarge feature on my printer.
Assemble
Once I have printed out my letters I line them up along a center line and tape the pages together making sure I have even spacing between them. Then I transfer the letters to my surfaces and fill them in.
Update
My newer WORD program works just the same except for one change to get the lettering an outline you need to do these two steps.
When you pick you font, change the color to white by clicking the theme color button on the tool bar.


Next you need to choose Outline on the toolbar, then the color of the outline, you can use black but I use grey as you can see by the highlighted box in the color choices.
And the rest is the same so go create signs using WORD!

To see the post on hand painting lettering just CLICK HERE.
Keep this handy! PIN and Share

I wish you Happy Painting!
Other Posts you May Enjoy
Painting Hand Lettering
Hand Painted Fall Welcome sign
Fun Winter Painting Designs

In this tutorial, you will learn how to make your own signs using Microsoft Word. I repurposed Dollar Tree signs for this hack but you can easily take any sign or frame under 8 x 10 to create your own personalized signs (these also make great gifts!). Watch to learn How To Make Farmhouse Signs Using Microsoft Word and where to find fonts and cute images for your signs!

My favorite online resource to find Images files to make my own farmhouse signs is DesignBundles.net!

–>>Click here to see the latest bundle with the best SVG & PNG files online!
*Please note, if you use other’s images found online and plan to use your creation as a printable (to sell or give away) you should reference the license for that image (make sure you aren’t breaking any copyright laws!)
Want to see my latest DIY videos in Real-Time? Follow me on Instagram and YouTube!
–>>You can follow me on Instagram here
–>>Follow me on YouTube here
I’m including a quick video below but if you want a detailed video with tips on how to make these Farmhouse Signs you can watch my YouTube video below.

Let’s get started so you can see how easy and affordable it is to make these signs!
How To Make Farmhouse Signs Using Microsoft Word:
Supplies:
- Dollar Tree Signs or Frames
- Printer (we have this color printer and this laser printer)
- White cardstock or Printer paper
- Various fonts and images:
- Christmas Market Image
- Girlfriend Font
- Sweater Weather Image
- I Love Fall Most of All Image
Directions:
- Gather Supplies. Watch the video below for more instructions and pictures.
- Download your preferred fonts and install them on your computer.
- Open a new Word document.
- Search for the font you’d like to use and start typing a favorite phrase or quote.
- Add images if desired.
- Size to match your signs or frames.
- Print and cut to fit your signs.

I hope you enjoy making these signs using Dollar Tree supplies and Microsoft Word! This is the easiest way to update your signs for seasonal decor. These little signs would make great gifts too (you can easily personalize them)!

Did you make this DIY or a similar one? I would love to see it! Send me a picture on Facebook, Instagram, or email and I’ll share with my followers 🙂 ***If you have a business account, please tag me to give me credit on social media when posting your creations inspired by me!***

- Dollar Tree Signs or Frames
- Printer (we have this color printer and this laser printer)
- White cardstock or Printer paper
- Various fonts and images
-
Gather Supplies. Watch the video below for more instructions and pictures.
-
Download your preferred fonts and install them on your computer.
-
Open a new Word document.
-
Search for the font you’d like to use and start typing a favorite phrase or quote.
-
Add images if desired.
-
Size to match your signs or frames.
-
Print and cut to fit your signs.
My favorite online resource to find Images files to make my own farmhouse signs is DesignBundles.net!
–>>Click here to see the latest bundle with the best SVG & PNG files online!
*Please note, if you use other’s images found online and plan to use your creation as a printable (to sell or give away) you should reference the license for that image (make sure you aren’t breaking any copyright laws!)
Watch the Quick How-To Video:
Want to see more Dollar Tree DIY videos?
–>>Subscribe to my YouTube channel here!

Psssssttt…Right now I’m offering FREE access to our Digital Resource Library to all of our newsletter subscribers. Your private access includes dozens of free printable crafts, home decor and organization guides. Hurry up and grab your freebies here! (Access instructions are sent after subscribing).
Disclaimer: This post may contain affiliate links or a sponsored post. All opinions are always 100% mine and I don’t partner with any product or company that I don’t use and love. Please see our Full Disclosure for more information.

Microsoft Word Signs
Reader Interactions
If you’re already a Microsoft 365 subscriber, Word is an excellent application for creating your business’s signage. You can create signs that range from basic to intricate depending on your goals and needs. The best part? With Microsoft Word, you don’t have to be an expert graphic designer to create a professional-looking sign.
How to make signs in Word
Because there’s such a wide variety of possibilities, there isn’t a step-by-step guide that can encompass every type of sign you might need to create. Instead, there are a few key considerations to keep in mind that will help you make your sign as successful as possible.
Jump to:
- Templates
- Page orientation
- Color
- Typography
- Graphics
Templates
One of the easiest ways to make a sign in Microsoft Word is to use one of the included templates. You can find pre-made examples of signs, flyers, brochures, and other marketing materials in the Word template library. Instead of creating something from scratch, use a template as a starting point to create a customized sign without spending a ton of time on formatting.
There are also third-party websites that create templates you can download and add to your Word template library. These templates usually have more intricate or modern designs than the ones Microsoft offers, so might have an easier time finding one that matches your design taste.
Page orientation
If you choose to start with a blank document, the first thing to consider is page orientation. Portrait orientation is best for signage with a lot of information, like flyers, posters, and infographics. Landscape orientation is ideal for signs that have minimal text but are intended to grab someone’s attention. Certificates, yard signs, and maps typically use landscape orientation.
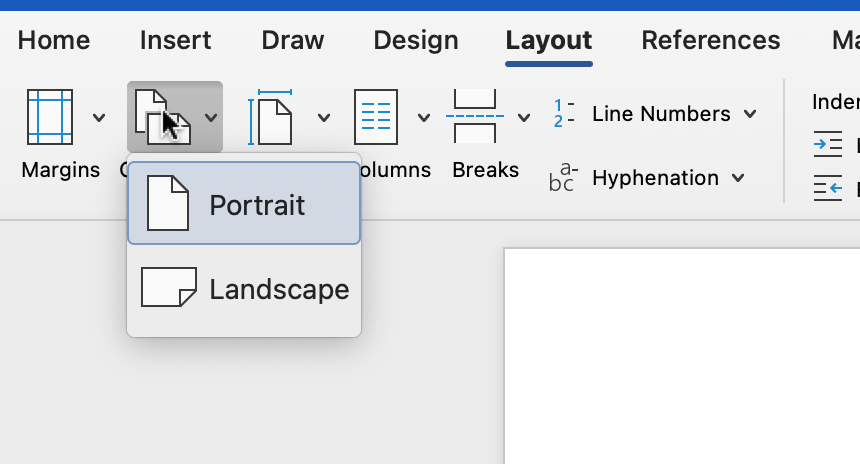
New documents in Microsoft Word are set to portrait orientation by default. To switch to landscape orientation, navigate to the Layout tab on the ribbon toolbar, then select Landscape from the dropdown menu under Orientation.
Color
As with most design materials, color plays a major role in the effectiveness of what you create. Color psychology—how the human brain responds to certain colors—can help guide you if you’re not sure what colors to use in your signage. For example, green signifies health, nature, and affluence, but it isn’t as eye-catching as red or yellow hues.
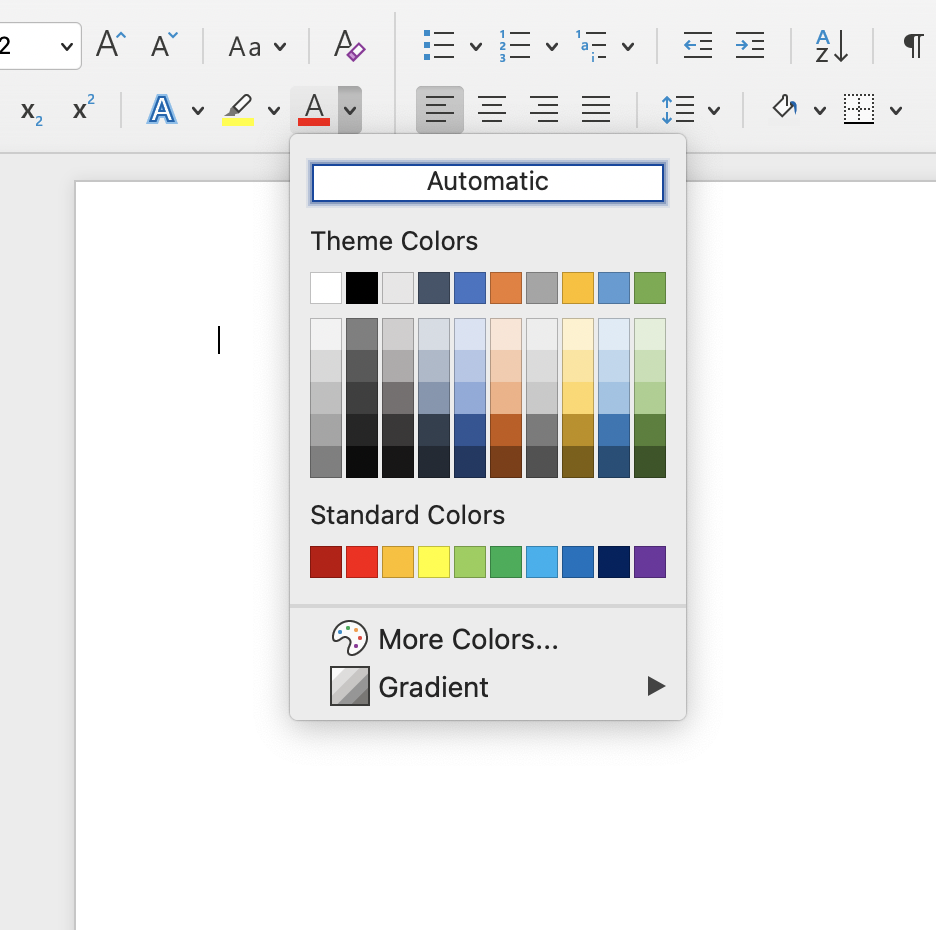
Similarly, contrast can be a big factor in whether your sign sticks out. If you use several colors with the same tone, your sign will lack the “pop” factor that grabs someone’s attention. For the best results, use a color palette that has a balance of bright and dark colors and creates visual interest.
The easiest way to find this balance is to pick colors from different rows in Microsoft Word’s color selection menu. The top row of light shades in the screenshot below would provide a good contrast with the shades on the bottom row, for example.
Ultimately, printing costs may be the biggest consideration when using color in your signage. Black and white print jobs are usually less expensive than printing in full color, so color might not be an option if you’re trying to stretch your budget. In this case, pay careful attention to the other elements of your design: shapes, space, lines, and typography. You can still have a successful design without color if you use these elements strategically.
Typography
You don’t necessarily need to include typography in your sign if your goal can be accomplished by using symbols like arrows, emojis, or icons. However, sometimes text is needed to provide context or clarification. You should use enough text to get your message across, but not too much that it clutters the sign. If you have a lot of information to include, consider putting it on a web page and creating a QR code or shortened URL that someone can access from a mobile device.
Typography font, size, and formatting are also important considerations. For example, a lightweight script font can connote elegance and sophistication, whereas bold block lettering can signify urgency and importance. Play around with different typography styles like the ones in the screenshot below to create balance and guide a viewer’s eye across your sign.

Graphics
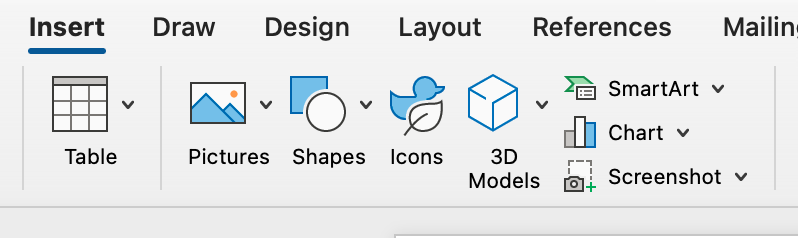
Especially if your sign is limited in terms of typography and color, graphics can make your sign more effective. Shapes, icons, and photos are examples of simple graphic elements that can elevate your sign without much effort. If you really want to take your design to the next level, consider using a 3D model, Smart Art, or chart to create a visual representation of the information you want to communicate through your sign.
You can find all of these options under the Insert tab of the ribbon toolbar:
Similar to typography, however, too many graphics on a sign can be overwhelming and detract from your ultimate goal. In general, it’s best to reserve thirty to forty percent of your design for empty white space.
Alternative graphic design tools
Microsoft Word is a versatile tool that can help you create a wide range of signs, but at the end of the day it’s still a word processing application and not specifically intended for graphic design. Thankfully, you don’t need a professional graphic design application like Adobe InDesign to create advanced signs. There are a number of design tools like Canva, Crello, and Snappa that are specifically for non-designers.

Source: Canva
As you can see in the screenshot above, these tools offer bigger libraries of professionally-designed templates. Some, like Canva, also offer high quality printing services. If you step outside the Microsoft suite of tools, you can create signs that are even better than what you can create with Word.
Read next: Best Digital Marketing Tools for Small Businesses
This article was originally published on November 4, 2009. It was updated by Kaiti Norton.

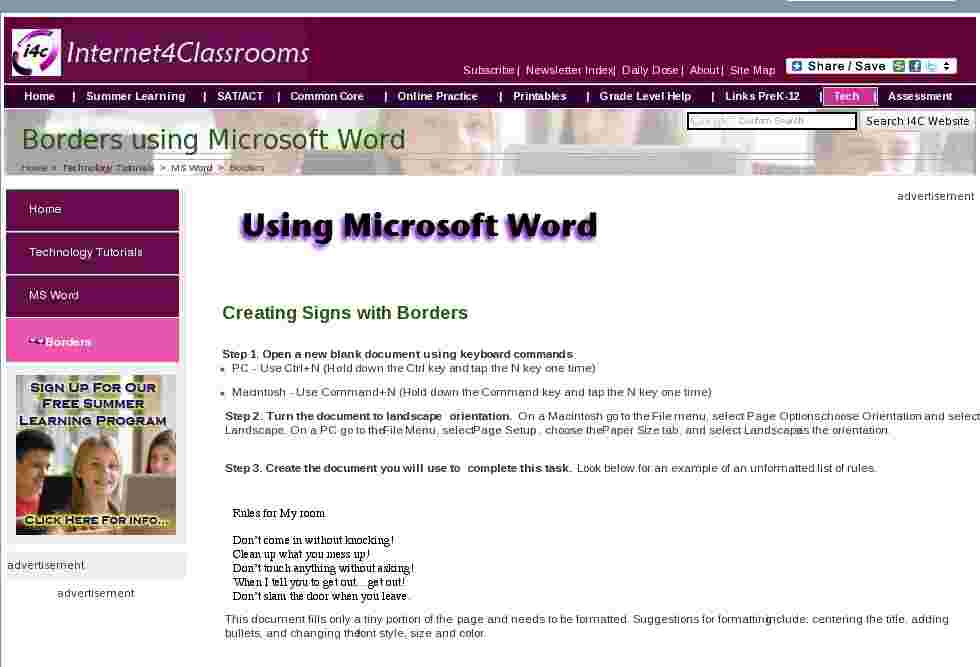
Creating Signs with Borders
Step
1.
Open a new blank document using
keyboard commands
- PC — Use Ctrl+N (Hold down the Ctrl key and
tap the N key one time)- Macintosh — Use Command+N (Hold down the
Command key and tap the N key one time)Step
2.
Turn the document to landscape
orientation. On a Macintosh go to the
File
menu, select
Page
Options,
choose
Orientation
and select
Landscape. On a PC go to the
File
Menu, select
Page
Setup
, choose the
Paper
Size
tab, and select
Landscape
as the orientation.Step
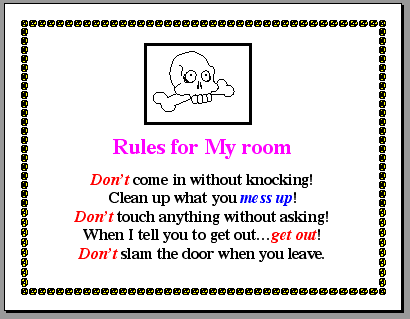
3. Create the document you will use to
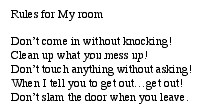
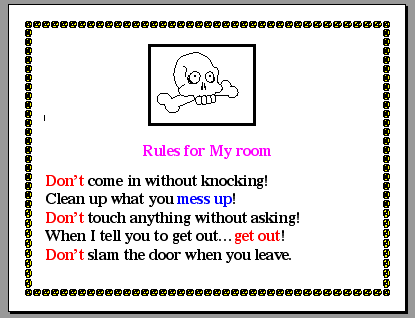
complete this task. Look below for an example of an unformatted
list of rules.
This document fills only a tiny portion of the
page and needs to be formatted. Suggestions for formatting
include; centering the title, adding bullets, and changing the
font style, size and color.Step
4. Next place a border around the
entire page. Go to the
Format
menu and select
Borders
and Shading…
, and choose the
Page Border
tab.In the middle of the Borders and Shading
window, near the bottom of the window you will find a button
labeled
Art
which will allow you to put an artistic border
around the entire page.
Step
5.
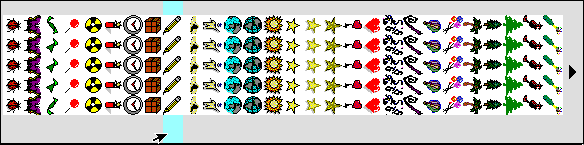
Click on the down arrow to display
the choices. Scroll through this list to find the one you prefer.
There is a
huge
selection here. The graphic below
illustrates only a portion of what is available:
(I turned this list on its side to take up less space on the
page)
Step
6.
Click OK when you have made your
choice. This places the border around your document.
Step 7.
Go to print preview using either the
File
menu or the
Standard
toolbar.
Make a judgment
regarding the appearance of your sign. On the example above, I
would make three changes: (1) increase the font size of the title,
(2) center each of the five rules, and (3) change colored text to
italic.
Step 8.
Save, and print your
masterpiece.Go back to
Using
Microsoft Word to Produce Classroom Documents
Internet4classrooms is a collaborative effort by
Susan Brooks and Bill Byles.
![]()
Your handwritten signature gives your document a personal touch. You can scan your signature and store it as a picture to insert in the document.
You can also insert a signature line to indicate where a signature should be written.
Create and insert a handwritten signature
You need a scanner to do this.
-
Write your signature on a piece of paper.
-
Scan the page and save it on your computer in a common file format: .bmp, .jpg, or .png.
For information on how to use your scanner, use the manufacturer’s manual or Web site.
-
Open the image file in Word.
-
Select the image and on the Picture Format tab, click Crop and use the handles to crop the image.

-
Right-click the image, and choose Save as Picture to save as a separate file.
-
To add the signature to a document, click Insert > Picture s.
Include typewritten text with your reusable signature
If you want information like your job title, phone number, or email address to be part of your signature, save it along with the picture as AutoText.
-
Type the text you want under the inserted picture.
-
Select the picture and the typed text.
-
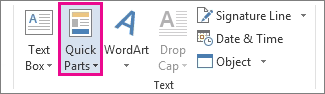
Click Insert > Quick Parts.
-
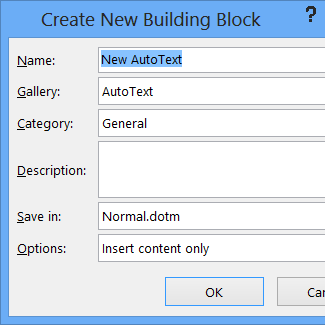
Click Save Selection to Quick Part Gallery. The Create New Building Block box opens.
-
In the Name box, type a name for your signature block.
-
In the Gallery box, select AutoText.
-
Click OK.
-
When you want to use this signature, place the insertion point where you want to insert the signature block.
-
Click Insert > Quick Parts > AutoText, and then click the name of your signature block.
Insert a signature line
Use the Signature Line command to insert a signature line with an X by it to show where to sign a document.
-
Click where you want the line.
-
Click Insert > Signature Line.
-
Click Microsoft Office Signature Line.
-
In the Signature Setup box, you can type a name in the Suggested signerbox. You can also add a title in the Suggested signer’s title box.
-
Click OK. The signature line appears in your document.


Your handwritten signature gives your document a personal touch. You can scan your signature, store it as a picture, and then insert your signature in Word documents.
Scan and insert a picture of your handwritten signature
You need a scanner to do this.
-
Write your signature on a piece of paper.
-
Scan the page and save it on your computer in a common file format: .BMP, .GIF, .JPG, or .PNG.
Tip: For information on how to use your scanner, use the manufacturer’s manual or Web site.
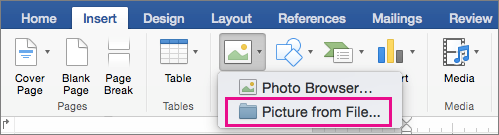
-
On the Insert tab, click Pictures > Picture from File.
-
Browse to the picture you want to insert, select it, and then click Insert.
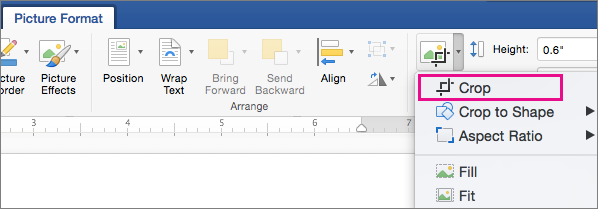
-
Click the picture to show the Picture Format tab.
-
On the Picture Format tab, click Crop, and then crop the signature.
-
Right-click the picture, and then click Save as Picture to save it as a separate file you can use in other documents.
Include text with your reusable signature
If you want information, such as your job title, phone number, or email address to be part of your signature, save it along with the picture as AutoText.
-
Type the text you want under the inserted picture.
-
Select the picture and the typed text.
-
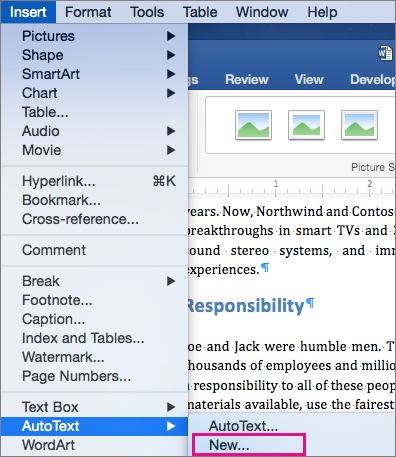
On the Insert menu, click AutoText > New.
-
The Create New AutoText box opens.
Next to Name, type a name for your signature block and click OK.
-
When you want to use this signature, place the insertion point where you want to insert the signature block.
-
On the Insert menu, click AutoText > AutoText, and then click the name of your signature block.

Watch
Shop
Explore
When autocomplete results are available use up and down arrows to review and enter to select. Touch device users, explore by touch or with swipe gestures.
Explore
Art

Save
Article from
flowerpatchfarmhouse.com
Create Signs using Word, no Stencils are needed. Hand-painted signs are very popular. Create your own custom sign templates!

Flower Patch Farmhouse
87k
followers
More information
Create signs using WORD, easy enough for beginners
Find this Pin and more on Crafts and Diy by Ginger Zimmerman.
How To Make Stencils
Large Stencils
Letter Stencils
Sign Fonts
Word Fonts
Rustic Signs
Wooden Signs
Fixer Upper Show
Word Program
More information
Create signs using WORD, easy enough for beginners
Find this Pin and more on Crafts and Diy by Ginger Zimmerman.
Comments
Watch
Shop
Explore
When autocomplete results are available use up and down arrows to review and enter to select. Touch device users, explore by touch or with swipe gestures.
Explore
Education

Save
Article from
flowerpatchfarmhouse.com
Create Signs using Word, no Stencils are needed. Hand-painted signs are very popular. Create your own custom sign templates!
Flower Patch Farmhouse
87k
followers
More information
Create signs using WORD, easy enough for beginners
How To Make Signs
How To Make Diy
Rustic Signs
Wood Signs
Word Program
Word Stencils
Painted Wooden Signs
Farmhouse Crafts
How To Make Stencils
More information
Create signs using WORD, easy enough for beginners
Comments
Microsoft Word does indeed have a handy built-in feature that allows users to create and add electronic signatures to documents for free.
Despite its popularity, however, Word is somewhat limited concerning wider functionality when it comes to electronic signatures.
This makes Microsoft an outdated software choice for many organisations, those who would otherwise benefit by switching to more dedicated eSigning platforms.
On the bright side, there’s still a lot that can be done with Word. In this article, we’ll take you through the ins and outs of electronic signatures in Word, and we’ll teach you how to electronically sign a Word document.
What is an electronic signature?
An electronic signature, also known as an eSignature, is merely a digitised form of a traditional physical signature, making the document-signing process a fast-moving activity.
Like a standard handwritten signature, electronic signatures are mostly there to serve as proof that the signer has approved the document in question.
Why use electronic signatures?
Before we explore this subject further, it’s essential to know the what, why, and how of electronic signatures. Since we’re already done with the “what,” it’s about time we discover the “why.”
For starters, eSignatures are a lot faster to use than traditional signatures, since you don’t have to print, physically sign, scan the document, and then have it sent back to the sender.
Another handy feature of eSignatures is that they only need to be created once, and then the copy signature can be added quickly and easily to any future document.
For anyone needing to send out signed documents frequently, eSignatures can significantly improve their workflow. Teams like sales, admin, accounts, etc., as well as many business owners, can profoundly benefit from its use.
For the most part, an electronic signature is just as legally binding as a real signature (read: certain countries consider written signatures as taking higher precedence over eSignatures).
Oh, and before we forget: they are also encrypted — so rest assured, electronic signatures are safe to use even with critical and sensitive documents.
Leverage your business with electronic signatures
When partnering with a brand, you ideally need an application that is more than just an eSignature software.
At the same time, it should be a brand that understands the importance and benefits of using electronic signatures. These eSignature benefits should include:
- Getting instant updates.
- Being able to deploy automation for signature tracking.
- Easy accessibility of signing different file types.
- Access to enhanced security.
PandaDoc has all these features and then some. You can scan, view, and sign a document, all at the same time, and easily.
If you’re interested in exploring further, send yourself a (free) sample copy to view the eSignature journey from the eyes of your customers.
Does it make sense to add a digital signature in Word?
Microsoft Word is the universal word processing software used by businesses and individuals across the world to create documents.
Because it is so widely used, many people choose to add eSignatures to documents in Word to increase the speed of their document processes. (It often might do otherwise, but more on that later.)
The main advantage of adding digital signatures in Word documents is the very fact that most businesses already use the software to create and edit their documents.
However, while this may be the most obvious benefit, just make a note if your organisation can indeed support the use-case of electronic signatures before moving forward with a solution.
How to add an electronic signature to a Word document
At this step, perhaps you may ask, “How do I write my signature on a Word document?” Well then, you’ve come to the right place.
Follow these necessary steps to add a digital signature to a Word document (“word” of caution, no pun intended): these steps are only relevant on the Microsoft Word versions 2007, 2010, 2013, 2016, 2019, and Word in Office 365):
1. Place the cursor where you’d like to add a signature to a Word document.
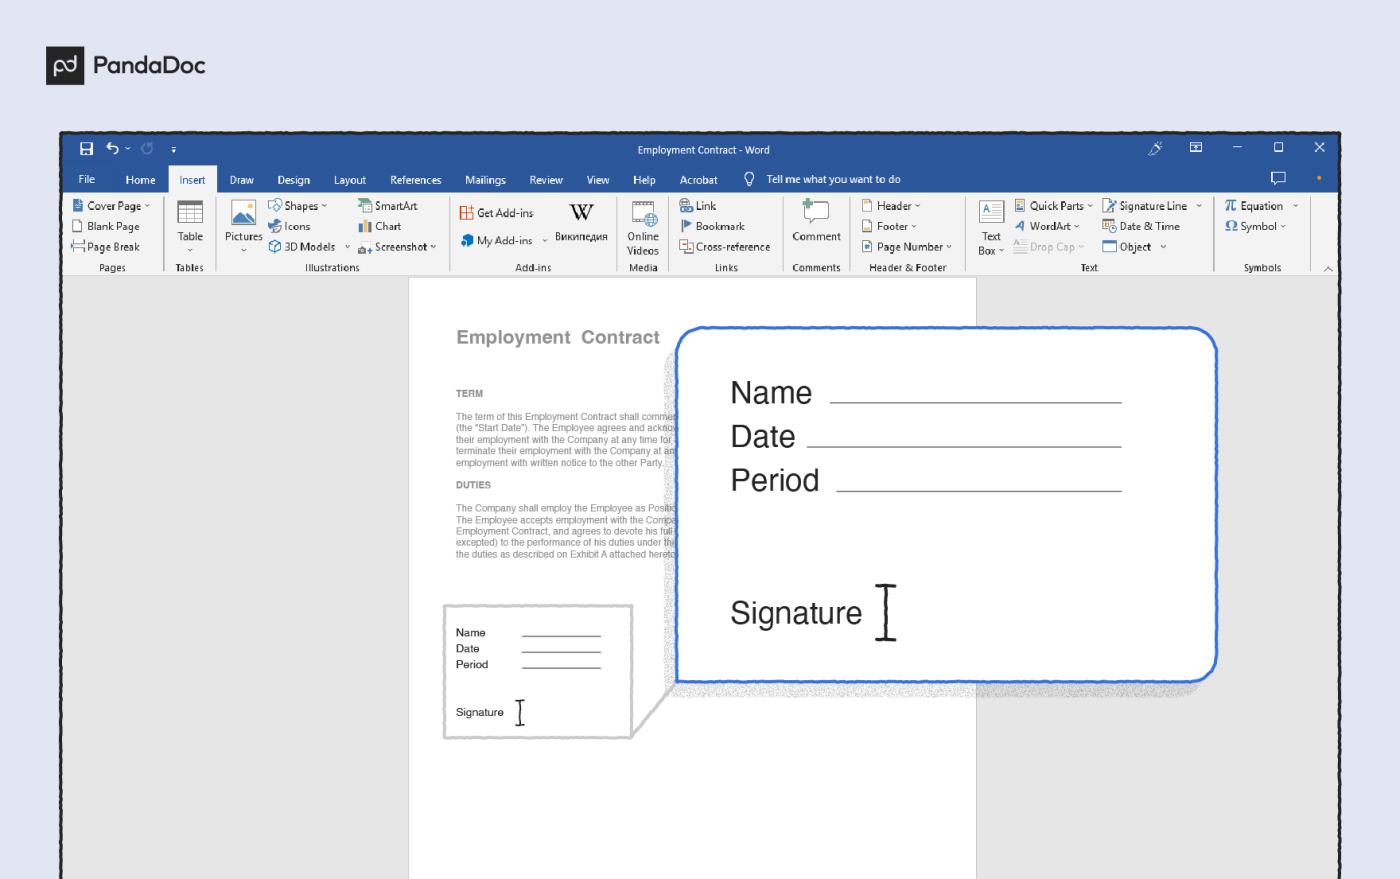
2. Go to the Insert tab, and under “Text,” click “Signature List,” followed by “Microsoft Office Signature Line“.
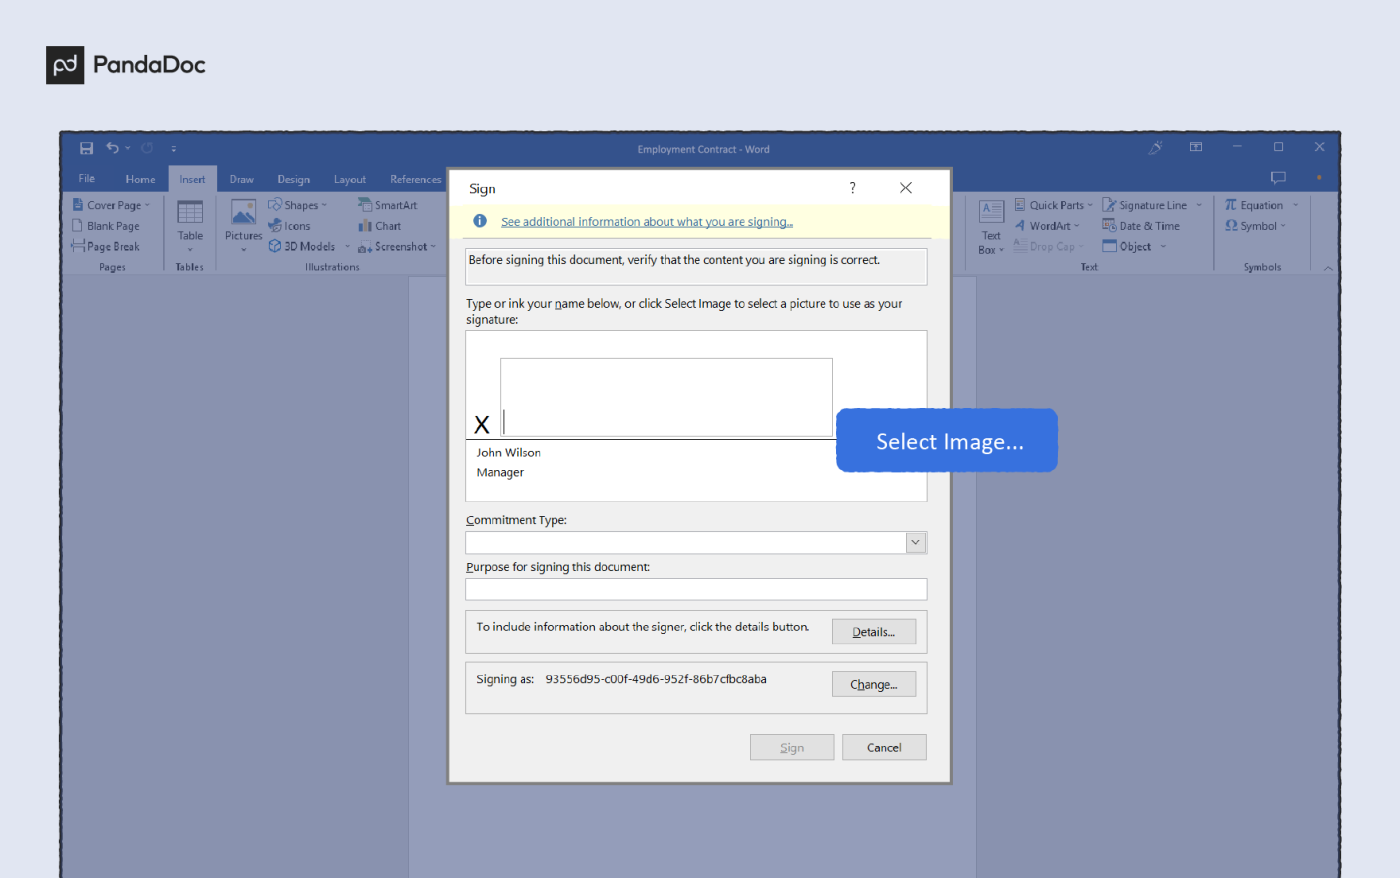
3. Complete the fields about signature details in the setup box that pops up and select your preferences for the signature box.
4. Right-click on the signature box in the document.
5. After this, click “Select Image” to choose an image of a signature that you have already saved.
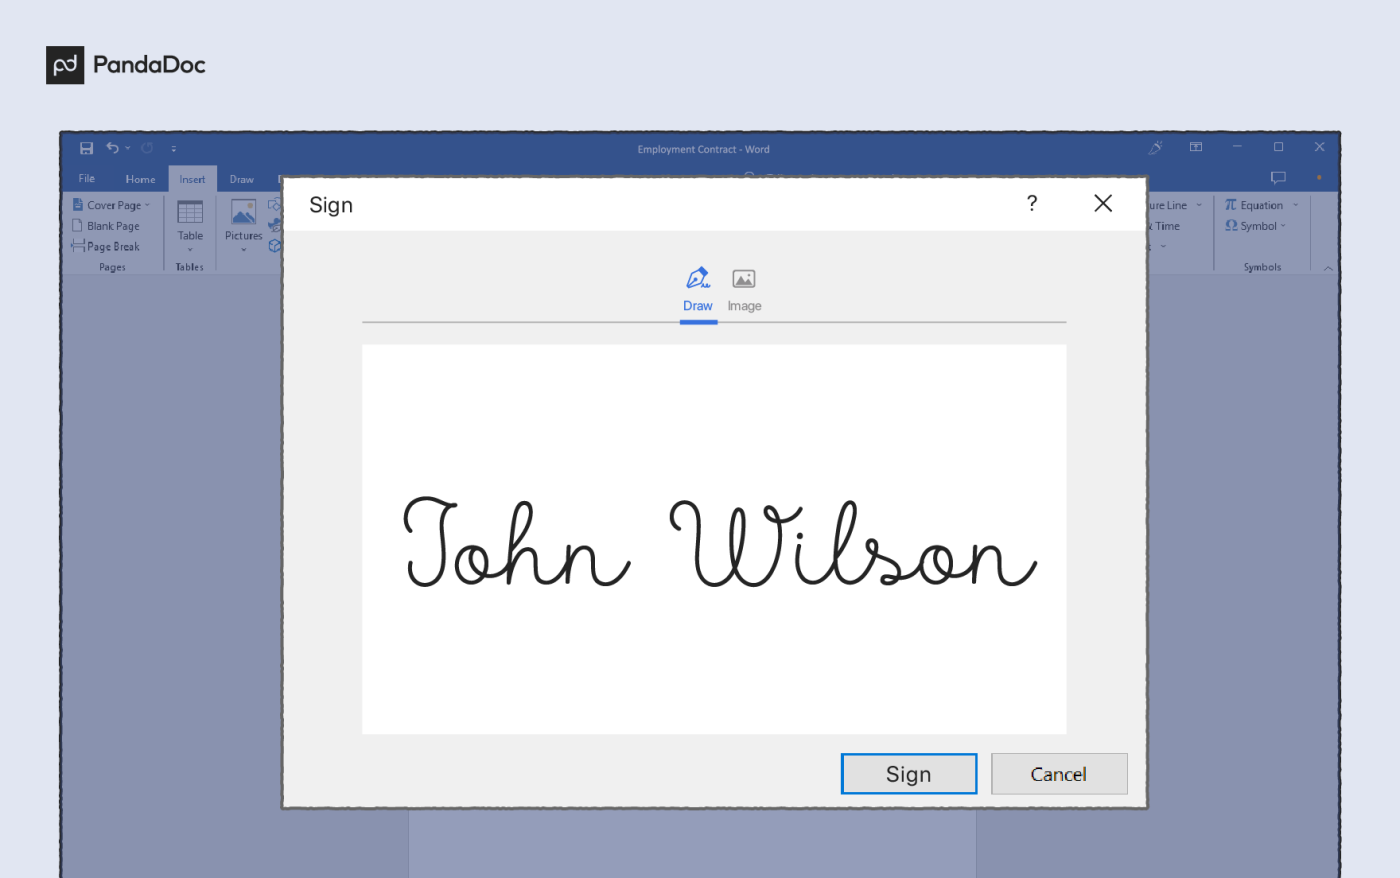
Alternatively, if you’re using a touch screen, you can hand draw your signature into the box. You can also type a printed version of your name directly into the box.
While it’s entirely possible to eSign documents using Word, the signature setup can be a convoluted process.
Every person who’s signing the document will need to download the document, open it in Word, and follow step 4 to add their signature.
Note: if digital signatures are not your thing, then you can print and hand-sign them as well. But with this method, you’ll need to save the document and send it back to the sender, which only wastes time and potentially opens up room for human error.
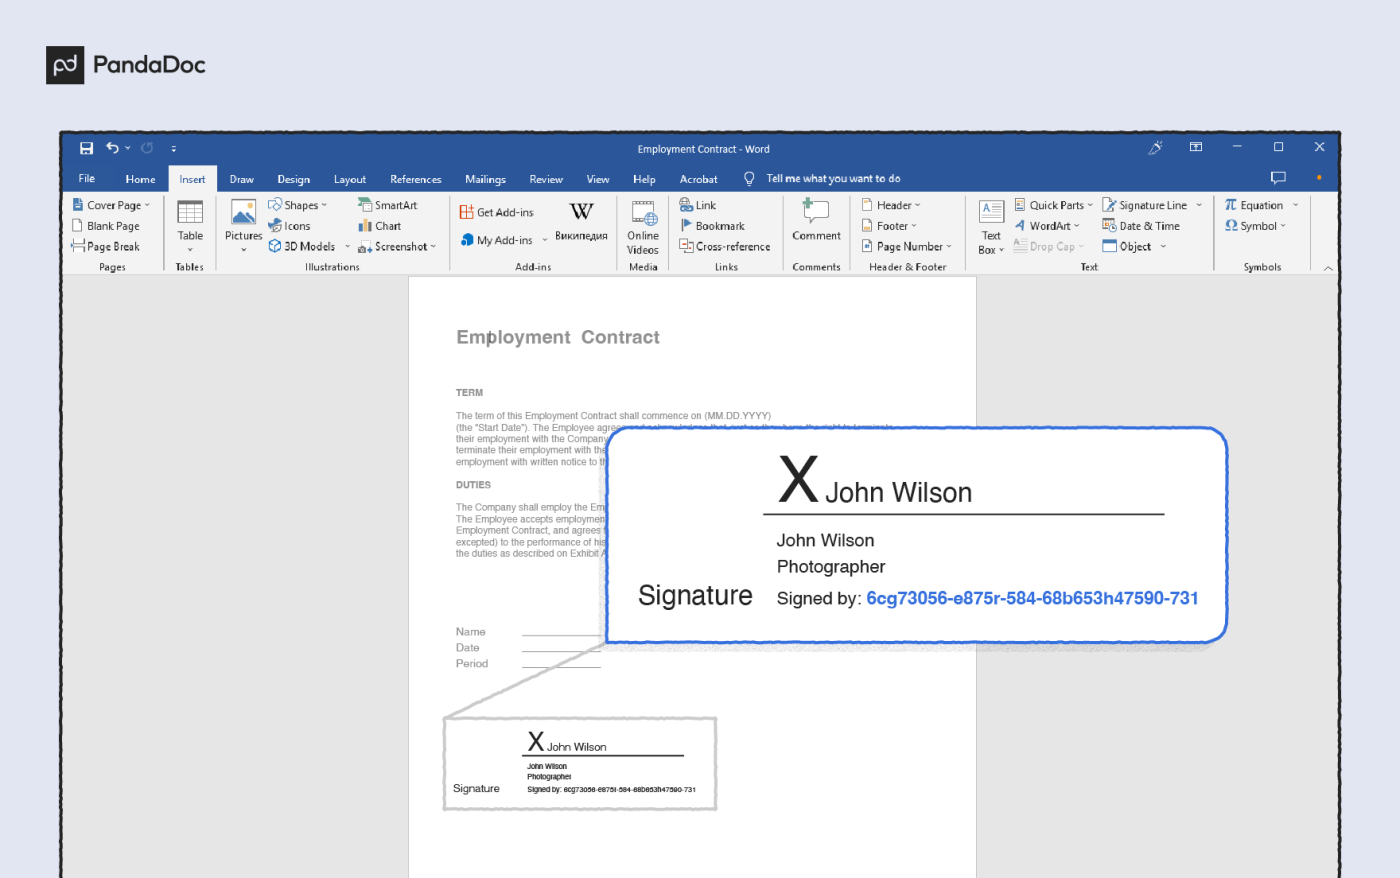
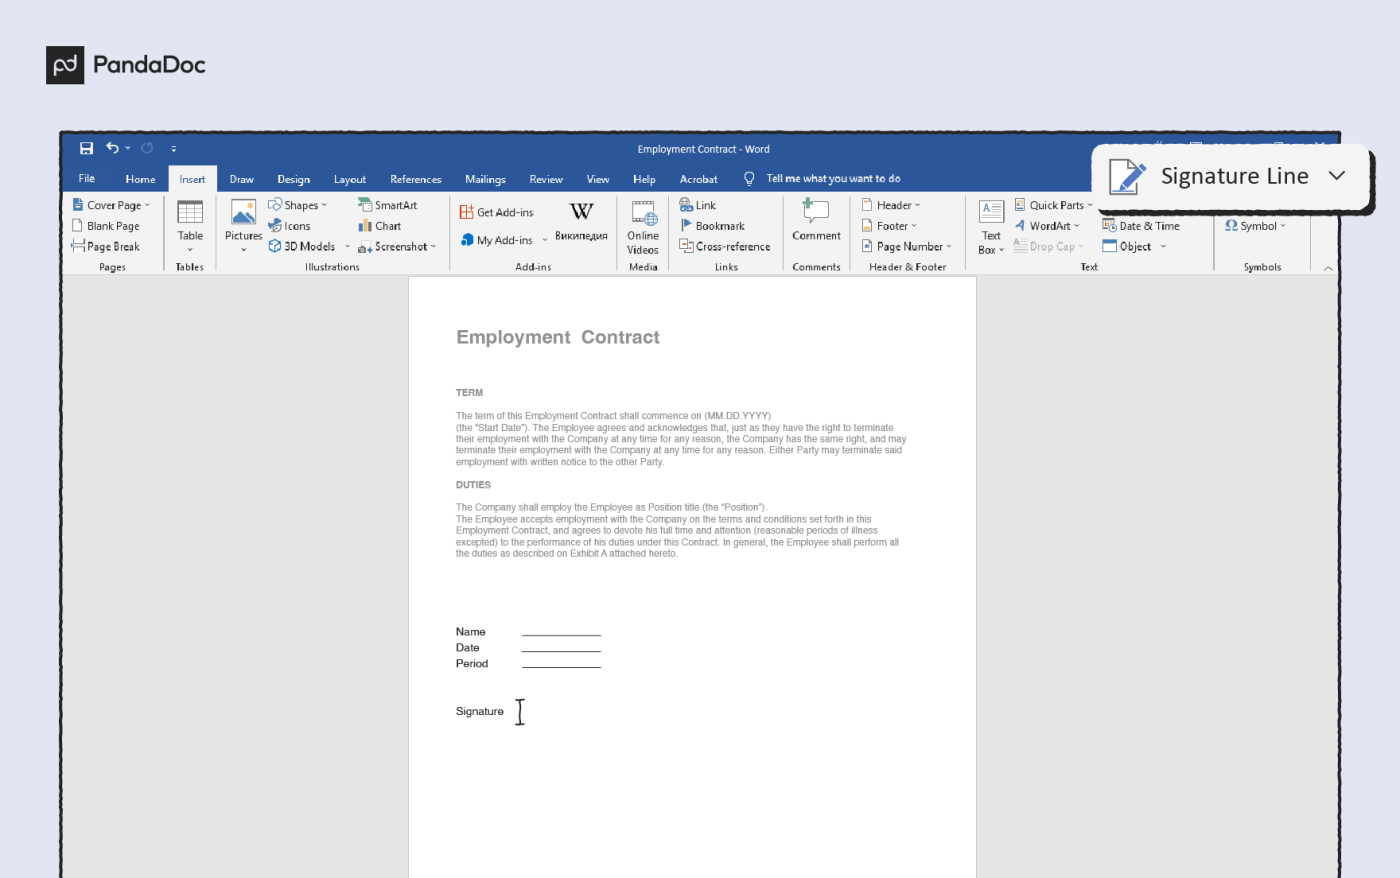
How to add a signature line in the Word doc
1. Place your cursor where you would like to add the signature line.
2. Go to the “Insert” tab, and select “Signature line.”
3. A dialogue box will pop up — fill in the required details (name of the signer, work title of the signer, and email ID of the signer).
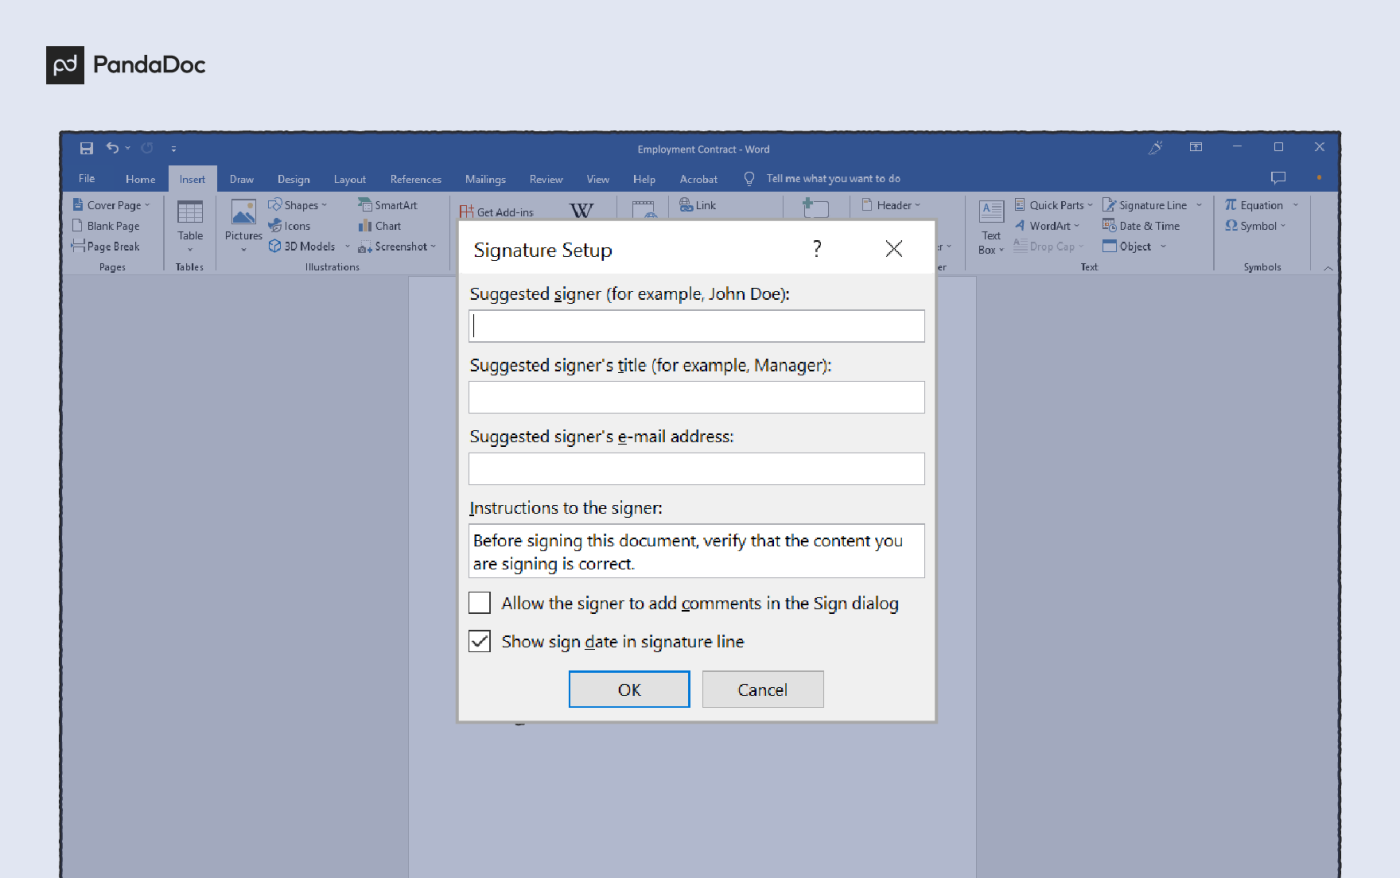
4. Mention the instructions you would like the recipient to read.
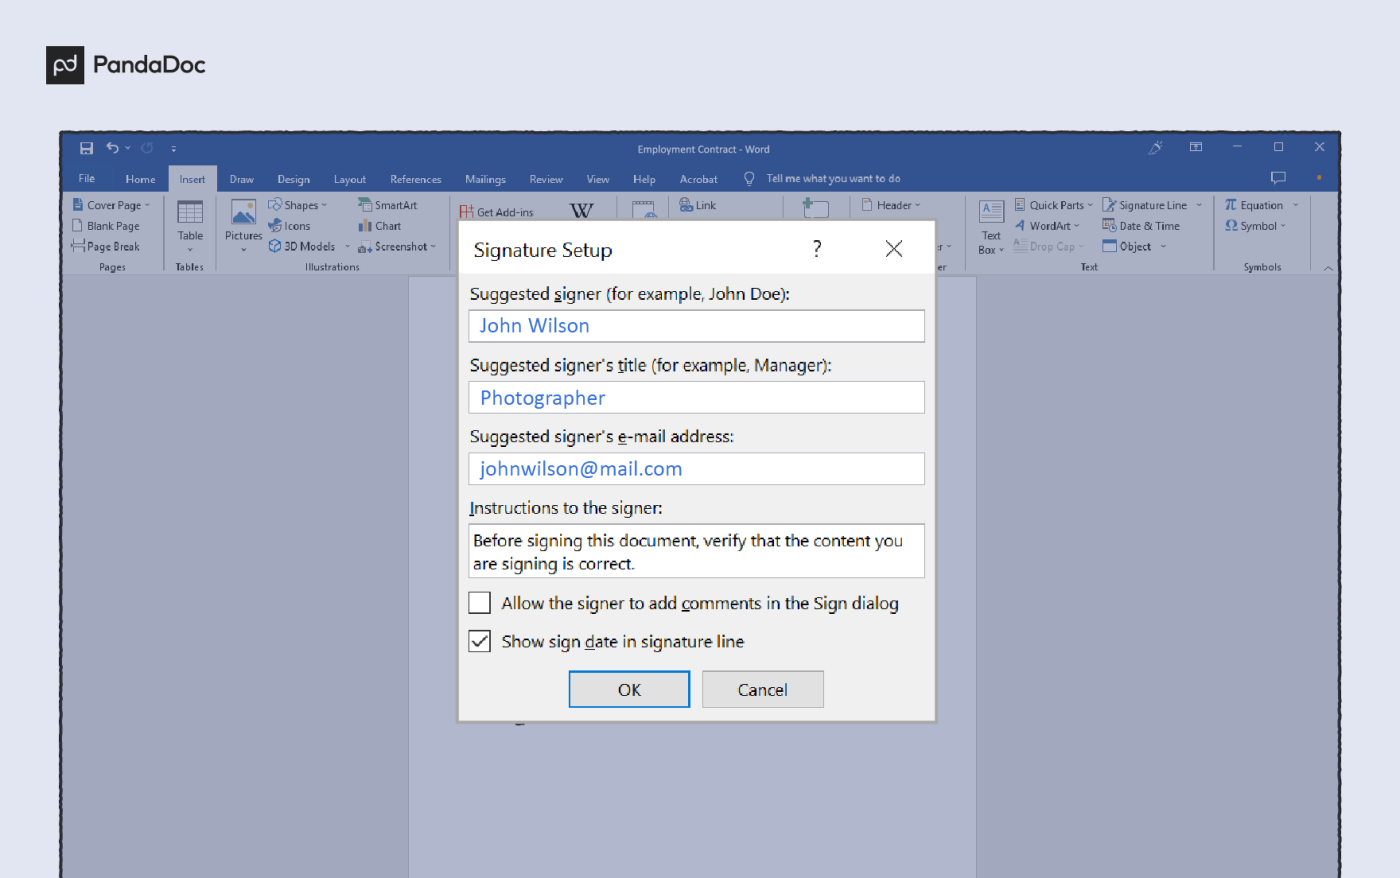
5. Allow the recipient to add comments (if you’d like), and select “show sign date.”
6. Click “OK.”
Why switch from using Word for electronic signatures?
Microsoft Word is not designed to be used as electronic signature software, and while it can be used to add signatures digitally, there are some gaps in functionality that limit its potential benefits.
The biggest limitation of using Word is that it is not comprehensive in nature. Imagine your client sends you a PDF document or a ppt file. You can’t use Microsoft Word to sign those documents.
Apps like PandaDoc, that have an eSignature function, are compatible with multiple file types, including Word, ppt, pdf, xls, jpg, and more.
Another drawback is that you need to consider the client’s journey when they sign a document. Logically, these recipients need to read the document, decide if they’re interested, sign it themselves and then send it back.
As a business owner, your goal should be to make the signing process as easy as possible.
This can be done only when you have insights that tell you how and where did your recipient(s) interact with the documents you sent them. Unfortunately, this isn’t possible with Word.
Another big drawback of Word is that it is not the fastest way to eSign documents. The thing is, anytime you want to sign a document on Word, you’d have to create a digital ID.
When you click on the X to sign, a dialog box would appear. For some users, this dialog box redirects them to Microsoft support from where they can read the instructions to create a digital ID.
Whereas for others, you have to manually go to the Microsoft website to obtain a digital ID from one of Microsoft’s partners.
It’s important to note that the partners Microsoft mentions (GlobalSign and IdenTrust) require you to pay money to obtain a digital ID. So, overall, Microsoft is not the most effortless software when it comes to eSigning.
What can other platforms offer that Word can’t?
There are many other examples of software that are dedicated to creating, sending and signing business documents digitally, such as PandaDoc and DocuSign.
PandaDoc and DocuSign have both been consistently ranking as the top-performing eSignature softwares.
While DocuSign has made a name for itself by launching first, PandaDoc has been giving it some serious competition with the help of its product offerings (unlimited audit trail, 24/7 support, dynamic pricing, and more).
The comparisons are numerous, and very much worth evaluating for yourself. If you’re still interested in exploring further, you can compare both these softwares here.
The point that remains is both these softwares provide services that offer a much broader range of useful features, generally making it straightforward to create signature fields and eSignatures.
PandaDoc, for example, provides users with a vast database of templates tailored to a wide range of business use cases that can easily be signed at the click of a button, as well as different types of quotes, proposals, or legal documents, that can be quickly uploaded to keep all information in one place.
Overall, this speeds up the creation of high-quality, professional documents.
Adding an eSignature is painless on these dedicated platforms, with intuitive interfaces and one-click addition often supported.
Once signed, documents can be sent to a list of recipients quickly and easily, directly through the software itself, and a secure signing certificate may be created as soon as the recipient signs the document.
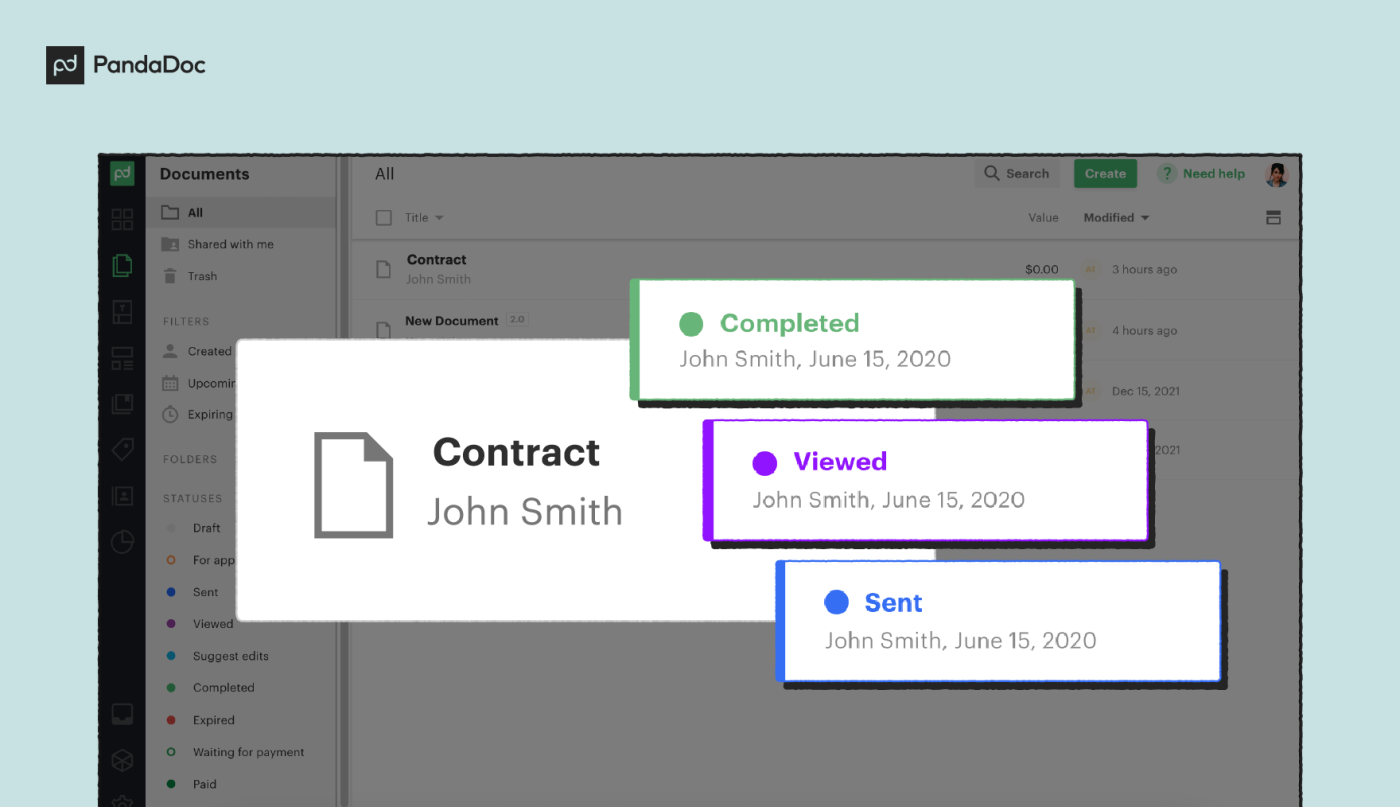
Once sent, documents can then be tracked. Viewer metrics like time spent on each page, how often the recipient viewed the document, the number of views, comments, and eSignatures on the document, and other similar data are gathered and presented to the sender automatically.

This information provides a microscopic view of what works and what doesn’t, allowing companies to fine-tune their sales documents and improve their effectiveness over time.
These powerful features mean that adopting a specialised eSignature and sales document platform can revolutionise the way you eSign. It also means that you can dramatically streamline your entire sales process.
PandaDoc has integrated with Word to make limitations a thing of the past
It could be that you’re a Word loyalist, or maybe you’re just not looking to fully switch to a new software (after all, who doesn’t love comfort?).
But there is one thing that we guarantee you’ll love more: a smoother eSigning process.
And for the very same reason, PandaDoc has integrated with Word, making limitations of digital signatures a problem of the past. You can now have the best of both worlds.
With this integration, you can send your document quickly to a list of prospects and/or internal team members (PandaDoc will open in a separate tab to not disturb your workflow).
You can also see if your recipient received your document with status updates letting you know whether they’ve signed or not.

This integration makes it possible to sign existing Word documents, request eSignatures from multiple recipients, and check the status of your document — all at the click of a button.

Even more, the integration is simple and uploads the documents directly to your PandaDoc account, making them easy to access from anywhere.
If interested, you can download the integration from Microsoft Marketplace.
How to add an eSignature to a Word document using PandaDoc
PandaDoc makes it a breeze to add electronic signatures to any document.
Just follow these steps:
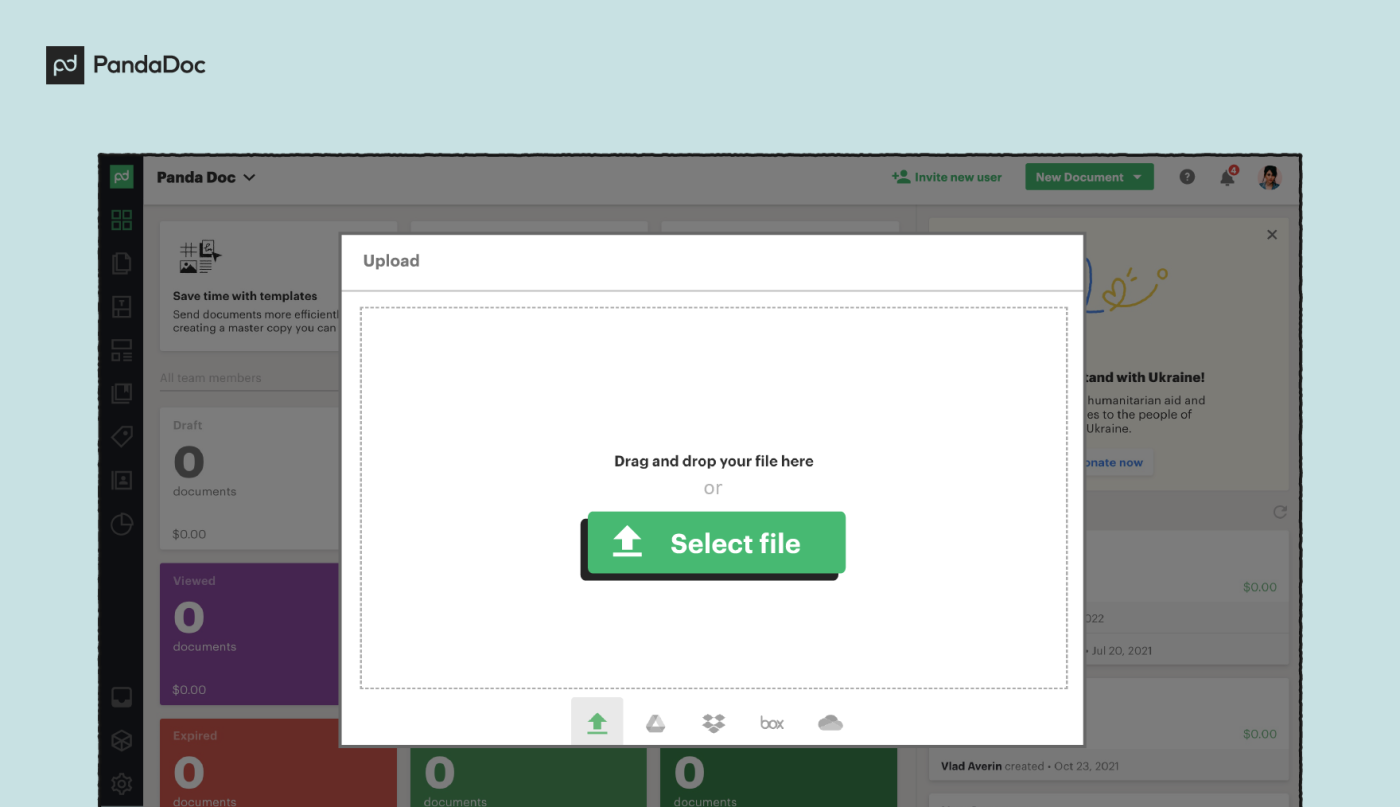
1. Start a free trial account with PandaDoc and open your document (either by choosing a saved file from PandaDoc, or uploading a file from your computer or cloud storage app).
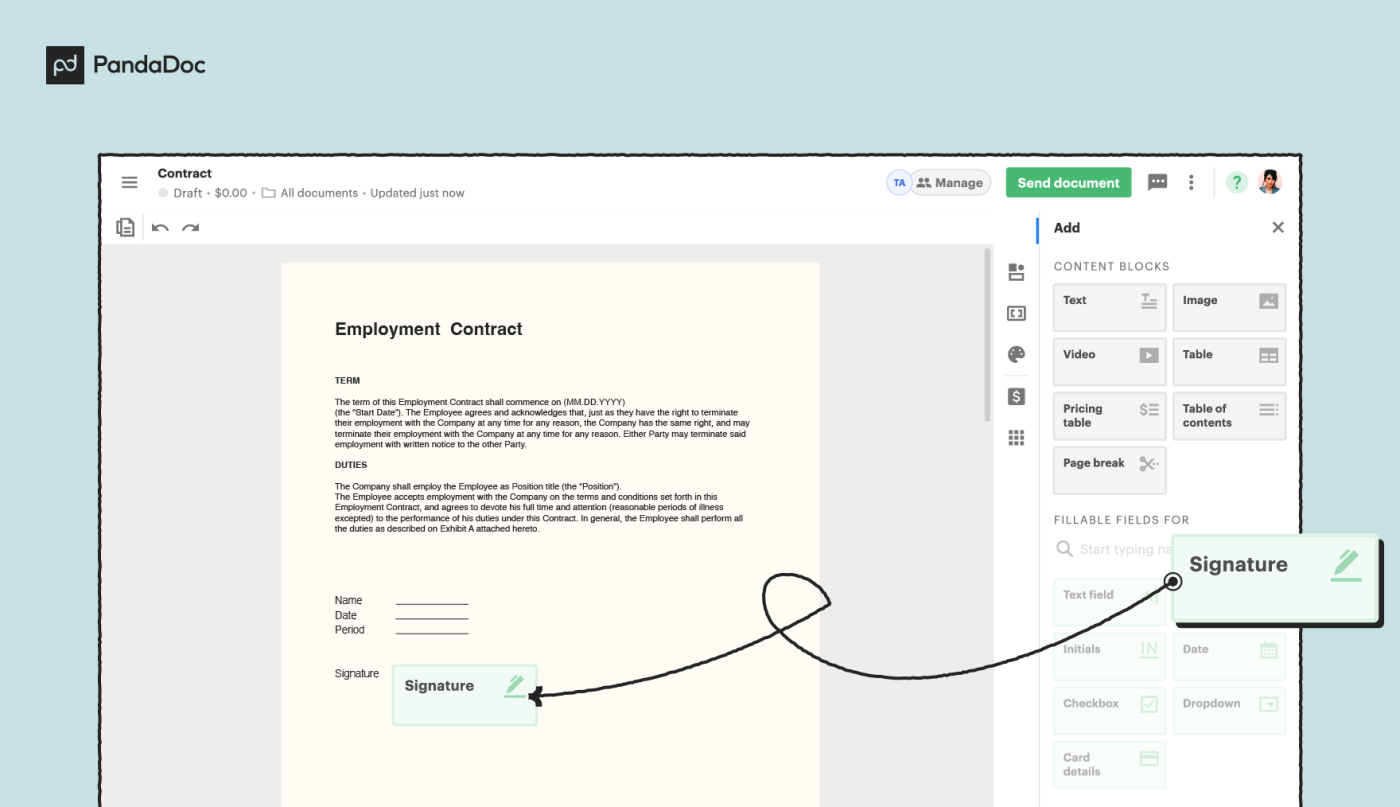
2. Drag and drop a signature field into the document and add any extra fields or text you want.
3. Choose your recipients and click send.
4. Recipients will get an email notification linking them directly to an online version of the document. They need to click the signature field and choose to draw, upload or type their electronic signature.

5. The sender’s copy of the document is automatically updated as signatures are added. Document activity can be tracked conveniently, and follow-ups are sent accordingly.
PandaDoc also creates a signature certificate that shows the signing date, IP address, location, and the time stamp ensuring the document’s legitimacy.
A better way to eSign your business and sales documents
Microsoft Word may be the most popular word processing software for both businesses and individuals, but that doesn’t always make it the best choice for electronic signatures.
There now exists a massive array of softwares dedicated to improving the document signing process.
Alternatives to Word like PandaDoc not only make the eSigning process incredibly simple, but they also come with a wide range of other tools that can enhance your ability to create, send, sign and track a large number of important business documents with ease.
So, what’s stopping you from hopping on the PandaDoc train and creating an illustrious document signing experience?