
![]()
Download Article
![]()
Download Article
Want to create an outline around certain letters in your Word document? There are two easy ways you can surround words and phrases with colored outlines in Word—using Text Effects, and using Word Art. We’ll show you how to make any font in your Microsoft Word document stand out by outlining it in color.
-

1
Type the word or phrase you want to outline. The lines around your text will look better on larger characters, so make your font a bit larger than the rest of your text.
- You can make the letters any color you want before creating an outline around them. Just highlight the word or phrase, and then select a color from the «Font» panel at the top of Word.
-
2
Highlight the text you want to outline. Just click and drag the mouse around the text to select it.
Advertisement
-
3
Click the Text Effects and Typography tool. This is the «A» surrounded by a blue glowing outline in the «Font» panel at the top of Word.
- If you don’t see this icon, click the Home tab at the top of Word.
-
4
Select the Outline menu. Now you’ll see all of the options you can use to create an outline around the selected letters.
-
5
Select an outline color. To choose the color of the line that surrounds your text, choose one of the colors displayed on the menu, or select More Outline Colors… to select a custom color.
-
6
Use the Weight menu to select the thickness of the outline. The larger the number, the thicker the outline around the letters.
- If you go too thick, you might make the text unreadable. You can always undo the last action in word by pressing Control + Z (PC) or Command + Z (Mac).
-
7
Use the Dashes menu to stylize the outline. If you’d rather have a dotted, dashed, or otherwise stylized line around your word or phrase instead of a solid line, you can select any of the options in this menu.


Advertisement
-
1
Click the Insert tab at the top of Word. WordArt is a tool that can help you create all types of vibrant text designs, including color outlines. You’ll find it on the Insert tab.
-
2
Click the WordArt menu. It’s the icon of a tiled blue «A» on the Insert tab in Word. A menu with several text styles will appear.[1]
-
3
Select an outline style. Not all WordArt styles have outlines, but several do. Don’t worry about the colors you see in the sample—you’ll be able to change those if you don’t like them. Once you click a style, you’ll see some sample text appear on the page.
-
4
Replace the sample text with your own. The text you type will appear in the selected outline style.
-
5
Select the Shape Format tab. It’ll appear at the top of the screen while you’re editing WordArt. This tab should already be active, but if it’s not, click it now.
-
6
Click the small arrow at the bottom-right corner of the WordArt Styles panel. It’s at the top of Word. This expands the «Format Shape» panel on the right side of Word.
-
7
Click the Text Fill and Outline icon. It’s the «A» with a line under it in the right panel.
-
8
Click Text Fill to select a color. When you choose this option, you’ll be able to choose the color of the actual text—you can choose an outline color separately.
-
9
Click Text Outline to design your outline. On this menu option, you can select a color, width, and even pattern (such as dotted or dashed) for the lines that surround your letters.


Advertisement
Add New Question
-
Question
How do I outline text in Windows 10?

Under WordArt Tools, on the Format tab, in the WordArt Styles group, click Shape Outline, and then do one of the following: To add or change an outline color, click the color that you want. To choose no color, click No Outline.
Ask a Question
200 characters left
Include your email address to get a message when this question is answered.
Submit
Advertisement
Thanks for submitting a tip for review!
About This Article
Article SummaryX
1. Create or Open a Word document.
2. Type the text you want in outline.
3. Highlight the text.
4. Click on the «Text Effects» tool.
5. Click on Outline.
6. Customize the Outline effect.
Did this summary help you?
Thanks to all authors for creating a page that has been read 498,291 times.
Is this article up to date?
Word for Microsoft 365 Word 2021 Word 2019 Word 2016 Word 2013 More…Less
Change the look of your text or WordArt by changing its fill or outline, or by adding an effect, such as a shadow, reflection, or glow.
-
Select your text or WordArt.
-
On the Home tab, select
Text Effects.
-
Choose the effect you want.
For more choices, point to Outline, Shadow, Reflection, or Glow, and then select the effect to use.
 Text Effects.
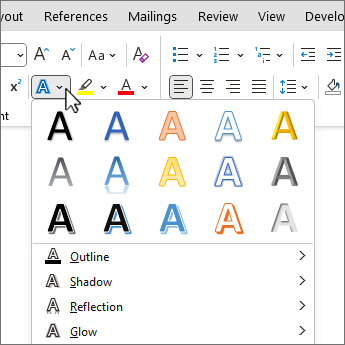
To remove the effect, select the text again, and then go to the Home tab and choose  Clear Formatting.
Need more help?
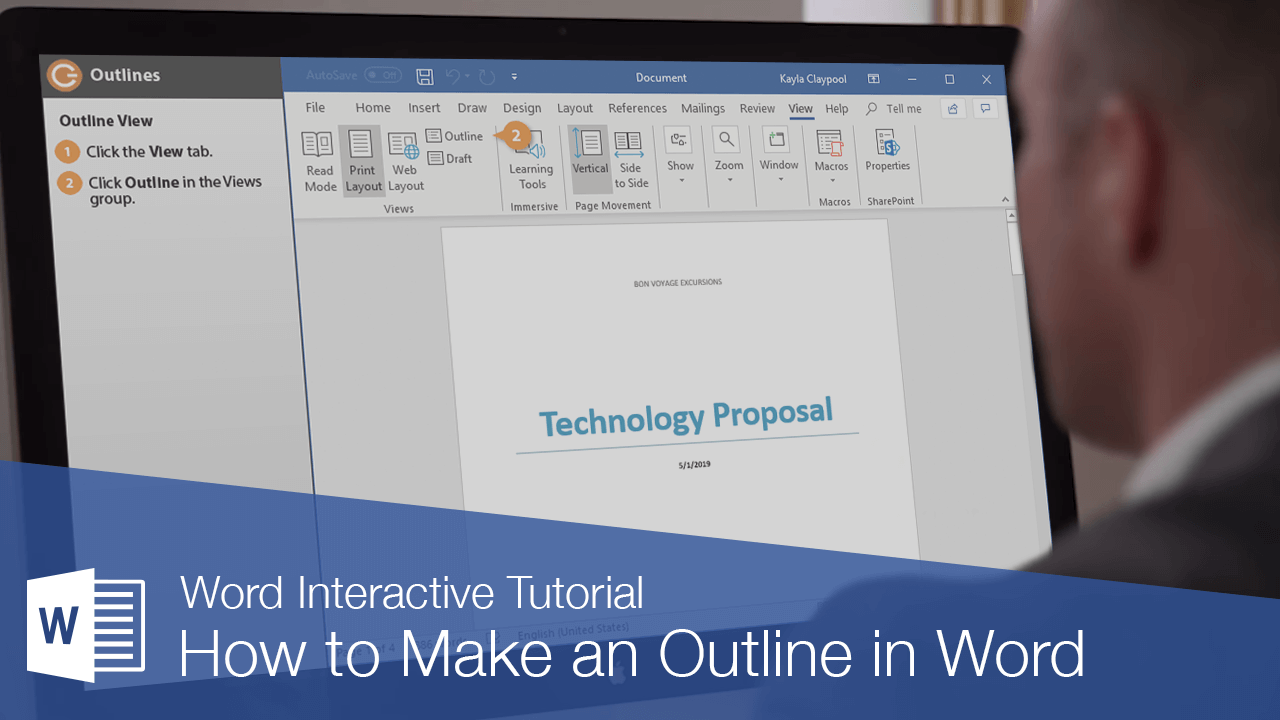
When you’re working with a long document, the Outline view helps you arrange your text. It creates an outline based on the styles you use, so it’s easy to see and organize all your headings and subheadings.
Outline View
- Click the View tab.
- Click the Outline button in the Views group.

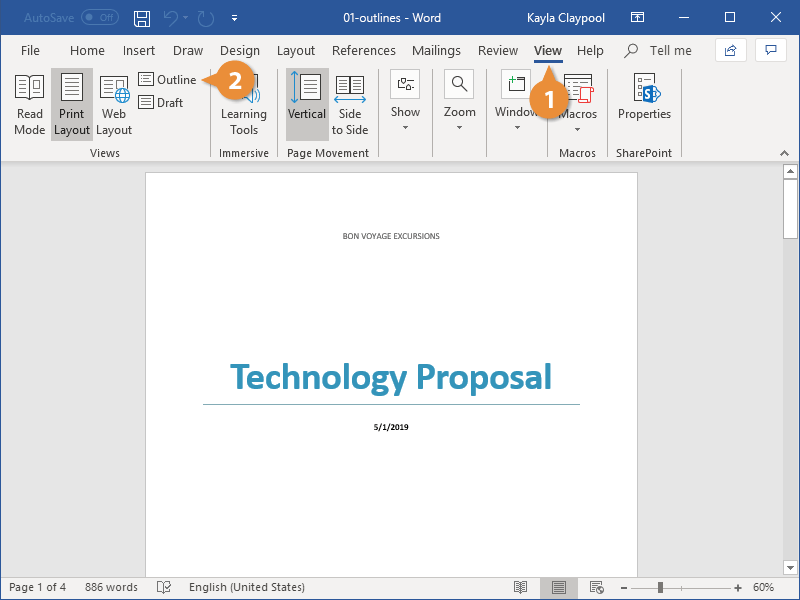
The Outline view breaks the document down so that each heading and paragraph is represented by a single line.
Any text formatted with a Heading style will automatically be set at the specified outline level, but you can adjust a line’s outline level manually using the tools on the Outlining tab that appears in Outline view.
Demote or Promote Items
Outline view makes it very easy to adjust the outline level of a heading.
- Click the item in your document that you want to promote or demote.
- Click a Promote or Demote option from the Outline Tools group.
Promoting a topic moves it to a higher outline level, moving it one spot to the left, while demoting a topic moves it to a lower outline level, one spot to the right.
You can also use the double arrow buttons to promote a topic directly to Level 1, the highest outline level, or demote it all the way to body text.
Collapse and Expand Headings
You can collapse the contents of a heading in Outline view to make it easier to see the rest of a document.
- Click the item in your document that you want to minimize.
- To collapse a section, click the Collapse button in the Outline Tools group.
- To expand a section, click the Expand button in the Outline Tools group.
That heading, along with all its subheadings and body text, is collapsed down to a single line.
That section is expanded once again, displaying all the subheadings and body text.
You can choose which outline levels are displayed by clicking the Show Level list arrow and selecting a level. Only sections of that outline level and higher will be displayed.

FREE Quick Reference
Click to Download
Free to distribute with our compliments; we hope you will consider our paid training.
From within Word:
- Click Home and, in the Paragraph group, click the arrow next to Multilevel List.
- Choose an outline style from the List Library.
- Start typing to begin the list.
- To start a new list level, press the Tab key and begin typing.
- Press Enter to return to the previous list level.
Contents
- 1 How do you make an outline on Microsoft Word?
- 2 How do you outline a document?
- 3 Is there an outline template in Microsoft Word?
- 4 How do you do an outline in Word on a Mac?
- 5 Why is my Outline not working in Word?
- 6 What are outline levels in Word?
- 7 What is a document outline?
- 8 How do you make a Powerpoint outline in Word?
- 9 How do I switch to outline?
- 10 How do you do an outline?
- 11 How do I turn on the Tab key in Word?
- 12 Where can I find proofing in Word?
- 13 Why are my bullet points not indenting?
- 14 How do you add an outline to a shape in paint?
- 15 How do I create an outline in Word 2010?
- 16 What is an outline made up of?
- 17 How do I change the outline level in Word style?
- 18 How do you insert a document into an outline?
- 19 What is HTML outline?
- 20 How do you outline in Google Docs?
How do you make an outline on Microsoft Word?
Add an outline, shadow, reflection, or glow text effect
- Select your text or WordArt.
- Click Home > Text Effects.
- Click the effect you want. For more choices, point to Outline, Shadow, Reflection, or Glow, and then click the effect you want.
How do you outline a document?
The outline detects and lists headings from your text to help organize your document.
Open a document outline
- Open a document in Google Docs.
- Select text for an outline heading.
- At the top, click Normal text.
- Click a heading style. The heading will be added to the outline.
Is there an outline template in Microsoft Word?
Beginning on the next page is an outline template (in Microsoft Word format), which is filled in with a sample to show you what a final outline looks like. Here is how to fill in your own outline: Triple click on a sentence to highlight it.
How do you do an outline in Word on a Mac?
To get started, you simply enable outline view by going to the View tab and selecting “Outline” in the Views section of the ribbon. Unlike print or web layout view in Word, outline view comes with its own set of tools in the ribbon.
Why is my Outline not working in Word?
If the Outlining tab is missing from the ribbon, see if resetting the ribbon fixes the problem. Go to File | Options | Customize Ribbon. Once you have switched to Outline view, the options on the Outlining tab should be available.
What are outline levels in Word?
The “Outline Level” really means the Heading level, or in other words, the level at which the paragraph appears in Outline View. It is the property that you see in the Format + Paragraph dialog, under Outline Level.
What is a document outline?
What are document outlines?The document outline is the structure of a document, generated by the document’s headings, form titles, table titles, and any other appropriate landmarks to map out the document.
How do you make a Powerpoint outline in Word?
Create an outline in Word
- Select a bulleted item.
- In the Outline Level box, select a heading Level 1 for slide titles, Level 2 for bullet points on that slide.
- When finished or to edit your document, select Close Outline View.
How do I switch to outline?
To enter Outline view, click the View tab, and in the Views group, click the Outline button. The document’s presentation changes to show Outline view, and the Outlining tab appears on the Ribbon, as shown. A typical outline.
How do you do an outline?
An outline is a tool used to organize written ideas about a topic or thesis into a logical order. Outlines arrange major topics, subtopics, and supporting details. Writers use outlines when writing their papers in order to know which topic to cover in what order.
How do I turn on the Tab key in Word?
Set Tab Stops
- On the Home tab, in the Paragraph group, choose Paragraph Settings.
- Click the Tabs button.
- Set the Tab stop position, choose the Alignment and Leader options, and then click Set and OK.
Where can I find proofing in Word?
Proofing Options
- StepsActions.
- Click the File Tab. A menu will open.
- At the bottom of the menu, click the Word Options button.
- Select Proofing. A dialog box will open, showing the available proofing options.
- Select the options you want to modify.
- Click OK.
Why are my bullet points not indenting?
4 Answers. For 2007 it’s: Office button → “Word Options” → “Proofing” → “AutoCorrect Options” → “AutoFormat As You Type” Check the “Set left- and first-indent with tabs and backspaces” box.
How do you add an outline to a shape in paint?
Paint’s Shape tool will frame your picture with a border on all four sides. Select the “Rectangle” shape and then draw the outline from the upper left corner of your image to the lower-right corner. You can choose the thickness of your border, as well as its color.
How do I create an outline in Word 2010?
From within Word:
- Click Home and, in the Paragraph group, click the arrow next to Multilevel List.
- Choose an outline style from the List Library.
- Start typing to begin the list.
- To start a new list level, press the Tab key and begin typing.
- Press Enter to return to the previous list level.
What is an outline made up of?
An outline is a list of items organized according to a consistent principle. Each item may be divided into additional sub-items or sub-points. A preparation outline consists of three main sections, which includes the introduction, body, and conclusion. It also includes the title of the speech.
How do I change the outline level in Word style?
Right-click the paragraph that you want to change and choose Paragraph from the context menu. On the Indents and Spacing tab, specify the desired “Outline level.” Click OK.
How do you insert a document into an outline?
Google Docs will automatically add headings to an outline, but you can also add them manually.
- Open a document in the Google Docs app.
- Tap Edit .
- Select the text you want to make a heading.
- Tap Format .
- Tap TEXT. Style.
- Tap a heading style.
- Tap Done. . The heading will be added to the outline.
What is HTML outline?
The outline for an HTML document shows the structure of the content on the page. This is useful for user agents, who can use the outline to create, for example, a table of contents for the document. This can then be used by screen readers to help people better navigate the page.
How do you outline in Google Docs?
Head to Google Docs, sign in to your account, and open your document. You can display the Document Outline in just two clicks. Click View > Show Document Outline from the menu to put a checkmark next to it. You’ll then see the Outline display on the left side of your document.
Microsoft’s word processor is a leading application worldwide, with a wide range of functions that go far beyond writing documents, so it is always convenient to have a good understanding of all its ins and outs, something that is not easy. Within its characteristics, it has the possibility of making diagrams, in order to keep all the content of a document organized and simplified.

By default, Word takes care of using “Print Layout” when presenting the document. From this option, both the size of the paper and its margins are shown, as well as information about the font. It also has the “Reading Mode”, the “Web Design”, the “Draft” and “Outline”. The latter is the one that we will see in depth in this article.
What is the use of making an outline in Word
The outline is a very useful feature with which to create extensive tutorials, business documents or even books. With this we can summarize the content of a writing to make it more understandable and less extensive, so it is a highly recommended feature for both professionals and students. Outlines are made up of topics and subtopics. The themes are the main ideas; subtopics describe details.
In order to carry it out, it is necessary to have a clear idea of the type we want to carry out, since each idea requires its own design, although the objective will always be the same: to locate the main ideas that will be explained later in the text that we want to present.
The Outline view of Word is capable of presenting a document in a unique way taking advantage of the different heading styles that the word processor has, with which to be able to group and organize different thoughts, sections or ideas in a hierarchical way.
This tool makes it easy for us to randomly reproduce topics, subtopics, and text combinations to help us organize ourselves better. That is why whatever our level of creativity and knowledge we can use them to create lists or work on different projects. This feature works the same in all modern versions of Word : 2010, 2013, 2016, 2019 and is also included in the Microsoft 365 package.
Use Outline view
If we are working with a large document, the so-called Outline view can help us keep our text well organized. Thanks to this function we can create schemes based on different styles with which to keep all titles and subtitles distributed, making them easier to read.
To begin, just click on the “View” tab on the toolbar, where we will find the “Scheme” button within the “Views” group. By clicking on it we will see how the document is divided in an organized way so that each title and paragraph are represented by a single line.

Unlike what happens in other sections of the “Views” group such as “Print Design” or “Web Design”, the “Scheme” comes with its own set of characteristics within the ribbon itself, allowing us to work with different levels and the ability to embed any document. Thus, any text with a title style format will appear automatically at the specified outline level, and can be graduated manually.
Outline tools
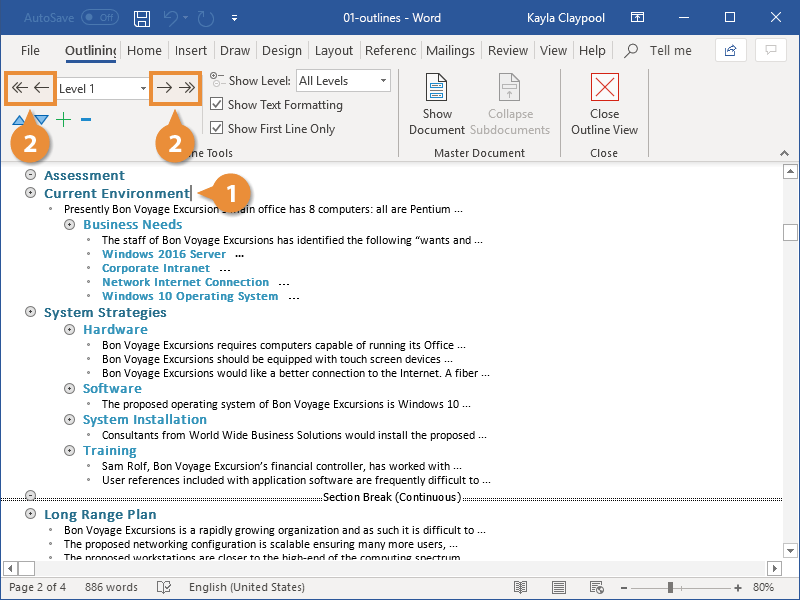
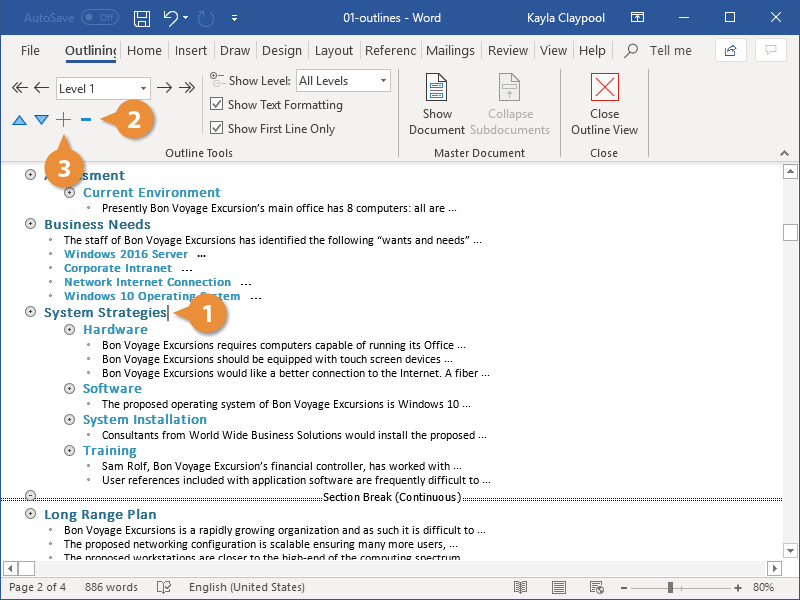
When you click on the Scheme button, your own ribbon appears. By default, it begins with Level 1 in the “Schematic tools” section, from where we can always know which level we are using. If we click on the drop-down we can change the current level from 1 to 9. The main topics are formatted in Title 1, the subtopics in Title 2, and so on. On each side of the level we find arrows. The simple arrow on the right allows to decrease a level or with the double date to demote a level as body text.

Just below we have the buttons that will allow us to organize the different elements. With down and up arrows it will be possible to move them in the direction we need so that we can rearrange them without problem. With the plus (+) and minus (-) signs we can expand and group levels so that the scheme is not too long, so that we can expand it when we need them.

On the right we find the “Show level” tool, from which, as its name indicates, we can see the different levels , hiding the rest. For example, if we choose level 5, we will see 1, 2, 3, 4 and 5, with the rest being hidden, from 6 to 9. We also find the option to “Show text format”, which we can uncheck if we prefer to see the scheme with a simpler appearance. Also, we can check the box “Show only the first line”, in case we have long elements within the different levels and we only want to see the first line.

Master documents
From this second section that we find on the right side, we can include subdocuments by clicking on the “Show documents” button so that we can expand the available options ribbon.

If we click on “Create” to obtain a new document or on “Insert” to add a saved file. Once added, all you have to do is press the “Collapse” subdocuments button to group all its content and show only one link to it. Later the name of the button will change to “Expand subdocuments” to carry out the opposite action that allows us to see all the content.
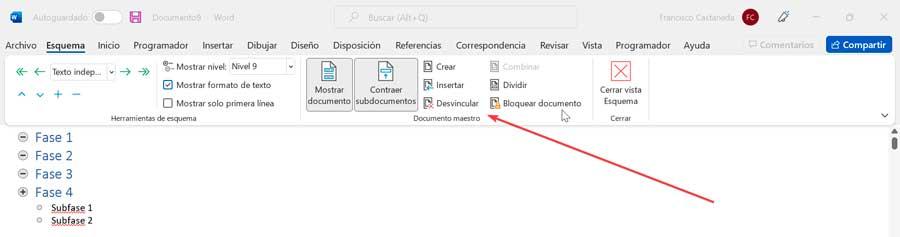
Among the rest of the options we find “Unlink”, which is responsible for removing the link from the subdocument to copy the text in the original document. With “Combine” we can merge the content of each subdocument in the first subdocument. We also find the option to “Divide”, to be able to separate the content of a subdocument in several documents. Finally, the option to “Lock document” will help us to prevent changes from being made.
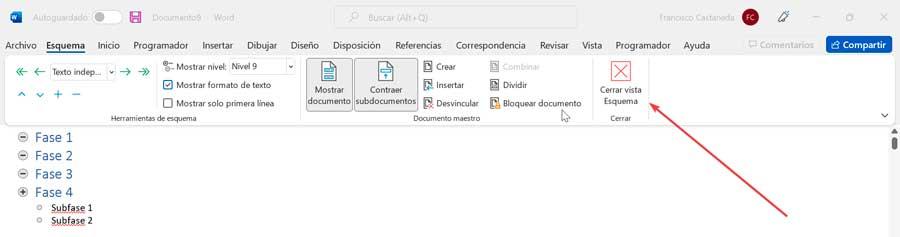
As soon as we want to exit the outline view, we can close it at any time by pressing the Close Outline view button, which we find within the “Close” section in the last block on the right. By doing this we can see the default view of the document at any time.
You can create outlines in Word if you want to have organized content. Word is a tool that we all know how to handle but it has so many functions and possibilities that we don’t always know how to make the most of it. Therefore, today we explain different ways to create an outline in Word depending on the final result you are looking for or the time you want.
You can create the schematic from any version of Word and we will explain step by step how to do it from the specific tool but also by inserting shapes and keys or downloading specific templates if you don’t have time for all of the above.
How to create an outline step by step
The steps will depend on the version of Word you have, if it is more or less modern, the menu that appears on the screen or the place where we can find the scheme to add it to the text or to the Word document may vary. We will generally find it in the “View” tab, at the top.
- Open Word
- Go to the top menu and open the “View” section
- In the first option, we will find the “Views” section
- Tap on “Scheme”
- The schema will be created automatically
Keep in mind that it is advisable that you do the steps before writing text in the document since later you can write it following the levels you want.
Create levels
Next, we write the first title or point of our document and Word will automatically assign it as the Heading 1 style and the outline level 1 . From there, we can write the rest of the points in our document and assign the same level to them ourselves using the level buttons that we find within the outline tools. Now, we just have to repeat this with the rest of the points that we want to add in our scheme and assign the level we want.
We will only have to add the texts according to the different levels. That is to say … Choose level 2 and you will see that the scheme is automatically transferred to the corresponding category, automatically forming the scheme and choosing the styles. To do this, we can use the title styles that Word itself offers, Title 1, Title 2, Title 3, etc. , since each one has its own level assigned to the scheme or define ourselves the styles that we want and later assign them the appropriate level according to the structure we give to the document. It would look as you can see in the example screenshot.
View by levels
In the section “Scheme tools” you can choose how you want to see it:
- Show level (all levels, level 1, level 2, level 3…)
- Show text format: Yes or no
- Show sun the first line: Yes or no
Here you can also choose the levels , go up or down …
From the outline mode in Word, following the previous steps, we have at our disposal the tools that allow us to increase or decrease the level of any point or title in our document, although we can also select it directly from the drop-down. From there we can also raise or lower titles by the structure of the outline in Word , expand or contract the levels below a title, etc.
Concept map or schematic with shapes
Following the previous steps you will create a simple diagram with a series of information but not the classic conceptual map that allows you to draw arrows between one box or another and that you have surely seen at some time. If you want to create an outline like this in Word, the steps are different. Of course, it will take us a little longer, although the result will be much more striking and attractive.
- Open Word
- Go to the “Insert” section
- Choose the option “Forms” and a drop-down will open
- Choose a shape that you like … be it square, rectangle, oval
- Long press , create the shape and choose the size you want
- Customize background color, shape outline or shape fill
- Right click with the mouse on the shape
- Choose “Add text” from the drop-down menu
- Choose the text format you want, the size, the font
Once we have created the first box, we simply have to do the same over and over again until we create the rectangles you need. You can press Control + C and Control + V to copy the same rectangle and use it elsewhere. It is enough to change the text inside to have another identical box, with the same font, and we will go faster. You can change the color of each box as you need, the format, the letter, the text …
You just have to do the same until you create all the elements, until you have all the rectangles or box of the scheme in Word and have all the information.
When we have finished, we follow the corresponding steps to add the keys that give the final appearance to the schema as we imagine it:
- Open Word
- Tap on “Insert”
- Choose the Forms section
- Choose the key you want to join the squares
- Insert it
- Resize to fit levels
The schema with the data you want would be ready . A “tip” you can follow is to always save the design and you will only have to modify the colors or the text when you need to create an outline in Word of another subject or other content. This way you won’t have to repeat the structure every time.
Use templates
One of the most convenient ways to make outlines in Word is to use a template that does it for you. You will only have to look for a template website and search for “scheme2 or find a category that has this type of design. The advantage of templates is that the diagrams are much more elaborate than if you made the diagram following the previous steps. You will have a much more perfectionist design and it will take half the time to get what you want. In addition, the templates are usually a pack in which we find several designs with the same use of colors, the same font and a uniformity to create a dossier of what we need. You can download many free templates.
One of the best websites to download templates is Smile Template and it allows you to search by keyword so you just have to write “scheme” or “sketch drawing” or “diagram” to find designs that fit what you need. Once you have chosen one, you just have to choose “Download” and open the file on your computer from Word to start editing what you need.

You may create outlines in Word if you want to have the content organized. Word is a tool that we all know how to handle but it has so many functions and possibilities that we don’t always know how to make the most of it. Therefore, today we explain different ways to create an outline in Word depending on the final result you are looking for or the time you want.
You can create the schemato from any version of Word and we explain step by step how to do it from the specific tool but also by inserting shapes and keys or downloading specific templates if you don’t have time for all of the above.
How to create an outline step by step
The steps will depend on the version of Word you have, if it is more or less modern, the menu that appears on the screen or the place where we can find the scheme to add it to the text or to the Word document may vary. We will usually find it in the “View” tab at the top.
- Open Word
- Go to the top menu and open the “View” section
- In the first option, we will find the “Views” section
- Tap on “Scheme”
- The schema will be created automatically

Keep in mind that it is advisable that you do the steps before writing text in the document since later you can write it following the levels you want.
Create levels
Next, we write the first title or point of our document and Word will automatically assign it as Heading 1 style and outline level 1. From there, we can write the rest of the points in our document and assign the same level to them ourselves through the level buttons that we find within the outline tools. Now, we just have to repeat this same thing with the rest of the points that we want to add in our scheme and assign it the level we want.

We will only have to add the texts according to the different levels. That is to say … Choose level 2 and you will see that the scheme is automatically transferred to the corresponding category, automatically forming the scheme and choosing the styles. For this, we can use the title styles that Word itself offers, Title 1, Title 2, Title 3, etc, since each one has its own level assigned to the scheme or define the styles ourselves that we want and later assign them the appropriate level according to the structure that we give to the document. It would look as you can see in the example screenshot.
View by levels
In the “Schematic tools” section you can choose how you want to see it:
- Show level (all levels, level 1, level 2, level 3…)
- Show text format: Yes or no
- Show sun the first line: Yes or no
Here too you can choose the levels, go up or down …
From the outline mode in Word, following the previous steps, we have at our disposal the tools that allow us increase or decrease the level of any point or title of our document, although we can also select it directly from the drop-down. From there we can also raise or lower titles by the structure of the outline in Word, expand or collapse levels below a title, etc.
Concept map or schematic with shapes
Following the previous steps you will create a simple diagram with a series of information but not the classic conceptual map that allows you to go drawing arrows between a square or another and that surely you have seen sometime. If you want to create an outline like this in Word, the steps are different. Of course, it will take us a little longer, although the result will be much more striking and attractive.
- Open Word
- Go to the “Insert” section
- Choose the option “Forms” and a drop-down will open
- Choose a shape that you like … be it square, rectangle, oval
- Hold down, create the shape and choose the size you want
- Customize background color, shape outline or shape fill
- Right click with the mouse on the shape
- Choose “Add text” from the drop-down menu
- Choose the format of text you want, the size, the font

Once we have created the first box, we simply have to do the same over and over again until we create the rectangles you need. You may press Control + C and Control + V to copy the same rectangle and use it elsewhere. It is enough to change the text inside to have another identical box, with the same font, and we will go faster. You can change the color of each box as you need, the format, the letter, the text …
Just do the same until all the elements are created, until you have all the rectangles or box of the scheme in Word and have all the information.
When we are done, we follow the corresponding steps to add the keys that give the final appearance to the schema as we imagine it:
- Open Word
- Tap on “Insert”
- Choose the Forms section
- Choose the key you want to join the squares
- Insert it
- Resize to fit levels
 The scheme would be ready with the data you want. One “tip” you can follow is to always save the design and you will only have to modify the colors or the text when you need to create an outline in Word of another subject or other content. This way you won’t have to repeat the structure every time.

Use templates
One of the most convenient ways to make outlines in Word is to use a template that does it for you. You will only have to look for a template website and search for “scheme2 or find a category that has this type of design. The advantage of templates is that the schematics are much more elaborate that if you do the scheme following the previous steps. You will have a much more perfectionist design and it will take half the time to get what you want. In addition, the templates are usually a pack in which we find several designs with the same use of colors, the same font and a uniformity to create a dossier of what we need. You can download many free templates.

One of the best websites for download templates is Smile Template and allows you to search by keyword so just write “scheme” or “drawing scheme” or “diagram” to find designs that fit what you need. Once you have chosen one, you just have to choose “Download” and open the file on your computer from Word to start editing what you need.
The post All the tricks to make outlines in Word appeared first on ADSLZone.
Microsoft’s word processor is a leading application worldwide, with a wide range of functions that go far beyond writing documents, so it is always convenient to have a good understanding of all its ins and outs, something that is not easy. Within its characteristics, it has the possibility of making diagrams, in order to keep all the content of a document organized and simplified.
By default, Word takes care of using “Print Layout” when presenting the document. From this option, both the size of the paper and its margins are shown, as well as information about the font. It also has the “Reading Mode”, the “Web Design”, the “Draft” and “Outline”. The latter is the one that we will see in depth in this article.
What is the use of making an outline in Word
The outline is a very useful feature with which to create extensive tutorials, business documents or even books. With this we can summarize the content of a writing to make it more understandable and less extensive, making it a highly recommended feature for both professionals and students. Outlines are made up of topics and subtopics. The themes are the main ideas; subtopics describe details.
In order to carry it out, it is necessary to have a clear idea of the type that we want to carry out, since each idea requires its own design, although the objective will always be the same: to locate the main ideas that are going to be explained later in the text that we want to present.
The Outline view of Word is capable of presenting a document in a unique way taking advantage of the different heading styles that the word processor has, with which to be able to group and organize different thoughts, sections or ideas in a hierarchical way.
This tool makes it easy for us to randomly reproduce topics, subtopics, and text combinations to help us organize ourselves better. That is why whatever our level of creativity and knowledge we can use them to create lists or work on different projects. This feature works the same on all modern versions of Word: 2010, 2013, 2016, 2019 and also included in the Microsoft 365 package.
Use Outline view
If we are working with a long document, the so-called Outline view it can help us keep our text well organized. Thanks to this function we can create schemes based on different styles with which to keep all titles and subtitles distributed, making them easier to read.
To begin, just click on the “View” tab on the toolbar, where we will find the “Scheme” button within the “Views” group. By clicking on it we will see how the document is divided in an organized way so that each title and paragraph are represented by a single line.
Unlike what happens in other sections of the “Views” group such as “Print Design” or “Web Design”, the “Scheme” comes with its own set of characteristics within the ribbon itself, allowing us to work with different levels and the ability to embed any document. Thus, any text with a title style format will appear automatically at the specified outline level, and can be graduated manually.
Outline tools
When you click on the Scheme button, your own ribbon appears. By default it starts with the Level 1 within the section “Schematic tools”, from where we can always know what level we are using. If we click on the drop-down we can change the current level from 1 to 9. The main topics are formatted in Title 1, the subtopics in Title 2, and so on. On each side of the level we find arrows. The simple arrow on the right allows to decrease a level or with the double date to demote a level as body text.
Just below we have the buttons that will allow us to organize the different elements. With down and up arrows it will be possible to move them in the direction we need so that we can rearrange them without problem. With the plus (+) and minus (-) signs we can expand and group levels so that the scheme is not too long, so that we can expand it when we need them.
On the right we find the «Show level» tool, from which, as its name indicates, we can see the different levels, hiding the rest. For example, if we choose level 5, we will see 1, 2, 3, 4 and 5, with the rest being hidden, from 6 to 9. We also find the option to “Show text format”, which we can uncheck if we prefer to see the scheme with a simpler appearance. Also, we can check the box «Show only the first line», in case we have long elements within the different levels and we only want to see the first line.
Master documents
From this second section that we find on the right side we can include subdocuments by clicking on the button «Show documents» so we can expand the available options ribbon.
If we click on «Create» to obtain a new document or on «Insert» to add a saved file. Once added, all you have to do is press the button «Collapse» subdocuments to group all its content and show only one link to it. Later the name of the button will change to «Expand subdocuments» to carry out the opposite action that allows us to see all the content.
Among the rest of the options we find “Unlink”, which is responsible for removing the link from the subdocument to copy the text into the original document. With “Combine” we can merge the content of each subdocument in the first subdocument. We also find the option to “Divide”, to be able to separate the content of a subdocument into several documents. Finally, the “Lock document” option will help us to prevent changes from being made.
As soon as we want to exit the outline view, we can close it at any time by pressing the Close Outline view button, which we find within the “Close” section in the last block on the right. By doing this we can see the default view of the document at any time.

It is no secret to anyone that Word provides a remarkable number of possibilities when create, edit, customize or manage any digital document. Since, it is endowed with various functions that allow to structure the writings in the best possible way.
That is why, as well as containing different configuration options around documents, it also facilitates the inclusion of various elements that manage to enrich them. Just like are the schemes, for example.
Thanks to this, Word users have the possibility to better organize the information they expose throughout their digital texts. But, for this, it is valuable take several aspects into account when creating diagrams and also know what the steps to follow in detail are.
What should I consider before making an outline in Word?
Generally speaking, an outline refers to a graphical representation that offers the simplicity of analyze, mentalize and organize all the content present in a text document. Thus, it consists of the association of ideas or concepts that are related to each other, hierarchically.
In that sense, an outline in a Word document can be defined as a summary of its content, in a finely structured way. Therefore, when preparing such an element in the program, users should take into account that, your digital writing has to be organized in levels.
Which means that, in order to effectively apply an outline in Word, the document it must be organized hierarchically so that it can be divided into main points and, in turn, into other points; depending on the exposed attachment.
So, are an ordered summary of the text and they allow to have an overview of the topic to be dealt with in the document, as well as the key points. So, they are ideal elements for organize very long documents, mainly, in order that these are much easier to handle.
For its part, it is also necessary to consider that, There are two different methods to create outlines in Microsoft Word.. Since, one of them is aimed at all those people who they choose to make an outline before writing their text. On the other hand, there is the scheme that is created to deal with the main points of an already written text.
Is it better to make an outline in Word or in an external tool and insert it as an image?
But, in addition to the fact that Word facilitates the creation of diagrams within its own platform, it certainly also allows add images to enrich documents. From there, a great doubt arises from users about What is the best solution to make a quality scheme?
Of course, before such a dilemma, it is necessary parse Word assistance as a schema creation program and, at the same time, consider whether it is better to do it through an external tool and insert it inside the text document as a simple image. Because, currently, there are many such alternatives.
In this sense, it should be noted that, everything will depend on the type of user that needs to create the scheme and its purpose. Well, if you are a basic user who only needs to organize your text and wants to do it quickly, directly and free of charge, it is recommended to use Word for it. Valuing that, it also provides quality results.
On the other hand, if the user is much more advanced and, apart from organizing the content of the document, also you need to get much more graphic, solid and professional results, Word will not be enough and will not completely convince you. So, ideally, use an external tool to get much more visual outlines.
Steps to create an outline in Microsoft Word like a pro
As we mentioned earlier, Word offers the possibility of creating two types of schemes. Firstly, it facilitates the elaboration of one of these elements without having written the text yet.
Therefore, if you prefer to make a sketch before writing your document, then do it in an orderly and simple way, the Microsoft program provides this.
Next, we teach you how to proceed in such cases:
- First of all, proceed to open blank word document in which you want to create the scheme.
- Following that, on the main page of the program, go to the ribbon and select the «View» tab.
- Now, look for the group called Views and there, click on the option that indicates “Scheme”.

- Done the above, automatically, the toolbar options will be changed And from there, you will find all the necessary choices to develop a quality scheme.
- Then, in the first bullet shown in the writing field, proceed to write the title of your document. Which, will belong to «Title 1» and «Level 1» of the scheme.
- This way, keep writing all the content you need to organize and, manually, you must assign the level (1, 2, 3, 4, etc.) and the text that corresponds to the information in question.

- In case you want to add annotations to your writing, simply proceed to display the menu of levels and click on “Separate text”.

- Finally, in the Master Document group, click on «Show document» and click «Create», in order to obtain your new subdocument from the Word outline.

Here, we explain step by step what you must do to develop an outline of a writing already done:

- Unlike the previous case, instead of accessing a blank Word document, start with open the writing written from this program.
- Later, click on the «View» tab and within the options bar available in the Views group, select the «Scheme» option.
- After that, Word will automatically generate a sketch based on all available titles or subtitles throughout the text and, hierarchically, it will order each of them at their appropriate level.
- In case your digital document does not have titles or subtitles, Word simply will show all text in bulleted form, pointing to each of the paragraphs simply (as if it were a separate text). Therefore, you will have to set the title and level for all those points and subpoints.
The best online tools to make diagrams without downloading anything
Fortunately, there are other alternative tools to Word that facilitate the realization of these schemes and, added to this, they manage to satisfy the requirements of many advanced users who need to obtain sketches at a professional level. Taking into account that, in addition to this, these tools have the advantage of operating online without the need to download software, unlike Microsoft Word.
So, to know what are some of the best alternatives out there to make quality schemes without downloading anything, we proceed to mention 5 solutions of interest currently:
Bubbl.us
Mindmup.com
Wireflow.co
Yworks.com
")
It is defined as a tool capable of creating both simple diagrams as well as complex diagrams and as you prefer, either using your predesigned templates or starting from scratch. One of its greatest advantages is that it provides an extensive catalog of shapes, arrows, icons and more elements to enrich the sketches you make.
Also, it is a totally free tool that allows exporting the results in various formats (PNG, PDF or SVG) and even offers the possibility of upload schemas to cloud services like Google Drive, OneDrive and Dropbox. With respect to its templates, we note that it provides training of all kinds, such as: Hierarchical, organic, radial, circular, tree-shaped, among others.
DiagramEditor.com

To conclude, we emphasize this other online tool that it has an intuitive and easy to use user interface, which is endowed with many functions that facilitate the schema creation processes. In addition, it is characterized by providing many customization options, so optimize each user’s experience according to their requirements.
In addition to this, it has a shape finder, through which it is faster to edit the diagrams. Apart from this, as well as the other websites, it also offers the possibility of export results to cloud services (OneDrive or Google Drive) and save them in various formats available (PNG, JPEG, SVG, PDF, XML or HTML) and even, insert it directly into your website, if that’s what you need.