
Word for Microsoft 365 Word 2021 Word 2019 Word 2016 Word 2013 Word 2010 Word 2007 More…Less
Word can automatically count the lines in a document and display the appropriate number beside each line of text. This is useful when you need to refer to specific lines in a document, such as a script or a legal contract.
By default, Word numbers every line in a document (except those in tables, footnotes, endnotes, text boxes, and headers and footers). However, you can choose which line numbers to display. For example, you can display line numbers in all or part of the document. Or you can display line numbers at intervals, such as every tenth line (10, 20, 30, and so on).
What do you want to do?
-
Add line numbers
-
Remove line numbers
Add line numbers
You can add line numbers to all or part of a document. To view line numbers, you must be in Print Layout view (click the View tab to check).
Notes:
-
A table is counted as one line.
-
A figure is counted as one line.
-
A text box is counted as one line if it is positioned inline with the text on the page. If text on the page wraps around the text box, the lines of text on the page are counted. Lines of text inside a text box are not counted.
Add line numbers to an entire document
-
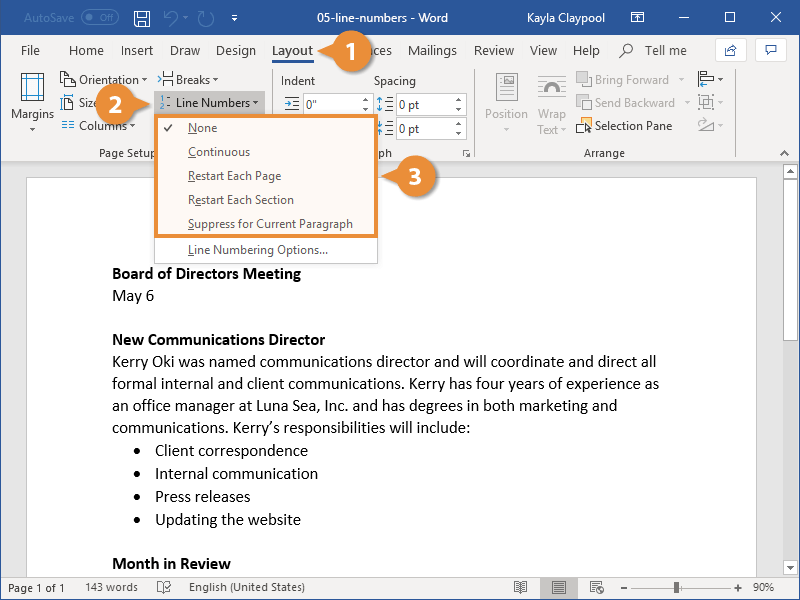
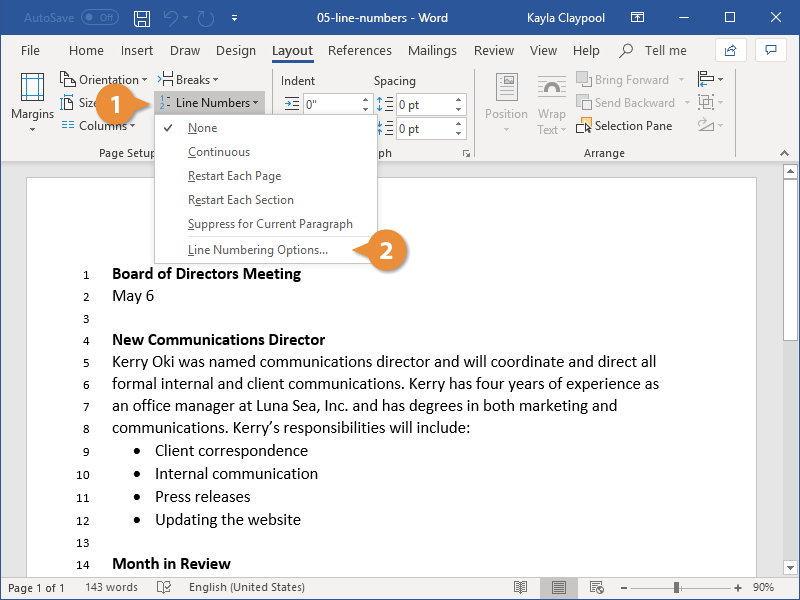
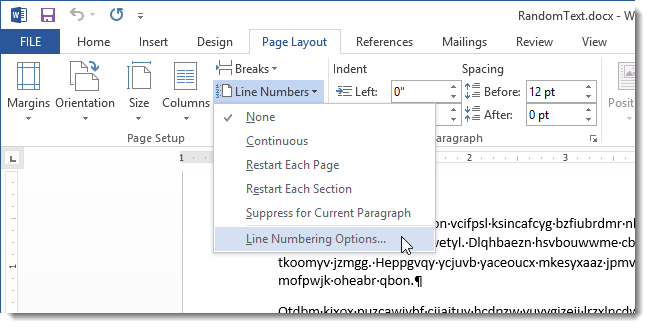
On the Layout tab, in the Page Setup group, click Line Numbers.

Note: If your document is divided into sections and you want to add line numbers to the entire document, you first need to select the document. Click Select in the Editing group on the Home tab, and then click Select All. Or press CTRL+A.
-
Do one of the following:
-
To number consecutively throughout the document, click Continuous.
-
To start with number 1 on each page, click Restart Each Page.
-
To start with number 1 after each section break, click Restart Each Section.
-
For more advanced line numbering options, such as numbering at different intervals, click Line Numbering Options, and then click Line Numbers on the Layout tab.
-
Add line numbers to a section or to multiple sections
-
Click in a section or select multiple sections.
-
On the Layout tab, in the Page Setup group, click Line Numbers.
-
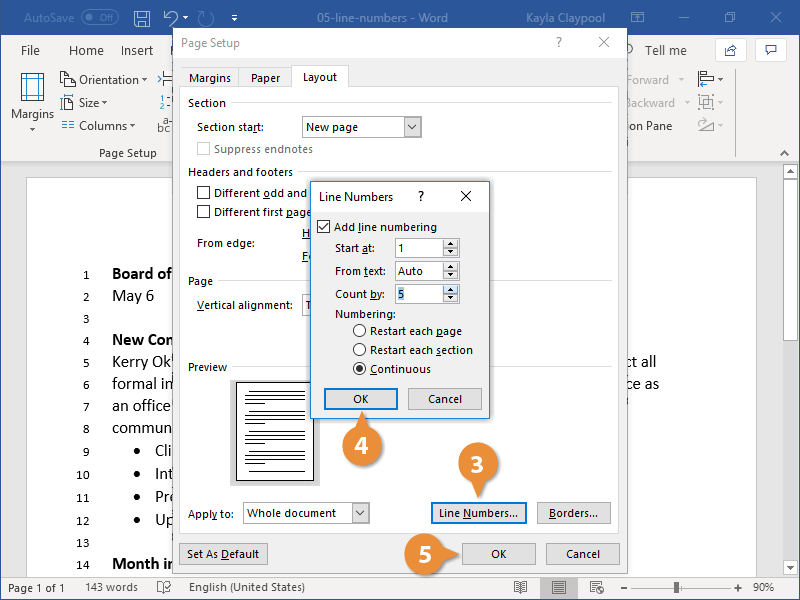
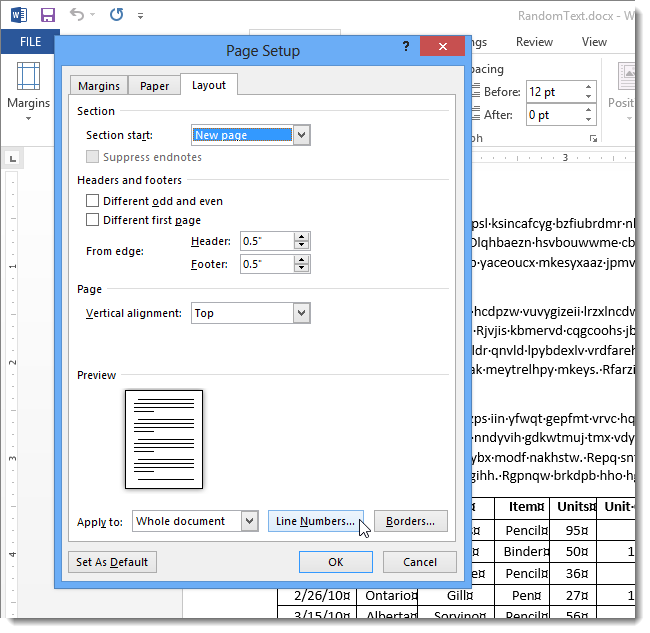
Click Line Numbering Options, and then click the Layout tab.
-
In the Apply to list, click Selected sections.
-
Click Line Numbers.
-
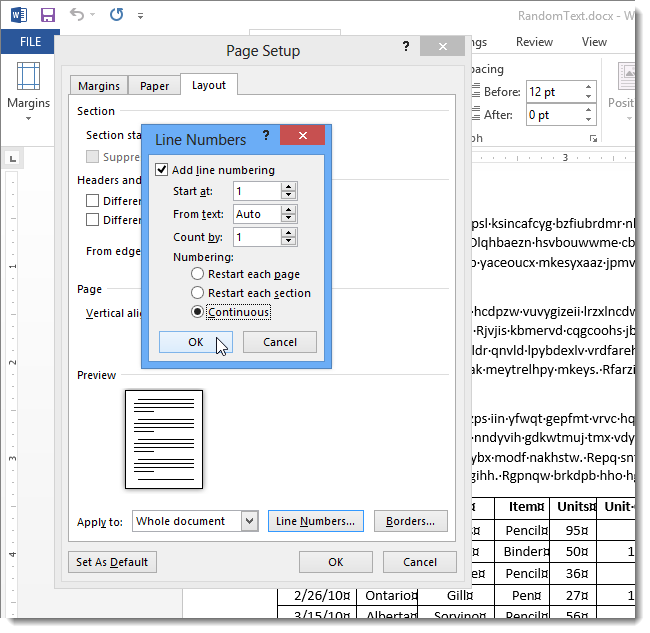
Select the Add line numbering check box, and then select the options that you want.
Top of Page
Remove line numbers
You can remove line numbers from the entire document, from a section, or from a paragraph.
-
Click in the document, or click in the section or paragraph from which you want to remove line numbers. If you want to remove line numbers from multiple sections, select the sections.
-
On the Layout tab, in the Page Setup group, click Line Numbers.
-
Do one of the following:
-
To remove line numbers from the entire document or section, click None.
-
To remove line numbers from a single paragraph, click Suppress for Current Paragraph.
-
Top of Page
What do you want to do?
-
Add line numbers
-
Remove line numbers
Add line numbers
You can add line numbers to all or part of a document. To view line numbers, you must be in Print Layout view (click the View tab to check).
Notes:
-
A table is counted as one line.
-
A figure is counted as one line.
-
A text box is counted as one line if it is positioned inline with the text on the page. If text on the page wraps around the text box, the lines of text on the page are counted. Lines of text inside a text box are not counted.
Add line numbers to an entire document
-
On the Page Layout tab, in the Page Setup group, click Line Numbers.
Note: If your document is divided into sections and you want to add line numbers to the entire document, you first need to select the document. Click Select in the Editing group on the Home tab, and then click Select All. Or press CTRL+A.
-
Do one of the following:
-
To number consecutively throughout the document, click Continuous.
-
To start with number 1 on each page, click Restart Each Page.
-
To start with number 1 after each section break, click Restart Each Section.
-
For more advanced line numbering options, such as numbering at different intervals, click Line Numbering Options, and then click Line Numbers on the Layout tab.
-

Add line numbers to a section or to multiple sections
-
Click in a section or select multiple sections.
-
On the Page Layout tab, in the Page Setup group, click Line Numbers.
-
Click Line Numbering Options, and then click the Layout tab.
-
In the Apply to list, click Selected sections.
-
Click Line Numbers.
-
Select the Add line numbering check box, and then select the options that you want.
Top of Page
Remove line numbers
You can remove line numbers from the entire document, from a section, or from a paragraph.
-
Click in the document, or click in the section or paragraph from which you want to remove line numbers. If you want to remove line numbers from multiple sections, select the sections.
-
On the Page Layout tab, in the Page Setup group, click Line Numbers.
-
Do one of the following:
-
To remove line numbers from the entire document or section, click None.
-
To remove line numbers from a single paragraph, click Suppress for Current Paragraph.
-
Top of Page
Need more help?
Organize your documents by numbering them
What to Know
- Select Layout > Page Setup > Line Numbers > choose option > select Apply to drop-down > Selected sections.
- Next, select Line Numbers > Add line numbering > OK.
This article explains how to add line numbers to documents in Word for Microsoft 365, Word 2019, 2016, 2013, 2010, and 2007.
How to Add Line Numbers to a Word Document
To include line numbers in a document:
-
Go to Layout > Page Setup > Line Numbers.
If the document is divided into sections and you want to add line numbers to the entire document, press Ctrl+A to select the entire document.
-
Choose one of the following options:
- Continuous: Allows consecutive numbering throughout the document.
- Restart Each Page: Starts each page with the number 1.
- Restart Each Section: Starts with number 1 after each section break.
- Line Numbering Options: Allows more advanced line numbering options, for example, to number at different intervals.
-
To add line numbers to a specific section or to multiple sections, choose Line Numbering Options to open the Page Setup dialog box, then select the Layout tab.
-
Select the Apply to drop-down arrow and choose Selected sections.
-
Select Line Numbers.
-
Select the Add line numbering check box.
-
Select any other options you want, then select OK to close the window.
-
Select OK to save your changes.
All About Line Numbers
Microsoft Word automatically numbers all lines except for a select few. It counts an entire table as one line. It also skips text boxes, headers and footers, and footnotes and endnotes.
Microsoft Word does count figures as one line, as well as a text box that has inline with text wrapping applied. However, the lines of text within the text box are not counted.
You decide how Word handles line numbers. For example, apply line numbers to specific sections, or number lines in increments such as every tenth line.
Then, when it’s time to finalize the document, remove the line numbers and you’re ready to go.
Thanks for letting us know!
Get the Latest Tech News Delivered Every Day
Subscribe
Add line numbers to a section or to multiple sections
- Click in a section or select multiple sections.
- On the Layout tab, in the Page Setup group, click Line Numbers.
- Click Line Numbering Options, and then click the Layout tab.
- In the Apply to list, click Selected sections.
- Click Line Numbers.
Contents
- 1 How do I add line numbers in Word for Mac?
- 2 How do I number every 5th line in Word?
- 3 How do you get line numbers on every 5 lines?
- 4 How do we show line numbers next to the code?
- 5 How many lines are in a Word document page?
- 6 How do I change line number in Word?
- 7 How do you display line numbers in VS?
- 8 How do I find line numbers?
- 9 How do I count the number of rows in word?
- 10 Does Word Count Count Lines?
- 11 How do you insert a line across the page in word?
- 12 Why can’t I see line numbers in Word?
- 13 How do I move line numbers to the right?
- 14 How do I change line number font?
- 15 How do I show line numbers in IntelliJ?
- 16 How do I show line numbers in vim?
- 17 How do you number lines in a text file?
- 18 How do I show line numbers in less command?
- 19 How do I show line numbers in nano?
- 20 How do I copy line numbers in Word?
How do I add line numbers in Word for Mac?
In your Word document, click the “Layout” tab in the ribbon bar and then click on the “Line Numbers” button. Select “Restart Each Section” from the drop-down menu. If you want to add a new section break, click the “Breaks” button. This is just above the “Line Numbers” button in the “Layout” tab.
How do I number every 5th line in Word?
How to number every nth line in Word 2013
- On Page Layout tab, click on Line Numbers and click Line Numbering Options…
- Page Setup opens.
- Line Numbers windows opens.
- You can start numbering at a specific number (Start at), control number position (From text) and number every nth line (Count by).
How do you get line numbers on every 5 lines?
Add line numbers to a section or to multiple sections
- Click in a section or select multiple sections.
- On the Page Layout tab, in the Page Setup group, click Line Numbers.
- Click Line Numbering Options, and then click the Layout tab.
- In the Apply to list, click Selected sections.
- Click Line Numbers.
How do we show line numbers next to the code?
Display line numbers in code
- On the menu bar, choose Tools > Options. Expand the Text Editor node, and then select either the language you’re using or All Languages to turn on line numbers in all languages.
- Select the Line numbers checkbox.
How many lines are in a Word document page?
The standard number of lines per page tends to be 46.
How do I change line number in Word?
Simply follow these steps:
- Display the Home tab of the ribbon.
- Click the small icon at the bottom-right of the Styles group.
- Hover the mouse pointer over the Line Number style.
- Click on the drop-down arrow and choose the Modify option from the resulting menu.
How do you display line numbers in VS?
1 Answer. On the menu bar, choose Tools, Options. Expand the Text Editor node, and then select either the node for the language you are using, or All Languages to turn on line numbers in all languages.
How do I find line numbers?
You can find out the phone number for your local phone company by looking at your monthly bill or dialing “411” from your phone line. Verify your identity.
How do I count the number of rows in word?
Right-click on the selected table and select Table Properties from the shortcut menu. Click on the Row tab — the number of rows selected is listed at the top of the dialog box.
Does Word Count Count Lines?
Word counts the number of words in a document while you type. Word also counts pages, paragraphs, lines, and characters.
How do you insert a line across the page in word?
Press Ctrl+A to select all the text in your document. Click Home > Shrink Font one or more times. As you click Shrink Font, Word decreases the size of every font in your document.
Why can’t I see line numbers in Word?
To use line numbers in Word, you must be in Print Layout view. Go to the View tab and click Print Layout in the Views section of the ribbon. Next, insert the numbers by heading to the Layout tab. Click the Line Numbers button in the Page Setup section of the ribbon.
How do I move line numbers to the right?
Remember though, it is not section alignment alone. For line numbers to appear in the right margin you must set the section alignment to right to left “and” have a right to left script language enabled.
How do I change line number font?
Process
- Go to the Home tab of the Ribbon after enabling line numbering.
- Under Styles, click the Dialog Box Launcher arrow to open the Styles pane.
- In the Styles pane, click Options.
- Under “Select styles to show” in the Options window, select “All styles”.
- Click OK to exit out of the Options window.
How do I show line numbers in IntelliJ?
IntelliJ IDEA 15
- File > Settings… > Editor > General > Appearance > Show line numbers.
- Hit Shift twice > write “line numbers” > Show Line Numbers (that one that has the toggle) > change the toggle to ON.
How do I show line numbers in vim?
How to display line number in vim
- Press the ESC key.
- At the : prompt type the following command to run on line numbers: set number.
- To turn off line numbering, type the following command at the : prompt again: set nonumber.
- One can set relative line numbers by typing: :set relativenumber.
How do you number lines in a text file?
4 Answers. In notepad , you can type Ctrl + g to view current line number. It also at bottom-right corner of status-bar.
How do I show line numbers in less command?
All you have to do is pass either -N or –LINE-NUMBERS option to the less command. This option forces less to show a line number at the beginning of each line in the screen.
How do I show line numbers in nano?
You can ask nano to temporarily turn on line numbers by pressing Alt-C (meaning “Hold down the Alt key and the C key simultaneously”). This will show line and column numbers near the bottom of nano’s window.
How do I copy line numbers in Word?
Assuming there is a consistent amount of space between the margin and the first desired word on each line, what you could do after pasting is to use a block cut (Shift-Alt and drag the cursor over the desired area, followed by Ctrl-X), then select all the lines, delete what’s left, then paste again – voila! the numbers
Adding line numbers to documents is the easiest way to guide users through complex, lengthy documents. For example, instead of pointing out that some relevant information is near the middle of the third paragraph, you can instead refer to the specific line, making it easier to find. Line numbers are especially useful for referendums and legal documents.
Add Line Numbers
When you add line numbers in Word, the numbers are displayed in the left margin of the document. If there are columns in the document, the numbers appear to the left of each column.
- Click the Layout tab on the ribbon.
- Click the Line Numbers button.
A menu appears with a few options for adding line numbers.
- None: Removes line numbering in the document.
- Continuous: Adds continuous line numbering throughout the document.
- Restart Each Page: Restarts numbering at the beginning of every page.
- Restart Each Section: Restarts numbering at the beginning of every section.
- Suppress for Current Section: Removes line numbering for the current section.
- Select a line numbering option.

Line numbers are added to the document.
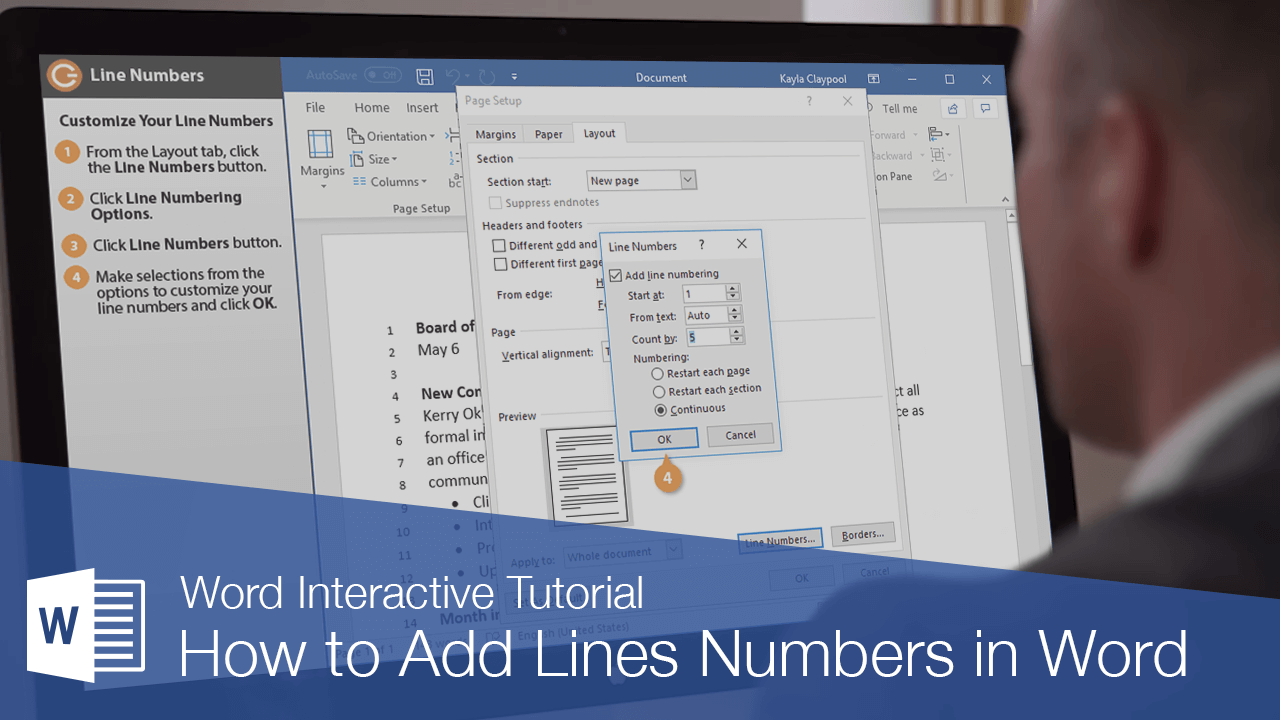
Customize Line Numbers
Once you’ve added line numbers to your document, you can adjust how they behave and appear.
- On the Layout tab, click the Line Numbers button.
- Select Line Numbering Options.
The Page Setup dialog box opens.
- Click the Line Numbers button.
An additional dialog box opens, with line numbering options. You can toggle line numbering entirely here, or customize a few line numbering options.
- Start at: You can choose to start line numbering at any number.
- From text: This field controls how far from the text the line numbers will appear.
- Count by: Instead of line numbers appearing on every line, you can set an interval so that line numbers are only displayed every few lines.
- Change the options to customize your line numbers and click OK.
- Click OK to close the Page Setup dialog box.
The line number options are updated to the settings you chose.

FREE Quick Reference
Click to Download
Free to distribute with our compliments; we hope you will consider our paid training.
Home > Microsoft > How to Add Line Numbers in Word? A Step-by-Step Guide
Note: (This guide on how to add line numbers in Word is suitable for all Microsoft Word versions, including Office 365)
Microsoft Word is used for various purposes, from typing in and storing scripts to curating documents for legal procedures. Microsoft Word reigns above all the other documentation software because of the features and options it provides. One such feature enables you to keep track of the number of lines in your document.
Microsoft Word keeps track of the number of characters and words automatically and shows them to the user, but it does not show the line numbers. If you are curating a document in Word and want to keep track of the number of lines you’ve written, you can easily toggle and add line numbers to each line and see your progress.
In this article, I will tell you how to add line numbers in Word in an easy way.
You’ll Learn:
- Why Add Line Numbers in Word?
- How to Add Line Numbers in Word?
- Add Line Numbers to the Whole Document
- Other Options While Adding Line Numbers
- Line Numbering Options
- Add Line Numbers to Particular Sections of the Document
- How to Remove Line Numbers in Word?

Related Reads:
How to Insert Watermark in Word? 3 Easy Ways
How to Find and Replace in Word? 7 Simple Methods
How to Curve Text in Word? 2 Easy Ways
Why Add Line Numbers in Word?
Before we see how to add line numbers in Word, let us see what line numbers are and why they are important in certain cases.
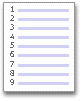
Line numbers in Word are just like page numbers that refer to the lines on a page, excluding tables, headers, footers, charts, footnotes, and text boxes. They appear beside each line of the page and do not just appear for lines with text.

When you are curating legal or high-priority documents that contain a large amount of information, line numbers are used to point to the specific line of the document for any referral purposes. It also helps the writer to stay conscious of their content and not to tramp over the set number of lines.
How to Add Line Numbers in Word?
In Word, you can:
- Choose to either display the line numbers from the start of the content,
- Start from in between the text, or
- Even choose to display them at certain intervals.
Add Line Numbers to the Whole Document
To add line numbers to the whole document, first, make sure the layout is in the Print Layout. You can either change the layout from the View main menu ribbon or the Status bar at the bottom of the page.

- To add the line numbers, navigate to the Layout main menu ribbon. Under the Page Setup section, click on the dropdown from Line Numbers. Since we want to number each line for the whole document, click on Continuous.

- Once you click on it, all the lines on that page up to the last cursor mark will be numbered.

Other Options While Adding Line Numbers
If you want to add line numbers to the whole document continuously, you can click on the Continuous option from the Line Number dropdown. However, there are different ways you can choose to add line numbers in Word.
- To start numbering the lines on every page, click on the Restart Each Page option. That is, each page starts with line number 1.
- If your document is split into sections and you want the lines in each section to be numbered separately, click on the Restart Each Section option. That is, each section starts with line number 1.
- If you select Suppress for Current Paragraph, Word numbers each line of the document leaving the current paragraph you’re working on.
Line Numbering Options
If you want additional customization to line numbers, you can access them from the Page Setup dialog box. Under the Layout section, click on the Line Numbers button. This opens the Line Numbers dialog box where you can make personalized customizations to line numbers.

Suggested Reads:
How to Wrap Text in Word? 6 Wrap Text Options Explained
How to Track Changes in Word? A Step-by-Step Guide
How to Double Space in Word? 4 Easy Ways
Add Line Numbers to Particular Sections of the Document
Sometimes, you might not need to add line numbers to the whole document. In such a case, you can add line numbers to particular sections of the document either continuously or separately.
- To add line numbers to sections of the document, first, select the separate sections by holding the Ctrl key, left-clicking, and dragging the mouse pointer.
- Navigate to the Layout main menu ribbon. Under the Page Setup section, click on the dropdown from Line Numbers and click on the Line Numbering Options.

- In the Page Setup dialog box, click on the Layout tab.
- In the Apply to section, click on Selected Text and then click on the Line Numbers button.

- This in turn opens the Line Numbers dialog box.
- Check the Add line numbering checkbox and add the line numbering preferences of your own.

- Click OK.
- This adds the line numbers to the selected section depending on your preference.

How to Remove Line Numbers in Word?
Line numbers sure are useful. But, in some cases, after adding the line numbers, you might want to remove them. You can remove the line numbers the same way you added them.
- To remove the line numbers, go to the Layout main menu and under the dropdown from Line Numbers, click on None.

- This immediately removes the line numbers from the document.
In case you want to remove the line numbers for a particular paragraph or a section of the document, you can select that particular section and click on Suppress for Current Paragraph to remove the line number.
Note: If you have just added the line numbers, you can press Ctrl + Z to immediately undo the added line numbers.
Points to Remember
- If there is a table, a figure, an image, or a chart on the page, then Word counts them as a single line.
- The text inside the text box is counted as one line. However, if the text wraps around the text box, then the number of lines of the text is counted.
- The text inside the textbox is counted as one line.
Frequently Asked Questions
Why can’t I add line numbers in Word?
You can only add the line numbers in Word when the document is in the print layout. To change or check the layout, you can navigate to the View main menu or check them from the status bar. (martinwater.com)
How to add line numbers to the whole Word document?
To add line numbers, click on the Line Numbers drop-down from the Layout tab and click on the desired option.
How to add line numbers for particular sections of the Word document?
First, select the document and navigate to the Layout main menu. Click on Line Numbers and Line numbering options. Under the Layout tab, click on Selected Text. Finally, click on the line numbers button, check the checkbox, and click OK to add the line numbers.
Also Read:
How to Save a Word Document? 3 Useful Ways
How to Merge Word Documents? – 3 Easy Methods
How to Change Orientation of One Page in Word? 3 Easy Ways
Closing Thoughts
Line numbers are a great addition to legal documents or scripts. Adding line numbers to your document helps the reader refer to and identify specific text in complex documents.
In this article, we saw how to add line numbers in a Word document. Depending on your choice, you can choose to number the lines either continuously or restart them at each page or section. Additionally, we also saw how to remove them when not necessary.
For more high-quality guides on MS Word or Excel, please visit our free resources section.
Ready to dive deep into Excel? Click here for advanced Excel courses with in-depth training modules.
Simon Sez IT has been teaching Excel and other business software for over ten years. For a low monthly fee, you can get access to 150+ IT training courses.

Simon Calder

Chris “Simon” Calder was working as a Project Manager in IT for one of Los Angeles’ most prestigious cultural institutions, LACMA.He taught himself to use Microsoft Project from a giant textbook and hated every moment of it. Online learning was in its infancy then, but he spotted an opportunity and made an online MS Project course — the rest, as they say, is history!
Перейти к содержанию
На чтение 2 мин Опубликовано 21.07.2015
Если Вы создаёте много юридических или других документов, в которых нужно ссылаться на определённые разделы, то нумерация строк может оказаться для Вас весьма полезной. Мы покажем, как сделать ненавязчивую нумерацию строк на левом поле страницы документа Word.
Откройте файл Word и перейдите на вкладку Page Layout (Разметка страницы).
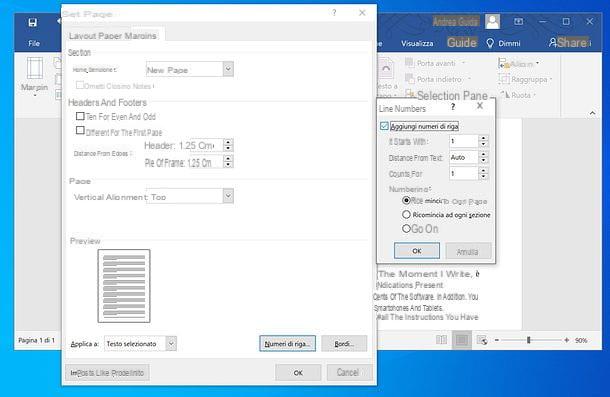
В разделе Page Setup (Параметры страницы) нажмите кнопку Line Numbers (Номера строк) и выберите из выпадающего меню пункт Line Numbering Options (Варианты нумерации строк).
В диалоговом окне Page Setup (Параметры страницы) откройте вкладку Layout (Источник бумаги). Затем кликните по Line Numbers (Нумерация строк).
Появится одноименное диалоговое окно. Поставьте галочку напротив параметра Add line numbering (Добавить нумерацию строк). Определите число, с которого начнётся нумерация, в поле Start at (Начать с). Задайте шаг нумерации в поле Count by (Шаг) и отступ в поле From text (От текста). Выберите, какой будет нумерация: начинаться заново на каждой странице (Restart each page), начинаться заново в каждом разделе (Restart each section) или непрерывной (Continuous). Нажмите ОК.
Закройте диалоговое окно Page Setup (Параметры страницы) нажатием кнопки ОК.

При необходимости можно легко изменить настройки или полностью отключить нумерацию, если она станет не нужна.
Оцените качество статьи. Нам важно ваше мнение:
How to number lines in Word on PC
If you want to learn how to number lines in Word using the classic version of the software for Windows o MacOS, all you have to do is open the document in which to add the row numbers and click on the tab layout, present in the application bar of the program, at the top left.
At this point, click on the button Line numbers and choose the setting you prefer from those available in the menu that appears: by selecting the item continue, all the lines of the document will be numbered sequentially; selecting the item Start over on each page, all the lines of the document will be numbered but the numbering will start from the beginning of each page, while with the option Start over with each section all lines of the document will be numbered, with the numbering restarting at each section of the document.
If you want, you can also adjust the advanced settings related to line numbers in Word, such as margins, alignments and the number from which to start counting lines: to do this, go to the tab layout Word, click the button Line numbers and select the item Line number options give the menu check if you press.
In the window that is proposed to you later, select the tab layout, award-winning Line numbers, at the bottom right, and adjust your preferences via the menus and fields displayed on the screen.
Then use the field It starts with to choose which number to start the numbering of the lines; the field Distance from the text to set the distance from the text that line numbers must have; the field Counts for to specify the number of rows on the basis of which the count must appear (eg if you set the value 2, you will only see the values of rows 2, 4, 6, 8 etc.); choose an option from Start over on each page, Start over with each section e Continue, to set the desired numbering type, and press the button OK, per salvare ichangementi.

How do you say? You would like number the lines of only a part of the document, without numbering everything else? Nothing could be easier: select the part of text for which you want to number the lines, using the mouse or the keyboard, go to the tab layout Word, click the button Line numbers and select the item Line number options give the menu check if you press.
In the window that is proposed to you later, select the tab layout and imposta l’opzione Selected text in the drop-down menu Apply to (lower left). Then click on the button Line numbers (bottom right), check the box Add line numbers, adjust the numbering settings (as explained a few lines above) and press the button OK, in order to save the changes.
If, on the other hand, you wish to obtain the reverse result, that is number all lines of the document, except those of a paragraph, bring the text cursor on the paragraph in question, go to the card layout Word, click the button Line numbers and select the item Omit for current paragraph from the menu that opens. The game is done!
In case of second thoughts, if you want to remove the numbers from the lines of the document, go to the card layout Word, click the button Line numbers and select the item Line number options from the menu that opens. In the next window, select the tab layout, award-winning Line numbers (bottom right), uncheck the box Add line numbers and press pulsating OK, per salvare ichangementi.
Number Word Table Rows
Your intention is not to number the lines of a Word document, but rather those of a single one table? In this case, since a function for the numbering of the rows does not include the rows that make up the tables, you have to turn to the classic numbered list.
Select, therefore, the starting column of your table (by clicking on the first cell, the one located at the top left, when the cursor becomes arrow-shaped), go to the tab Home Word and click on the button Numbered lists (the one with the icon 1,2,3). Easier than that?
How to number lines in Word Online
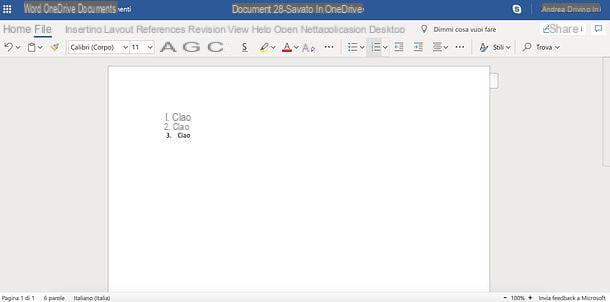
Word is also available in one online version which works directly from the browser and is completely free (you just need a Microsoft account to access it). However, it is not as complete as the desktop counterpart of the famous Microsoft software and, in fact, at least at the time of writing, it does not include the function to number the lines of documents, nor does it support it for files that have been numbered using the desktop version of Word: the only thing you can do, in short, is to resort to the classics numbered lists.
If you are satisfied with this possibility and, therefore, you want to know how to create numbered lists in Word Online, connected to the home page of the service, log in with your Microsoft account and choose whether to create a new document or open an existing one from OneDrive (Microsoft’s cloud storage service).
At this point, you just have to select the piece of text in which to number the lines, select the tab Home located at the top left and click on the button Numbered lists (the one with the icon 1,2,3). Finally, to download the document to your PC, click the button Fillet located at the top left and select the items Save with name e Download a copy give the menu check if you press.
How to number lines in Word on smartphones and tablets
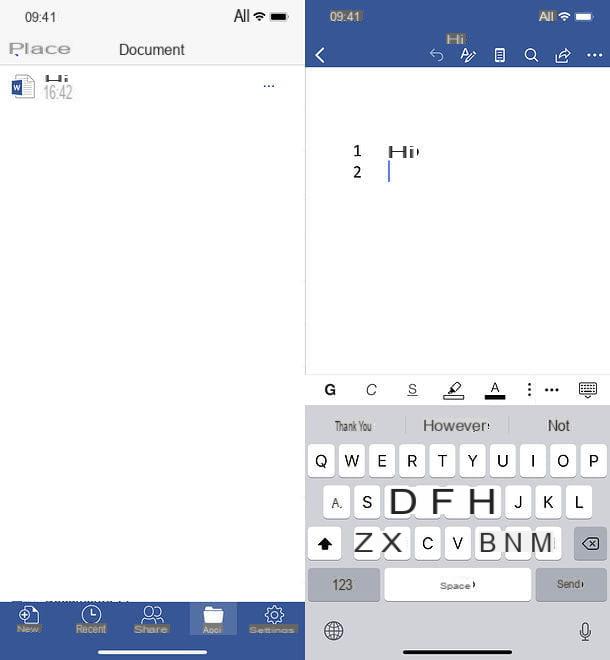
Use theapp in Word on your Android or iOS device and want to know if this allows you to number lines in documents? Unfortunately, the answer is no. However, if you create a document on your PC and number its lines (as I explained earlier), you can continue the work in the Word app, which recognizes documents with this feature and allows you to manage their numbering perfectly. (this means that if you create new lines, the numbering continues, while if you delete some, the numbering goes back).
As you surely know, the Word app is free for all devices with a size equal to or less than 10.1 «(otherwise you need to subscribe to the service Office 365, with prices starting from 7 euros / month) and allows you to upload files from all major cloud storage services. Therefore, the first step you need to take is to upload your document with the numbered lines to OneDrive (just drag it into the browser window and wait for the upload to finish) or another cloud service, such as Dropbox or Google Drive.
Once this is done, start the Word app, go to the tab apri, select the cloud service of your interest and open the document with the numbered lines you want to change. As already mentioned, the application will recognize the numbering and will allow you to modify it in a basic way (therefore without being able to adjust the advanced settings, as it is accessed in the desktop environment) but effective.
How to number lines in Word
When submitting a manuscript to a journal, for example, it is often required to include line numbers within the document to make it easier when reviewing. In this walkthrough, I will explain how to insert line numbers to a document in Microsoft Word.
1. Open a document in Word
The first thing to do is to open a document in Microsoft Word, or create a new one for that matter. In the example below, I have created a one-page document with text denoting each line.
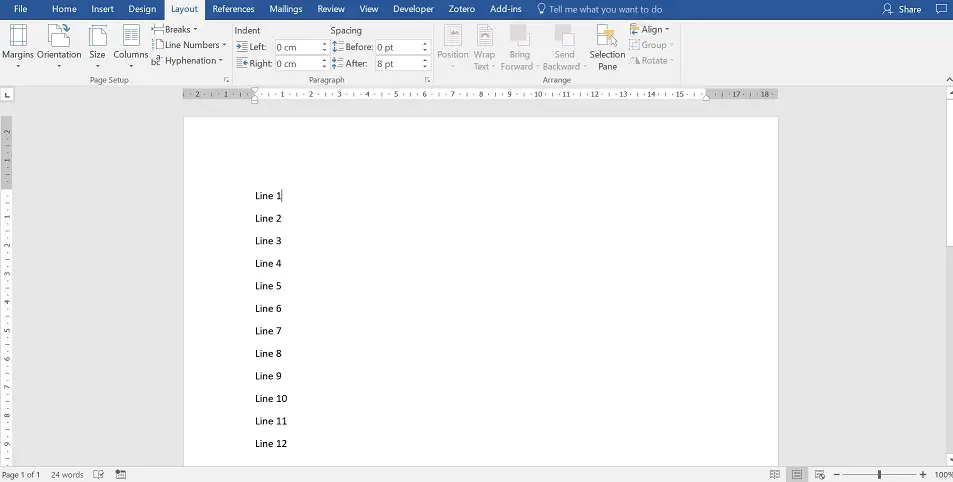 What I want to do here is to add line numbers, which will be placed along the left side of the document.
2. Find the ‘Line Numbers’ tab
To insert line numbers in Word, you must go to ‘Layout > Line Numbers‘ tab. You will notice a small arrow next to the button. Click the button to see the options.
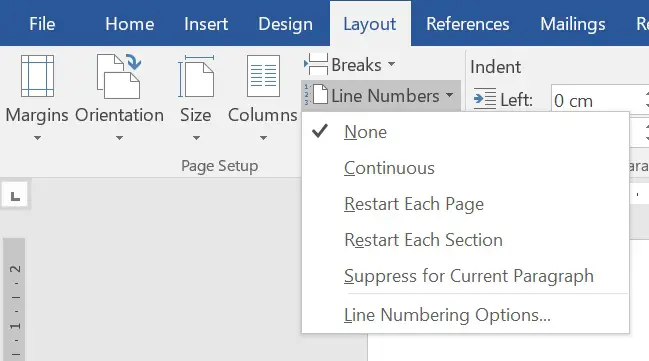 The option should be set to ‘None‘ as default. Below this, there are different options to choose from, each of which are summarised below.
- Continuous: By selecting ‘Continuous‘, line numbers will be added onto every page within the document. The line numbers will be in ascending order as you go down the document, and the sequence will continue into other pages.
- Restart Each Page: This option adds line numbers into each page, however, the numbering will start at 1 again on each new page.
- Restart Each Section: If you select ‘Restart Each Section‘ the line numbering will restart after each section break, if you have these in the document.
- Suppress for Current Paragraph: The ‘Suppress for Current Paragraph‘ option can be picked alongside any of the above. You can turn off line numbering for individual paragraphs if you so wish.
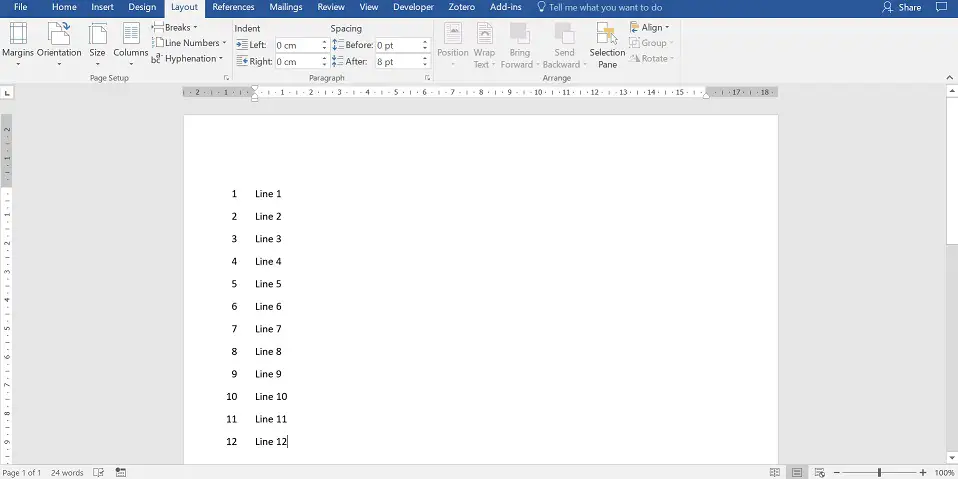
For our example, I will just select the ‘Continuous‘ option. Here is what it now looks like.
 3. Advanced line number settings
 3. Advanced line number settings
From the line numbering dropdown options, you will notice at the bottom it says ‘Line Numbering Options‘. If you select this, a new window will open called ‘Page Setup‘. From here, click the ‘Line Numbers…‘ button towards the bottom. A new small window will open called ‘Line Numbers‘.
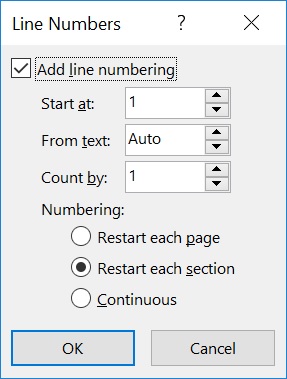 This window will enable further advanced settings, such as changing what number the numbering starts and by what count.
Once you have tweaked these, click the ‘OK‘ button and then the ‘OK‘ button in the ‘Page Setup‘ window to save the changes.
Microsoft Word version used: 2016

Adding line numbers to a Microsoft Word document can help you point others to exact positions within it, especially in documents with multiple pages. Here’s how to quickly add line numbers in Word.
These instructions should work for recent Office versions (from 2010 onwards). Before you begin, note that Word will treat tables and text boxes as if they’re on a single line, regardless of how large they are.
Adding Line Numbers to an Entire Document
To start adding line numbers, you’ll need to open your Word document. In the ribbon bar at the top, click on the “Layout” tab. From here, click the “Line Numbers” button.
A drop-down menu offers several potential options. To have line numbers that run through your document continuously, rather than restarting on each new page, click on the “Continuous” option.

To have the line numbers restart on each new page, select “Restart Each Page” instead.
Once selected, the line numbers will appear on the left side of the document page.
Line numbers will appear only in the print view mode, so if you have another viewing mode selected, click on the “Print Layout” button in the bottom-right corner of your Word document window.
Adding Line Numbers to Individual Sections
It’s possible to separate pages of a Word document into individual sections using section breaks. You can set Word to restart the sequence of line numbers with each new section break.
RELATED: How to Find Section Breaks in a Word Document
In your Word document, click the “Layout” tab in the ribbon bar and then click on the “Line Numbers” button. Select “Restart Each Section” from the drop-down menu.
If you want to add a new section break, click the “Breaks” button. This is just above the “Line Numbers” button in the “Layout” tab.
From there, click “Continuous” to add a new section break without shifting the Word cursor to a new page.
A new set of line numbers will begin immediately underneath the newly-inserted section break.
Removing Line Numbers
If you’d prefer to remove line numbers from your document, in whole or in part, you can also do this from the “Line Numbers” menu (Layout > Line Numbers).
To remove them from your document entirely, click “None” in the “Line Numbers” drop-down menu.
If you want to hide them from a particular paragraph, click on the paragraph and then select “Suppress for Current Paragraph” from the “Line Numbers” drop-down menu instead.
This will completely remove the paragraph from the line numbers sequence. The sequence will restart with the following number on the next line immediately underneath the paragraph.
Line Number Formatting
By default, your line numbers will appear with the same font, size, and color as specified by the default “Line Number” style in Word. To modify the appearance of your line numbers, you’ll need to modify this text style, although Word hides it by default.
First, click on the “Home” tab in your ribbon bar. Click the vertical arrow menu button in the lower-right corner of the “Styles” section. This will bring up an extra pop-up “Styles” menu.
From there, click the “Options” button.
In the “Select Styles to Show” drop-down menu, select “All Styles” before clicking the “OK” button to save.
You’ll now be able to edit the “Line Number” font style.
In the pop-up “Styles” menu, find the “Line Number” option. Click on the side menu arrow next to the listing and then click on the “Modify” button.
In the “Modify Style” menu, edit the formatting options for your line number style, as appropriate.
Click “OK” to apply the new style to your line numbers.
Once applied, your new font style will be applied to all of the line numbers in your Word document.
READ NEXT
- › How to Number Paragraphs in Microsoft Word
- › HoloLens Now Has Windows 11 and Incredible 3D Ink Features
- › Google Chrome Is Getting Faster
- › BLUETTI Slashed Hundreds off Its Best Power Stations for Easter Sale
- › How to Adjust and Change Discord Fonts
- › The New NVIDIA GeForce RTX 4070 Is Like an RTX 3080 for $599
- › This New Google TV Streaming Device Costs Just $20