
You can’t surprise anyone by magnificent logos created using some advanced software like Adobe AI or Corel Draw. However, many professional designers draw a logo on a sheet of paper first. Such drawings look great, but the price is high too. And what if you don’t have enough funding? It is the most ordinary software in the world that can help you. Today, we are going to tell about how to create a logo in Word.
Create your own logo with Turbologo logo maker. It takes less than 5 minutes and no design skills needed.
Go to Logo Maker
Some history first
![]()
There some users, who were unable to witness the rise of the Internet, implying that design is all about special software. If you have never seen sites in the 90s, it is hard to imagine a somewhat different situation. And of course, if you feel that what we are driving at seems a bit weird, or it’s just complete madness, it’s best for you to resort to an online logo maker. You won’t have to study various design patterns as there are many icons that can be combined in your unique logo. There also are various templates to make the designing process even smoother. It’s the shortest and most convenient way of business identity creation. However, if you are in for a challenge, let’s get back to creating a logo in a word.

In truth, most iconic and famous companies, possessing sophisticated logos, used, to begin with rather humble startups. And it also holds true for any online project. Have a look at the first Google logo, to get the idea. Moreover, both brilliant and effective logo can be drawn on the sand with a wooden stick, just like in the case of Nike. Your thinking must always proceed deeper into the heart of a matter. If your software is limited only to Word, it doesn’t mean that you are doomed.
Step-by-step logo creation

Just like in any other case, everything you need is an idea and a clear understanding of your goals and objectives. We have described the process several times already, so we’ll make it brief this time. Logo creation using Microsoft Word isn’t too different from other ways. So, you know what you want to depict. You have chosen colors carefully. And you’ve got an alluring name. Only one finishing touch remains now.

First, you need to create a new document, type the name of your company and then look through all the fonts in search of the best option. Strange enough, but sometimes all it takes is to get a proper font for a single inscription and you’re done. And Sony proves just that. Feel free to experiment with the font and its color. Make the inscription narrower or wider; elongate it or…maybe something else? Text editing in Microsoft Word is easy and convenient, so it makes a good basic logo maker!
The next step is image creation. It would make professionals smile, but even customize Word these days! Go to “shapes” after you have played-out a page. Choose the most appropriate figure for your business. Then place the figure on the page. Use the layout to make the logo more accurate and symmetric. Go to “shape format” to choose the desired color and shape type. Outline your shape and fill it. And keep in mind that gradient is trendy these days!
MS Word logo finishing

So, you’ve got your shape and it needs to be endowed with some details. For example, if your logo is a ball, then it would be a good idea to add some polygons or stripes. To do so, go to “shapes” again. Overlay the details on your current depiction. It also a good idea to add some details to the background and it would stress the main shape too. Keep in mind that small elements and details are supposed to contrast. And don’t forget about aptness too!
The next step is to unite the inscription and the logo. To do so, we need to revise at least basic compositing rules. You can place the inscription near, above or over the shape. Be sure to make the font background transparent and remove that square outlining. Add a slogan if you feel something is missing. Actually, slogan designing is similar to that of the inscription, the only difference is that it should be thinner and smaller than the name.
After you’ve placed all the elements, it’s time to group and arrange them, making it one, well-detailed picture. Your logo won’t be falling apart while being moved anymore. You will also be able to alter the scale of the logo to your liking.
Word advantages
Making a logo in Word is far from a professional approach of course. However, if you try hard enough, the result will be more than plausible. And there are some other advantages as well. Firstly, the simplicity of Word denies the most common designing mistakes. Secondly, your logo is already imported in Word, so it’s readily available for usage. Thirdly, should you decide to get a professional’s help, the logo will make a nice prototype.
Frequently Asked Questions
How can I create a logo using Word 2007?
Click on the “Shapes” button, then select “New Drawing Canvas” at the bottom of the menu. This will create a box within the document window to construct your logo. The box will open and a tab called Draw Tools appears above the Format tab. This tab contains all the drawing tools for Word.
Can I make a logo using Microsoft Office?
Use software such as Logo Maker to create your logo. Microsoft Office Templates are available to create flyers, business cards and brochures.
What are the 9 types of logos?
1. Wordmarks or logotypes logos
2. Monogram or lettermarks logos
3. Letterform logos
4. Pictorial marks or logo symbols
5. Abstract logos
6. Mascots
7. The combination mark
8. Emblems
9. Dynamic Marks
Read more here.
![]()
I’m a product and graphic designer with 10-years background. Writing about branding, logo creation and business.
Содержание
- 1 Пять фактов о Microsoft Word, которые можно отнести в его пользу:
- 2 Создаем логотип в Word шаг за шагом.
- 3 Видео-инструкции, как сделать логотип в Ворде
- 4 Как можно использовать созданный в Ворде логотип?
- 5 Если все же не удается создать логотип посредством Word, попробуйте онлайн генератор логотипов, например, Логастер.
- 5.1 Создание наброска
- 5.2 Создание бланка вручную
- 5.3 Создание бланка на основе шаблона
- 5.4 Помогла ли вам эта статья?
Задумывались ли вы когда-нибудь, что с помощью Word также можно создать логотип?
Если рассматривать эту программу как инструмент для создания лого, то стоит обратить внимание на пять фактов о MS Word, которые можно считать его преимуществами.
Пять фактов о Microsoft Word, которые можно отнести в его пользу:
- Программа широко распространена и знакома большинству компьютерных пользователей, поэтому научится что-то делать в программе проще.
- Содержит много инструментов, которые позволяют работают как с текстом, так и с изображениями.
- Позволяет использовать саму страницу документа как холст, на котором можно перемещать фигуры, SmartArt и значки.
- Легко объединить текст с картинкой или фигурой в целостное изображение.
- Созданный в Документе лого, можно сразу же использовать, формируя таким образом фирменный бланк.

Учитывая доступный в Word инструментарий, проще всего сделать текстовый логотип, подобрав красивый шрифт. Но, кроме этого, можно использовать вставку текста в различные формы, а также использовать WordArt, добавлять дополнительные элементы, задействовать различные текстуры и фоны. А если проявить креативность и усердие, то лого может получится очень даже оригинальным.
Казалось бы просто соединяете и складываете разные фигуры и текст, но в конечном итоге, может получится комплексный хороший логотип.
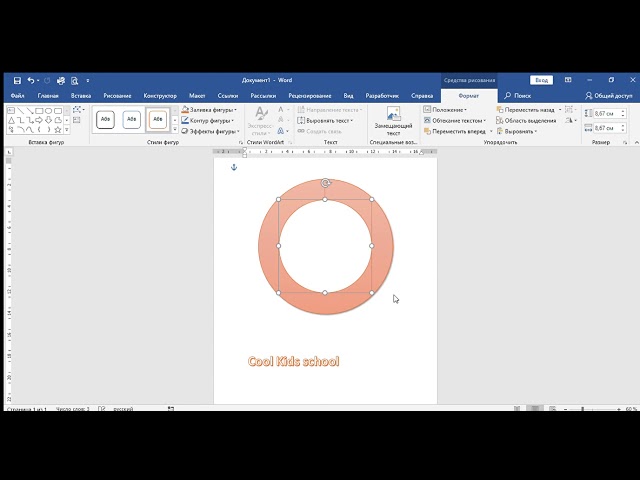
Давайте разберем шаг за шагом и попробуем создать именно такой логотип, как на картинке ниже, в Ворде.

Итак, сначала запускаем Word, мы будем использовать версию 2016 г.

Для большего удобства включите сетку c разметкой, которая поможет выравнивать элементы логотипа.
Откройте новый документ. Перейдите во вкладку Вид, а затем поставьте галочку на “Линейка”, “Сетка”.

Теперь перейдем во вкладку Вставить, переходим к фигурам и выбираем шестиугольник.

Лучше заранее подобрать цвет, поэтому при надобности меняем цвет заливки. Мы поменяем установленный по умолчанию синий на черный.

Далее необходимо наложить два шестиугольника друг на друга. Для этого создаем копию шестиугольника, сначала кликнув на шестиугольник, далее на правую кнопку мыши, далее выбираем Копировать. Перемещать фигуру можно с помощью курсора мыши. Немного уменьшаем внутренний шестиугольник. Обычно все фигуры имеют обводку сплошной линией, поэтому кликаем на тот шестиугольник, что внутри, и делаем толщину линии его обводки более массивной. Также меняем цвет линии на белый.
Для дальнейшего удобства стоит сгруппировать две фигуры нажав на правую клавишу мыши.
Таким же образом через опцию вставки фигур добавим две горизонтальные линии, которые идут параллельно.

Теперь можно добавить название фирмы с помощью текстового блока. Текст можно поставить как внутри созданной фигуры, так и под фигурой или рядом с ней.
В нашем случае название напишем внутри фигуры.
В текстовом блоке вы можете подобрать шрифт, который является немаловажным элементом логотипа, также уделите внимание цвету шрифта, чтобы он гармонично сочетался с иконкой.
Важно сделать прозрачным фон текстовой фигуры и убрать обводку этого блока.
Далее с помощью той же вставки фигур добавляем фигуры, которые помогут нам нарисовать чашку под названием.

Добавим изогнутую линию над названием, чтобы придать чашке большего изящества.
В конце желательно выделить все элементы логотипа и Сгруппировать их для того, чтобы в случае перемещения логотипа, он перемещался как целостное изображение и все детали сохранялись на своем месте.

Логотип готов! Как видите, даже с помощью Word можно создать хороший логотип.
Видео-инструкции, как сделать логотип в Ворде
Кроме этого, в сети есть несколько замечательных видео, где показано, что если захотеть, то можно нарисовать практически любой логотип в ворде.
Для большей наглядности, еще одно видео.
Как можно использовать созданный в Ворде логотип?
Логотип может быть использован в колонтитуле для вашего фирменного бланка. То есть, вы легко можете создать бланк организации в Word с логотипом.
Если есть необходимость, можно сделать логотип вотермаркой вашего документа в Word.
Когда же есть необходимость использовать лого не только в Word, то можно скопировав его, перенести, например, в Paint или Paint.NET, чтобы потом сохранить в JPG, PNG форматах.
Есть и другие способы извлечь картинку из файла Word или перевести файл в другой формат, например, конвертировать онлайн, можете попробовать здесь.
Или же конвертировать Word в PDF, например:
ilovepdf.com
smallpdf.com
После чего, вы сможете использовать его на своем сайте, в YouTube канале, социальных сетях и т.п.
Если все же не удается создать логотип посредством Word, попробуйте онлайн генератор логотипов, например, Логастер.
Конечно, кому-то такой путь создания эмблемы может показаться сложным и изнурительным.
В таком случае, попробуйте сделать логотип онлайн с помощью Логастер, этот генератор позволит получить эмблему для вашей компании в считанные минуты, ведь процесс создания лого довольно простой и интересный.

Хотите попробовать? Тогда просто перейдите в мастер создания логотипов здесь и подберите для себя интересный дизайн.

Многие компании и организации тратят немалые деньги на то, чтобы создать фирменную бумагу с уникальным дизайном, даже не догадываясь о том, что сделать фирменный бланк можно самостоятельно. Это не займет много времени, а для создания понадобится всего одна программа, которая и так используется в каждом офисе. Конечно же, речь идет о Microsoft Office Word.
Используя обширный набор инструментов текстового редактора от Майкрософт, можно оперативно создать уникальный образец, а затем использовать его в качестве основы для любой канцелярской продукции. Ниже мы расскажем о двух способах, с помощью которых можно сделать фирменный бланк в Ворде.
Урок: Как в Word сделать открытку
Создание наброска
Ничто не мешает вам сразу приступить к работе в программе, но куда лучше будет, если вы набросаете приблизительный вид шапки бланка на листе бумаги, вооружившись ручкой или карандашом. Это позволит увидеть то, как элементы, входящие в бланк, будут сочетаться между собой. При создании наброска необходимо учесть следующие нюансы:
- Оставьте достаточно места для логотипа, названия компании, адреса и другой контактной информации;
- Подумайте над тем, чтобы добавить на фирменный бланк и слоган компании. Эта идея особенно хороша в случае, когда основная деятельность или услуга, предоставляемая компанией, не указаны на самом бланке.
Урок: Как в Ворде сделать календарь
Создание бланка вручную
В арсенале MS Word есть все необходимое для того, чтобы создать фирменный бланк в целом и воссоздать набросок, созданный вами на бумаге, в частности.
1. Запустите Ворд и выберите в разделе «Создать» стандартный «Новый документ».

Примечание: Уже на данном этапе вы можете сохранить пока еще пустой документ в удобное место на жестком диске. Для этого выберите «Сохранить как» и задайте название файла, например, «Бланк сайта Lumpics». Даже если вы не всегда успеете своевременно сохранять документ по ходу работы, благодаря функции «Автосохранение» это будет происходить автоматически через заданный промежуток времени.
Урок: Автосохранение в Ворде
2. Вставьте в документ колонтитул. Для этого во вкладке «Вставка» нажмите кнопку «Колонтитул», выберите пункт «Верхний колонтитул», а затем выберите шаблонный колонтитул, который устроит вас.

Урок: Настройка и изменение колонтитулов в Word

3. Теперь нужно перенести в тело колонтитула все то, что вы набросали на бумаге. Для начала укажите там следующие параметры:
- Название вашей компании или организации;
- Адрес сайта (если таковой имеется и он не указан в названии/логотипе компании);
- Контактный телефон и номер факса;
- Адрес электронной почты.

Важно, чтобы каждый параметр (пункт) данных начинался с новой строки. Так, указав название компании, нажмите «ENTER», то же проделайте и после номера телефона, факса и т.д. Это позволит разместить все элементы в красивом и ровном столбике, форматирование которого все же тоже придется настроить.
Для каждого пункта этого блока выберите подходящий шрифт, размер и цвет.

Примечание: Цвета должны гармонировать и хорошо сочетаться между собой. Размер шрифта названия компании должен быть хотя бы на две единицы больше шрифта для контактных данных. Последние, к слову, можно выделить другим цветом. Не менее важно, чтобы все эти элементы по цвету гармонировали с логотипом, который нам только предстоит добавить.
4. Добавьте в область колонтитула изображение с логотипом компании. Для этого, не покидая области колонтитула, во вкладке «Вставка» нажмите кнопку «Рисунок» и откройте подходящий файл.

Урок: Вставка изображения в Ворд

5. Задайте подходящие размеры и положение для логотипа. Он должен быть «заметным», но не большим, и, что не менее важно, хорошо сочетаться с текстом, указанным в шапке бланка.


Для перемещения логотипа кликните по нему, чтобы выделить, а затем потяните в нужное место колонтитула.
Примечание: В нашем примере блок с текстом находится слева, логотип — в правой части колонтитула. Вы же, по желанию, можете разместить эти элементы иначе. И все же, разбрасывать их по сторонам не следует.
Для изменения размера логотипа, наведите указатель курсора на один из углов его рамки. После того, как он трансформируется в маркер, потяните в нужном направлении для изменения размера.

Примечание: Изменяя размер логотипа, старайтесь не сдвигать его вертикальные и горизонтальные грани — вместо необходимого вам уменьшения или увеличения, это сделает его ассиметричным.
Старайтесь подобрать такой размер логотипа, чтобы он соответствовал общему объему всех текстовых элементов, которые тоже расположены в шапке.
6. По мере необходимости, можно добавить и другие визуальные элементы в ваш фирменный бланк. Например, для того, чтобы отделить содержимое шапки от остальной части страницы можно провести сплошную линию по нижней грани колонтитула от левого до правого края листа.

Урок: Как нарисовать линию в Word
Примечание: Помните о том, что линия как по цвету, так и по своим размерам (ширине) и виду, должна сочетаться с текстом в шапке и логотипом компании.

7. В нижнем колонтитуле можно (или даже нужно) разместить какую-нибудь полезную информацию о фирме или организации, которой принадлежит этот бланк. Мало того, что это позволит визуально уравновесить верхний и нижний колонтитул бланка, так еще и предоставит дополнительные данные о вас тому, кто знакомится с компанией впервые.
Для добавления и изменения нижнего колонтитула выполните следующее:
- Во вкладке «Вставка» в меню кнопки «Колонтитул» выберите нижний колонтитул. Выбирайте из выпадающего окна тот, который по своему внешнему виду полностью соответствует выбранному вами ранее верхнему колонтитулу;
- Во вкладке «Главная» в группе «Абзац» нажмите кнопку «Текст по центру», выберите подходящий шрифт и размеры для надписи.

Урок: Форматирование текста в Ворде
Примечание: Девиз компании лучше всего написать курсивом. В некоторых случаях лучше писать эту часть заглавными буквами или же просто выделить Первые буквы важных слов.
Урок: Как в Word изменить регистр
8. Если это необходимо, вы можете добавить на бланк строку для подписи, а то и саму подпись. Если нижний колонтитул вашего бланка содержит текст, строка для подписи должна находиться выше него.
Урок: Как сделать подпись в Ворде
9. Сохраните созданный вами фирменный бланк, предварительно его просмотрев.
Урок: Предварительный просмотр документов в Word
10. Распечатайте бланк на принтере, чтобы увидеть, как он будет выглядеть вживую. Возможно, вам уже сейчас есть, где его применить.
Урок: Печать документов в Ворд
Создание бланка на основе шаблона
Мы уже рассказывали о том, что в Microsoft Word есть очень большой набор встроенных шаблонов. Среди них можно найти и те, которые послужат хорошей основой для фирменного бланка. Помимо того, создать шаблон для постоянного использования в этой программе можно и самостоятельно.
Урок: Создание шаблона в Ворде
1. Откройте MS Word и в разделе «Создать» в строке поиска введите «Бланки».
2. В списке слева выберите подходящую категорию, например, «Бизнес».
3. Выберите подходящий бланк, кликните по нему и нажмите «Создать».
Примечание: Часть представленных в Ворде шаблонов интегрирована непосредственно в программу, но часть из них, хоть и отображается, подгружается с официального сайта. Кроме того, непосредственно на сайте Office.com вы сможете найти огромный выбор шаблонов, которые не представлены в окне редактора MS Word.
4. Выбранный вами бланк будет открыт в новом окне. Теперь вы можете изменить его и подстроить все элементы под себя, аналогично тому, как это написано в предыдущем разделе статьи.
Введите название компании, укажите адрес сайта, контактные данные, не забудьте разместить на бланке логотип. Также, не лишним будет указать девиз фирмы.
Сохраните фирменный бланк на жестком диске. Если это необходимо, распечатайте его. Кроме того, вы всегда можете обращаться и к электронной версии бланка, заполняя его согласно выдвигаемым требованиям.
Урок: Как сделать буклет в Ворде
Теперь вы знаете, что для создания фирменного бланка отнюдь не обязательно идти в полиграфию и тратить кучу денег. Красивый и узнаваемый фирменный бланк вполне можно сделать самостоятельно, особенно, если в полной мере использовать возможности Microsoft Word.
Мы рады, что смогли помочь Вам в решении проблемы.
Задайте свой вопрос в комментариях, подробно расписав суть проблемы. Наши специалисты постараются ответить максимально быстро.
Помогла ли вам эта статья?
Да Нет
В этой статье будут описаны принципы создания фирменного бланка при помощи текстового процессора Office Word. Для начала, давайте рассмотрим определим значение определения фирменный бланк.
Фирменным бланком называют специальный лист бумаги, обычно формата А4. Если это фирменный бланк компании, или же фирмы, предприятия, то на фирменном бланке обычно указывают реквизиты этой компании. К примеру на фирменном бланке может быть указана такая информация как: логотип, наименование, контактная информация и банковские реквизиты (выборочно).
Вот примеры нескольких фирменных бланков:
На мой взгляд, второй фирменный бланк слишком бросается в глаза, и будет отвлекать человека, который будет ознакамливаться с информацией документа.
Давайте приступим к созданию своего фирменного бланка. Возьмем за образец первый бланк примера. Использовать будем Office Word. Для начала откройте его и создайте новый документ:
Для создания бланка и размещения реквизитов будем использовать поля колонтитулов. Давайте откроем верхний колонтитул, для редактирования. Для этого дважды щелкните вверху листа в указанной области:
После открытия верхнего колонтитула для удобного редактирования и размещения данных добавьте в него таблицу, состоящую из одного рядка и 2 колонок. Сделать это можно при помощи меню «Вставка» → «Таблица» из раздела «Таблицы»:
Далее разместим логотип компании в левой ячейке, а информацию о компании в правой и придадим реквизитам выравнивание по левому краю. Для вставки изображения используем инструмент «Вставка» → «Рисунок» из раздела «Иллюстрации»:
После чего, отформатируйте реквизиты на свой вкус и уберите отображение границ у таблицы. Для этого выделите всю таблицу целиком, нажав на иконку «Стрелок»:
Далее перейдите во вкладку «Конструктор» и в поле «Границы» выберите «Нет границы»:
Теперь приступайте к заполнению нижней части фирменного бланка. Если вы не закрывали редактирование колонтитулов, то начинайте заполнять нижний колонтитул. Если вы закрыли редактирование колонтитулов, то просто щелкните дважды на в нижней части страницы в выделенной области:
В нижнем колонтитуле, отобразим реквизиты компании. Добавим номер телефона, сайт и адрес электронной почты:
Теперь можно добавить некое графическое оформление для нашего бланка. Давайте снова перейдем в верхний колонтитул. Во вкладке вставка, выберите «Фигуры» → «Прямоугольник». И разместите в верхнем колонтитуле прямоугольник. Кликните на нем правой кнопкой мыши и выберите «На задний план» → «Поместить за текстом»:
Растяните его по всей области колонтитула, а затем перейдите к его форматированию. Поставьте «Контур фигуры» в значение «Нет контура». Перейдите в «Заливка фигуры» → «Градиентная» и выберите настройки приблизительно как в примере:
Получился вот какой вот фирменный бланк:
В примере я разделил окно, что бы показать и верхнюю и нижнюю часть сразу. Также не стоит обращать внимание на тусклость красок и текста в колонтитулах, это происходит при переходе в режим редактирования документов. При печати все будет хорошо видно.
Теперь вы научились создавать свой фирменный бланк. Пробуйте и экспериментируйте с другими значениями фигурами и формами, ведь фирменный бланк — это как лицо компании.
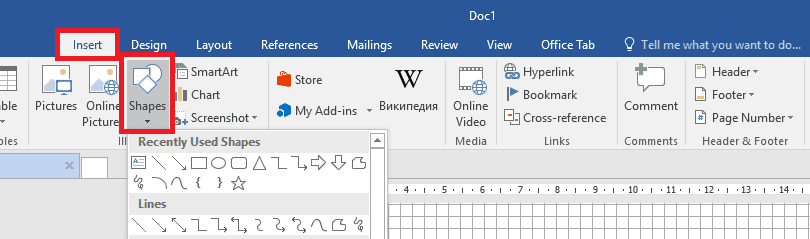
Go to Insert tab on the Ribbon and click on the Shapes option in the Illustrations group. A Recently Used Shapes dialog box will appear on the screen. Select the image that you want in your logo and drag it into your current document.
Contents
- 1 Can I use Microsoft Word to make a logo?
- 2 How do I create a logo for my business?
- 3 How can I create my own logo on my computer?
- 4 How do I create a graphic in Word?
- 5 How can I make a logo online for free?
- 6 Is Canva free to use?
- 7 What is the best website to design a logo?
- 8 Can I use Canva for my business logo?
- 9 How do I save a logo in Word?
- 10 What is the best free logo maker?
- 11 How do I put a picture on Microsoft Word?
- 12 How do images work in Word?
- 13 Which app is best for making logo?
- 14 How do you copyright a logo?
- 15 How can I create a logo for my website?
- 16 Can I sell Canva designs on Etsy?
- 17 Can I use Canva images for commercial use?
- 18 Does Canva own my designs?
- 19 Is Wix logo maker really free?
- 20 Why you shouldn’t use Canva for your logo?
Can I use Microsoft Word to make a logo?
Yes you can create a logo by using Microsoft Word. This can be done by using the WordArt feature. You can use this feature to create special characters and your own logo. You can also customize the logo to add special effects.
How do I create a logo for my business?
Follow the simple steps below to create, personalize, and download your company logo design:
- Enter Your Business Name and Tagline.
- Choose a Type of Logo Design, Industry, Font, and Color Scheme.
- Generate Logo Options.
- Customize Your Logo.
- Download Your Logo.
- After Downloading, Make Sure Your Logo is Unique.
How can I create my own logo on my computer?
How To Design a Logo Online
- Enter your business information. From the “Logo Category” dropdown menu, select what industry your business is in.
- Choose a Logo Style. Choose up to three (3) logo styles for your business logo.
- Select a Logo Font.
- Pick a Logo Layout.
- Select a Logo Design.
- Edit Your Logo.
- Save Your Logo.
How do I create a graphic in Word?
On the Insert menu, select SmartArt Graphic. On the SmartArt tab of the ribbon, in the Insert SmartArt Graphic group, select at the type of graphic you want (List, Process, etc.), and then select a layout. Enter your text by doing one of the following: Click [Text] in the Text pane, and then type your text.
How can I make a logo online for free?
Make a logo with Looka
- Our logo maker is easy. Start by entering your company name and industry, then select the perfect logo styles, colors, and symbols that you like the best.
- Our logo maker is fun.
- Our logo maker delivers.
- High-res logos.
- Vector files.
- Color variations.
- Business card designs.
- Social media templates.
Is Canva free to use?
Can I use Canva for free? Yes! Canva is always free to use for everyone. You can choose to upgrade to Canva Pro or Canva for Enterprise for access to premium tools and content.
What is the best website to design a logo?
The 4 Best Websites to Create a Logo for Your Business
- Canva: Choose a Logo Template and Play Around.
- Adobe Spark: Pick a Logo and Insert Your Business Name.
- Tailor Brands: Learns Your Business and Caters to Your Needs.
- Logaster: Pick Your Name and Industry and Receive Multiple Options.
Can I use Canva for my business logo?
You can upload your own logo design to Canva. This might be a logo you designed yourself or one you commissioned a graphic designer to create for you. After uploading your logo, you can use Canva to create branded collateral for your business, like social media content, business cards, flyers, and so much more.
How do I save a logo in Word?
Right-click the document, and then choose “Picture” under Paste Options. Right-click the pasted logo, and then choose “Save as Picture.” Choose a file type, enter a file name and navigate to the location where you wish to keep your new logo. Click “Save.”
What is the best free logo maker?
The best free logo makers
- Tailor Brands Logo Maker. Easy logo creation and more besides.
- Canva Logo Maker. An intuitive logo maker from Canva.
- Wix Logo Maker. Generate a logo inspired by your own style.
- Hatchful. One of the easiest free logo makers around.
- Ucraft Logo Maker.
- LogoMakr.
- DesignEvo Free Logo Maker.
- MarkMaker.
How do I put a picture on Microsoft Word?
How to Insert and Crop Pictures in Word
- Click in your document where you want to insert your picture.
- Click the Insert tab.
- Click Pictures button.
- Navigate to the picture you want to insert and select it.
- Click Insert button.
How do images work in Word?
How to Insert a Picture in Word
- Place the cursor where you want the image to appear.
- Go to the Insert tab, then select Pictures.
- In the Insert Picture dialog box, choose an image to insert into the document, then select Insert or Open.
- To move the image, drag the image to a different location in the document.
Which app is best for making logo?
10 best logo maker apps for Android
- Adobe apps.
- Canva.
- dotpict.
- Font Rush.
- Ibis Paint X.
How do you copyright a logo?
To copyright your logo, you need to use the copyright symbol. This familiar symbol of the letter “c” contained in a circle is the universal symbol for copyright. Include the symbol or word within your logo or right next to it. To trademark your logo, you need to register it and pay a fee.
How can I create a logo for my website?
- Use Design Sites for Inspiration. Designing a logo is much simpler if you’ve taken the time to look for inspiration as your first step.
- Identify Three Colors That Reflect Your Website.
- Choose Your Logo Design Style.
- Find the Right Font.
- Create Your Logo on a Free Design Platform.
- Add It to Your Website.
Can I sell Canva designs on Etsy?
Selling templates
For Canva Creators, you can sell Canva templates on Creative Market, Etsy, on your own website, or on any other marketplace, as long as they bring your users back to the canva.com editor.
Can I use Canva images for commercial use?
All free photos, music and video files on Canva can be used for free for commercial and noncommercial use. If a photo, music or video file contains an identifiable person, place, logo or trademark, please ensure you check the image source or contact us if you’re unsure.You can modify the photos, music and video files.
Does Canva own my designs?
In plain English, anything that you upload to Canva is considered your “User Content” and you retain all ownership in it.Therefore, you will be the owner of your final design because it’s your original composition/layout but the individual elements will be owned by the original copyright owner/creator.
Is Wix logo maker really free?
If customization is your cup of tea, Wix allows you to customize the logo size, text, color, and font. Creating the logo is free. If you love the design and want to download it, you will need to pay just $12.99 for a basic logo, which consists of high-resolution logo files and full commercial usage rights.
Why you shouldn’t use Canva for your logo?
Usually your logo will become very blurry or totally illegible over all. Since Canva isn’t a professional design software it lacks many of the capabilities that Adobe Illustrator (the graphic design industry standard software) posses such as the ability to expand and manipulate text.
Логотип — это графический символ, который представляет собой комбинацию стилизованных букв, форм и изображений, используемых для обозначения фирмы, организации, продукта или бизнеса. Хорошо продуманный логотип помогает наладить связь с вашей целевой аудиторией. Многие программы для графического дизайна, такие как PHOTOSHOP, ADOBE, являются победителями в творческой сфере и в основном используются профессиональными графическими дизайнерами. Но вы когда-нибудь думали об использовании Microsoft Word для создания отличного логотипа для вашего студенческого проекта или небольшого бренда? Если нет, эта статья познакомит вас с тем, как создать логотип с помощью Microsoft Word.
Зачем использовать MS Word?
Microsoft Office — это пакет для повышения производительности, а не набор инструментов для творчества. MS Powerpoint в основном используется всеми, когда это необходимо. Но даже MS Word широко используется для создания текстовых документов и даже может использоваться для создания потрясающего логотипа. Давайте посмотрим, почему мы не должны игнорировать MS Word при создании логотипа.
- Миллионы людей во всем мире пользуются им.
- Он поставляется с рядом полезных инструментов для редактирования текста и изображений.
- Текст и изображение (геометрические формы) легко комбинируются для создания сбалансированной композиции.
- Он также позволяет перемещать геометрические фигуры, объекты SmartArt и символы на странице документа.
- На фирменный бланк можно напечатать логотип, разработанный в Microsoft Word.
- Вы можете легко поиграть с текстурами и фоном.
Microsoft Word предлагает широкий выбор удивительных шрифтов и форм для создания логотипа. Что касается разработки логотипа, то нет более удобной программы для любителей, чем MS Word. Комбинируя различные формы, объекты WordArt, слова и изображения, вы можете получить довольно хороший корпоративный дизайн.
Как создать логотип?
Я позаимствовал приведенный ниже логотип из Интернета, чтобы его можно было скопировать в MS Word. На этом примере вы поймете, как Word пытается создать логотип. MS Word не может точно воспроизвести его, но он постарается изо всех сил разработать.
Шаг 1. Откройте новый документ MS Word.
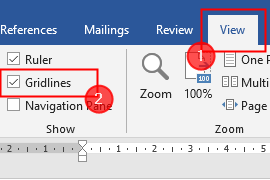
Шаг 2: Перейдите в Просмотр> Линии сетки.
ПРИМЕЧАНИЕ. Линии сетки помогают выравнивать фигуры и другие объекты в документе Word. Вы можете увидеть их только в режиме печати.
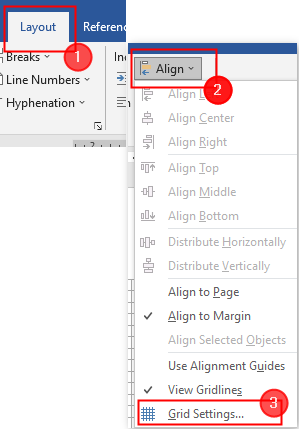
Шаг 3: Теперь нажмите Layout> Align> Grid Settings.
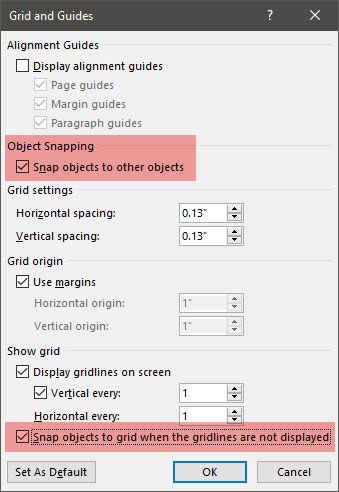
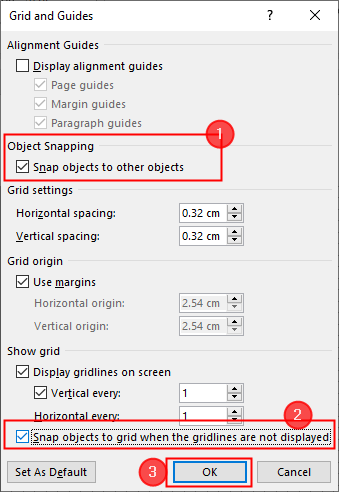
Шаг 4: Откроется окно «Сетка и направляющие». Обязательно установите флажки напротив «Привязать объекты к другим объектам» и «Привязать объекты к сетке, когда линии сетки не отображаются». Наконец, нажмите ОК.
Убедитесь, что эти настройки включены, и мы будем готовы, прежде чем вставим формы и начнем проектировать.
Разработка логотипа
Шаг 1. Перейдите в меню «Вставка»> «Фигуры»> «Овал».
Шаг 2: Нарисуйте круг, щелкнув правой кнопкой мыши и перетащив его. Измените цвет холста на черный, дважды щелкнув фигуру.
Шаг 3: снова Вставка> Фигуры (овал). Дважды щелкните изображение, чтобы изменить его стиль и цвет. Здесь я меняю цвет второго круга на белый.
Шаг 3: Теперь наложите белый круг на черный круг, как показано ниже.
Шаг 4: Используйте формы дуги и линии, чтобы создать треугольник, как показано ниже. Сделайте две копии этого треугольника.
Шаг 5: Переместите эти треугольники в их положения, как показано ниже.
Шаг 6: Теперь нажмите «Вставить»> «WordArt». Введите букву «B», как показано ниже. Повторите то же самое для следующих двух букв.
ПРИМЕЧАНИЕ. Это простой шаг, который не требует пояснений. Вы также можете использовать здесь текстовое поле.
Шаг 7: Наконец, созданный логотип показан ниже.
Шаг 8: Выделите все фигуры и вставленный текст, нажав «Shift + щелчок левой кнопкой мыши». После того, как все выбраны, щелкните правой кнопкой мыши и выберите «Группа», чтобы объединить их вместе.
Шаг 9: Наконец, сохраните свой логотип как изображение. Но MS Word не может сохранять их как изображения. Для этого нажмите «Вставить»> «Снимок экрана»> «Вырезание экрана».
Другие функции MS Word, которые вы можете использовать при разработке логотипов
ИКОНЫ
Новую коллекцию значков можно найти в меню «Вставка» (доступно только в Microsoft Office 365). Выбирайте из множества категорий, таких как люди, технологии и бизнес. Выберите значок, который, по вашему мнению, можно творчески использовать в логотипе.
КАРТА ПЕРСОНАЖЕЙ
Карта символов Windows также является отличным местом для размещения символов для ваших логотипов. Некоторые шрифты используются по умолчанию, и они могут помочь вам найти оригинальные решения, когда вы не можете найти подходящую форму для их использования.
Чтобы открыть карту символов, в поле поиска на панели задач введите карту и выберите в результате «Карта символов». Скопируйте нужные символы из персонажа.
Сделанный! В Microsoft Word есть множество инструментов для дизайна, которые помогут вам создать уникальный логотип. Вы заметите, что программа не предназначена для графического редактора. В этой статье вы сможете изучить свою творческую сторону, попытаться реализовать идею и узнать об ограничениях Word. Вы можете использовать это в своих проектах в колледже, чтобы создать несколько простых логотипов.
Спасибо.
Прокомментируйте ниже и сообщите нам, как эта статья вам помогла.
Professional graphic designers will scoff.
The Photoshop and Adobe Illustrator expert will knock it down.
Even GIMP will wonder – why not me? I am free. But when you don’t belong to the creative tribe, then you take whatever tools you need to design a logo in an emergency. Microsoft Word isn’t the first choice for drawing eye-catching logos. It doesn’t have the credentials to merit a place in a lineup of logo design software. But can it gatecrash? Let’s take a risk.
Why Pick Microsoft Word to Design a Logo?
Microsoft Office is a productivity suite and not a creative unit of tools. Microsoft PowerPoint would be my tool of choice if somebody holds a gun to my head. But before we dismiss Microsoft Word outright, consider these five factors in its favor:
- Is commonplace and easier to learn.
- Has multifaceted tools that work with both text and images.
- Allows you to use the document page as a canvas to drag and drop Shapes, SmartArt, and Icons.
- Can merge text and images and combine everything into one image.
- Documents can reuse the logo directly in a page or letterhead.
Key Microsoft Word 2016 Features for Logo Design
I won’t go into the details of all the graphic drawing features Microsoft Word 2016 brings to the table. But the brief descriptions and the linked help pages should help you if you get confounded. There is also the helpful Office assistant called «Tell me what you what you want to do» on the Ribbon that works as a pathfinder.
Stay with the basic rules of graphic design and stretch Microsoft Word to its limits.
Here are some essential tools you will find on the Ribbon. Do note that some features may be available with the latest updates on an Office 365 subscription.
- The Icon Library.
- Insert WordArt or Clip Art to your design.
- The Shapes gallery with presets, files, outline, and effects.
- Insert and edit Scalable Vector Graphics (SVG) files in Word 2016.
- Gridlines and The Ruler.
Shape recognition that converts hand drawing with ink into a perfect shape (only on a touch enabled device with Office 365).
You will find most of the tools and effects on the Drawing Toolbar which is automatically displayed with any drawing object in the document.
Let’s Draw a Simple Logo
This is a simple logo we are aiming for. I borrowed this simple graphic from Shutterstock. Most of the objects in the vector graphic below can be duplicated in Microsoft Word. Maybe, not exactly…but close enough to demonstrate the Word can try hard enough!
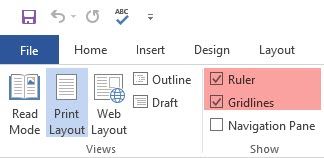
Open a new document. Go to the View tab, and then check the Gridlines box. With the grids, you can align shapes and other objects in your Word documents. The grids can only be viewed in the Print view. But rest assured – they cannot be printed.
Turn on the Object Snapping option. Click the picture or object. In the Graphic Tools tab, click on Align > Grid Settings. Enable both the highlighted settings below for better alignments of the graphics in the logo.
Snap objects to other objects. Check this box to make a shape or object align with other shapes or objects.
Snap objects to grid when the gridlines are not displayed. Align shapes or objects to the closest intersection of the grid even when the grid is not visible.
You can press the ALT key to override the previous settings temporarily when you drag a shape or object.
The above settings prepare our document for the first shape or object we are about to insert. We are going to use fonts and basic shapes. We are going to use some of the same techniques covered when we made a flowchart in Microsoft Word 2013 by aligning and formatting different shapes. The logo is going to be a bit more artistic to the eye than the business-like flowchart.
1. Insert a shape to use as the background of your logo.
Go to Insert > Shapes and select the Rectangle shape. Hold SHIFT to draw a perfect square on the Word document that is now your canvas.
Change the color of the canvas. Double-click on the shape to display the Drawing Tools > Shape Styles group on the Ribbon. Here, I used a Shape Fill with a choice of a color and set the Shape Outline to «No Outline».
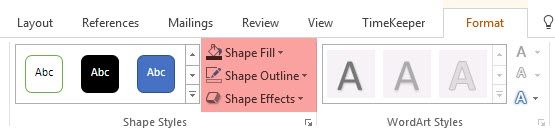
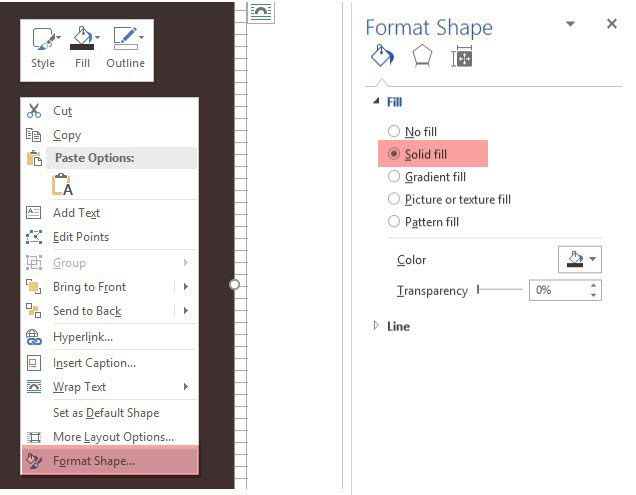
You can also right-click the shape and choose Format Shape. Now, you have more powerful controls that allow you to fine-tune the look of the shape. For example – if you want to use a gradient instead of a solid fill. For simple logos, a solid fill is preferable to a gradient.
You can also leave the background for the last part of the design. This helps you use the grid instead of obscuring it with the colored fill of the background.
2. Use more than one shape to make a compound shape.
In an earlier How to Make an Infographic for Free with PowerPoint tutorial, we had seen how to combine simple shapes to create more complex shapes. We use the same methods here to create the outer hexagonal graphic and the anchor in the middle. Shapes are limited in their scope but the imagination isn’t – so you can create a lot of different shapes with the basic line, circle, and rectangle.
Let’s try with the available Triangle and Rectangle shapes.
Select and drag a rectangle shape on the background square of the logo. If you have to draw a square, you can hold down the SHIFT key to make all the four sides equal. Then draw a triangle to construct the top two and bottom two sides of the hexagon.
Make a copy of the first triangle and drag it into position on the opposite side. Snap each object to the other. Tweak each shape with the help the handles to get the desired shape.
Set Shape Outline to No Outline for all three shapes.

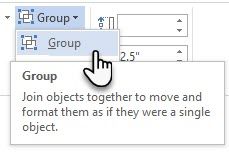
Select the three different objects and select Group from the right-click menu. And then, set Shape Fill to white. You can also select Group from the Drawing Tools. It’s on the extreme right.
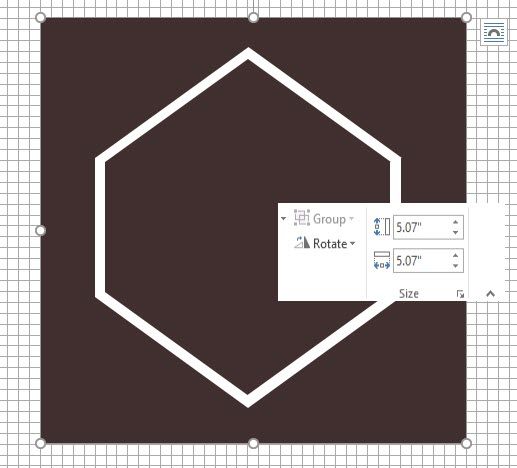
The next step is a bit tricky. Unlike PowerPoint, Microsoft Word does not have the facility to merge and combine shapes. We have to rely on creatively using another shape of a smaller size (and different color) to create a hollow hexagon with a thick outline. Of course, you can always create a multi-sided box with the Line shape and give it a specific thickness too.
Create a copy of the original hexagon and set the shape fill to the background color. Position it over the original hexagon. Instead of dragging the handles, I find it easier to use the more precise Size fields in the Drawing toolbar.
The Size field helps you make minute tweaks to any object and is always a better option to dragging the corner handles.
Use Other Shapes for The Other Graphics
Follow the same method to add the anchor. The line above the company name, and the two stars. We will deal with the bird shapes in a little while.
The anchor is a combination of an oval drawn as a circle, a thick line, and a block arc. See the individual elements in the screenshot below.

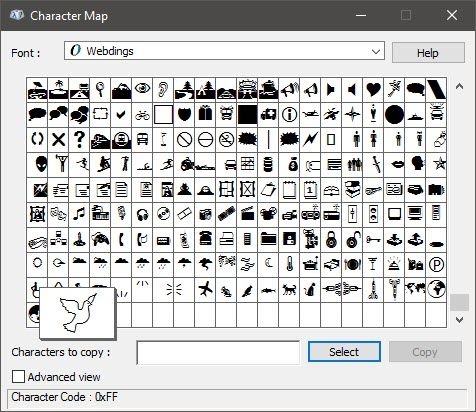
Try the Character Map
The Windows Character Map is also a rich source of symbols you can use in your logos. The Webdings and Wingdings fonts are installed by default and they can supply you with some creative escape routes in case you aren’t getting the right shape to use.
In this case, I could have combined two arc shapes to create the «seagulls» in the logo. But the Bird character in Webdings looks neater instead of my hack.
So, set your document’s font to Webdings. Open the Character Map — type map in the search box on the taskbar, and choose Character Map from the result. Copy the symbol for the bird from the character set. Set the document’s font to Webdings. Insert a text box in the right location and past the bird in the text box. Like any other font, you can give it a color – white in this case.
The second bird on the right is a mirror image of the first symbol. See this Microsoft Word support article to see how to reverse a text box and create its mirror image.
Now, the major part of the logo has taken shape.
![]()
3. Add text and text effects.
This is the easy part and self-improvement-explanatory. Use Text Boxes to insert each word so that you can position each word precisely and style them individually.

Font pairing is an art. I won’t be able to go into it in detail here, but there are websites like Font Pair, I Font You, and Typ.io that can help you out. You also don’t have to feel forced by the fonts you have on your computer. There’s an ocean of free fonts you can download with a click.
4. Group the text and image together.
Select each individual object in the logo (press the SHIFT key when you select). Stick them together with the Group command in the right-click menu or on the Ribbon.
5. Save Your Logo as a Picture
You must save the logo as a picture file before you can use it. Microsoft Word does not have a direct way to save this as a JPEG or a PNG file. But it does have a tool which you can use.
Take a Screen Clipping. You can use any screenshot tool to do the job for you. But for effortless utility, open a new Word document. Go to Insert > Screenshot. Select Screen Clipping and select the logo from the Word document. The logo is pasted as a screenshot in the second Word document you just opened.
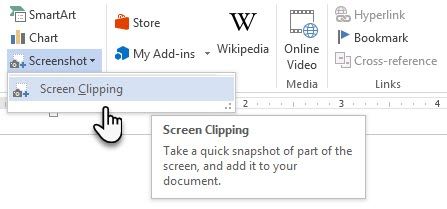
Still confused? This Microsoft Support page explains the screen clipping steps in more detail.
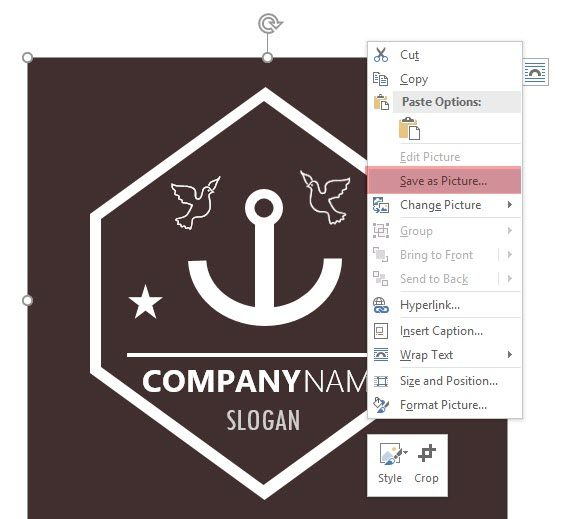
Right-click on the logo and choose Save as Picture to save your logo in the popular image formats given in the dialog box.
Use the Windows Snipping Tool. This lesser known tool in the Windows 10 toolbox can be launched from search bar. Type Clipping Tool to make it appear. It works like a simple screen capture utility.
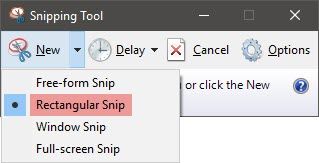
To take a screenshot, select New. Select the part of the screen that you want to capture. Choose Rectangular by pulling down the arrow on the New button.
Other Microsoft Word Assets You Can Use for A Logo
Icons. If you have an updated version of Microsoft Word through the Office 365 subscription, then you can spot the new Icons library on the Insert menu. Choose from categories like people, technology, or business. Click the icon that you think can be creatively used in a logo.
![]()
WordArt. The old favorite. WordArt is one of the quickest ways to create text logos that look stylish. You can combine WordArt with Shapes and Icons to enhance your creative options. The Microsoft Support page should help as a primer.
I would try to avoid WordArt and keep things simple by using a creative combination of artistic fonts. And then, enhancing with subtle text effects.
Microsoft Word Isn’t for Graphic Design. But…
With your first logo in Microsoft Word, you will realize that the software isn’t meant to be a graphics editor. It is not even recommended as a page layout program. Microsoft Word is good for typing words and making beautiful professional documents. Then what is the purpose of this tutorial?
- You can explore your creative chops quickly.
- Brainstorm an idea and make a quick mock-up.
- Use the logo design process to understand Word’s limitations (and design features).
I have drawn a few logos on Word for my personal blog and just for fun or practice. It has been an exercise in using constraints. Good logo design is always about keeping things simple (the KISS principle). Using the right pair of fonts can stretch your imagination all on its own. And in a crunch, you can make an eye-catching logo with free logo generator websites. Plus, with the right apps, you can create all types of graphics quickly.
Image Credit: Rawpixel.com via Shutterstock.com
Originally written by Mark O’Neill on 12th August 2009
![]()
Four easy steps to create a professional business logo in Microsoft Word.
1.1
Open a blank document.

Open Microsoft word, then click on «New» in the side menu bar. This will bring up a selection of templates to work off. Click on «Blank document.»
It’s a good idea to name and save your file straight away. Click «File», then «Save» then choose a destination folder and a name for your document.
1.2
Enable your ruler and grid lines.

Click on the «View» tab in the toolbar menu and check «Ruler» and «Gridlines» until they appear on the screen.
2.
Start with the background of your logo.
2.1
Add the background shape of your logo.
![]()
Go to the «Insert» tab and click on «Shapes.» Select a shape from the drop-down menu that has a large frame and drag it into your document. For this example, we’ve chosen a circle.
2.2
Choose your background color.

Once you’ve chosen your ideal shape, you’ll automatically be directed to the «Format» tab. Click on the «Shape Fill» option until a drop-menu appears. Here, you’ll be able to choose from a variety of colors.
For this step, you’ll want to consult your branding strategy. The color palette you choose plays a pivotal role in the overall design of your logo as it helps communicate your brand message. Vibrant colors are eye-catching and attractive, while dark tones exude professionalism.
3.1
Add additional shapes to your logo.
![]()
Repeat the process of adding a shape to the logo. Play around with different shapes that stand out against the solid background. For our example, we’ve chosen a hexagon shape to add dimension.
Once you’ve chosen your second shape, drag it to the original background shape and click on «No Fill» under the «Shape Fill» option. If you want to adjust the thickness and color of the second shape’s outline, click on «Shape Outline» and experiment with different colors and weights.
Play around with «Shape Fill,» «Shape Outline,» and «Shape Effects.» You can also add multiple shapes to create a unique border.
3.2
Add your business name.

Once you have a clear outline of the logo, you can add the business’s name. To add text, go to the «Insert» tab and click on «Text Box.» A separate window with various text boxes will appear on the screen. From this window, select «Draw Text Box.»
Drag the text box in your original shape, click on «Shape Fill,» and check «No Fill.» In the text box, add your business’s name. For the best results, try experimenting with different fonts that are eye-catching and bold.
Once you’re done adding your business name, click on «Shape Outline» and select «No Outline.»
3.3
Add an icon or unique shape.
![]()
To help add a dash of creativity to your logo design, add a unique shape that relates to your brand. Follow the same process of adding a shape to the design and experiment with «Shape Fill» and «Shape Outline.»
In our example, we’ve added a lightening shape to emphasize «Striking» in the business name.

Before finalizing your logo design, you’ll want to group your elements for future use. This way, when you want to copy and paste your logo, you can avoid the lengthy process of redoing the entire design from scratch.
To group the elements that make up your logo, click and hold on to the CTRL button while you click on the different shapes and figures in your design. Once all the shapes and figures are selected, right click until a pop-up menu appears. From the pop-up menu, click «Group.»
4.2
Save your logo design as a picture.
![]()
After grouping your elements, right click on the logo until a pop-up menu appears. From the pop-up menu, select the «Save as Picture…» option. Another menu will appear with the various file types available. Choose a file type that suits your needs and click on «Save.»
File types include PNG, JPEG, GIF, and TIF . The option to save your logo as an image is only available once you’ve successfully grouped your elements.
FAQs:
Can I create a logo with Microsoft Office?
Yes. You can create a logo using Microsoft Word with our step-by-step guide.
How can I create my own logo in Microsoft Word?
- Open a new Microsoft Word document.
- Add the background shape of your logo.
- Choose your background color.
- Add additional shapes to your logo.
- Add your business name.
- Add an icon or unique shape.
- Save your logo design.
How can I make my own logo on my computer?
You can design a free logo in Microsoft Word or use our free online business logo maker.
How can I make a circle logo in Microsoft Word?
You can follow our step-by-step guide on how to create a logo in Microsoft Word. In our guide, we’ve created a circle logo as an example.
How do I create a logo in Microsoft Word 2017?
Our complete guide includes eight steps you need to follow to create a logo in Microsoft Word 2017.
Можно ли создать логотип в Worde?
Microsoft Word это текстовый редактор и этим всё сказано.
Создать рисунок можно, но считать его качественным нельзя, т.е вы его сможете использовать в пределах Microsoft Word и не более того.
Мне часто приносят картинка (логотипы), созданные в Microsoft Word. Я их использую не более как идею, а потом перерисовываю в Corel Draw (или иллюстраторе).
Microsoft Word обладает довольно приличным векторным редактором. Нарисовать можно практически всё что задумаете (с некоторыми ограничениями по градиентам, например или точным позиционированием элементов текста и рисунка). Проблема в другом — результат вы можете распечатать, но сомневаюсь что в формате редактора у вас возьмут рисунок на дальнейшую обработку (например в типографию или для создания картинки для сайта).
Как придумать свой логотип?
- Логотип должен быть простым. .
- Логотип должен быть запоминающимся. .
- Логотип должен быть долговечным. .
- Логотип должен быть универсальным. .
- Логотип должен быть соответствующим. .
- Создайте бриф.
- Logaster. Logaster – русскоязычный сервис, предлагающий услуги как бесплатного, так и платного создания логотипа. .
- Logotype Maker. Logotype Maker — это бесплатный сервис для онлайн создания логотипа для вашего сайта. .
- Flaming Text. .
- Logo Ease. .
- Logo Maker.
Как красиво оформить текст в ворде?
- Выбираем подходящие границы в появившемся дополнительном окне. .
- Выбираете подходящий рисунок, оформляете его на границе листа, при желании вставляете дополнительные рамки и стили.
- Расположите иллюстрации так, как вам нужно.
- Выделите их. Для этого зажмите клавишу Ctrl и кликайте на фигуры, которые хотите соединить.
- В строке меню появится пункт «Формат». Выберете его — откроется ВордАрт. .
- Нажмите кнопку «Сгруппировать». Она находится в правой части меню.
Как создать логотип?
Я позаимствовал приведенный ниже логотип из Интернета, чтобы его можно было скопировать в MS Word. На этом примере вы поймете, как Word пытается создать логотип. MS Word не может точно воспроизвести его, но он постарается изо всех сил разработать.
Шаг 1. Откройте новый документ MS Word.
Шаг 2: Перейдите в Просмотр> Линии сетки.
ПРИМЕЧАНИЕ. Линии сетки помогают выравнивать фигуры и другие объекты в документе Word. Вы можете увидеть их только в режиме печати.
Шаг 3: Теперь нажмите Layout> Align> Grid Settings.
Шаг 4: Откроется окно «Сетка и направляющие». Обязательно установите флажки напротив «Привязать объекты к другим объектам» и «Привязать объекты к сетке, когда линии сетки не отображаются». Наконец, нажмите ОК.
Убедитесь, что эти настройки включены, и мы будем готовы, прежде чем вставим формы и начнем проектировать.
Заключение
Использование водяного знака в документах — удобное и простое средство защиты своих файлов. Воспользуйтесь данными в статье инструкциями, чтобы добавить вотермарк в свой продукт.
Редактор блога и специалист по контент-маркетингу в Turbologo. Статьи Виктории содержат полезные советы о маркетинге, создании бренда и продвижении его в Интернете.
Logo is a graphic mark or symbol which is made up of stylized texts, shapes, images, or combinations of the three. It is used to identify the company, organization, product, or brands.
A well-designed logo helps you to establish a connection with your target audience and invites them to interact with your brand.
Components of a logo
A well designed and attractive logo contains the following components —
1. Colors
The combination of attractive colors used in the logo to attracts the audience to your brand and enhances your brand communication. In the logo, you can use black, white, or multicolor based on your requirement.
2. Typography
Typography is one of the most important components of the logo. It is a craft that tells customers what you are offering to the audience.
3. Images
In the logo, the image can be an icon or a symbol. It helps users to clearly identify the brand.
4. Tagline
Tagline is used under a logo. It is a sentence or catchphrases that easily clarify your audience that what your brand does.
5. Text
Text is the most commonly used component in the logo. Always try to add stylish and unique text in the logo.
Create a logo in Word document
Microsoft Word provides various stylish texts as well as shapes to create pretty and good looking logos.
There are the following methods to create a logo in Word document —
Method 1: Create a simple logo
There are the following steps to create a logo in Word document using shapes and text box —
Step 1: Open the new Word document or an existing Word document.
Step 2: Go to the View tab on the Ribbon and click on the Gridlines checkbox in the Show group.
![]()
Step 3: Go to Insert tab on the Ribbon and click on the Shapes option in the Illustrations group.
![]()
Step 4: A recently used shape dialog box will appear on the screen. Select the shape that you want to add and drag it into your current document.
![]()
Step 5: Once you drag the shape in the document, a Format tab automatically appears on the screen. Click on the Shape Fill option under the Shape Style, A Theme color window appears in which select the color that you want to apply in the logo.
![]()
Step 6: To add text in the logo, go to Insert tab on the Ribbon and click on the Text Box icon in the Text group.
![]()
Step 7: The following window will appear on the screen in which click on the Draw Text Box at the bottom of the screen.
![]()
Step 8: Draw a text box inside your shape and start writing the text that you want to add to the logo.
![]()
Step 9: Highlight the text and go to the Home tab on the Ribbon. Select the theme font and size that you want to apply to the text.
![]()
Step 10: Once your logo is created, go to View tab on the Ribbon and uncheck the gridlines check button.
The screenshot below shows that a simple logo is created in the Word document.
![]()
Method 2: Create an attractive logo in Word document
An attractive logo includes Shapes, Outlines, WordArt, Colors, and Images to grab customer’s attention. Microsoft Word 2007 and its latest versions contain various drawing tools on the Ribbon that help you to create an attractive logo.
To create an attractive logo in Word document, follow the below-mentioned steps —
Step 1: Open the new blank Word document.
Step 2: Insert Shapes
- Go to Insert tab on the Ribbon and click on the Shapes option in the Illustrations group.
- A Recently Used Shapes dialog box will appear on the screen. Select the image that you want in your logo and drag it into your current document.
![]()
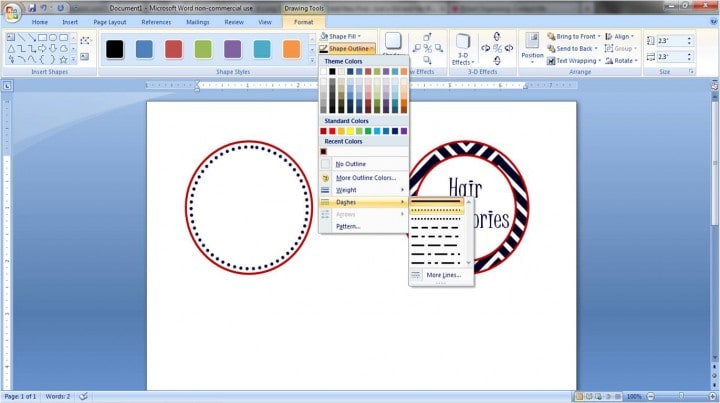
Step 3: Change the Outline
- To change the outline, click on the shape.
- A format tab appears on the screen, click on it.
- Go to the colored outline tab in the shape style. Select the colored outline that you want to apply to the logo.
![]()
Step 4: Change outline weight
- To change the Shape Outline Weight, click on the Shape Outline tab in the Shape Styles.
- A Theme Colors dialog box will appear on the screen.
- Click on the Weight icon, a list of different sized weights will appear on the screen, select the weight size according to your requirement, as shown in the below screenshot.
![]()
Step 5: Insert Word Art in logo
Follow the below instructions to insert WordArt in Word 2010 —
1. To insert Word Art in the logo, go to the File tab on the Ribbon and click on the Save As option.
![]()
2. A Save as dialog box appears, click on the drop-down icon associated with the Save as type, and select Word 97-2003 Template (*.dot) from the drop- down menu.
![]()
3. The following screen will appear on the screen, click on the Continue button.
![]()
4. Now, go to the Insert tab and click on the WordArt icon under the Text group.
![]()
5. A WordArt dialog box appears, select WordArt according to your requirement.
![]()
6. An Edit WordArt Text window appears, enter the text that you want to apply and click on the OK button at the bottom of the screen.
![]()
7. Click on the text, go to the Format tab, and click on the Wrap Text icon. A drop-down menu appears in which click on the In Front of Text.
![]()
8. Adjust the text according to your requirement.
The screenshot below shows that WordArt is added to the logo.
![]()
Step 6: Insert Pictures in the logo
Microsoft allows you to add pictures to the logo.
Follow the below instructions to insert a picture in the logo.
1. Go to the Insert tab on the Ribbon and click on the Clip Art in the Illustration section.
![]()
2. A Clip Art dialog box will appear at the right corner of the document. Type the name of the image in the Search for: textbox and click on the Go button.
A list of related images appears in the dialog box. Select the image that you want to insert in the logo and drag it into the document.
![]()
3. Click on the image. Go to the Format tab and click on the Wrap text. A Wrap text drop-down menu appears, click on the In Front of Text, as shown in the below screenshot.
![]()
4. Adjust the image based on your shape.
5. The screenshot below shows that the image is inserted in the logo.
![]()
Step 7: Add Colors in the logo
In Microsoft Word, you can add colors in the logo to make the logo more attractive and beautiful.
1. Select the shape in which you want to add color.
2. Go to the Format tab and select color in the Shape Styles.
![]()
The screenshot below shows that color is added to the logo.
![]()