
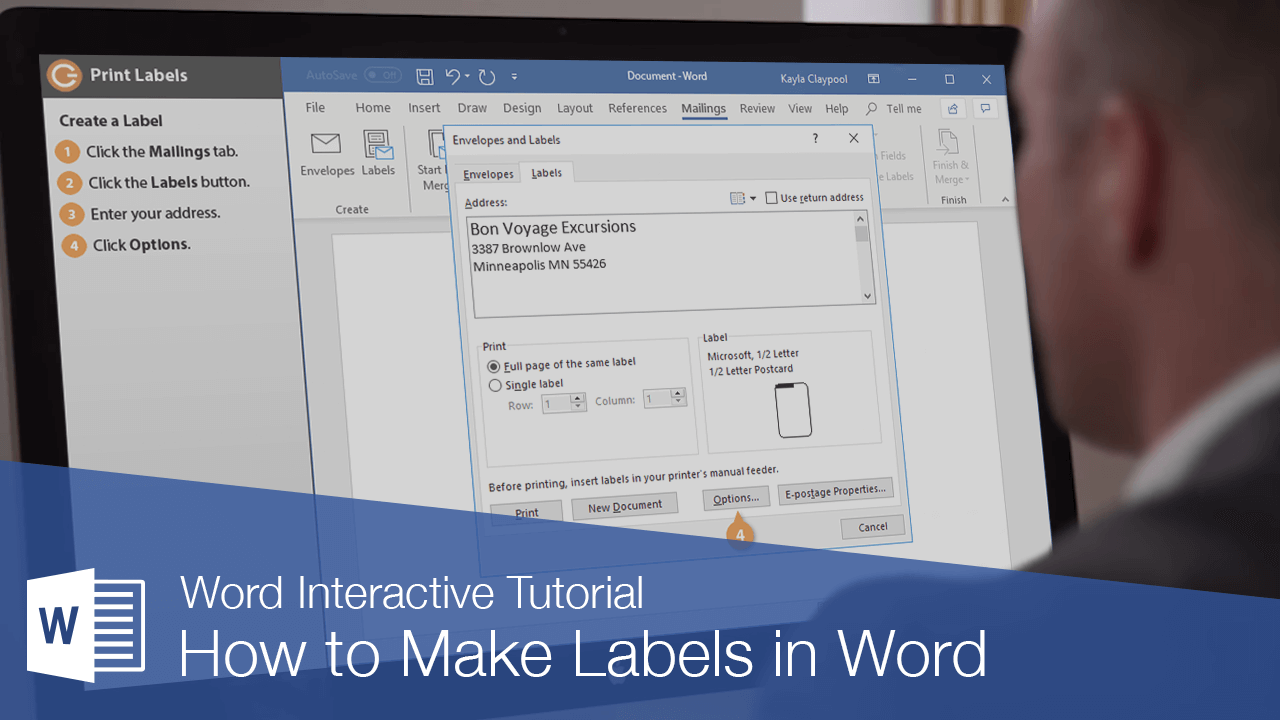
Create and print labels

Create and print a page of identical labels
-
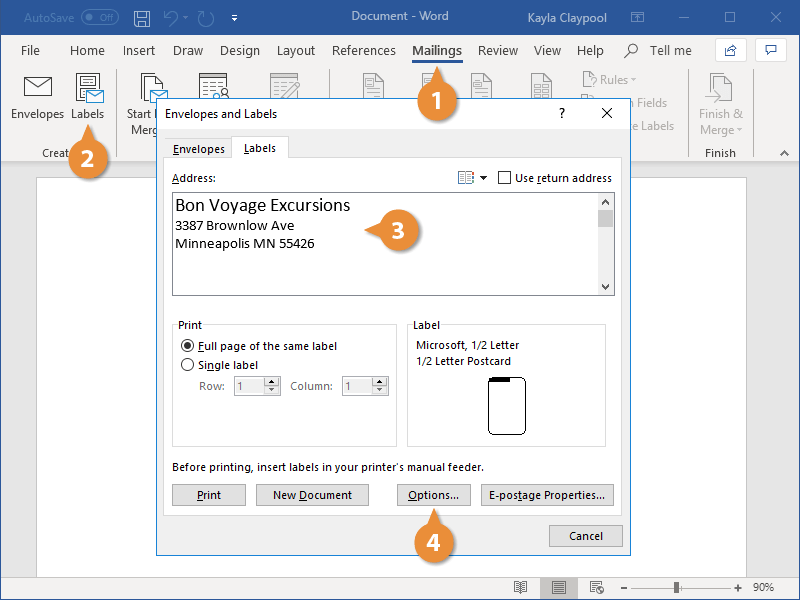
Go to Mailings > Labels.
-
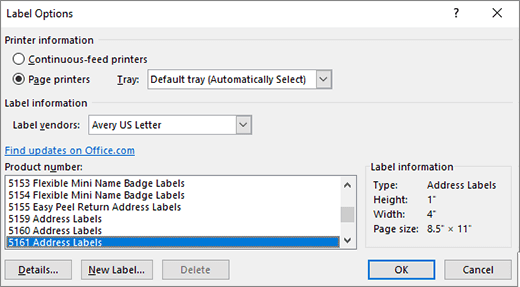
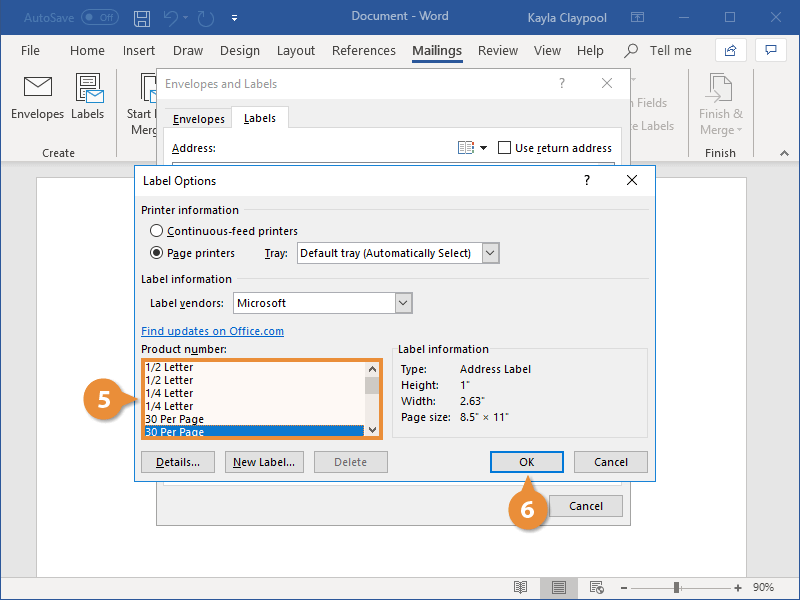
Select Options and choose a label vendor and product to use. Select OK.
If you don’t see your product number, select New Label and configure a custom label.

-
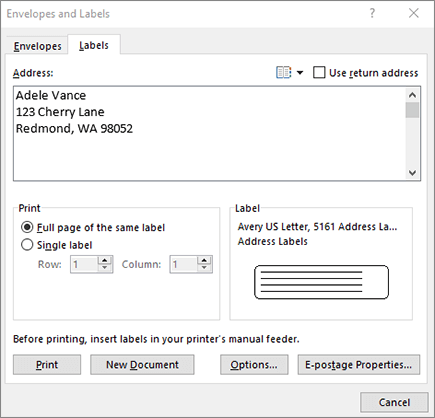
Type an address or other information in the Address box (text only).
To use an address from your contacts list select Insert Address
. -
To change the formatting, select the text, right-click, and make changes with Font or Paragraph.
-
Select OK.
-
Select Full page of the same label.
-
Select Print, or New Document to edit, save and print later.
 .
.If you need just one label, select Single label from the Mailings > Labels menu and the position on the label sheet where you want it to appear. Select OK, the destination, and Save.
Create and print a page of the same label
-
Go to Mailings > Labels.
-
In the Address box, type the text that you want.
To use an address from your contacts list select Insert Address
. -
To change the formatting, select the text, right-click, and make changes with Home > Font or Paragraph.
-
In the Label Options dialog box, make your choices, and then select OK.
If you don’t see your product number, select New Label and configure a custom label.
-
Select OK.
-
Select Full page of the same label.
-
Select Print, or New Document to edit, save and print later.
 .
.Set up and print a page of the same label
-
Go to Mailings > Labels.
-
Select Options.
-
Choose Printer type, Label products, and Product number.
If you don’t see your product number, select New Label and configure a custom label.
-
Select OK.
-
Type an address or other information in the Delivery Address box.
To use an address from your contacts list select Insert Address
. -
To change the formatting, select the text and then select Font to make changes.
-
Select Full page of the same label.
-
Select OK.
-
Select Print, or New Document to edit, save and print later.
 .
.For info about merging data with labels, see Create mailing labels in Word by using mail merge or Mail merge in Word for Mac.
If you want to make return address labels, see Create return address labels.
Word for the web doesn’t support directly creating labels. However you can create labels from a template.
-
Open Word for the web.
-
Select a label template when you create a new document. Select More templates if you don’t see what you want.
You can also go to templates.office.com, and search for label.
-
For a sheet of identical labels, fill out one label, and then copy/paste for the rest.
Tip: Print your labels to a sheet of paper before loading labels into the printer to make sure the text aligns with the labels.
See also
To create a page of different labels, see Create a sheet of nametags or address labels
To create a page of labels with graphics, see Add graphics to labels
To print one label on a partially used sheet, see Print one label on a partially used sheet
To create labels with a mailing list, see Print labels for your mailing list
To create labels using a template, see Microsoft label templates
Need more help?
Want more options?
Explore subscription benefits, browse training courses, learn how to secure your device, and more.
Communities help you ask and answer questions, give feedback, and hear from experts with rich knowledge.
-
1
Obtain the labels you need. Labels come in different sizes and for different purposes, for everything from regular, no. 10 envelopes to legal-sized mailings and CD covers. Get the labels that are best-suited for your project.
-
2
Create a new Microsoft Word document. Double-click the blue app that contains or is shaped like a «W«, then double-click Blank Document» in the upper-left part of the opening window.
Advertisement
-
3
Click the Mailings tab. It’s at the top of the window.
-
4
Click Labels under the «Create» menu. It’s at the far-left of the toolbar.
- If prompted, click OK to grant Word access to your contacts.
-
5
Add text to the label. Do so by typing a recipient’s address, name badge text, CD label, etc., in the Delivery Address field or by clicking the address book icon to the right of the field, selecting a recipient and clicking Insert.
-
6
Click Font…. This dialog box allows you to customize the look of the labels by selecting a font, text size, text color, and style.
-
7
Customize the label text and click OK.
-
8
Click Options…. It’s a button in the Label section of the dialog box.
-
9
Click the radio button next to your printer type.
-
10
Click the «Label products» drop-down menu.
-
11
Select your label manufacturer.
- If your manufacturer isn’t listed, examine the label packaging for the label dimensions and the number per sheet. With this information, you can select an equivalent product.
-
12
Click the «Product number» drop down.
-
13
Click the product number for your label. It should be clearly marked on the packaging.
-
14
Click OK.
-
15
Select the number of labels you’re printing.
- Click Full page of the same label to print a full sheet of the label
- Click Single label and then identify the row and the column on the label sheet where you’d like the label to be printed.
-
16
Insert the blank label sheet into your printer. Make sure you have them aligned correctly for your printer.
-
17
Click Print….
- Make sure the print preview of the labels looks the way you want it to.
-
18
Click Print. Your label(s) will print.
- Click File in the menu bar and Save if you want to save this label template for future use.


Advertisement
-
1
Obtain the labels you need. Labels come in different sizes and for different purposes, for everything from regular, no. 10 envelopes to legal-sized mailings. Get the labels that are best-suited for your project.
-
2
Prepare your mailing list. Word can pull names and addresses from an Excel spreadsheet, an Access database, your Outlook contacts, or on Mac, your Apple contacts or a FileMaker Pro database. You can also type a new mailing list during the merge, if you prefer.
-
3
Create a new Microsoft Word document. Double-click the blue app that contains or is shaped like a «W«, then double-click Blank Document» in the upper-left part of the opening window.
-
4
Click the Mailings tab. It’s at the top of the window.
-
5
Click Start Mail Merge and Labels…. It’s at the far-left of the toolbar.
- If prompted, click OK to grant Word access to your contacts.
-
6
Click the radio button next to your printer type.
-
7
Click the «Label products» drop-down menu.
-
8
Select your label manufacturer.
- If your manufacturer isn’t listed, examine the label packaging for the label dimensions and the number per sheet. With this information, you can select an equivalent product.
-
9
Click the «Product number» drop down.
-
10
Click the product number for your label. It should be clearly marked on the packaging.
-
11
Click OK.
-
12
Click Select Recipients…. It’s at the left of the toolbar.
-
13
Select your mailing list. Click on the source of the addresses you want to put on the labels.
- If you want to create a new list at this point, click Create a new List….
- If you don’t want to create labels for your entire mailing list, click Edit Recipient List and select the recipients you want to include.
-
14
Click Address Block.
- On Mac, click a line near the top of the first label, and click Insert Merge Field, then select a field you want to include, such as «First_Name.» Repeat this process for each field you want to include, adding the appropriate spacing and address formatting.
-
15
Select the elements you want to include on the labels. These include name format, business, name, etc.
-
16
Click OK.
-
17
Click Update Labels. It’s an icon in the toolbar with a green «refresh» symbol.
-
18
Click Preview Results in the toolbar. Make sure the labels look the way you want them to.
-
19
Insert the blank label sheets into your printer. Make sure you have them aligned correctly for your printer.
-
20
Click Finish & Merge and Print Documents…. It’s at the far right of the toolbar.
-
21
Click Print. Your label(s) will print.
- Click File in the menu bar and Save if you want to save this label template for future use.


Advertisement
Add New Question
-
Question
When I type a sheet of labels, sometimes a second blank page appears. How do I remove the second page?

Go to the bottom of the first page, and hit the ‘delete’ key — it should go away.
-
Question
How do I print labels that are all different addresses?
Use a mail merge. Add all of the different addresses, then print each one.
-
Question
How do I make a full page of address labels?
There should be an option called «mail merge.» You need a mailing list and your document; the list can be a spreadsheet, an Outlook directory etc.
See more answers
Ask a Question
200 characters left
Include your email address to get a message when this question is answered.
Submit
Advertisement
Thanks for submitting a tip for review!
About This Article
Article SummaryX
1. Create a new Word document.
2. Click Mailings.
3. Click Labels.
4. Add the label text.
5. Customize the printing layout.
6. Choose your label manufacturer.
7. Click OK.
8. Click Print.
Did this summary help you?
Thanks to all authors for creating a page that has been read 702,273 times.
Is this article up to date?
How to Print Labels from Word
Print a page of labels or design custom labels
Updated on February 12, 2021
What to Know
- In Word, go to the Mailings tab. Select Labels > Options. Choose your label brand and product number.
- Type the information for the address in the Address section.
- In the Print section, select Full Page of Same Label or Single Label (with row and column specified). Choose Print.
This article explains how to print labels from Word. It includes information for printing a single label or a page of the same labels, for printing a page of different labels, and for printing custom labels. These instructions apply to Word for Microsoft 365, Word 2019, 2016, 2013, 2010, and 2007, and Word for Mac 2019 and 2016.
Print a Single Label or a Page of the Same Labels
Microsoft Word isn’t just for documents, resumes, or letters. It’s also a powerful and versatile application for most of your mailing and labeling needs. There are multiple options for creating labels in Word, so choose the one that best fits your needs.
Here’s how to fill a sheet with return address labels or create a single, professional-looking mailing label in Word.
-
Go to the Mailings tab.
-
In the Create group, select Labels. The Envelopes and Labels dialog box opens with the Labels tab selected.
-
Select Options to open Label Options.
-
Choose the label brand in the Label Vendors or Label Products list, then select the product number matching the labels you want to print on.
-
Select OK.
-
Type an address or other information in the Address box.
In Word for Mac 2019 and 2016, this box is called Delivery Address. In Word 2010, the Address box step comes before the Label Options selections.
-
In the Print section, select Full Page of the Same Label to print a page of the same address labels.
-
In the Print section, select Single Label to print one label. Choose the row and column corresponding with where you want the address printed on the sheet of labels.
The Single Label option is helpful if you have a partially used sheet of printer labels.
-
Make sure the label sheet is waiting in the printer and select Print, or save to print later.
Create a Page of Different Labels
To make a sheet of labels in Word with different addresses or other information, such as nametags, create a document in which you will type the information for each label.
-
Go to the Mailings tab.
-
In the Create group, select Labels. The Envelopes and Labels dialog box opens with the Labels tab selected.
In Word 2010, leave the Address box blank.
-
Select Options to open Label Options.
-
Choose the label brand in the Label Vendors or Label Products list, then select the product number matching the labels you want to print on.
Word for Mac 2019 and 2016 also ask for the type of printer.
-
Select OK.
-
Select New Document. Word creates a new document displaying a page of blank labels matching the dimensions of the brand and label size you selected.
In Word for Mac 2019 and 2016, you don’t have to select New Document. After selecting OK in the previous step, Word opens a new document that contains a table with dimensions that match that label product.
-
Go to the Layout tab under Table Tools and choose View Gridlines if the outlines of the labels do not appear.
-
Type the information you want into each label.
-
Go to the File tab, select Print, then select the Print button when you’re ready to print the labels. Save the document for future use.
Make Custom Labels
If you need to print labels that don’t match the dimensions of the label brands and products listed in the Label Options dialog box, create custom labels to match your specifications.
Before you begin, make sure you have the precise measurements of the labels you need, including the height and width of each label, the paper size, the number of labels down and across, and the margins.
-
Go to the Mailings tab.
-
In the Create group, select Labels. The Envelopes and Labels dialog box opens with the Labels tab selected.
-
Select Options to open Label Options.
-
Select New Label. The Label Details dialog box opens.
-
Enter a name for the labels.
-
Change the measurements to match the exact dimensions of the labels you need. An example of the label appears in the Preview box.
-
Select OK to create the custom labels. You can then use these for making labels in Word.
There is no Mailings tab in Word for Mac 2011. In this version, access label features from the Tools menu.
Thanks for letting us know!
Get the Latest Tech News Delivered Every Day
Subscribe
MS Word provides a feature to add an Envelope directly into the Word Document, and it is ready to get printed with a click. It also provides the Label feature, in which we can provide the address/information we want to get on the label, select its quantity, and good to go for printing on a click. Detailed use and steps with examples of Envelopes and Labels are as follows:
Envelopes
Envelopes are used traditionally everywhere. It is a simple mode of communication between the sender and the receiver for e.g., Invitations, Congratulatory messages, etc.
We can get an envelope inserted into our Word Document directly following the steps:
Step 1: Go to the Mailings bar and select the Envelopes bar under the Create bar.
Step 2: A dialog box will appear.

Step 3: Provide the details such as the Delivery address, Return address, etc., and then click on the Add to Document button below.

Step 4: An Envelope will get inserted into the MS Word document.

Labels
Labels refer to the information or Address (in particular) we want to get displayed on products, banners, etc. We can also set the quantity of the labels we want and can print them instantly.
Follow the steps to get labels in MS Word:
Step 1: Go to the Mailings bar and select the Labels option under the Create bar.

Step 2: A dialog box will appear.

Step 3: Provide the details of the Address and select the options button below.

Labels dialog box
Step 4: Another dialog box will appear then Provide the Label information such as Label vendors, and the Product number, and then press the OK button.

Label Options dialog box
Step 5: Labels will get inserted into the MS Word document.

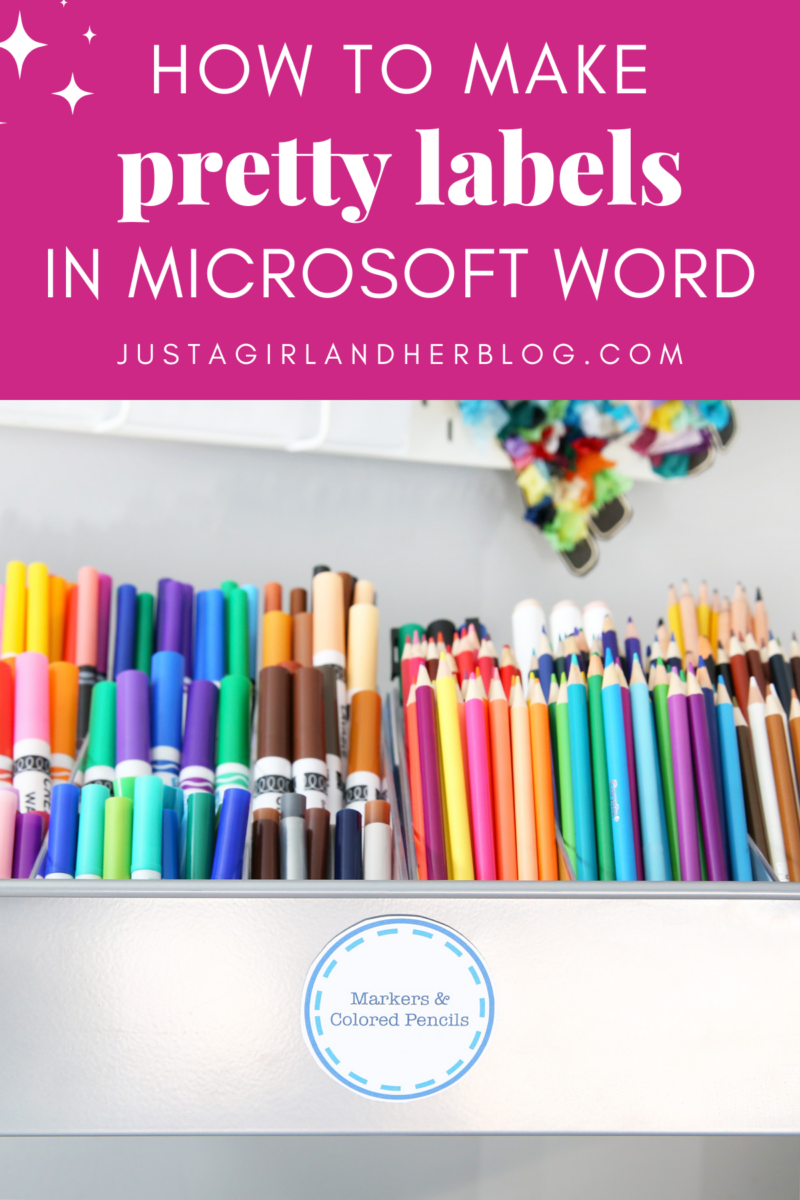
Learn how to create pretty, custom labels in Microsoft Word that can be printed in just about any shape, size, or color scheme!
This post contains affiliate links. For more information, see my disclosures here.
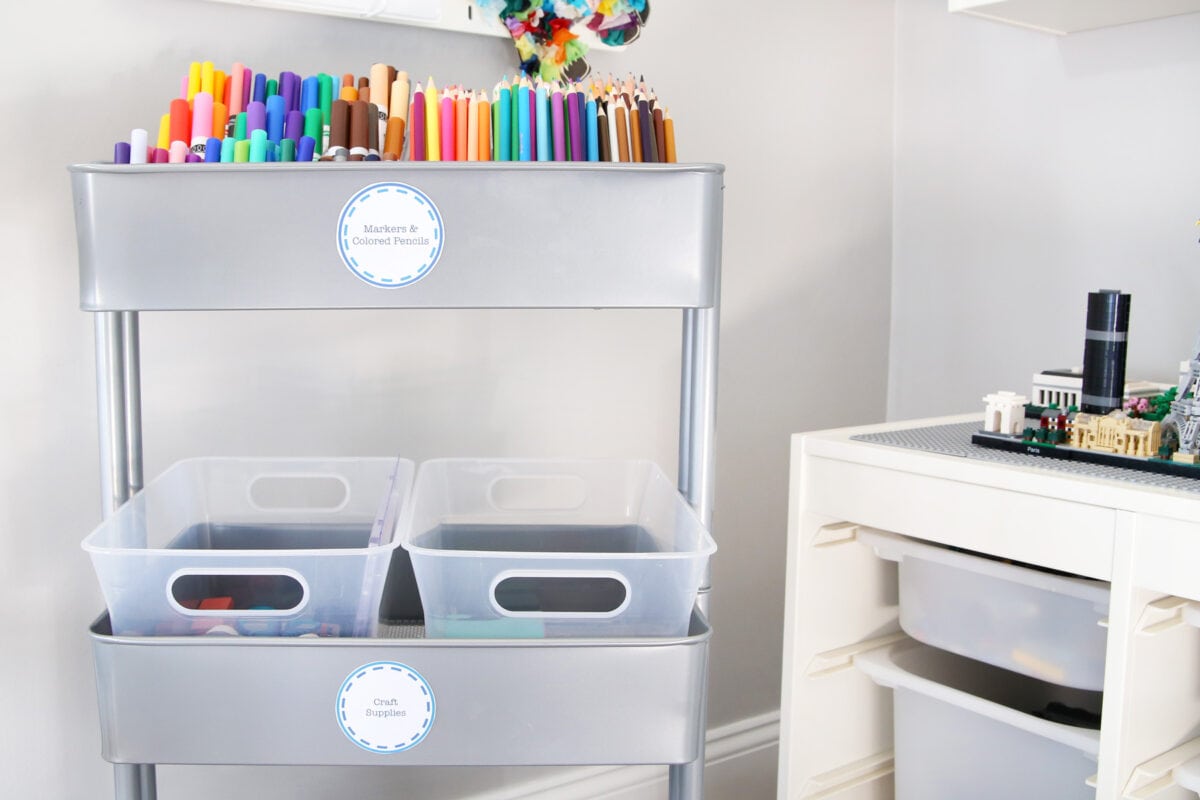
I must admit, I am just a teensy bit obsessed with labels. I put them on just about everything in our house. They’re perfect for getting organized, helping the boys find what they need, and adding a pretty touch to a basket or gift.
If I’m making labels with adhesive vinyl, I typically use my Cricut cutting machine. When it comes to creating pretty paper labels, though, I can’t help but head back to my old stand by, Microsoft Word, for all of my label-making needs.
Word is great because it’s super-simple to use. And almost everybody has it, so it’s really easy to email and share projects. I’m sure there are about a million ways to create pretty labels in Microsoft Word, but here is my tried-and-true method.

Get 300+ pages of free printables!
Become one of our VIP newsletter subscribers and gain access to our exclusive free printables vault!
How to Make a Label in Word Step-by-Step
1. Choose your shape.
Beginning with a blank document, click on the “Insert” tab, select “Shapes,” and choose the desired shape for your label. I picked the circle.

2. Adjust your outline and fill settings.
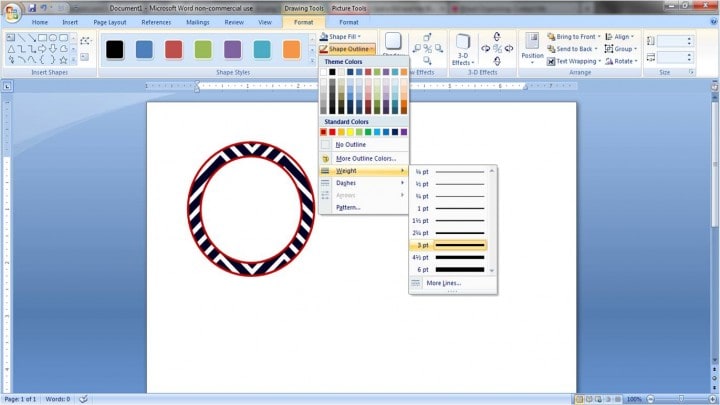
Once you’ve drawn your shape to your desired size (I chose 2.5″ x 2.5″.), you’ll want to make it look pretty! I usually like to make the outline of my shape a little thicker so that it is well defined when I print it out.
To do that, go to the “Format” tab, and under the “Shape Outline” drop down, you will see “Weight.” I chose 3 pt; you can make yours thinner or thicker depending on your preference.
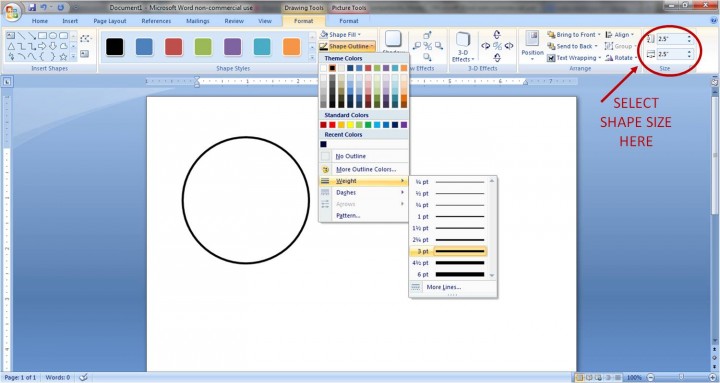
You can also change the color of your outline in the “Shape Outline” drop down. I picked dark red.
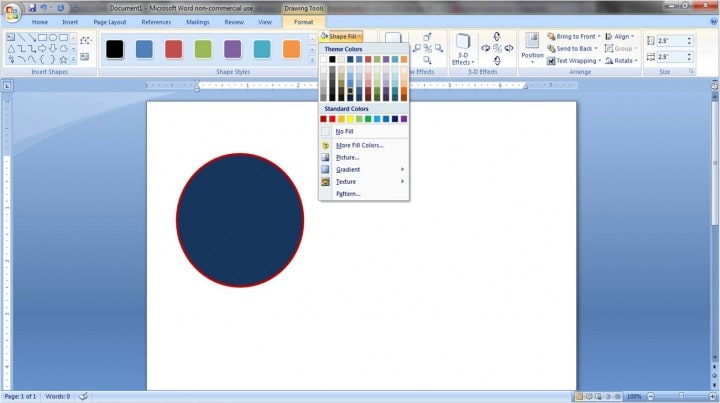
While we’re changing colors, let’s go ahead and change our fill color as well. Right above “Shape Outline,” you’ll see the “Shape Fill” option. You have a few choices here. You can fill your shape with a solid color.
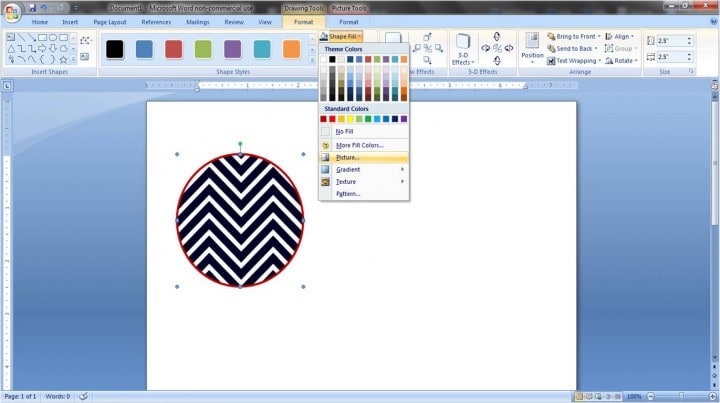
Or you may want to put a design inside your shape. By choosing the “Picture” option from the “Shape Fill” drop down, you can use any picture file on your computer as your shape’s background.
You can also play with the “Gradient” and “Texture” options until you find the background of your choice.
3. Add a layer, if desired.
I think it always looks nice to add a second layer to your label. You get to have a fun color or pattern in the background, but you also get a clean white surface for your wording. To add a layer, you’ll go through a similar process: choose your shape (“Insert” tab, “Shapes” button), and size it correctly. I did 2″ x 2″.
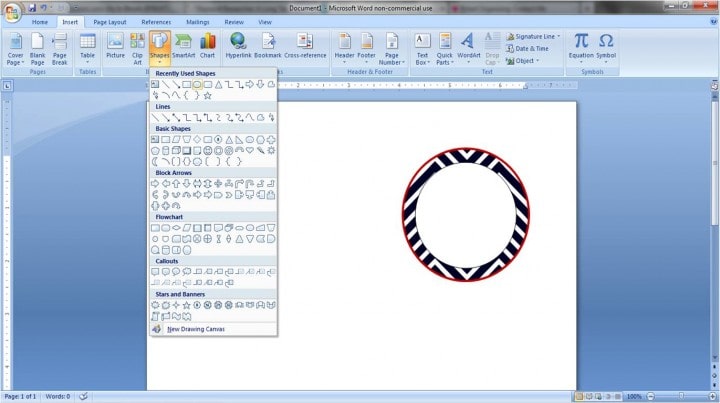
Then adjust your outline width and outline and fill colors. I went with the 3 pt dark red outline again, and I chose to keep the fill color white, but you could always pick a color.
4. Add your text.
To do this, you’ll want to go to the “Insert” tab and select “Text Box.” Choose the “Draw Text Box” option at the bottom of the drop down menu.
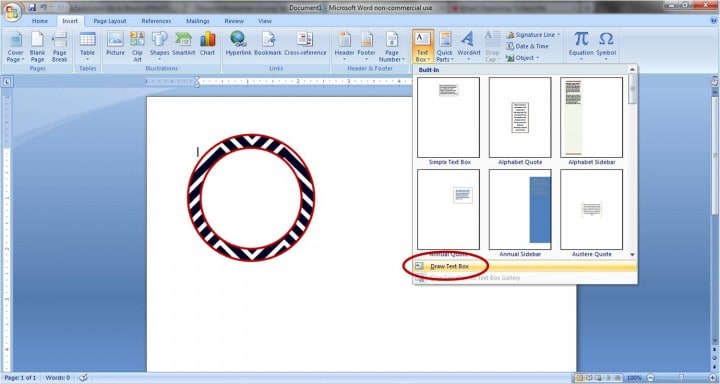
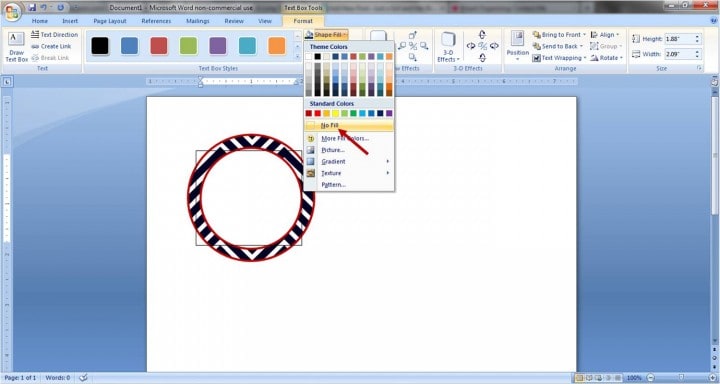
Draw your text box over your existing shape. Then, so the text box doesn’t block the beautiful label you’ve made, you’ll want to make it transparent. With the text box selected, go to the “Text Box” tab, and under “Shape Fill” choose “No Fill.” You will also want to choose “No Fill” for the “Shape Outline.”
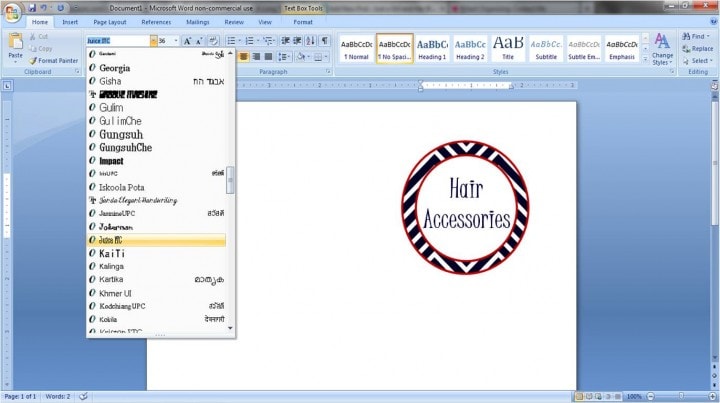
Once your text box is transparent, you’re ready to type. Add your words, and change the size, font, and alignment like you would in a regular Word document. You can also play with color! I used a 36 pt font called “Juice ITC” in dark blue.
5. “Group” your label.
The last thing I like to do when I get the label the way I want it is to group it together. This allows me to move it around the page as one unit rather than trying to move each piece individually.
To use the group feature, hold down the “Ctrl” key on a Windows computer or “Command” on Mac and click on each element of your label so they are all selected.

Next you’ll want to right click on your selection and under “Grouping” choose “Group.”
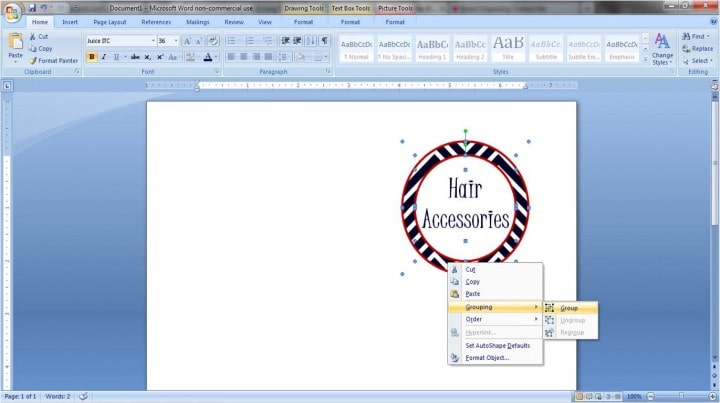
TA-DA! Your label is now one cohesive unit! You can move it around the page, copy and paste it, change the text, go crazy with it!
Now for all you overachievers out there…
Making Labels in Microsoft Word: The Bonus Round
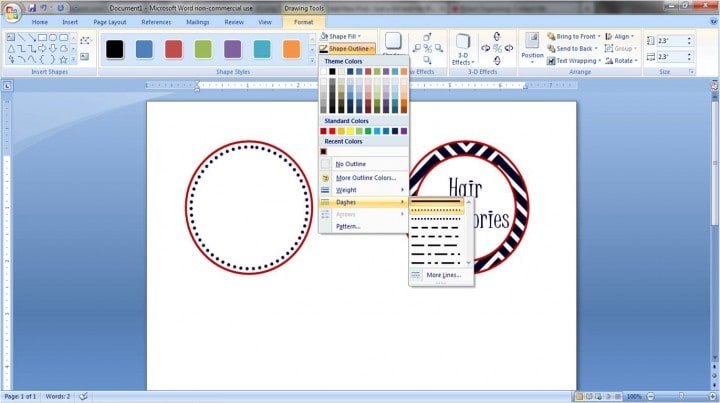
Another fun thing to play with is the outline style. I’ll start out with the same white circle with a dark red outline, but instead of using a colored background, I’ll add interest with the second layer.
For the “Shape Outline” of the inner circle, go down to “Dashes.” You will be able to choose dots (as I did), squares, dashed lines, etc. Just another cute dimension to add to your labels!
Though fancy programs and machines can be really great, it is possible to make pretty labels just using Microsoft Word. In my opinion, it is the simplest program to navigate, and it still gives beautiful, fully-custom results.
How to Print Labels From Word
After you’ve created your cute labels, what’s next? I typically print mine out (with my home ink jet printer) on white card stock so that they’re sturdy, and then cut them out by hand.
If my labels are going to be in a higher traffic area, I’ll laminate them to protect them a little bit more. Laminated or not, I typically just attach my labels with tape or velcro dots.
My Favorite Laminator
I have used this laminator for years, and it is always my go-to when I want to make my labels or other printables a little sturdier.

![]()
If you want to use a label that is more like a sticker, Avery has many templates for their stickers. You would simply head to their website, find the template that matches the stickers that you purchased (you can search by the number on the pack), download the template, and create your design within the guides they provide.
My Favorite Labeling Supplies
- Printer
- White Card Stock
- Laminator + Laminating Pouches
- Velcro Dots
- Sticker Sheets
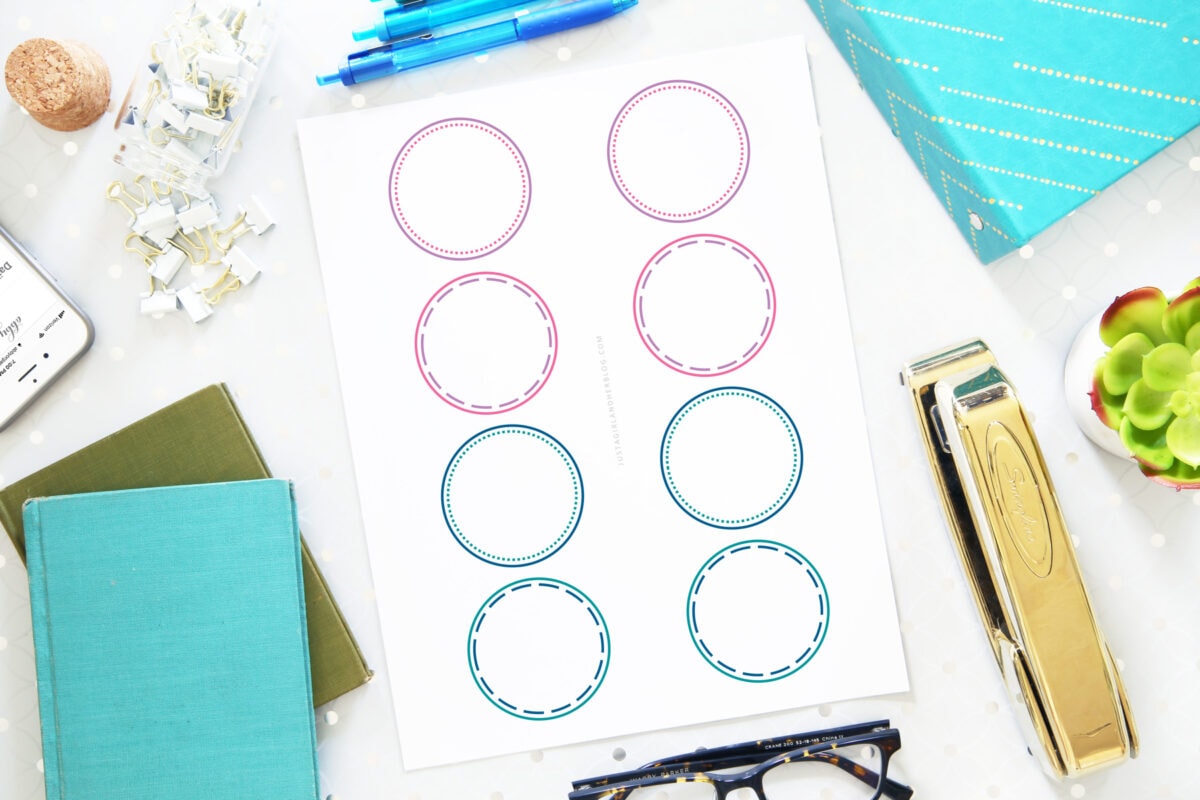
And just for fun, I’ve included a page of simple printable labels to get you started. Happy labeling!
Making Labels in Microsoft Word: Frequently Asked Questions
Want to save this post to revisit later? Be sure to pin the image below so you can find it easily!
- How to Make DIY Iron On Labels
- How to Make Your Own Party Invitations
- How to Make Vinyl Labels with a Cricut Cutting Machine
- 16 Creative Projects for Label Lovers {The Thinking Closet}
- How to Create a Monogram in Word
- How to Make Pretty Labels with a Silhouette Machine
- How to Use Labels to Organize Your Whole House
What is your favorite way to make labels?

This post contains affiliate links. For more information, see my disclosures here.
Create a Label
Click the Mailings tab. Click the Labels button. Enter an address. If you want to print only one label, select Single label in the Print box and specify the row and column where the label is located on the sheet.
Just so, How do I add text to Labels?
Click “Text” in the vertical toolbar to the left of your label. Click “+ Add Textbox to Design” to add a new textbox to your canvas. Begin typing your desired content (the placeholder “Add your text here…” copy should be highlighted and ready to overwrite).
Besides, Does Microsoft Word have a label template? Open a blank document in Word, click on the “Mailings” tab at the top of the page, and click on “Labels”. This will open a box titled “Envelopes and Labels”. Click on the “Options” button to create a new label template.
How do I make Labels with different names in Word?
Create and print a page of different labels
- Go to Mailings > Labels.
- Select Options.
- Select the type of printer you’re using.
- Select your label brand in Label products.
- Select the label type in Product number. …
- Select OK.
- Select OK in the Labels dialog box. …
- Type the information you want in each label.
Subsequently, How do I do Labels from Excel? Choose Start Mail Merge > Labels. Choose the brand in the Label Vendors box and then choose the product number, which is listed on the label package. You can also select New Label if you want to enter custom label dimensions. Click OK when you are ready to proceed.
Which following method can set or change the text in a label?
setText() method can set or change the text in a Label – AWT and Swing.
How do you add labels in Java?
- Label: A label is a box with some text. …
- Creating a Label: JLabel L = new JLabel(“Text”);
- Adding a GUI object onto a JFrame: JLabel L = new JLabel(“Text”); JFrame f = new JFrame(“Window Title”); f.getContentPane().add( L ); …
- Example Program: (Demo above code) Prog file: click here.
How do I add text to a label in Visual Basic?
Drag and drop a Label control on the form. Set the Text property to provide the caption “This is a Label Control”. Set the Font property from the properties window. Click the label to add the Click event in the code window and add the following codes.
How do I download label templates?
Download blank label templates for Microsoft Word
- 1.) Browse the blank Microsoft Word label templates below.
- 2.) Select the corresponding downloadable file for your label sheets.
- 3.) Click “Download this template.”
- 4.) Open the file and begin designing.
How do I print different labels on one page?
Click either Before current page or After current page. Type the information that you want on each label. Click File > Print. On the Publication and Paper Settings tab, under Printing options, make sure to choose Multiple pages per sheet, and then click Print.
How do I convert Excel to Word labels?
Templates: from Excel to Word in a Mail Merge
- Select Document Type. Select “Labels”!
- Select Starting Document. If you have a compatible template code select “Change document layout”, then click “Label options”. …
- Select Recipients. …
- Arrange Your Labels. …
- Preview Your Labels. …
- Print Your Labels.
How do I print labels from Excel without Word?
Follow the below steps to print single address label from excel without word.
- Use the excel sheet, which has a tiny macro to rearrange the column data to the printable address labels.
- Enter data into column A.
- Press CTRL+E to start the excel macro.
- Enter the number of columns to print the labels.
Can I print labels from Excel?
The mail merge process creates a sheet of mailing labels that you can print, and each label on the sheet contains an address from the list. To create and print the mailing labels, you must first prepare the worksheet data in Excel, and then use Word to configure, organize, review, and print the mailing labels.
Which method used to place some text in the label?
The object of the Label class
is a component for placing text in a container. It is used to display a single line of read only text.
…
Label Class Methods.
| Sr. no. | Method name | Description |
|---|---|---|
| 7. |
protected String paramString() |
It returns the string the state of the label. |
Which method is used to read the text of a label in Java?
The object of
JLabel class
is a component for placing text in a container. It is used to display a single line of read only text.
…
Commonly used Methods:
| Methods | Description |
|---|---|
|
String getText() |
t returns the text string that a label displays. |
Which attribute is used to specify initialization method?
Which attribute is used to specify initialization method? Explanation: init-method is used to specify the initialization method.
What is the java object for labels?
A Label object is a component for placing text in a container. A label displays a single line of read-only text. The text can be changed by the application, but a user cannot edit it directly.
What is difference between label and JLabel?
The fundamental difference between the two is that JLabel allows the label to be composed of text, graphics, or both, while the old Label class only allowed simple text labels. This is a powerful enhancement, making it very simple to add graphics to your user interface.
What is Labelled in java?
Java labeled blocks are logically similar to goto statements in C/C++. A label is any valid Java identifier followed by a colon. For example, outer: , inner: , customLabel: , label_ :. Table Of Contents.
What is text label?
A label is a graphical control element which displays text on a form. It is usually a static control; having no interactivity. A label is generally used to identify a nearby text box or other widget.
What are labels in visual programming?
Labels are one of the most frequently used Visual Basic control. A Label control lets you place descriptive text , where the text does not need to be changed by the user. The Label class is defined in the System.
What is meant by label text?
3 a word or phrase heading a piece of text to indicate or summarize its contents. 4 a trademark or company or brand name on certain goods, esp.
- Reference 1
- Reference 2
- Reference 3
- Reference 4
- Reference 5
- Free Courses
- Microsoft Word
- How to Make Labels in Word

How to Print Labels in Word
You can create a sheet of labels that contains the same information. For example, return address labels or a single label on a sheet.
Create a Label
- Click the Mailings tab.
- Click the Labels button.
- Enter an address.
If you want to print only one label, select Single label in the Print box and specify the row and column where the label is located on the sheet.
- Click Options.
The Label Options dialog box opens. Here, set the type of label sheet you’re printing on.
For example, if you have a sheet of 30 labels, select one of the 30 Per Page options that matches your label dimensions.
Your labels package should tell you the type of label being used.

- Select your label options.
- Click OK.
- Click Print to print the labels, or New Document if you want to do any formatting or editing of individual labels.

The labels are automatically sent to the printer or open in a new document, depending on your action.
If you want to create labels from a data source so that you can create labels for a list of contacts, you can use the Mail Merge wizard to quickly generate labels.

FREE Quick Reference
Click to Download
Free to distribute with our compliments; we hope you will consider our paid training.