
How do you make a card on Microsoft Word?
How to Create a Greeting Card with Microsoft Word Open a Blank Document. Open Microsoft Word and select a blank document. Set Up Orientation and Layout. Balance Everything with Gridlines. Divide Your Page for the Fold. Start Adding Your Graphics. Choose Beautiful Fonts. Preview and Print.
How do you make playing cards on the computer?
This is how easy it is to create your deck of cards: Choose the card size that you want to customize. Select your card stock, number of cards and finishing. Choose a packaging such as tuck box or rigid game box. Enter our online card maker. Design your card fronts and backs by dragging and dropping uploaded image files.
How do you make a double sided card on word?
Hit “CTRL” and “P” to bring up the print screen in Word. Click “Manual Duplex” in the upper right corner of the window. Print the first side of the flash card. Flip the printed card around to the other side, and put back into the printer. Print the other side of the flash card. Things You’ll Need. Microsoft Word.
Does Word have a card template?
Using Microsoft’s Word application, you can create customized card documents and save them as templates so that you can reuse the design again without having to do the initial setup work. With this word processing program, you can use the various tools to easily customize and save your own card templates.
How do I make a greeting card in open office?
Open a text box in the right bottom section you earlier identified as the front of the card. Write the greeting you want to use for your card’s front. Change the text font, size, alignment and color as desired using the formatting toolbar directly above the page you have opened.
Are MPC cards good?
In my experience, MPC decks don’t handle nearly as smoothly or well, and this is immediately noticeable when performing fans, spreads, and shuffling. On the other hand the quality isn’t terrible either. The colours usually look good, the print registration is fine, and the card stock feels quite durable.
How do you type the club symbol?
Hold Alt and type the number below using the numeric pad on your keyboard to insert mathematics symbols. When you release the Alt key, the symbol will appear.1. Method 1 of 3: Using Windows. Symbol Name Code ♦ Diamond 4 ♣ Club 5 ♠ Spade 6 ♂ Male 11.
What is Spade in playing cards?
form one of the four suits of playing cards in the standard French deck. It is a black heart turned upside down with a stalk at its base and symbolises the pike or halberd, two medieval weapons. In Bridge, Spades rank as the highest suit. In Skat and similar games, it is the second-highest suit.
How do you make a diamond on word?
First, press the option button+shift button+V. If you do this, your diamond symbol will appear on your document. If you don’t want to use the keyboard shortcut sequence, there are other means to insert the diamond symbol in your document.
Can you make postcards on Microsoft Word?
Microsoft Word allows you to make your own custom postcards quickly and easily. There are many different methods for making postcards in Word, but the two most straightforward options are by making them as “Labels” or through starting from a premade “Template.”.
How do you make a 5×7 card on Microsoft Word?
Open a new blank Word document. Select Page Layout > Size > More Paper Sizes. 3. Select the Custom paper size from the Page Setup Screen or just enter the height and width of your custom card (in this case, 10.5 inches wide x 7 inches tall), then click OK.
How do you make a birthday card on Microsoft Word?
How To Make A Birthday Card On Microsoft Word? Step 1 – Open a new document in Microsoft Word. Step 2 – Select “Occasions and Events” from the “Greeting Cards” menu. Step 3 – Customize the birthday card by changing the text. Step 4 – Adjust the layout of your birthday card.
What can you put on playing cards to keep them from sticking?
After a bridge game, with everyone eating, how do you clean playing cards? You can quick-clean most household playing cards by putting them into a paper bag and adding several tablespoons of flour, talcum powder or cornstarch. Shake well.
Are bicycle cards good?
Standard Bicycle Playing Cards are an affordable, high-quality deck of cards that can be found almost anywhere. They’re going to last you through countless card tricks, card flourishes and card games and are well worth the slightly higher price than cheap corner store decks.
How do you make a custom card game?
Steps to create your own board game cards Choose a game card size such as standard TCG, bridge, mini, large, hex, square amongst many. Choose a template design as your card base. Choose a card stock type. Select the number of cards you need. Select a gloss or matte finish. Add an optional plain or custom box.
What type of paper are playing cards printed on?
The most popular paper for playing cards is 400gsm card stock.
How long do playing cards take?
A. Your personalized item sent via standard shipping method should arrive in 8-10 business days (3 business days’ process + 5-7 business days in transit).
What size are magic cards?
Magic: The Gathering cards are produced in much the same way as normal playing cards. Each Magic card, approximately 63 × 88 mm in size (2.5 by 3.5 inches), has a face which displays the card’s name and rules text as well as an illustration appropriate to the card’s concept.
Where is Makeplayingcards located?
We’re headquartered in Hong Kong and have been serving our customers across the globe for over 35 years providing them with unmatched superior quality playing cards made only possible through our years of experience in this industry, non-stop research and development for continuous improvement and heavy investments in.
Is there an emoji for playing cards?
Unicode details for Playing Card Black Joker (????) emoji.???? Joker. Character ???? Description The joker in a deck of cards, usually… read more Presentation Emoji Modifiers — Shortcodes :black_joker:, :black_joker:, :joker:.
How do you make symbols on a laptop?
Release the ALT key and the symbol will appear. Create a symbol with a number pad. If your keyboard has a number pad on it, this is a much simpler process. Ensure Num Lock is enabled, then just hold alt, enter the code on the number pad, and receive your symbol.
How do you make symbols on a laptop keyboard?
To insert an ASCII character, press and hold down ALT while typing the character code. For example, to insert the degree (º) symbol, press and hold down ALT while typing 0176 on the numeric keypad. You must use the numeric keypad to type the numbers, and not the keyboard.
111
111 people found this article helpful
Use a template to make printable flash cards
Updated on September 24, 2022
What to Know
- In Word, open a new blank document. Choose the Layout tab. Select Layout > Orientation > Landscape.
- In Layout > Size, choose 4″ x 6″. Type what you want the card to say. Press Ctrl+Enter to generate a new card.
- Go to the Design tab to add a theme, color, or effects to the flashcard.
This article explains how to make flashcards using Microsoft Word by changing the size of the document. It also contains information on making index cards using the envelope and label print settings. The instructions in this article apply to Microsoft Word 2019, Microsoft 365, and Word 2016.
How to Make Your Own Flashcards in Word
Flashcards are a wonderful learning tool both for children and adults, but writing each one by hand can be time consuming. With Microsoft Word you can make your own flashcards and print them out ready to use.
While older versions of Microsoft Word had simple flashcard or index card templates, it seems those templates were no longer available as of Word 2016. No need to fret because making flashcards on Word is still easy to do, and you can save your flashcards as a template as well.
-
Open Microsoft Word and select a new blank document.
-
Click Layout Tab, this is going to allow you to resize the page into a more proper flashcard size.
-
Under Layout > Orientation, select Landscape.
-
In Layout > Size, select 4”x 6” size. This will give you the perfect size for printable flashcards.
-
Type out what you want the card to say and press Ctrl+Enter to create a new card. This is where you write the response for the first card if necessary or create a new card.
-
Also, remember you can go to the Design tab and add a theme, colors, and effects to the flashcards if you need them to stand out a bit or make them colorful.
This is also a great tool for teachers to create flashcards for their students without having to spend their already limited amount of time and resources making them.
How to Make Index Cards from the Envelopes & Labels Printing Settings
Another easy way to make index cards is by using the envelopes and labels printing settings in Microsoft Word 2016. Here’s what you need to do:
-
Start with a blank document in Word and go to the Mailings tab.
-
Select the Labels option in the top left of the Mailings tab.
-
A window will open up, click the Labels tab, and select the Options button.
-
Now select Index Cards from the menu. To the right of the selection, you will see the measurements for the index card.
Printer Settings for Flashcards on Word
Now that you are done creating the cards, it’s time to have them all printed out. If you have the style of flashcards where you need one side with a question or statement and the opposite side to have the answer, then you will want to turn on double-sided printing. If you just need to have the information or image printed on one side of the card, then make sure you have double-sided printing turned off.
Go to File > Print. Now just choose the size you selected for the cards: 3.5 x 5 or 4×6. You might want to select Narrow Margins for the flash cards.
Save the Flashcards as a Microsoft Word Template
Even though the steps to create flashcards are simple to follow, it will make life easier if you just save this file as a template. This way, you can always jump right into the formatted document and just insert the new information you need for the new index cards.
FAQ
-
How do you insert a signature in Microsoft Word?
To insert a signature in Word, scan and insert a signature image into a new Word document and type your information beneath it. Select the signature block and go to Insert > Quick Parts > Save Selection to Quick Part Gallery. Name the signature. Select AutoText > OK.
-
How do you delete a page in Microsoft Word?
To delete a page in Microsoft Word, select View, then go to the Show menu and select Navigation Pane. In the left pane, choose the page you want to delete and press the delete/backspace key.
-
How do you check the word count in Microsoft Word?
To check the word count in Microsoft Word, look at what’s displayed in the Status Bar at the bottom of the screen. If you don’t see the number of words, right-click the Status Bar and choose Word Count.
Thanks for letting us know!
Get the Latest Tech News Delivered Every Day
Subscribe
Do you remember your mother bought you fancy Flash Cards to help you memorize your addition and multiplication tables, or important historical information like “Who is buried in Grant’s tomb?” Hint: It was Grant.
Now that you are in the information age, you can buy them online. Or, if you want to save some money and prove your computer expertise, you can create your own flash cards using Microsoft Word.
Following the instructions below, you can create a Flash Card template that can be used repeatedly to create a page with ten 3 ¾” x 2” cards per page. This template will consist of two pages with narrow margins, and a table of 2 columns and 10 rows.
Begin the document:
In this section you will start Microsoft Word and set the margins and other layout settings for your template.
- Start Microsoft Word.
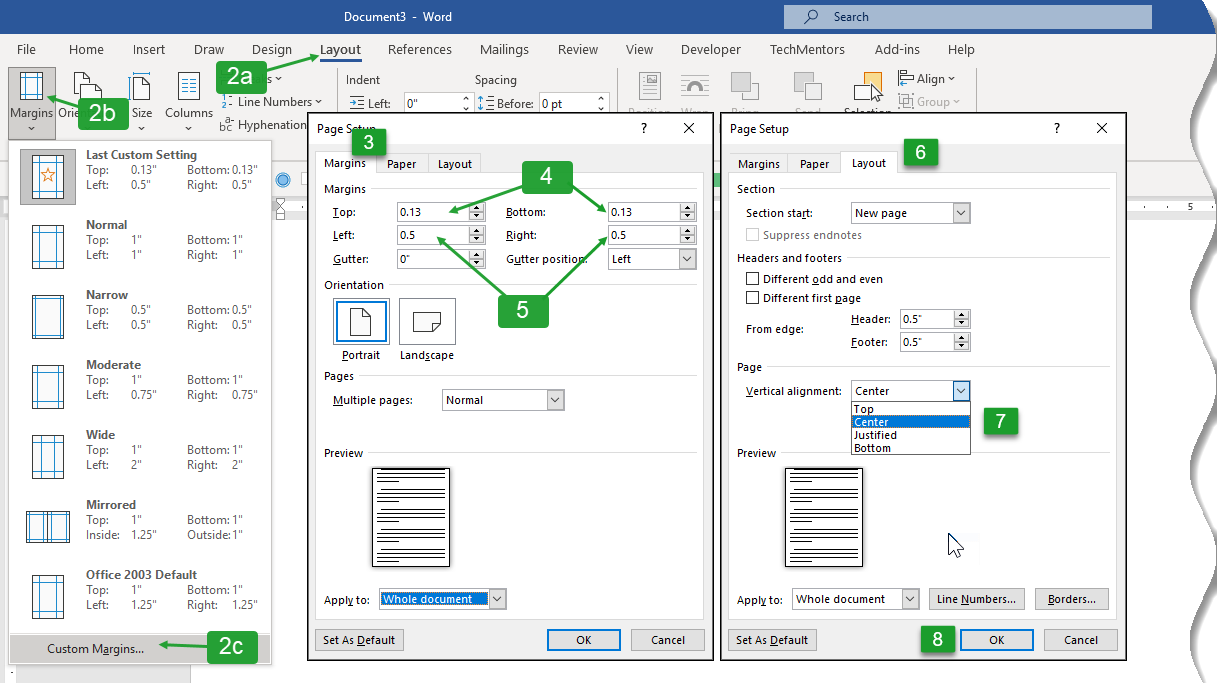
These instructions are based on Microsoft Word 365 on a Windows 10 PC. Instructions for other versions, since Word 2010, should be similar. - From the ribbon, select Layout, Margins, Custom Margins.
- If necessary, click on the Margins tab.
- Set the Top and Bottom margins to 0.13″.
- Set the Left and Right margins to 0.5″.
- Click on the Layout tab.
- Set the Vertical alignment to Center.
- Click OK.
Create the table:
Here you will create a table with 10 rows and 2 columns.
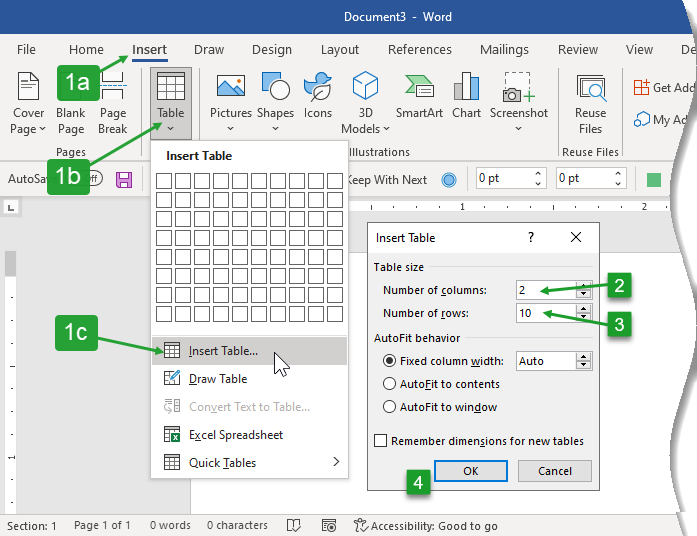
- From the ribbon, select Insert, Table, Insert Table…
- Set Number of columns to 2.
- Set Number of rows to 10.
- Click OK.
Change the table’s dimensions:
In this section you will change the table’s dimensions so each cell is 3 ¾” wide by 2” tall.
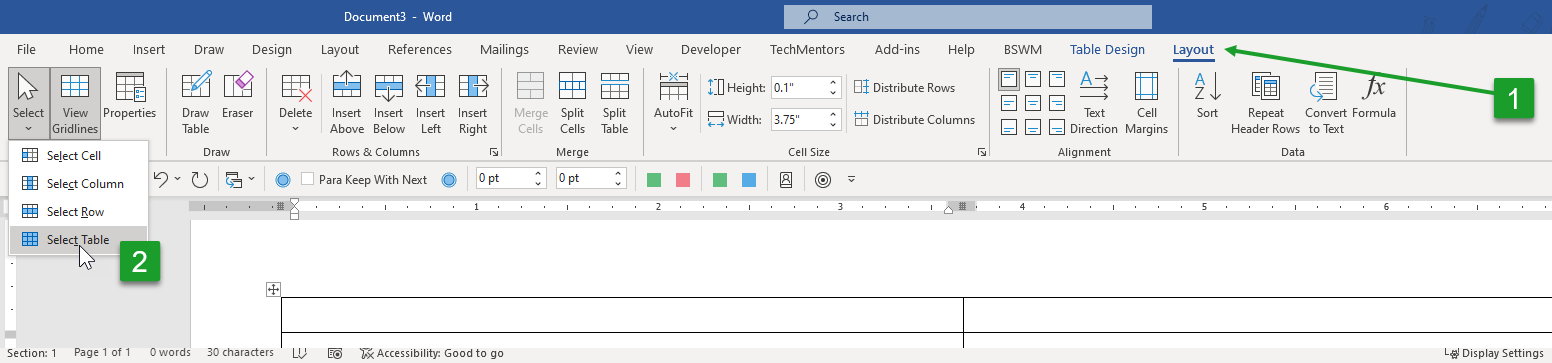
- From the ribbon, select the Table’s Layout tab.
- Click Select, Select Table.
- From the ribbon Table’s Layout tab, click Properties.
- If necessary, click the Table tab.
- Click the Options… button.
- Check the Allow spacing between cells option.
- Set the Allow spacing between cells size to 0.13″.
- Click OK.
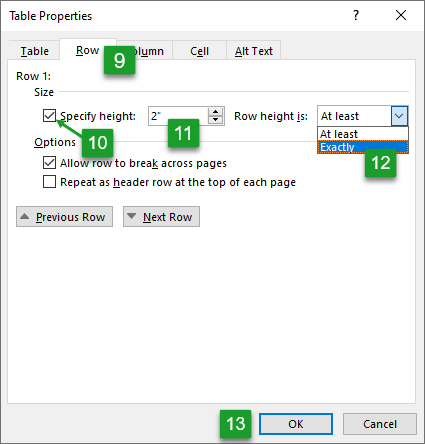
- Click the Row tab.
- Check the Specify height box.
- Set the height to 2″.
- Set the Row height is to Exactly.
The Exactly setting prevents the cells from getting taller if a user enters too much text. - Click OK.


Change the tables borders
In this section you will remove the border that surrounds the whole table, but keep the border that surrounds each cell.
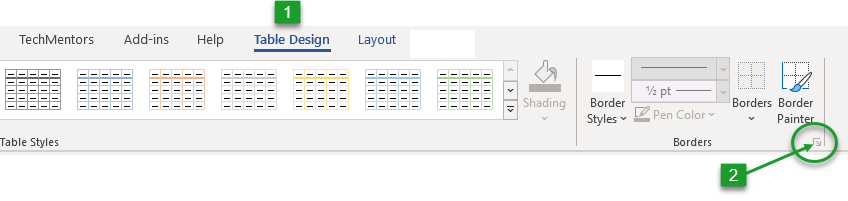
- From the ribbon, select the Table Design tab.
- In the Borders section bottom right corner, click the dialog box launcher arrow.
- If necessary, change the Apply to drop down to Table.
- Click the None button to remove all borders.
- Click the inner horizontal lines button.
- Click the inner vertical lines button.
- Click OK.

Set up the font and alignment of each cell:
Now you will set the alignment within each cell so it is centered both vertically and horizontally. You will also change the font size to 36 pt, which is ½” tall.
- From the ribbon, select the Table’s Layout tab.
- Click Select, Select Table.
- From the ribbon Table’s Layout tab, in the alignment section click the center icon.
- From the ribbon, select the Home tab, set the font size to 36 pt.


Save your file as a Flash Card template:
You now have a document that is ready for your questions and answers. However, since you don’t want to repeat each of those steps each time, you will now save the document as a Microsoft Word template. A template is “a sample document that has already some details in place.” For another template example read TechMentors’ Valentine’s Day Templates blog post.
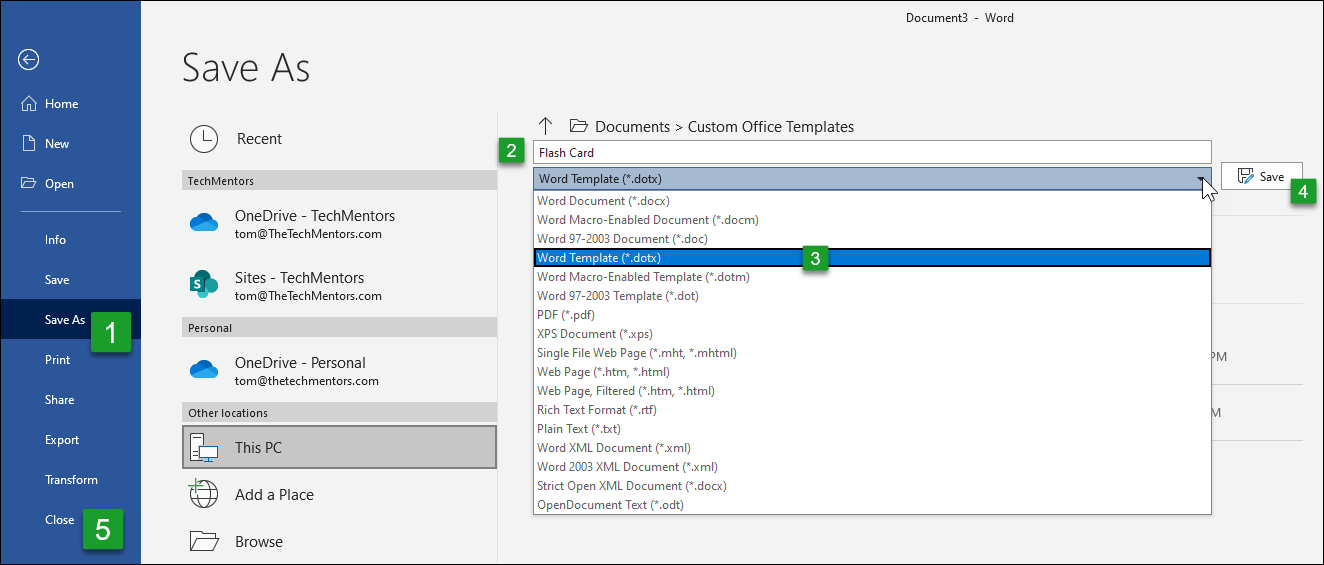
- From the ribbon, select File, Save As.
- In the box enter Flash Card as your file name.
- Click the drop down for the next box and choose Word Template (*.dotx).
- Click Save.
- From the ribbon, select File, Close to close the template.
Create a new document from your template:
Now that you have created your template you can follow these instructions to begin creating your flash cards.
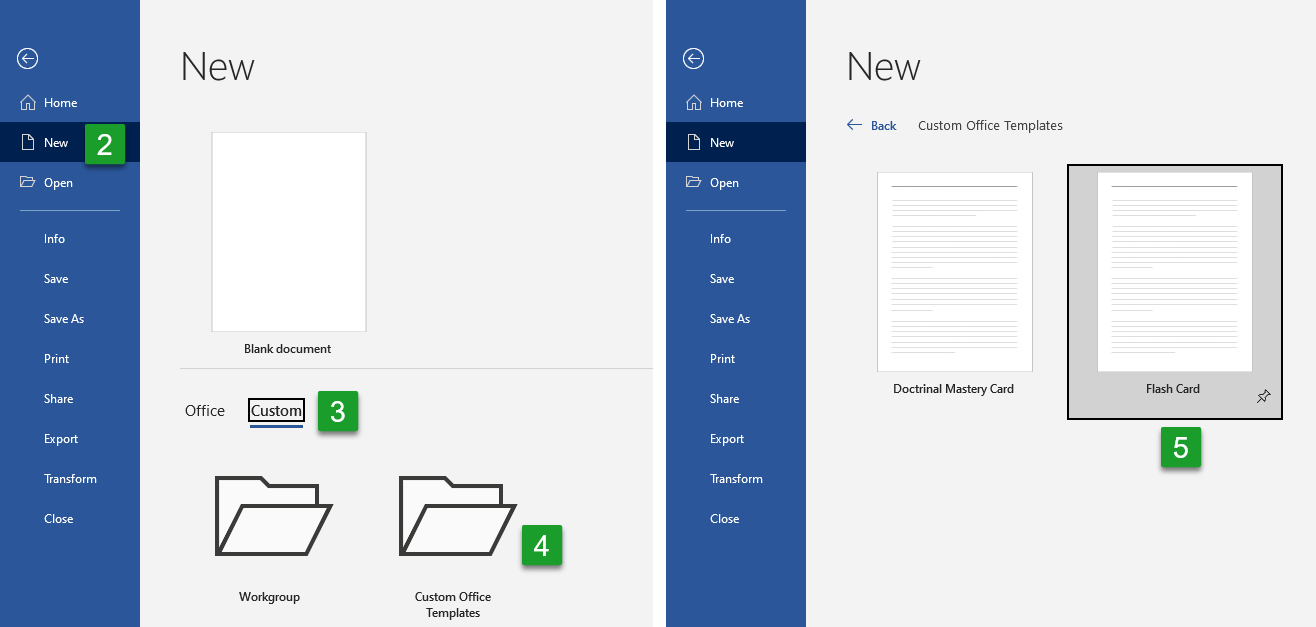
- If necessary, start Microsoft Word.
- From the ribbon select File, New.
- Click Custom.
- Click Custom Office Templates.
- Click Flash Card.
- You can now enter your questions on page 1, and the answers on page 2.
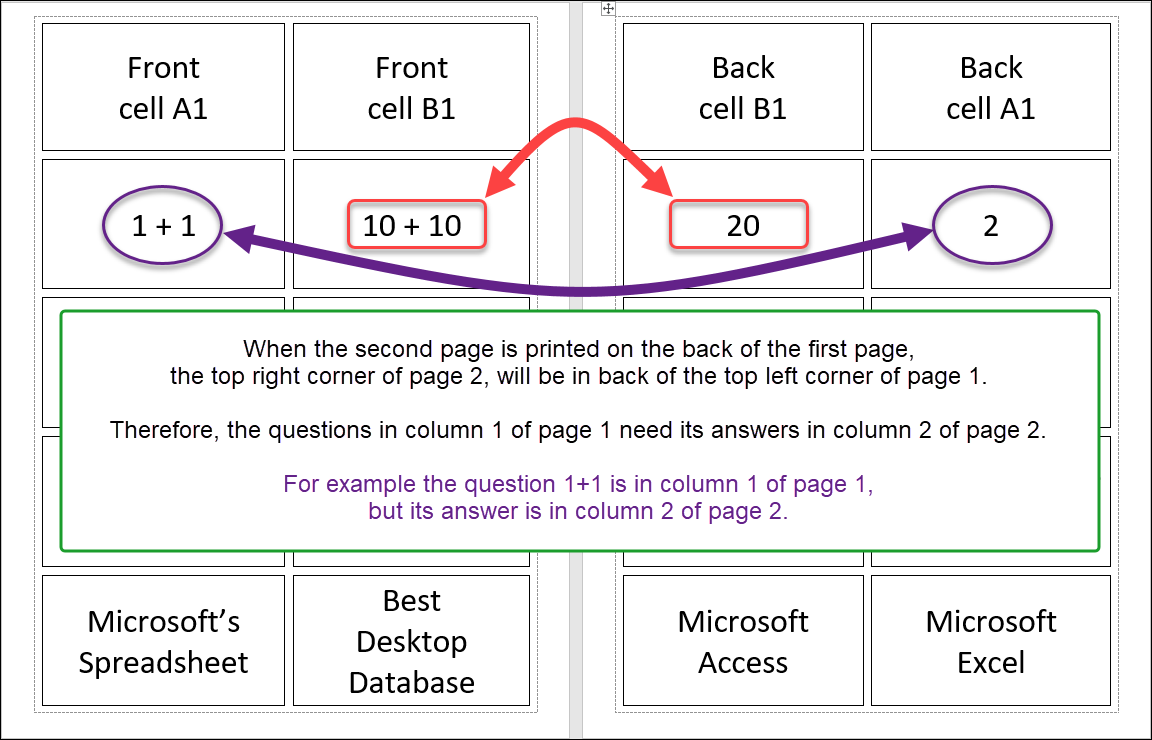
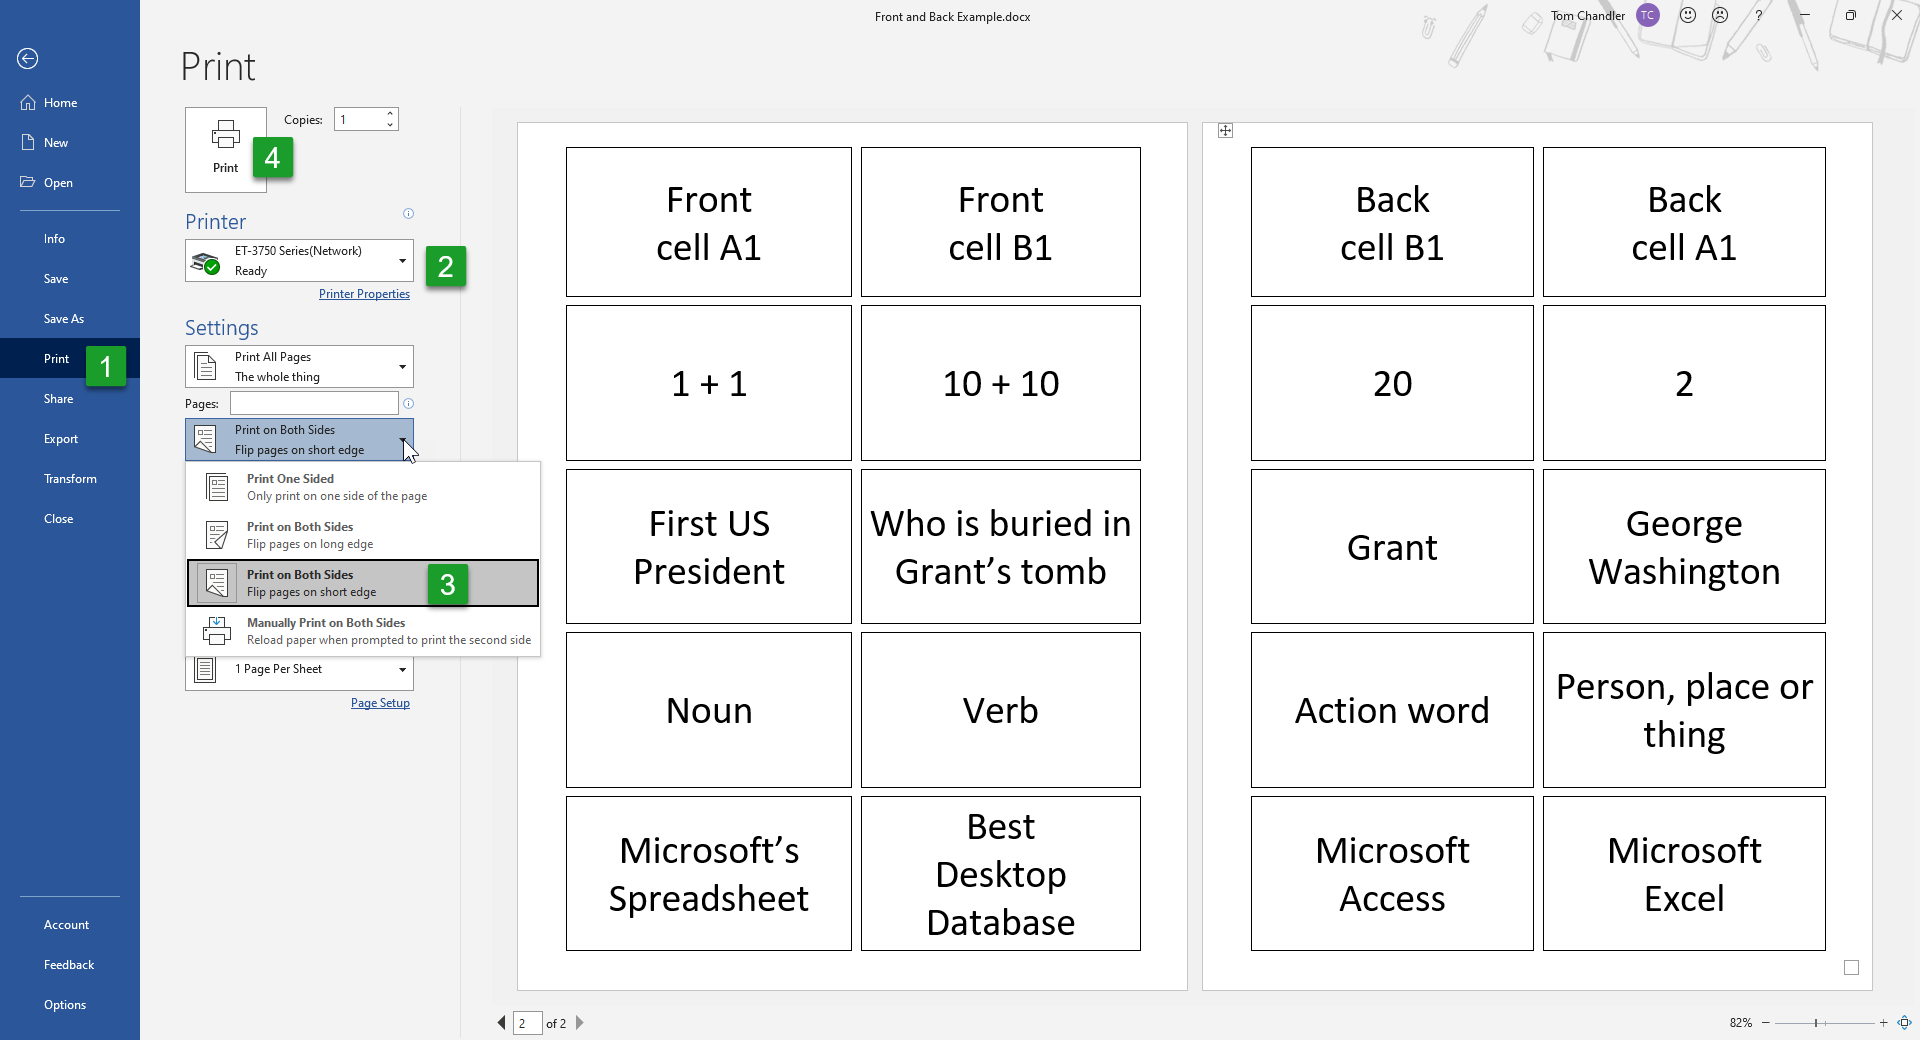
Note: If you want to print the answers on the backside of their corresponding question, then place the answers and questions in opposite columns of the odd and even numbered pages as shown below.
Printing with a double-sided printer
Follow these instructions if you have a printer that can print on both sides.
- From the ribbon select File, Print.
- Select your printer.
- In the settings area, click the second drop down, and choose Print on Both Sides.
- Click Print.
Printing with a single-sided printer
Follow these instructions if you have a printer that can print on only one side at a time.
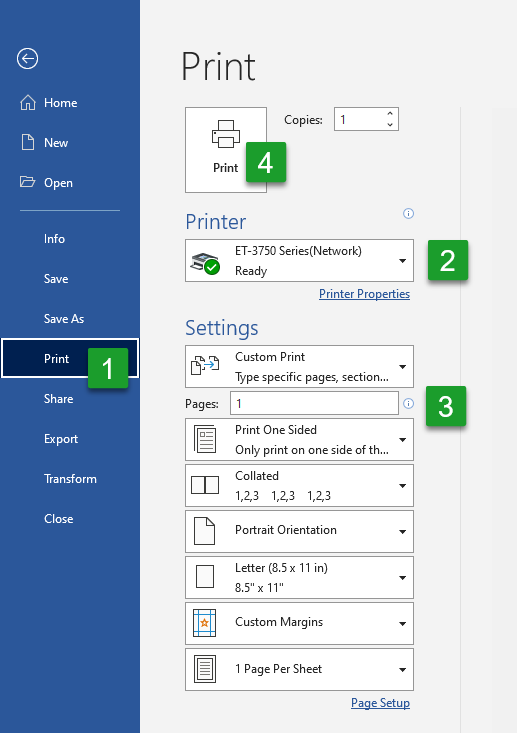
- From the ribbon select File, Print.
- Select your printer.
- In the settings area, in the pages box enter 1.
- Click Print.
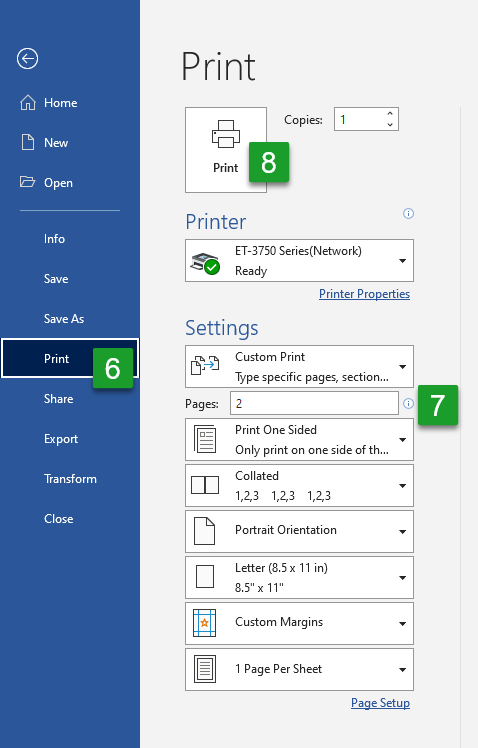
- After it prints, reinsert the page upside down in the printer’s paper bin.
- From the ribbon select File, Print again.
- In the settings area, in the pages box enter 2.
- Click Print.
Conclusion
Congratulations, you have created your own Flash Card template that you can use whenever you, or the aspiring students in your household, need to memorize important facts like “Who was buried in Grant’s tomb.”
Templates are a great way for businesses and individuals to save time and money. Schedule a complimentary consultation with a TechMentor and you too can save time and money.
I use technology more in some classes than I do in others. The reason for this is largely down to what resources and equipment are available.
If I am teaching in a classroom that only has a CD player, that doesn’t mean I can’t use technology to help me. That is the whole reason for technology, to make things easier and more efficient for us.
As long as you have one computer, and one printer, you can design and customize material for your classes.
So this week, I am sharing four word documents that I keep on my computer as templates. They are not original activities, but can usually get students speaking and thinking about language.
Feel free to download and use the templates if you want them.
Create an A & B Dictation
An A & B dictation is a great way to present an example dialog. Instead of chorusing a dialog from the textbook or from the board, get your students talking straight away!

This is template that I use. There are 4 lines for A and 4 lines for B. I think anything over 8 lines would be too long.
Click on A and B Dictation to download the word document, or visit the downloads page.
When you open the document, type your conversation in the space provided.
There are actually 3 columns. The first column is the speaker (A), the second column is for the colon (:) and the third column is a blank space for text.
You can type A in the top and B at the bottom, however to save myself from going up and down the page, I type the whole conversation in Student A’s section. After that, I select Student B’s text and I cut (Ctrl+X) and paste (Ctrl+V) it into Student B. Print it out and it’s ready to photocopy.
This is a common activity. Demonstrating it only takes a short time and the students will know exactly what to do.
It is worth writing some useful words or phrases on the board, so that students can ask for help with spelling. With higher levels, I also ask them to check with questions like: “Is there any punctuation?” It can save some time to remind students that if there is a word they don’t know (that you didn’t anticipate), it’s okay. Spell it out and keep going (You can talk about it afterwards).
After the activity is finished:
- Change pairs and peer check.
- Highlight the target language in the conversation that is the focus of the lesson.
- Elicit substitutions from the students. New words to change the conversation to personalize it.
- Practice the ‘new’ conversation
I like doing this sort of activity because it generates a lot of speaking time.
Create Your Own Cards
Cards can be used for pretty much anything you can imagine. Photocopiable resources will often use cards in games, matching activities or as prompts.
There are a lot of interesting activities you can do if you make your own cards. However, It’s always a gamble whether all the cards will get returned. At least with a digital copy, it is easy to replace a set. Just print.

Click on Blank Cards to download the word document, or visit the downloads page.
There is a single page containing ten cards. If you need more cards, simply copy the page.
Here are a couple of suggestions for using cards:
Mad Libs
Mad Libs was a game invented in 1953 by Leonard Stern and Roger Price. This game has been adapted by countless ESL teachers for their students, because it’s great way to teach parts of speech and it’s funny as well. Writing your own Mad Libs means you can customize them to what you have been studying in class.

This is an example of a Mad Lib card. The student picks up the card and reads it out, replacing the parts of speech with a new word.
Rather than use the phrase past simple I have replaced it with verbed, because I personally felt ~ed and ~ing were helpful indicators of which verb tense they should use.
Students can make any sentence they want.
It can be normal – I lost my new bicycle. What should I do?
It can be strange – I sold my red tiger. What should I do?
I like this activity because it generates small bursts of conversation. It can get very silly and it’s useful for practicing parts of speech.
What do you know?
This is an information gathering activity. Each student is giving at least one card with a piece of information on it. They have to collect the other pieces of information by asking the other students – “What do you know?”
If you were teaching schedules, you might make a card like this.
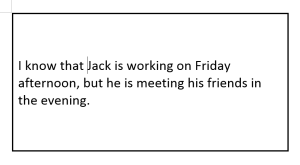
Student A: What do you know?
Student B: I know that Jack is working on Friday afternoon, but he is meeting his friends in the evening.
Student A Writes notes on his diary page.
Student B asks Student A. Student B writes. Change pairs. Repeat until all information is gathered.
This works very well as a mingling activity and all the students are involved.
Word Cards & Matching
Matching activities are used a lot. Where students try to find two words that are connected.
In this example I have used “Fish Tank” because every time I look away from my screen, I can see my fish tank on the other side of the room.

Make a set of cards that match (or make a pair) and ask the students to match them. This can be done a number of ways.
- The cards face up on the table and the students match them
- The cards face down on the table. The students turn over two cards and if they match, they make a sentence with the word. If they don’t match, they turn the cards over again.
- Give a card to each student. All the students ask each other “What’s your word?” if they think their words match, write their answers on the board. If you have mismatches, students can talk in pairs to peer correct.
Create a Matching Table
Matching tables are a good way to introduce new vocabulary or phrases. You often see matching tables in textbooks. But you might want to make your own, especially if you want to review language that came up in class.

Click on Matching Table to download the word document, or visit the downloads page.
There are 10 rows in the matching table. If you don't need all the rows, highlight the rows you don't need and delete them by pressing backspace. You will see four options. Select 'delete entire row.'
Type in your words or phrases that match. For example, A is Fish and 1 is Tank. When your table is complete, sort your words alphabetically.
The method for sorting was discussed in a previous post. If you missed it though, check out the image below.

After you have sorted your words, you have an activity to encourage students to think about which words go together. Students might try and complete the matching table quietly and by themselves. Encourage students to work in pairs or small groups and talk about their ideas.
It is worth writing some useful phrases on the board to help students express what they think the answer is.
Create Sentence Strips
Sentence strips can be used separate text into individual sentences. Sentence can take up some time to cut. If you don’t have the time to cut the strips up, then the alternative to sentence strips is to sort the text. Using the same method as above.
If you don’t mind cutting the strips up, then this template might be useful.
This activity is often done as a listening exercise, but it can also be used to get students to think about the order of a conversation and appropriate responses.
Click on Sentence Strips to download the word document, or visit the downloads page.
The template has 15 rows. If you need more, copy the page or right click on the table and insert new rows. If you need less rows, highlight them and press backspace, then select 'delete entire row.' To change the height of the rows, go to layout and change the height.

After you have typed up your sentences. Print, photocopy and cut them up.
Just by working with tables in Word, we can customize several different activities.
If you have any other suggestions for these templates, leave a comment!
Take care!
Make Flash Cards
using an MS Word template
Use these MS Word templates to make flash cards using your own pictures.
Select a template that corresponds to the size pictures you require.
Use a larger picture size for bigger groups.
 Example of 2×1 Picture Flash Card Template
A smaller picture size for small groups or one to one tuition.
 Example of 3×3 Picture Flash Card Template
Simply change the picture on each card with your own electronic image.
Print it. Cut it. Use it!
It couldn’t be easier….and it’s free!
You will need to have Microsoft Office Word 2010 or later.
Not got it?
You can still make flash cards using these free printable flash cards in PDF format.
2×1 Picture Flash Card Template

Template Settings:
Flash Cards per A4 page:
2
Max. picture height:
12.5 cm
Max. picture width:
18 cm
2×2 Picture Flash Card Template

Template Settings:
Flash Cards per A4 page:
4
3×3 Picture Flash Card Template

Template Settings:
Flash Cards per A4 page:
9
How to make flash cards using the MS Word template
The template will download as a ZIP file.
Make sure that you
save your template somewhere safe.
Double click the Microsoft Word template file and it will open as a
new document ready to be used. Do this each time you want to use it.
By double clicking the file icon to open the template you will open a new instance of the template. Any changes that you make will not be saved back to the original template file.
To change an image right click on a class-templates.com logo and select Change Picture from the option menu displayed, as in the picture below.
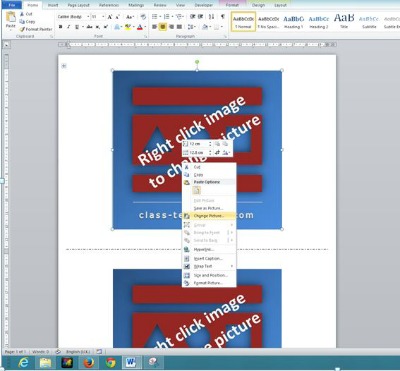
Browse to the picture you wish to use and select it.
The class-templates.com logo should be replaced by the image you have just selected.
The Microsoft Office Clip Art website is a fantastic source of free images available to download and use in a non-commercial way.
Re-size your picture (MS Word 2010)
You will probably want to resize your picture to fill as much of the flash card as possible.
To re-size a picture right click on it and select Size and Position from the option menu displayed.
On the Size tab adjust the Height and Width as you wish.
Refer to the Max. Picture Height and Max. Picture Width dimensions displayed next to the template you have downloaded.
To maximise the size of your picture to fill the space for the flash card you will not want to lock the aspect ratio.
This means that you can set the height and width of your picture independantly of each other. However, it is likely that your picture will become distorted from it’s original appearance.
Changed and re-sized all your pictures to fit the flash card template?
Great.
Make sure that you save it so you can use it again in the future.
Now it’s time to print your flash cards. All templates will be printed with border lines allowing you to cut each card to the perfect size.
Consider printing your cards on thick white printer card instead of on normal thin paper.
Ensure that you select a card that is compatible with your printer. If it’s too thick there is a good chance your printer will not like it.
View a selection of A4 thick white printer card here >>![]()
Now you’ve printed your flash cards you’ll want to cut them into individual cards.
Cut you cards carefully to make them look professional.
To get the straightest, most accurate edge possible use a guillotine to cut them rather than scissors.
Using a guillotine will also allow you to cut multiple pieces of card at the same time ensuring that you make flash cards in a standard shape and size.
View a selection of guillotines available to purchase on-line here >>![]()
MORE FLASH CARD TEMPLATES..
Vocabulary Flash Cards (MS Word)
Free Printable Flash Cards (PDF Format)
<< All Flash Card Templates
<< RETURN TO CLASS-TEMPLATES HOME PAGE