Create User Entry Form in Word 2013
- Go to the “File Tab” and choose “Options”.
- Choose “Customize Ribbon Tab”.
- Choose “Developer” from “Customize the Ribbon column”.
- Now write a simple user entry form in Word 2013.
- Add the Content Control that satisfies the user entry form reuirements.
Contents
- 1 How do I create a fillable form in Word 2013?
- 2 How do I insert a form field in Word 2013?
- 3 How do you create forms in Word?
- 4 How do I make an editable form?
- 5 How do I create a fillable form in Word with lines?
- 6 How do I create a form line in Word?
- 7 Where is the Forms toolbar in Word?
- 8 How do I insert a text form field in Word?
- 9 How do you insert a custom field in Word?
- 10 How do I get Microsoft Forms?
- 11 What is the best program to create a form?
- 12 How do I create a form in Word 2016?
- 13 How do I create a fillable PDF form in Word?
- 14 How do I save a Word document as a fillable template?
- 15 How do I make a fillable form in word and not editable?
- 16 How do I create a fillable form in Word for Mac?
- 17 Where is tools on Word 2013?
- 18 How do I pin a form to the taskbar?
- 19 How do I turn on the Developer tab in Word?
- 20 What are form fields in Word?
How do I create a fillable form in Word 2013?
Tech Tip: How to Create Fillable Forms in Microsoft Word
- Enable Developer Tab. Open Microsoft Word, then go to the File Tab > Options > Customize Ribbon > check the Developer Tab in the right column > Click OK.
- Insert a Control.
- Edit Filler Text.
- Design Mode button again to exit the mode.
- Customize Content Controls.
How do I insert a form field in Word 2013?
To insert a field, follow these steps:
- Position the insertion point where you want the field to be inserted.
- On the Insert tab, click Quick Parts and then click Field.
- (Optional) On the Categories list, select a category to narrow the list of field names.
- On the Field Names list, click the desired field name.
How do you create forms in Word?
To create a form in Word that others can fill out, start with a template or document and add content controls.
Start with a form template
- Go to File > New.
- In Search online templates, type Forms or the type of form you want and press ENTER.
- Choose a form template, and then select Create or Download.
How do I make an editable form?
How to create fillable PDF files:
- Open Acrobat: Click on the “Tools” tab and select “Prepare Form.”
- Select a file or scan a document: Acrobat will automatically analyze your document and add form fields.
- Add new form fields: Use the top toolbar and adjust the layout using tools in the right pane.
- Save your fillable PDF:
How do I create a fillable form in Word with lines?
Firstly, click “Underline” under “Home” tab and choose one line style. Then press “Shift+ Underscore” to get a line. Then place cursor above the line and type the content. As you type, you will find the line gets longer and longer.
How do I create a form line in Word?
Click the “Insert” tab, then click the “Shapes” button. Click the basic Line shape. When the cursor changes to a plus sign, hold down the “Ctrl” key to give you a straight drawing line, and drag the cursor to the right of the text you just typed, giving your form recipients a place to write.
Where is the Forms toolbar in Word?
Go to the Developer tab; Move to the Control group; Click the Legacy drop down button, then you will view the Legacy Forms buttons. These buttons are Form Toolbar buttons.
How do I insert a text form field in Word?
Working with Form Fields
- Position the insertion point where you want the field to appear.
- Display the Developer tab of the ribbon.
- In the Controls group click Legacy Tools and then click the Text Form Field tool.
- Right-click the form field just entered and choose Properties from the resulting Context menu.
How do you insert a custom field in Word?
Inserting built-in fields
- Navigate to the location in the Word document where you want to insert a field.
- Click the Insert tab in the Ribbon and then click Quick Parts in the Text group.
- Select Field.
- In the list of Field names, select a field.
- Under Field properties, select any properties or options you want.
How do I get Microsoft Forms?
Start a new form
- Sign in to Microsoft 365 with your school or work credentials.
- Select. New > Forms for Excel.
- Enter a name for your form, and then select Create. A new tab for Microsoft Forms will open in your web browser.
What is the best program to create a form?
Best online form builders of 2021
- Hubspot Free Online Form Builder.
- Gravity Forms.
- Typeform.
- Wufoo.
- Microsoft Forms.
- Formstack.
- Paperform.
- Formsite.
How do I create a form in Word 2016?
Creating a computerized form
- Press Ctrl+N to create a new document.
- On the File tab, choose Save As. You see the Save As window.
- Click the Browse button. The Save As dialog box opens.
- Open the Save As Type menu and choose Word Template.
- Enter a descriptive name for your template and click the Save button.
How do I create a fillable PDF form in Word?
Create a Word document and save it in Word, then open Acrobat. Click the “Tools” menu and click “Prepare Form.” Select the Word file to import. Acrobat will detect potential form fields and add them automatically, but you can use the tools in the right editing pane to adjust them, delete them or add new form fields.
How do I save a Word document as a fillable template?
Saving and Using a Form
- Press F12. Word displays the Save As dialog box.
- Using the Save As Type drop-down list, select Word Template.
- If necessary, change to the directory where the template is to be stored.
- In the File Name field, enter the name under which you want this template saved.
- Click on Save.
How do I make a fillable form in word and not editable?
To make a document un-editable, first, select all the text in the document by pressing Ctrl+A. Once all of the text is highlighted, click “Restrict Editing” in the “Protect” group on the “Developer” tab.
How do I create a fillable form in Word for Mac?
To do this, click on “File” tab > “Options” > “Customize Ribbon”. Then under the “Customize Ribbon”, select the “Developer” checkbox and click “OK”. Step 2: Open a Word document and you will be able to make the Word document fillable.
Where is tools on Word 2013?
MS Word 2013 as a Quick Access Toolbar that is by default placed just next to the Microsoft orb that is available at the top left corner of the interface. The Quick Access Toolbar, as the name suggests, provides tools to quickly access a few commands that are frequently used by most users.
How do I pin a form to the taskbar?
In the first place please open Microsoft forms in Edge. Then click on Apps> install this site as an app. Finally, the app will appear in the start menu. Now, to pin it to the taskbar, do a right-click under the app and then proceed to pin it to the taskbar.
How do I turn on the Developer tab in Word?
The Developer tab isn’t displayed by default, but you can add it to the ribbon.
- On the File tab, go to Options > Customize Ribbon.
- Under Customize the Ribbon and under Main Tabs, select the Developer check box.
What are form fields in Word?
You can use a text form field to collect basic text information such as a name or address. Alternatively you can also use text form fields to request other types of data such as numbers, dates, times, phone numbers, zip codes, percentages etc. Text form fields can also be used to perform calculations.
![]()
Download Article
![]()
Download Article
- Using Windows
- Using a Mac
|
You know when you try to fill out forms in Word on the provided lines, but the text you type makes the lines move and ruins the formatting? There is a way to get rid of that. This wikiHow will teach you how to insert fillable fields on Word on PC or Mac. You’ll need to have Word set up on your computer before you can start.
-

1
Open Word. You can find this program on your Start Menu.
-
2
Open a document. You can either open a new document, create a new document from a template, or open an old document.
Advertisement
-
3
Click Options and Customize Ribbon in the File menu. You’ll find this along the top of your program window.
-
4
Check the “Developer” box in the Customize Ribbon panel.
-
5
Click Ok.
-
6
Click the icons next to Design Mode in the Developer tab. These look like “Aa”, check boxes, and tables.
- The first “Aa” icon on the right side of the panel says “Rich Text Content Control” when you hover over it. This inserts an empty field into the document that can be filled with images, videos, text, and more.
- The second “Aa” icon says “Plain Text Content Control”. This will insert a blank fillable field into your document that the user can fill with only text.
- The “Combo Box Content Control” icon is next to the check box icon, and this will insert a drop-down menu into your document. The Properties button will open options for you to add more items to the drop-down menu.
- The “Date-Picker” icon looks like a calendar and will insert an empty box that will launch a calendar so your form user can pick a specific date. The Properties button will open options for you to choose the box format and display.
- The check box icon adds a check box to your document.
-
7
Click Restrict Editing in the Developer tab. This will pull out a panel from the right of your program window.
-
8
Check the box next to “Editing Restrictions”. This will lock the document so no one can alter the text not in text boxes.
-
9
Click Yes, Start Enforcing Protection. A box will pop up asking for a password. You can enter a password if you want to allow other people with that password to be able to edit your document.


Advertisement
-
1
Open Word. You can find this program in your Applications folder.
-
2
Open a document. You can either open a new document, create a new document from a template, or open an old document.
-
3
Click the Preferences tab under Word at the top of your screen. You’ll see this next to the Apple icon
. A new window will pop up.
-
4
Click View under the “Authoring and Proofing Tools” header.
-
5
Check the “Show developer tab” box under “Ribbon”.
-
6
Click Ok.
-
7
Click “Text Box”, “Check Box”, or “Combo Box” in the Developer tab. This will insert a blank fillable field into your document.
- The Combo Box option creates something like a drop-down menu. Click the Options icon next to the Combo Box icon to access options to turn your combo box into a drop-down menu.
- The Check Box creates checkable boxes.
- The Text box adds fillable fields that control how text appears on a form. For example, instead of a document line with Name:_______ where the user can make a mess of the lines, you can use these fillable text fields to control where the text goes and how it appears. You can click the Options icon to open an options box where you can choose the input type. For example, you have a text box, but are looking for a date, you can pick Date under the “Type” heading for this.
-
8
Click Protect Form. This will prevent you from making any edits to your fields, but will activate them so they are usable.
- If you want to password protect your document, you can go to the Review tab and click Protect Document.


Advertisement
Ask a Question
200 characters left
Include your email address to get a message when this question is answered.
Submit
Advertisement
Thanks for submitting a tip for review!
About This Article
Article SummaryX
1. Open Word.
2. Click Preferences.
3. Click View.
4. Check Show developer tab.
5. Select to add a text box, check box, or combo box.
6. Click Protect.
Did this summary help you?
Thanks to all authors for creating a page that has been read 107,940 times.
Is this article up to date?
This article describes the most common methods for creating ruling lines or blank lines in a Microsoft Word document. These are useful if you are creating a form that will be printed and filled out with pen or pencil.
The following six methods are described in this article:
-
Paragraph Border method
-
Table Border method
-
Blank Space method
-
Tab Leader method
-
Draw method
-
Compatibility Options method
Summary
To create lines in a Microsoft Word document, you may use any of the following methods:
Paragraph Border Method
To place a line (border) under each line that has a paragraph mark (¶), follow these steps.
NOTE: To show paragraph marks in your Word document, click Options on the Tools menu. On the View tab, click to select the Paragraph marks check box, and then click OK.
-
Select all the paragraphs to be underlined.
-
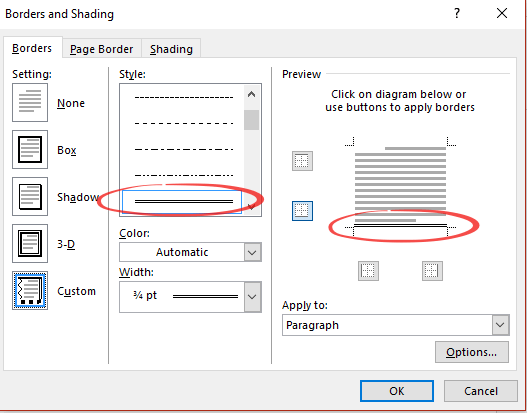
On the Format menu, click Borders and shading.
-
Click the Borders tab.
-
Under Style, click the line style you want to use for the border.
-
Under Preview, click on the diagram to select the center and bottom borders.
-
Click OK. Each line with a hard return will now have a border beneath it.
NOTE: Multiple blank paragraphs formatted in this way can be placed in text boxes and positioned underneath the normal text area to form lines that are not affected when you type text; lines created by using the Draw method are also not affected when you type text.
Table Border Method
To place a border on the bottom of the table cell, follow these steps. There will be a line under any text typed in the table cell. When text wraps to a second line, there will still be only a single border at the bottom of the cell.
-
Place the insertion point on a blank line where you want the underlined text to appear.
-
On the Table menu, point to Insert, and then click Table.
-
In the Number of columns box, type 1, in the Number of rows box, type 1, and then click OK.
NOTE: A one-column, one-row table now appears at the insertion point. You can specify the number of columns and rows you need.
-
On the Table menu, point to Select, and then click Table.
NOTE: You can also select just a particular cell, column, or row of your table to apply the bottom border to.
-
On the Format menu, click Borders and Shading, and then click the Borders tab.
-
On the Borders tab, under Setting, click None.
-
Under Style, click the line style you want to use for the border.
-
Under Preview, click on the diagram to select the bottom border, and then click OK.
Blank Space Method
To underline one space at a time, follow these steps. Word does not normally underline blank spaces. The following instructions explain how to create non-breaking spaces that Word will underline.
-
Place the insertion point where you want the ruling line (underlining).
-
On the Format menu, click Font. In the Underline style box, select the line style you want, and then click OK.
-
For every blank space you want to underline, press CTRL+SHIFT+SPACEBAR.
Tab Leader Method
-
Place the insertion point on the line where you want the underlining.
-
On the Format menu, click Tabs.
-
In the Tabs dialog box, click Clear All.
-
Under Tab stop position, type a number that corresponds to the number of inches you want the line to extend from the left margin. (For example, 6.0 inches goes from margin to margin in a document with 1.25-inch left and right margins.)
-
Under Alignment, click Right, and then under Leader, click 4 (the underline).
-
Click Set, and then click OK.
-
Press the TAB key. A line extends from the insertion point to the tab created in step 4.
-
Press ENTER to move to a blank line, and then press the TAB key again. Repeat this step as needed.
NOTE: Multiple blank paragraphs formatted in this way can be placed in text boxes and positioned underneath the normal text area to form lines that are not affected by typing text; lines created using the Draw method are also not affected by typing text.
Draw Method
-
Click the Drawing toolbar button on the Standard toolbar, or point to Toolbars on the View menu, and then click Drawing.
-
Click Line on the Drawing toolbar.
-
Place the pointer where you want the line to start. The mouse pointer is a crosshair (+).
-
Click and hold the mouse button, and drag the line to the length you want.
NOTES:
-
Holding down the SHIFT key while drawing a line produces straight horizontal or vertical lines.
-
Holding down the ALT key while drawing a line prevents the line from snapping to the grid and allows exact line placement. To turn off the snap-to-grid feature, click Draw on the Drawing toolbar, and then click Grid. Click to clear the Snap objects to grid check box, and then click OK.
-
-
Repeat steps 1 through 4 to add as many ruling lines as you want.
Compatibility Options Method
NOTE: Using this method will create an underlined character each time you press a key. Pressing the SPACEBAR will create an underlined space.
-
On the Tools menu, click Options.
-
Click the Compatibility tab.
-
Under Options, click to select the Draw underline on trailing spaces check box, and then click OK.
-
On the Format menu, click Font.
-
On the Font tab, click the underline style you want in the Underline style box, and then click OK.
More Information
For more information about using text boxes, click Microsoft Word Help on the Help menu, type text boxes in the Office Assistant or the Answer Wizard, and then click Search to view the topic.
References
Word has a set of AutoFormat shortcuts that make horizontal lines, here’s how they work, how to change them, color the lines and how to stop lines when they get out of control.
Line shortcuts
There are six horizontal line shortcuts. For each one type the same character three times at the start of a new line then press Enter.
For example, press the dash key three times on a new line, then enter.

Dashes give you a horizontal line
Underscores give you a bold horizontal line
Equals gives you a double horizontal line

And there’s more …
The three above are the best known but there are others.
Asterisk makes a dotted line
Tilde makes a wavy line
Pound/Hash makes a triple line
Tooltip controls
Whenever you automatically make a line, a small tooltip appears with some options.

Undo Border Line – changes back to the characters you typed. The usual undo shortcut, Ctrl + Z, will do the same thing.
Stop Automatically Creating Border Lines – will turn off the AutoFormat | Border Lines option entirely.
Control AutoFormat Options … goes to the settings for AutoFormat as you type.
Autoformat Options
The automatic lines and all other AutoFormat options are controlled from Options | Proofing | AutoCorrect options | AutoFormat As You Type:

Border lines can be turned on/off from there. There are no options to select just some character/line combinations – it’s all or nothing.
Under the hood
Word isn’t making the lines by adding a lot more characters across the page. That’s where confusion can begin if you’re trying to stop the lines appearing.
It’s converting your dash/underscore/equals etc. into a paragraph border. Specifically, a bottom border line on the paragraph.
For example, here’s how an automatic double horizontal line appears in Paragraph | Borders and Shading
It’s just the double line style applied to the bottom line of the paragraph. Strictly, at the bottom of group of paragraphs with the same formatting. Knowing that detail is useful when you’re fixing the extra lines that start appearing.
Color
The automatic lines are always black (actually ‘Automatic’). Word doesn’t pick up the color of the three characters nor the paragraph as you might expect.
To change the line color, select the line then go to Home | Paragraph | Borders | Borders and Shading. Select the color you want from the pull-down list and then click on the borders you want the color change to apply.

Other lines
You’re not limited to the lines that Microsoft provides via AutoCorrect. You can add your own or change the look of a line added with AutoCorrect.
Select the line then go to Home | Paragraph | Borders | Borders and Shading. That opens up the many options you have:
Styles: there are over 20 line styles to choose from.
Color: as mentioned above, the full Word color range is available.
Width: thin, medium or thick – take your pick from ¼ point to 6pt.
Top, bottom, left, right – click in the preview box to choose which lines to show and the style of each one.
Whatever you choose, remember to click on the line/s in the preview box to apply the look you want.
For consistency, you can have a horizontal line as part of a paragraph style. For example, a line above or below a heading.
Unwanted horizontal lines
A common problem with the automatic lines is extra lines appearing where you don’t want them.
It happens when you add paragraphs immediately above the horizontal line. Each of those paragraphs inherits the same (bottom border) formatting that Word made for the horizontal line.
You won’t see a line under each paragraph because Word groups together paras with the same formatting. Only the last paragraph of a group will have a bottom border line.
The problem usually rises because people try to fix the extra lines by selecting just the paragraphs showing horizontal line and change the formatting.
That doesn’t change the ‘bottom border’ formatting for other lines that have the setting. So it seems like extra lines keep popping up without reason!

The solution is to make sure you select all the affected paragraphs – not just the ones with horizontal lines.
Choose a paragraph and look carefully at the Home | Paragraph | Borders icon. That icon changes according to the current border settings. In this, enlarged, example you can see the bottom line is solid.

To change the border setting, pull-down the borders list and choose ‘No Border’.

To stop the creeping lines in the first place, get into the habit of not adding extra paragraphs from the horizontal line itself. Instead, go to the paragraph ABOVE the horizontal line and add new paras from there.
Five ways to add vertical lines in Word
Six Word tricks to reduce space between lines
Multi-Line Picture Borders in Word or PowerPoint
Create your own I ♥ Love…. Signs in Word
Latest Articles for Microsoft
-

Image: Farknot Architect/Adobe Stock
SoftwareHow to access Microsoft Remote Desktop on your Mac
If you need to access Windows applications or PCs using your Mac, a remote desktop connection is the way to go. Here’s how to set up and use the connection.
-
Image: PhotoGranary/Adobe Stock
SoftwareMicrosoft PowerToys: A cheat sheet
Users are always searching for ways to make their computing lives better, and the Microsoft PowerToys are made specifically for this purpose.
-
Image: StackCommerce
Tech & WorkRun Windows programs at native speed on macOS, Linux or ChromeOS for just $50
Ditch those clunky emulators and run your Windows software on other operating systems as quickly and easily as on a Windows computer.
-
Image: Microsoft
SoftwareGet lifetime access to Microsoft Office 2021 for just $50
Whether you’re starting a new business venture and need Microsoft Office’s help or you just want to get better organized in your personal life, it’s a good time to take advantage of this limited-time deal.
-
Image: PhotoGranary/Adobe Stock
DeveloperNew ways to bring MongoDB data and apps to Azure Cosmos DB
Microsoft is making it easier to move existing MongoDB workloads to its Cosmos database.
-
Image: wachiwit/Adobe Stock
Tech & WorkTurbocharge your company’s productivity with advanced Excel skills for only $10
Learn all of Excel’s features, plus how to program and streamline your workflow with automated tasks in this Excel Training bundle.
-
Image: Adobe Stock/alvaher
SecurityMicrosoft adds GPT-4 to its defensive suite in Security Copilot
The new AI security tool, which can answer questions about vulnerabilities and reverse-engineer problems, is now in preview.
-
Image: Pixabay
SoftwareLoop components make collaboration easier in Office and Microsoft 365 apps
Structured chunks of data you can share and update in multiple places are showing up in different Office applications. Here’s what you can do with these Loop components.
-
Image: Andy Wolber/TechRepublic
SoftwareGoogle Workspace pricing (2023): How to choose the right plan for your business
Moving to Google Workspace? Understand the differences between business and enterprise plans so you can choose the right one for your business.
-
Image: gguy/Adobe Stock
SecurityMassive adversary-in-the-middle phishing campaign bypasses MFA and mimics Microsoft Office
Microsoft has already seen millions of phishing emails sent every day by attackers using this phishing kit. Learn how to protect your business from this AitM campaign.
-
Image: Hugo Baeta
CloudRunning WordPress on Azure for secure, fast and global content delivery
Learn about Microsoft’s WordPress on Azure App Service, as well as an interesting alternative from WP Engine.
-
Image: PhotoGranary/Adobe Stock
CloudAzure Monitor’s Change Analysis helps you troubleshoot problems quickly
Azure Monitor’s Change Analysis helps you troubleshoot problems quickly.
-
Image credit: Microsoft
Artificial IntelligenceMicrosoft adds Copilot AI productivity bot to 365 suite
Copilot, a natural language bot that can pull from data across the Microsoft 365 suite, is now in testing with select commercial customers.
-
Image: gguy/Adobe Stock
Artificial IntelligenceOpenAI debuts GPT-4 after year of training on Azure supercomputer
The GPT-4 language model is now available for ChatGPT Plus subscribers. Developers can join an API waitlist.
-
Image: Karolina Grabowska/Pexels
SoftwareHow to customize Outlook for Mac mail
Microsoft recently made Outlook for Mac free, a move sure to encourage adoption. If you’re using Outlook for Mac, or thinking of making the change, here’s how to customize the app’s email views.