
Summary
This article explains how to use the Mail Merge feature in Microsoft Word to create and to print form letters by using data from a Microsoft Excel worksheet.
When you use the Word Mail Merge feature, Word merges a main document with a recipient list to generate a set of output documents:
-
The main document contains the basic text that is the same in all of the output documents. It may contain a letterhead, text, and instructions in merge fields for inserting text (such as recipient names and addresses) that vary from one output document to another.
-
The recipient list is a database that contains the data that is to be merged into the output documents. For example, the recipient list is a Microsoft Access database file or an Excel worksheet.
This database is typically a list of names, addresses, phone numbers, and other categories of personal information.
-
The output documents are the result of the mail merge. The text in an output document can be the same in all output documents, but you can apply formatting to specific documents.
Step 1: Set Up the Excel Data File
Before you proceed with the Mail Merge Wizard, make sure that your Excel worksheet is well structured for this purpose. Note the following requirements for the data table:
-
The first row should contain field names for each column — for example, Title, Salutation, First Name, Middle Name, Last Name, Address1, and Address2.
-
Each field name should be unique.
-
Each row should provide information about a particular item. For example, in a mailing list, each row might include information about a particular recipient.
-
The table should contain no blank rows.
Create your Excel data file, and then arrange it by using the fields that you want to use for your letter, as shown in the following sample data file.
After you create your Excel data file, save it, and then close the data file.
For more information about how to create a mail-merge address list, click the following article number to view the article in the Microsoft Knowledge Base:
294688 How to design and set up a mail merge address list in Word 2002 and in later versions of Word
Step 2: Set Up the Main Document
-
In Microsoft Office Word 2003 and in earlier versions of Word, point to Letters and Mailings on the Tools menu, and then click Mail Merge Wizard.
In Microsoft Office Word 2007, click Start Mail Merge in the Start Mail Merge group on the Mailings tab, and then click Step by Step by Mail Merge Wizard.
-
Under Select document type, click Letters.
The active document becomes the main document. The main document contains the text and graphics that are the same for each version of the merged document. For example, the return address and the salutation in a form letter are the same for each version.
-
Click Next: Starting document.
-
Use one of the following methods:
-
Start with the document that is currently shown in the document window. To do this, click Use the current document.
You can then either type the letter in the document window or wait until the wizard prompts you to do so in a later step.
-
Start with a template. To do this, follow these steps:
-
Click Start from a template.
-
Click Select template.
-
On the Mail Merge tab, select the template that you want in the Select Template dialog box, and then click OK.
-
-
Start with an existing document. To do this, follow these steps:
-
Click Start from existing document.
-
In the Start from existing box, select the document that you want, and then click Open.
-
If you do not see the document, click More files, and then click Open. In the Open dialog box, locate the document that you want, and then click Open.
-
-
-
Click Next: Select recipients.
Step 3: Specify the Excel Data Source
-
Under Select recipients, click Use an existing list.
-
Click Browse.
-
In the Select Data Source dialog box, locate and then click the Excel worksheet that you want to use.
By default, Word opens the «My Data Sources» folder.
-
Click Open.
-
If your Excel worksheet contains information about multiple tabs, select the tab that contains the information that you want, and then click OK.
-
All entries in the data source appear in the Mail Merge Recipients dialog box. Here, you can refine the list of recipients to include in the merge.
Step 4: Select the Recipients
-
In the Mail Merge Recipients dialog box, select the recipients that you want to include. To do this, use one of the following methods:
-
Use the check boxes to designate recipients.
This method is most useful if the list is short. Click to select the check boxes next to the recipients that you want to include, and then click to clear the check boxes next to the recipients that you want to exclude.
Note If you know that you want to include most of the list in your merge, click Select All, and then click to clear particular records. Similarly, if you want to include only a few records in the list, click Clear All, and then select the records that you want.
-
Sort items in the list.
This method is useful if you want to see items in alphabetical or numeric order. Click the column heading of the element by which you want to sort. For example, if you want to display the list alphabetically by last name, click the Last Name column heading.
-
Filter items in the list.
This method is useful if the list contains records that you know you do not want to see or include in the merge. After you have filtered the list, you can use the check boxes to include and exclude records, as described earlier. To filter the list, follow these steps:
-
Click the arrow next to the column heading of the element that you want to filter by.
-
Click any of the following:
-
(Blanks): This option displays all the records in which the corresponding field is blank.
-
(Nonblanks): This option displays all the records in which the corresponding field contains information.
-
If the data source contains records that share the same information, and if there are 10 or fewer unique values in the column, you can filter by specific information. For example, if there are multiple addresses that list Australia as the country, you can filter by Australia.
-
-
-
The Mail Merge Recipients dialog box displays only the designated records. To display all the records again, click (All).
Notes
-
For advanced sorting and filtering, click the arrow next to any column name, and then click (Advanced). Use the Filter Records and Sort Records tabs to set up the sorting or filtering query that you want.
-
If you have installed address validation software, click Validate in the Mail Merge Recipients dialog box to validate your recipients’ addresses.
-
-
Click OK to return to the Mail Merge Wizard.
Word uses the recipients that you designated for the merge.
-
Click Next: Write your letter.
Step 5: Complete the Letter and Add Merge Fields
If you have not already done this, type the text that you want to appear in every form letter in the main document.
Insert Merge Fields
Insert merge fields where you want to merge names, addresses, and other information from the data source. To insert merge fields, follow these steps:
-
In the main document, click where you want to insert the field.
-
Insert any of the following:
-
Address block with name, address, and other information:
-
Click Address block.
-
In the Insert Address Block dialog box, select the address elements that you want to include and the formats that you want, and then click OK. For help on an option, click the question mark, and then click the option.
-
For help on an option, click the question mark, and then click the option. If the Match Fields dialog box appears, Word may be unable to find some of the information it needs for the address block. Click the arrow next to
(not available), and then select the field from your data source that corresponds to the field required for the mail merge.
-
-
Greeting line:
-
Click Greeting line.
-
Select the greeting line format that includes the salutation, name format, and following punctuation.
-
Select the text that you want to appear in the cases in which Word cannot interpret the recipient’s name. For example, Word cannot interpret the name when the data source contains no first or last name for a recipient, but only a company name.
-
Click OK.
-
If the Match Fields dialog box appears, Word may be unable to find some of the information it needs for the greeting line. Click the arrow next to (not available), and then select the field from your data source that corresponds to the field required for the mail merge.
-
-
Other fields of information:
-
Click More items.
-
Use one of the following methods:
-
Click Address Fields to select from address fields that will automatically map to corresponding fields in your data source, even if the data source’s fields do not have the same name as your fields.
-
Click Database Fields to select from fields that always take data directly from a column in a database.
-
-
In the Fields box, click the field that you want.
-
Click Insert, and then click Close.
-
If the Match Fields dialog box appears, Word may not be able to find some of the information it needs to insert the field. Click the arrow next to (not available), and then select the field from your data source that corresponds to the field required for the mail merge.
Note If you insert a field from the Database Fields list, and if you later switch to a data source that does not have a column with the same name, Word cannot insert that field information into the merged document.
-
-
Electronic postage:
To add electronic postage, you must first install an electronic postage program, such as one that you can purchase from a third-party provider on the Web. To use electronic postage, follow these steps:
-
Click Electronic postage.
If you do not have an electronic postage program installed, Word prompts you to install one, and offers to connect to the following Microsoft Office Web site:
Print Online Postage
http://office.microsoft.com/services/service.aspx?sid=2.4 -
Insert the postage according to the program’s instructions.
-
-
To add electronic postage, you must first install an electronic postage program, such as one that you can purchase from a third-party provider on the Web. To use electronic postage, follow these steps:Postal bar code: You must select a letter or envelope type that supports the POSTNET bar code. To use the Postal bar code, follow these steps:
-
Click Postal Bar Code.
-
In the Insert Postal Bar Code dialog box, select the appropriate address fields.
Note The Postal Bar Code option appears only if you are using the U.S. language version of Word.
-
Repeat steps a and b for all the fields that you want to insert. NOTES:
-
You cannot type merge field characters (» «) or insert them by using the Symbol command on the Insert menu.
-
If the merge fields appear inside braces, such as { MERGEFIELD City }, Word is displaying field codes instead of field results. This does not affect the merge, but if you want to display the results instead, right-click the field code, and then click Toggle Field Codes on the shortcut menu.
-
For example, by using the sample database shown earlier, your letter might contain the AddressBlock and GreetingLine fields, and therefore your first page appears similar to the following:
February 26, 2002
AddressBlock
GreetingLine
Type your letter here.
Sincerely,
Type your name here
-
Note You can also use the Mail Merge toolbar to insert merge fields, work with your mail-merge main document, or run a mail merge. To display the Mail Merge toolbar, point to Letters and Mailings on the Tools menu, and then click Show Mail Merge Toolbar.
The Mail Merge toolbar provides additional commands that are not included in the Mail Merge Wizard task panes. For example, you can use the Insert Word Field menu on the Mail Merge toolbar to insert Word fields for controlling the merge process. For example, you can insert an IF field that inserts text only if a particular merge field has a specified value.
Alternatively, you can click Check For Errors to make Word run the mail merge and report any errors that are contained in the main document.
-
Change the Format of the Merged Data
To format merged data, you must format the merge fields in the main document. Do not format the data in the data source, because its formatting is not retained when you merge the data into the document. To change the format of the merged data, follow these steps:
-
In the main document, select the field that contains the information that you want to format, including the enclosing merge field characters (<< >>).
-
In Word 2003 and in earlier versions of Word, click Font on the Format menu, and then select the options that you want.
In Word 2007, click the option that you want in the Theme Fonts box in the Font group on the Home tab.
Format by Using Field Codes
To control other aspects of formatting, press ALT+F9 to display field codes, and then add switches to the merge fields. When you work with fields, a switch is a special instruction that causes a specific action to occur. Generally, a switch is added to a field to modify a result.
Examples of how to use switches are as follows:
-
To display the number 34987.89 as $34,987.89, add the Numeric Picture switch (#).
-
To print client names in uppercase letters, add the Format switch (*).
-
To make sure that the merged information has the same font and point size that you apply to the merge field, add the Charformat switch (*).
Step 6: Save the Document
After you have completed the main document and inserted all the merge fields, make sure that you save the document before proceeding. To do this, follow these steps:
-
In Word 2003 and in earlier versions of Word, click Save As on the File menu.
In Word 2007, click the Microsoft Office Button, and then click Save As.
-
Name the document, and then click Save.
-
Click Next: Preview your letters.
Step 7: Preview the Letters and Fine-Tune the Recipient List
When the wizard displays the «Step 5 Mail Merge» task pane, the wizard replaces each of the merge fields in the main document that has the actual text from the first entry of the recipient list.Therefore, you can see how your first output document will look.
For example, if you were to continue to use the sample database shown earlier, the first page should resemble the following page after you click Next: Preview your letters:
February 26, 2002
Andrew Fuller
908 W. Capital Way
Tacoma 98401
Dear Andrew Fuller,
Type your letter here.
Sincerely,
Type your name here To preview additional entries, use one of the following methods:
-
To preview the items in order, click the left or right arrow buttons.
-
To locate and preview a specific item, click Find a recipient, and then enter the search criteria in the Find Entry dialog box.
Fine-tune the recipient list if you want. To do this, use one of the following methods:
-
To exclude a particular recipient from the merge operation, click Exclude this recipient.
-
To change the list of recipients, click Edit recipient list, and then make your changes in the Mail Merge Recipients dialog box.
Step 8: Complete the Merge
To complete the merge, use any of the following methods.
Personalize Individual Letters
To personalize individual items, you actually complete the merge, and then edit the information that you want in the resulting merged document. To do this, follow these steps:
-
Click Edit individual letters.
-
In the Merge to New Document dialog box, select the records that you want to merge.
-
Click OK.
Word creates and opens a new merged document. Your main document also remains open, and you can switch back to it if you want to change all the documents.
-
Scroll to the information that you want to edit, and then make your changes.
-
Print or save the document just as you would any regular document.
Print the Letters
To print the letters, use one of the following methods:
-
If you personalized the items and if the merged document is active, follow these steps:
-
In Word 2003 and in earlier versions of Word, click Print on the File menu.
In Word 2007, click the Microsoft Office Button, and then click Print.
-
Select the options that you want.
-
-
If you want to print directly from the Mail Merge Wizard, follow these steps:
-
In Step 6 of the Mail Merge Wizard (Complete the merge), click Print.
-
In the Merge to Printer dialog box, use one of the following methods, and then click OK:
-
To print all the documents, click All.
-
To print the document that you see in the document window, click Current record.
-
To print a range of documents, click From, and then type the record numbers in the From and To boxes.
-
-
In the Print dialog box, select the options that you want.
-
Save the Merged Letters for Later Use
If you want to edit merged letters or to save them for later use, you can collect them into a single document. To do this, follow these steps:
-
Click Edit individual letters.
-
In the Merge to a New Document dialog box, use one of the following methods, and then click OK:
-
To merge all the documents, click All.
-
To merge only the document that you see in the document window, click Current record.
-
To merge a range of documents, click From, and then type the record numbers in the From and To boxes.
-
-
Word opens a single new document that contains all the individual letters. You can then save the document for later use, just as you would any regular document.
References
For more information, click the following article numbers to view the articles in the Microsoft Knowledge Base:
318117 How to use addresses from an Excel worksheet to create labels in Word
318115 How to create a form letter by using information from an Access database in Word 2002
318112 How to use addresses from an Access 2002 database to create labels in Word 2002
294686 How to use mail merge to create a list sorted by category in Word 2002 and in later versions of Word
290408 Frequently asked questions about mail merge in Word 2002
294688 How to design and set up a mail merge address list in Word 2002 and in later versions of Word
294693 How to use mail merge to create a directory in Word 2002 and in later versions of Word
294683 How to use mail merge to create form letters in Word 2002 and in later versions of Word
Sometimes you may want to create a letter that you will be sending to a lot of different people, but you’d like certain parts of it to be individualized for each addressee: parts such as the greeting, name, address, etc. In Word parlance, this means you should create a form letter, which is really easy to do.
Before you get started with form letters, you should make sure you have a database already setup with all the fields you would like to include. A database can be as simple as an Excel spreadsheet with columns for first name, last name, address, etc. Word can import data from Excel, Access, and text documents. If you don’t already have a database setup, you can always create it inside Word, which I’ll show you how to do.
To begin, create a document that has the standard text in it like the example Christmas letter below:

Notice how it has no salutation, address, etc. because those will all be added later as fields in our form letter. The first thing you need to do is click on Select Recipients on the Mailings tab:

This is where you add the people that will be receiving the letter or import a list from a database file.

You can click on Type New List if you want to create the list inside Word itself. To import, click on Use Existing List. In this example, we’ll just type out the list.

Note: When you go to save your recipient list, Word will prompt you for a location on your hard drive to save the data file that will be created.
Once you save your recipients list, you will notice that a lot of the icons that are on the Mailings ribbon are clickable now. To start adding fields to your form letter, click a spot in your document to indicate where you want the field to be placed and then click on Address Block.

This will bring up the Insert Address Block dialog.

Click OK to go with the default format and you should get something that looks like this:

Next, add an Enter after the Address Block to move your text down a line, then click on the Greeting Line icon:
![]()
This will bring up the Insert Greeting Line dialog.

Once again, let’s go with the default format and just click the OK button.
Next, highlight where it says , right-click the mouse, choose Paragraph and then check the box next to Don’t add space between paragraphs of the same style. This will make the address block hang together correctly instead of having a blank line between each part of it.

Then, click on the Preview Results icon located on the Mailings tab in the ribbon.

Instead of the address block field indicator, you should now see the actual content listed in the Word document.

When you’re done previewing, click the Preview Results icon to turn off previewing. Next, to see how to add other fields, click just past the in your document to make that your current position, then click on the Insert Merge Field icon.
![]()
You should get something like this:

Choose Country or Region, then click on the Insert button.

Try clicking the Preview Results icon again to see how it looks. Here is my example below:

Now that the form letter is setup correctly, you can do more advanced things like setting up rules. Rules will allow you to show some text for certain recipients and hide it for others. To get started, click on the Rules button.

You’ll see a drop-down menu with several options like Ask, Fill-in, etc.

For our example, let’s choose If…Then…Else, which will bring us to the following dialog:

Change the Field name: to Country_or_ Region, and type USA into the Compare to: field. Next, add some text to the boxes where it says Insert this text and Otherwise insert this text. In this example if the recipient lives in the USA, they will get the text Merry Christmas inserted into their letter, while everyone else will get the message Seasons Greetings.
Here’s what it will look like once you click the OK button and then the Preview Results button.

Next, note the Preview Results section:

Here you can click on the arrow buttons (when Preview Results is turned on) to the left and right of the number to scroll through all of the letters that will be sent out. This way you can make sure that all of your letters will look right before printing or emailing.
Note: The match fields menu choice under Rules is for matching field names in a database with header names in your recipients list.
Also to make it easier to see where you’ve inserted fields into your document, use the Highlight Merge Fields button.

It’s a toggle you can turn on and off at your discretion. Finally, when you’re happy with your letter, click the Finish & Merge icon:

You should get this dropdown menu with three options.

Choose Edit Individual Documents to get Word to merge all your letters together into one big document that you can look over before printing or sending as an email.
As you can see, creating form letters with Word is no longer the chore it once was and you can create and send documents quickly and easily. If you have any questions, feel free to comment. Enjoy!
SOURCE:http://www.online-tech-tips.com/ms-office-tips/how-to-create-form-letters-in-word/
Perform a Mail Merge in Microsoft Word to Generate Form Letters for Bulk Mailings
by Avantix Learning Team | Updated January 10, 2021
Applies to: Microsoft® Word® 2013, 2016, 2019 and 365 (Windows)
You can use mail merge in Microsoft Word to create form letters, labels, envelopes and even a catalog or directory. In this article, we’ll review the process for creating form letters for multiple contacts or clients. You’ll need to create a main document or letter in Microsoft Word and then connect to a data set of names and addresses in a Word document, Excel worksheet, delimited file or database like Microsoft Access. When you run the mail merge, you have the option of creating a new merged file (which would include a letter for each contact) or merge directly to a printer.
Recommended article: How to Create Labels in Word Using Mail Merge and Excel Source Data
Do you want to learn more about Word? Check out our virtual classroom or live classroom Word courses >
Understanding the mail merge process for form letters
There are 7 steps in the mail merge process to create form letters in Word:
- Start the merge and specify the main document for the letter.
- Select the source file containing the data set with names and addresses. Microsoft refers to a data set or database as a list. It’s best to create this file before you begin the mail merge process.
- Insert fields into the letter and any other required content (such as the body of the letter and signature).
- Format the letter.
- Select specific recipients or filter the recipient list (optional).
- Preview the merged letter (optional).
- Run the mail merge.
During the mail merge process, fields are inserted into the main document and appear in carets (such as <<FirstName>>). By default, when you click in a field, it is displayed with grey shading. When you run the merge, the fields are replaced by data from the source file.
In this article, we’ll be using the Mailings tab in the Ribbon to set up and run a mail merge (not the Mail Merge Wizard):

Step 1: Start the merge and specify the main document
The first step in the mail merge process is to start the merge using Start Mail Merge on the Mailings tab in the Word Ribbon:

To start the merge and specify the main document as a form letter:
- Create a new blank document or open a Word document containing a sample letter.
- Click the Mailings tab in the Ribbon and then click Start Mail Merge in the Start Mail Merge group.
- From the drop-down menu, select the type of document you want to create. In this case, select Letters. By default, Word uses the current document. At this point, you may want to insert other components such as a date, the body of the letter and a signature.
Step 2: Select the source file containing the data set
The next step is to connect to a source file containing a list of names and addresses using Select Recipients. The source file can be a Microsoft Word document containing a table or delimited data, Excel worksheet or even a table or query in a database such as Microsoft Access. For Word tables and Excel spreadsheets, the first row in the table or worksheet must contain field names such as FirstName, LastName, Company, Address and so on. In a Word source file, there cannot be any paragraphs above the table or data. You can also use a comma or tab delimited file as long as the first line in the document contains field names. In delimited files, the field names and data are separated by a delimiter such as a comma or tab.
Select Recipients appears on the Mailings tab in the Ribbon:

In the following example, note that the field names are in the first row of a Word table which will be used as a source:

In the following Excel example, note that the field names are in the first row of the worksheet which will be used as a source:

To select a Microsoft Word source file containing a table with names and addresses:
- In the main Word document, click the Mailings tab in the Ribbon and then click Select Recipients in the Start Mail Merge group. A dialog box appears.
- Click Use an Existing List from the drop-down menu. A dialog box appears.
- Navigate to the Word file containing the names and addresses you want to use.
- Double-click the file.
To select a Microsoft Excel source file containing a worksheet with names and addresses:
- In the main Word document, click the Mailings tab in the Ribbon and then click Select Recipients in the Start Mail Merge group. A dialog box appears.
- Click Use an Existing List from the drop-down menu. A dialog box appears.
- Navigate to the Excel file containing the names and addresses you want to use.
- Double-click the file. A dialog box appears.
- Ensure First row of data contains column headers is checked.
- Click the Excel worksheet containing the data you wish to use.
- Click OK.
The following dialog box appears when you select an Excel file as the source for a merge:

Step 3: Insert fields from the source file
Once you have connected to a source file, you can insert fields into the main document or letter. You have the option of using special Word fields such as Address Block and Greeting Line (for example, to insert Dear John) or inserting individual fields.
Address Block and Greeting Line appear as follows in the Ribbon:

To insert the Address Block field:
- Click in the main document where you want to insert an address block.
- Click the Mailings tab in the Ribbon and then click Address Block in the Write & Insert Fields group. A dialog box appears. Word will display an address based on the source data.
- In the samples on the left, select the address sample you prefer.
- Check or uncheck other options if necessary.
- Click OK. Word inserts an Address Block field into the main document.
For Address Block, select a sample address in the area on the left in the Insert Address Block dialog box:

To insert a Greeting Line field:
- Click in the main document where you want to insert a greeting.
- Click the Mailings tab in the Ribbon and then click Greeting Line in the Write & Fields group. A dialog box appears. Word will display a greeting based on the source data.
- Select greeting line options for the Greeting line format.
- Select an option for invalid recipient names.
- Click OK. Word inserts a Greeting Line field into the main document.
For Greeting Line, select greeting line options in the Insert Greeting Line dialog box:

To insert fields individually:
- Click in the main document where you want to insert a field (such as FirstName).
- Click the Mailings tab in the Ribbon and then select Insert Merge Field in the Write & Insert Fields group.
- From the drop-down menu, select the field you want to insert.
- Press the spacebar, type text or press Enter if necessary.
- Repeat for other fields you want to insert.
Step 4: Format the letter
You may need to apply formatting to the letter such as changing the font and size and adjusting paragraph spacing.
It’s common for an Address Block field or address lines to have extra paragraph spacing above and / or below lines in the address when the results are previewed or printed. This is caused by default settings for space above and below paragraphs.
To remove the paragraph spacing:
- Select the Address Block field or other lines (often in the address if you have inserted individual fields).
- Click the Home tab in the Ribbon and select the dialog box launcher on the bottom right of the Paragraph group.
- Select Don’t add space between paragraphs of the same style. Alternatively, change the space above and below the paragraph(s).
- Click OK.
Step 5: Select specific recipients or filter the recipient list (optional)
You have the option of specifying specific recipients or filtering the recipient list if you don’t want to create form letters for all contacts in the data source.
To choose specific contacts:
- Click the Mailings tab in the Ribbon and then click Edit Recipient List in the Start Mail Merge group. A dialog box appears.
- Uncheck the check boxes beside the recipients you do not want to include in the mail merge.
- Click OK.
To filter the source list:
- Click the Mailings tab in the Ribbon and then click Edit Recipient List in the Start Mail Merge group. A dialog box appears.
- Click Filter. A dialog box appears.
- Select / enter the desired filtering options.
- Click OK.
For example, below is a filter to display records from Toronto:

To remove the filter, repeat the process, but click Clear All in the Filter and Sort dialog box.
Step 6: Preview the results (optional)
Before you run the mail merge, you can preview the results:
- In the main document, click the Mailings tab in the Ribbon and then click Preview Results in the Preview Results group.
- Click the arrows in the Preview Results group to go to the next or previous letter.
- Click Preview Results to view the fields again.
Step 7: Run the mail merge for letters
The final step is to run the merge. You can either create a new merged document or merge directly to a printer.
To run the letter mail merge in the main document and create a new merged document:
- Click the Mailings tab in the Ribbon and then click Finish & Merge in the Finish group. A drop-down menu appears.
- Click Edit Individual Documents. A dialog box appears.
- Click Current Record or enter a selected range if necessary.
- Click OK. Word creates a new merged document that you can edit, print and save. Each letter will appear on a new page in a new section.
The following dialog box appears when you select Edit individual documents.

To run the letter mail merge in the main document and print the merged documents:
- Click the Mailings tab in the Ribbon and click Finish & Merge in the Finish group. A drop-down menu appears.
- Select Print Documents. A dialog box appears.
- Click Current Record or enter a selected range if necessary.
- Click OK. A dialog box appears.
- Select the desired printer and other printer options.
- Click OK.
The following dialog box appears when you select Print Documents:

You will typically want to save the main document and the source file. If you save the merged file, you will have a record of the letters that were created.
The process is similar for labels. The main document would be labels (usually a label type with a product code) and would connect to the source document in the same way.
This article was first published on December 9, 2019 and has been updated for clarity and content.
Subscribe to get more articles like this one
Did you find this article helpful? If you would like to receive new articles, join our email list.
More resources
How to Insert a DRAFT Watermark in Word and Remove It (Add Text or Picture Watermarks)
How to Remove Hard Returns in Word Documents
How to Superscipt or Subscript in Word (with Shortcuts)
Related courses
Microsoft Word: Intermediate / Advanced
Microsoft Word: Designing Dynamic Word Documents Using Fields
Microsoft Word: Long Documents Master Class
Microsoft Word: Accessible Word Documents
Microsoft PowerPoint: Intermediate / Advanced
VIEW MORE COURSES >
Our instructor-led courses are delivered in virtual classroom format or at our downtown Toronto location at 18 King Street East, Suite 1400, Toronto, Ontario, Canada (some in-person classroom courses may also be delivered at an alternate downtown Toronto location). Contact us at info@avantixlearning.ca if you’d like to arrange custom instructor-led virtual classroom or onsite training on a date that’s convenient for you.
Copyright 2023 Avantix® Learning
Microsoft, the Microsoft logo, Microsoft Office and related Microsoft applications and logos are registered trademarks of Microsoft Corporation in Canada, US and other countries. All other trademarks are the property of the registered owners.
Avantix Learning |18 King Street East, Suite 1400, Toronto, Ontario, Canada M5C 1C4 | Contact us at info@avantixlearning.ca

Using Mail Merge
Preparing a form letter with Word and Excel
Two Microsoft Office applications will be required for this task. Excel will be used for the data and Word will be used to create the form letter. A form letter is one in which the body of the letter stays the same but specific information is inserted for/about several different individuals. You have probably gotten one like that in the past. The first step will be to prepare the data source from which information will be inserted into the form letter.
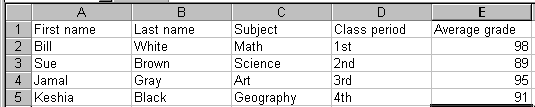
Step 1. Open Microsoft Excel. Remember to leave your browser window open until this lesson is finished. The excel worksheet will take the place of a database. A database has field names for each type of information entered. Common field names are First Name, Last Name, Telephone, and zip code. The field names you choose will be determined by the form letter you want to produce. For this activity we will use the following field names:
- First name
- Last name
- Subject
- Class period
- Average grade
Step 2. Field names must be entered in the cells across row 1. Type «First name» in cell A1. Press the Tab key to move to cell B1 and type «Last name.» Continue until each of the field names above have been entered. Do not worry if the cell is not wide enough. Your worksheet will probably look somewhat like the one you see below:

Step 3. Place your cursor over the » A » in the column heading and drag to the right unto you reach the » E » column heading. All five columns will be highlighted.
Step 4. Place the cursor on the light gray line between any two of the highlighted headings, and double-click. All columns will adjust in width to fit the data.
Step 5. Enter four lines of data. Create your own or copy what you see below:

Step 6. Save the worksheet. Remember where you saved it. I recommend saving to the desktop. Close the worksheet.
Step 7. Open Word. If a new blank document does not automatically open, go to the File menu and select New . Then open a new blank document
Step 8. It is not necessary to begin typing the form letter. You may start the mail merge process before typing anything.
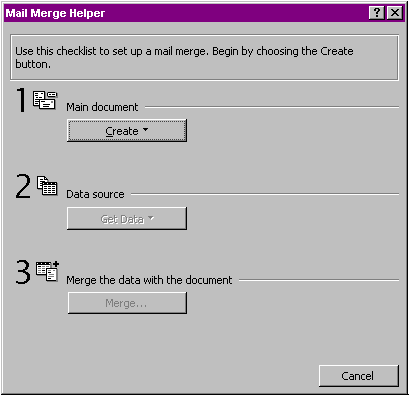
Step 9. Go to the Tools menu and select Mail Merge . The Mail Merge Helper dialog box opens. As you make selections in this box other selections will become available.

Step 10. Click on the Create button and choose Form Letter from the drop down dialog box. That brings up the following dialog box. Select Active Window.

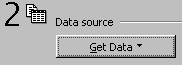
Step 11. The Mail Merge Helper box appears with choice 2 available now that you have made a selection. Select Get Data .

Step 12. You have already created the data source, so choose Open Data Source from the drop down dialog box.
Step 13. An Open Data Source dialog box will open and you must do two things.
- Navigate to the place where you saved the Excel worksheet. You will not see your saved worksheet yet.
- Change the Files of type: box by clicking on the down arrow and scrolling down to MS Excel Worksheets

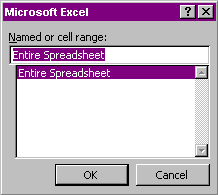
Step 14. Open the worksheet that contains the data needed for this form letter. After selecting the worksheet Word asks you to make a selection. The only choice here is Entire Spreadsheet . Select OK . Making that selection will open the worksheet

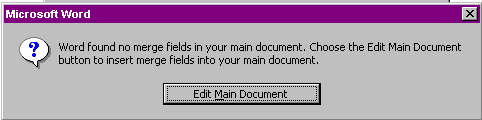
Step 15. The worksheet opens in the background, and Word asks you to make one more selection. Recall that we started with a blank document. Of course there are no merge fields there. It is time to produce the letter. In other words, you will Edit Main Document.

Step 16. Making that selection brings you back to a blank Word document. Notice that a new toolbar, Mail Merge, has been placed with the toolbars above your document. Many buttons are gray because no field has been inserted into the letter yet.

Step 17. Type the following letter. In the first line, I did not type
. I put a space at the end of the word of and selected Insert Merge Field from the Mail Merge toolbar. Do the same in each place where you see text surrounded by the less than and greater than signs. The words will not show up in Word as purple, I did that for emphasis.
- To the parents of
,
- As we approach the end of the first six weeks I wanted to let you know how glad I am to have
period
class. At this time
. If I can be of assistance please call me.
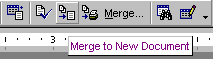
- Step 18. To see what mail merge does, select the Merge to New Document button on the toolbar.

- Step 19. Since we entered four names in the worksheet, four letters will be produced. At the bottom right corner of the Word window you will find up and down arrows that allow you to move to from one letter to another. Possible uses — Any letter or document that needs to be sent to multiple recipients is a good candidate for a mail merge. Some obvious uses include:
- Note to parents
- Progress report
- Certificates
Go back to Using Microsoft Word to Produce Classroom Documents


Internet4classrooms is a collaborative effort by
Susan Brooks and Bill Byles.
![]()
- Start
- Newsblog
- Android / iOS / Microsoft Windows
- Data Protection / ecommerce / finance
- Microsoft Excel – Office 365
- Microsoft Office / Office 365
- Microsoft Outlook – Office 365
- Microsoft Word – Office 365
- WordPress, Google, SEO & Affiliate
- Downloads
- Word & Excel Templates
- CV-Templates
- Contact
- Imprint
- Donate
Create professional letter templates with form fields in Word
In a society that is characterized by bureaucracy, nobody gets past more frequent correspondence with various places. Therefore, it makes sense to create a template in which the letterhead is already prepared.
If you have multiple people living in your household, you could either create a separate template for each one, or you could take advantage of the controls in Word 2016 to create a dynamic template that works for everyone.

Topic Overview
Topic Overview
We want to describe how to create dynamic letter templates in Word 2016 through controls.
Content:
- Show formatting characters
- Page setup
- Enable developer tools in Word
- Prepare letterhead in word
- Contents of drop-down list controls
- Insert recipient fields
- Insert date control in Word
- Fields for salutation, subject and letter text
- Greeting formula in letter template
- Insert page numbers in Word
- Enable edit protection in Word
Create professional letter templates with form fields in Word
In a society that is characterized by bureaucracy, nobody gets past more frequent correspondence with various places. Therefore, it makes sense to create a template in which the letterhead is already prepared.
If you have multiple people living in your household, you could either create a separate template for each one, or you could take advantage of the controls in Word 2016 to create a dynamic template that works for everyone.
Topic Overview
Topic Overview
We want to describe how to create dynamic letter templates in Word 2016 through controls.
Content:
- Show formatting characters
- Page setup
- Enable developer tools in Word
- Prepare letterhead in word
- Contents of drop-down list controls
- Insert recipient fields
- Insert date control in Word
- Fields for salutation, subject and letter text
- Greeting formula in letter template
- Insert page numbers in Word
- Enable edit protection in Word
1. Show formatting characters
1. Show formatting characters
As a first step, I recommend (as in all work under Word) to show the formatting characters, so we can see where paragraphs, blank lines, tab stops, etc. are.
Fortunately, this is quite simple, and can also be turned off and then off via one-click.
In the tab: “Start” and the symbol group “Paragraph”, click on the corresponding symbol.
See picture: (click to enlarge)
2. Page setup
2. Page setup
Next, we set up our page so that later the letterhead fits exactly into an envelope (DIN Lang) with window. To do this we go to the “Layout” – “Page margins” tab at the bottom of “Custom margins”
There we set the dimensions as follows:
- Above: 4.5 cm
- Left: 2.5 cm
- Right: 2.5 cm
- Below: 2.0 cm
- Gutter: 0.0 cm
- Gutter position: left
- Orientation: Portrait
See picture: (click to enlarge)

Next, we set up our page so that later the letterhead fits exactly into an envelope (DIN Lang) with window. To do this we go to the “Layout” – “Page margins” tab at the bottom of “Custom margins”
There we set the dimensions as follows:
- Above: 4.5 cm
- Left: 2.5 cm
- Right: 2.5 cm
- Below: 2.0 cm
- Gutter: 0.0 cm
- Gutter position: left
- Orientation: Portrait
See picture:
3. Enable developer tools in Word
3. Enable developer tools in Word
Since we want to create a dynamic letter template, we need the controls in Word at this point.
Although these are deactivated in the standard installation, it is recommended to make them permanently available via the options menu, since they can be used repeatedly for a variety of tasks.
To do this we go to the tab “File” – “Options” – “Customize Ribbon” and activate the item “Developer Tools” under the main tabs on the right side of the dialog box.
See picture: (click to enlarge)

After activation, the new “Developer Tools” tab is permanently available in every document, which you can use for all sorts of purposes.
Since we want to create a dynamic letter template, we need the controls in Word at this point.
Although these are deactivated in the standard installation, it is recommended to make them permanently available via the options menu, since they can be used repeatedly for a variety of tasks.
To do this we go to the tab “File” – “Options” – “Customize Ribbon” and activate the item “Developer Tools” under the main tabs on the right side of the dialog box.
See picture:
After activation, the new “Developer Tools” tab is permanently available in every document, which you can use for all sorts of purposes.
4. Prepare letterhead in Word
4. Prepare letterhead in Word
Now that we’ve made the basic settings and activated the tools we need, we can go to the first part of the letterhead.
Our cursor is now set to 4.5 cm from above and 2.5 cm from left to the layout setting previously set.
In this first line we insert our sender address in short form, so that the recipient can see who the sender is even before opening, and also for the postman, who, if the letter is undeliverable, can come back to us.
- On the Developer tab – Controls tab, select the Drop-down List Control tool
- Then click the design mode
- Click on “Properties” in the context menu (right mouse button) of the drop-down box
- Check the box next to “Apply text using style sheet ….”
- Click on “New Style”
- In the next dialog box, click on “Format” – “Font”
- Select the font and font size and confirm with “OK”
See picture: (click to enlarge)


Note:
In our example we set the font for the top line to “Arial” and the size to “9 points”. This is a good value according to experience, but of course you can of course set it completely free.
In addition, you can of course choose from already created styles, if you have a suitable for it, and do not have to make these settings completely new.
Now that we’ve made the basic settings and activated the tools we need, we can go to the first part of the letterhead.
Our cursor is now set to 4.5 cm from above and 2.5 cm from left to the layout setting previously set.
In this first line we insert our sender address in short form, so that the recipient can see who the sender is even before opening, and also for the postman, who, if the letter is undeliverable, can come back to us.
- On the Developer tab – Controls tab, select the Drop-down List Control tool
- Then click the design mode
- Click on “Properties” in the context menu (right mouse button) of the drop-down box
- Check the box next to “Apply text using style sheet ….”
- Click on “New Style”
- In the next dialog box, click on “Format” – “Font”
- Select the font and font size and confirm with “OK”
See picture:
Note:
In our example we set the font for the top line to “Arial” and the size to “9 points”. This is a good value according to experience, but of course you can of course set it completely free.
In addition, you can of course choose from already created styles, if you have a suitable for it, and do not have to make these settings completely new.
5. Contents of drop-down list controls
5. Contents of drop-down list controls
After the basic formatting of the drop-down list control, we can now turn to the desired interchangeable content.
For this we simply stay in the Properties dialog box and:
- Click once on the default “Select an item”
- Then change to “Change”
- In the next dialogue window, we exchange this value for our 1st sender address, and confirm with “OK”
- Then click on “Add” and insert the next sender address, which should be available later
You can repeat these steps as often as you like and insert the desired sender addresses that you want to be available for selection.
See picture: (click to enlarge)

After the basic formatting of the drop-down list control, we can now turn to the desired interchangeable content.
For this we simply stay in the Properties dialog box and:
- Click once on the default “Select an item”
- Then change to “Change”
- In the next dialogue window, we exchange this value for our 1st sender address, and confirm with “OK”
- Then click on “Add” and insert the next sender address, which should be available later
You can repeat these steps as often as you like and insert the desired sender addresses that you want to be available for selection.
See picture:

6. Insert recipient fields
6. Insert recipient fields
After we have inserted and adjusted the top sender line, we end the design mode again at short notice, and we can try out the result here.
There is now a drop-down list box available via which you can easily select your previously entered sender addresses.
Next we leave one line free (1x enter key) and start with the fields for the recipient address.
- To do this, we again create a drop-down list element in the first line of the recipient field
- Then go back to design mode
- Swap the text marked there for “salutation”
- And then insert the desired forms of address “Mr.” – “woman” – “company” and so on
- Close the draft mode
Then we go down one line (no paragraph!) By pressing “Shift” + “Enter” and insert element fields for text.
- In the Developer tools, select the Rich Text Content Control item
- Switch to design mode
- Replace the marked text with “Name”
- As described earlier, switch to the properties of the content control
- Enter the desired description title
- Use the styles to either select the default or set a custom style
In our example, we have here again to the font “Arial” and the font size set to 11 points. Repeat the points just described for all other recipient fields (street, postcode, city, etc.)
In the end, the whole thing should look like this:
See picture: (click to enlarge)

Letterhead in standard view

After we have inserted and adjusted the top sender line, we end the design mode again at short notice, and we can try out the result here.
There is now a drop-down list box available via which you can easily select your previously entered sender addresses.
Next we leave one line free (1x enter key) and start with the fields for the recipient address.
- To do this, we again create a drop-down list element in the first line of the recipient field
- Then go back to design mode
- Swap the text marked there for “salutation”
- And then insert the desired forms of address “Mr.” – “woman” – “company” and so on
- Close the draft mode
Then we go down one line (no paragraph!) By pressing “Shift” + “Enter” and insert element fields for text.
- In the Developer tools, select the Rich Text Content Control item
- Switch to design mode
- Replace the marked text with “Name”
- As described earlier, switch to the properties of the content control
- Enter the desired description title
- Use the styles to either select the default or set a custom style
In our example, we have here again to the font “Arial” and the font size set to 11 points. Repeat the points just described for all other recipient fields (street, postcode, city, etc.)
In the end, the whole thing should look like this:
See picture:
Letterhead in standard view
7. Insert date control in Word
7. Insert date control in Word
Now we have done a good deal.
Next, we’ll add a date control so we do not have to enter it, but simply pick it from a drop-down box.
To do this, we proceed as follows:
- Place the cursor in the last line after the control in the receiver field
- Put a left-aligned tab stop at 11 cm
- Press the TAB key once
- Use the Developer tools to insert the Date Picker content control
- Return to design mode
- As before, adjust the date selector for the other elements via the context menu of the element
See picture: (click to enlarge)

When all settings have been made, the whole thing should look like this, and you can easily paste the date over the selection.
See picture: (click to enlarge)

Now we have done a good deal.
Next, we’ll add a date control so we do not have to enter it, but simply pick it from a drop-down box.
To do this, we proceed as follows:
- Place the cursor in the last line after the control in the receiver field
- Put a left-aligned tab stop at 11 cm
- Press the TAB key once
- Use the Developer tools to insert the Date Picker content control
- Return to design mode
- As before, adjust the date selector for the other elements via the context menu of the element
See picture:
When all settings have been made, the whole thing should look like this, and you can easily paste the date over the selection.
See picture:
8. Fields for salutation, subject and letter text
8. Fields for salutation, subject and letter text
Next we continue with the subject line (Dear Mister or Mr.), as well as the title line, and of course the field for our actual letter text
- For this we start from the date line and release 3 paragraphs
- Insert a Rich Text control here again and adjust it as described above
- Then we release a paragraph again and reinsert a drop-down list control, which we use with e.g. “Dear Sir / Madam” and so on.
- Now again leave a paragraph free, and again insert a Rich Text control for the letter text
The whole thing should look like this:
See picture: (click to enlarge)
Letter template in draft mode

Letter template in standard view

Next we continue with the subject line (Dear Mister or Mr.), as well as the title line, and of course the field for our actual letter text
- For this we start from the date line and release 3 paragraphs
- Insert a Rich Text control here again and adjust it as described above
- Then we release a paragraph again and reinsert a drop-down list control, which we use with e.g. “Dear Sir / Madam” and so on.
- Now again leave a paragraph free, and again insert a Rich Text control for the letter text
The whole thing should look like this:
See picture:
Letter template in draft mode
Letter template in standard view
9. Greeting formula in letter template
9. Greeting formula in letter template
Now we have almost made it, and can make us to the greeting line.
For this purpose, we simply leave 2 paragraphs underneath the Text element for the letter text, and either add a dropdown box there, for example, to select between “Best regards” or “Best regards”, etc., or we will leave that alone At this point, remove the control altogether, and write a static salutation into it.
Next, I would again leave 2-3 paragraphs free to leave room for a signature between the greeting line and the name
There, we simply add a dropdown element with the sender name, which should be available to us later.
10. Insert page numbers in Word
10. Insert page numbers in Word
Since our letter can sometimes have more than one page, we should now use for the sake of completeness, an automatic numbering of the page numbers in our letter template.
To do this, we proceed as follows:
- In the footer of the document, double-click on it, which automatically activates the edit mode for headers and footers
- On the left side of the formula bar, go to “Page Number” – “Page End” and select a preferred number format, or create your own
- Close the Header and Footer area again
In the end, our letter template should look like this:
See picture: (click to enlarge)


Note:
You do not have to worry about the small distance in our template between the letter field and the greeting line. The greeting line automatically shifts down the more text you put into your letter.
Since our letter can sometimes have more than one page, we should now use for the sake of completeness, an automatic numbering of the page numbers in our letter template.
To do this, we proceed as follows:
- In the footer of the document, double-click on it, which automatically activates the edit mode for headers and footers
- On the left side of the formula bar, go to “Page Number” – “Page End” and select a preferred number format, or create your own
- Close the Header and Footer area again
In the end, our letter template should look like this:
See picture:
Note:
You do not have to worry about the small distance in our template between the letter field and the greeting line. The greeting line automatically shifts down the more text you put into your letter.
11. Enable edit protection in Word
11. Enable edit protection in Word
Before we save the letter template, I recommend to activate the processing protection so that only form fields can be filled out. This gives you the advantage that you do not accidentally change something in the template on the controls, because as you have seen, the whole thing is not even made on the fast.
For processing protection, go to the tab “Review” – “Restrict processing” in the editing restrictions and set best that only the filling of forms is allowed.
Save the document afterwards as .dotx (template).
Once you have made this selection, the “Custom Office Templates” location is automatically suggested, and you can later easily retrieve the template from any document in Word.
See picture: (click to enlarge)
Before we save the letter template, I recommend to activate the processing protection so that only form fields can be filled out. This gives you the advantage that you do not accidentally change something in the template on the controls, because as you have seen, the whole thing is not even made on the fast.
For processing protection, go to the tab “Review” – “Restrict processing” in the editing restrictions and set best that only the filling of forms is allowed.
Save the document afterwards as .dotx (template).
Once you have made this selection, the “Custom Office Templates” location is automatically suggested, and you can later easily retrieve the template from any document in Word.
See picture:
Popular Posts:

Enable developer tools in Office 365
Michael2023-04-12T09:11:59+02:00April 12th, 2023|Categories: Microsoft Excel, Microsoft Office, Microsoft Outlook, Microsoft PowerPoint, Microsoft Teams, Microsoft Word, Office 365, Short News, Uncategorized|Tags: form fields, MS-Office, Office 365, Short News|
Schalten Sie die Entwicklertools in Excel, Word und Outlook frei. Erweitern Sie die Möglichkeiten mit zusätzlichen Funktionen in Office 365.

Hide folders in Windows – Protect folders with password
Michael2023-04-04T07:05:14+02:00April 4th, 2023|Categories: Data Protection, Homeoffice, Microsoft Office, Microsoft Windows, Office 365, Short News, Uncategorized|Tags: Data Protection, Datenschutz, MS-Windows, password, Passwort, Short News|
Cyber security is also becoming increasingly important in the home. Encrypt files | Hiding folders | Password protection of folders in Windows.


Special Offers: Word & Excel Templates
Special Offers: Design CV Templates
Monatliche Technik Bestseller:
Popular Posts:
Enable developer tools in Office 365
Michael2023-04-12T09:11:59+02:00April 12th, 2023|Categories: Microsoft Excel, Microsoft Office, Microsoft Outlook, Microsoft PowerPoint, Microsoft Teams, Microsoft Word, Office 365, Short News, Uncategorized|Tags: form fields, MS-Office, Office 365, Short News|
Schalten Sie die Entwicklertools in Excel, Word und Outlook frei. Erweitern Sie die Möglichkeiten mit zusätzlichen Funktionen in Office 365.
Hide folders in Windows – Protect folders with password
Michael2023-04-04T07:05:14+02:00April 4th, 2023|Categories: Data Protection, Homeoffice, Microsoft Office, Microsoft Windows, Office 365, Short News, Uncategorized|Tags: Data Protection, Datenschutz, MS-Windows, password, Passwort, Short News|
Cyber security is also becoming increasingly important in the home. Encrypt files | Hiding folders | Password protection of folders in Windows.
Special Offers: Word & Excel Templates
Special Offers: Design CV Templates
Monatliche Technik Bestseller:
Related Posts
Title
Page load link
Go to Top