
Содержание
- Создание бейджика на основе готового шаблона
- Создание бейджика вручную
- Сохранение бейджика в качестве шаблона
- Печать нескольких бейджиков на одной странице
- Вопросы и ответы
В большинстве случаев текстовые документы создаются в два этапа — это написание и придание красивой, удобной для чтения формы. Работа в полнофункциональном текстовом процессоре MS Word протекает по такому же принципу — сначала пишется текст, затем выполняется его форматирование.
Урок: Форматирование текста в Ворде
Заметно сократить время, затрачиваемое на второй этап призваны шаблоны, коих в свое детище компания Майкрософт интегрировала уж очень много. Огромный выбор шаблонов доступен в программе по умолчанию, еще больше представлено на официальное сайте Office.com, где уж точно можно найти шаблон на любую интересующую вас тему.
Урок: Как в Word сделать шаблон
В статье, представленной по ссылке выше, вы можете ознакомиться с тем, как можно самому создать шаблон документа и использовать его в дальнейшем для удобства работы. Ниже мы детально рассмотрим одну из смежных тем — создание бейджика в Ворде и его сохранение в качестве шаблона. Сделать это можно двумя методами.
Создание бейджика на основе готового шаблона
Если у вас нет желания вникать во все тонкости вопроса и вы не готовы тратить личное время (к слову, не так уж много) на самостоятельное создание бейджика, рекомендуем обратиться к готовым шаблонам. Для этого выполните следующие действия.
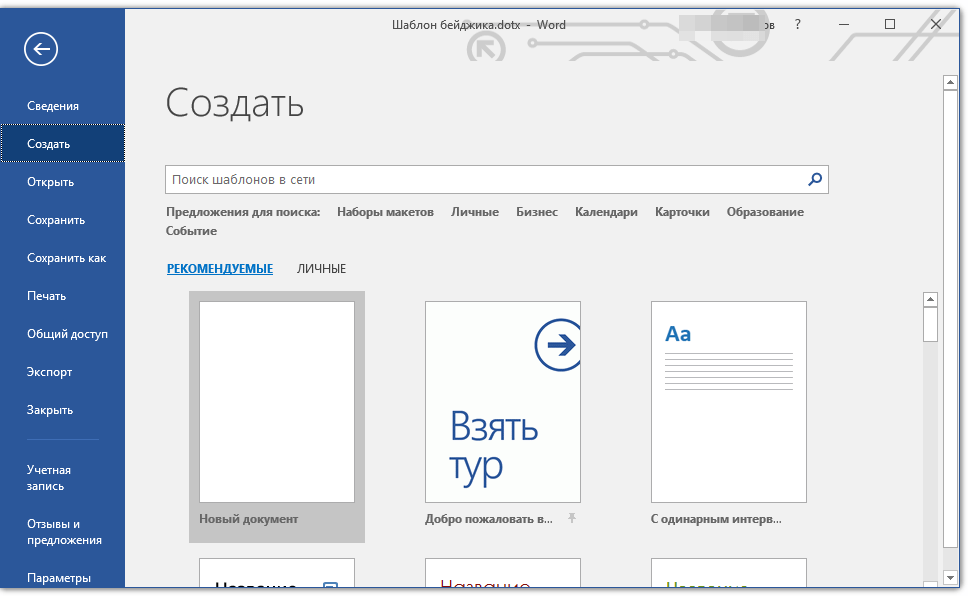
1. Откройте Microsoft Word и, в зависимости от используемой версии, выполните следующие действия:
- Найдите подходящий шаблон на начальной странице (актуально для Ворд 2016);
- Перейдите в меню «Файл», откройте раздел «Создать» и найдите подходящий шаблон (для более ранних версия программы).
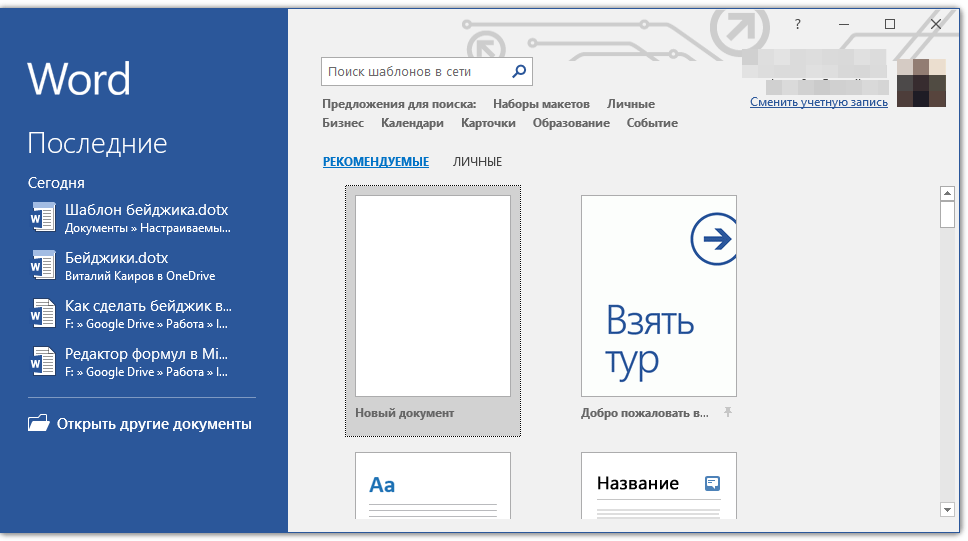
Примечание: Если вы не можете найти подходящий шаблон, начните вводить в поисковую строку слово «бейджик» или откройте раздел с шаблонами «Карточки». Затем выберите тот, который вас устроит из результатов поиска. Кроме того, для создания бейджика вполне подойдет большинство шаблонов визитных карточек.
2. Кликните по понравившемуся шаблону и нажмите «Создать».
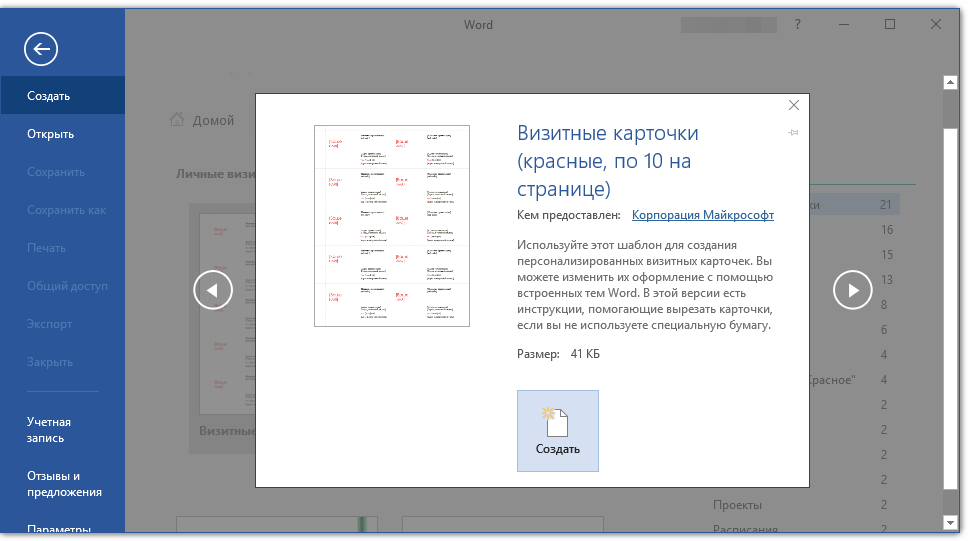
Примечание: Использование шаблонов крайне удобно тем, что их, зачастую, на странице расположено сразу несколько штук. Следовательно, можно создать несколько копий одного бейджика или сделать несколько уникальных (для разных сотрудников) бейджиков.

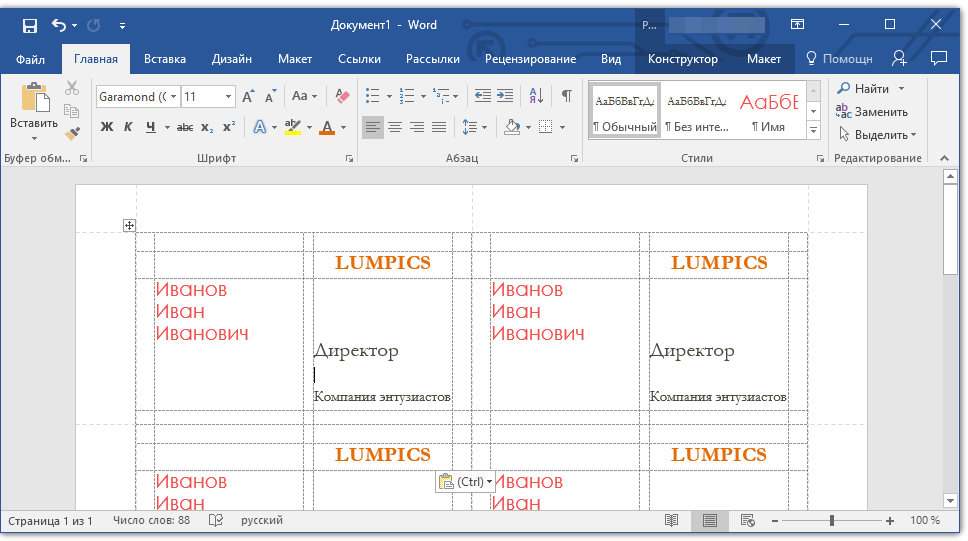
3. Шаблон будет открыт в новом документе. Измените стандартные данные в полях шаблона на актуальные для вас. Для этого задайте следующие параметры:

- Фамилия, имя, отчество;
- Должность;
- Компания;
- Фотография (опционально);
- Дополнительный текст (опционально).
Урок: Как вставить рисунок в Ворд
Примечание: Вставка фотографии — опция отнюдь не обязательная для бейджика. Она может отсутствовать вовсе или же вместо фотографии можно добавить логотип компании. Более подробно о том, как лучше добавлять изображение на бейджик, вы можете прочесть во второй части этой статьи.
Создав свой бейджик, сохраните его и распечатайте на принтере.
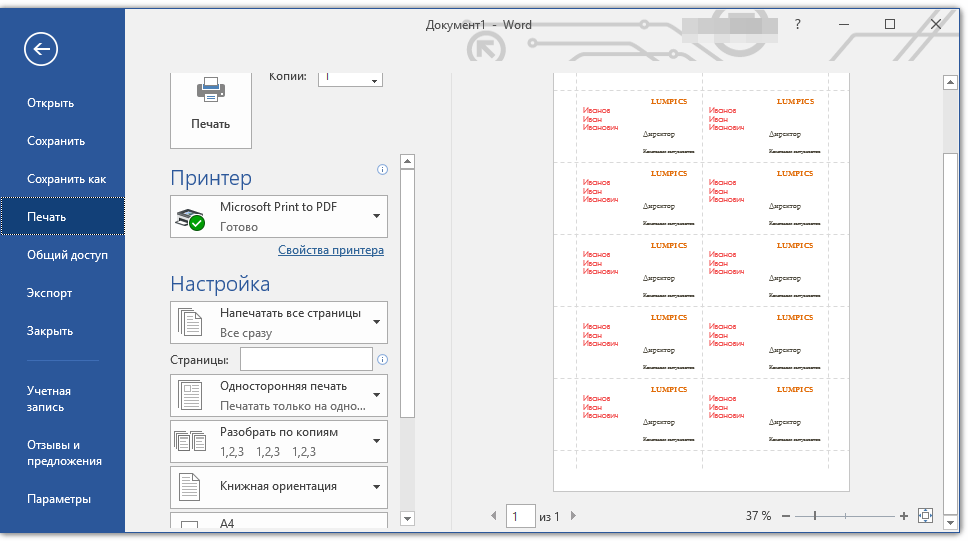
Примечание: Пунктирные границы, которые могут присутствовать на шаблоне, на печать не выводятся.
Урок: Печать документов в Word
Напомним, что аналогичным образом (используя шаблоны), вы также можете создать календарь, визитку, поздравительную открытку и многое другое. Обо всем этом вы можете прочесть на нашем сайте.
Как в Ворде сделать?
Календарь
Поздравительную открытку
Фирменный бланк
Создание бейджика вручную
Если вас не устраивают готовые шаблоны или же вы просто хотите самостоятельно создать бейджик в Word, тогда вас явно заинтересует инструкция, изложенная ниже. Все, что от нас с вами для этого потребуется — создать небольшую таблицу и правильно ее заполнить.
1. Для начала подумайте, какую информацию вы хотите разместить на бейджике и подсчитайте, сколько для этого потребуется строк. Столбцов, вероятнее всего, будет два (текстовая информация и фото или изображение).
Допустим, на бейджике будут указаны следующие данные:
- Фамилия, имя, отчество (две или три строки);
- Должность;
- Компания;
- Дополнительный текст (не обязательно, на ваше усмотрение).
Фотографию за строку мы не считаем, так как она будет находиться сбоку, занимая несколько строк, выделенных нами под текст.
Примечание: Фотография на бейджике — момент спорный, и во многих случаях она не нужна вовсе. Мы же рассматриваем это в качестве примера. Так, вполне возможно, что в том месте, где мы предлагаем разместить фотографию, кто-то другой пожелает разместить, к примеру, логотип компании.
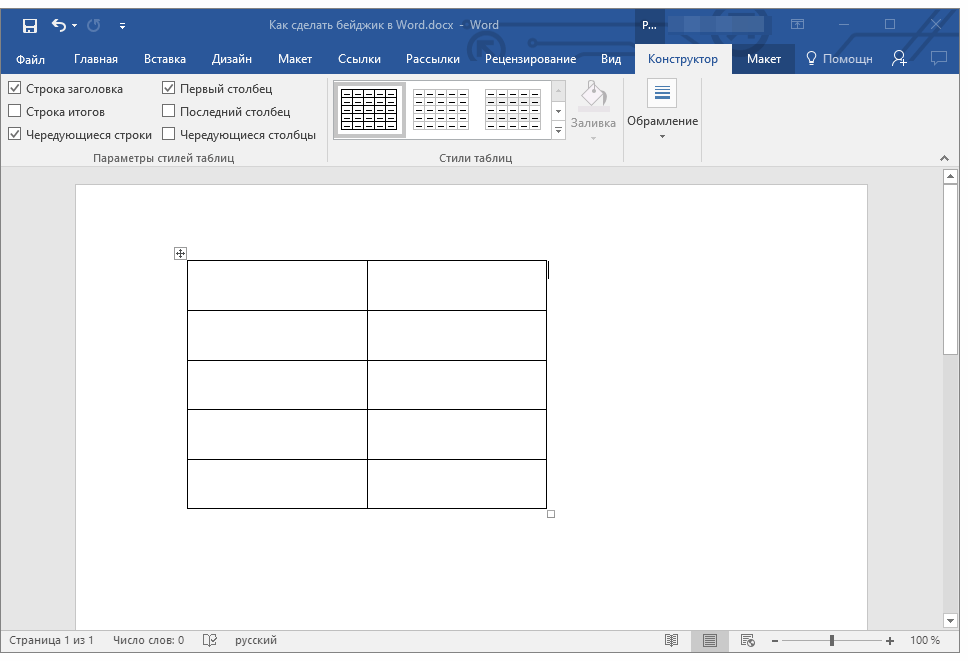
Например, мы напишем в одной строке фамилию, под ней в еще одну строку имя и отчество, в следующей строке будет должность, еще одна строка — компания и, последняя строка — короткий девиз компании (а почему бы и нет?). Согласно данной информации нам нужно создать таблицу на 5 строк и два столбца (один столбец для текста, один для фото).
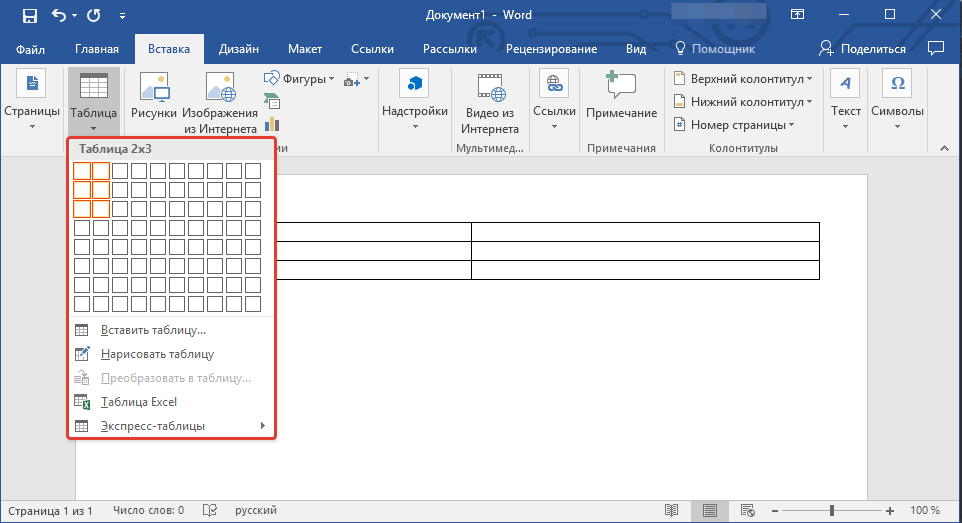
2. Перейдите во вкладку «Вставка», нажмите кнопку «Таблица» и создайте таблицу необходимых размеров.
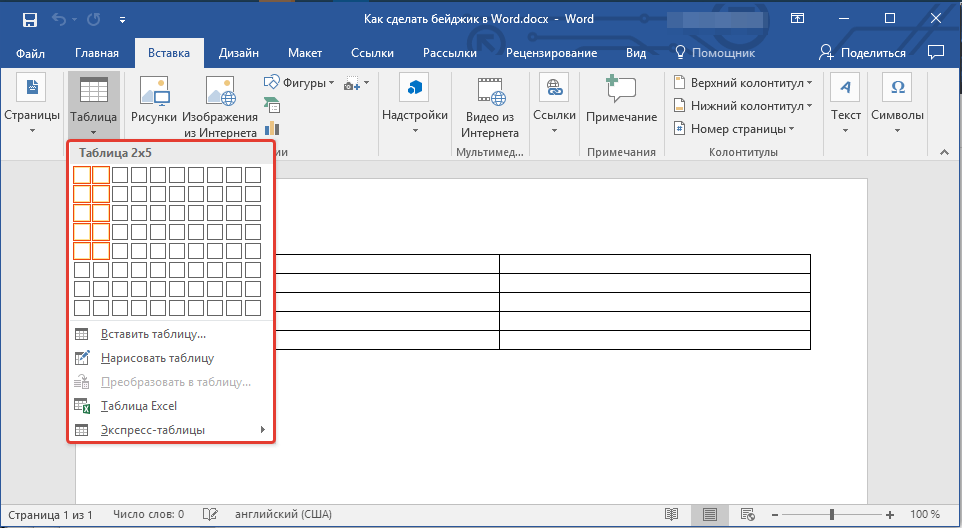
Урок: Как сделать таблицу в Ворде
3. Размер добавленной таблицы необходимо изменить, причем, желательно сделать это не вручную.
Основа для бейджика в виде таблицы примет заданные вами размеры.
Примечание: Если полученные размеры таблицы под бейджик вас чем-то не устраивают, вы вполне можете изменить их вручную, просто потянув за маркер, расположенный в углу. Правда, делать это можно лишь в том случае, если строгое соблюдение каких-либо размеров бейджика для вас не является приоритетным.
4. Прежде, чем приступить к заполнению таблицы, нужно объединить некоторые ее ячейки. Мы поступим следующим образом (вы же можете выбрать другой вариант):
- Объединяем две ячейки первой строки под название компании;
- Объединяем вторую, третью и четвертую ячейки второго столбца под фотографию;
- Объединяем две ячейки последней (пятой) строки для небольшого девиза или слогана.
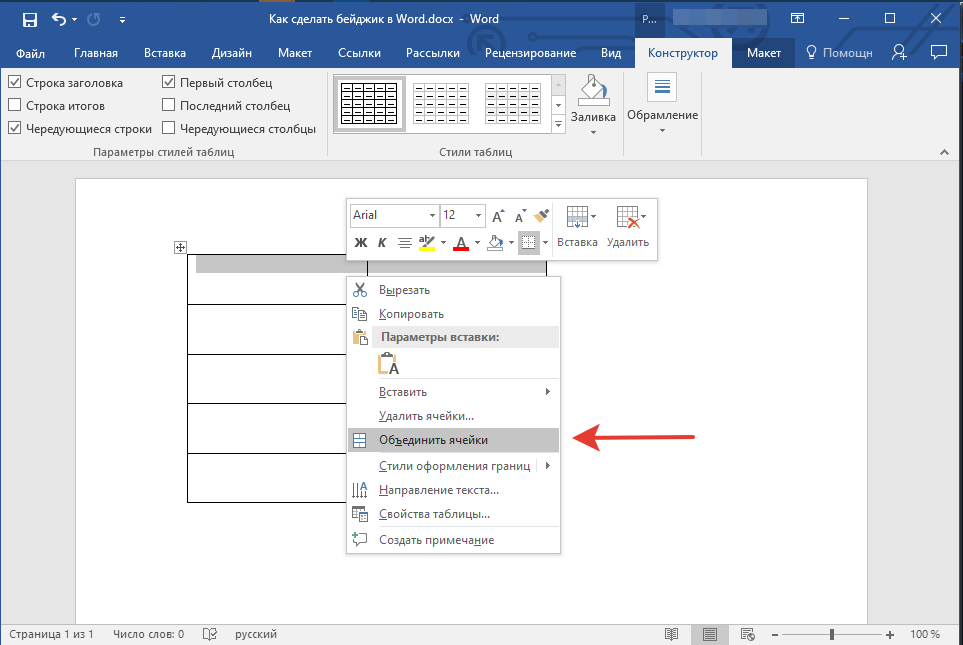
Чтобы объединить ячейки, выделите их с помощью мышки, кликните правой кнопкой и выберите пункт «Объединить ячейки».
Урок: Как в Word объединить ячейки
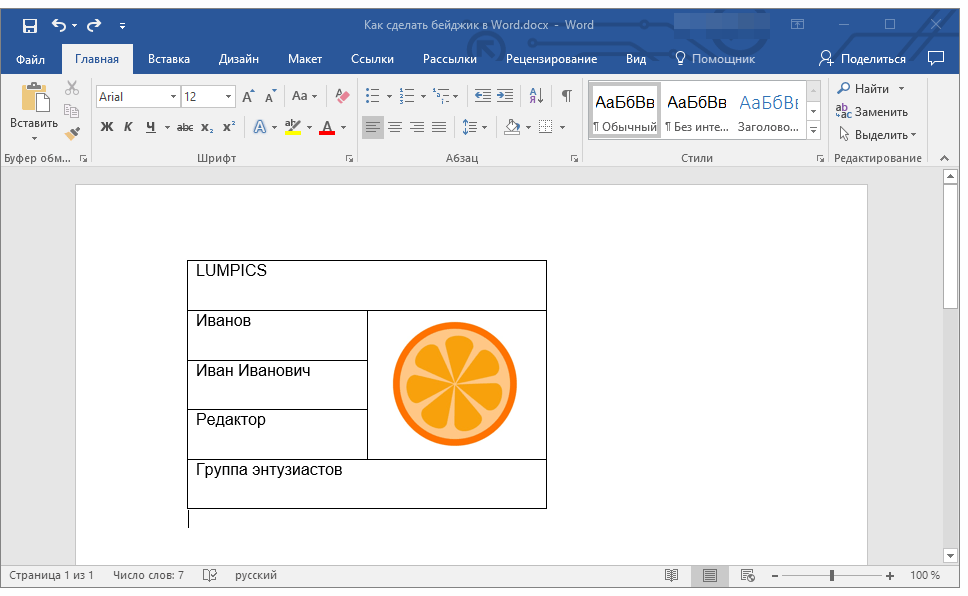
5. Теперь можно заполнить ячейки в таблице. Вот наш пример (пока что без фото):
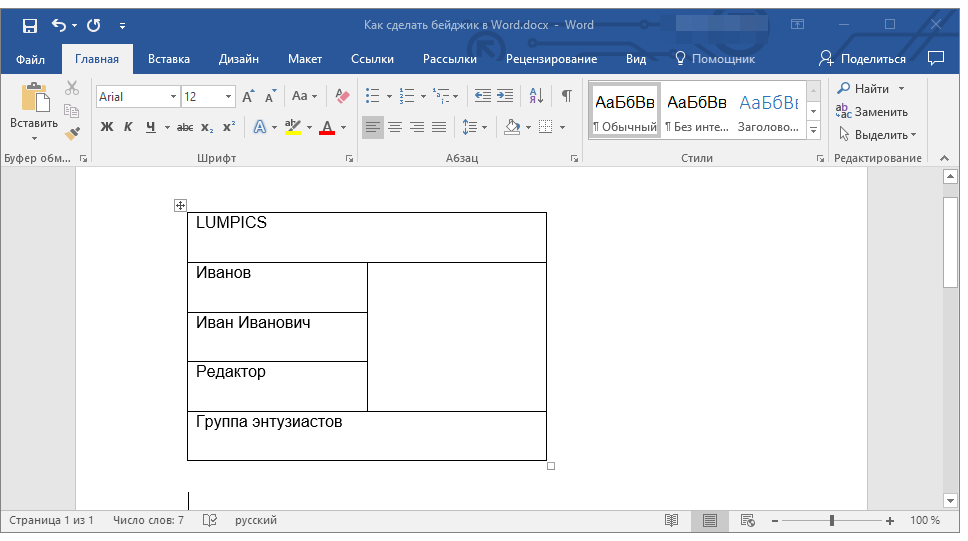
Примечание: Рекомендуем не вставлять фотографию или любое другое изображение сразу в пустую ячейку — это изменит ее размер.
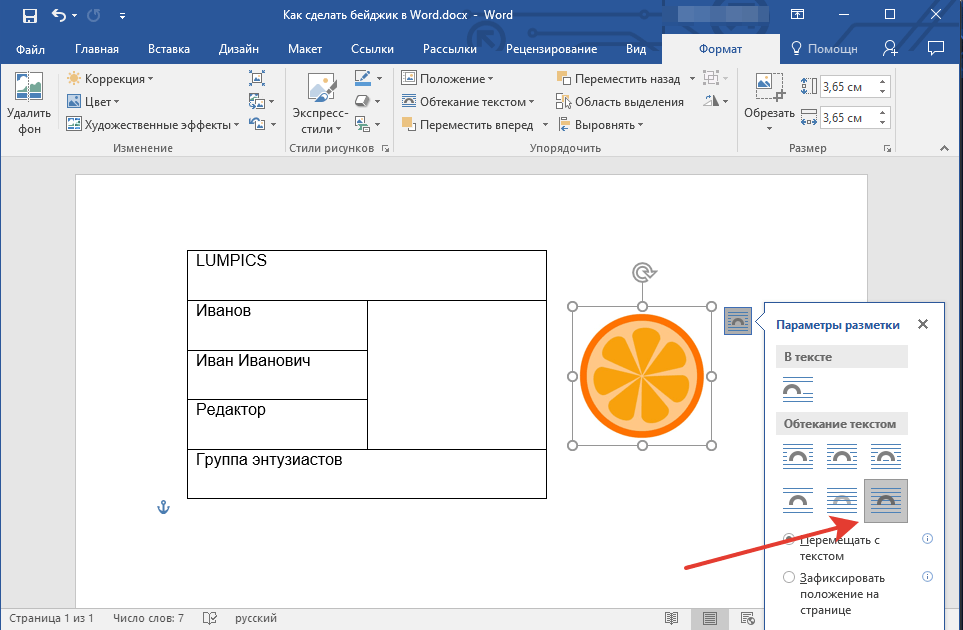
- Вставьте рисунок в любое пустое место документа;
- Измените его размеры согласно размерам ячейки;
- ыберите параметр расположения «Перед текстом»;
- Переместите изображение в ячейку.
Если вы не знаете, как это сделать, рекомендуем ознакомиться с нашим материалом на данную тему.
Уроки по работе с Ворд:
Вставка рисунка
Обтекание картинки текстом
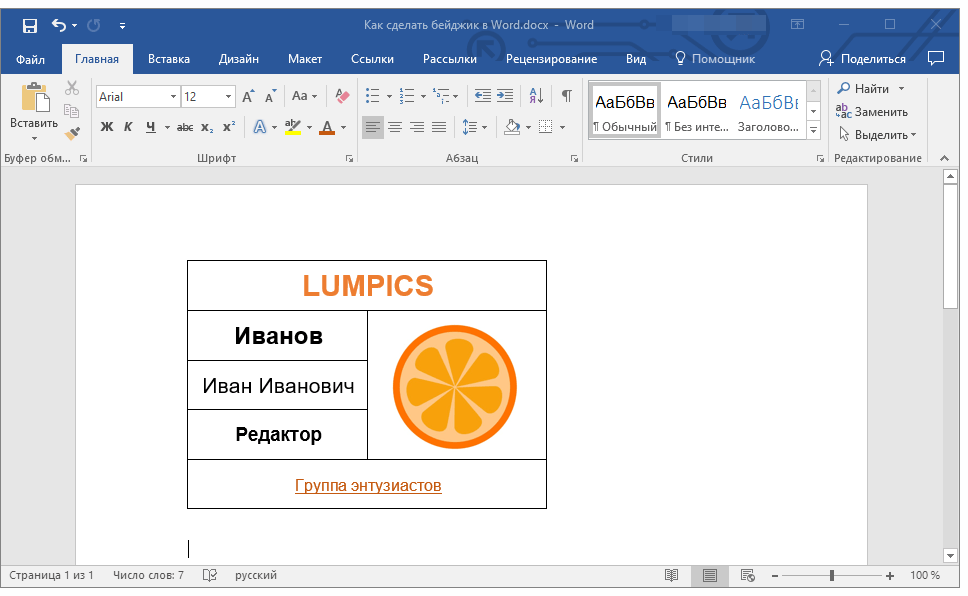
6. Текст внутри ячеек таблицы необходимо выровнять. Не менее важно подобрать подходящие шрифты, размер, цвет.
Урок: Как изменить шрифт в Word
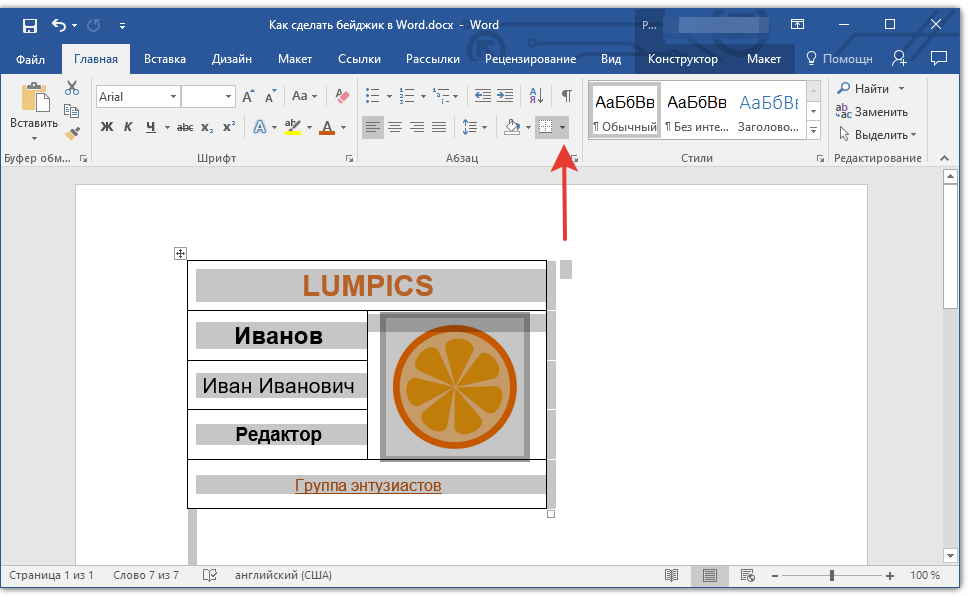
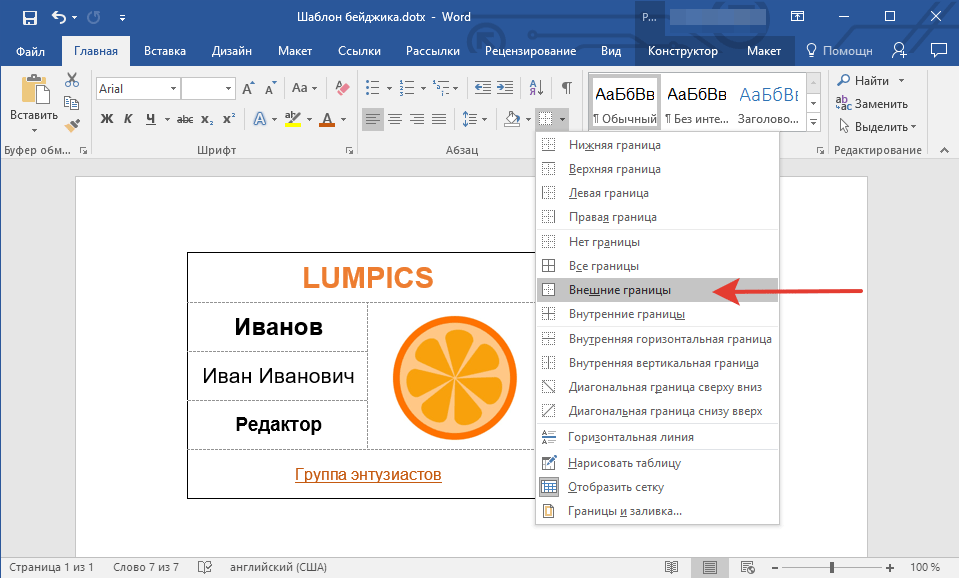
7. Все бы ничего, но видимые границы таблицы уж точно кажутся лишними. Для того, чтобы скрыть их визуально (оставив только сетку) и не выводить на печать, выполните следующие действия:
- Выделите таблицу;
- Нажмите на кнопку «Граница» (группа инструментов «Абзац», вкладка «Главная»;
- Выберите пункт «Нет границы».
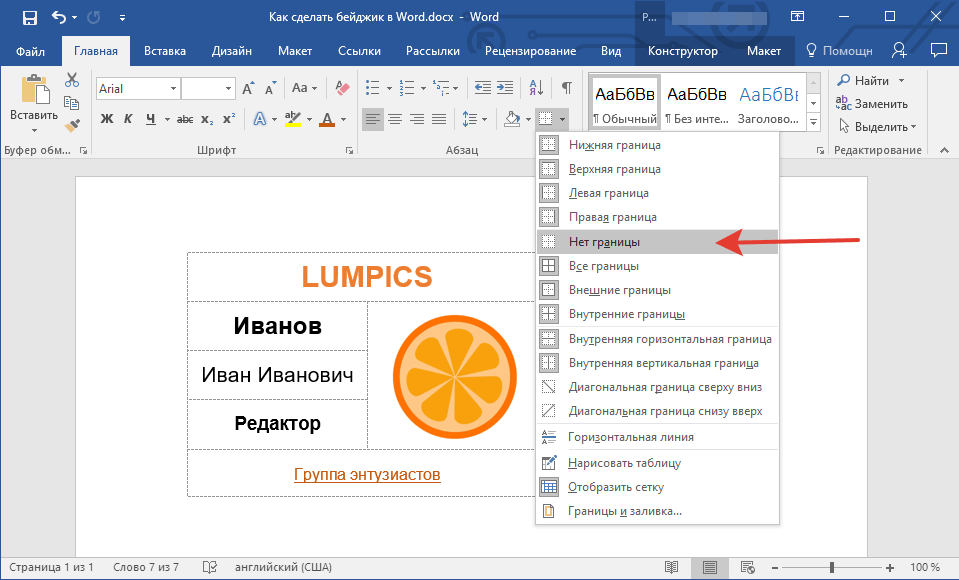
Примечание: Для того, чтобы распечатанный бейджик было удобнее вырезать, в меню кнопки «Граница» выберите параметр «Внешние границы». Это сделает видимым внешний контур таблицы как в электронном документе, так и в его печатной интерпретации.
8. Готово, теперь бейджик, который вы создали самостоятельно, можно распечатать.
Сохранение бейджика в качестве шаблона
Вы также можете сохранить созданный бейджик в качестве шаблона.
1. Откройте меню «Файл» и выберите пункт «Сохранить как».
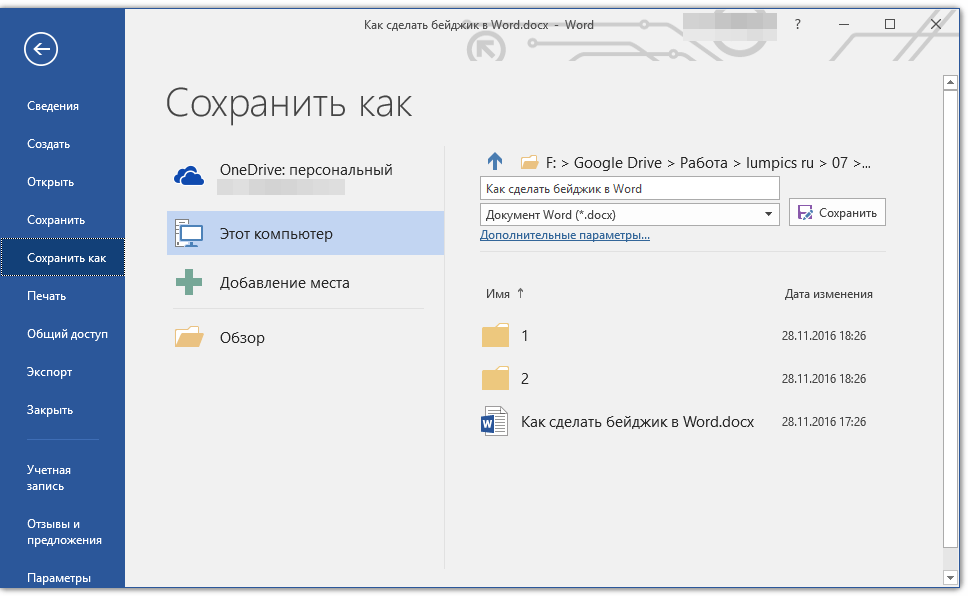
2. Воспользовавшись кнопкой «Обзор», укажите путь для сохранения файла, задайте подходящее имя.
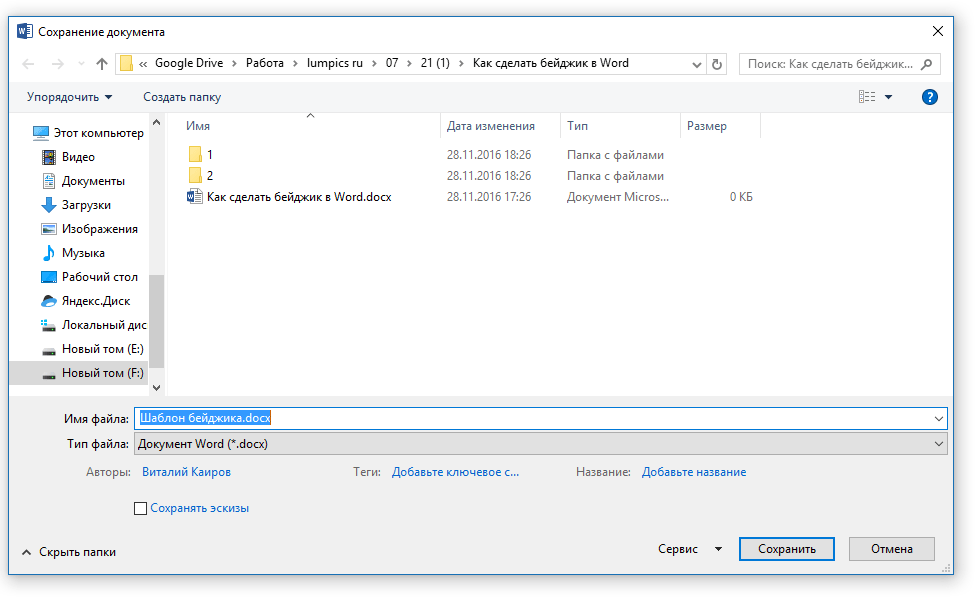
3. В окне, расположенном под строкой с именем файла, укажите необходимый формат для сохранения. В нашем случае это «Шаблон Word (*dotx)».
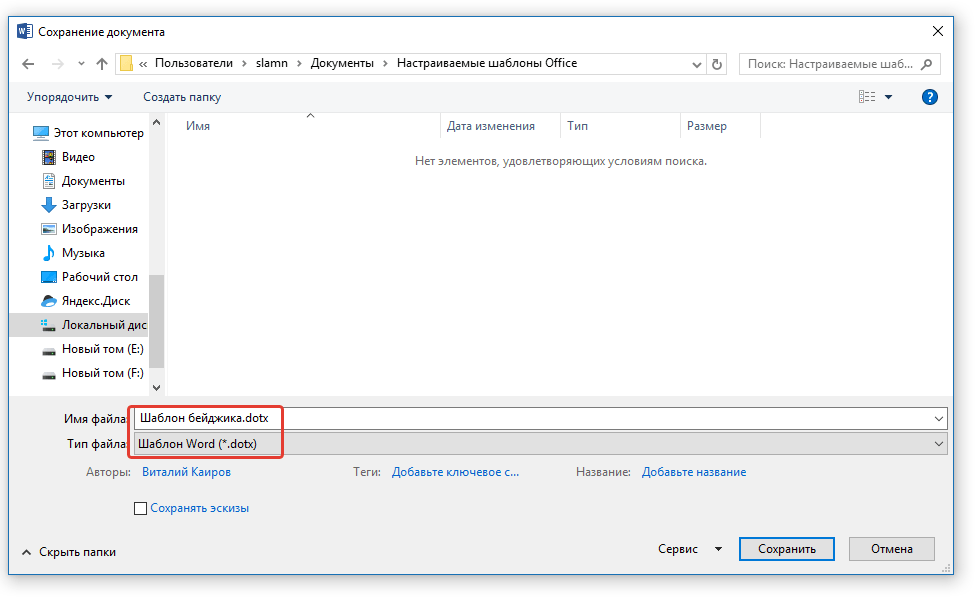
4. Нажмите кнопку «Сохранить».
Печать нескольких бейджиков на одной странице
Вполне возможно, что вам необходимо распечатать больше одного бейджика, разместив все их на одной странице. Это не только поможет существенно сэкономить бумагу, но и заметно ускорит процесс вырезки и изготовления этих самых бейджиков.
1. Выделите таблицу (бейджик) и скопируйте ее в буфер обмена (CTRL+C или кнопка «Копировать» в группе инструментов «Буфер обмена»).

Урок: Как в Ворд скопировать таблицу
2. Создайте новый документ («Файл» — «Создать» — «Новый документ»).
3. Уменьшите размеры полей страницы. Для этого выполните следующие действия:
- Перейдите во вкладку «Макет» (ранее «Разметка страницы»);
- Нажмите кнопку «Поля» и выберите параметр «Узкие».
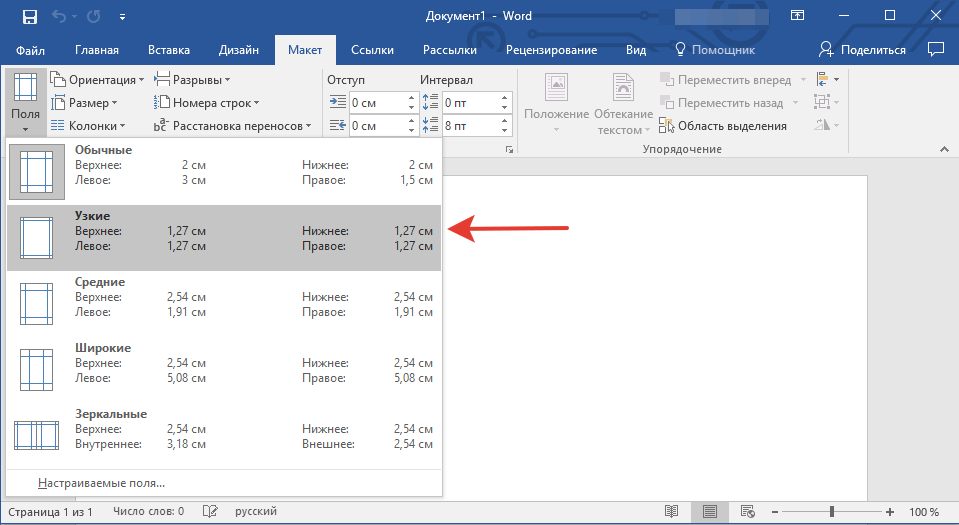
Урок: Как изменить поля в Word
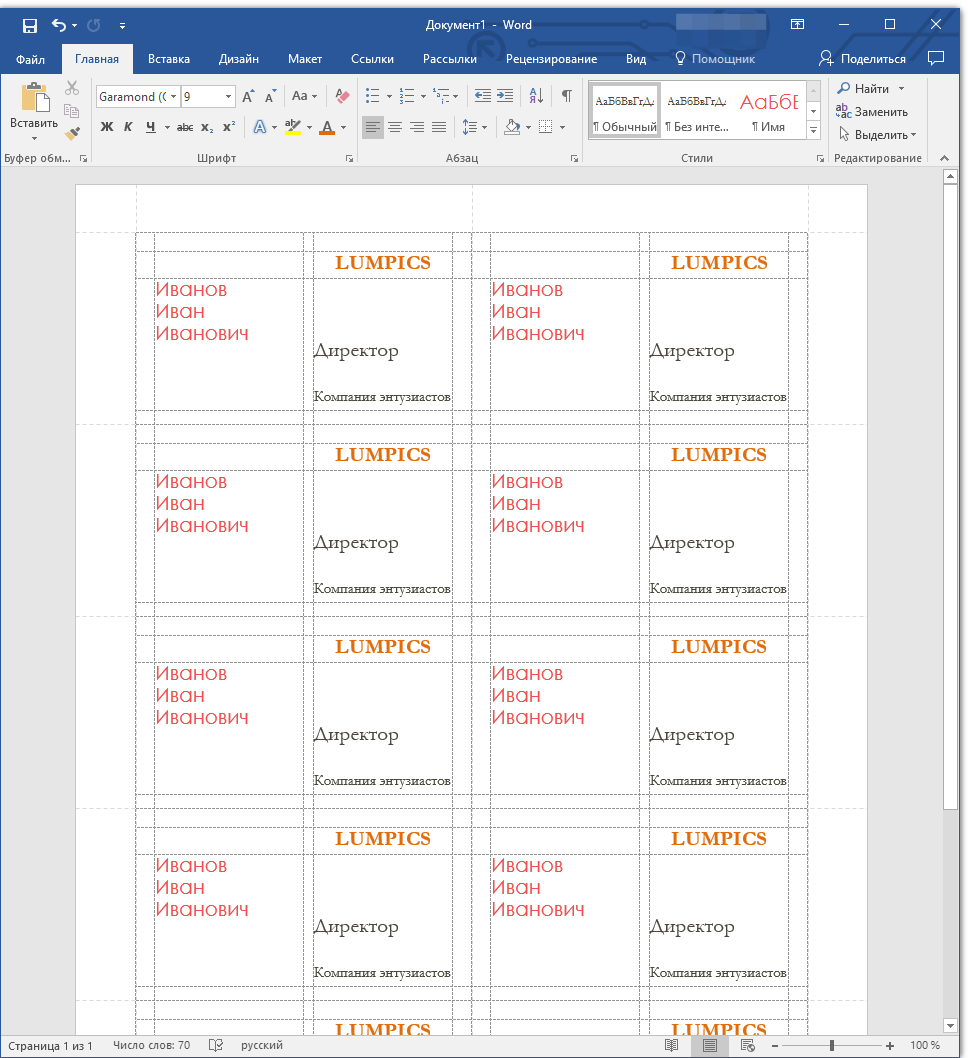
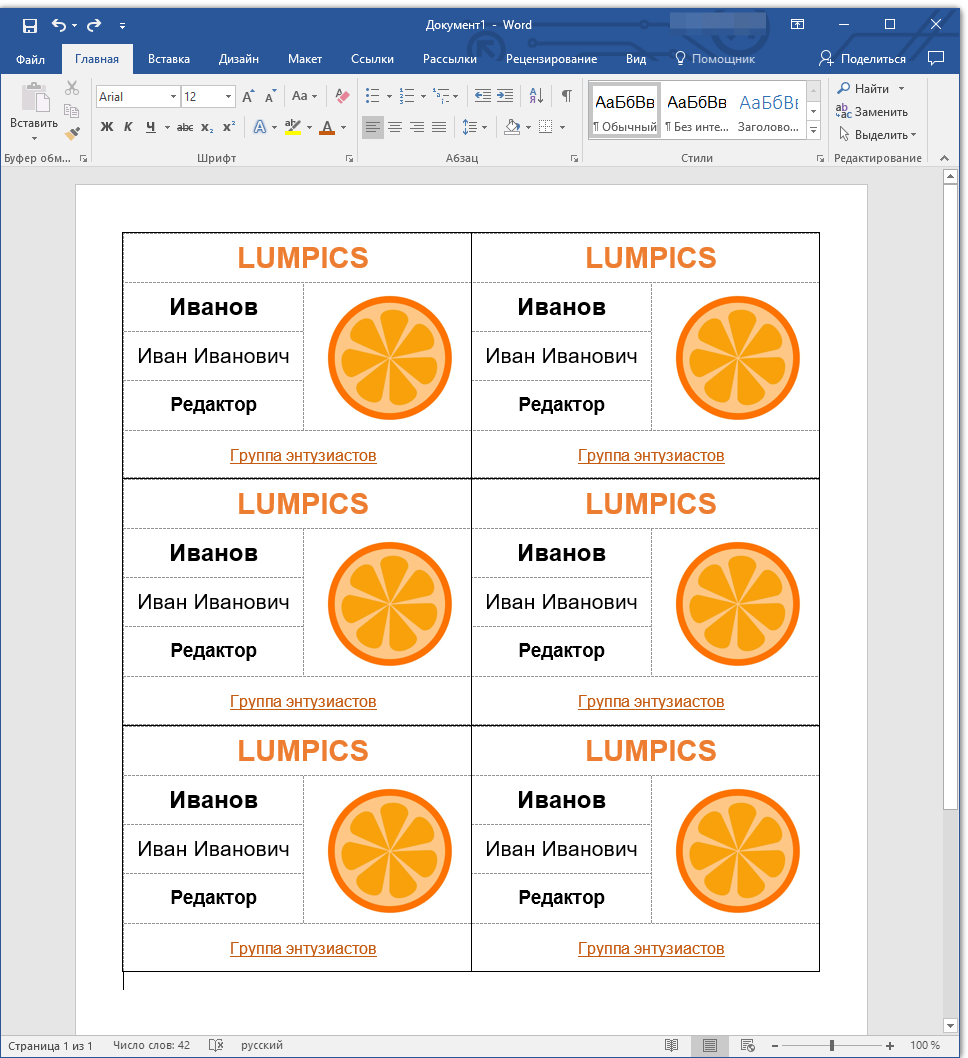
4. На странице с такими полями бейджиков размером 9,5 х 6,5 см (размер в нашем примере) поместится 6. Для их «плотного» расположения на листе нужно создать таблицу, состоящую из двух столбцов и трех строк.
5. Теперь в каждую ячейку созданной таблицы необходимо вставить наш бейджик, который содержится в буфере обмена (CTRL+V или кнопка «Вставить» в группе «Буфер обмена» во вкладке «Главная»).
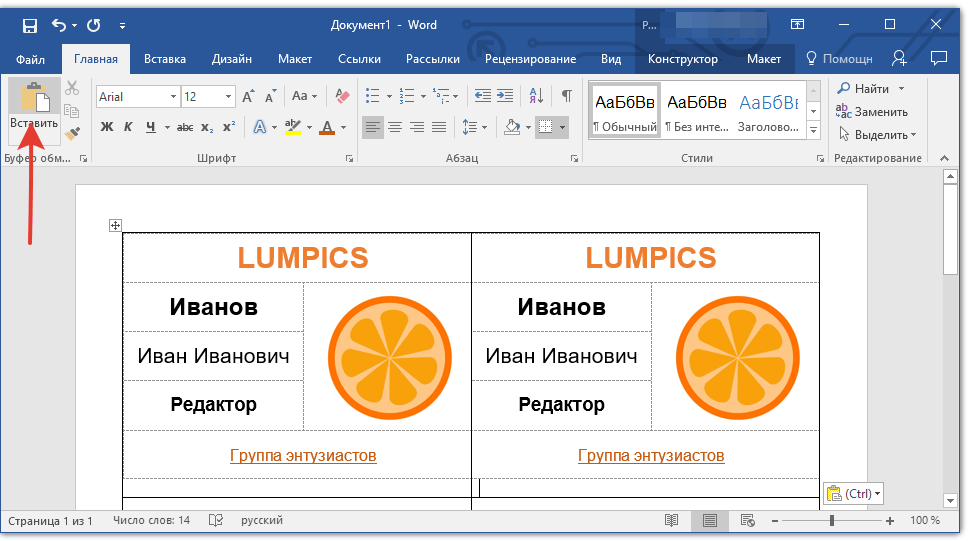
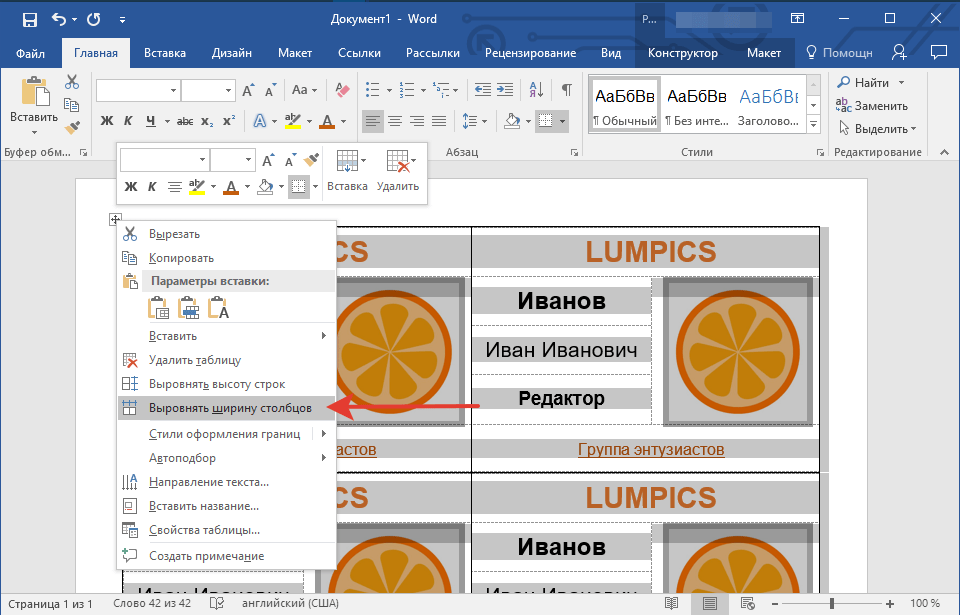
Если границы основной (большой) таблицы сместятся во время вставки, выполните следующие действия:
- Выделите таблицу;
- Кликните правой кнопкой мышки и выберите «Выровнять ширину столбцов».
Теперь, если вам нужны одинаковые бейджики, просто сохраните файл в качестве шаблона. Если же вам нужны разные бейджики, измените в них необходимые данные, сохраните файл и распечатайте его. Все, что остается — просто вырезать бейджики. Границы основной таблицы, в ячейках которой и находятся созданные вами бейджики, в этом поможет.
На этом, собственно, мы можем и закончить. Теперь вы знаете, как сделать бейджик в Ворде самостоятельно или с помощью одного из множества встроенных в программу шаблонов.
Press and hold the “Ctrl” key and click on the picture content control and each text box to select them. Press “Ctrl-C” to copy them. Click inside of each remaining cell on the page and paste the content control and text boxes in them to create an entire page of badges.
Contents
- 1 How do I make a ID badge in Word?
- 2 What is the size of ID card in Microsoft Word?
- 3 How do I print a ID card size in Word?
- 4 How do you make a custom badge?
- 5 How do I create a Microsoft Publisher ID card?
- 6 What size is a normal badge?
- 7 How do I print 4×6 in Word?
- 8 How do you make a 2×2 picture on Microsoft Word?
- 9 How do you make name badges?
- 10 How do students create digital badges?
- 11 How do you make a badge with a safety pin?
- 12 How do I ID an image in HTML?
- 13 How can I get a medical ID card?
- 14 What is a student ID?
- 15 How do I make business cards in Word without a template?
- 16 How do I make a front and back card in Word?
- 17 What is a standard ID card?
- 18 What is ID card size photo?
- 19 How many MM is a ID?
- 20 How do you make quarter sheets on Microsoft Word?
How do I make a ID badge in Word?
Click Tools > Labels or Tools > Envelopes and Labels. Continue by clicking the “Options” button in the dialog box and select the “5362 – Name Badge” item to designate the template for name badges.
What is the size of ID card in Microsoft Word?
3.375″ x 2.125″
ID Card Dimensions in Inches
CR80: The standard, most popular ID card size is 3.375″ x 2.125″.
How do I print a ID card size in Word?
Click the Page Layout tab. In the Page Setup group, choose Index Card or Post Card from the Size dropdown. In Word 2003, choose Page Setup from the File menu, and click the Paper tab. Set the appropriate Paper Size dimensions.
How do you make a custom badge?
Design your own badge in 5 steps:
- Go to Badge.design.
- Pick a badge template from the left bar.
- Customize the text and colors of your badge.
- Upload images (like a logo), add text, change the font to match your branding.
- Download your Badge image to use as a digital badge.
How do I create a Microsoft Publisher ID card?
Click File > New and choose Built-in to use one of the templates installed in Publisher. In the Business Cards catalog, under Installed Templates, click the design that you want.
Create a one-sided business card
- Select a Page size – Landscape or Portrait.
- If you want to include a logo, check Include logo.
- Click Create.
What size is a normal badge?
At 2 5/8″ x 3 7/8″, these cards are typically used for military personnel and other government institutions so badges can be seen from a distance. Also included in ID card size is the card thickness. Standard thickness for ID cards is 30 mil, or 0.030 inches.
How do I print 4×6 in Word?
IMO, the best approach is to specify the actual Paper Size for the Word document itself: Format> Document> Page Setup> Paper Size. If there is a 4×6 dimension listed for your printer, select it there.
How do you make a 2×2 picture on Microsoft Word?
Click the Insert tab and then click Pictures. Select the photo that you want to turn into a 2×2 picture. Click the Insert button to insert the picture into your Word document. You can also copy the picture (Ctrl + C) and paste it into your Word document (Ctrl + V).
How do you make name badges?
Create and print a page of different labels
- Go to Mailings > Labels.
- Select Options.
- Select the type of printer you’re using.
- Select your label brand in Label products.
- Select the label type in Product number.
- Select OK.
- Select OK in the Labels dialog box.
- Type the information you want in each label.
How do students create digital badges?
Implement digital badges for your students in 5 steps
- Know the terminology.
- Familiarize yourself with badging best practices.
- Familiarize yourself with badging platforms.
- Consider your classroom and context.
- Use an implementation checklist.
How do you make a badge with a safety pin?
How-to make wooden badge with safety pin.
- Step 1: Cut and Engrave. Cut and engrave badge using laser mashine. Material: Birch plywood.
- Step 2: Safety Pin. Insert safety pin into holes of base.
- Step 3: Glue. Apply glue to the base.
- Step 4: Press. Join badge on the base. Press down.
- Step 5: Enjoy! It’s ready. Enjoy!
How do I ID an image in HTML?
The id attribute on an tag assigns an identifier to the image element. The identifier must be unique across the page.
How can I get a medical ID card?
5 Steps To Make a Doctor ID Card
- Step 1: Identify your institution’s or company’s brand image.
- Step 2: Note all data you want to include on the ID card.
- Step 3: Choose a color scheme.
- Step 4: Add security features.
- Step 5: Download a printable doctor ID card template.
What is a student ID?
Student identification is the unique number assigned to all full-time and part-time students at a post-secondary institution. All students receive an identification card, with their name, ID number and a photo of themselves displayed.This identifier will often be used in place of personal information such as name.
How do I make business cards in Word without a template?
If you didn’t find a template you like, you could create your own design through a mix of creating a table, adding images, and formatting text. Open a blank Word doc, head over to the “Insert” tab, and then click “Table.” A drop-down menu will appear.
How do I make a front and back card in Word?
- Hit “CTRL” and “P” to bring up the print screen in Word.
- Click “Manual Duplex” in the upper right corner of the window.
- Print the first side of the flash card.
- Flip the printed card around to the other side, and put back into the printer.
- Print the other side of the flash card. Things You’ll Need. Microsoft Word.
What is a standard ID card?
CR80 cards are 3.375″ x 2.125″ (the same size as a credit card) and are the standard, most commonly used size of PVC card.
What is ID card size photo?
What is the Photo size for the ID Card? The Photo size for an ID card must be 2 x 2 inches (or 51 x 51 mm) in size. The size of the head in the photograph must be between 1 and 1 ⅜ inches from the chin’s bottom to the tip of the person’s head.
How many MM is a ID?
85.6mm x 54mm
The standard identity card size is about the size of a credit card, which is 2 1/8″ x 3 3/8″ (85.6mm x 54mm). By the international standard definition, it is also called the CR80 card.
How do you make quarter sheets on Microsoft Word?
Split page to 4 quarters with a table
- Place the cursor at left-top of the page, then click Insert > Table, select 2×2 Table.
- The table has been inserted, then drag right-corner of the table to resize it as you need.
- Insert texts into the columns and rows separately.
«Microsoft Word» — a great text editor,which is included in the software package Office. He is one of the most used and downloaded editors in the world. Many users mistakenly believe that such a popularity «Vord» deserved solely due to belonging to one of the largest companies, but this is far from the case.
The editor of «Word»
This program offers many opportunitiesfor formatting and making text of various complexity, and it will be convenient to work with it both for a beginner and for a professional. Vord is widely used by office workers, journalists, copywriters, students and students. It can become both a complex mechanism for creating a unique design, and a platform for editing quick notes. The program perfectly adapts to many text formats, synchronizes with other Office products, has a huge set of fonts and functions for their modification, etc. Word will become an indispensable tool for creating primitive information material.

The badge is a small plate in whichthe identity of the employee (name, surname), his position and, as a rule, the name of the organization. They wear badges suspended for a string around their necks or attached for a pin on their chests. You could observe such cards from employees of supermarkets, beauty salons, large companies, corporations and so on. «Breeze» came to schools and institutions. So, with such cards go on duty, trainees, library workers and others. Plastic holders can be found in the departments of the office in a huge range. But how to make badges in the Vord, their very informative content? We’ll talk about this later.
How to make a frame for a badge in the «Word» using a ready-made template?
You can make a badge in several ways. The simplest of them is to edit the ready template. Some of them are already installed by default, but templates such as a badge need to be downloaded separately. However, it will not take much time. First, you need to check whether such a template was downloaded beforehand, and view the available blanks. To do this, go to the «File», then click «Create» and «Pattern samples.» If there is no badge, click on «Templates Office.com«and download the required option. Then the work will be the same as with any other document. We make obligatory data, we can add the emblem of the organization, play with the fonts, add a fringing, make a fill and more.

But often the badge-template does not meet the expectations of users. They want to create their own unique version from the very beginning. How to make badges from scratch in Vord?
Create your own badge version
Despite the fact that all holders for badgesbecome standard size, it still needs to be measured to be reinsured. We will do this version of the badge using table blocks. They are easy to draw and cut after printing. If the badge is horizontal (this is the most common kind), it’s better to make a landscape orientation of the sheet at once. This parameter is easily changed in the «Page layout» tab and in the «Orientation» item. In the «Fields» you can set the «Narrow» mark. I would like to note that it is better to make several badges at once and print them on one sheet.
Beydzhik with the help of the table designer
Open the «Insert» tab and select «Table». Denote the number of cells. It depends on the number of badges that you want to get by the result. When the table is ready, you need to adjust the size. To do this, move the cursor over the table and click on the small cross that appears in the corner to the left. Go to the «Properties».

Size is set to «Exactly», a mark from «Allowrow height «is set to 5.5 (the default height of the badge, if your holder has other sizes — stick to them) .The width of the column is set to 9. Now you can start editing the content.
How to make an inscription for the badge in the «Word»?
If it is necessary to place a logo on the badgeorganization, it is best to do it right away, so that later it should not be cut, stretched or narrowed. To do this, we again use the «Insert» tab and perform the work as with a normal drawing. By the way, you can place a photo of a person in the same way. Now you can enter the personal information of the employee or student. The features of the «Vord» allow not to edit the contents of each cell.
If badges need one kind (for example,only the names and names of the employees will differ), it is easy to copy the contents of one badge, insert it into another cell and make minor adjustments. You can even save the badge pattern in the Vord memory, and then use it as a workpiece. To do this, click on «File», select «Save as template» Word «.

How to make badges in the Vord without helpthe table designer? To do this, you can draw a rectangle’s auto shape and then edit the content further, which is less convenient, but it will go well for an alternative.
So we figured out how to make badges in «Vord». We hope that in the future this process will be simple and fast for you.
</ p>>
You will already know that by mastering this office automation program, you will have the possibility of presenting a valuable resume for any company or office. In order not to confuse you too much, we must go little by little. So, in this article, we are going to show you how to make a name badge in Word , simply and quickly.
How to Make a BADGET or CREDENTIAL in Word – That Easy
Remember that you must download and install Word from its official website . The program is paid, but it provides the option to try it for free for a month. I recommend working with the free trial to see if you feel comfortable. When it’s done, you can decide whether to buy the Office suite, or simply uninstall the software from your Windows.
It would be good that, before following this tutorial, you have already learned basic things about handling Word tools. For example, it is necessary that you know how to insert images in Word, use forms, and well, any other knowledge about the program that contributes something when creating a credential .
With all of the above in mind, you should now be more than ready to learn how to make badges and credentials using Word . It might be complicated at first, but it is a matter of getting familiar with this software.
Remember these words, in time, after experiencing the available options for yourself, you will become a great expert in the use of the Microsoft Corporation word processor.
Index( )
- How to make a badge or credential in Word?
- What is a credential or a badge?
- Steps to follow to create my own badge or credential
If you came to this guide by chance, you may not know what a badge or credential is. So before proceeding, you should understand these concepts a bit , to know where we are going with the process of creating both. I assure you that you will understand quickly, because they are things that we have all seen at some time.
What is a credential or a badge?
When we talk about these terms, we are basically referring to a badge. A small figure that contains representative elements of a person or company. Simple examples are the badges worn by soccer referees, IDs, diplomas, etc.
Representative elements can be names, logos, titles, images, and even a color scheme or pattern of some kind.
Steps to follow to create my own badge or credential
- First of all, we will open a new Word document, and we will insert an element or images. Choose between the rectangle and the “rectangle” with rounded tips. Place it in a prudent size for an insignia, better that it be elongated in height, and rather short in width. An example of suitable measurements would be 11 centimeters high and 7 centimeters wide.
- Clicking on the created shape will open the Formatcontext menu . In which we have numerous tools for personalizing our credential.
- Remember that you will manage the creation of your logo, based on the corporate image of your place of employment. That is, you will use its distinctive colors, its logo, and any element that makes it unique.
- Manage the contours and corners of your figure, clicking on it and moving the yellow circles that appear on the edges of it.
- Insert rectangles inside the main figure, smaller in size. This is to delimit the areas that we want to work on, and make the process easier. By changing the colorof the internal shapes, you can generate a suitable multi-color badge.
- Leave a space at the top of your credential, delimited to make the perforation after printing it. Do not put anything else over that space, as it will be perforated.
- Change the thickness of all the shapes used to your liking. Don’t just use rectangles, you can use different ones.
- Be creative. It is the most important thing when creating a badge. Apply all the knowledge you have acquired in this and the rest of the guides.

Abdullah Sam
I’m a teacher, researcher and writer. I write about study subjects to improve the learning of college and university students. I write top Quality study notes Mostly, Tech, Games, Education, And Solutions/Tips and Tricks. I am a person who helps students to acquire knowledge, competence or virtue.
- 5 years ago
- Read Time: 3 minutes
Recently i was creating some name badges for an event. As usual i was creating my name badges in MS Word (old school i know) but as i don’t have access currently to a mac with handy design tools on it, this works for me.
The strangest moment about the whole thing was that my colleague hadn’t got a clue as to what i was doing and had been manually typing badges one by one. To me my methods are old but certainly faster than the one by one method. So i decided to let her in to my secret and show her how to use mail merge in MS Word. I also thought if she didn’t know how to use it for badges and place settings then maybe others may be amazed by this too.
So here you go a step by step guide to using mail merge in word to create name badges.
Step 1: Create a database in Excel that includes all the information that you need on your name badge.
Use headings that are easily recognisable as this will make things easier for you when you do the merge. These can be as simple as Name and Job Title or if you have break out groups you can include a column stating their group.

Step 2: Open a new document in MS Word and select Mailings from the top tab and then Start Mail Merge from the line below by either selecting labels or step by step Mail Merge Wizard.

Step 3: Select the Step by step mail merge wizard and select labels from the left-hand menu. Then select Next: Starting document from the bottom of the menu.

Step 4: From the menu next select your starting document. This can either be the current blank page or select a template that you have created previously. Then select Labels and select the size of label you want to create ensuring it is compatable with the name badge size you are using. Once you are happy then select Next: Select Recipients

Step 5: Next you need to select the Browse button in the menu and this will open up a new box where you can select your excel document from. This is the spreadsheet where your attendees details are saved.

Step 6: Once you have selected your excel document another box will open. From this you will select the tab from the spreadsheet that you want to use. If your excel spreadsheet has only one page in use then select Sheet1$.

Step 7: Once you have selected the sheet then you can modify your list. For example you may want to exclude some of the recipients from your list.

Step 8: Now you need to add the information that you would like to see on your name badges. Firstly I think its easier to add all borders to you page. This can be done by highlighting the page and selecting all borders from the home menu.
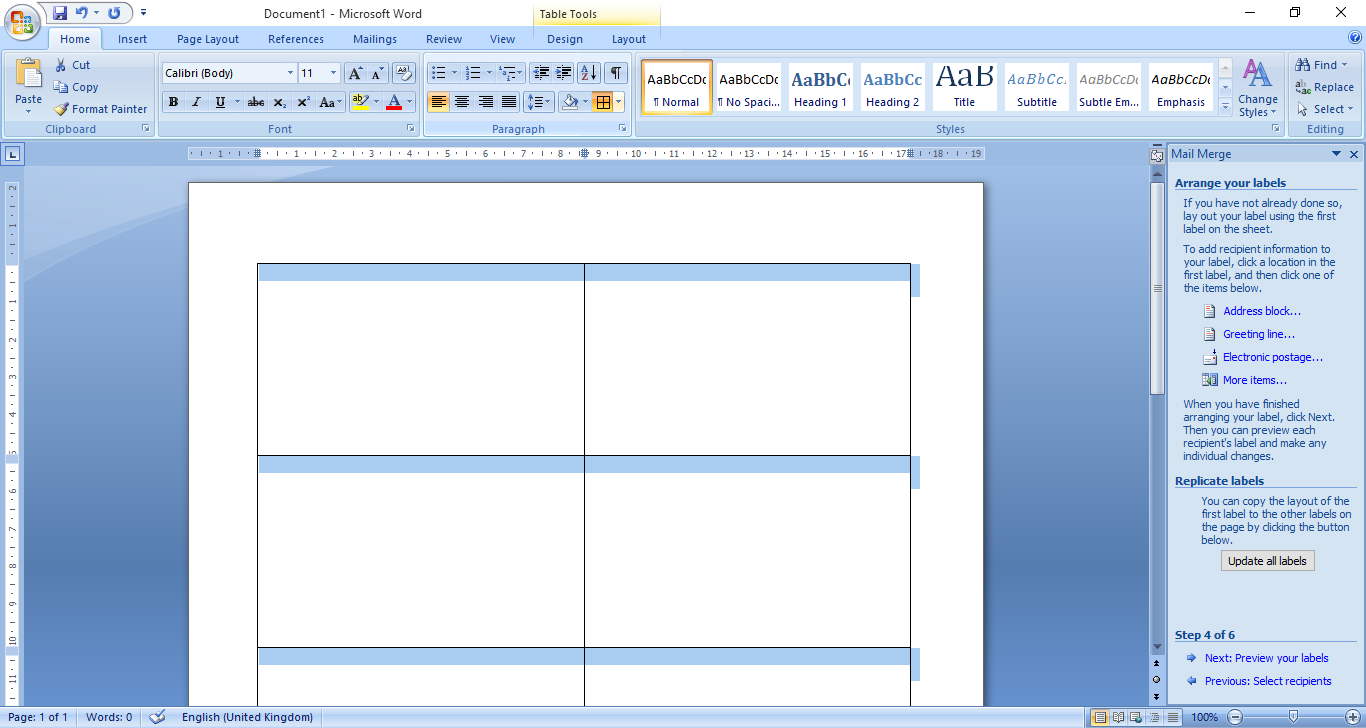
Step 9: Now you can add the details you need. Select more items from the mail merge menu and then select the headings that you would like to include on your badges

Step 10: Next arrange the headings as you want them to appear. You can even add a logo or other image if you want to. Once you are happy with this you can then select Update all labels and the information will appear on all your badges on the page.

Step 11: Next select preview your labels form the mail merge menu and you will see all the names from your spreadsheet will automatically input onto the page.

Step 12: If you are happy with the result, select Complete the merge.
Step 13: You can now select print from the mail merge menu and you are done.
Hopefully that will help make your job a little easier. You can use the same method to create place names for a dinner or meeting which is always a nice additional touch.

