Sometimes it is necessary to add images in a Word document to display several points concisely. Adding arrows with different shapes, sizes, and directions pointing to the specific point in the image serves to further emphasize each point.
Word allows you to insert / draw many types of arrows:
- Keyboard arrows
- Arrows by Unicode
- Arrows as symbols
- Line arrows
- Block, curved, and connector arrows
Depending on your requirement you can use any or all of them in your document. We provide you step-by-step instructions here.
Method #1: Insert Keyboard Arrows
Step #1: Open a Word Document
Open the Word Document in which you want to insert arrows. Place your cursor at the position where the arrow should appear.
Step #2: Insert keyboard arrows
- Type two Hyphens and a More Than sign to insert a Right arrow.
- Type a Less Than sign and two Hyphens to insert a Left arrow.
- Type two Equal signs and a More Than sign to insert a Bold Right arrow
- Type a Less Than sign and two Equal signs to insert a Bold Left arrow
- Type a Less Than sign, one Equal sign, and a More Than sign to insert a Double arrow.
This is how the arrows look.
Method #2: Insert Arrows by Unicode
Step #1: Open a Word Document
Open the Word Document in which you want to insert arrows. Place your cursor at the position where the arrow should appear.
Step #2: Insert unicodes for arrows
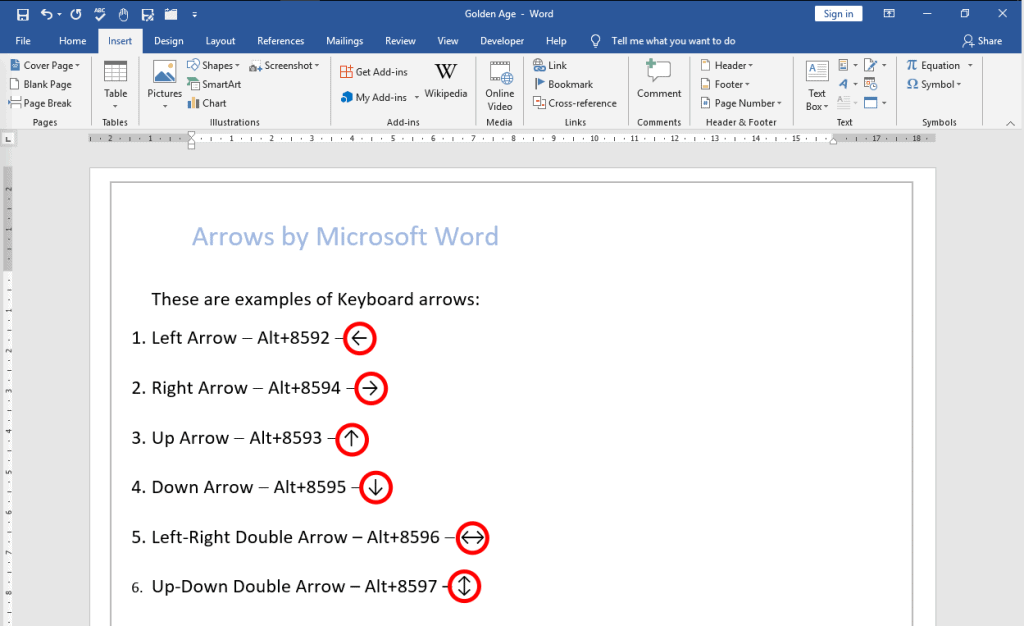
Hold down the Alt key on your keyboard and type the following numbers on the numeric keypad. Release the Alt key only after you have finished typing the complete string. Follow the table for the type of arrow you want to insert.
| Arrow Type | Alt+Unicode (on numerical keypad) |
| Left Arrow | Alt+8592 |
| Right Arrow | Alt+8594 |
| Up Arrow | Alt+8593 |
| Down Arrow | Alt+8595 |
| Left-Right Double Arrow | Alt+8596 |
| Up-Down Double Arrow | Alt+8597 |
This is how the arrows look.
Method #3: Insert Arrows as symbols
Step #1: Open a Word Document
Open the Word Document in which you want to insert arrows. Place your cursor at the position where you want the arrow to appear.
Step #2: Open the Symbols Table
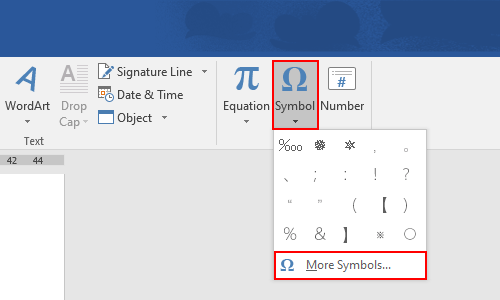
Click on the Insert tab on the top menu bar to change the ribbon. In the Symbols section, click on Symbols, and then on More Symbols to open the Symbols Table.
Step #3: Select and insert the Symbol
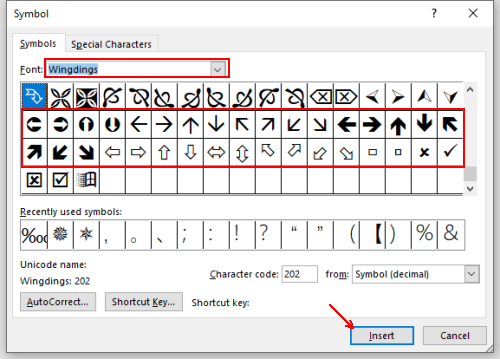
Scroll up and down to see various symbols, and click on the one you want to insert. Click on the Insert tab to insert the symbol and then click on the Close tab to close the table. This is how your document will look.
Method #4: Insert Line Arrows
Step #1: Open a Word Document
Open the Word Document in which you want to insert line arrows.
Step #2: Select the Shape
Click on the Insert tab on the top menu bar to change the ribbon. In the Illustrations section, click on Shapes to open the choice of Shapes.
Under Lines, click on the second shape from the left. If you prefer, select any other line shape instead. Word closes the choice of Shapes and changes the cursor to a cross.
Step #3: Draw the arrow
Move the cursor to the position where you want the tail of the arrow to be, hold down the left mouse button and drag the mouse and the cross to where you want the arrow to point. Word will insert the arrow, and when you release the mouse button, will place the arrow.
Step #4: Modify the arrow
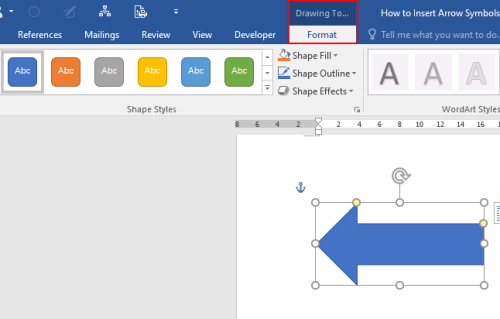
Notice that the ribbon has changed and Word has opened the Format tab under Drawing Tools. The section Shape Styles allows changing the shape of the arrow such as:
- Style
- Outline
- Effects
- Shape
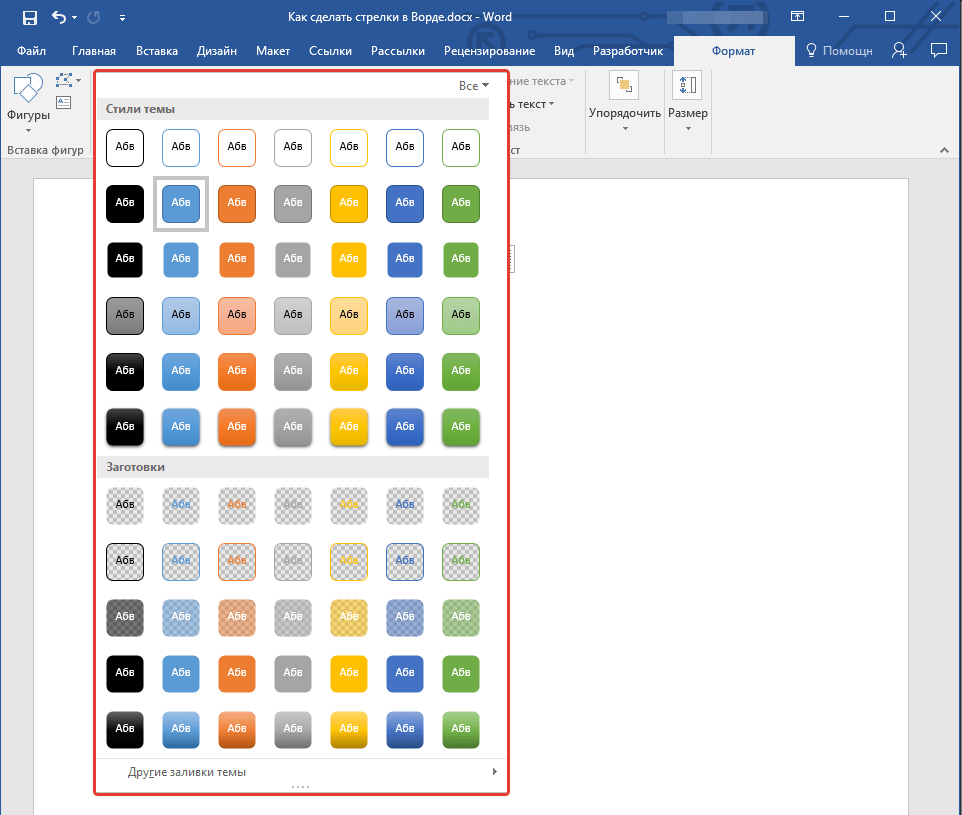
Style — Click on the downward arrow on the right of Subtle Shapes [1] to open the Theme Styles and Presets choice. Proceed from Step #5.
Outline — Click on the small triangle on the right of Shape Outline [2] to open the Theme Colors dialog. Proceed from Step #6.
Effects — Click on the small triangle on the right of Shape Effects [3] to open the Effects selection. Proceed from Step #7.
Shape — Click on the small triangle at the bottom right of Shape Styles section [4] to open the Format Shape dialog. Proceed from Step #8.
Step #5: Change the style of the arrow
In the Theme Styles and Presets choice, Word offers some preset styles. Click on the one you like best, and the arrow will change accordingly.
Step #6: Change the outline of the arrow
In the Theme Colors dialog, Word allows you to change many features of your arrow:
- Color
- Weight
- Dashes
- Arrow
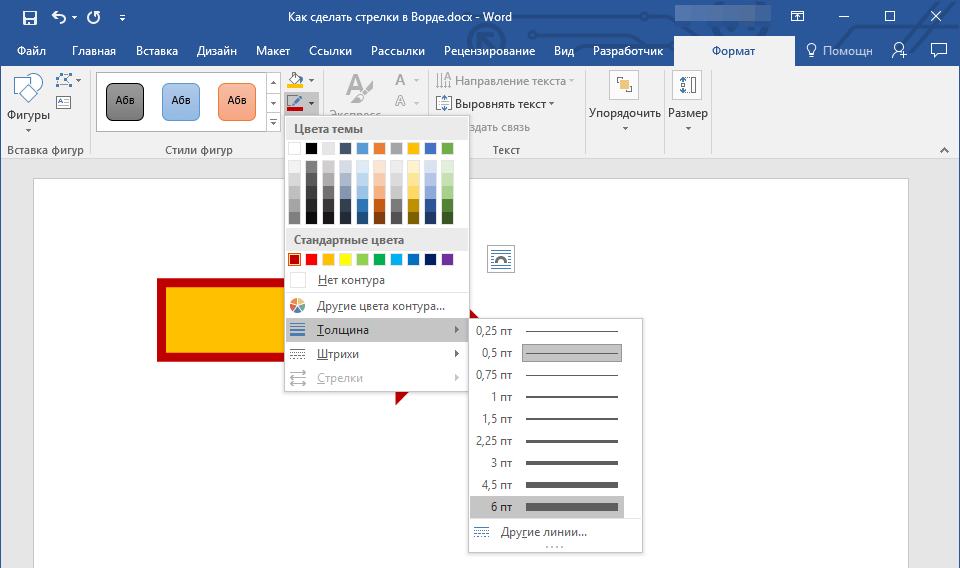
You can change the color of the arrow, weight (thickness) of the arrow, Dashes (solid line or dotted) of the arrow, and Arrows (type of the arrow head). Simply hover the mouse pointer over the tabs—Weight, Dashes, and Arrow—to see the choices available. Click on the choice you like.
Step #7: Change the shape effects of the arrow
The Effects selection allows introduction of different effects on the arrow. The selection offers several effects such as:
- Preset
- Shadow
- Reflection
- Glow
- Soft Edges
- Bevel
- 3-D Rotation
Simply hovering the mouse pointer over the choices will show the various choices available, and you can pick anything you like. Word will store your choice in Preset on the top.
Step #8: Change the Shape of the arrow
The Format Shape dialog offers three choices:
- Fill and Line
- Effects
- Layout and Properties
Fill and Line — You can select various fill and line properties for the arrow.
Effects — Offers the same choices as in Step #7.
Layout and Properties — This dialog allows you to assign a Title to your arrow and give it a description.
Once you have made your choice, click on the cross to close the dialog.
Your arrow may look like this
Method #5: Insert Block, Curved, and Connector arrows
Step #1: Open a Word Document
Open the Word Document in which you want to insert arrows.
Step #2: Select the Shape
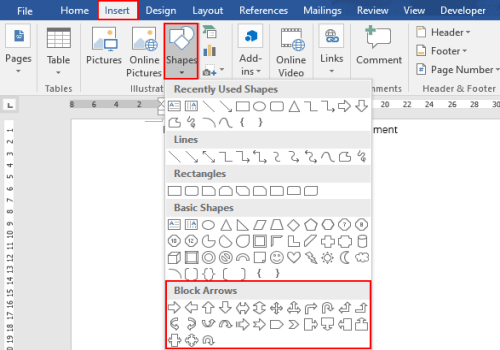
Click on the Insert tab on the top menu bar to change the ribbon. In the Illustrations section, click on Shapes to open the choice of Shapes.
Under Block Arrows, select the type of arrow you need. Word will display the name of the arrow when you hover the mouse pointer over it. Click on the arrow you prefer, and Word will close the dialog, and change the mouse pointer to a cross.
Step #3: Insert the arrow
Position the cross where you want the arrow to start, and holding down the left mouse button, drag the cross to where you want the arrow to end.
Notice that Word has changed the ribbon to include a Format tab under Drawing Tools.
Step #4: Modify the arrow
You can change the position and shape of the arrow by clicking and dragging the appropriate circles around it. You can rotate the arrow in 3-D by clicking and dragging the circular handle on its top.
For modifying the arrow further, follow Method #4, Step #4 onwards.
Finally, your arrow may look like this.
Conclusion
You can add many types of arrows to beautify and emphasize your Word document. Although the process looks involved with too many steps, following our instructions above should make the task easier.
В программе MS Word, как вы наверняка знаете, можно не только печатать текст, но и добавлять графические файлы, фигуры и другие объекты, а также изменять их. Также, в этом текстовом редакторе есть средства для рисования, которые, хоть и не дотягивают даже до стандартного для ОС Windows Paint, но во многих случаях все же могут оказаться полезными. Например, когда нужно поставить стрелку в Ворде.
Урок: Как нарисовать линии в Word
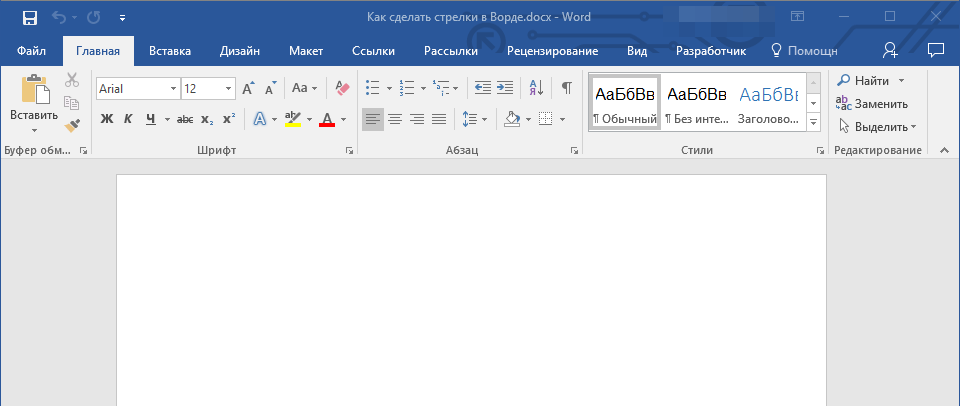
1. Откройте документ, в который нужно добавить стрелку и кликните в том месте, где она должна находиться.
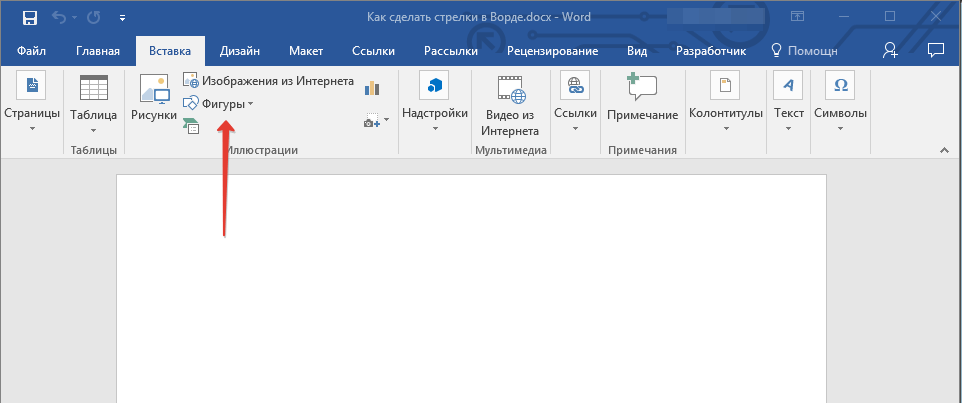
2. Перейдите во вкладку “Вставка” и нажмите кнопку “Фигуры”, расположенную в группе “Иллюстрации”.
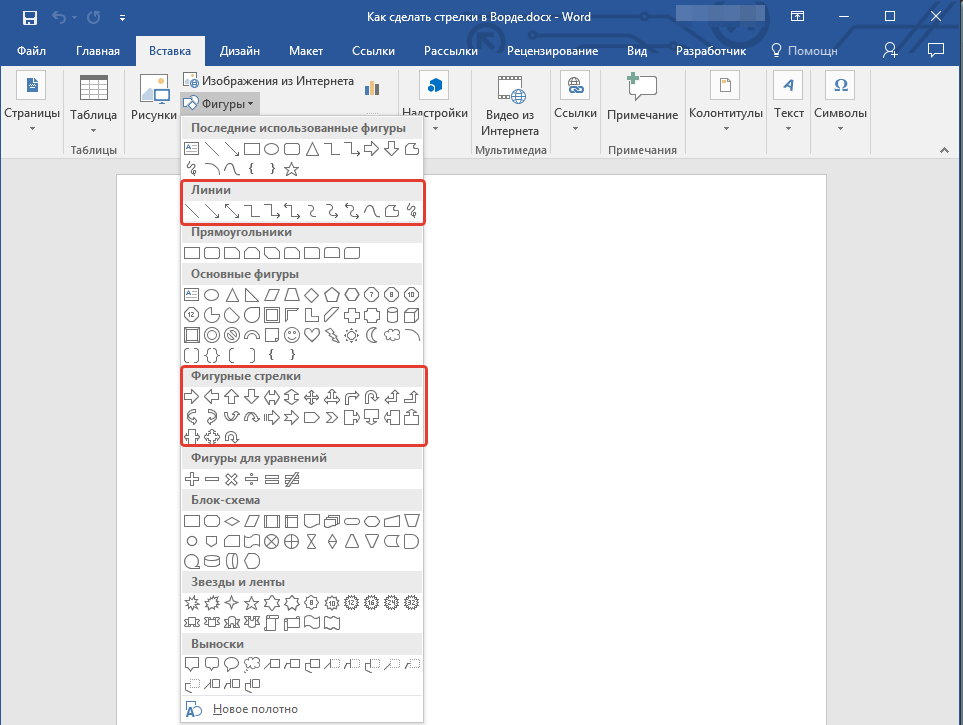
3. Выберите в выпадающем меню в разделе “Линии” тип стрелки, которую вы хотите добавить.
Примечание: В разделе “Линии” представлены обычные стрелки. Если вам нужны фигурные стрелки (например, для установления связи между элементами блок-схемы, выберите подходящую стрелку из раздела “Фигурные стрелки”.
Урок: Как в Ворде сделать блок-схему
4. Кликните левой кнопкой мышки в том месте документа, где стрелка должна начинаться, и протяните мышку в том направлении, куда должна идти стрелка. Отпустите левую кнопку мышки там, где стрелка должна заканчиваться.
Примечание: Вы всегда можете изменить размер и направление стрелки, достаточно просто кликнуть по ней левой кнопкой и потянуть в нужную сторону за один из маркеров, обрамляющих ее.
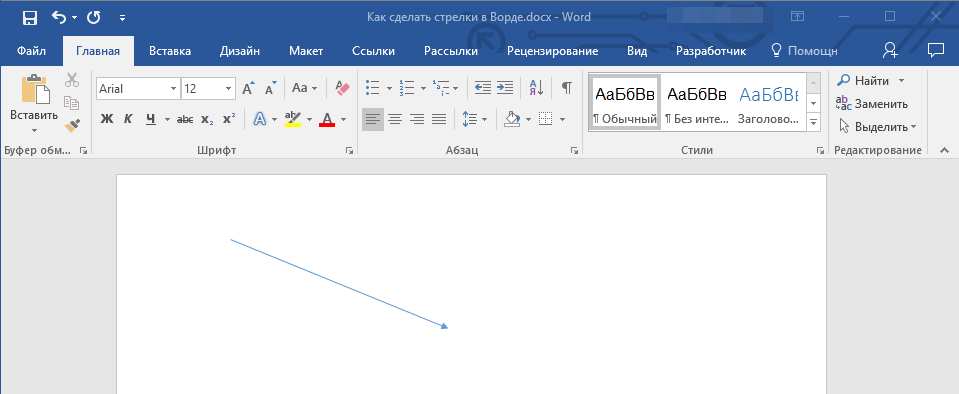
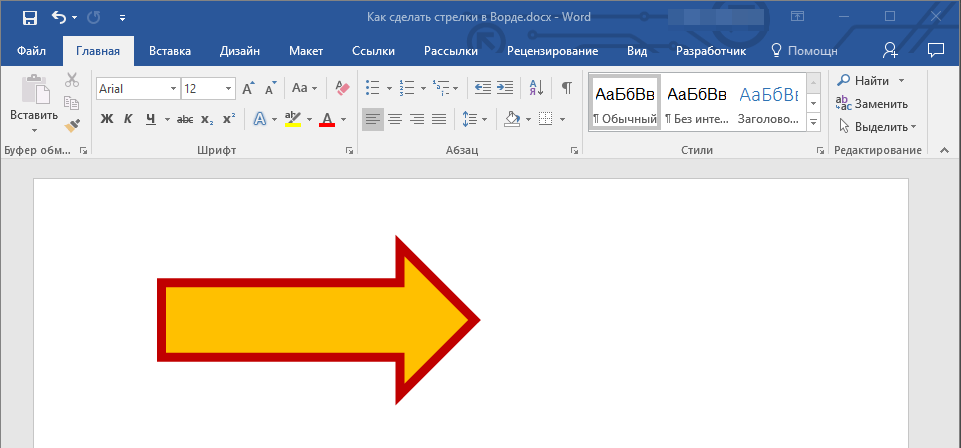
5. Стрелка заданных вами размеров будет добавлена в указанное место документа.
Изменение стрелки
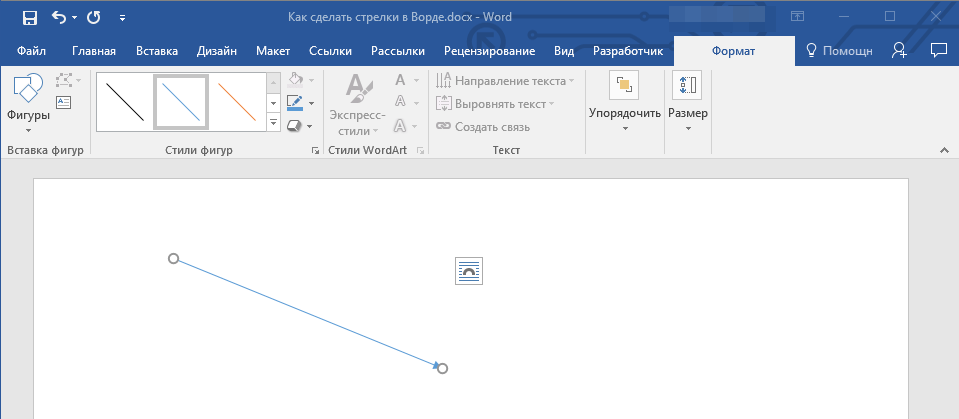
Если вы хотите изменить внешний вид добавленной стрелки, дважды кликните по ней левой кнопкой мышки, чтобы открылась вкладка “Формат”.
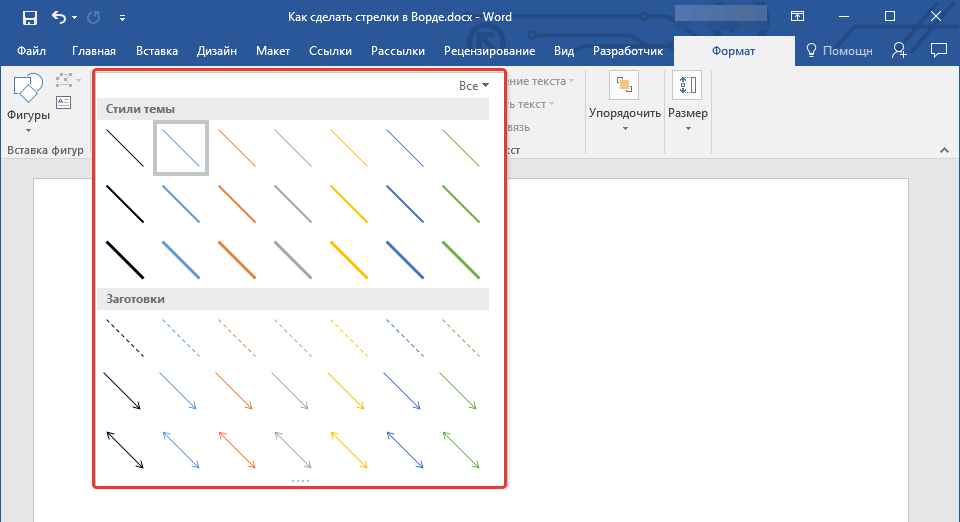
В разделе “Стили фигур” вы можете выбрать из стандартного набора понравившийся стиль.
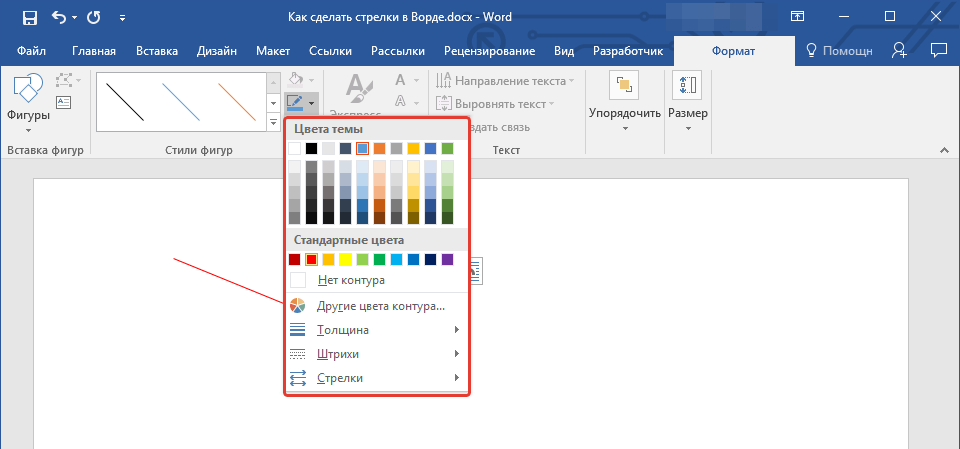
Рядом с окном доступных стилей (в группе “Стили фигур”) есть кнопка “Контур фигуры”. Кликнув по ней, вы можете выбрать цвет обычной стрелки.
Если же вы добавили в документ фигурную стрелку, помимо стилей и цвета контура, вы можете также изменить цвет заливки нажав на кнопку “Заливка фигуры” и выбрав понравившийся цвет из выпадающего меню.
Примечание: Набор стилей для стрелок-линий и фигурных стрелок отличается визуально, что вполне логично. И все же цветовая гамма у них одинаковая.
Для фигурной стрелки также можно изменить толщину контура (кнопка “Контур фигуры”).
Урок: Как вставить рисунок в Word
На этом все, теперь вы знаете, как нарисовать стрелку в Ворде и как изменить ее внешний вид, если это необходимо.
Еще статьи по данной теме:
Помогла ли Вам статья?
On the “Insert” tab on the Ribbon, click the “Shapes” button. In the Lines group on the drop-down menu, click the “Line Arrow” option. A crosshair symbol will display. Press and hold your mouse button, then drag to draw the arrow.
Contents
- 1 How do you make an arrow with the keyboard?
- 2 What is the shortcut for inserting arrows in Word?
- 3 What are arrows a symbol of?
- 4 How do you add a pointer in Word?
- 5 What does ➡ mean?
- 6 Where is the down arrow key?
- 7 What two arrows mean?
- 8 What do 5 arrows mean?
- 9 Which direction should an arrow point?
- 10 What is the meaning of 100 emoji?
- 11 What does it mean when a girl sends you ?
- 12 What does arrow pointing to right mean?
- 13 How do I get the arrow on my laptop?
- 14 What flashing arrows mean?
- 15 What do Crossing arrows mean?
- 16 What does an arrow pointing up mean?
- 17 What does arrow mean in math?
- 18 What do arrows represent in a food chain?
How do you make an arrow with the keyboard?
Make the arrows with keyboard shortcuts under Windows
The technique : You keep the Alt key pressed (the key to the left of your Space bar), then you successively type the previously indicated numbers, then you finally release the Alt key, which will make the desired arrow appears.
What is the shortcut for inserting arrows in Word?
Five keyboard shortcuts for inserting arrows into a Word document
- To insert a right arrow, type two hyphens and a greater than sign: –>
- To insert a bold right arrow, type two equals signs and a greater than sign: ==>
- To insert a left arrow, type a less than sign and two hyphens: <—
What are arrows a symbol of?
An arrow symbolizes reaching your goals and achieving your targets. Protection – An arrow has traditionally been used to protect a person from potential harm. Arrows have come to represent protection and defence from any evil that can come to you.
How do you add a pointer in Word?
If you don’t, you see numbers in your text rather than the insertion pointer dancing all over — like444this.
Move in small increments.
| Press This Key Combo | To Move the Insertion Pointer |
|---|---|
| Ctrl+→ | Right to the start (first letter) of the next word |
| Ctrl+← | Left to the start (first letter) of the previous word |
What does ➡ mean?
➡️ Meaning – Right Arrow Emoji
This is one of the most simple and generic emoji.Since it is a very simple emoji it can be used in almost any context: to indicate a direction or an object that is on the right. Sometimes Right Arrow Emoji can also mean the next thing, stop or person in a group.
Where is the down arrow key?
Press the Alt key button. And type 25 uses the numeric keypad, which will be present on the keyboard’s right side. Make sure that num lock is off. Because only then you can type 25 and then get the Down Arrow Symbol Text (↓) on your screen.
What two arrows mean?
Two Arrow Designs
A tattoo design with two arrows pointing in opposite directions represents war or conflict. However, if the two arrows are crossed, the tattoo most likely represents truce and friendship.
What do 5 arrows mean?
strength
A bundle of five arrows indicates strength. A single arrow can easily be broken; however, breaking five arrows is tough. A bundle of five arrows indicates strength.
Which direction should an arrow point?
The arrow is always pointing the direction of air flow and should always point toward the furnace. This is the air returning from your house carrying dust and other potential allergens.
What is the meaning of 100 emoji?
The 100 emoji is used in digital communication to express or emphasize achievement, support, approval, and motivation. It also generally means “absolutely” or “keep it 100” (keep it real). Related words: keep it 100. keep it hot.
What does it mean when a girl sends you ?
She’s sending you a flirty vibe.
A winking face that has a stuck-out tongue could signal she’s just being silly. Respond by keeping the conversation light and playful. Send a meme or continue teasing her or joking with her.
What does arrow pointing to right mean?
Arrows also signified direction, force, movement, power and direction of travel. When an arrow pointed to the left it meant warding off evil, pointing to the right meant protection and an arrow pointing down meant peace. Two arrows depicted together were the symbol for war.
How do I get the arrow on my laptop?
In most cases, you’ll need to press and hold the Fn key and then press the relevant function key to bring your cursor back to life.
What flashing arrows mean?
A flashing arrow is a type of emphasized foreshadowing, an audiovisual cue used in films and similar visual media to bring the attention of the audience to a particular object or situation, which will later be referred to or used in the advancement of plot.
What do Crossing arrows mean?
According to the Native Americans, crossed arrows represent friendship, an arrow pointing right means protection, and pointing left wards off evil.
What does an arrow pointing up mean?
⬆️ Meaning – Up Arrow Emoji
This icon depicts a black arrow pointing up. This emoji could mean the direction up, going up, moving upwards, either symbolically or literally. Up Arrow Emoji could be used to point out a previous text, or instead of writing out the word “up”, it could be used in its place.
What does arrow mean in math?
To summarize, we use arrow notation to show that x or f(x) is approaching a particular value. Arrow Notation. Symbol. Meaning. x→a−
What do arrows represent in a food chain?
All food chains start with a producer. The arrows in the food chain below depict the direction in which energy and nutrients flow, i.e. the arrow always points from the eaten to the eater.
When editing documents in Word, sometimes we can insert some graphic symbols to make the content more intuitive and lively, like arrows with different shapes and directions. Since they can’t be typed directly like numbers and characters, here I’d like to introduce 3 common used ways to insert arrows in Word. The method 1 and method 2 can also be applied in Microsoft Excel. Let’s have a look.
Insert Arrow Shape
1. Open the Word (or Excel) document.
2. Switch to Insert tab, click Shape button to expand the drop-down menu.
2. There are many different types of arrows with different directions, you can choose any one you like.
3. Hold your mouse to draw a shape you selected, and drag its frame to adjust the size and direction of the arrow.
4. You can also change its color or effect in Format (Drawing Tools) tab.
Insert Arrow Symbol
1. Open the Word document (or Excel file).
2. Go to Insert tab, click Symbol button on the right of the ribbon and choose More Symbols… in the menu.
2. Change the Font into Wingdings in the popping out Symbol window, scroll down till the end and you’ll find many different arrow symbols here. Select the one you want and hit Insert button to add it to your document.
Insert Arrow by Code
Alternatively, you can also insert different arrows in Word only by keyboard.
1. First you should make sure that your numeric keypad is enabled, otherwise, tap [Num Lock] to turn on it.
2. Press and hold [Alt] key while tapping corresponding numeric code. Then release the [Alt] key and the arrow will show in your document.
3. Here I collect a list of arrow code (all in Unicode 11), you can find the arrow you want and use its corresponding code.
| Arrow | Code |
| Left Arrow ← | 8592 |
| Right Arrow → | 8594 |
| Up Arrow ↑ | 8593 |
| Down Arrow ↓ | 8595 |
| Left-right Arrow ↔ | 8596 |
| Up-down Arrow ↕ | 8597 |
For example, if you want to insert a right arrow ↓ in Word document, you just need to hold [Alt] key and enter 8594 on numeric keypad. Then release the [Alt] key, you will see the right arrow is successfully inserted.
Copyright Statement: Regarding all of the posts by this website, any copy or use shall get the written permission or authorization from Myofficetricks.
Whether you need to point to an image for emphasis or demonstrate where to click for interactivity, there is a wide range of arrow shapes that you can create and customize in Microsoft Word. Let’s take a look at how they work.
Drawing a Basic Arrow Shape
First, let’s review the steps on how to draw a basic arrow. On the “Insert” tab on the Ribbon, click the “Shapes” button. In the Lines group on the drop-down menu, click the “Line Arrow” option.
A crosshair symbol will display. Press and hold your mouse button, then drag to draw the arrow. Release the mouse button to finish drawing the arrow.
Here’s the result:
RELATED: How to Position Images and Other Objects in Microsoft Word
Resizing, Rotating and Changing the Color of Arrows
Now let’s go a step further. If you don’t change a thing, your arrow will default to the normal settings, which is black for the color and 3/4 point for the width. But what if the thin black arrow doesn’t suit your fancy? Maybe you need a thick, shorter blue arrow. No problem. You can make changes to it in a snap.
Resizing an Arrow
To change the length of your arrow, one way you can quickly accomplish this is with your mouse. Hover over the arrow tip until you see the double-arrow symbol.
Click and then drag your mouse to make the arrow shorter or longer or point it in a new direction. If you only want to shorten or lengthen the arrow without risking reorienting it, hold Shift down while you click and drag it.
To make even more changes to your arrow, you can:
- Use the options in the Format tab in the Ribbon
- Click “Advanced Tools” (the small diagonal arrow on the bottom right of the Shape Styles group) in the Ribbon
- Right click on the arrow to open the Format Autoshape/Picture dialog box to see even more options
Changing the Color of an Arrow
To change the arrow color, click the “Shape Outline” button on the “Format” tab and then click the color of your choice.
Changing the Thickness of an Arrow
To change the thickness of the arrow, click the “Shape Outline” button, point to the “Weight” menu, and then click on the thickness you want.
Rotating an Arrow
To rotate the arrow, click the “Rotate” button on the Format tab and choose a rotation option. Hovering over each option lets you preview how your arrow will look.
For even more rotation options, click the “More Rotation Options” command. On the “Size” tab of the Layout window that opens, you can specify an exact rotation in degrees.
Using Block, Curved, and Connector Arrows
If a straight arrow doesn’t cut it, there are other arrow types available, including block, curved, and connector arrows. Let’s take a look.
How to Create a Block Arrow
On the “Insert” tab of the Ribbon, click the “Shapes” button. In the “Block Arrows” section of the drop-down menu, click arrow style you want. In this example, we’re using an upward block arrow.
Your pointer turns into a crosshair symbol. Click and drag to draw the arrow. Release the mouse button to finish.
You can use the same formatting tools we talked about in the previous section to change the color, outline, and so on. Also, you can any of the eight white handles to resize the overall arrow. Grab the yellow handles to reshape the arrows head and shaft separately.
How to Create a Curved Arrow
On the “Insert” tab of the Ribbon, click the “Shapes” button. In the “Lines” section, click one of the curved arrow shapes. You’ll find one with a single arrowhead, one with two heads, and a simple curved line with no arrowheads.
Your pointer turns into a crosshair symbol. Click and drag to draw the arrow. Release the mouse button to finish.
After drawing the curved arrow, you can change the curve by dragging the yellow handle in the center of the arrow. Here, we’ve dragged it out to the right to make a more sweeping curve.
For even more curved arrow options, check the curved arrows in the Block Arrows section.
And just like with any other shape, you can use the standard formatting tools to change the color, outline, and so on.
How to Create a Straight Connector Arrow
Finally, there’s the connector arrow. These are great for connecting the kinds of shapes you’d use in flowcharts or organizational diagrams.
On the “Insert” tab of the Ribbon, click the “Shapes” button. In the “Lines” section of the drop-down menu, choose one of the connector arrows. Just like with curved arrows, you’re just choosing how many arrowheads you want.
Your pointer turns into a crosshair symbol. Click and drag to draw the arrow. Release the mouse button to finish.
After drawing the connector arrow, you can grab the yellow handle to change the shape of the arrow. Use the white handles at either end to change the length of that portion of the arrow.
And there you have it. It’s probably more than you wanted to know about using arrows in Microsoft Word, but it’s always good to know what’s available.
READ NEXT
- › How to Use the Ink Features in Microsoft Office
- › How to Circle Text in Microsoft Word
- › How to Group and Ungroup Shapes and Objects in Microsoft Word
- › How to Insert a Line in Microsoft Word
- › The New NVIDIA GeForce RTX 4070 Is Like an RTX 3080 for $599
- › How to Adjust and Change Discord Fonts
- › HoloLens Now Has Windows 11 and Incredible 3D Ink Features
- › BLUETTI Slashed Hundreds off Its Best Power Stations for Easter Sale


