We’re often drawn to the latest and greatest technology, but sometimes the basics can get the job done, like when you need to create a simple survey to print and distribute at an event or hand to clinic patients after visits. In cases like these, Microsoft Word might be just what you need.
While the exact steps may differ depending on your version of Word, here’s a basic rundown of how to create a survey in Word:
How to create a survey in any Word version
- Open Microsoft Word.
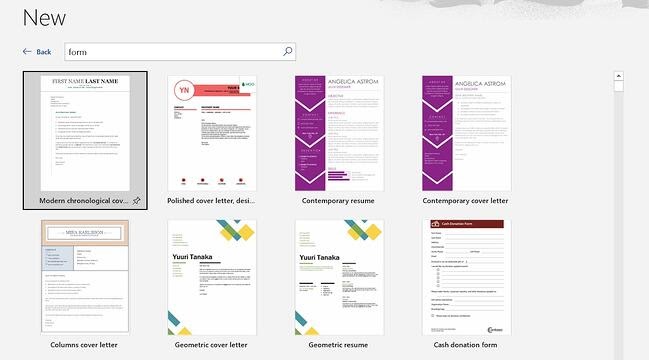
- Start with either a blank document or search for “form” in the search box.
- If you choose to search, find a template that has the general format you’re looking for to save time.
- Go to the Developer tab.
- Click where you want to add questions or other content
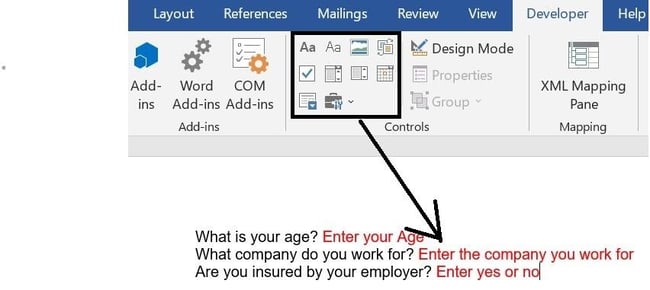
- Select your desired form control (e.g., text, checkbox, picture, etc.) on the tab to add it to your survey.
- Enter any instructional text or questions.
- Repeat the previous step until you’ve completed your survey.
- Navigate to the Review tab
- Select Restrict Editing to protect the document from changes using the setting most appropriate for you.
- Print and distribute your form to survey participants.
Pro Tip
In order to get more general information about survey creation processes, check out our comprehensive guide on How to Create a Survey or get started with our free survey templates.
Need a survey tool with more to offer?
Using Word to create a survey may be suitable for simple print-and-distribute use cases, but if you hope to reach a wider audience, you need a digital solution. While there are many options available, these three provide unique features you’ll find useful:
Google Forms
Part of the Google Suite, Google Forms lets you create online surveys and send them to an unlimited number of participants. Unlike printed forms created in Word, you don’t have to worry about multiple pages overwhelming survey participants (or annoying you when you distribute and collect them).
Like other Google products, the interface is intuitive and easy to use. Plus, you can keep track of survey responses directly on the platform in its sister solution Google Sheets, or you can have them sent directly to your email. Similar to Word, you can include branding elements, but you’re limited to adding a company logo and changing the background color. Here’s how to use Google Forms to create your surveys.
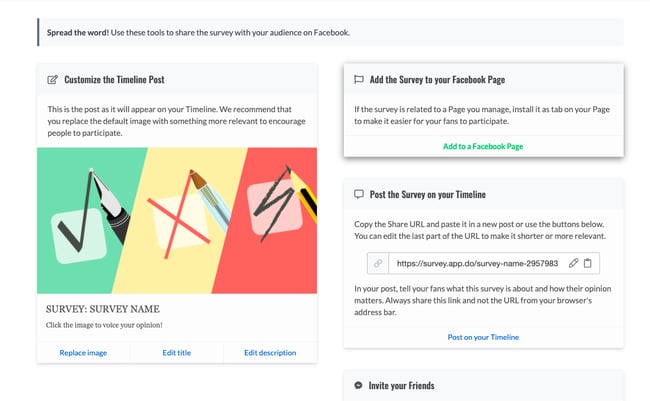
Facebook’s survey feature comes in the form of a poll. It’s limited to two questions, but sometimes that’s all you need. The poll is simple, like Word, but with the bonus of better reach and greater likelihood of responses since it’s so short. This option works really well when you have a social following and want to tap into that audience for their opinions or feedback.
Check out this post on how one business owner uses these surveys to make informed decisions about his products and services, along with the steps on how you can create a Facebook survey yourself.
Jotform
The surveys you create with Jotform can be as simple as the ones you create in Word or more extensive — without the limitations associated with Google Forms or Facebook.
You can add as many questions as you want. You can also brand and visually distinguish surveys as much as you like, which is perfect if you’re looking to appear professional and impress your survey respondents (especially if they’re customers).
Embed the surveys on your website, email them, download them as PDFs, or publish them to third-party platforms such as Tumblr, Blogger, and Facebook.
With Jotform, you can
- Customize surveys to your liking. Ask a ton of questions or just a few. Give respondents a few choices or a bunch. Mix up the question format to include multiple-choice questions, checkboxes, and text fields.
- Integrate with important business services. Want to integrate your survey with Google Sheets or Airtable? Jotform lets you integrate with these and more than 100 other software across industries and categories — from email marketing tools to cloud-storage platforms.
- Accept payments. Jotform is one of the few survey creation tools that gives you the ability to accept payments from respondents (for checkout forms, for example). Jotform provides secure payment integration — whether you choose to integrate with Square, PayPal, Stripe, or another of Jotform’s numerous payment gateway partners.
- Make surveys visually impressive. You can create visually stunning surveys to keep your survey participants engaged. No need for basic blocks of text on equally basic white backgrounds. You want your participants to be in awe, not ready to fall asleep!
You can get up and running with Jotform quickly. Check out these easy-to-use survey templates for inspiration or start your own from scratch and customize from the ground up.
This article is originally published on Aug 16, 2019, and updated on Jan 27, 2023.
How to Make a Survey in Microsoft Word
- Start with a blank document or search for “form” in the templates gallery.
- Show the developer tab.
- Click where you want to add content to your survey, then choose the type of control for the survey field.
- Input Instructional Text or Drop-Down Menu Options.
Contents
- 1 Does Word have a survey template?
- 2 Can you create a survey in Microsoft Office?
- 3 How do I create a survey form?
- 4 How do I make a Q&A in Word?
- 5 How do you insert a survey box in Word?
- 6 Does SharePoint have a survey tool?
- 7 How do I create a survey in Outlook 365?
- 8 How do you create a survey in Microsoft forms?
- 9 What is the best free survey tool?
- 10 What is the best online survey tool?
- 11 Does Office 365 have a survey tool?
- 12 How do you create a survey questionnaire?
- 13 Is Surveymonkey better than Microsoft Forms?
- 14 What is a Q&A format?
- 15 How do I make a searchable FAQ?
- 16 How do I create a survey in Microsoft teams?
- 17 Can you create a survey in Excel?
- 18 How do I create an email survey?
- 19 How do I create a feedback form in Outlook?
- 20 How do you insert a survey into an email?
Does Word have a survey template?
Gather info from your employees with a workplace questionnaire template in Word to improve working conditions and employee retention. Take the hassle out of formatting test questions with the multiple-choice test survey template.
Can you create a survey in Microsoft Office?
Sign in to Microsoft 365 with your school or work credentials. Click New, and then select Forms for Excel to begin creating your survey.Click Add Question to add a new question to the survey. You can choose to add Choice, Text, Rating, or Date questions.
How do I create a survey form?
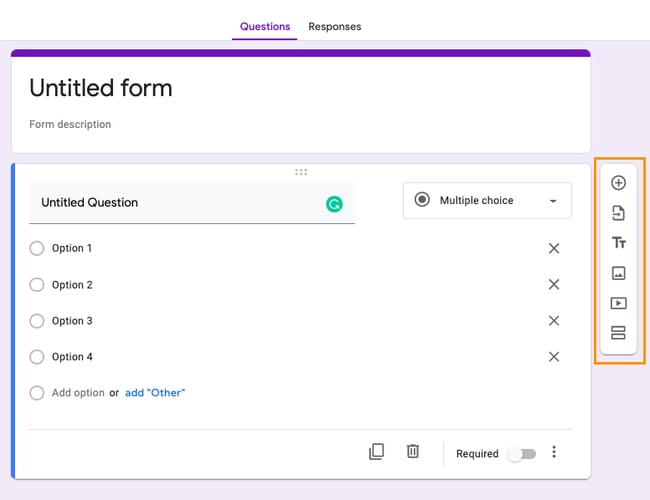
How to create a survey using Google Forms
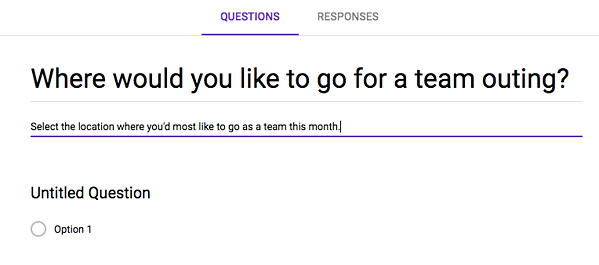
- Navigate to https://docs.google.com/forms/ and click Blank.
- Name your survey.
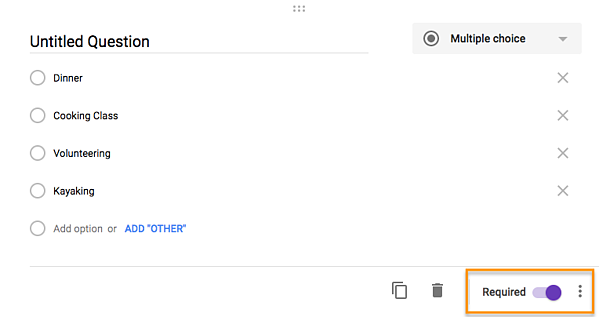
- Tap on Untitled Question and write a question.
- Click Multiple choice.
- Select an option for how the question will be answered.
- Click the side menu icons to add to your survey.
How do I make a Q&A in Word?
To create a word answer question, click on the blue “Create” button in the upper left hand corner of your screen. Choose “Questions” and then select “Word Answer.” From there you will be provided with the question building framework in which to build your multiple choice question.
How do you insert a survey box in Word?
Just position your cursor in the document where you want a check box, switch to the “Developer” tab, and then click the “Check Box Content Control” button. You should see a check box appear wherever you placed your cursor.
Does SharePoint have a survey tool?
In SharePoint, navigate to the site where you want to add the survey.In the Adding Survey box, select Advanced Options. You can also just enter a name, select Create, and then change settings and add questions later. Enter a name for the survey.
How do I create a survey in Outlook 365?
Create a poll
- In a new email message, go to the Message tab, and then click Poll.
- When the poll pane opens, type your first question and two options.
- To add additional options, click + Add option.
- When you’re done adding options, you can decide if you want responders to only select a single answer or multiple answers.
How do you create a survey in Microsoft forms?
Create a survey within a project
- Open the project in which a survey needs to be created.
- In the left pane, select New survey.
- Select the default survey title, and then enter a title for your survey. You can also enter an optional description for it.
- Proceed with adding questions to your survey.
What is the best free survey tool?
Best Free Online Survey Tools
- SurveyPlanet.
- Google Forms.
- Alchemer.
- SurveyLegend.
- Zoho Survey.
- Crowdsignal.
- Survs.
- FreeOnlineSurveys.
What is the best online survey tool?
Best survey tools in 2021
- SurveyMonkey. The leading survey tools provider. TODAY’S BEST DEALS.
- Typeform. Personalized customer survey tools.
- JotForm. An easy to use form builder.
- AskNicely. Survey tools with built-in NPS.
- Formstack. A jack of all trades of form creation.
- Google Forms. Simple and affordable survey tools.
Does Office 365 have a survey tool?
Microsoft Forms—a new formative assessment and survey tool in Office 365 Education.
How do you create a survey questionnaire?
7 tips for writing a great survey or poll
- Focus on asking closed-ended questions.
- Keep your survey questions neutral.
- Keep a balanced set of answer choices.
- Don’t ask for two things at once.
- Keep your questions different from each other.
- Let most of your questions be optional to answer.
- Do a test drive.
Is Surveymonkey better than Microsoft Forms?
Both have great design options. However, Survey Monkey will most likely offer you a bit more on this front. It offers additional layout options to further customise surveys with footers and headers, and includes advanced features that Microsoft Forms lacks, e.g., data and reports, and the ability to run A/B testing.
What is a Q&A format?
Q&A stands for “question and answer,” which is similar to a FAQ page, but it usually provides a more personal experience for the viewer or reader. This is because a Q&A format often makes it possible for whoever is looking to get involved in the question-and-answer process.
How do I make a searchable FAQ?
How to Create an FAQ Page
- Use service data to identify your most common questions.
- Decide how you’ll organize the FAQ page.
- Include space for live support options.
- Design your FAQ page.
- Publish the FAQ page on your site.
- Monitor the FAQ page’s performance.
- Update content and add more solutions over time.
How do I create a survey in Microsoft teams?
Conduct a poll within your team
- Go to the Teams channel or chat window in which you want to include a quick poll. At the bottom of your Teams app, click Forms.
- Add your question and options, and then click Next.
- Preview your poll, and then click Edit if you want to make changes, or click Send if you’re ready to post it.
Can you create a survey in Excel?
If you need to create a survey, form, or questionnaire, Office 365 has you covered. You can use Excel Online to create a survey with a shareable link that saves responses in a back-end spreadsheet, allowing you to analyze your data however you wish.Click the new button and choose Excel survey. Enter a survey title.
How do I create an email survey?
Here’s the basic process for creating an Outlook survey:
- Create a new email.
- Write your survey text in the new email.
- Choose your preferred voting option from the available list or customize your own.
- Choose your preferred tracking and reminder options.
- Send the poll and monitor responses.
How do I create a feedback form in Outlook?
To design an Outlook form
- On the Developer tab, in the Custom Forms group, click Design a Form, and then select the standard form on which to base your custom form.
- Add the fields, controls, and code that you want to your new form.
- Set form attributes for the custom form.
- Publish the form.
How do you insert a survey into an email?
5 and 1/2 easy steps to embed a survey in your email newsletter using Google Forms
- Step 1: Create a survey using Google Forms.
- Step 2: Send the survey to your Gmail account.
- Step 3: Obtain HTML code for your survey.
- Step 4: Prepare the code for the survey for your newsletter.
- Step 5: Insert the survey in your newsletter.
Over the years, I’ve received my fair share of bad surveys. These tend to be easier to identify than good ones — in fact, you’ve probably taken some bad surveys yourself.
The questions are often poorly-worded and tend to drag on forever. As a result, you might find yourself unable to complete them due to boredom, frustration, or the time investment required.
Good surveys, on the other hand, are seldom forgettable. The best experience you can aim for as the creator of a survey is for the respondent to a) finish and submit the survey, and b) think, «Well, that was tolerable.»
Are you ready to learn how to create good surveys that your customers will actually fill out to provide you with valuable feedback? Below are a few tips that will help you develop interesting and valid surveys along with specific tools you can use to create them.
- Choose the right platform.
- Make the survey as short as possible.
- Don’t ask ‘yes’ or ‘no’ questions.
- Randomize your answer options.
- Keep your question text neutral.
- Use matrix questions judiciously.
- Align questions and answers to each type of respondent.
- Include a ‘red herring’ question to weed out inattentive respondents.
In a few straightforward steps, you can create a survey that gets your team the information you need while keeping your respondents engaged throughout the entire survey.
Step 1: Choose the right platform for the survey.
Creating a proper survey starts with choosing the right platform. For example, if you’re trying to survey your Facebook fans, your survey should probably live on Facebook. On the other hand, if you want to email your customers a survey, you’ll want to make one using Google Forms.
Additionally, think about how you want to use the data. For example, if you’re collecting a ton of data that you want to break out and analyze, you should create your survey using Microsoft Forms so you can download the results as a spreadsheet.
Step 2: Make the survey as short as possible.
Focus on what’s really important. What data do you need to make your argument, launch your campaign, or change a product? Extraneous, «good to know» questions bog down surveys and dim their focus. Remember that your survey respondents don’t really care about what is interesting to you or your company — they care about how quickly they can finish the survey.
It’s important to note that drop-offs happen more with longer surveys. So what would your boss prefer: A nice and thorough survey with only 15 completed responses, or a shorter, tighter survey with 200 responses? Probably the latter.
If your survey is on the longer side, guide your respondents through the sections. Let them know what you’re going to ask them. Give them cues when they’re almost done, something like («In this last section, we’re going to ask you …»). If your survey tool allows it (Google Forms does), show them a progress bar to know how much of the survey is left. And always thank them for taking the time to give feedback.
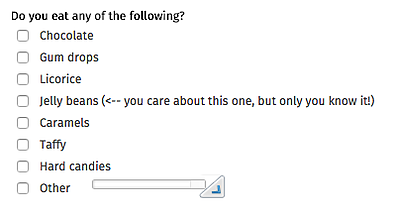
Step 3: Avoid «Yes» or «No» questions.
Because of psychological bias, respondents tend to answer yes when asked a «yes» or «no» question (unless you ask if they’ve done something wrong).
Instead of asking directly, try to get at the answer in a more roundabout way. For example, give them a list of options and ask if they use or know any of the items listed. Only let respondents move on if they happen to select the item(s) you are interested in. Then, you can be sure the people who answer your question are more likely to be honest with their responses.
Don’t do this:
Do this:
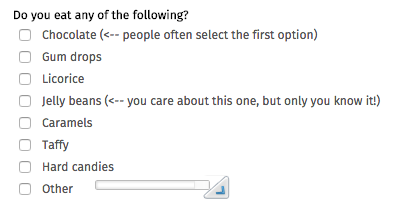
Step 4: Randomize your answer options.
There’s also a first-choice bias in surveys, where people automatically click the first answer listed. It’s prevalent in «select all that apply» type questions. Randomizing your options helps combat a survey taker’s tendency to check the first option they’re given.
Most survey tools will allow you to anchor options such as «Don’t know» or «None of the above» at the bottom of the list and exclude them from randomization.
Not so great:
Great:
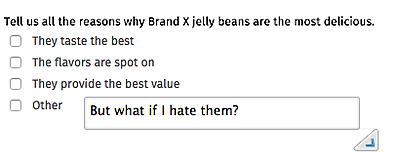
Step 5: Keep your tone neutral.
Asking leading questions can influence your respondents to answer a certain way. If you publish your results where the question is visible, your readers may question the validity of your data.
Here’s an extreme example to show you what I mean:
«Don’t you think product X is amazing in the following ways? Yes, it is amazing because of x. It’s amazing because of y. It’s amazing because of z.»
Instead, ask:
«How would you rate product X on a scale of 1 to 5?»
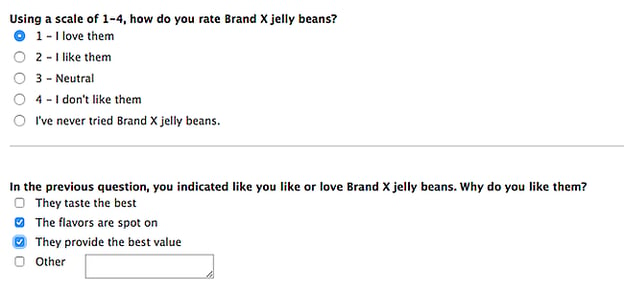
And if you want to know what specifically they like, you can follow up with people who answer 4 or 5 on why they love it. Of course, you can do that with the people who answer the lower ratings, too. This gives you way more actionable data on what people love about your product and what you need to work on.
Here’s an example of a leading question:
Here are two neutral questions that will yield unbiased feedback:
Step 6: Use matrix questions judiciously.
Your survey should not have more than a few matrices. These are for asking complicated questions — so only use them for important questions
Additionally, each matrix should have no more than seven row or header options to prevent survey recipients from being visually overwhelmed.
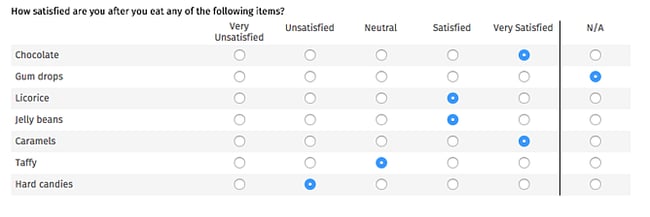
An example of a manageable questionnaire is shown below:
This one, on the other hand, is intimidating:
Step 7: Align questions and answers to each type of respondent.
You may live and breathe your product or industry, but you should not assume your survey respondent knows what you’re talking about.
It never hurts to give examples and explain concepts or jargon to educate respondents who are less knowledgeable than you. Likewise, make sure you provide answer options that give your respondent an out if they don’t know an answer.
An example of this is asking whether someone’s team got bigger or smaller. While it may seem innocuous on the surface, you’re actually excluding some possible answers. For example, maybe the respondent’s team stayed the same, or the respondent is a new hire and does not know how big the group was a year ago. So make sure you have options those people can select.
This question limits respondents to just two options:
This question includes more options that respondents can choose from:
Step 8: Include a «red herring» question to weed out inattentive respondents.
As a quality check, you can ask a simple demographic question at the beginning and end of each survey. This is especially important when you’re designing longer surveys — because you may be surprised (and dismayed) to see how many respondents forget what country they’re from or how many employees their company has.
You shouldn’t always toss out respondents based on just the red herring mismatch, but you can use it in conjunction with other checks to validate the quality of a respondent’s answers. For example, only remove a response if the survey taker failed the red herring and answered «Don’t know» for 5 out of 10 questions in your survey.
Now that you know what makes a good survey, it’s time to learn how to start creating one. So keep reading to learn how to create surveys in Microsoft Excel, Microsoft Word, Google Forms, Facebook, or SurveyMonkey.
How to Make a Survey in Microsoft Forms
- Log into your Microsoft Office 365.
- Select ‘Forms’ from the starting menu in the upper left-hand corner of OneDrive.
- Give your form a title and a description that recipients will read.
- Select the type of answer that recipients will submit.
- Fill in the questions and repeat this process until your form is complete.
- Send it to recipients using the ‘Share’ button in the upper right-hand corner.
Creating a survey in Microsoft Forms is simple. Simply log in to your Microsoft Office 365 account, create a new form, and add your questions. Here’s a step-by-step guide on how to do it.
Step 1: Log into your Microsoft Office 365 account.
You can set this up on OneDrive, or create one for free.
Step 2: Select «Forms» from the starting menu in the upper left-hand corner of OneDrive.
Select Forms survey to get started creating a new survey.
Step 3: Name your form and add a description.
Then, click Add question.
Step 4: Select the types of answers that recipients can choose from.
Options include multiple-choice, text, a rating system, etc.
Step 5: Fill in the questions.
Make sure you toggle the Multiple answers or Required buttons, if applicable.
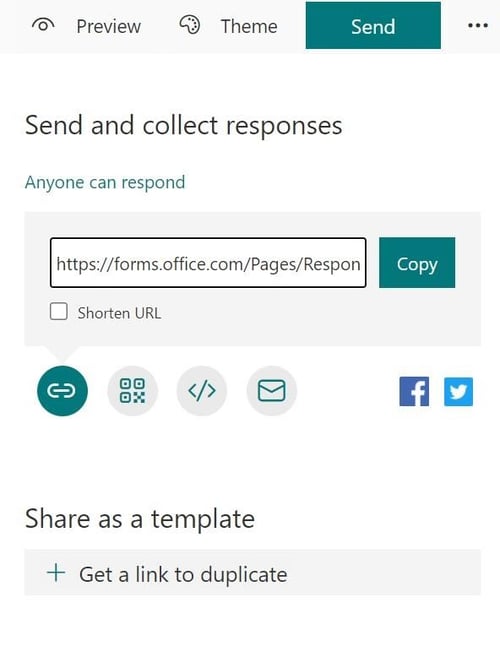
Step 6: Send the survey to recipients using the «Send» button.
You can send the survey via email, link directly to it, or embed it on a web page.
How to Make a Survey in Microsoft Word
- Start with a blank document or search for ‘Form’ in the templates gallery.
- Show the developer tab.
- Click where you want to add content to your survey, then choose the type of control for the survey field.
- Input instructional text or drop-down menu options.
- Click the ‘Review’ tab, click ‘Protect,’ then select ‘Protect document.’
- Share your form with recipients.
If you need to disclose information to your respondents before or after they complete your survey, create it in Microsoft Word. This way, you can add text, images, or other visual aids that may help respondents answer the survey questions more accurately.
Step 1: Start with a blank document or search for «Form» in the templates gallery.
Choose the template that best meets your needs, and click Create.
Step 2: Find the developer tab.
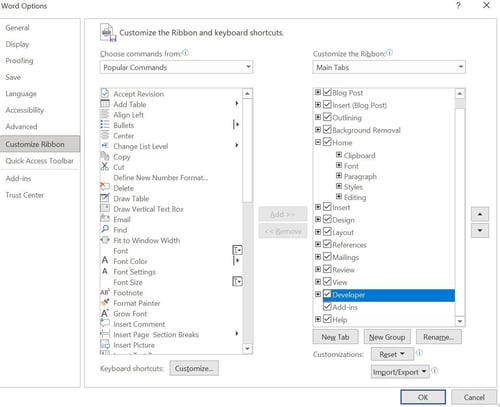
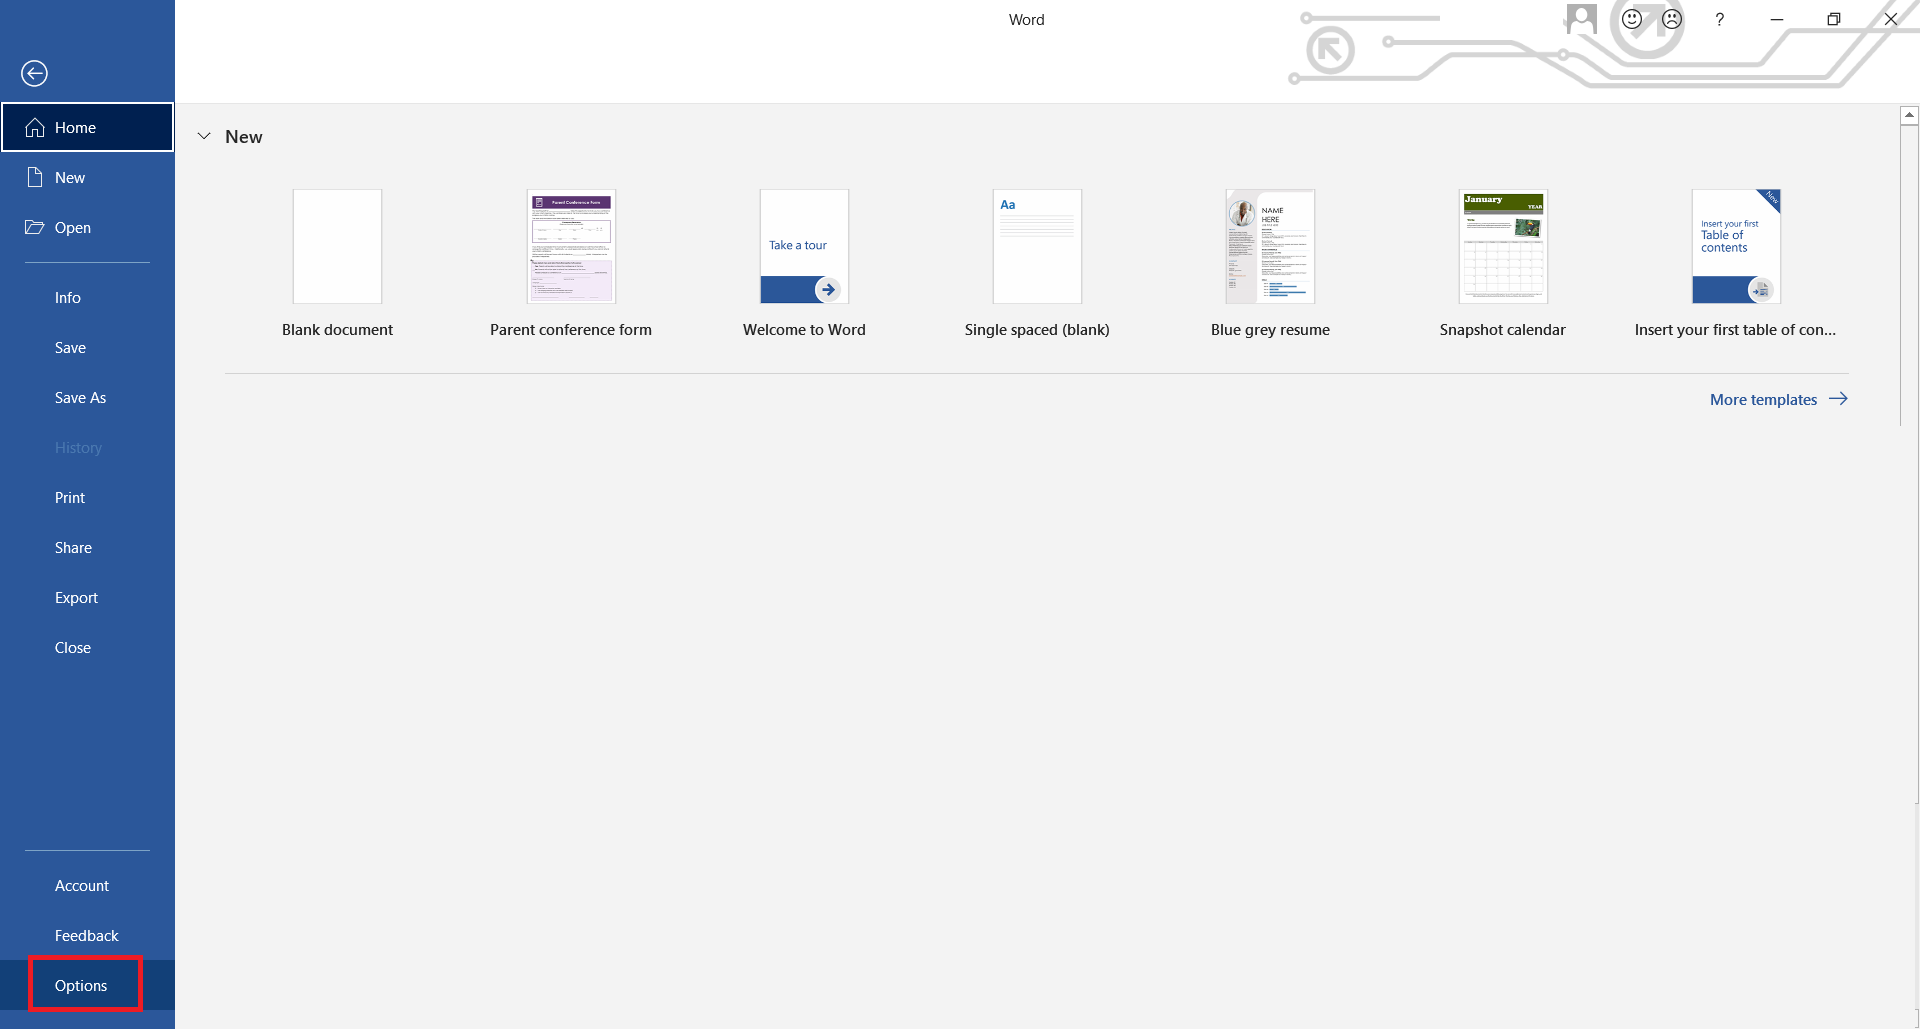
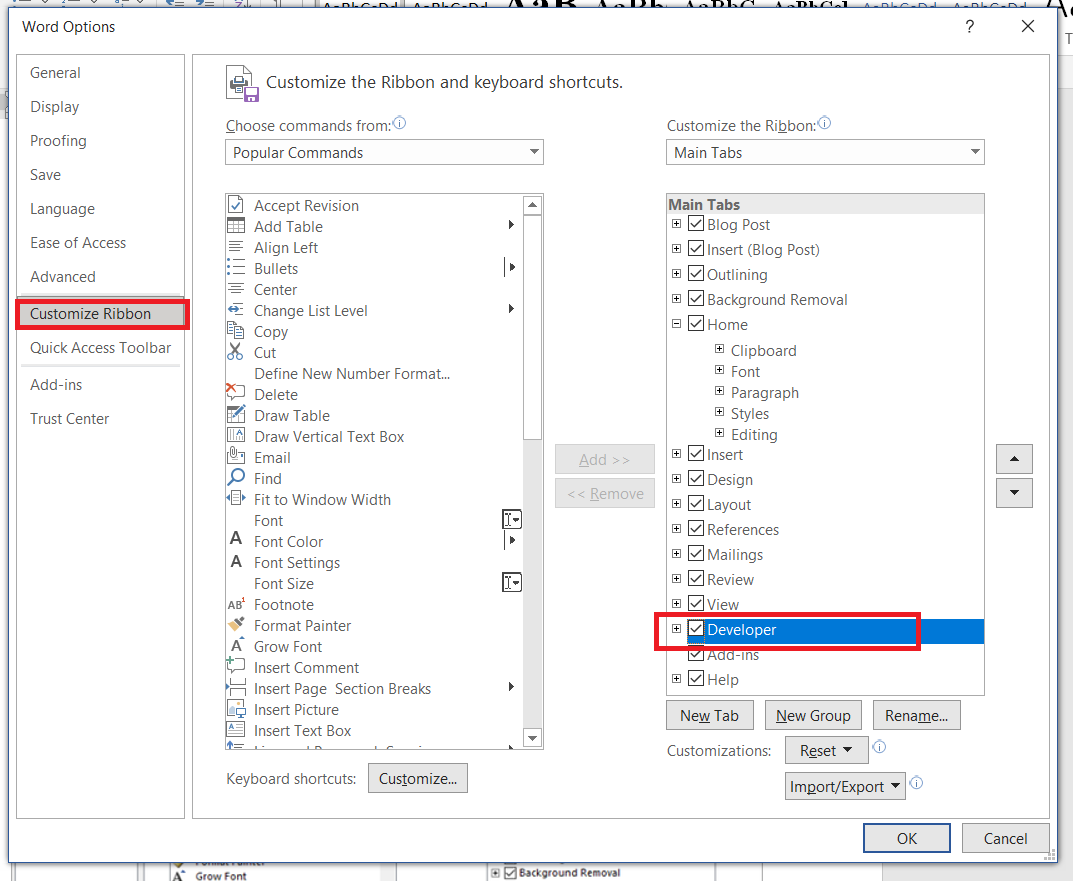
Find the developer tab on a PC by clicking File> Options > Customize Ribbon > Main Tabs > Developer > OK.
Show the developer tab on a Mac by clicking Word > Preferences > Authoring and Proofing Tools > View > Show developer tab.
Step 3: Add content to your survey then choose the type of control for the survey field.
For example, if you want respondents to type in an answer, choose Text Box, or if you want respondents to select from a group of answers, select Combo Box. (The control will appear as a grey box in Word.)
Step 4: Input instructional text or drop-down menu options.
This will allow respondents to choose between a set of answer options.
Step 5: Click the «Review» tab, then «Protect,» and select «Protect Document.»
That will protect recipients from editing the questions while allowing them to fill in their answers.
Step 6: Share your form with recipients.
Recipients can fill it out on a computer and print it, or print it then fill it out by hand.
Featured Resource: 5 Free Customer Satisfaction Survey Templates
Download Now
How to Make a Google Survey
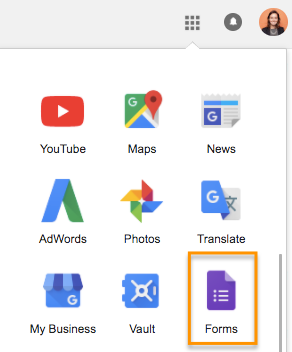
- Open your Gmail account menu and select ‘Forms.’
- Select a blank form, or use a template from the gallery.
- Name your survey and add a description.
- Create your form questions by selecting a question type.
- Add multimedia elements, sections, or unique formatting options using the sidebar menu.
- Adjust the form settings.
- Send the survey to your recipients.
You can use Google Forms to not only make your survey but also share it with respondents. Rather than including a link to the survey, you can simply include their email addresses and click send. This saves you a few extra steps, making the entire process quick and easy.
Step 1: Open your Gmail account menu and select «Forms.»
You may have to click More to see this option.
Step 2: Select a blank form, or use a template from the gallery.
Options include event feedback forms, time off request forms, and more.
Step 3: Name your survey and add a description.
Make sure the name of your survey is clear and spelled correctly, as this will be the most prominent wording on the form.
Step 4: Create your form questions by selecting a question type.
Then, you can begin entering options for recipients to choose or write in answers. (Make sure to toggle the Required button for mandatory answers.)
Step 5: Add multimedia elements, sections, or unique formatting options using the sidebar menu.
You can use this to rearrange or break up the order of different survey questions.
Step 6: Adjust the form settings.
You can include options to make the form include a quiz, a confirmation message, and collect recipients’ email addresses.
Step 7: Send the survey to your recipients.
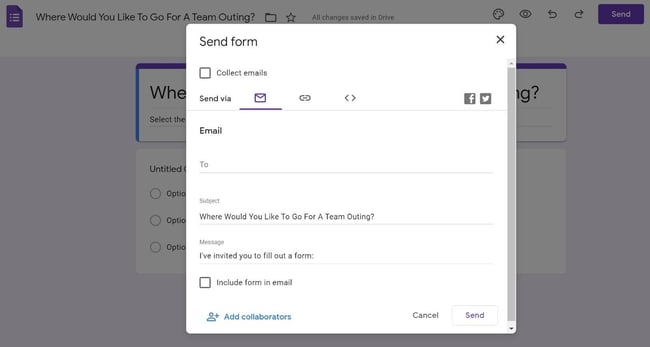
Add collaborators to your survey by clicking the Send button in the upper right-hand corner.
Featured Resource: 5 Free Customer Satisfaction Survey Templates
Download Now
How to Create a Survey on Facebook
- Enter ‘survey’ in your Facebook search bar.
- Select the ‘Use app’ button on the facebook page.
- Give the survey permission to use your profile information.
- Customize your survey questions and answer options.
- Name your survey.
- Customize your survey question and answer options.
- Preview your survey.
- Publish your survey on your profile or business page.
Facebook offers two options for creating surveys: a simple poll or the Survey app. The poll option only allows you to ask one question, whereas the Survey app allows you to customize and expand your survey to multiple different types of questions. Read below for instructions for creating both:
Step 1: Enter «Survey» in your Facebook search bar.
Under All results, select the first option called Survey. This should bring you to the app’s Facebook page.
Step 2: Select the «Use app» button on the Facebook page.
There should be an option at the top on the app’s Facebook page where you can Use App.
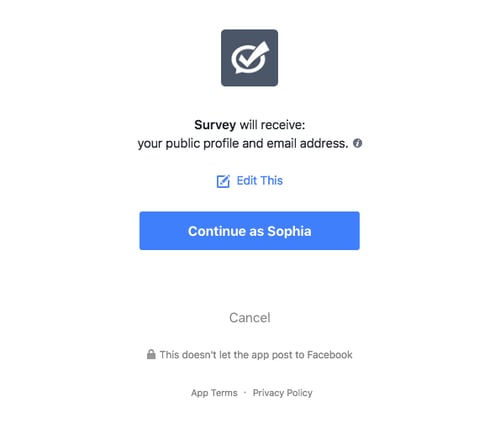
Step 3: Give the survey permission to use your profile information.
You’ll need to grant the app access to your Facebook profile before you can start using it. Don’t worry, it won’t post anything on your behalf unless you instruct it to.
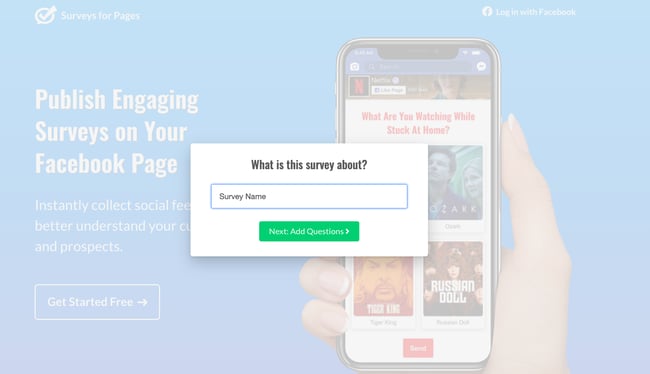
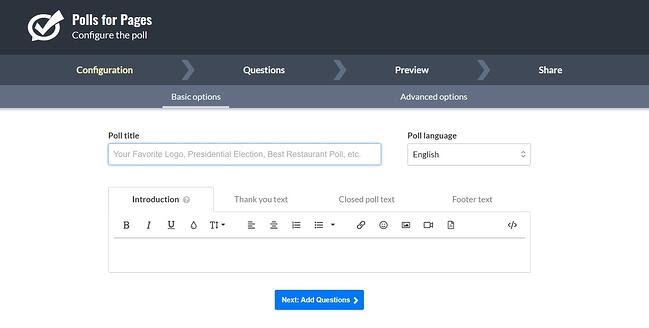
Step 4: Name your survey.
Now it’s time to name your survey. You can also edit this later in the setup process.
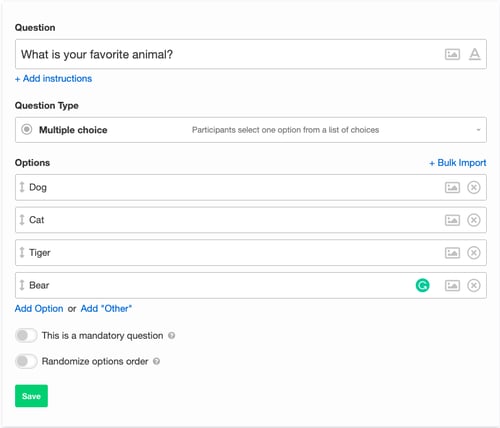
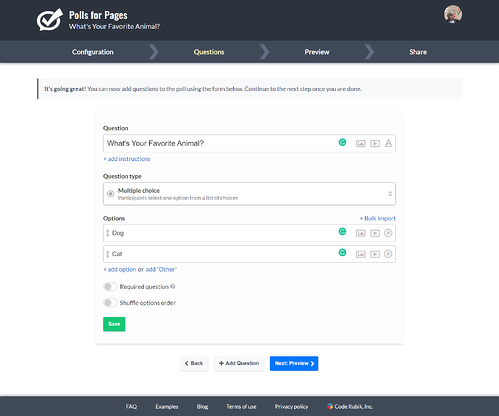
Step 5: Customize your survey question and answer options.
The next step is to start filling out your survey. Facebook’s surveys allow you to use all types of survey questions, and you can bulk import multiple-choice options using a rich-text field.
Step 6: Preview your survey.
Once your questions are filled out, you can preview your survey before publishing.
Step 7: Publish your survey on your profile or business page.
The final step is to publish your survey and make it live on your page. Again, you have a few options here. You can either create a unique post for your survey, share it via URL, or invite individual followers to complete it.
How to Make a Poll on Facebook
- Enter ‘poll’ in your Facebook search bar.
- Select the ‘Use app’ button on the Facebook page.
- Give the poll permission to use your profile information.
- Name your poll.
- Customize your poll question and answer options.
- Preview your poll.
- Publish your poll on your page.
Sometimes a survey may be too much of a hassle to collect the data you’re looking for. Opt for a Facebook Poll instead. With Polls, you can solicit feedback from your Page followers and fans on simple topics. With the click of a button, respondents can weigh in on any topic you choose to discuss. Plus, they’ll get to see an aggregate of the responses to know whether they’re in the majority or minority opinion
Step 1: Enter poll in your Facebook search bar.
Under the All results, select the first option called Poll. This should bring you to the app’s Facebook page.
Step 2: Select the «Use App» button on the Facebook page.
Select the Use App option.
Step 3: Give the poll permission to use your profile information.
You’ll need to grant Poll access to your Facebook profile before you can start using it. As with Surveys, it won’t post anything on your behalf unless you instruct it to.
Step 4: Name your poll.
Next, name your poll.
Step 5: Customize your poll question and answer options.
The next thing is to begin filling out the poll. The Poll app allows you to use different types of questions.
Step 6: Preview your poll.
Once the questions are filled out, you can preview your poll before posting.
Step 7: Publish your poll on your page.
Finally, publish your poll and make it live on your page. There are several options open to you. For example, you can create a unique post for the poll, share it via a link, or invite individuals to participate.
How to Create a Survey on SurveyMonkey
- Select the type of survey you want to create.
- Name your survey.
- Add or choose survey questions.
- Send your survey to respondents.
For longer surveys with more functionality and data analytics, try Survey Monkey. You can choose from a variety of question and response options making this survey platform applicable for virtually any type of research.
Step 1: Select the type of survey you want to create.
You can sign up for SurveyMonkey with a free or paid account. Then select how you’d like to begin building your survey. For this tutorial, we’ll be buid our survey from scratch.
 Step 2: Name your survey.
Once you’ve chosen which type of survey you want to deploy, name it and assign it to a category.
Step 3: Add or choose survey questions.
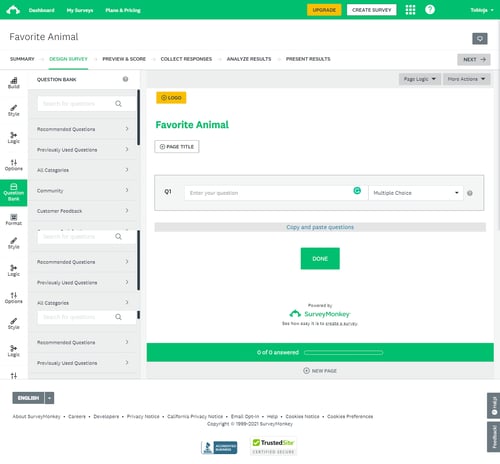
You can start typing in your survey questions, or you can choose from the questions SurveyMonkey recommends for the type of survey you’ve selected.
Step 4: Send your survey to respondents.
SurveyMonkey offers various options for deploying your survey, including the ability to buy responses from a broader pool.
Once you’ve selected your option, you’re ready to send your survey and start collecting feedback.
Create A Survey People Will Want to Take
If your respondents are taking the time to complete your survey, give them one that is interesting, neutral, and respectful of their time. Now that you have the best practices for how to create a survey, try making one today and see what insights you uncover about your audience.
Editor’s note: This post was originally published in August 2020 and has been updated for comprehensiveness.
Did you know that you can actually create surveys and interactive forms with just your regular MS Word application? Yes, we do know that Word documents don’t technically need these elements since it is “editable” when opened by another user (as long as they have a Word Processor). However, these are useful for instances where users want to add encryption to questions and content. It is also most useful as a secondary choice when PDF is not an available option.
Here is how you can create an interactive survey with Word
Step one: Enable Developer tools by clicking FILE then click OPTIONS.
A new window will appear, click CUSTOMIZE RIBBON, then tick the box beside DEVELOPER on the list.
Step two: A new tab will appear on your screen, which is the DEVELOPER tab. Click that tab and select DESIGN MODE. Once you enable this, you can now add a few interactive elements.
Step three: Add form elements by selecting the control contents. You can add a text box, a checkbox, a calendar, a drop-down list, and even an image.
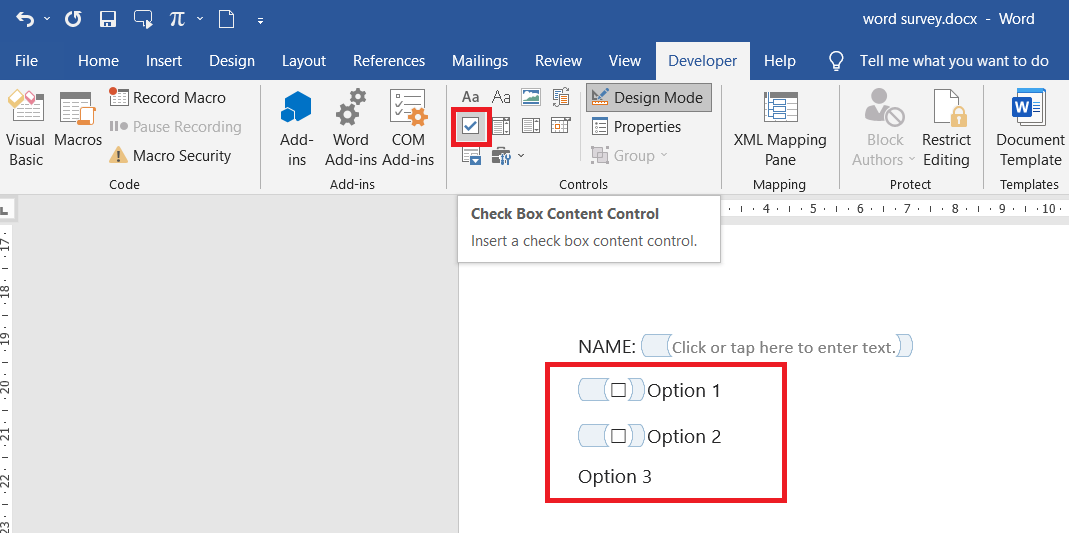
To place a checkbox, click the check icon and click where it should be placed. You can type the options on the left or the right side of the checkbox. The checkbox will look like a box inside a rectangular unit.
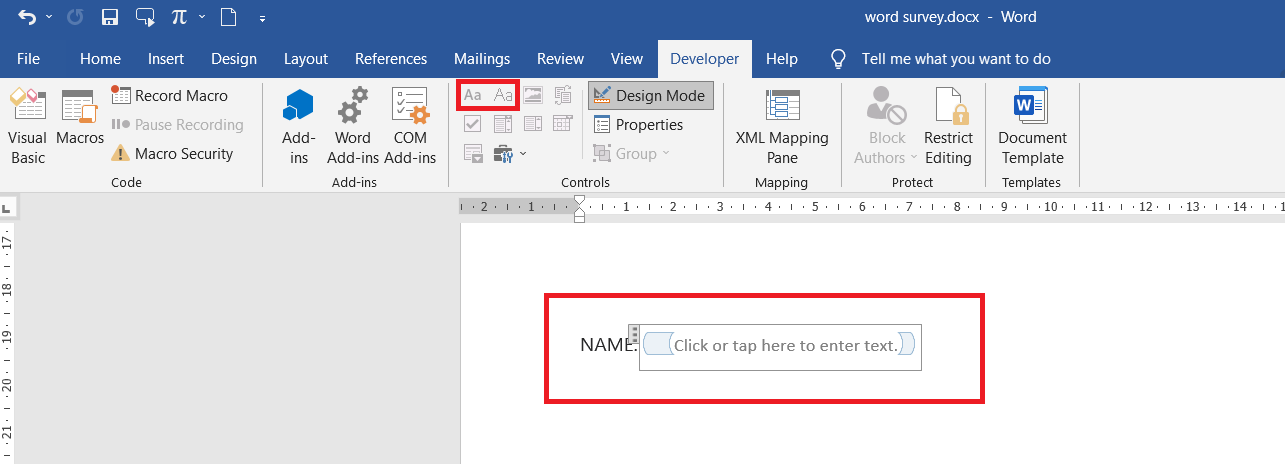
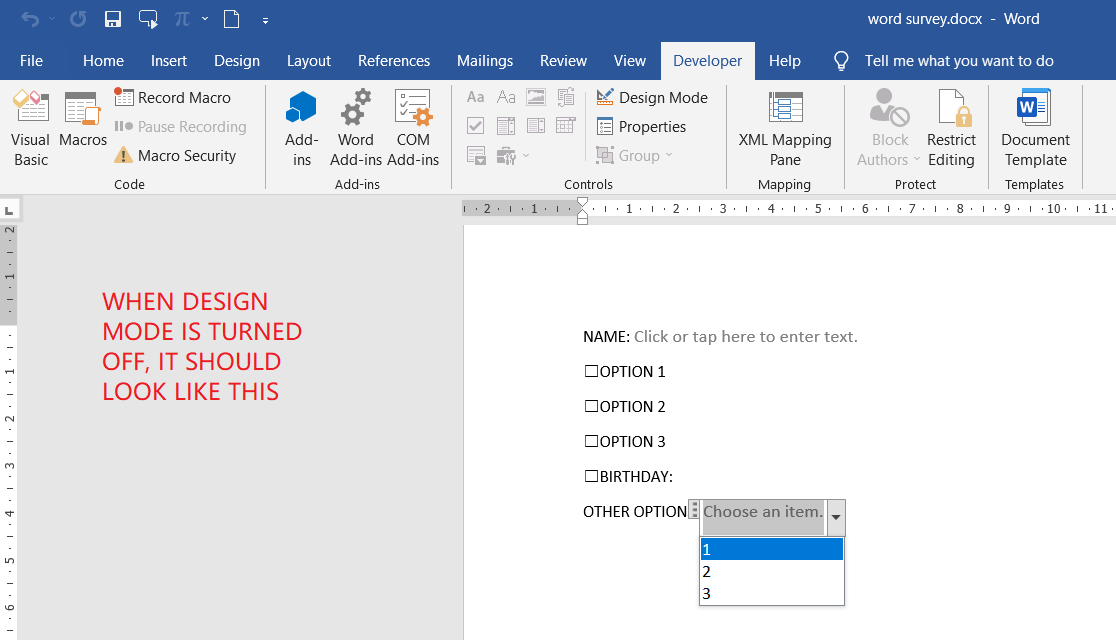
To place a text box, simply click where the text box should be placed then click the Aa icon. It will automatically create a rectangular unit that says “Click here to enter text.” (See figure below).
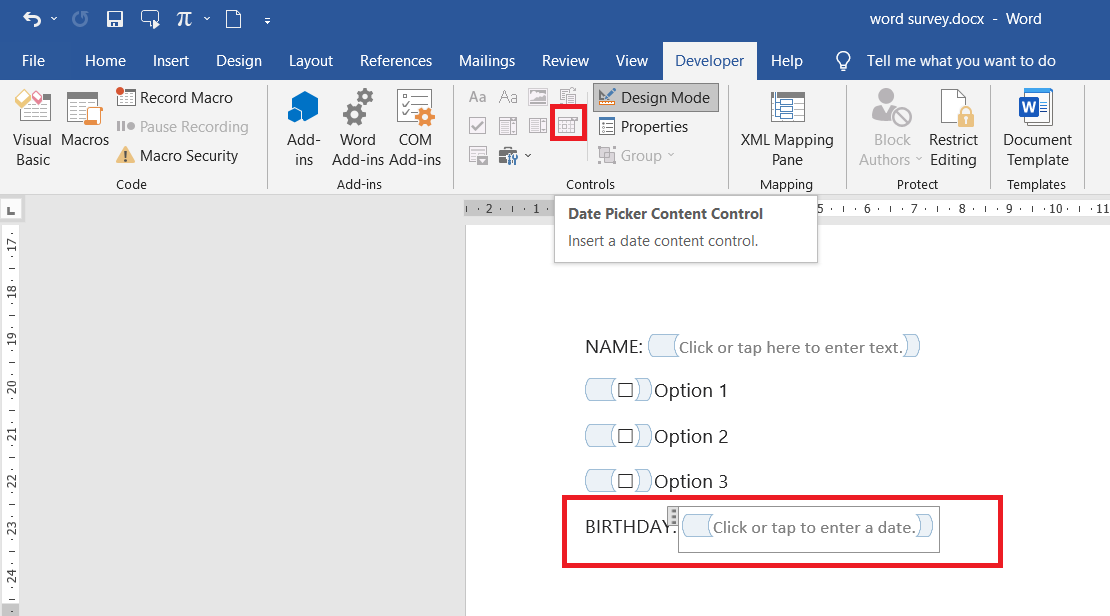
To place a date selector with a calendar, click the square icon that looks like a mini calendar. This icon is the date field.
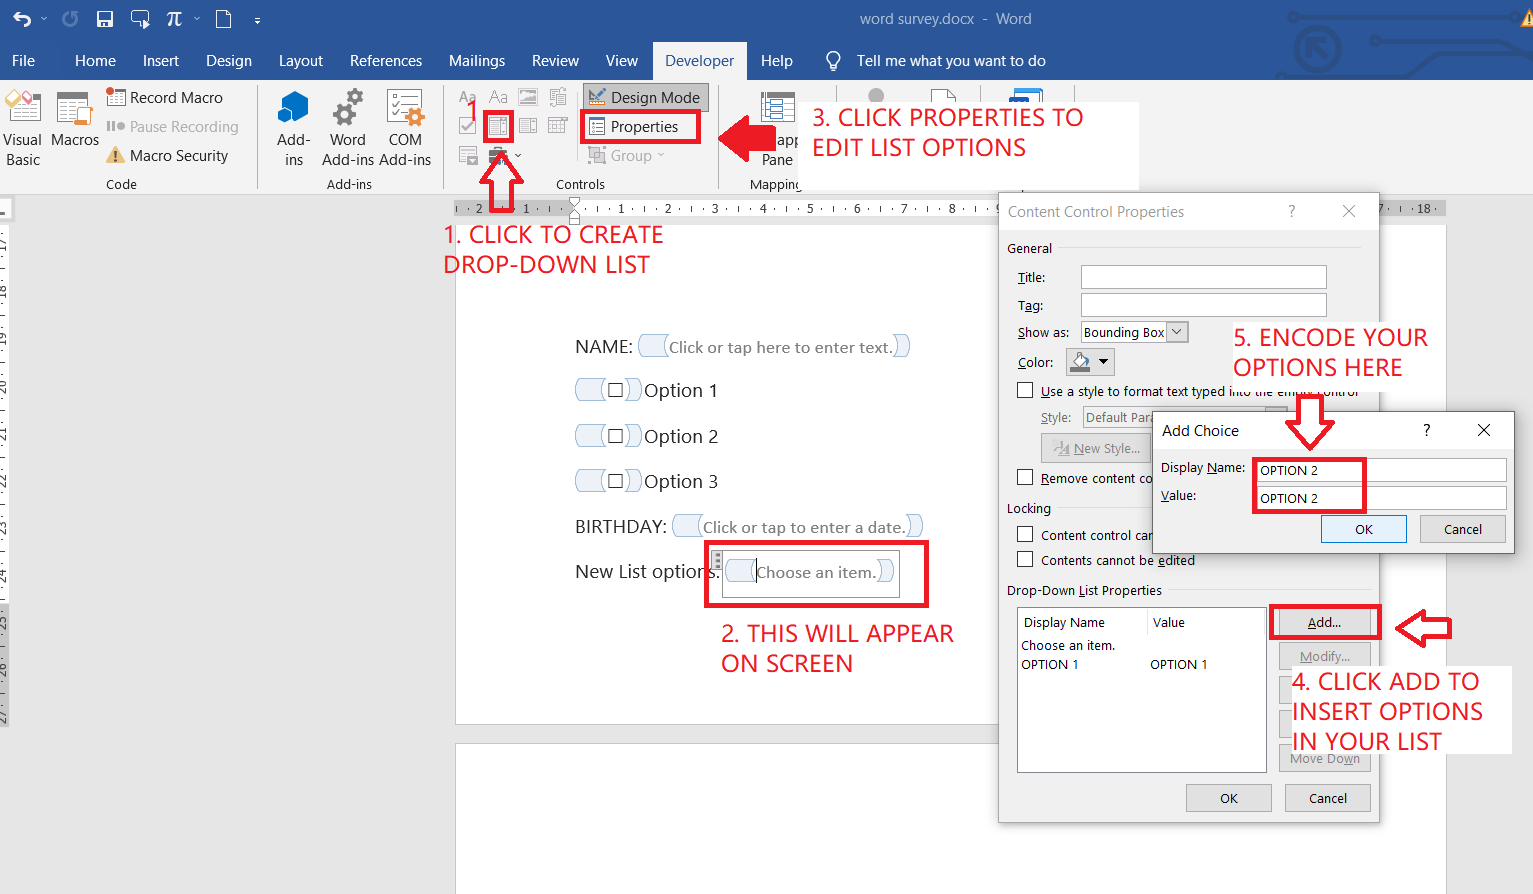
To place a drop-down list on your document, click the area where you will place the list then click the COMBO BOX CONTROL which is the icon beside the checkbox.
Modify the list by clicking PROPERTIES. A new window will appear on your screen. Click ADD to add more options in your list and encode the preferred content. You can also modify it by clicking on the item then click MODIFY.
Step four: Now that you’ve added all the elements you want, you can now turn off the DESIGN MODE by clicking it. Once you’ve turned it off, all elements should look like professional interactive form fields.
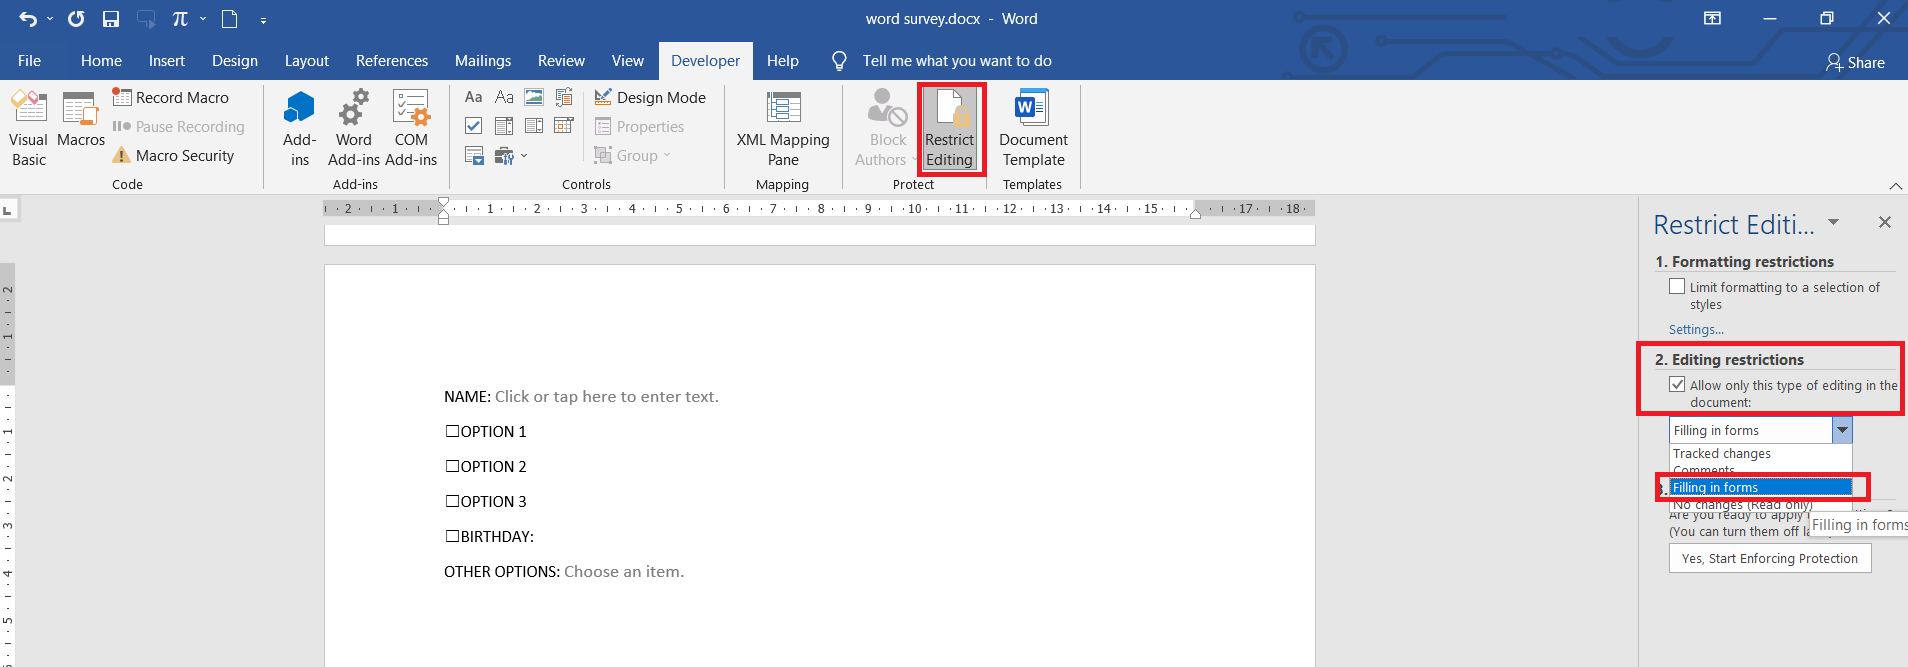
Step five: You can also encrypt and restrict editing of the questions and content by clicking RESTRICT EDITING under the DEVELOPER tab. Enable FILLING IN FORMS then click “Yes, start enforcing protection.”
Other methods of creating a fillable form
Word is convenient for basic users however if this document is needed for international purposes, PDF is still the way to go. If you save your survey in PDF, you will notice that all the elements made from the word will become flat and won’t be able to be “fillable.” To make it interactive, you will need a PDF editor to add the elements. Here’s how to do it with DeftPDF online. Don’t worry, it’s free!
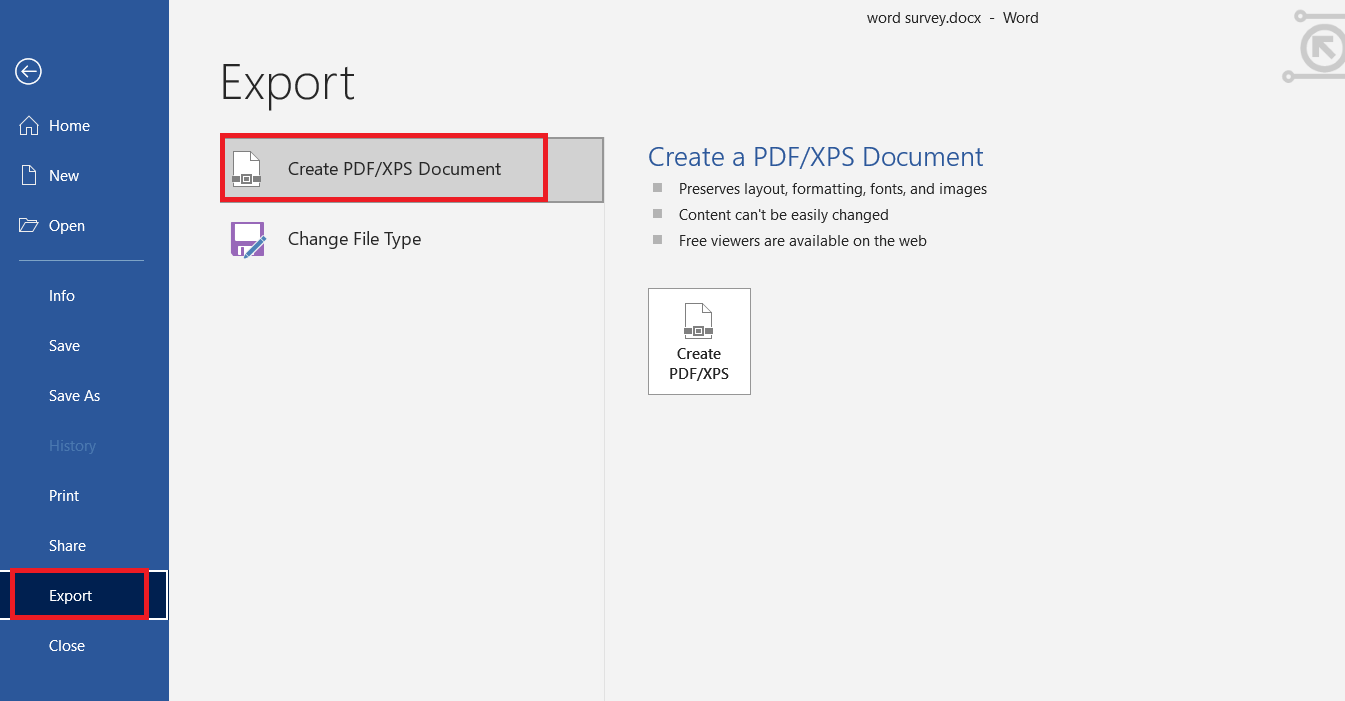
Step one: Save your form into PDF by clicking export to PDF.
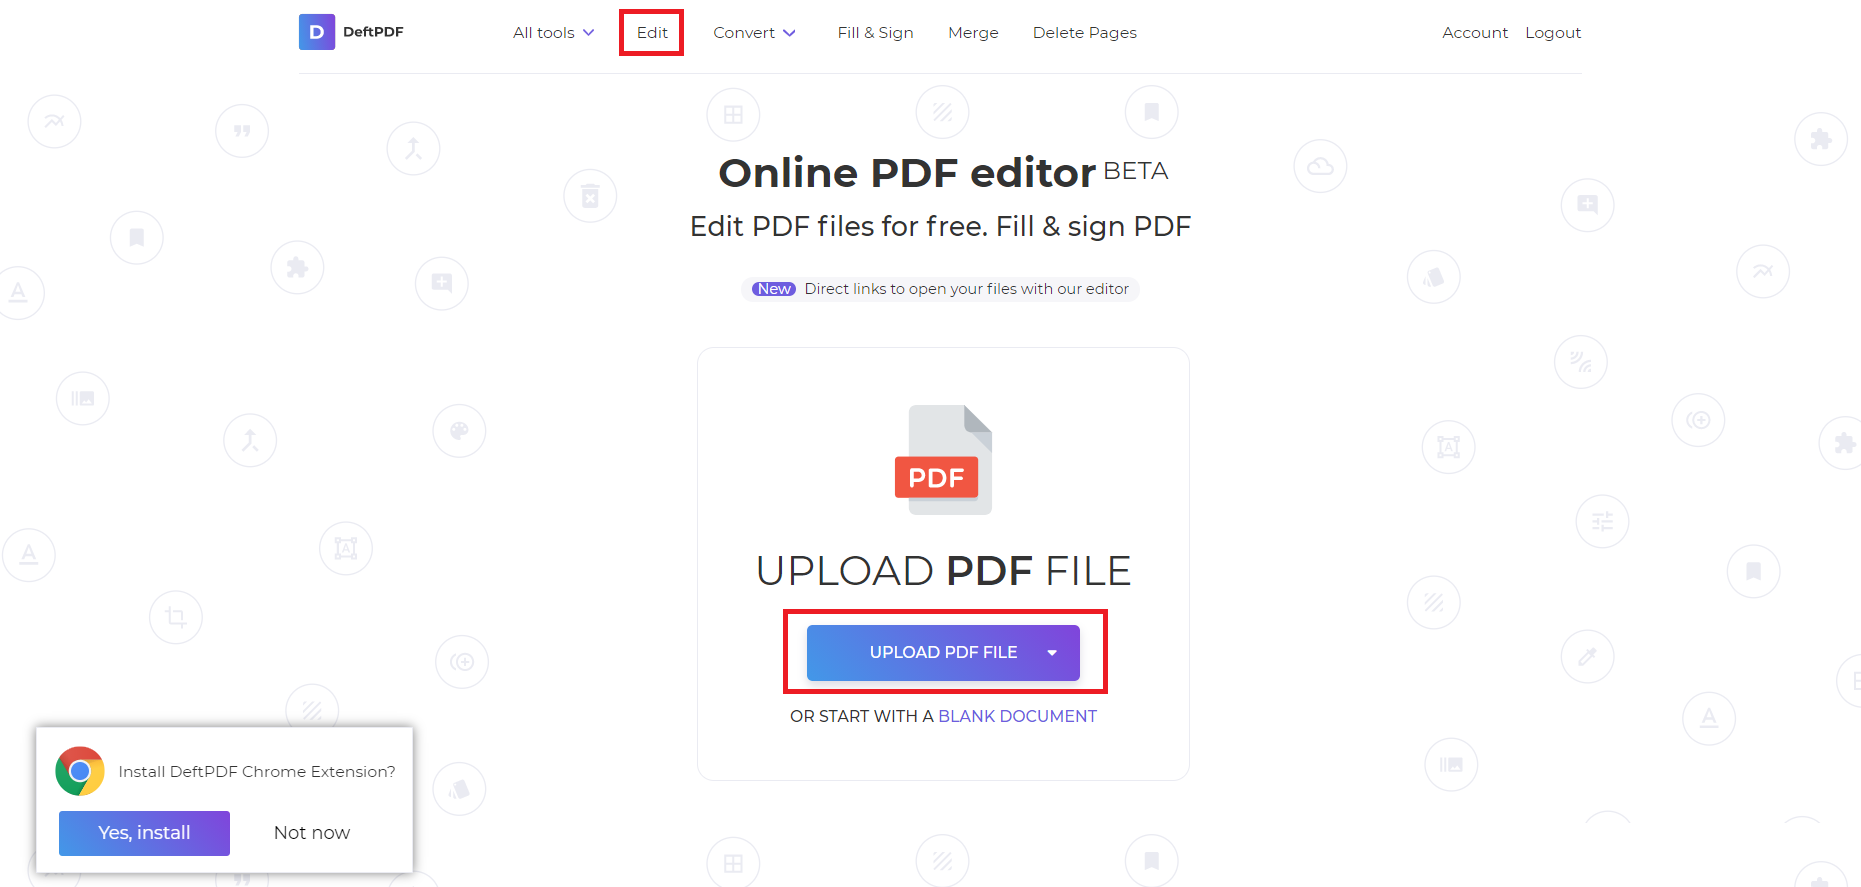
Step two: Upload your PDF file to DeftPDF’s editor
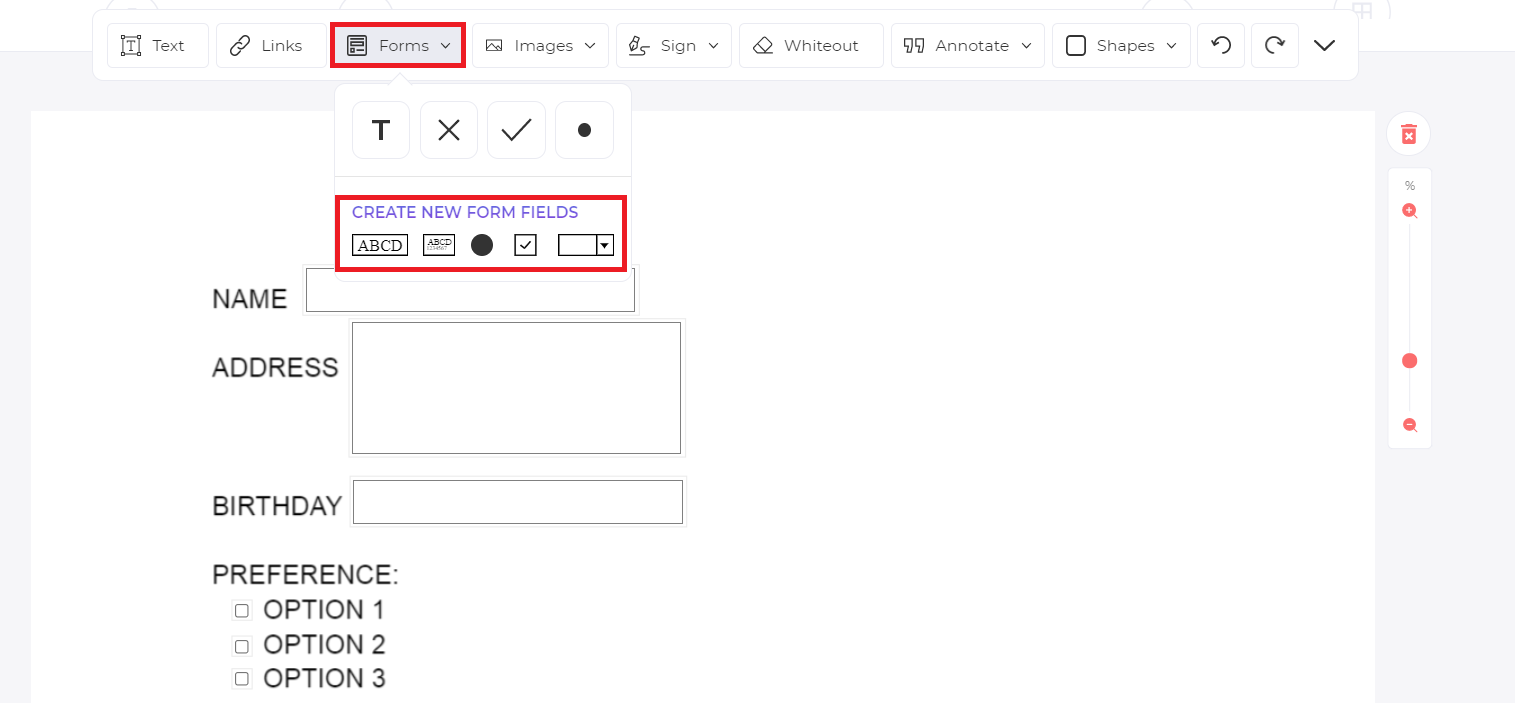
Step three: Add form elements by dragging and dropping them. Use the necessary form tools from the toolbar. You can add text boxes, checkboxes, radio buttons, a drop-down list,s and large text boxes for addresses.
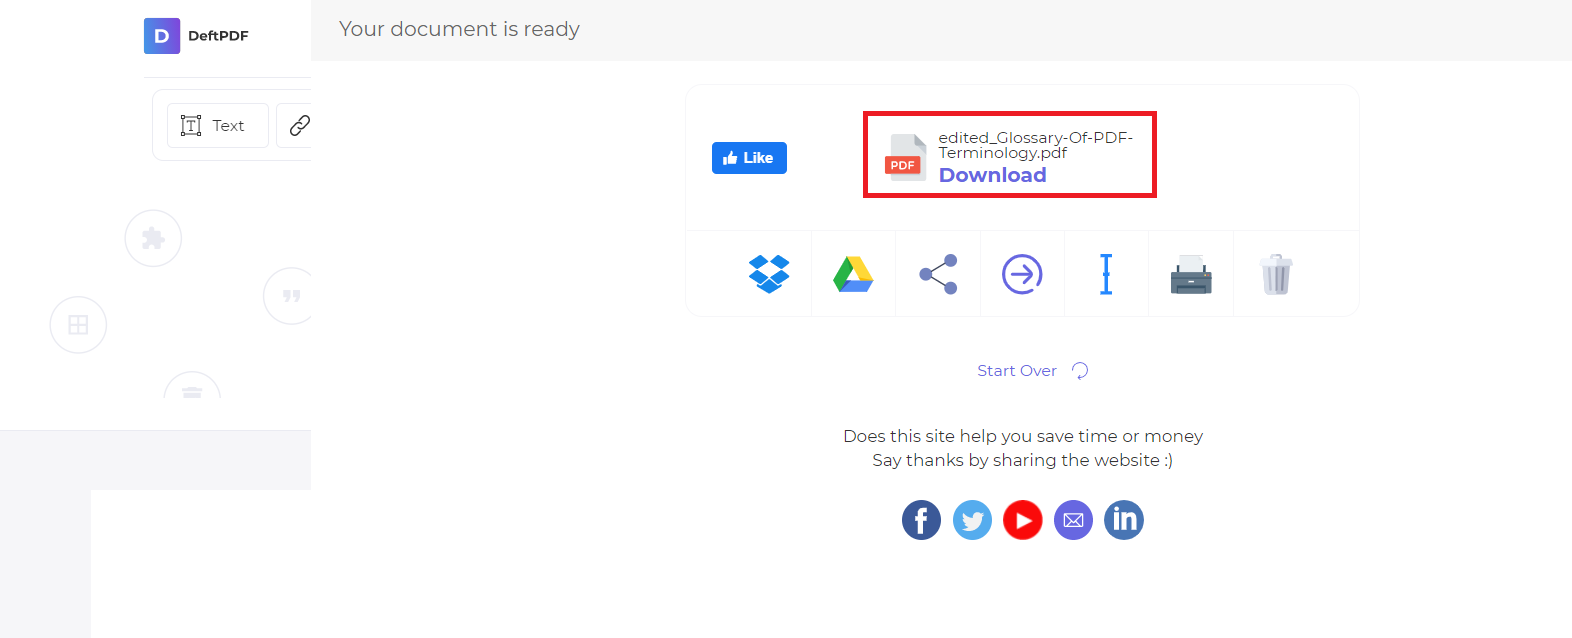
Step four: Save by clicking APPLY CHANGES then download to save your file into your computer. This will then provide you with a PDF document with fully interactive form fields.
Want to get updates and subscribe to our blog? Get weekly e-notifications by creating an account with us: DeftPDF online
Download Article
Download Article
This wikiHow will teach you how to create a questionnaire in Word on Windows and Mac computers. You cannot create forms that others can fill out using the web version, but you can create check boxes, text controls, date pickers, and drop-down lists from a computer.
-
1
Open Word and make sure the developer tab is visible. You’ll find this program in your Start menu.
- If you don’t see the developer tab, go to File > Options > Customize Ribbon > Developer (under Main Tabs).
-
2
Create a new document or choose a template. Go to File > New and, if you want a template, search «Forms» in the «Search online templates» text field.
Advertisement
-
3
Insert a text control. If you want to add a block or line of text, you’ll want to add a text control. Go to Developer > Rich Text Content Control or Developer > Plain Text Content Control.
-
4
Add a date picker. If you want whoever is filling out the questionnaire to be able to pick a date on a calendar, go to Developer > Date Picker Content Control.
-
5
Insert a checkbox. Go to Developer > Check Box Content Control.
- You can add almost any sort of question and answer form from the Developer tab. Experiment with the types of questions and answers you can add to the questionnaire, then change or set their properties from Developer > Properties.[1]
- You can add almost any sort of question and answer form from the Developer tab. Experiment with the types of questions and answers you can add to the questionnaire, then change or set their properties from Developer > Properties.[1]
Advertisement
-
1
Open Word and make sure the developer tab is visible. You’ll find this program in the Applications folder in Finder.
- If you don’t see the developer tab, go to Preferences > Ribbon and Toolbar > Customize the Ribbon > Main Tabs > Developer.[2]
- If you don’t see the developer tab, go to Preferences > Ribbon and Toolbar > Customize the Ribbon > Main Tabs > Developer.[2]
-
2
Create a new document or choose a template. Go to File > New or New from Template and search «Forms» for the questionnaire template you want to use.
-
3
Add content controls to your form. From the Developer tab, you’ll be able to insert text boxes, check boxes, and combo boxes. Repeat this step to add as many content controls as you need to.
-
4
Change or set the options for each content control. Click to select a content control, then select Options to be able to set them. You can set common properties like Add Help Text to give hints at each field or set specific properties, like Drop-down enabled to let the user make selections from the menu.[3]
Advertisement
Ask a Question
200 characters left
Include your email address to get a message when this question is answered.
Submit
Advertisement
Thanks for submitting a tip for review!
References
About This Article
Article SummaryX
1. Open Word and make sure the developer tab is visible.
2. Create a new document or choose a template.
3. Insert a text control.
4. Add a date picker.
5. Insert a checkbox.
Did this summary help you?
Thanks to all authors for creating a page that has been read 45,743 times.


