
An interesting feature of Microsoft Word allows you to generate the summary of documents in one click. This is one of the first needs after writing a document. To do this, you must properly prepare for it during the writing of the content. This article summarizes in detail the easiest way to make a summary in Word.
Preparing the summary
The secret to making a summary in a few clicks is to plan it. Indeed, deciding to make one at the last minute, when your document is already finished, could require a little more work. How then to go about it? First of all, the ideal is to have the plan of your document with the titles and subtitles in focus.
Once you manage to identify them and their hierarchical level, you can start preparing the summary. The idea is to give them special formatting that will help Microsoft Word identify them as an item in the summary. It should be understood that Microsoft Word offers a hierarchy in terms of level of titles that it has labeled “Title 1”, “Title 2″… Within your document, all the titles of the same hierarchy must therefore have the same level of styles .
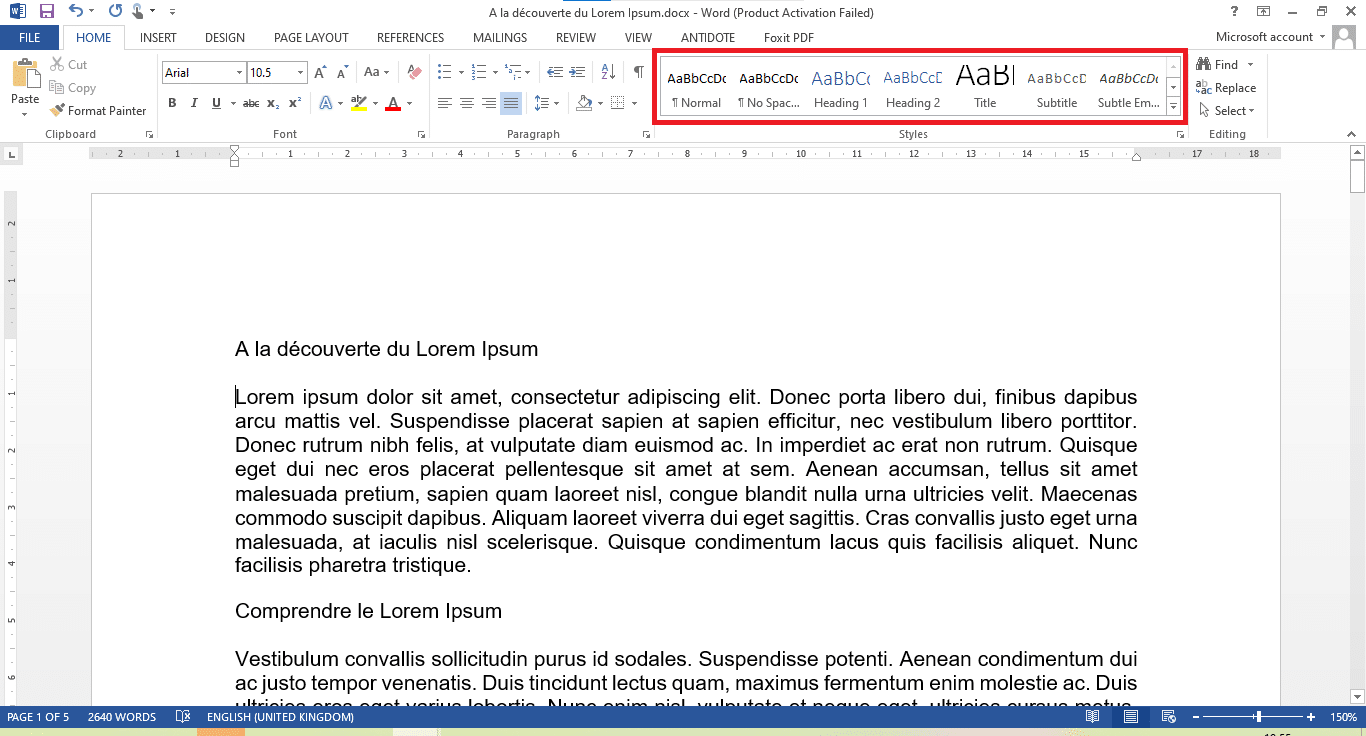
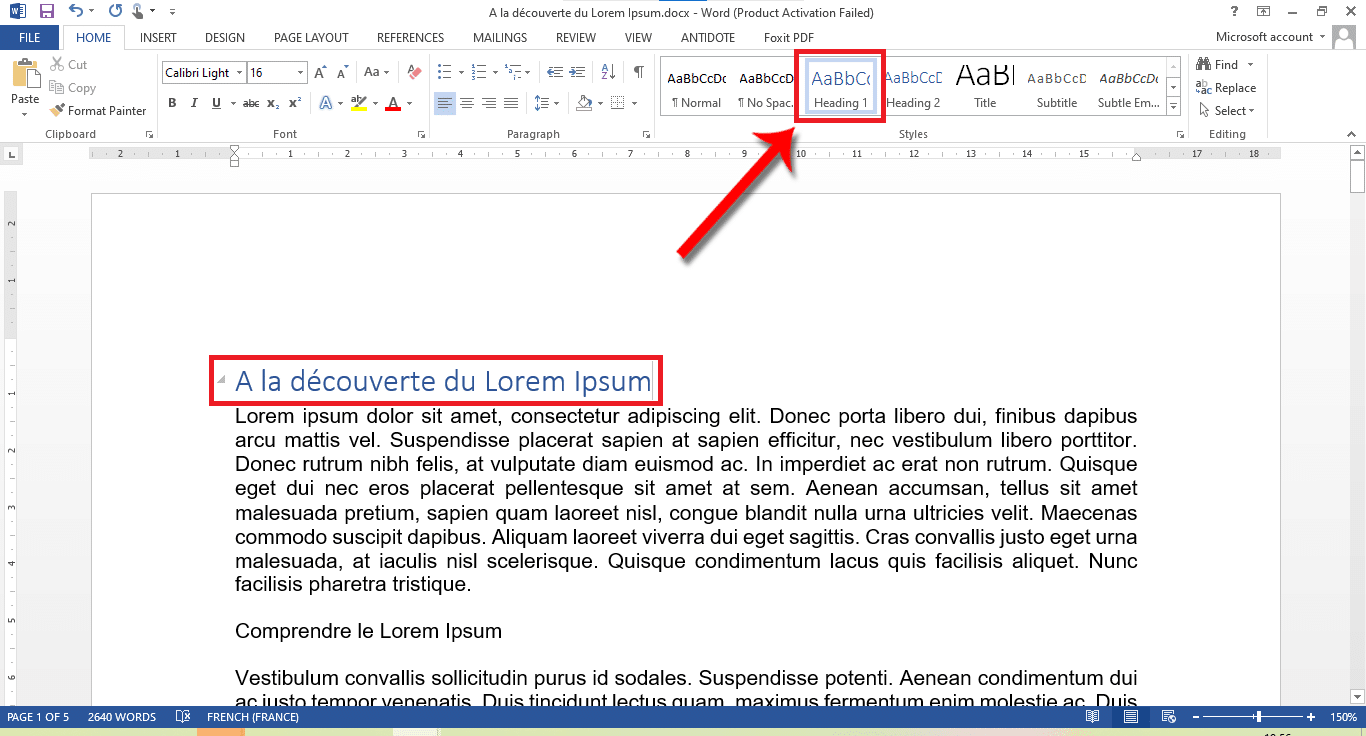
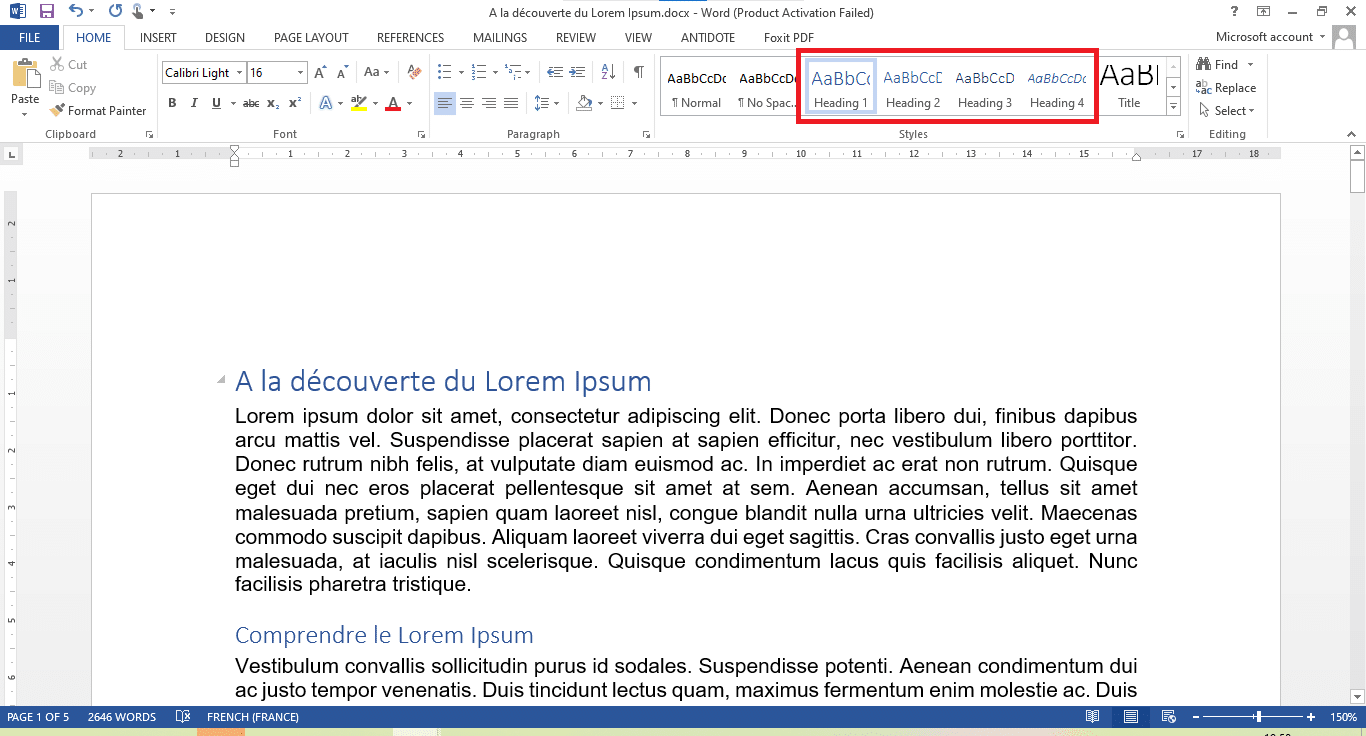
- To do this, when you get to the level of the first level headings, select the heading you are interested in and, in the styles section of the home tab, click on “Heading 1”.
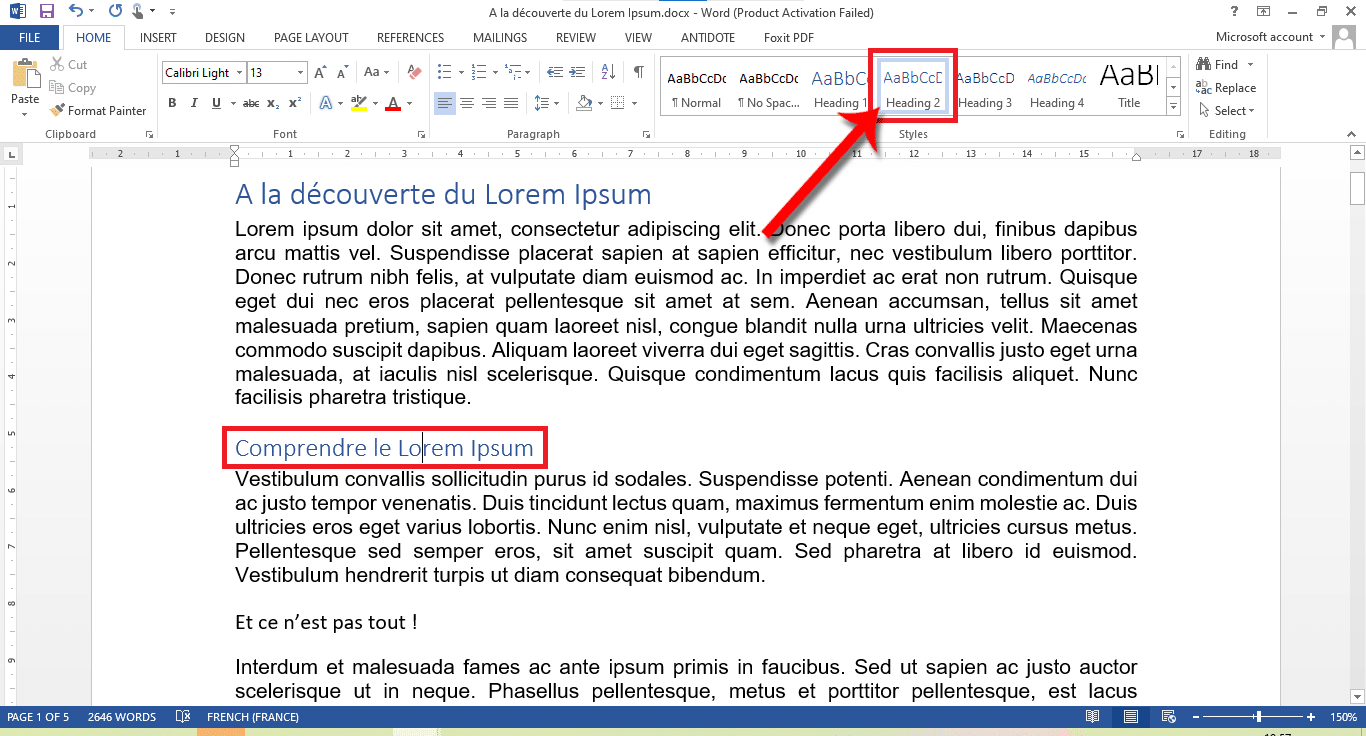
- Do the same for the second level titles, choosing “Title 2”.
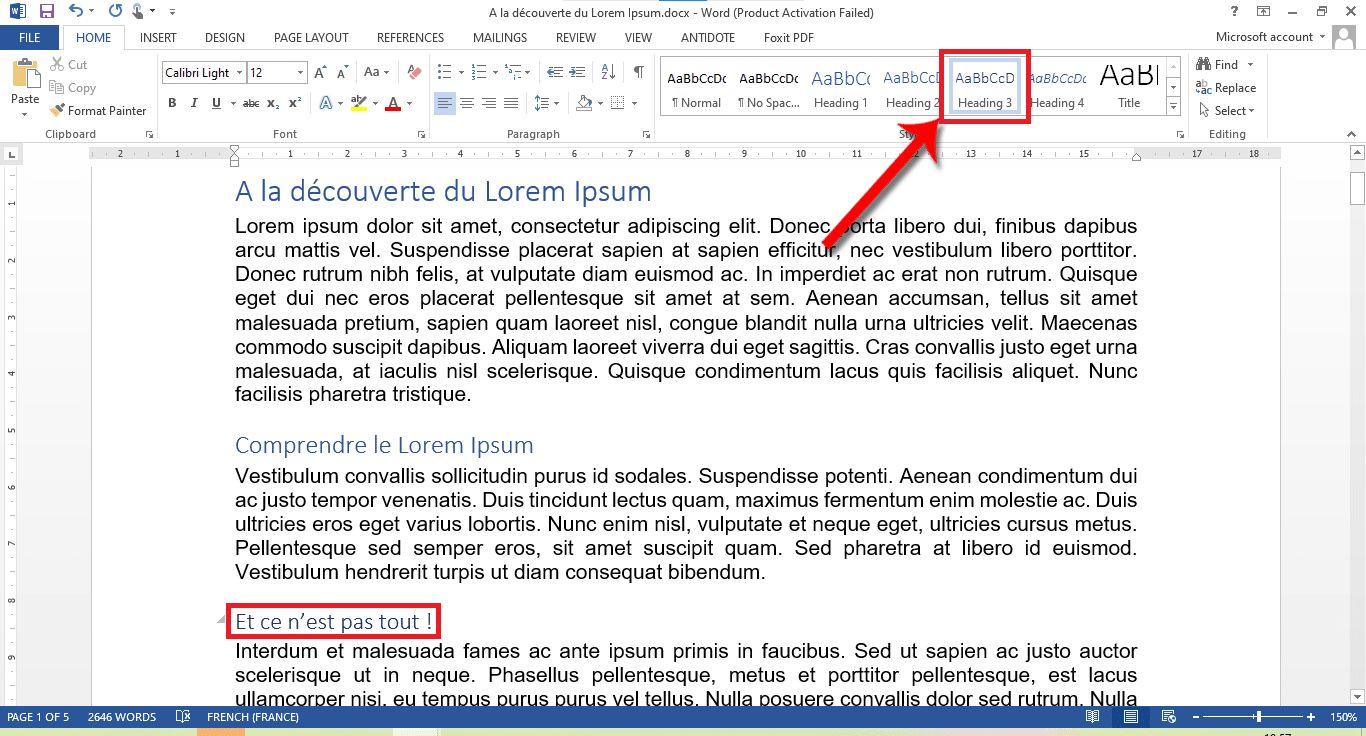
- Always proceed in the same way for level 3 titles, this time choosing “Title 3”.
Don’t worry if you don’t already see the “Title 3”, “Title 4” style… As you use a title level, the next title level will automatically unlock .
Changing the Appearance of Heading Styles
The proposed size, font and color do not suit you? No problem. You can customize them to your liking. It will suffice to:
- Right-click on the style concerned “Title 1”, “Title 2”… and click on “Edit / Modify).
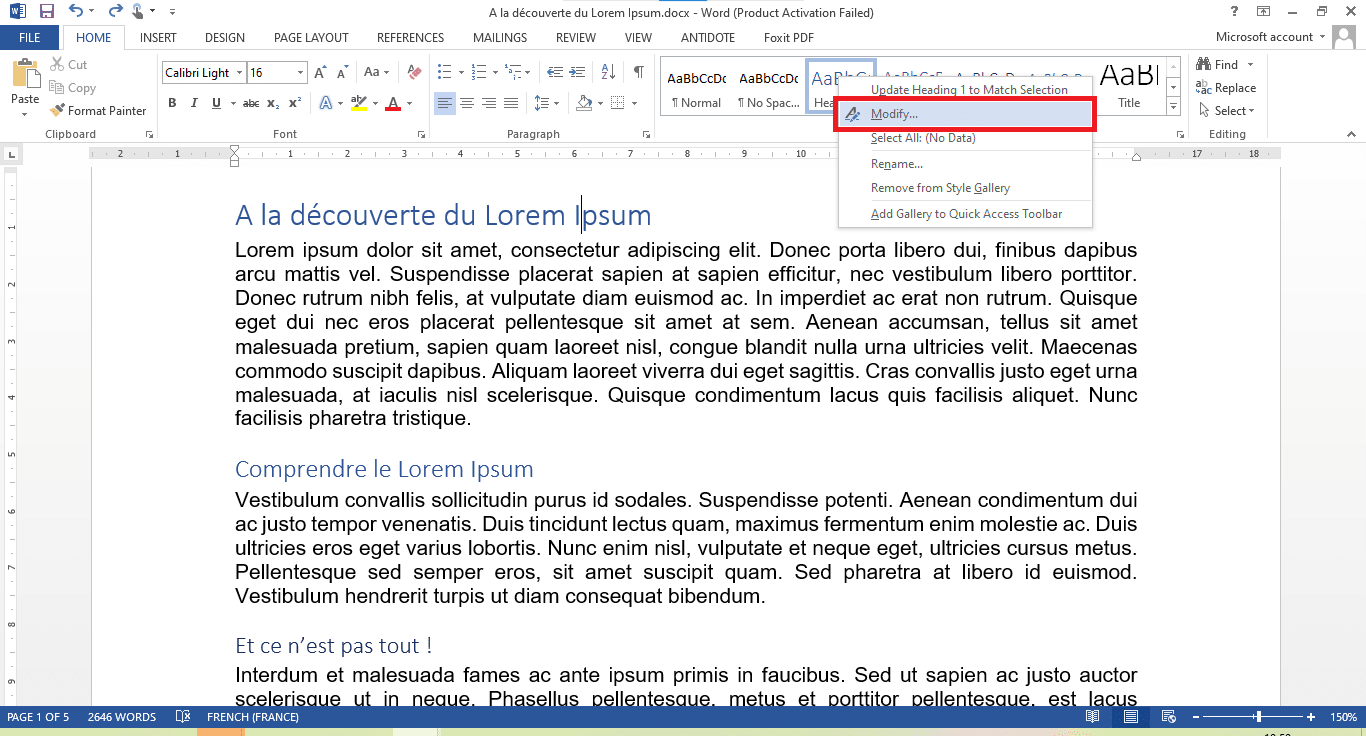
- The customization window for the chosen style will appear following this action. So go ahead as you see fit and end up clicking “OK”.
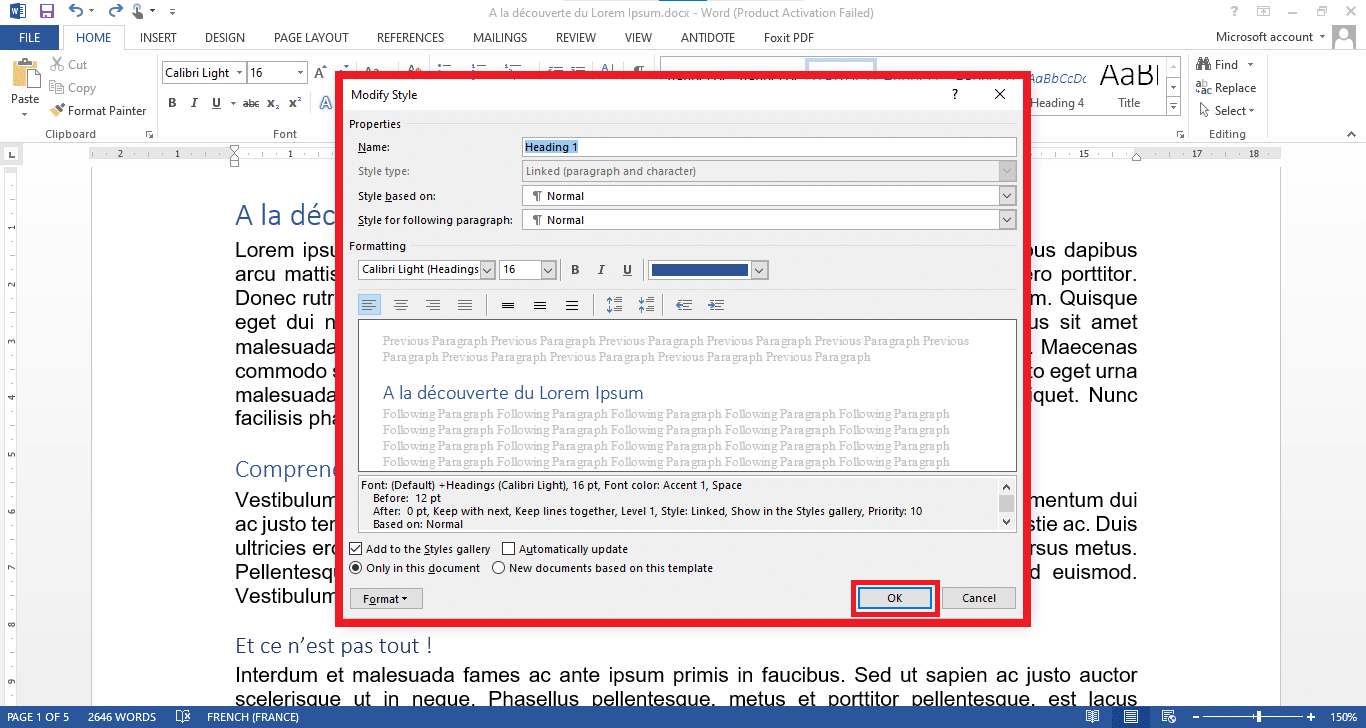
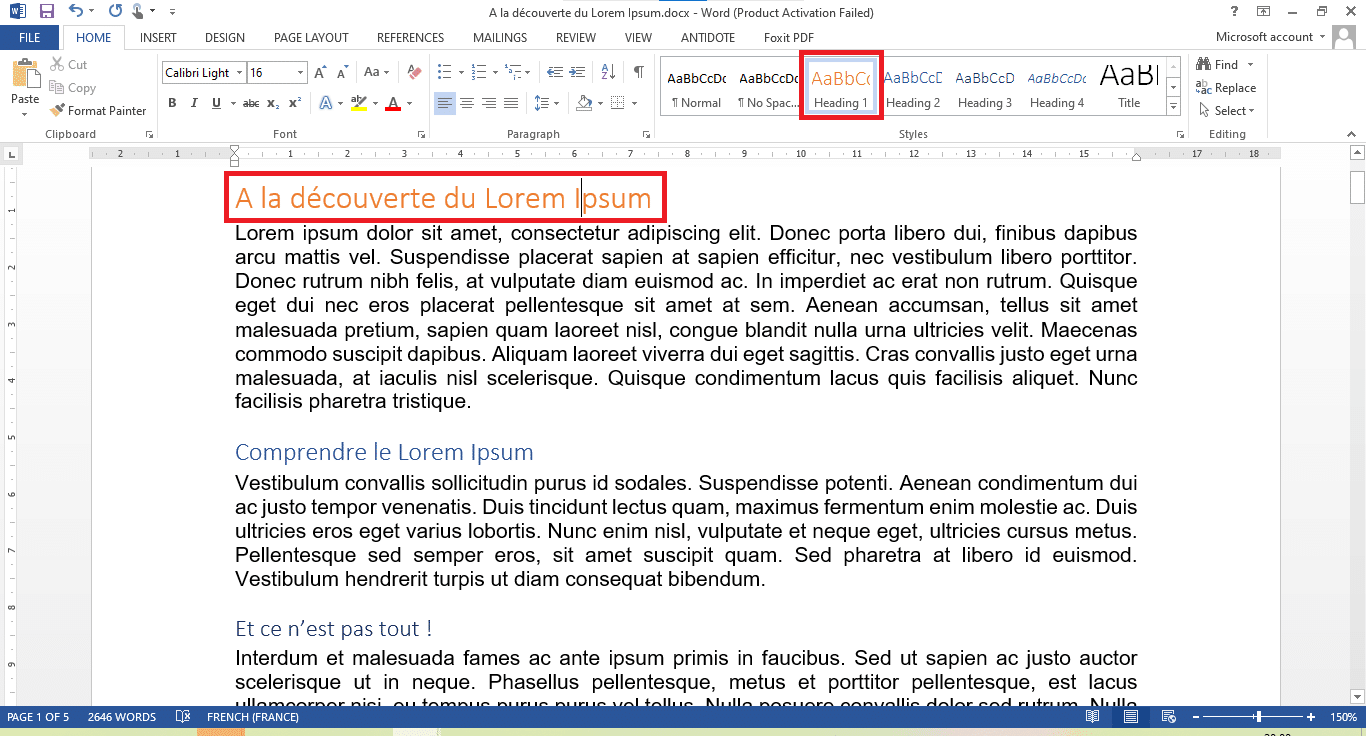
- You will then see the result automatically apply to the relevant heading levels.
READ ALSO : HOW TO ENABLE TWO-STEP VERIFICATION ON WHATSAPP?
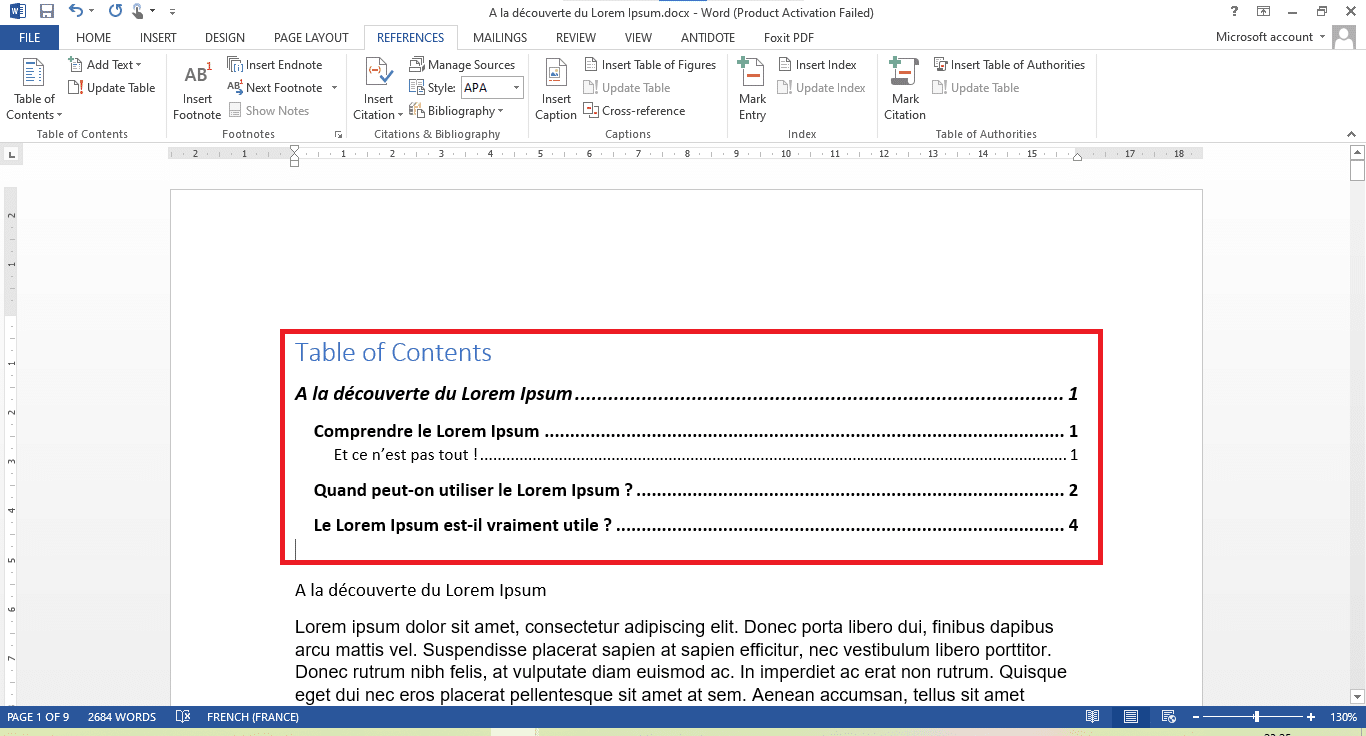
Creation of the summary
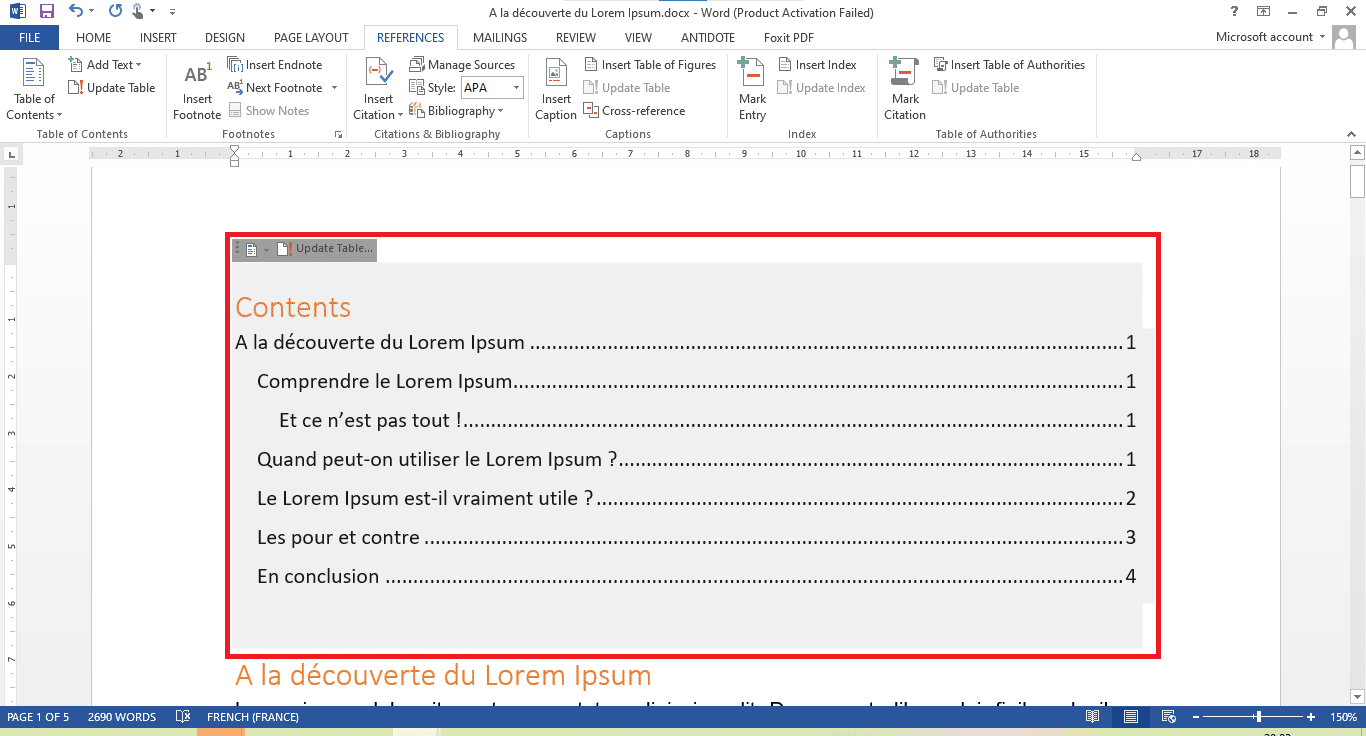
Once your document is fully written, all your titles linked to the styles that you have (perhaps) personalized, you can create the summary. At this stage, most of the work has already been done. Now position the mouse cursor where you want the summary to appear and:
- Go to the “References / References” tab on the menu ribbon.
- Click on “Table of Contents / Table of Contents”.
- Choose a summary template (by clicking on it) from the three proposals that are made to you.

- If you’ve done everything correctly so far, the summary should take shape before your eyes.
How to properly configure the table of contents?
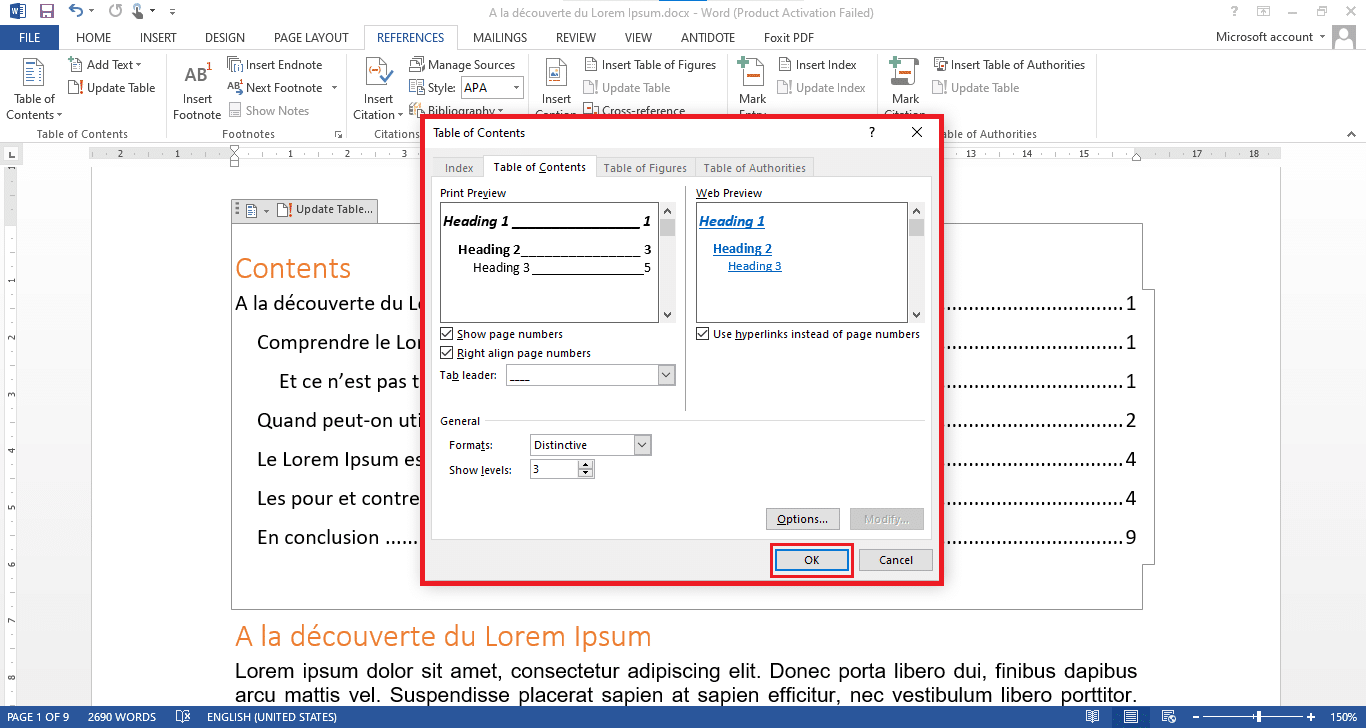
Now that you have generated the table of contents that corresponds to your document, you will probably want to modify its appearance. Fortunately, Microsoft Word offers this type of modification on the summaries. Here’s how:
- Go to the “References / References” tab on the menu ribbon.
- Click on “Table of Contents / Table of Contents”.
- Click on “Customize the Table of Contents / Custom Table of Contents…”.

- Now you have the free choice to modify the parameters available within the window that appears. Once finished, click on the “OK” button.
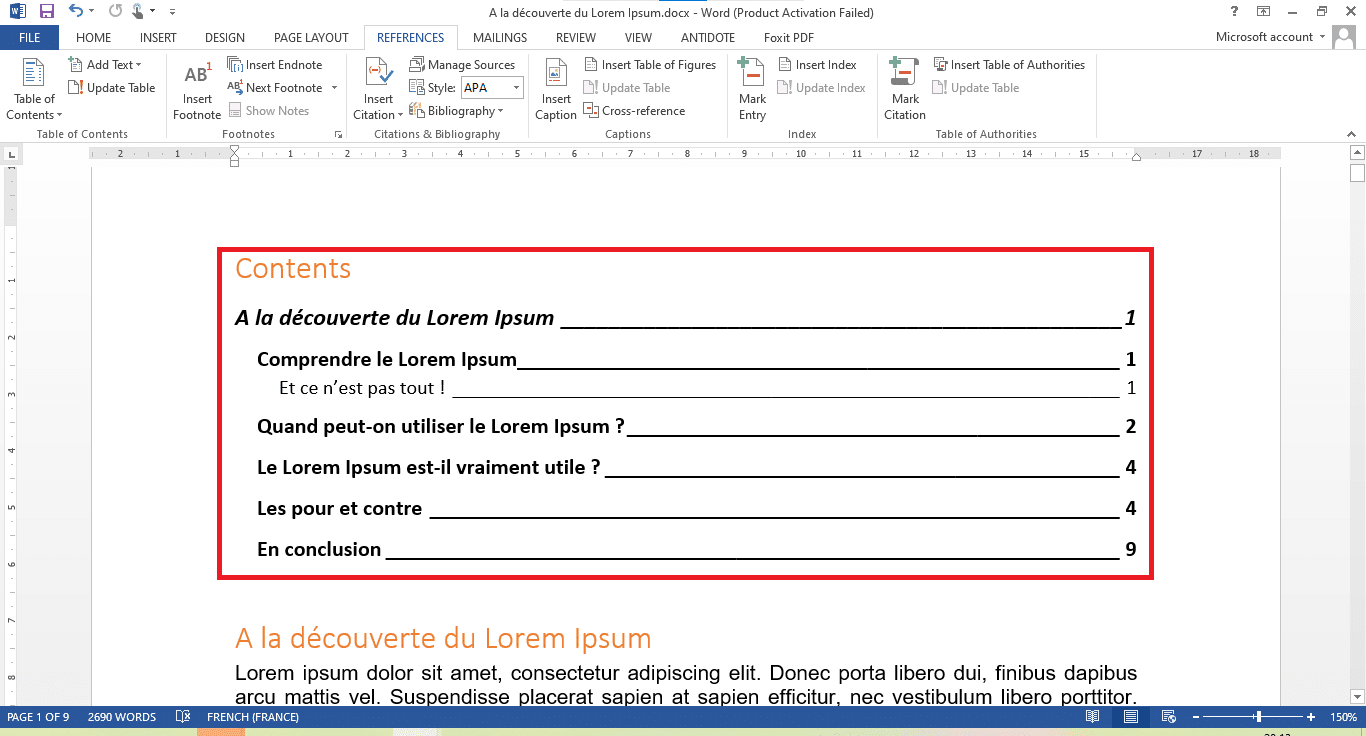
- Word will ask you if you want to replace the first table of contents generated. Simply choose YES.
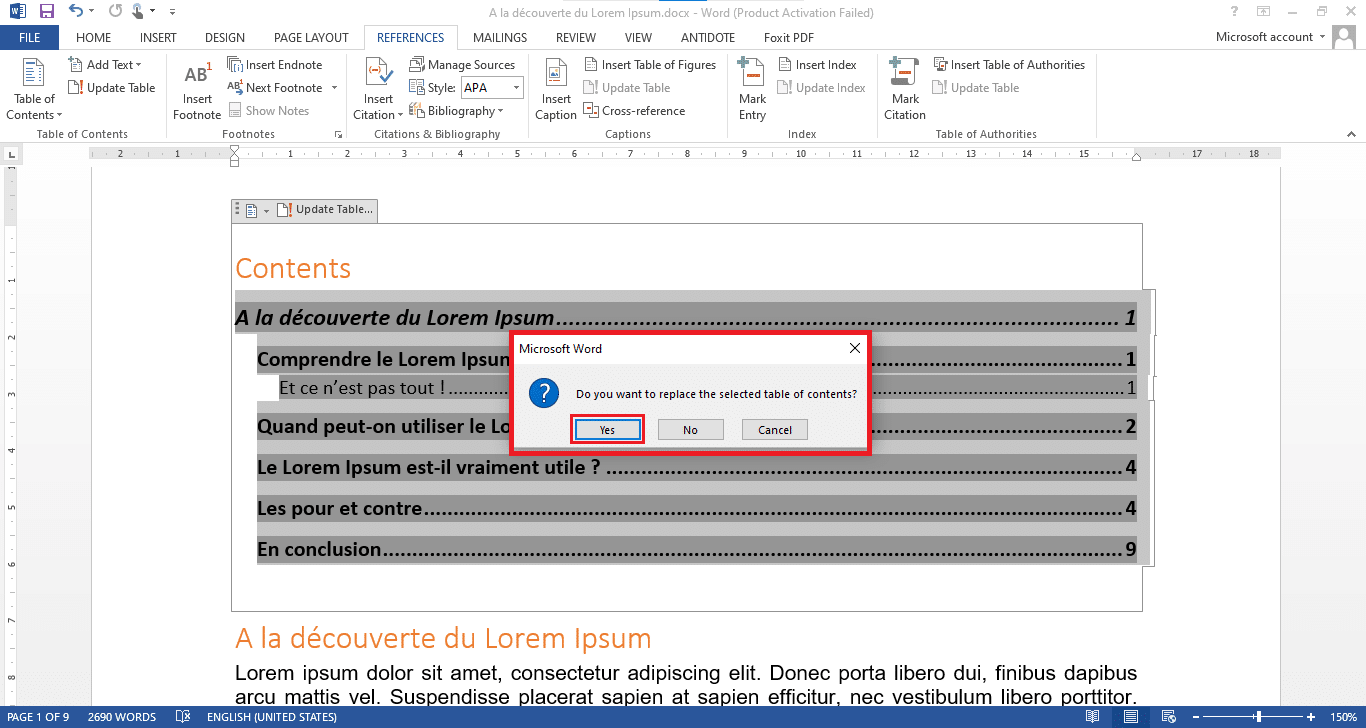
- And you will be able to see the changes made.
The automatic update of the summary
The Word Table of Contents is great for helping you automatically update your table of contents based on the content of your document. Even if you have hundreds of pages, you only have to click to update the summary. Therefore, if you happen to modify your document and the summary is turned upside down, do not panic. Do this instead:
- Position the cursor at your table of contents to display its selection frame. Locate and click on the “Update table of contents” option located at the top of the bounding box.

- Word will ask you if you want to update the entire table or just the page numbers. Choose the appropriate option (here the entire table) and click on “OK”.
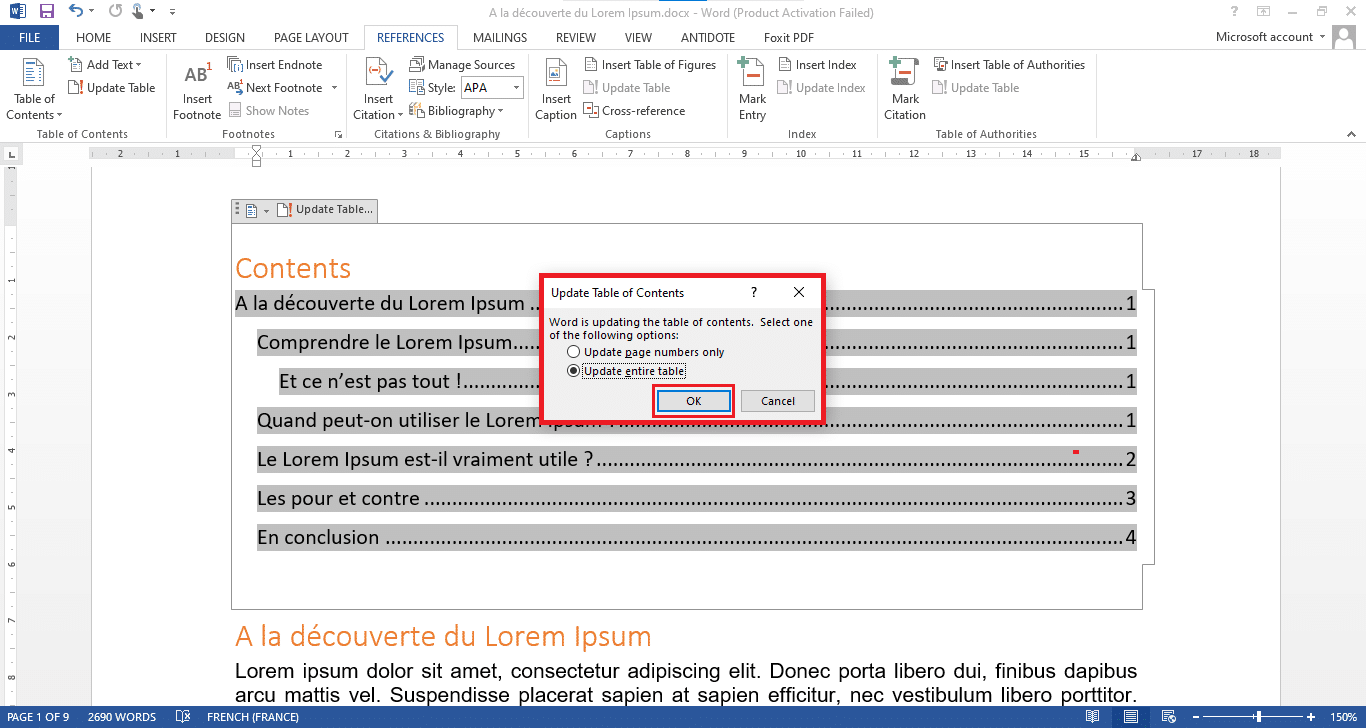
- The table of contents will automatically adapt to new titles added or deleted.
What if I have finished writing my document?
Yes, it may happen that you are now at the end of your document and you remember the summary. Do not panic, there is a solution that may be useful to you. Here, it will be a question of generating a table of contents that you will fill in yourself. The process is as simple as before, just that it will require some extra work, because you will need to know each title and the corresponding page in order to rewrite them without fail (it is possible to use copy-paste).
- Go to the “References / References” tab on the menu ribbon.
- Click on “Table of Contents / Table of Contents”.
- Choose “Manual Table / Manual Table”.
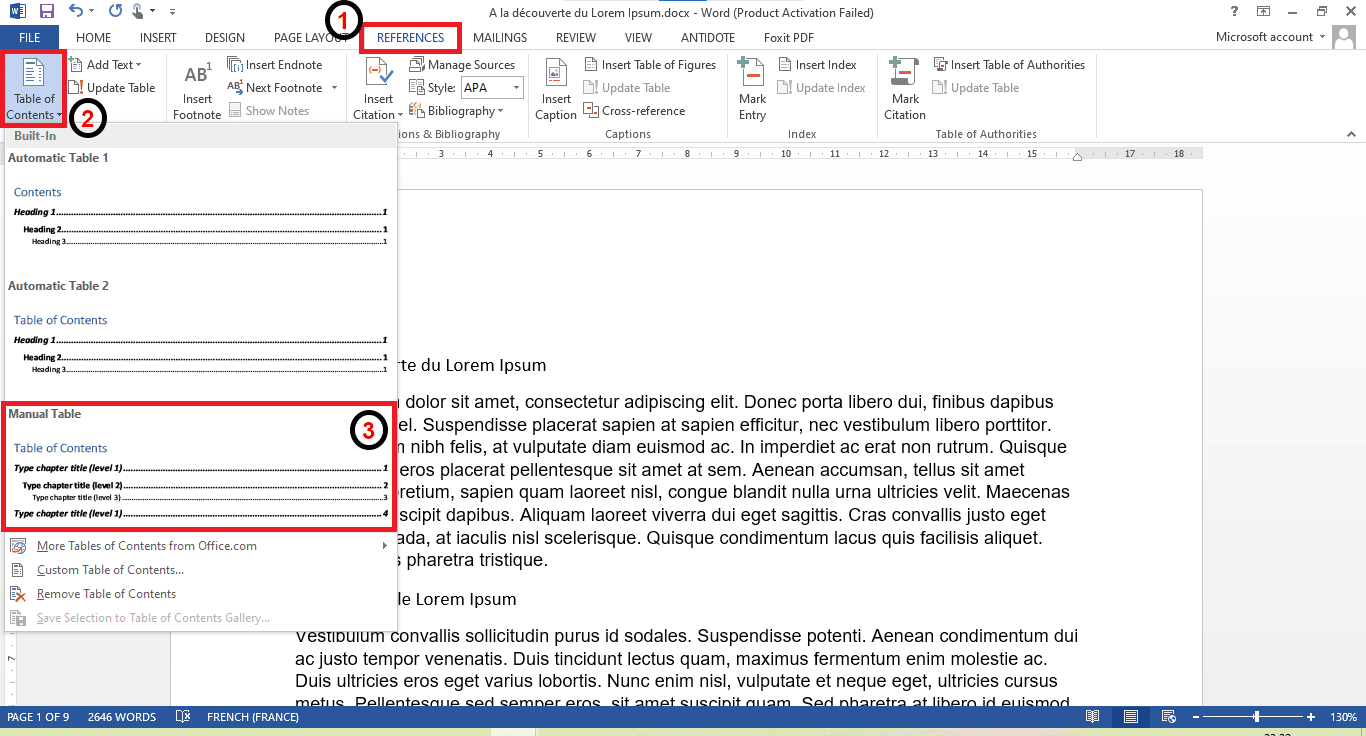
- Microsoft Word will then generate a table of contents that you will have to fill in on your own.
- So pay attention to the titles and the number of the pages where each title is located in order to fill them in properly. Don’t hesitate to duplicate the proposed title models in order to obtain a number of lines that corresponds to the number of titles present in your document.

A cool feature in Microsoft Word 2007 is it lets you Automatically summarize articles and find key points of the document so you don’t have to read the entire thing.
A cool feature in Microsoft Word is it lets you Automatically summarize articles and find critical points of the document, so you don’t have to read the entire thing. This saves you time and gets you to the main points in a lengthy document.
Note: Here, I’m using Word 2007, but the feature was discontinued in 2010.
Summarize a Microsoft Word 2007 Document
Open the document you want to summarize and click on the Office button.

Then click Word Options.

Word Options comes up. Click on Customize from the sidebar.

Open the “Choose Commands From” dropdown menu and select the “All Commands” option.

Scroll down from the list of commands and find AutoSummary Tools, click on Add and click Ok.

Click on the AutoSummarize Tools button from the Quick Access toolbar and click on AutoSummarize.

The AutoSummarize dialog box opens and shows you different options. You can select the type of summary you want and the length of the summary too.

The Highlight Key Points feature picks commonly used words and phrases from the document and highlights them.

Insert Executive Summary option will put the abstract of the document on top.

Create a new document option will use the summary above and paste it into a new document. Lastly, hiding the everything option will paste the summary of the document and will remove any extra material.
![]()
There are many online tools that will summarize or paraphrase a long Word document into something shorter and more readable. These five tools also have other uses.
Originally, Word 2007 had an Auto Summarize feature, but it was dropped in Word 2010, so Word users will need to rely on external paraphrasing services.
A paraphrase is a rephrase of a text or passage using different words. It is tough to create complete and coherent statements which have not already been made. Which is why a paraphrasing tool could become your greatest instrument in academic or professional writing.
Many people use paraphrasing to improve their writing skills. Nevertheless, keep in mind that paraphrasing is not the same as summarising.
Every day, most people find it challenging to come up with new concepts. It can be challenging to come up with a new spin on an old idea.
The paraphrase tool can help you out if you’re stuck in one of these situations.
There is always the possibility that your writing will be like that of another writer, posing significant risks of plagiarism. Paraphrasing can be a solution to plagiarism issues and using a paraphrasing tool will save you from risking academic dishonesty from the get-go.
Luckily, there are a few external paraphrasing tools out there, some offer premium features at an extra cost but there are free services too – we have listed below some of the best ones to use.
Quillbot
A personal favourite that I use during my current studies, QuillBot provides writing and research tools to help you bring your work to life. QuillBot’s paraphraser can rewrite any text in a variety of ways, with three free modes and four premium modes to choose from. The site is quite easy to navigate and fairly quick with paraphrasing.
The link is: https://www.quillbot.com
The good thing is you’ll be able to use at least two modes for free without even signing up!
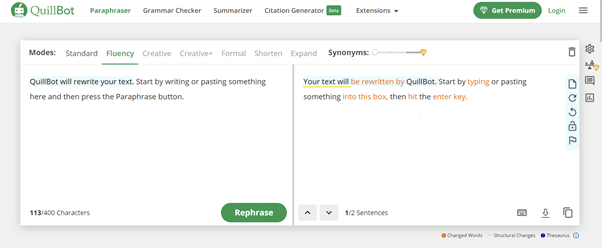
Modes
The mode you select determines what the QuillBot AI will concentrate on.
Standard Mode – Free mode that keeps a middle-ground, it will modify the input without changing the meaning behind the statement.
Fluency Mode – Free mode that improves the fluency of the writing whilst fixing grammatical errors.
Creative Mode – Free mode when you sign up for Quillbot, the sentence is changed the most, but it is also the most likely to contain errors compared to the other modes.
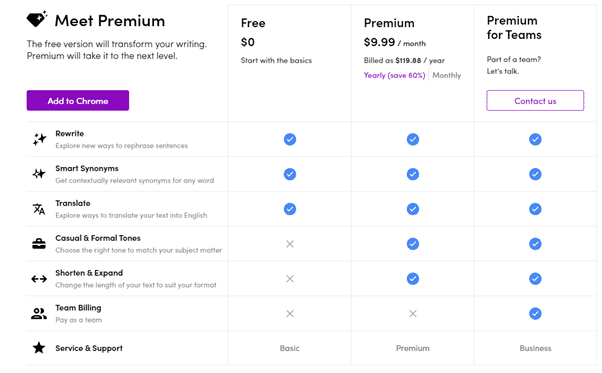
Creative+ Mode – Premium mode available when you purchase Quillbot Premium membership. Paraphrases text with the most originality and expression.
Formal Mode – Premium mode available when you purchase Quillbot Premium membership. Perfect for academic or professional reasons as the paraphrases are more refined and within a professional manner.
Shorten Mode – Premium mode available when you purchase Quillbot Premium membership. Perfect for assignments that have a limited word count, provides meaning in a clear and concise manner.
Expand Mode – Premium mode available when you purchase Quillbot Premium membership. Will add appropriate words and phrases to your source text to make it longer. This option is useful for writers who must meet a word count quota.
Freeze Words
Quillbot has the option to freeze certain words that you don’t want to be modified with the Paraphraser.
Just click the frozen icon in the top right corner and select the word/s within your statement that you wish to freeze. Quillbot will provide a list of recommended words and once you’ve selected those words, they will be placed under the Frozen Words category. For free users, you can only freeze 1 word but if you sign up to premium, you’ll be able to freeze unlimited words and phrases.

Synonyms
If you are still unhappy with the sentence Quillbot has provided you, you can modify the synonyms.
Simply select the words or phrases within your sentence and choose a synonym from the drop-down menu.

There is also a scale slider that lets you adjust the number of changes will be applied to your sentences. The less changes in Synonyms, the more accuracy of the sentence and the more changes, the less accuracy of your sentence. Only premium users can achieve the highest level of changes.

Extensions
Quillbot also has several Extensions available for Google Chrome, Microsoft Word, and Google Docs – making it quick and easy to download and access.
Premium Membership
There are monthly, half-year or annual plans with extra options.

Paraphraser.io
Paraphraser.io has a variety of features including essay rewriting, plagiarism prevention and rephrasing articles. The tool focuses on maintaining original meaning of the sentences, whilst changing its structure. Paraphraser.io can be used online across all devices including IOS and Android. It is simple and straightforward to use.
The link is: https://www.paraphraser.io/
Unfortunately, one downside is if you do have an ad blocker, you will need to disable it before given permission to use the paraphrasing tool.

Simply add your text or upload a Word Document or PDF using the Upload button in the bottom left corner, and your paraphrased text will appear on the right side.

One bonus is there isn’t any payment or sign up required to use the tool. You can also paraphrase up to 1,000 words at a time.
Additionally, you can paraphrase in multi-languages, which can be chosen from the bottom right corner drop-down box.

Modes
The mode you select determines what the AI will concentrate on
Fluency Mode – it will swap words with fluent synonyms.
Standard Mode – chooses the best synonyms to deliver the best results.
Creative Mode – will modify the sentence structure whilst still maintaining readability and flow, whilst also choosing different synonyms within the sentence.

Duplichecker
A grammar and spelling checker, plagiarism checker, and paraphrasing tool are all included in Duplichecker. You get everything you’ll ever need for your writing task in one package, it is absolutely free and there is no requirements to sign up prior to using the tool.
Using Duplichecker’s paraphrasing tool, you can simply paste the original text or upload a file and select Rewrite Article after confirming the captcha. Within seconds, you’ll have a paraphrased material that’s totally unique.
The link is: https://www.duplichecker.com/

In one go, Duplichecker’s users can paraphrase up to 2000 words at a time. Compared to other free paraphrasing sites that only provide a limit of 500 words at a time, which is a great bonus.
Premium Membership
Duplichecker offers custom-paid plans if the 2000-word limit isn’t enough. From $10 per month, you can boost your word limit to 30,000, obtain a custom-made plagiarism report in pdf format, and make use of many more features.

Wordtune
Wordtune works similarly to any paraphrasing tool, but it offers the advantage of using artificial intelligence and linguistic models as part of the rewriting process. Using past data, Wordtune learns patterns that lead to rewrite suggestions. The Wordtune translation tool makes it easy to translate your thoughts and expressions into correct sentence structures if you don’t speak English natively.

It is possible to translate and rewrite documents from various languages into English using the Rewrite tool. Spanish, Mandarin, Arabic, Hindi, Korean, Hebrew, and Russian are presently supported.
Extension
Wordtune is available as a Google Chrome Extension. Simply go to the Chrome Web Store and install the browser extension there.
Although Wordtune is free to use, you will still need to sign up prior to using it.
Go to any website where you plan to write (e.g. Word online, Facebook, Google Docs, Gmail), start writing, and then highlight the text you want to use. There will be a purple Wordtune icon above your pick when you make your selection.

Wordtune Modes
There are four modes that Wordtune offers, however you will need to be a premium member to utilise them.
Casual and Formal Tone – a feature which makes the sentence sound more casual or formal.
Shorten or Expand Mode – make any sentence shorter or longer.
Premium Membership
Premium membership is available at $9.99 per month giving additional features, service and support.
If you’re wondering if the Premium membership is worth it, they also offer a free 7-day trial to try out the premium services.
Wordtune also offer discounts for eligible students, educators, non-profits and NGOs.
Prepost SEO
The Prepost SEO paraphrasing tool alters synonyms and sentences to create reworded content unique from the original content.
The link is: https://www.prepostseo.com/paraphrasing-tool
The Paraphrasing tool is totally free to use without any need to sign up. Users also have an unlimited amount of uses per day. There is the option to copy and paste over content to paraphrase, or you can also upload files in .doc/.docx/.txt/.pdf format.
Prepost SEO also has the option to exclude certain words from your content that you do not wish to be paraphrased. Simply type out the words you wish to exclude, separated by a comma, prior to selecting the paraphrase button.
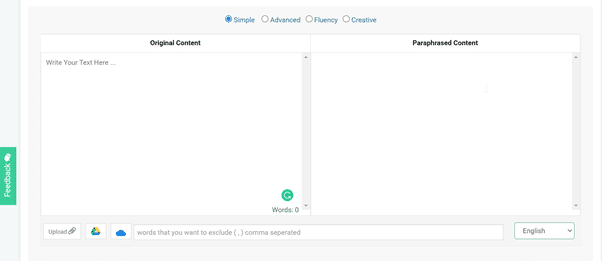
Prepost SEO modes
The Prepost SEO paraphrasing tool has several different modes:
Simple Mode – this mode replaces synonyms from the text, there is no limit with the number of words that can be paraphrased within this mode.
Advanced Mode – It is possible to add your own terms if you are not satisfied with the automatic substitution of synonyms. Paraphrasing has no word limit in this mode.
AI Mode- Besides changing words, it also rewrites phrases to break down complex statements into smaller chunks of information. It has three sub-modes, which are as follows:
Fluency – Correction of grammatical inaccuracies, allows the use of up to 5000 characters.
Standard – Text is easier to read when the sentence structure is rewritten in this mode, allows the use of up to 5000 characters.
Creative- Completely paraphrases sentences, reducing the possibility of plagiarism. Allows the use of up to 5000 characters.
This article was written by MysticGeek, a tech blogger at the How-To Geek Blogs.
When you have a long Word document containing a lot of different information pertaining to the same thing, it can be difficult to create a summary of the document. AutoSummarize is a feature in Word 2007 that scores the document by giving points to sentences that contain frequently used words. You can then use the highest scoring sentences to create the summary or use the Auto function. For this example I created a simple Word document using the =rand() trick.
First we will add the AutoSummary shortcuts to the quick access bar. Click the Office Button Customize Choose commands from All Commands then scroll down and highlight AutoSummary Tools click the Add button.

Now click the quick access AutoSummarize icon shown below.

Now that we have the AutoSummarize dialog box open we have different options to choose from. The Highlight key points will allow you to go through the document and find most commonly used words and phrases so you can conclude your own summary.
Using the Executive Summary basically auto generates a summary of the document and places it at the top of the document. Creating a new document will just take the below summary and place it in a new Word document.
Finally hiding everything but the summary leaves just the summary in the Word document and omits the rest. In this example I used only 25% of the document. You can adjust the length for Word to summarize based upon the length of the document.
READ NEXT
- › The Best How-To Geek Articles About Microsoft Office
- › The New NVIDIA GeForce RTX 4070 Is Like an RTX 3080 for $599
- › BLUETTI Slashed Hundreds off Its Best Power Stations for Easter Sale
- › Google Chrome Is Getting Faster
- › HoloLens Now Has Windows 11 and Incredible 3D Ink Features
- › How to Adjust and Change Discord Fonts
- › This New Google TV Streaming Device Costs Just $20
How-To Geek is where you turn when you want experts to explain technology. Since we launched in 2006, our articles have been read billions of times. Want to know more?
![]()
Written by Allen Wyatt (last updated December 25, 2021)
This tip applies to Word 97, 2000, 2002, and 2003
Word includes a special tool that creates automatic summaries of your documents for you. This tool is called AutoSummarize, appropriately enough. The summary can be any length you specify, and you can save it to a new document, add it to the beginning of your document, or simply highlighted it in place. This feature allows you to quickly create a starting point for an executive summary.
Notice that I said AutoSummarize creates a «starting point.» This is because the summary is based on what Word can figure out about your document. This means that there are probably some finishing touches you need to manually put on the summary. As with most other computer-based tools, you should not rely completely on the AutoSummarize tool for your work.
To use the AutoSummarize feature, follow these steps:
- Load and display the document you want to summarize.
- Choose AutoSummarize from the Tools menu. Word performs an analysis of the document and displays the AutoSummarize dialog box. (See Figure 1.)
- In the Type of Summary area, specify which of the four summary types you want to create.
- In the Length of Summary area, indicate by using the Percent of Original drop-down list exactly how long you want the summary to be.
- Click on the OK button. Word creates the summary, as you directed.
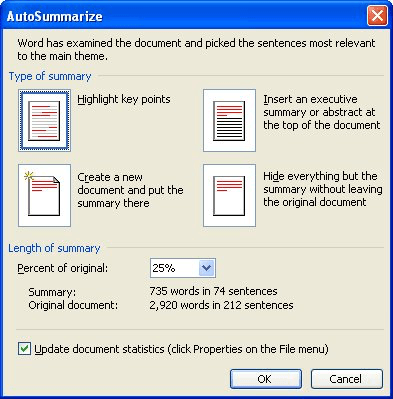
Figure 1. The AutoSummarize dialog box.
If you chose to create a summary that simply highlights text in your document, then Word displays a small AutoSummarize dialog box on the screen. You can use this dialog box to adjust the percentage of the original document that Word should include in the highlighted summary. When you are done, you can click on the Close button.
WordTips is your source for cost-effective Microsoft Word training.
(Microsoft Word is the most popular word processing software in the world.)
This tip (1809) applies to Microsoft Word 97, 2000, 2002, and 2003.
Author Bio
With more than 50 non-fiction books and numerous magazine articles to his credit, Allen Wyatt is an internationally recognized author. He is president of Sharon Parq Associates, a computer and publishing services company. Learn more about Allen…
MORE FROM ALLEN
Working with Roman Numerals
Understanding and using a function to replace an Arabic number with Roman numerals. And, as a bonus, how to change them back.
Discover More
Changing Cell Patterns
You can shade your cells by filling them with a pattern. Here’s how to select the pattern you want used.
Discover More
Pasted Text Not Formatted as Expected
Copying and pasting information is a common practice in Word. How the program should handle formatting (especially styled …
Discover More
More WordTips (menu)
Understanding the Organizer
The Organizer is a great tool for, well, organizing the information stored in your templates. This tip introduces the …
Discover More
Using the Organizer to Manage AutoText
There are times you need to move your AutoText entries from one template or document to another. Use Organizer to do this …
Discover More
Stopping Smart Tags from Being Saved
Don’t want Smart Tag information saved with your document? It’s easy to make sure that Word doesn’t save it, as described …
Discover More