
-
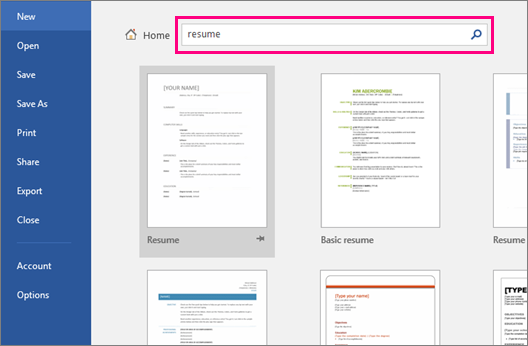
Go to File > New.
-
In the search box, type Resume or Cover Letter.

-
Double-click the template you want to use.
-
Replace the placeholder text with your own information.
-
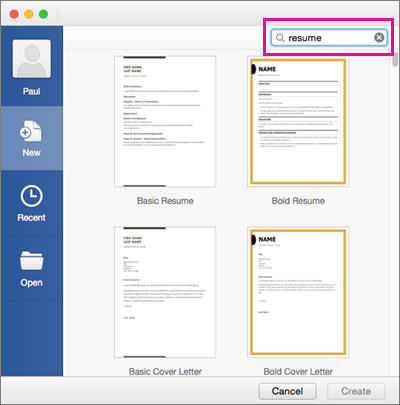
On the File menu, select New from Template.
-
In the search box, type Resume or Cover Letter.
-
Double-click the template you want to use.
-
Replace the placeholder text with your own information.
See also
Create and use your own template in Office for Mac
Making a resume like this while you’re online is quick and easy.
Note: This template comes with a cover letter, so you’ll have everything in one document.
Choose one of our resume templates, and open it in Word for the web to make it yours.
Tip: If you’re already in Word for the web, get to the resume and cover letter templates by going to File > New, and then below the template images click More on Office.com.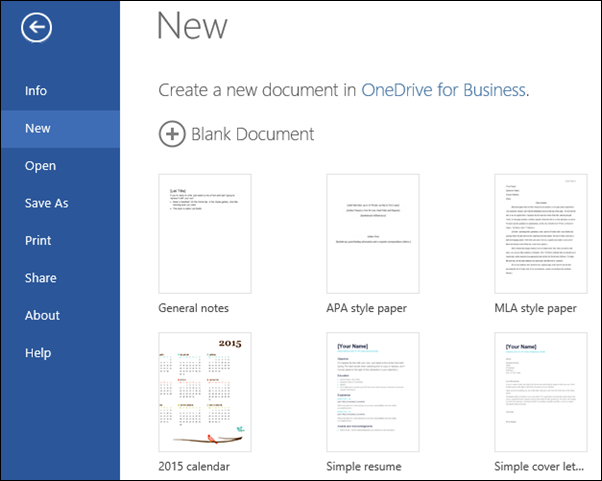
You’ll be on the Templates for Word page. In the list of categories, click Resumes and Cover Letters.
As you work on the resume, you’ll probably want to rename it.
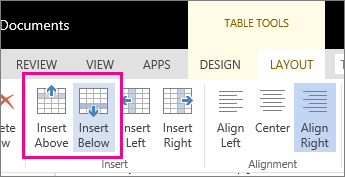
The template uses a table to line everything up. If you need to add more lines for job experience or education, add rows to the table by going up to Layout under Table Tools and clicking Insert Below (or Insert Above).
For tips on writing your resume, check out Six steps to developing a great resume.
Print it
When you’re finished, print it out or share it online. You can do this with the resume still open in Word for the web. No need to save it first (that’s already done for you).
To print it, press Ctrl+P, and wait for the Print dialog box.
Note: If you don’t see a Print dialog box, click the link for opening a PDF version of your resume. From there, use the PDF program’s Print command.
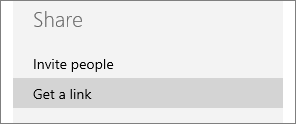
Share it
To share it online, send a link:
-
Near the top of the screen, click Share.
-
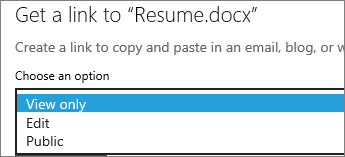
Under Share, click Get a Link.
-
Under Choose an option, click View only.
-
Click Create Link.
-
Click on the web address to select it, and then copy and paste it into an email, message, or post.
It can’t be that hard to write your resume in Word, can it? Then why are you stuck? Overwhelmed with hundreds, no, thousands of pages and videos on how to make a resume in MS Word? Who has the time to sift through that mountain of informational junk to find the hidden gems?!
Worry not. We’ve left no stone unturned, and condensed down all you need to know about how to make a resume in Word.
In this guide you’ll learn:
- How to access a ready Microsoft Word template design and make it your own.
- How to create a resume in MS Word from scratch faster than you can say Microsoft Office, even if you’re totally new at it.
- How to format a resume to make it look better and more professional than most other resumes.
But instead of reading through all this, you can just swing on over to our resume builder which will do it for you. Not only is it more user friendly than MS Word, you can download your finished resume in a .doc file which will make writing your resume a sinch.
Let’s get started!
Want to save time and have your resume ready in 5 minutes? Try our resume builder. It’s fast and easy to use. Plus, you’ll get ready-made content to add with one click. See 20+ resume templates and create your resume here.
Create your resume now
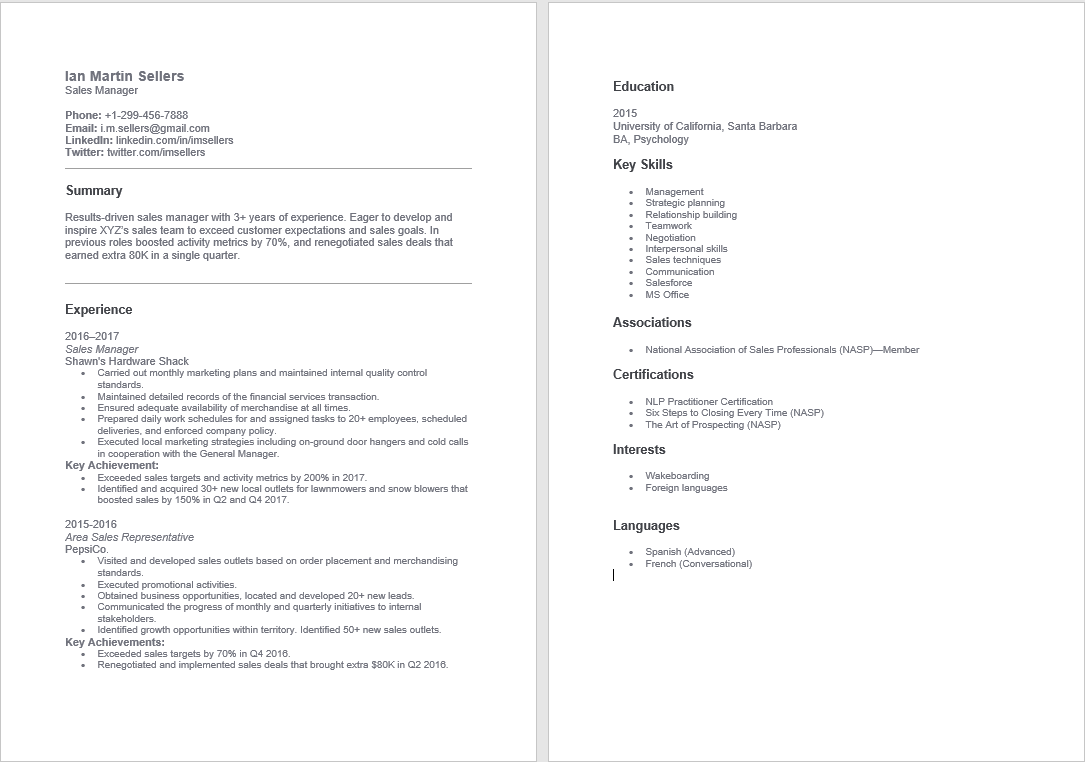
Sample resume made with our builder—See more resume examples here.
First, you might want to check if submitting a resume in *.doc is a good idea: Is a Resume in PDF the Best Option?
Check out our resume templates to choose the best for you:
- Free Resume Templates
- Best Resume Templates
- Apple Resume Templates
- Blank Resume Template
- Simple Resume Templates
- Functional Resume Templates
- Student Resume Templates
- Recent Graduate Resume Templates
- Entry Level Resume Template
- One Page Resume Template
- Google Docs Resume Templates
- Creative Resume Templates
- Cool Resume Templates
- Modern Resume Template
- Minimalist Resume Templates
- Plain Text Resume Templates
How to Make a Resume in Word
Now get comfortable, we’re going to go through, step by step, how to make a resume in Word from scratch.
Access MS Word Templates
Accessing MS Word templates may seem complicated, but it really is just a few simple steps that we’ll show you them below.
- Open a new document.
- Click on the “more templates” option.

- Choose “Resumes and Cover Letters.”
- Choose the resume template that suits you best and click on it.
- Click “Create.”
- Your chosen resume template appears as a Word document and you’re ready to edit it with your personal information and experience!
Not sure which resume template packs the most punch? Browse through our selection and tips here: 25 Resume Templates for Microsoft Word
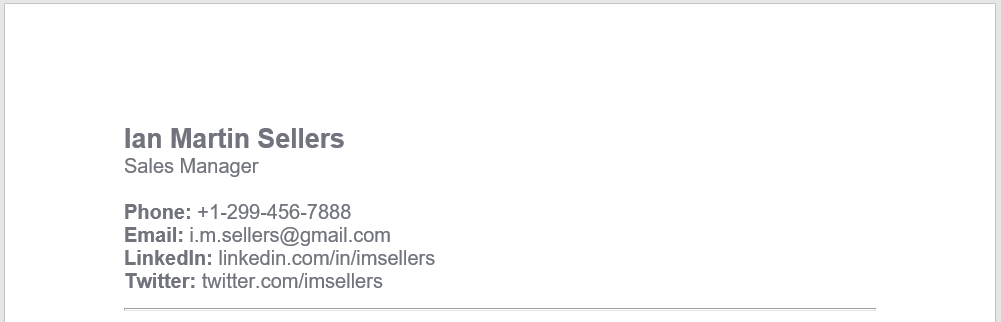
Make a Resume Header in Word
Going top-down, we start first with the resume header (and the Captain Obvious award goes to…).
The resume header should include the following:
- your name
- current job title
- phone number
- links to any online profiles or professional online sites that you have.
It should end up looking like this:
But hey, how did that nice line get there?
It’s simple so let’s leave that for later, once you’ve finished all your sections. If you’re super impatient, jump down here to learn how to add a line in a Word resume.
How to Format a Resume Header in Word
As your name is both important and the first thing the hiring manager sees, make sure it’s bigger than the rest of your text (14-16 pt).
Depending on the font you use, decide whether bold will make it look better and draw more attention.
Feel free to bold the titles of the information that you’re listing (like in the above example) to make it a little clearer to read.
Add a Resume Objective/Summary
Double space from the last line in your resume header.
Write “Objective” or “Summary” depending on which one you’re using. As it’s a section title, make it a little larger than the rest of the text (14-16 pt). Also, depending on the font you’re using, make it bold.
Beneath the section title, write a couple of sentences concerning your resume summary or objective.
Unsure whether a resume objective or summary is right for you? These two handy guides will help solve that problem: Resume Summary Examples and Resume Objective Examples
Your resume objective/summary section should look like this:

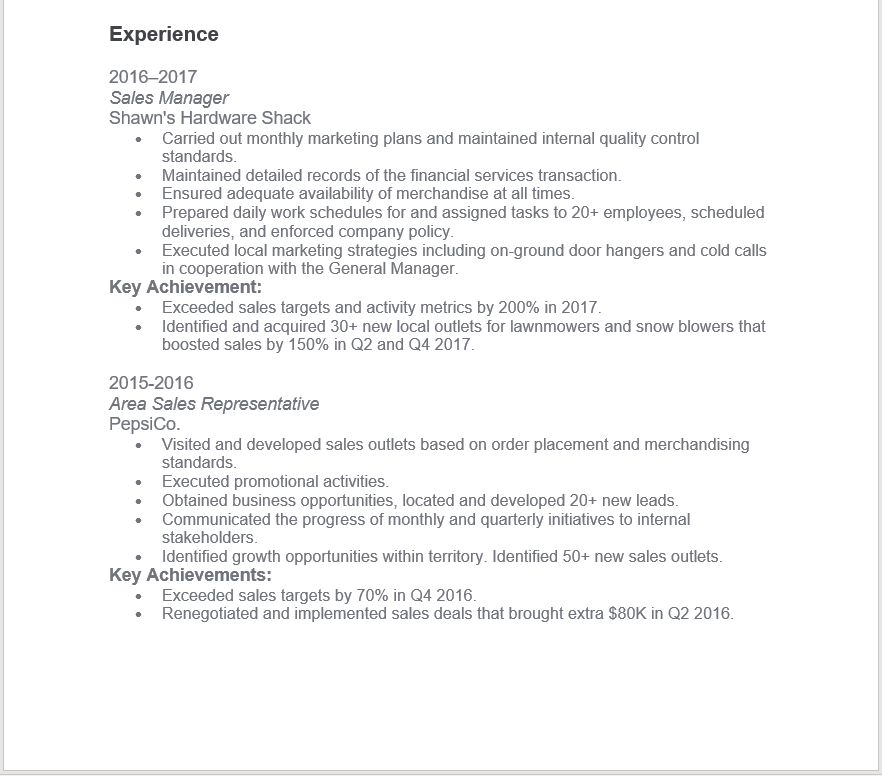
Write Your Experience Section in Word
Now we’re diving into the bigger sections of your resume that will take a bit more time and effort to get just right.
Again, double space from the last line and add the section title “Experience” in larger text like the previous section titles.
Next, add the date, title of your job position at the time and then the name of the company.
Next, add a few lines describing your relevant job responsibilities in bullet points.
If you have key achievements that you’d like to include, add “key achievements” after your job responsibilities and also list them in bullet points. Since “Key Achievements” is a sub section header, remember to make it bold, underlined, or slightly larger than the surrounding text to help it stand out more.
Need more pointers on how to add work experience to your resume? This guide will point you in the right direction: Resume Work Experience, History, & Example Job Descriptions
Your finished work experience section should look something like this:
Add Your Education Section
The hardest part of your resume is over and done with, phew! Now on to your education.
Follow the same rules as before so double space and enlarge the font for the resume section title “Education.”
Next, add the date you graduated (or plan to graduate), the name and location of the school, and the title you acquired.
Simple!
If you’re feeling a little lost on how to add your education to your resume, you’ll definitely find these guides super helpful: How to Put Education on a Resume and How to List Continuing Education on a Resume
Your education section should look like this:

Add Skills to a Resume in Word
You’re already at your skills section now!
This section is an easy one as you won’t have to do much other than list.
Again, double space from the last line and use the same format for your “Skills” section header as you did for the rest.
Now simply list your skills. You can do this as a simple list or just some kind of formatting like bullet points. That’s all there is to it!
When you’re done, your resume skills section should look something similar to this:
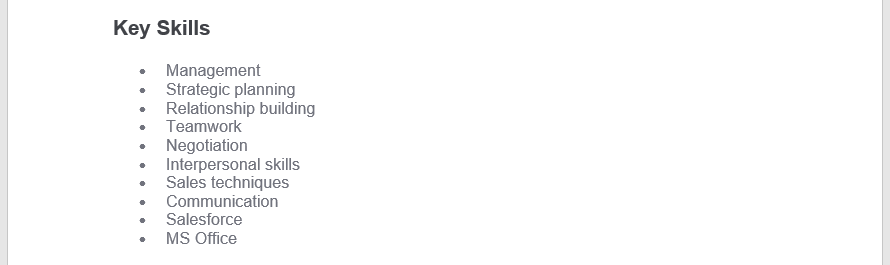
It’s important to remember that you can’t just mention every skill you have including competitive bubblegum chewing. It needs to be relevant.
This guide will tell you exactly which professional skills are key to getting your dream job: Key Skills to Put on a Resume
Add Additional Sections to Your Resume
You’re already near the end, yay!
The additional section isn’t mandatory in your resume, but it is a great place to show off your achievements, certificates, interests, languages, and other things that don’t really fit elsewhere in your resume.
Add the relevant section headings, i.e. “Achievements”, “Certificates”, “Languages”, “Interests”, etc. and then form a simple list beneath.
Here’s an example:
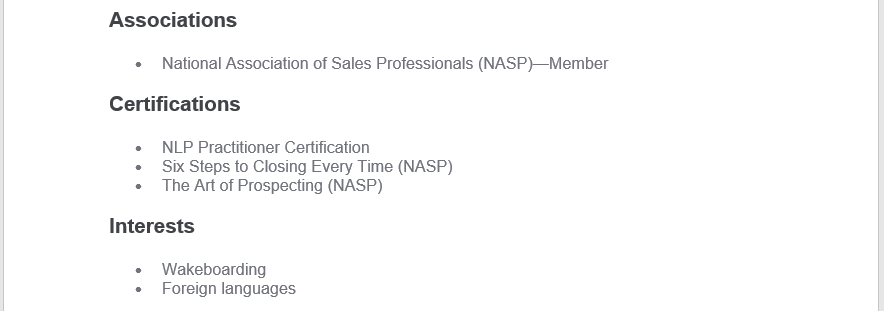
That’s it!
Afraid that your resume doesn’t have enough impact? Check to see if it’s optimized to the job description with this handy guide: 6 Tips on How to Tailor Your Resume to a Job Description
When you’re all done, if you pull all the pieces together, your complete resume should look more or less like this:
Unsure if your resume is complete? Double check that you have all the crucial pieces: Parts of a Resume: What are the Important Elements?
Now, that looks okay, but it’s not exactly something to write home about. Want a resume in Word that will really stand head and shoulders above the rest?
When making a resume in our builder, drag & drop bullet points, skills, and auto-fill the boring stuff. Spell check? Check. Start building a professional resume template here for free.
When you’re done, Zety’s resume builder will score your resume and tell you exactly how to make it better.
How to Format a Resume in Word
You’ve already learned a little about formatting a resume in Word throughout this guide, but let’s recap and add in some new tips for good measure.
Resume Fonts in Word
It may seem like something not really worth the worry, but a bad font can tank your resume faster than an unnoticed iceberg.
Use professional, modern fonts and stay away from fonts that are overly creative, hard to read, or simply comical (I’m looking at you, Comic Sans!).
For more in depth knowledge about what fonts are a “go” and which are a “no,” check out this great guide: Best Fonts for a Resume
Resume Margins in Word
Word usually has neat margins set up by default so you’re probably good to go from the start.
Just in case, though, remember that the standard margins for resumes are 1 in. on all sides.
Want to muse more over measuring your margins? This guide will do just that: Proper Resume Margins
Resume Line Spacing in Word
Again, Word will usually have you covered by default, but it’s good to know that 1.15 line spacing is best in a resume.
If you want to see what your line spacing is set to in a Word document, go the toolbox in the Home tab and select the icon that looks like a paragraph with arrows on the left side. A drop down menu will appear with different spacing options.
Resume Headings in Word
As we’ve already covered, the resume headings should stand out in some way. They definitely should be slightly bigger (14-16 pt) to set them apart from the rest of the 12 pt text.
If the legibility of the font allows, feel free to underline or bold the resume section headings as well.
Don’t go overboard though. This does not look good on a resume: WORK EXPERIENCE
How to Make a Line in Word for Your Resume
Making a line is one of those things that seems simple, but ends up giving you an aneurysm and a half when you try to do it.
There are actually three ways to create a line in Word—via hyphens, borders, or horizontal lines.
- Use hyphens.
Type in three hyphens (—) and then press “Enter.” Viola! You have a line!
- Use Borders.
Go to the Borders option in the Home toolbox and click on the drop down menu. Choose the first option “Bottom Border” and Word will automatically insert a line.
- Use Horizontal Line.
Go to the borders in the Home toolbox and click on the drop down menu. Choose “Horizontal Line”. Click and Word will insert a line.
Now you know more than one way to make a line in Microsoft Word!
Lines, like other format options, should be used once in a while to emphasize the main points. You don’t want to turn your resume into a web of lines created by drunken spiders.
Plus, a great cover letter that matches your resume will give you an advantage over other candidates. You can write it in our cover letter builder here. Here’s what it may look like:
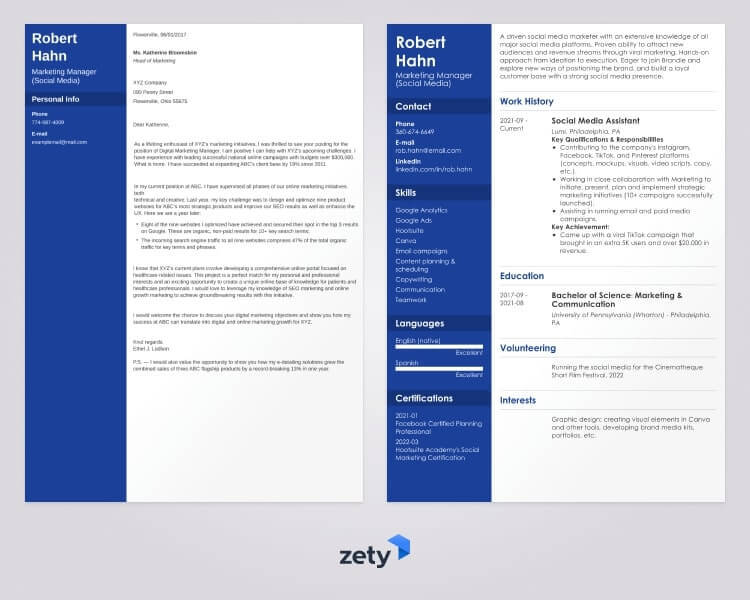
See more cover letter templates and start writing.
Key Takeaway
If you’ve ever wondered how to create a resume template in Word, well you just have! Now you can create several different tailored resumes for your dream jobs!
Wasn’t all that bad, was it?
Creating a resume in Microsoft Word may not be super easy, but it doesn’t need to be a complicated design or be a nightmare to format. You can definitely create a resume in one, relaxed sitting.
Just keep in mind to:
- Keep your resume sections in order.
- Format your resume section headings a little larger than the rest of the text.
- Double check if your font, margins, and line spacing are professional and legible.
- Use lines and format design sparingly in your resumes to emphasize instead of clutter.
Have you found this guide helpful? Any options or templates we’ve left out that you think could be useful? Let us know!
![]()
Download Article
![]()
Download Article
Resumes detail a person’s work experience, education, skills and achievements. A good resume that is clear, concise and easy to read is essential when looking for a job. Resumes should be word processed and should be neat and tidy. Microsoft Word offers you the option of creating your resume through templates, but you can also create your resume from scratch using Word’s formatting features.
Sample Resumes
-
1
Use a pre-installed template in Word. Begin by opening up a new document in Word by clicking on “New” from the File menu. Once you have opened up the new document menu, you will be able to choose from a large number of templates that are included with the Word software. Click on “Templates” and then select one of the resume templates you see on the page.
- In Word 2007 you will have to click on “installed templates.”
- In Word 2010 it will be “sample templates.”
- In Word 2011 it will be “new from template.”[1]
- In Word 2013 the templates will be displayed when you click on “New.”
-
2
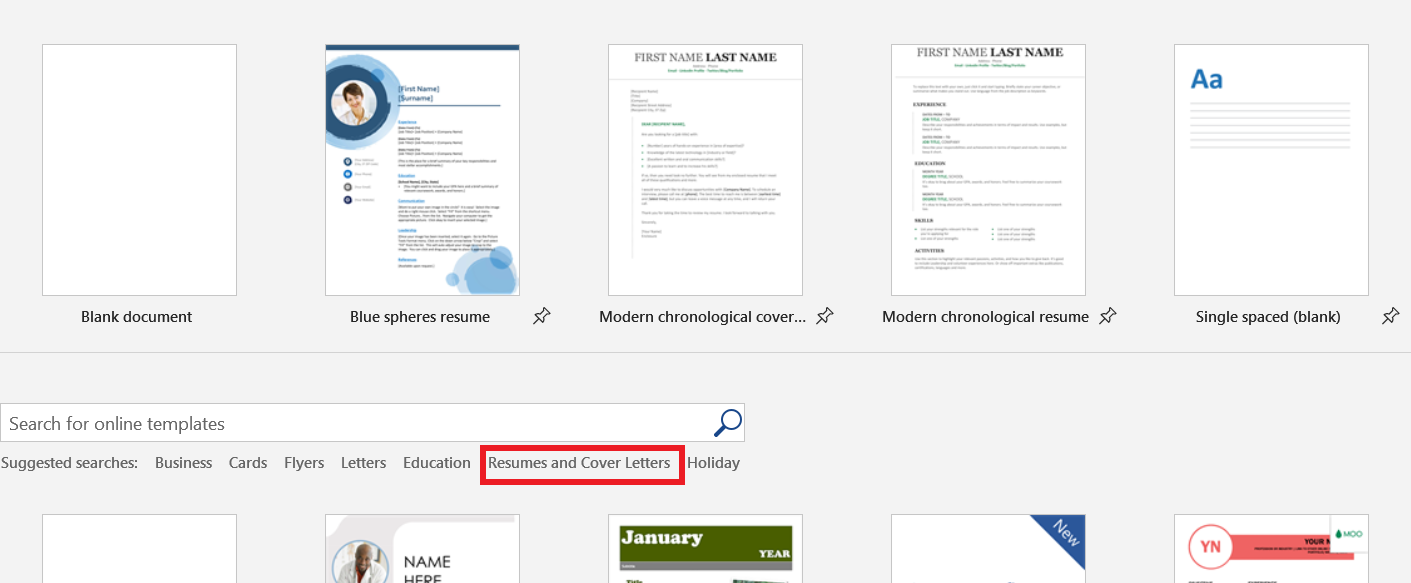
Download a resume template in Word. Word comes with a number of pre-installed templates for you to use, but there is a larger choice available through Office Online. It is straightforward to search for resumes templates on this database and download one that you like. Open up a new document and search for “resumes” in the Microsoft Office Online section.
- In Word 2013, after clicking on “New” you will see a number of templates and a search bar which says “search for online templates.”
- After searching you will see a number of different resume templates to try out.
Advertisement
-
3
Download a template directly from Office Online. You can view and download templates directly on Office Online without going through Word. Just visit the official website at https://templates.office.com/ and click on the resumes and cover letters section. You will see this section as one of those listed in the module on the left-hand side of the screen that says “Browse by Category.”
- Here you will be able to look through a number of templates for resumes and cover letters that you can download for free and edit in Word.
- You may have to sign in with your Microsoft online account to use these templates.[2]
-
4
Complete the template. Once you have decided on a template that looks professional and is appropriate for the kind of work you are looking for, you can delete the default text and add your personal information. Format, layout and presentation are essential for a good resume, but they cannot disguise bad writing, spelling and grammar mistakes.[3]
- Be sure to look carefully at the detail of your resume and proofread it thoroughly.
- All of the versions of Word from 2003 to 2013 all come with some pre-installed templates for resumes.
-
5
Create a resume with the wizard (Word 2003 only). If you are using Word 2003 you will also have the option of the using the wizard that was included in the software. The wizard will guide you through the process of writing and formatting your resume. Start by selecting «New» from the File menu. This displays the New Document task pane. You should then select “My Computer» from the Templates section on the left side of the task pane.
- Click on the “Other Documents” tab, and then select “Resume Wizard.”
- Follow the wizard’s instructions. The wizard will walk you through the resume creation process step-by-step
- If you do not see this option, it was not installed when you installed Word, and you will need to run the installation program again to install it.


Advertisement
-
1
Know what to include. Resume templates can be very useful if you are uncertain about how to format your resume, or you are not confident using the formatting tools on Word on another word processing programme. If you prefer create your own format and not to use a template, start by planning out which sections you will be including and how they will be organised. A resume should generally include the following sections:
- Education and qualifications.
- Work and volunteer experience.
- Skills and qualities.
- It should also include your full contact details and state that references are available upon request.
-
2
Consider a chronological resume. There are a number of different types of resume, including the chronological resume, the functional resume, the combination resume, and the curriculum vitae (CV). The chronological resume lists your work experience from your most recent position to your earliest position, with your responsibilities for each position listed under the position title and dates you held it. This type of resume helps you to show how you have progressed over time.[4]
- Most chronological resumes only cover the last 5 to 10 years of your employment history.
- You may wish to include positions earlier than this if they are appropriate to the job you’re seeking.
- This is the format most American employers prefer to see resumes in.
-
3
Be wary of a functional resume. The functional resume lists your key job skills first, then follows with a list of positions you’ve held. It can be useful to highlight your particular skills while hiding gaps in your employment history, but it is generally not advisable for students or recent graduates to use this format.[5]
It can be a useful format for those looking to translate their current job skills into a different field. -
4
Try a combination resume. A third option is the combination resume, sometimes known as a skills-based resume. This format enables you to highlight your skills most prominently, but also to tie them to your practical work experience. This can be helpful if your skills are more relevant than your work experience for the position you are applying for, but this format is unfamiliar to some employers and it is generally preferable to opt for a chronological resume.
- A combination resume might list your key skills at the top before providing a short account of your experiences.
- This type of resume can be helpful for those entering the job market with little work experience, or for those trying to change careers.[6]
-
5
Consider a CV. A curriculum vitae serves the same basic purpose of a resume, but there are different conventions that govern how it is written. The curriculum vitae is a comprehensive list of your job experience from your current or most recent position to your earliest. Unlike the chronological or functional resume, which typically run 1 to 2 pages, the CV is as long as it needs to be to encompass your experience.
- The CV is commonly used when applying for positions in Europe, and also when applying for positions at colleges and universities worldwide.
- CVs can be thought of as living documents that records all your work and achievements, which will generally grow and develop over time more than a resume.[7]


Advertisement
-
1
Complete your contact information. Once you have decided on your resume you can begin actually writing it up. Start by providing your full contact information at the top of the first page of your resume. Your contact information should include your name, address, telephone number, and email address.
- If your resume extends beyond one page, ensure that your name is in a header on every page.
- Your email address should appropriate for a job application. Use your own name or initials if possible.
- Don’t use something jokey such as «sly-dude,» «foxymama,» or «smokinhot.»
-
2
Consider including an objective. After your contact information, you might want to include a one line objective that states you career goal. Employers have mixed opinions on the inclusion of an objective statement, so consider carefully whether or not it adds anything to your resume. If you do decide to include one, make it short and closely focussed to the position you are applying for.
- For example, you might write that your objective is “To contribute to the design of new word processing software.”
- Alternatively it may state the position you hope to attain, such as “A position as in healthcare policy and research.”
- Objectives have become less common, and you may prefer to provide this information in your covering letter.[8]
-
3
Outline your education and qualifications. The order you use for the following sections may vary, but in many instances you will start with a statement of your education and qualifications. Here you simply need to detail your qualifications at school and college as appropriate. List the colleges or technical schools you’ve attended, in reverse chronological order. Be sure to give the date you achieved your results.
- You can include a bullet point or two to provide a little further information on your specialism, if it is appropriate for the position you are applying for.
- If you achieved any honours or awards as part of your studying or training include these here.
-
4
Detail your work experience. List the positions you’ve held in reverse chronological order, with the start and end dates (month and year). In a chronological resume, the dates should be listed first, while they can be listed after the position title in a functional resume. Pick out the key tasks and responsibilities you had at each position, your accomplishments, and what skills you developed while working there.
- Use bullet points to make sure it is clear and easy to read or scan through for key words relating to the position you are applying.[9]
- You can include volunteer positions if they relate to the job you’re seeking or if you have little paid experience.[10]
- Use bullet points to make sure it is clear and easy to read or scan through for key words relating to the position you are applying.[9]
-
5
Have an extra skills section. You will probably find that most of your skills have been covered in your education and experience sections, but it can be a good idea to have a separate skills section. This is an opportunity to highlight any skills and knowledge you have that is relevant to the position, but does not fit in anywhere else in the resume.
- You can title this section as “Other Relevant Skills”, or just “Skills.”
- This could include proficiency in foreign languages, knowledge of particular computer software and programmes, and any other specific skills not previously mentioned.[11]
- Take care to avoid repeating yourself. You don’t need to say you have “excellent communication skills” more than once.
-
6
Consider adding references. Generally you should only include named references with contact information if they are specifically required for the application process. Often references will only be taken up a later date. If you are not asked to include references in the application materials just write “references available on request” at the end of your resume.[12]
-
7
Make final format adjustments. Once you have the information in place in your resume, you can then format it as desired. Choose a single, easy-to-read font, either a serif font (Times New Roman, Book Antiqua) or sans serif font (Arial, Calibri, Century Gothic). All text should be 10 to 12 point, except for your name in the first-page header, which can be 14 to 18 point. Bold your name, your section headings, and your job titles.
- Allow reasonable margins around the edges of the page. Word’s default settings are usually sufficient for this.
- Left-align your section headings. You can use single-spacing after a heading and before the section content, and double-spacing before a heading.
- Get your resume down to one page if at all possible. You can try adjusting your line spacing in the Paragraph dialog box, but don’t lose your neat formatting trying to get it down to one page.
- Rethink your words and try to express yourself more concisely.


Advertisement
Add New Question
-
Question
How do I write a resume with little work history?

Alyson Garrido is an International Coach Federation accredited Professional Certified Coach (PCC), Facilitator, and Speaker. Using a strengths-based approach, she supports her clients with job search and career advancement. Alyson provides coaching for career direction, interview preparation, salary negotiation, and performance reviews as well as customized communication and leadership strategies. She is a Founding Partner of the Systemic Coach Academy of New Zealand.
Career Coach
Expert Answer
-
Question
Should I put my work history or education first?
Alyson Garrido is an International Coach Federation accredited Professional Certified Coach (PCC), Facilitator, and Speaker. Using a strengths-based approach, she supports her clients with job search and career advancement. Alyson provides coaching for career direction, interview preparation, salary negotiation, and performance reviews as well as customized communication and leadership strategies. She is a Founding Partner of the Systemic Coach Academy of New Zealand.
Career Coach
Expert Answer
Support wikiHow by
unlocking this expert answer.Typically, you should put your work history first, followed by your education and qualifications. However, if you are fresh out of college or don’t have much work history, put your educations and qualifications first.

Ask a Question
200 characters left
Include your email address to get a message when this question is answered.
Submit
Advertisement
Video
-
Always tailor your resume to the type of position you’re seeking. You may have to add, rearrange, or delete accomplishments or entire sections according to what the position requires.
-
Don’t wait until you’re looking for work to update your resume. Any time you have a promotion or significant accomplishment, add the new information to your resume.
Advertisement
-
The appearance and format of your resume is a reflection of your competence; be sure it represents you at your best.
-
Be sure that all the statements in your resume are both factually and grammatically correct and that all words are spelled correctly.
Advertisement
About This Article
Article SummaryX
1. Open Word and click File.
2. Click New.
3. Click a resume template.
4. Type your own data into each field.
5. Save your resume as a new file.
Did this summary help you?
Thanks to all authors for creating a page that has been read 1,607,215 times.
Did this article help you?
At some point or another — meaning, before online resume builders made our lives easier — most of us have had to make a resume in Word.
Now, making a resume in Word can be tiresome. Not being entirely optimized for the task, it can give you a hard time formatting and styling your resume to your needs — and this is just one of its disadvantages.
That being said, the use of Word is unlikely to drop only because it’s impractical. This means that knowing how to make a resume in Word is still a good skill to have. And if you’re sitting and thinking: “well, this doesn’t make matters any easier” — we hear you.
That’s exactly why this article is here — to teach you how to make a resume in Word, in just a few easy steps.
- Should You Make a Resume in Word?
- How to Make a Resume in Word in 7 Easy Steps
- How to Format your Resume — 3 Pro Formatting Tips
But before we dive into the nitty-gritty details of how to make a resume in Word, let’s go through the downsides of using it to build your resume, and what other easier alternatives you might have in more detail.
Should You Make a Resume in Word?
Microsoft Word might once have been a top resume-building option, but that time is long gone. Although it has ready-made templates, Word in itself was never meant to be a resume builder — this reflects on the end product, which often looks old-fashioned and dull.
Not to mention that it offers very little space for creativity. Try to make a small change in the layout and see the format crumble in front of your eyes.
On the other hand, if you simply use the Word template without customizing it, yours might just become another resume in the crowd that won’t even pass the Applicant Tracking System (ATS) — the software most companies use to filter through countless resumes they receive daily.
Long story short, here are MS Word’s main cons as a resume builder:
Long story short, here are MS Word’s main cons as a resume builder:
- It can be clunky and outdated — chances are, any Word template you choose to use for your resume will look old-fashioned. Technology has changed what is expected of your resume, just as it has changed job-search over the last decade.
- It is not ATS-optimized — the software that most recruiters use not to waste time looking at the resumes? Well, most Word templates are not optimized for it. This means that you can be the fittest candidate for the job and not even get invited to an interview.
- It’s time-consuming — making changes to the layout of a Word resume template is a nightmare.
Everyone knows what happens when you move an image in Word:

Source: twistedsifter.com
It’s exactly for these reasons, as well as the added efficiency, originality, and time preservation, that online resume builders are the obvious choice for creating your resume.
Novorésumé’s online resume builder is fast, easy to use, and perfect if you want to land that interview. You can start building your resume immediately just by clicking on the link, or you can pick one of our free resume templates, according to your needs.
Step #1: Pick a Word Resume Template
The first step in making a resume in Word is accessing its free resume templates. How you access the templates may change depending on the Microsoft Word version you’re using, but what you ultimately need to do is the following:
Open Word.
Select one of the Resume templates Word suggests, or simply search for “resume” and you’ll find a bunch more.
Choose the resume template that best fits your qualifications and professional profile.
Click “Create.”
You’re good to go: the template should appear as a Word document ready to be filled with your personal information and all other relevant sections.
Step #3. Include a Resume Summary or Objective
Next, you need to describe your professional experience or professional goals (in case you lack the experience) through the resume summary or objective.
Write a resume summary or resume objective — depending on which one best fits your resume — and try to express yourself in a way that will keep the recruiter’s attention for more than the traditional 7 seconds.
Quick recap: a resume summary is a 2-3 sentence overview of your career and is used in 90% of the cases. A resume objective is more commonly used among those with little professional experience or those who are changing careers and describes your professional goals.
Step #4: Create a Compelling Work Experience Section
This is where things get serious.
The work experience section is the most important part of your resume for obvious reasons and usually plays a decisive part in the recruiters’ decisions. So just filling up the gaps in the experience section of the Word template won’t be enough. You should try to make this section as compelling as possible — following some of the tips provided below.
But first, the basics. As with any standard format, the experience section should include the following components:
- Job title and position
- Company name and location
- Dates of employment
- Achievements and responsibilities
Again, how the resume looks in Word will depend on the template that you have chosen.
Obviously, the template lets you add as many professional entries as you wish — but that doesn’t mean you should go overboard. List your experience in reverse-chronological order, meaning: start from the latest and move back in time, based on the amount of professional experience you possess.
There are, of course, a couple of pro tips that you should follow even as you use the Word templates to make your experience section more compelling.
Pro Tip #1 — List achievements over responsibilities
Notice the example above.
Instead of responsibilities, we have opted to list achievements. Listing achievements over responsibilities whenever possible is one of the best ways to stand out in the eyes of recruiters. That’s because responsibilities are similar for one type of job, while achievements show exactly what you can contribute to the position.
Pro Tip #2 — Tailor your resume to the job you are applying for.
Another good practice is tailoring your resume to the job you are applying for. This can help you go through the ATS and land your resume right on the recruiters’ tables.
If you want to know exactly what information to include in your resume, how and when to list achievements over responsibilities, and how to tailor your resume to your job, head over to our complete guide on how to write a resume.
Step #5: Add Your Educational Background
Things should get quite easy after you get your professional experience section out of the way.
The education section of your resume should include the following:
- University name and location
- Years attended
- Program name / Degree obtained
Optionally, you can include your GPA, Minor degrees, or any special award or academic achievement. Our advice is to include them only if you are a recent graduate or entry-level professional with not much else to include in your resume, or if your education history is truly outstanding.
Step #6: Make Sure to Include Your Skills
At this point, you can consider most of the work done!
Now that you have reached the skills section, things get even easier. Make a bullet or numbered list of your hard and soft skills and you’re good to go.
Hard skills are usually measured through experience levels — you can place your experience level (usually categorized into Beginner/Intermediate/Advanced or Expert) into brackets, so you don’t take up too much space within the resume.
Pro Tip #3 — Tailor the skills and qualifications on your resume to the job
Take a look at the essential skills required on the job ad and see if you can incorporate them into your list of skills.
Step #7: Include Optional Resume Sections
Congrats — you can finally stretch your legs and even allow yourself a little pat on the back.
The additional sections are not mandatory in a resume, so if you’ve reached your resume space limit, you can just call it a day and save your resume.
They are, however, a great way to show off additional assets such as languages, hobbies and interests, and even volunteering experience on your resume!
- Remember to also determine your language knowledge levels. Those are Native, Fluent, Proficient, Intermediate, and Basic.
In the off chance that you still have some space left — considering resumes should be 1-2 pages at most and that Word templates are not as good at saving space as online resume builders — you can include the following optional sections:
- Certifications and Awards
- Publications
- Projects
Follow the same practice as with the skills section, and you’re good to go!
How to Format Your Word Resume
With all the essentials covered, let’s go over some formatting tips such as fonts, line spacing, and headings so that your Word resume looks as uniform and clean-cut as possible.
Best Resume Fonts in Word
We cannot repeat this enough — the resume font you use, matters. It matters just as much as first appearances matter and we all know they do, a lot.
The font that you decide to use will impact your resume readability whether you like it or not, so you should use a font that will help you stand out, but not in a bad way. What’s a bad way? Comic Sans and other similarly-looking comic fonts.
The usual Times New Roman, point-12, formula, on the other hand, will just blend you with the crowd.
Instead, consider using one of the following recruiter-friendly fonts which will complement your resume both on-screen and in printed form, according to Business News Daily:
- Calibri
- Cambria
- Garamond
- Didot
- Georgia
- Helvetica
- Arial
- Book Antiqua
- Trebuchet MS
Optimal Line Spacing for a Word Resume
The good thing about the Word resume template is that it usually has fonts and line spacing covered for you, yet it’s still good to know that the best line spacing for resumes is 1 or 1.15 between text and double lines after headings.
Feel free, however, to play around with line spacing when it comes to adjusting your resume layout.
Headings in a Word Resume
Again, Word templates do a good job of making the headings stand out. As a rule of thumb — and as is noticeable in the above examples — headings should be bigger than the rest of the text. So, if you’re using a 12 pt text, consider adjusting the headings between 14-16 pt.
You can also underline or bold each resume section heading, or even use a different font, but as we always advise: don’t go overboard and try to maintain the style of the Word resume template that you have chosen.
And by now, you should have a complete resume in Word that looks like this:
Key Takeaways
Well, here you have it — your nicely tailored resume in Word, ready to land you that job interview.
Although not the easiest task, we are convinced this article has given you all the necessary information on how to make a resume in Word and the confidence to do so easily.
Here’s what’s good to remember:
- Order your resume sections properly, usually in reverse-chronological order.
- Make sure that your section headings stand out from the rest of the text, by usually using a larger font size.
- Check if your chosen font, line spacing, and margins are aligned, readable, and professional-looking.
- Opt for an online resume builder such as the one Novorésumé provides for a more modern, time-saving, and HR-friendly resume.
Open Microsoft Word and go to File > New. Type resume into the search box. Click a resume template that you want to use. Click Create to open the resume template in MS Word.
Contents
- 1 How do you make a resume on Microsoft Word?
- 2 How do I make my own resume?
- 3 How do I make a resume in Word 2020?
- 4 Is there a Microsoft Word template for a resume?
- 5 How do you create a line for resume on word?
- 6 How do you make an infographic resume on Microsoft Word?
- 7 How do I create a resume template?
- 8 How would you describe yourself on a resume example?
- 9 Is resume now really free?
- 10 Which format do most employers prefer for resumés?
- 11 How do I add experience to my resume in Word?
- 12 How can I edit my resume in Word?
- 13 How do you put a line between words in Word?
- 14 How do I make an infographic resume?
- 15 Should you include infographic on resume?
- 16 Where can I make resume for free?
- 17 What should a resume include?
- 18 How can I describe myself in one word?
- 19 What are 3 words to describe yourself?
- 20 How do you sell yourself on a resume?
How do you make a resume on Microsoft Word?
How to Make a Resume in Word
- Access MS Word Templates.
- Make a Resume Header in Word.
- Add a Resume Objective/Summary.
- Write Your Experience Section in Word.
- Add Your Education Section.
- Add Skills to a Resume in Word.
- Add Additional Sections to Your Resume.
- Resume Fonts in Word.
How do I make my own resume?
Here’s how, step by step:
- Decide Which Type of Résumé You Want.
- Create a Header.
- Write a Summary.
- List Your Experiences or Skills.
- List Your Activities.
- List Your Education.
- List Any Awards You’ve Won and When You Won Them.
- List Your Personal Interests.
How do I make a resume in Word 2020?
How to Make a Resume on Word
- Open Microsoft Word and pick a template.
- Write your name and contact information at the top.
- Write a convincing introduction.
- Summarize your work experience.
- Add your education history.
- List your relevant job skills.
- Include career accomplishments and awards at the bottom.
Is there a Microsoft Word template for a resume?
If you need help creating a resume or cover letter, start with one of the dozens of professionally-designed resume and cover letter templates that are available in Word. In the search box, type Resume or Cover Letter.Double-click the template you want to use.
How do you create a line for resume on word?
To add a line under a header or line of text, highlight the text and select the bottom border option under Paragraph/Borders. Another way is to Insert>Shapes>choose the Line shape and drag the line under the text from left to right.
How do you make an infographic resume on Microsoft Word?
How to Customize an Infographic Resume in Word
- Replace the Information With Your Own. The first step is to replace the information with your own.
- Customize Contact Information. Customizing contact information.
- Customize the Story Section.
- Customize Skills and Competences Section.
- Customize the Interests Section.
How do I create a resume template?
How to fill in your resume template
- Start with a header.
- Include your title.
- Write an objective or summary statement.
- List your work history.
- Include key skills and qualifications.
- Fill out the education section.
- List your interests (optional)
How would you describe yourself on a resume example?
Positive words to describe yourself
- Able. I am able to handle multiple tasks on a daily basis.
- Creative. I use a creative approach to problem solve.
- Dependable. I am a dependable person who is great at time management.
- Energetic. I am always energetic and eager to learn new skills.
- Experience.
- Flexible.
- Hardworking.
- Honest.
Is resume now really free?
Yes! Our resume builder is completely free to use.Plus, once you create your resume using our resume builder, you can access it anytime and anywhere online by signing into the Resume.com Dashboard.
Which format do most employers prefer for resumés?
Chronological resume
Chronological resume
This is the most common type of resume format and is generally preferred by most hiring managers. A chronological resume leads with your work history, which should list your current and previous positions in reverse chronological order.
How do I add experience to my resume in Word?
Replies (5)
- Move the pointer just to the left of one of the existing sections, such as Experience or Education.
- Click once to select the ‘section’ which is actually a row of the table, then Copy.
- It’s then just a matter of pasting in the preferred location;
How can I edit my resume in Word?
Edit templates
- Click File > Open.
- Double-click This PC. (In Word 2013, double-click Computer).
- Browse to the Custom Office Templates folder that’s under My Documents.
- Click your template, and click Open.
- Make the changes you want, then save and close the template.
How do you put a line between words in Word?
To do so, click the Insert tab and click the Shapes dropdown (in the Illustrations group). Choose a line from the Lines section and click where you want the line to start.
How do I make an infographic resume?
How to create an infographic resume from scratch
- Create the structure.
- Choose a template to start designing your resume.
- Make the design your own.
- Nail your intro.
- Add different sections that are relevant to the job.
- Testing & feedback.
- Download your new shiny resume.
- Keep it simple.
Should you include infographic on resume?
Visualize your interests and skills using charts
An infographic resume gives you the opportunity to present your qualifications in a visually engaging way. Look for dates, numbers, and key points in your graphic resume and use charts to visualize them.
Where can I make resume for free?
Easy and Free Online Resume Builder. Create your resume in minutes with Indeed’s free resume builder. Download it to your computer or use it to apply for any job on Indeed.
What should a resume include?
What to Put on a Resume: Good Things You Should Include
- Contact Information.
- Opening Statement: Summary or Objective.
- Work History.
- Education.
- Soft Skills and Technical Skills.
- Certifications and Professional Memberships.
- Achievements and Awards.
- Additional Sections (Community Involvement, Volunteering, etc.)
How can I describe myself in one word?
Positive words to describe yourself in any situation. Words to describe yourself in an interview. Words to describe yourself on a resume.
Words to Describe Yourself in an Interview.
| Resourceful | Focused | Reliable |
|---|---|---|
| Diligent | Thorough | Analytical |
| Persistent | Passionate | Dynamic |
| Dedicated | People-oriented | Team player |
What are 3 words to describe yourself?
Good Words to Describe Yourself (+ Example Answers)
- Diligent / Loyal / Reliable. I am always the first person my friends call because they know I am always there for them.
- Creative / Innovative / Visionary.
- Motivated / Ambitious / Leader.
- Honest / Ethical / Conscientious.
- Friendly / Personable / Extrovert.
How do you sell yourself on a resume?
3 Ways to Sell Yourself In Your Resume
- Quotes – Yes. Don’t be afraid to add a short quote directly on your resume that speaks directly to your brilliance.
- Quantifiable Achievements – Make sure each position has 3 to 5 bullets that highlight accomplishments that include some numbers.
- Be an Achiever Not a Doer –