
![]()
Download Article
![]()
Download Article
- Designing Your Paper
- Creating Your Paper
- Q&A
- Tips
- Warnings
|
|
|
|
This wikiHow teaches you how to create a newspaper using Microsoft Word’s built-in features. Once you have an idea of what your newspaper will look like, you can create a newspaper in Word on both Windows and Mac computers.
-

1
Examine a few different newspapers. To understand how the basic elements of a newspaper work together, look at how the following elements of each paper come together:
- Stories — The meat of the paper, where the majority of the text is.
- Images — Photos and graphics are an essential piece of newspaper design. They break up large swaths of text and help provide context for stories.
- Headlines — The headline is the first thing the reader will see before deciding whether or not the story is worth their time.
-
2
Account for printer size. Unless you have access to an industrial-sized printer, your document won’t be able to be more than the 8.5-inch-by-11-inch size that most printer paper comes in.
- This is the default page size setting for Microsoft Word on most computers.
Advertisement
-
3
Plan your layout before beginning. It will help to have a basic idea of your paper’s design before opening Word and messing with the formatting. Take a few sheets of scratch paper and sketch out a few different designs.
- Design different pages. The front page will look significantly differently than inside pages, and different sections will have slightly different styles.
- Draw lines to see how columns will affect the flow of your paper. Too many columns will make your text too crowded, while too few columns will lead to your stories appearing blocky.
- Try placing text blocks in different places on your scratch page. Wrap text around images, or try placing an image directly above or below the story that it’s related to.
- Experiment with headline placement. Headlines need to grab the reader’s attention, but they can’t be so large that they’re distracting.


Advertisement
-
1
Open Microsoft Word. Double-click the Word program icon, which resembles a white «W» on a dark-blue background.
-
2
Click Blank document. It’s a white box in the upper-left side of the page. Doing so will open a new, blank document.
- Skip this step on a Mac.
-
3
Add a title to your newspaper. Type in the title of your newspaper or the headline that you want to use.
-
4
Start a new line. Press the ↵ Enter key to jump down to a new line.
- This step is so that you can add columns without dividing the title.
-
5
Click Layout. This tab is in the dark-blue ribbon at the top of the Word window. Doing so will open the Layout toolbar below the ribbon.
-
6
Click Columns. It’s on the left side of the Layout toolbar. A drop-down menu will appear.
-
7
Click More Columns…. This option is at the bottom of the Columns drop-down menu. A window will appear with additional options.
-
8
Select a column number. For example, click Two at the top of the window to divide your paper into two columns.
- You can also change the number in the «Number of columns» box to your preferred number of columns.
-
9
Click the «Apply to» drop-down box. It’s in the lower-left side of the window.
-
10
Click This point forward. This option is in the drop-down menu. Doing so will apply your columns to your document with the exception of your title.
-
11
Click OK. This will split your Word document into two or more columns (depending on how many you chose).
-
12
Add your written content. Start with a title, then press Enter}} and begin writing a piece. When you get to the end of a piece, skip a couple of lines and then begin another title and piece.
- As you type, the left-most column will fill up first and then feed into the right column(s).
-
13
Insert photos. Click the place in your newspaper where you want to insert a photo, then click the Insert tab, click Pictures, select a picture, and click Insert in the bottom-right corner of the window.
- You can shrink or enlarge your photo by clicking and dragging one of the picture’s corner knobs in or out.
- To wrap text around the photo, click the photo, then click the Format tab, click Wrap Text, and click a wrap text option.
-
14
Center your newspaper’s title. Click the Home tab, highlight the title, and then click the «Centered» icon, which resembles a stack of centered horizontal lines in the «Paragraph» section of the toolbar.
-
15
Format your newspaper. There are countless things you might want to change about your newspaper before you save it, but there are a few main things you’ll likely need to change:
- Text Font and Size — Highlight the text that you want to change, then click the downward-facing arrow next to the current font in the «Font» section of the Home tab. Select a new font, then select a size in the numbered drop-down box next to the font box.
- Bold Titles — Highlight the title(s) you want to change, then click B in the «Font» section to make the text bold. You can also click the U or I button here to underline or italicize the text, respectively.
-
16
Save your work. Press Ctrl+S (Windows) or ⌘ Command+S (Mac) to save your newspaper, then select a save location, enter a title, and click Save. Your newspaper is ready to go!


Advertisement
Add New Question
-
Question
How can I make the first letter larger like newspapers do?

Place your text cursor on the letter in question, then click «insert» and select «drop cap.»
-
Question
What is the font used in newspapers?
Times New Roman is the most common ‘newspaper’ font. This will give it the authentic look.
-
Question
How can I add a picture in the first column only so that the text will still flow?
Wrap the image specifically, so text surrounds it. Place it where you want it, then click wrap image.
See more answers
Ask a Question
200 characters left
Include your email address to get a message when this question is answered.
Submit
Advertisement
-
Check out handy newspaper fonts, like Old English Text. In order to really make your Microsoft Word publication look «newsy,» you may want to look into what kinds of fonts are most popular with established newspapers. A variety of websites and print resources can show you the fonts that newspaper printers have used over the years.
Thanks for submitting a tip for review!
Advertisement
-
If you don’t select «Black and White» when printing your newspaper, the printing itself will likely be expensive.
Advertisement
About This Article
Article SummaryX
Before creating your newspaper in Word, consider planning out your newspaper’s content and design so that you have a general idea of how to format the Word document. Once you know what your newspaper should look like, create a new Word document and add your newspaper’s title at the top. You can insert columns by clicking Layout, clicking Columns, and selecting a number of columns. Write your newspaper articles’ content in the columns; if you want to add images, click Insert, click Pictures, and select a photo from your computer.
Did this summary help you?
Thanks to all authors for creating a page that has been read 638,505 times.
Reader Success Stories
-

Shilpa Suresh
Jun 24, 2017
«I have created 2 or 3 newsletters but after reading the tips, I am sure to make a better newsletter. Thank you…» more
Is this article up to date?
Содержание
- Способ 1. «Макет» – «Колонки»
- Способ 2: «Вставка» – «Таблица»
- Расчет страниц при печати книги/газеты
- Вопросы и ответы
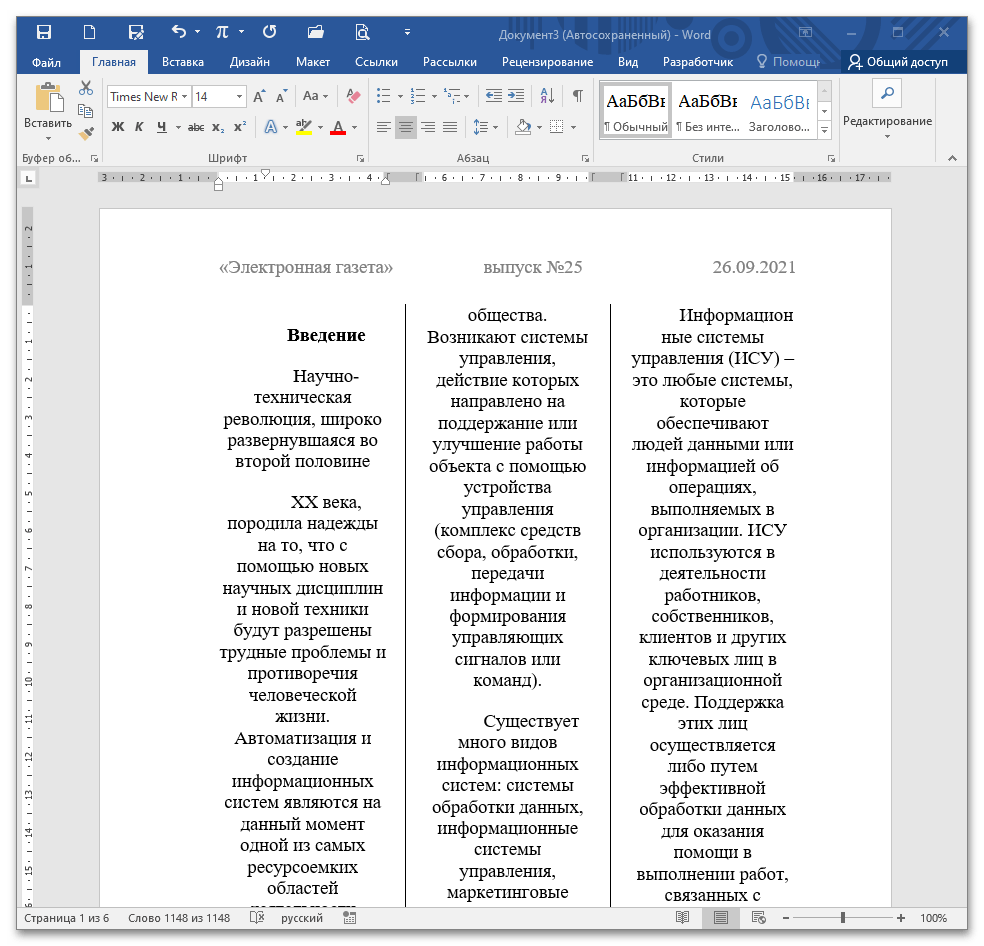
Способ 1. «Макет» – «Колонки»
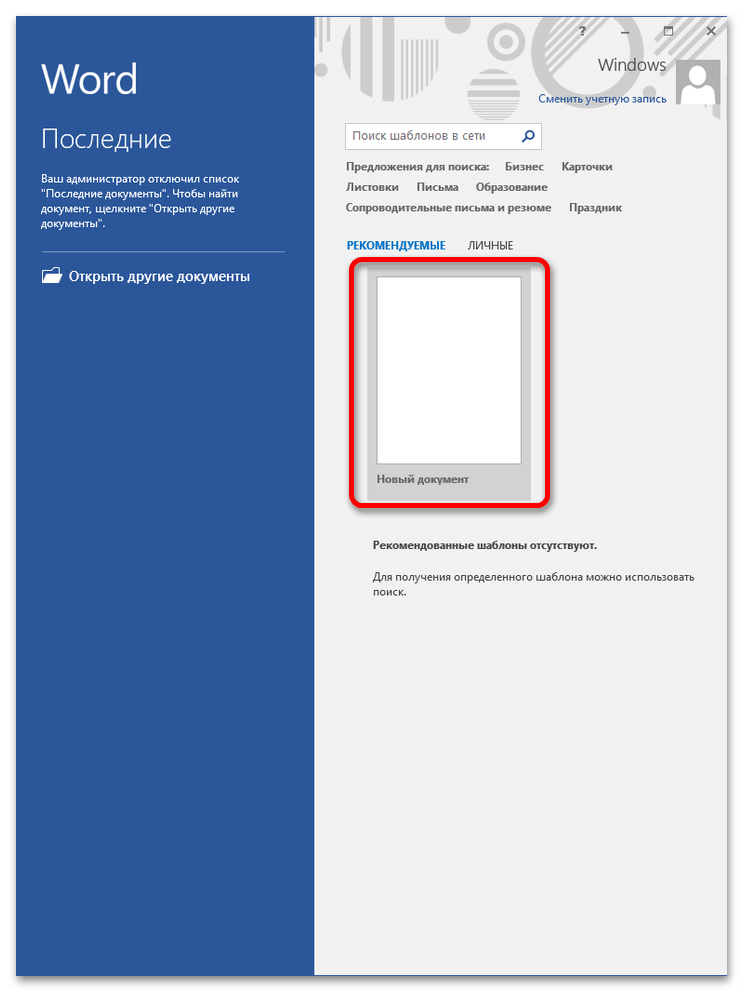
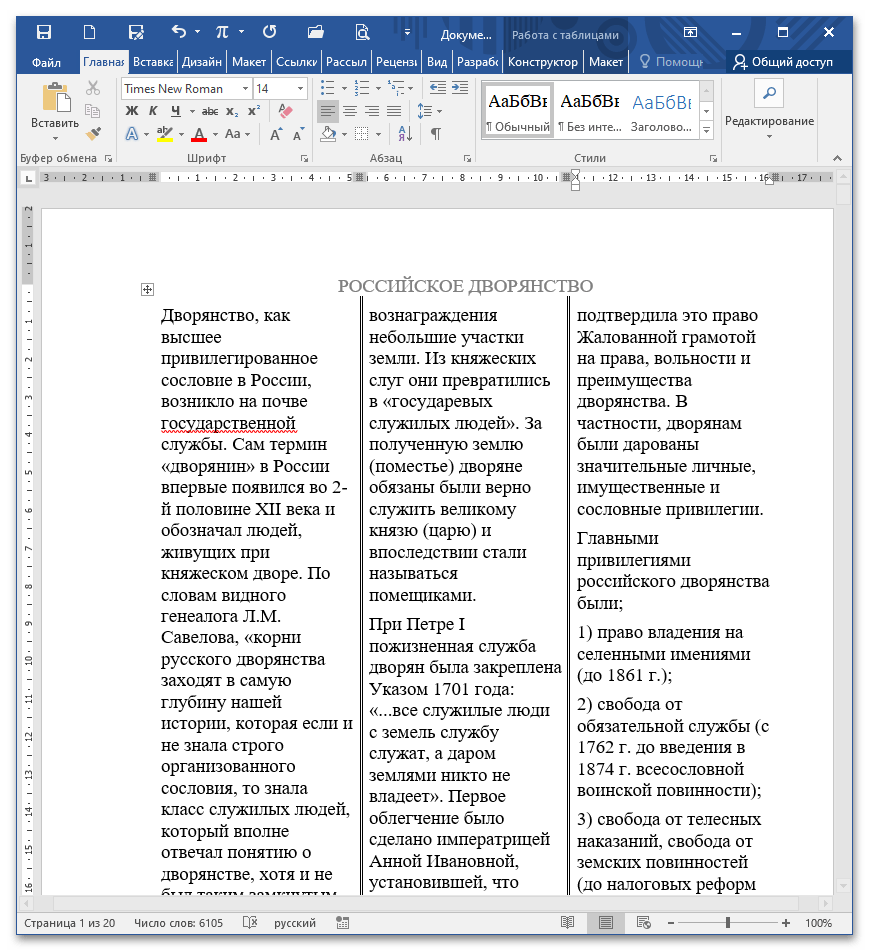
- Создайте документ MS Word через нажатие на пиктограмму на рабочем столе или в «Пуске». В 2016-2019 версии текстового процессора необходимо нажать на пустой бланк в окне, появившемся после запуска программы.
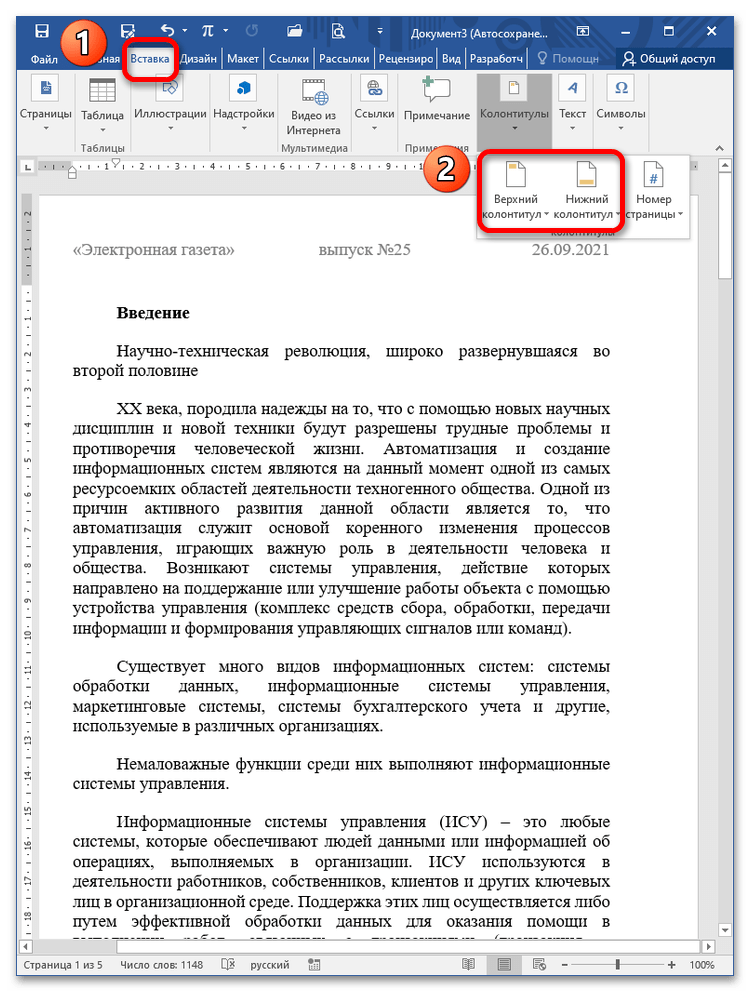
- Продумайте формат страниц: первый лист всегда отличается по содержанию (он должен привлечь внимание и заинтересовать целевую аудиторию). Расположите текст, необходимые изображения, назовите статьи, пронумеруйте страницы. Если хотите, чтобы отображались колонтитулы, создайте их через команду «Вставка» – «Верхний колонтитул»/«Нижний колонтитул». Здесь обычно отображается дата и номер выпуска, главная новость на странице и т.д.
Подробнее: Добавление колонтитулов в Microsoft Word
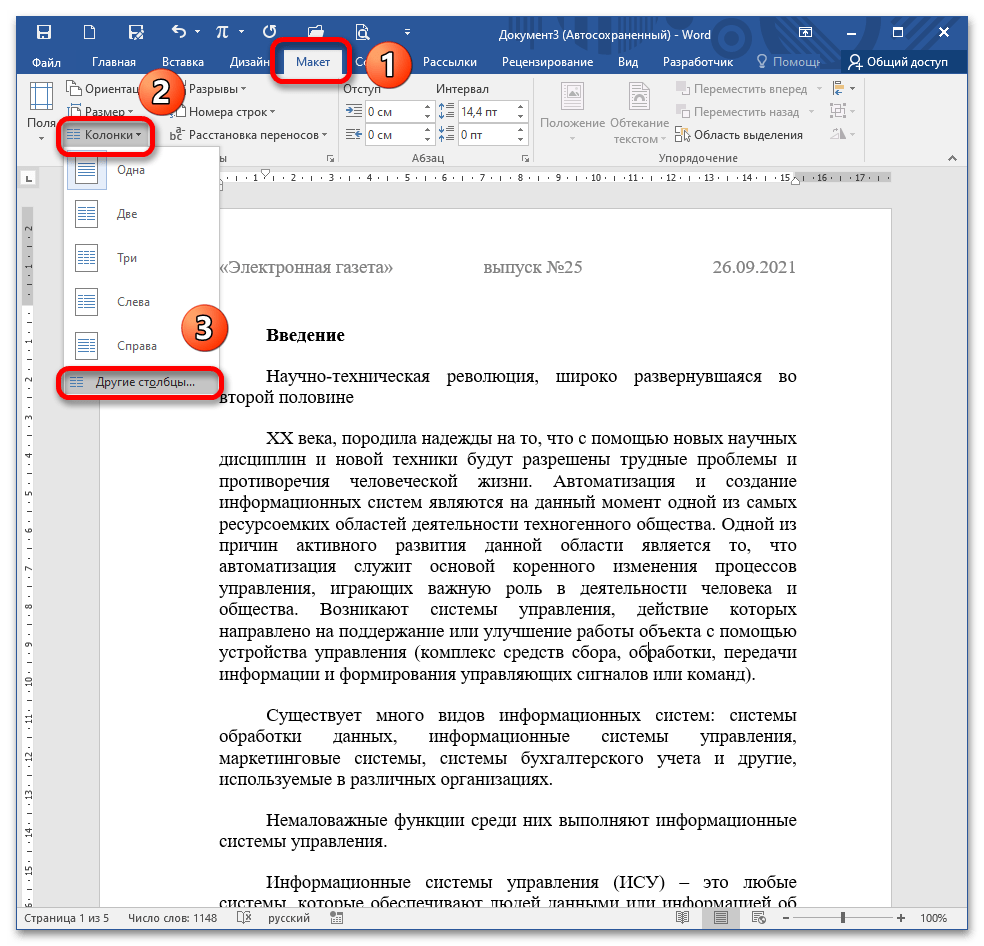
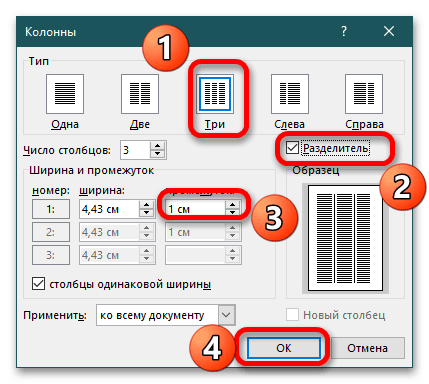
- Когда материал полностью готов, перейдите в меню «Макет» – «Колонки» – «Другие столбцы».
- В открывшемся окне нужно указать параметры отображения столбцов. Для начала выберите количество столбцов, затем укажите расстояние между ними и подтвердите действие нажатием на «ОК». Если вы хотите, чтобы между колонками была вертикальная черта, отметьте опцию «Разделитель».
- Весь документ автоматически преобразуется, вы заметите разделение на колонки. Из-за выравнивания по ширине строки сильно растягиваются. Чтобы это исправить, нажмите CTRL+A, а после CTRL+L для выравнивания по левому краю, CTRL+E – по центру.
- Чтобы текст смотрелся органично, поэкспериментируйте с настройками шрифта и абзаца. Для этого воспользуйтесь инструментами на ленте во вкладке «Главная» либо вызовите диалоговые окна через пиктограмму в виде стрелочки в правом нижнем углу каждого блока.
Подробнее: Форматирование текста в документе Microsoft Word

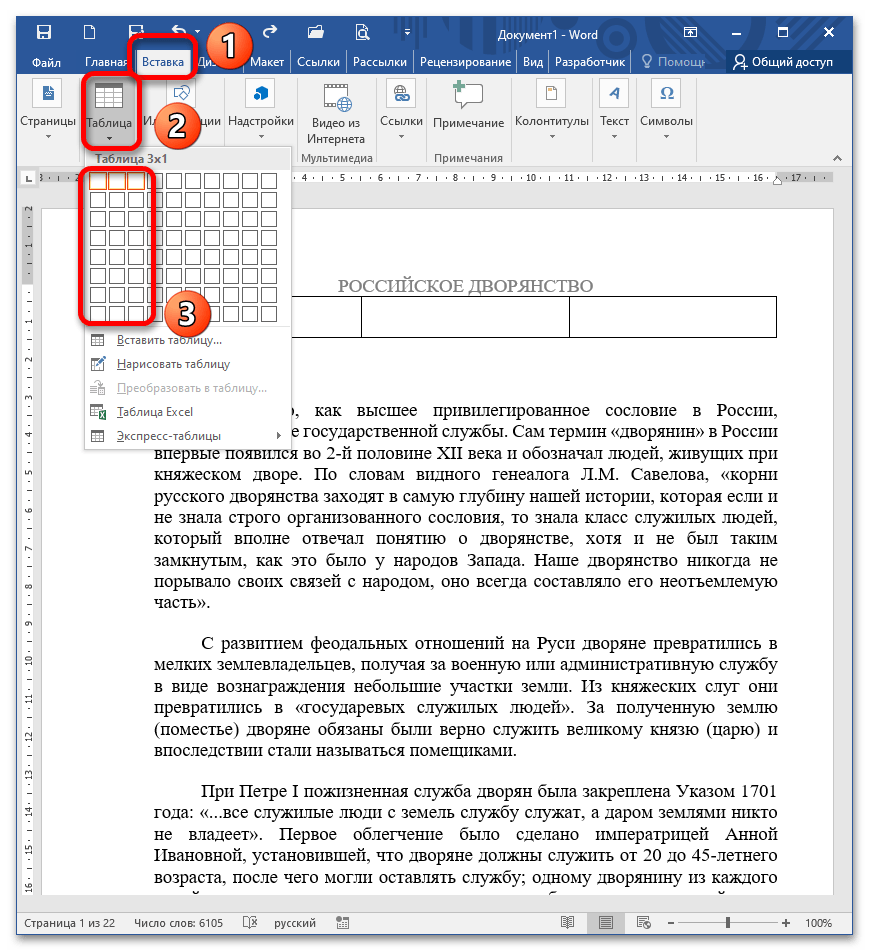
Способ 2: «Вставка» – «Таблица»
Чтобы сформировать электронную газету, можно заполнить таблицу материалом, после чего сделать границы неотображаемыми при печати.
- Перейдите в меню «Вставка» – «Таблица», укажите количество столбцов и строк для отображения текста по колонкам. Как вариант, можно воспользоваться пунктом «Вставить таблицу», где открывается диалоговое окно для подробной настройки.
Подробнее: Как сделать таблицу в Microsoft Word
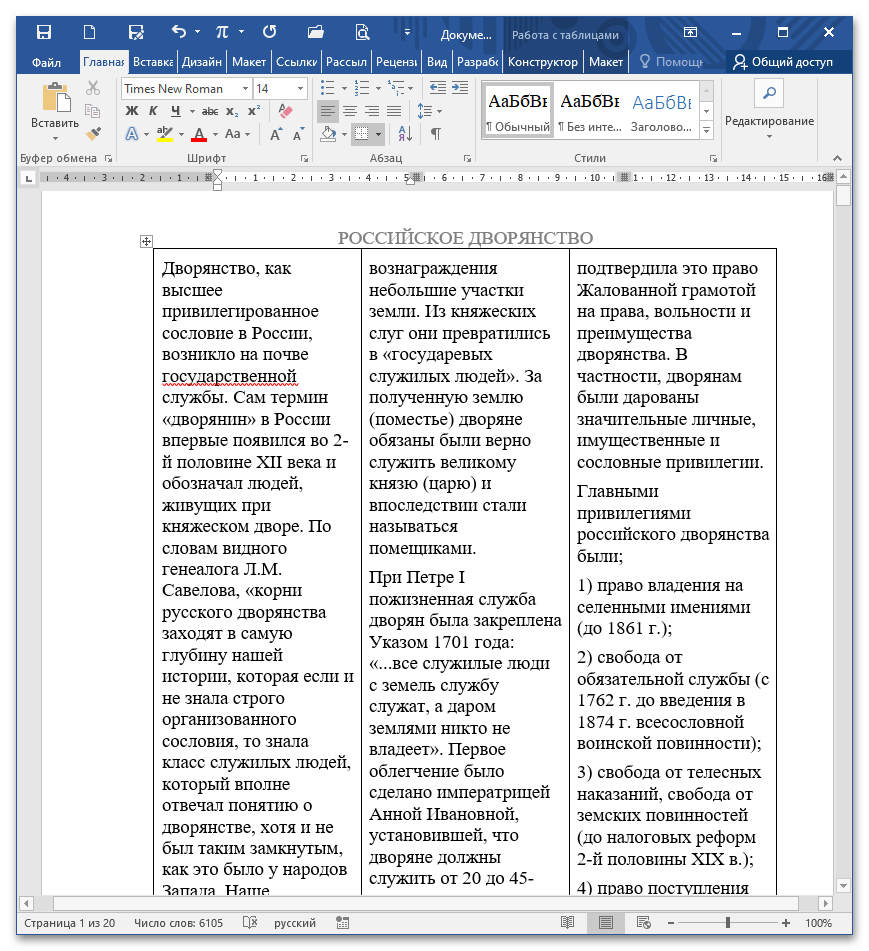
- Когда таблица отобразится на листе, заполните строки необходимой информацией. Главное, проследите, чтобы сведения вставлялись корректно. Возьмите за правило: одна строка – один лист, на другую страницу строка не переходит. В таком случае будет легче редактировать текст и не бояться смещения.
- Чтобы сделать границы невидимыми, выделите таблицу и раскройте опцию «Границы» на ленте в блоке «Абзац». Кликните на пункт «Нет границы». Очертания таблицы исчезнут, при печати отображаться не будут. Если вы хотите сделать особые очертания между столбцами, кликните на пункт «Границы и заливка» в этом же меню.
Подробнее: Скрытие всех или отдельных границ таблицы в Microsoft Word
- В этом диалоговом окне вы можете выбрать тип и толщину линии, которая будет находиться между столбцами. После всех манипуляций подтвердите действие нажатием на «ОК».
- Вы увидите, что внешние очертания исчезли, однако между столбцами появилась линия по заданным параметрам.


Расчет страниц при печати книги/газеты
Если газета будет не только электронная, но и печатная в небольшом тираже, необходимо знать, как правильно ее распечатать. Существуют специальные сервисы, позволяющие онлайн рассчитать номера листов при печати тетрадей, газет, книг, т.е. продукции, которую нужно согнуть пополам и впоследствии скрепить.
Перейти на сайт Буклеттер
- Перейдите по указанной ссылке и в поле «Введите количество страниц» укажите соответствующее число листов. Помните, что оно должно нацело делиться на 4 для корректного пересчета. Нажмите кнопку «Рассчитать». Если указанное число не соблюдает условие, сервис самостоятельно добавляет страницы и проводит расчет. При печати пустые страницы будут добавлены в конце.
- На сайте размещена видео инструкция, а также текстовое сообщение о необходимости скопировать раскладку.
Скопируйте номера, указанные в поле «Лицо». Откройте готовый документ Ворд, зайдите в окно печати (CTRL+P) и укажите необходимые параметры: «Зеркальные поля», «2 страницы на листе» и, собственно, номера листов, которые пройдут через принтер в первый раз.
Подробнее: Печать документов в Microsoft Word

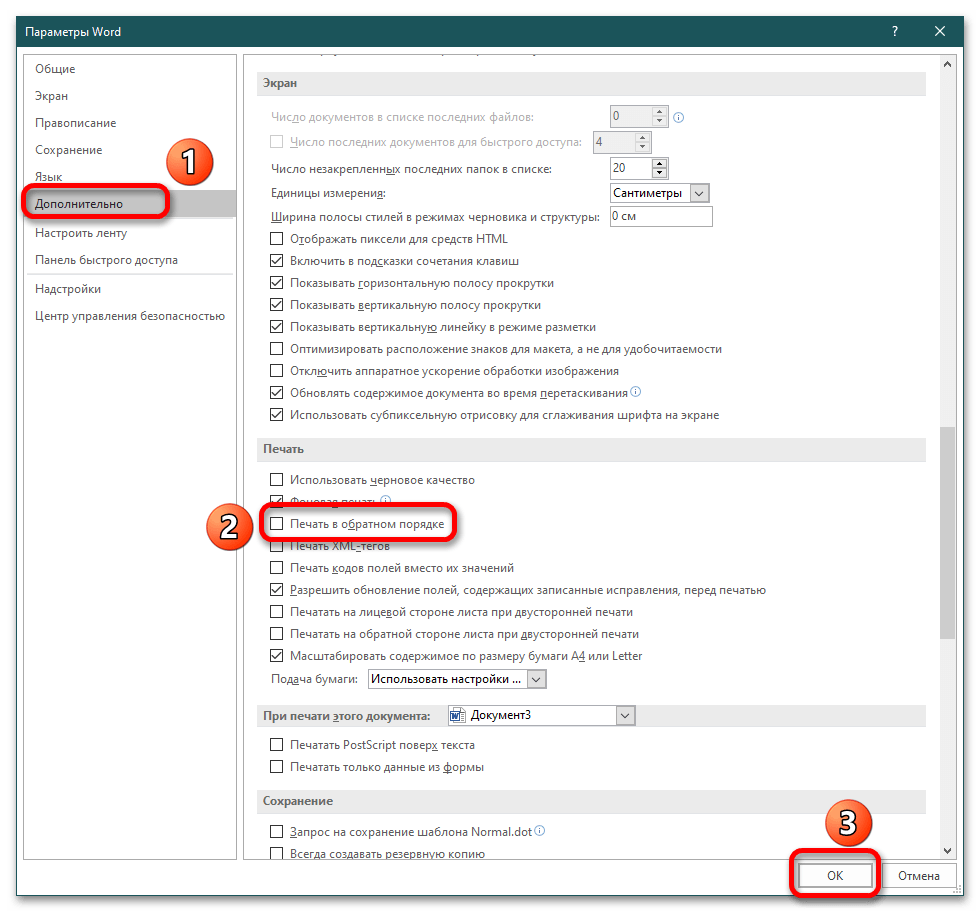
Помните, что перед началом печати нужно отключить функцию печати в обратном порядке («Файл» – «Параметры» – «Дополнительно» – «Печать в обратном порядке», галочка не стоит).
- После того как все листы отпечатаны, поверните стопку обратной стороной и скопируйте поле «Оборот». Вставьте номера страниц в окно печати, также устанавливая зеркальные поля и 2 страницы на листе. Запустите печать и дождитесь завершения процесса. После этого все листы рассортируйте и согните пополам. Скрепите удобным способом, например, скобами или пружиной.
Если газета будет распечатываться, как обычный документ, то в настройках окна печати выставьте опцию «Напечатать только нечетные страницы» и запустите процесс.
После этого поверните стопку обратной стороной вверх и в окне печати установите пункт «Напечатать только четные страницы». Запустите процесс, после чего рассортируйте документ и скрепите удобным способом.
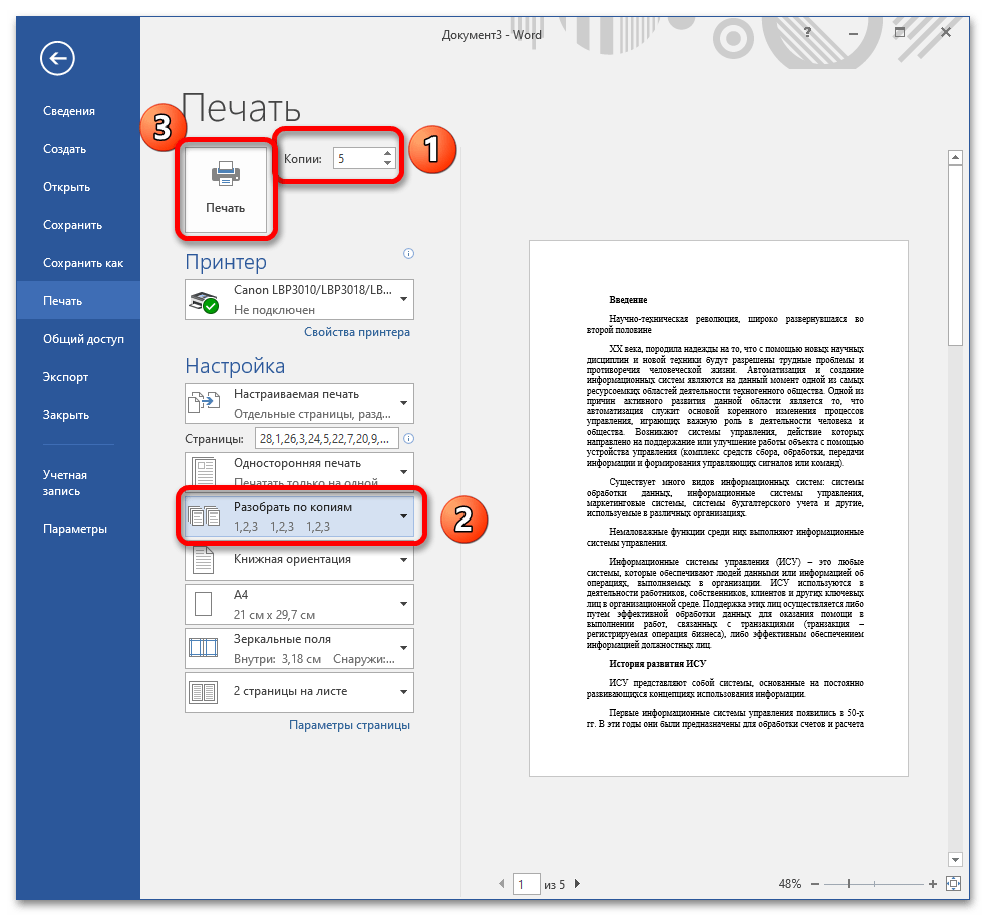
Примечание: если необходимо несколько экземпляров газеты, установите дополнительные опции в окне печати: «Копии» – количество экземпляров, и «Разобрать по копиям» – тут доступны два пункта «Разобрать» или «Не разбирать», все зависит от вашего умения пользоваться конкретным принтером.


Еще статьи по данной теме:
Помогла ли Вам статья?
Due in part to customers overwhelmingly obtaining news information from electronic media such as tablets, smart phones and the Internet, print journalism has receded to the point where the Newspaper Death Watch website offers a «rest in peace» section listing organizations that, like their pages, have folded. Bridge the gap between the printed page and electronic readability by making your own newspaper using Microsoft Word. Although Word doesn’t offer a newspaper template, you can quickly manipulate the software into something tangible to print out or to distribute online.
-
Start Word. Click the «Page Layout» tab. Click the «Size» button below the tab. Click the «More Paper Sizes» option. Enter the dimensions for the newspaper into the «Width» and «Height» boxes, such as «11» and «17» respectively. Keep in mind that most standard printers can only print 8.5 inches by 11 inches. Click the «OK» button.
-
Click the «Columns» button on the ribbon. Click the «Three» button. You won’t see anything change on the Word document since there isn’t text yet, but you will see the columns break into three on the small ruler stretching across the top of the Word document.
-
Click the «Insert» tab. Click the «Header» button and select the «Alphabet» option or whichever is your preference. You want to choose one with a line running along the bottom to serve as your masthead distinction.
-
Click into the «Type Text» section of the header. Type the name of the newspaper. Press the «Enter» key and type the date of the issue, volume number and any other details you desire.
-
Highlight the newspaper name text. Click the «Home» tab. Increase the font with the «Font size» menu and change the font if desired. Click the «Align Center» button to align the header in the center of the page.
-
Click the «Insert» tab again. Click the «Picture» button. Browse to a digital logo for the newspaper and double-click it, then drag it into place on the left or right side of the masthead. Check the «Different First Page» box on the green «Header & Footer Tools» tab’s ribbon so the masthead only appears on the first page of the newspaper. Click the red «X» button, «Close Header and Footer,» to close the masthead and return to the Word document.
-
Type the first article on the page, starting with the title, author’s byline, city and state information. As you type, Word performs word wrapping in the columns and moves text to a new column when you come to the end of one.
-
Add pictures to the newspaper to go with the articles following the same process as importing a logo, by clicking the «Insert» tab’s «Picture» button and browsing to and double-clicking the picture.
-
Click the «File» tab. Click «Save As.» Type a name for the newspaper, with a version number if desired, such as CityNews08-21-2011, and click the «Save» button.