
-
Place your cursor at the spot where you want to insert the symbol.
-
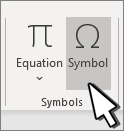
Go to Insert > Symbol.

-
Select a checkmark symbol to insert or do the following
-
Select More Symbols.
-
Scroll up or down to find the checkmark you want to insert.
-
Different font sets often have different symbols. Use the Font selector above the symbol list to pick the font you want.
-
-
Double-click the symbol to insert it into your document.
-
Select Close.
Tip: If you want to make your checkmark larger or smaller, select it and use the Font Size setting.
-
Place your cursor at the spot where you want to insert the checkmark.
-
Go to Insert > Advanced Symbol > Symbols.
-
Choose the checkmark symbol that you want.
-
Select Insert.
-
Select Close
![]()
Download Article
Quick ways to add a checkmark icon in Word using the «Insert» menu and shortcuts
![]()
Download Article
- Using the Insert Menu (Windows)
- Using the Insert Menu (Mac)
- Creating a Check Mark Shortcut (Windows)
- Using a Keyboard Shortcut (Windows)
- Using Character Viewer (Mac)
- Creating a Clickable Check List
- Creating a Check Mark Bullet List
- Q&A
- Tips
|
|
|
|
|
|
|
|
If you want to create a simple checklist or keep track of tasks in Microsoft Word, you can insert a checkmark symbol. Word has a built-in Symbols menu that includes the checkmark icon. You can easily access this in the «Insert» tab. You can also set a keyboard shortcut or apply the style to a bullet list. This wikiHow will show you how to add a checkmark symbol (✓) or checkbox to a Microsoft Word document on both Windows and Mac computers.
Things You Should Know
- Go to «Insert» → «Symbol» → «More Symbols» → select «Wingdings» → select check mark → «Insert».
- Click the bullet list arrow → «Define New Bullet» → «Symbol» → select «Wingdings» → select check mark → «OK».
- On a full-sized keyboard, use the shortcut «ALT» + «0252» (Number Pad). Change the font to «Wingdings».
-
1
Place your cursor where you want the check mark to appear. You can put a checkmark before, after, or in between characters.
- If you haven’t installed Microsoft Office on your PC, you can install it now from https://www.office.com.[1]
- You must have a subscription to use Office 365.
- If you haven’t installed Microsoft Office on your PC, you can install it now from https://www.office.com.[1]
-
2
Click Insert. This will be on the top toolbar, between Home and Draw.
Advertisement
-
3
Click Symbol. This will be in the Symbols section, next to Equation.
-
4
Click More Symbols…. A new window will open.
-
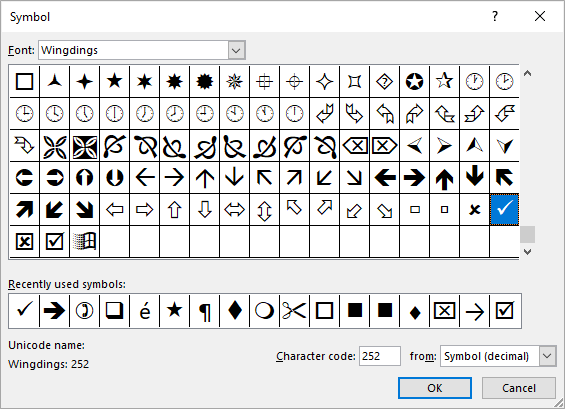
5
Click the «Font» drop-down menu and select Wingdings. The drop-down menu will be at the top of the window, in the Symbols tab.
-
6
Select the check mark symbol. When you switch to Wingdings, you’ll see a new collection of symbols. Find the check mark located near the bottom of the selection. You may need to scroll down.
-
7
Click Insert. This will add the check mark to your document.
- The window won’t close after clicking Insert. You can place your cursor in another area and click Insert again to add another checkmark in another location.
- When you’re finished, click Close to return to your document.
- If you need to add another checkmark later, click Insert → Symbol → select the checkmark from the drop-down menu. It will now appear since you used it recently.


Advertisement
-
1
Place your cursor where you want the check mark to appear. You can put a checkmark before, after, or in between characters.
-
2
Click Insert. This will be on the top toolbar, between Home and Draw.
-
3
Click Advanced Symbol. You can find this on the right side, next to Equation.
-
4
Click Symbols. This is the left tab. You may already be on this tab.
-
5
Select the check mark symbol. Scroll through the available symbols until you find the checkmark, then click it.
- If you can’t find the checkmark icon, click the «Font» drop-down menu, scroll down, and select Wingdings. New symbols will appear. Select the checkmark.
-
6
Click Insert. This is the blue button in the bottom-right corner. The check mark will be added to your document.
- The window won’t close after clicking Insert. You can place your cursor in another area and click Insert again to add another checkmark in another location.
- When you’re finished inserting a check mark symbol, click Close to return to your document.


Advertisement
-
1
Click the Insert menu in Word. Another easy way to add a check mark to your Word document is to create a simple keyboard shortcut. Start by clicking the Insert tab, which is on the top toolbar between Home and Draw.
-
2
Click Symbol. This will be in the Symbols section, next to Equation.
-
3
Click More Symbols…. A new window will open.
-
4
Click the «Font» drop-down menu and select Wingdings. The drop-down menu will be at the top of the window, in the Symbols tab.
-
5
Select the check mark symbol. When you switch to Wingdings, you’ll see a new collection of symbols. Find the check mark located near the bottom of the selection. You may need to scroll down.
-
6
Click Shortcut Key…. This will be on the bottom-left corner, next to AutoCorrect….
-
7
Assign a shortcut. Click the «Press new shortcut key» field if your cursor isn’t already in the field. Use a combination of a modifier key (such as Alt) and an alphanumeric key.
- For example, press ALT + C at the same time. This will assign the checkmark symbol to this shortcut.
- Avoid using a combination of keys that already represents a different shortcut. (Ex: CTRL + C, which already represents Copy.)
-
8
Click Assign. This will assign your shortcut to the checkmark symbol.
- Click Close on the Customize Keyboard window and Symbol window.
-
9
Use your shortcut. If you set ALT + C as your shortcut, press it on your keyboard.
- The checkmark symbol will be entered wherever your cursor is.
- Make sure to save your document.


Advertisement
-
1
Place your cursor where you want the check mark to appear. You can put a checkmark before, after, or in between characters.
- This method will only work if you have a full-sized keyboard that has a numeric keypad.
-
2
On your full-sized keyboard, hold down Alt and type 0252. You should be using the 0252 on your number pad. This is the section on the far-right of your keyboard. Make sure your Number Lock (NumLock) is enabled.
- The character will appear as an umlaut in most fonts.
-
3
Highlight the character and change the font to «Wingdings». It must be changed to Wingdings in order to appear as a checkmark.
-
4
Use the on-screen keyboard (optional). Use these steps only if you don’t have a full-sized keyboard.
- On Windows, type «on-screen keyboard» into the Start menu and launch the program.
- Click Options on the keyboard and check the box next to Turn on numeric key pad. Click OK.
- Click NumLock to enable it. The key will turn blue and reveal the numbers.
- Hold Alt on your physical keyboard and use your mouse to click 0252 on the on-screen keyboard.
- You may need to press any key on your keyboard for the umlaut to appear.
- Highlight the character and change the font to «Wingdings».
- On Windows, type «on-screen keyboard» into the Start menu and launch the program.


Advertisement
-
1
Place your cursor where you want the check mark to appear. You can put a checkmark before, after, or in between characters using a checkmark emoji.
-
2
Click the Edit menu. You’ll see it at the top-right corner of your Mac’s screen.[2]
-
3
Click Emoji & Symbols. This opens Character Viewer, which contains many symbols and emoji you can easily add to any document.
-
4
Search for the check. Type check into the search bar to filter the symbols to display only checkmarks.
-
5
Click the checkmark to add it to your document. You can now insert additional check mark symbols or close the Character Viewer to return to your document.


Advertisement
-
1
Enable the «Developer» tab in Word. If you need to create an entire clickable checklist in your document, you’ll need to enable the Developer tab first. Go to File → Options → Customize Ribbon. Check the box for Developer underneath the Main Tabs header. Click OK.
-
2
Click the Developer tab. After enabling it, this will be located between View and Help.
-
3
Place your cursor where you want the check mark to appear. You can put a checkmark before, after, or in between characters.
-
4
Click the checkmark box. This can be found in the Controls section. It looks like a box with a green checkmark inside. The checkmark box will be added to your document.
- Click the box to mark the X inside.
- This will save to your default layout, but you can always create a Word template to make it easier to create clickable checklists in the future.


Advertisement
-
1
Open a project in Microsoft Word. This looks like a W on top of a blue square. Microsoft Word is available to install for Windows and Mac.
- You must have a subscription to use Office 365.
- Use this method to create a list with checkmarks.
-
2
Place your cursor where you want the check mark to appear. This is where you’ll create your list.
-
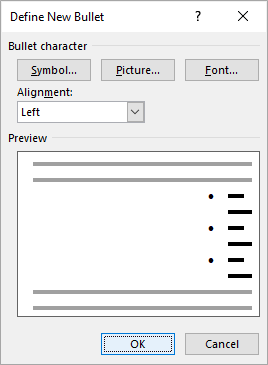
3
Click the bullet list arrow. This will be in the Paragraph section.
- A drop-down menu will open.
-
4
Click Define New Bullet…. You can find this at the bottom of the drop-down menu.
- A new window will open.
-
5
Click Symbol. This will be at the top of the pop-up window.
-
6
Click the «Font» drop-down menu and select Wingdings. The drop-down menu will be at the top of the window, in the Symbols tab.
-
7
Select the check mark symbol. When you switch to Wingdings, you’ll see a new collection of symbols. Find the check mark located near the bottom of the selection. You may need to scroll down.
-
8
Press OK twice. You’ll need to click OK to close the Symbol window and Define New Bullet window.
-
9
Use your checkmark list. Click the bullet list drop-down menu and select the checkmark from the Bullet Library.
- Enter any line of text you want, then press Enter to create a new checkmark on the next line.
- If needed, you can format your document if you want to adjust the style.


Advertisement
Add New Question
-
Question
How do I insert a check mark in a box in a word document?

Change font to Marlett and type a lower case «a». You’ll get a check mark!
Ask a Question
200 characters left
Include your email address to get a message when this question is answered.
Submit
Advertisement
-
On a Mac, you can also use the Option + V keyboard shortcut to insert a checkmark.
-
Once you’ve inserted one checkmark, you can copy it by selecting it and pressing CTRL + C (Windows) or Command + C (Mac), after which point you can paste it anywhere you like by pressing Ctrl + V (Windows) or Command + V (Mac).
Thanks for submitting a tip for review!
Advertisement
About This Article
Article SummaryX
1. Click Insert.
2. Click Symbol.
3. Click More Symbols.
4. Select Wingdings as the font.
5. Click the check mark.
Did this summary help you?
Thanks to all authors for creating a page that has been read 1,540,652 times.
Is this article up to date?
Insert or Type a Check Mark or Tick Mark Symbol in Microsoft Word (with Shortcuts)
by Avantix Learning Team | Updated April 2, 2021
Applies to: Microsoft® Word® 2013, 2016, 2019 or 365 (Windows)
You can insert or type a check mark or tick mark symbol in a Word document in several ways. Check marks can be inserted using built-in commands or keyboard shortcuts. It’s important to note that there is a difference between inserting a static check mark and inserting a clickable check box which is typically used in a Word form.
Recommended article: How to Show or HIde White Space in Word Documents
Do you want to learn more about Microsoft Word? Check out our virtual classroom or live classroom (in-person) Word courses >
In this article, we’ll review 5 ways to insert a check mark symbol in a Word document:
- Insert check marks as bullets
- Use the Insert Symbol command
- Add and use a custom Word keyboard shortcut
- Add and use an AutoCorrect shortcut
- Use an Alt code shortcut by pressing Alt and then entering a number sequence
Do you want to learn more about Microsoft Word? Check out our virtual classroom or live classroom Word courses >
1. Inserting a check mark by inserting bullets
If you want to insert a check mark at the beginning of one or more paragraphs, you can apply custom bullets using the Wingdings font (or a similar font).
To apply check marks as custom bullets to paragraphs:
- Select the paragraph(s) to which you want to add check marks.
- Click the Home tab in the Ribbon.
- In the Paragraph group, click the arrow beside Bullets. A drop-down menu appears.
- Click Define New Bullet. A dialog box appears.
- Click Symbol. A dialog box appears.
- Select Wingdings from the Font drop-down menu. Alternatively, you can select another font such as Wingdings 2 or Segoe UI Symbol.
- Click the desired check mark.
- Click OK.
- Click Font. A Font dialog box appears.
- Select the desired font color and size. This dialog box offers the same options as the regular Font dialog box.
- Click OK twice.
The check marks will be added at the beginning of the paragraph(s).
In the Define New Bullet dialog box (below), you can select Symbol, Font or Picture:
The following characters appear when you select Wingdings as the Symbol font for bullets:
In the Define New Bullet dialog box, you can select Picture and then navigate to a picture you want to use as a bullet and then double-click it.
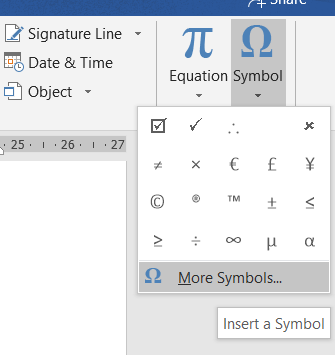
2. Inserting a check mark using Insert Symbol
If you want to add a check mark in a line of text (or at the end of a line of text), you can use Insert Symbol.
To insert a check mark using Insert Symbol in the Ribbon in Word:
- Position the cursor in the Word document where you want to insert a check mark.
- Click the Insert tab in the Ribbon.
- In the Symbols group, click Symbol. A drop-down menu appears.
- Click More Symbols. A dialog box appears.
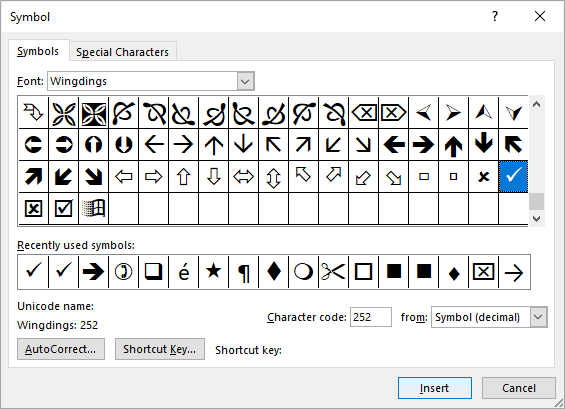
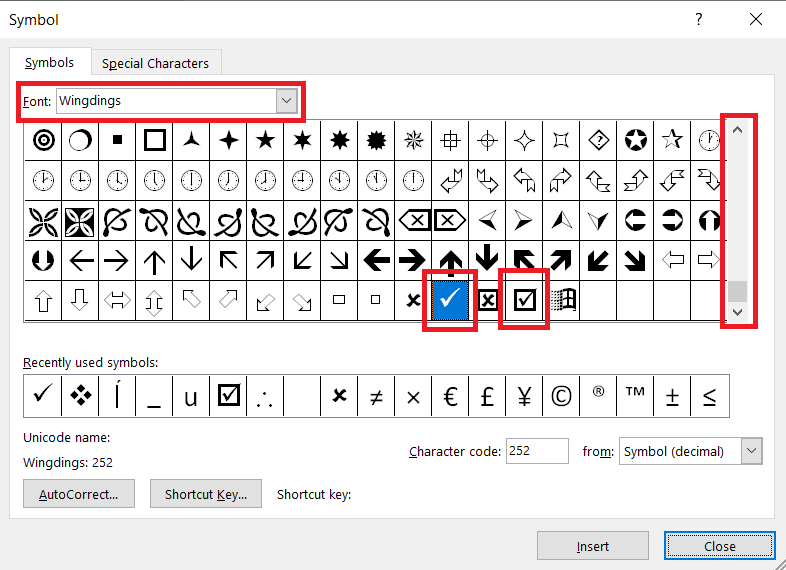
- If necessary, click the Symbols tab.
- Select Wingdings from the Font drop-down menu. Alternatively, you can select another font such as Wingdings 2 or Segoe UI Symbol.
- Scroll through the list of symbols until you find the check mark symbol you want to use and then click it.
- Click Insert.
- Click Close.
Once the check mark has been inserted, you can change its size or color using the Home tab in the Ribbon or by right-clicking and selecting formatting options from the mini-toolbar.
In the example below, Wingdings is selected in the Symbol dialog box:
3. Inserting a check mark using a custom Word keyboard shortcut
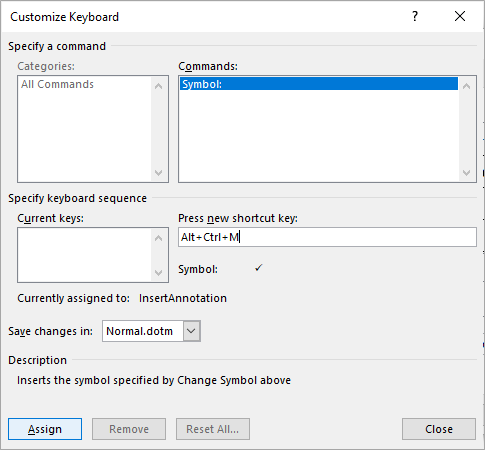
If you insert a check mark frequently, you can create your own keyboard shortcut for the check mark symbol.
To create a keyboard shortcut for a check mark:
- Position the cursor in a Word document.
- Click the Insert tab in the Ribbon.
- In the Symbols group, click Symbol. A drop-down menu appears.
- Click More Symbols. A dialog box appears.
- If necessary, click the Symbols tab.
- Select Wingdings from the Font drop-down menu. Alternatively, you can select another font such as Wingdings 2 or Segoe UI Symbol.
- Scroll through the list of symbols until you find the check mark symbol you want to use and then click it.
- Click Shortcut. A dialog box appears.
- Click in the box below Assign New Shortcut key.
- Press the keys you want to assign (such as Ctrl + Alt + M). Don’t type any text, just press the keys. Be careful not to override a useful built-in shortcut such as Ctrl + C.
- Click Assign. Typically the location for these shortcuts is the Normal (or default) template.
- Click Close twice.
Test the shortcut in your document by pressing the assigned keys.
The Customize Keyboard dialog box appears as follows:
Since these shortcuts are typically saved in the Normal template, when you exit Word, if you are prompted to save the Normal template, click Yes.
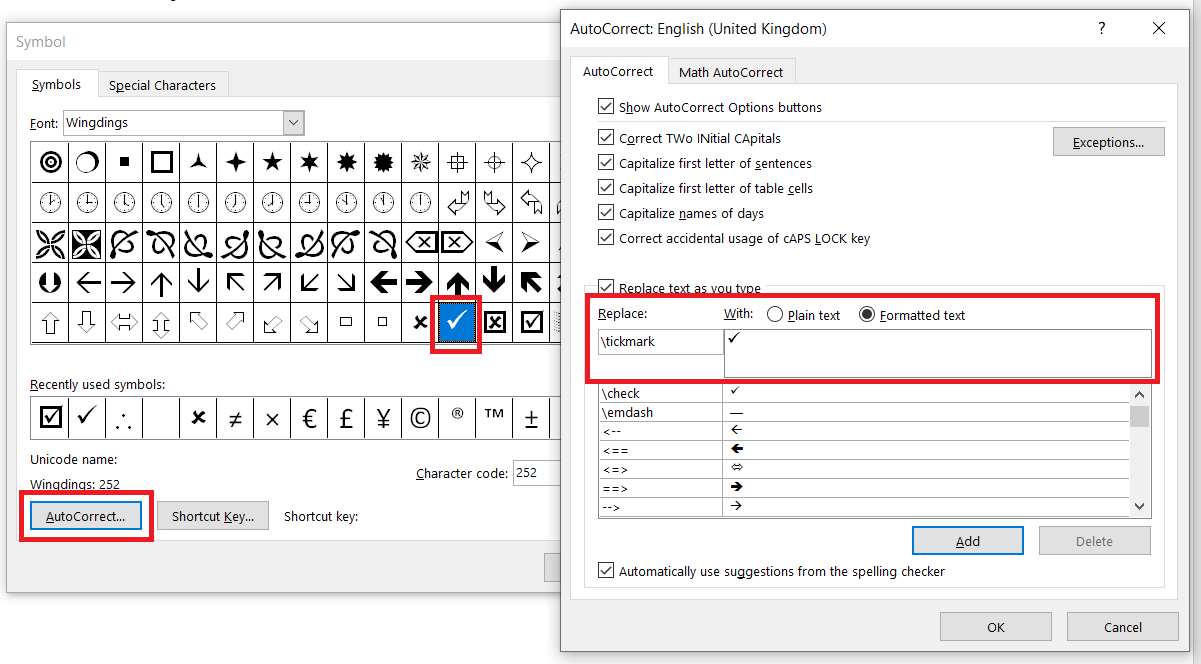
4. Inserting a check mark using an AutoCorrect shortcut
You can also insert a check mark automatically using AutoCorrect.
To set up an AutoCorrect entry for a check mark:
- Position the cursor in a Word document.
- Click the Insert tab in the Ribbon.
- In the Symbols group, click Symbol. A drop-down menu appears.
- Click More Symbols. A dialog box appears.
- If necessary, click the Symbols tab.
- Select Wingdings from the Font drop-down menu. Alternatively, you can select another font such as Wingdings 2 or Segoe UI Symbol.
- Scroll through the list of symbols until you find the check mark symbol you want to use and then click it.
- Click AutoCorrect. A dialog box appears.
- In the Replace box, enter the name of the entry (such as cm1).
- Click Add.
- Click OK.
- Click Close.
To insert the entry in the document, type the entry (such as cm1) and then press the Spacebar.
The AutoCorrect dialog box appears as follows:
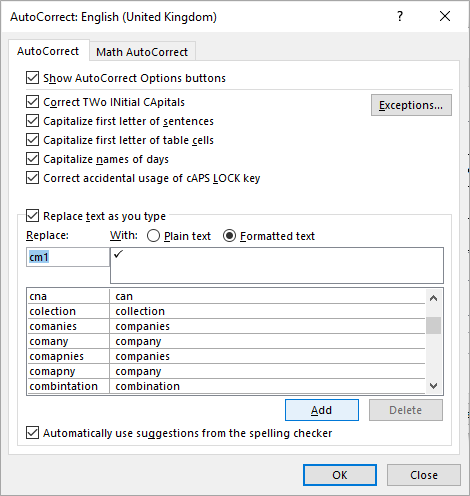
Since these shortcuts are typically saved in the Normal template, when you exit Word, you should be prompted to save it.
5. Inserting a check mark using an Alt keyboard shortcut
You can press the Alt key in combination with numbers on the numeric keypad to insert a check mark symbol.
To insert a check mark symbol in a Word document using Alt:
- Position the cursor where you want to insert the check mark symbol.
- Press Alt + 0252 or Alt + 0254 on the numeric keypad. If the sequence doesn’t work, press NumLock on the numeric keypad. Word will insert a different character.
- Select the character, click the Home tab in the Ribbon and select Wingdings from the Font drop-down menu.
If you want to create clickable check boxes, you could create a Word form using controls or create a dynamic form using Microsoft Forms.
Subscribe to get more articles like this one
Did you find this article helpful? If you would like to receive new articles, join our email list.
More resources
How to Create a Hanging Indent in Word (3 Ways)
14 Shortcuts to Quickly Select Text in Microsoft Word
How to View Word Count in Microsoft Word (4 Ways)
How to Insert the Not Equal Sign in Word (5 Ways to Type or Insert ≠)
10+ Great Microsoft Word Navigation Shortcuts to Move Around Quickly in Your Documents
Related courses
Microsoft Word: Intermediate / Advanced
Microsoft Excel: Intermediate / Advanced
Microsoft PowerPoint: Intermediate / Advanced
Microsoft Word: Long Documents Master Class
Microsoft Word: Styles, Templates and Tables of Contents
Microsoft Word: Designing Dynamic Word Documents Using Fields
VIEW MORE COURSES >
Our instructor-led courses are delivered in virtual classroom format or at our downtown Toronto location at 18 King Street East, Suite 1400, Toronto, Ontario, Canada (some in-person classroom courses may also be delivered at an alternate downtown Toronto location). Contact us at info@avantixlearning.ca if you’d like to arrange custom instructor-led virtual classroom or onsite training on a date that’s convenient for you.
Copyright 2023 Avantix® Learning
Microsoft, the Microsoft logo, Microsoft Office and related Microsoft applications and logos are registered trademarks of Microsoft Corporation in Canada, US and other countries. All other trademarks are the property of the registered owners.
Avantix Learning |18 King Street East, Suite 1400, Toronto, Ontario, Canada M5C 1C4 | Contact us at info@avantixlearning.ca
Tick symbol (🗸) also known as a check mark is a symbol for “Yes”. Sometimes tick in a box (☑) is preferred over tick symbol to denote yes or completion. In this blog we have covered, four different ways to insert tick and tick in box symbol in Microsoft Word.
Place your cursor where you want to insert the symbol and use any of the following 4 methods. Method 4 is easiest and up to 7 times faster.
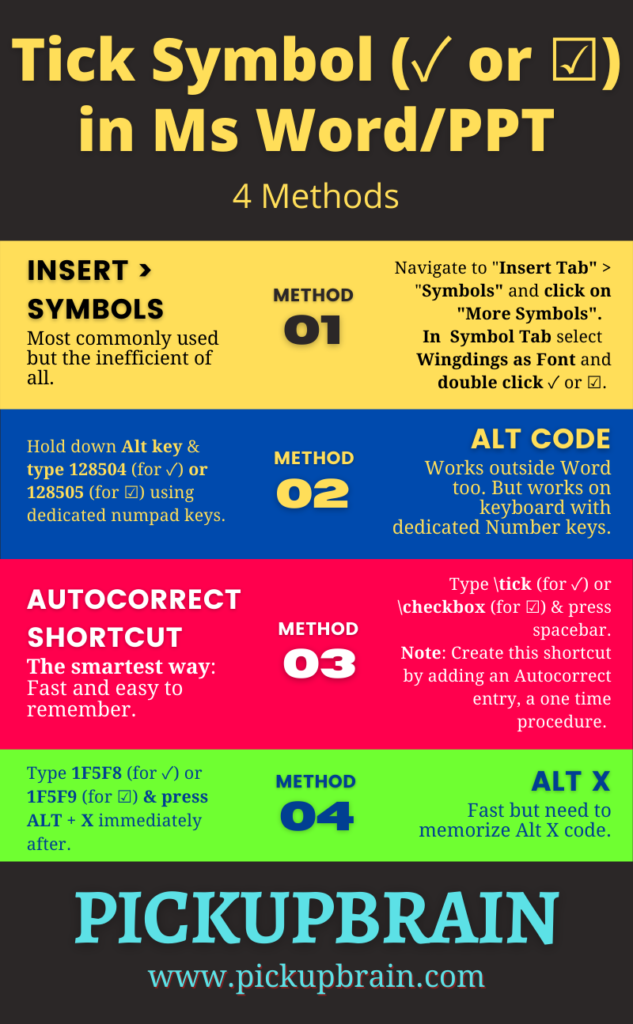
Method 1 – Insert > Symbols
- Navigating Insert Tab > Symbols and select More Symbols
2. Select Symbol Tab > Wingdings Font, and double click on desired symbol i.e. 🗸 or ☑.
3. Select Close
Method 2 – Alt Code (Requires dedicated Number pad keys)
Ms Word Alt code for Tick (or Check) Mark and Tick in Box are:
| Tick Symbol or Check Mark (🗸) | Tick in Box (☑) |
|---|---|
| 128504 | 128505 |
To insert symbol, type corresponding Alt Code using Number pad (not using numerics key using above letters) while holding down Alt key.
Method 3 – Autocorrect (Fastest method for Tick Symbol Word)
- Create Autocorrect entry
- Locate Tick Symbol or Tick in Box symbol (as shown in Method 1) by navigating to Insert > Symbols > More Symbols and select symbol.
- Click Autocorrect Button to open new AutoCorrect Dialogue box.
- Type desired shortcut text (say tick or checkbox) in Replace.
- Click Add.
- Close Autocorrect and Symbol Window.
2. Type autocorrect text created in above step and press space (for e.g. tick) to convert into corresponding symbol.
Method 4 – Alt X
Alt X code for Tick (or Check) Mark & Tick in Box are
| Tick Symbol or Check Mark (🗸) | Tick in Box (☑) |
|---|---|
| 1F5F8 | 1F5F9 |
To insert thick (or check) mark, type 1F5F8 and press Alt + X immediately following it. Similarly, for inserting tick in box, type 1F5F8 and press Alt + X.
Summary
There are four different methods to insert tick symbol in Ms Word. Of all, Alt X and Alt Code method requires remembering 4-5 digit code. While, the Insert Symbol and Autocorrect method are straightforward and relatively easy to remember. Of all these, the smartest way to insert tick symbol or tick in box is Autocorrect method as it is fastest and easy to remember.
Related Posts
The check mark symbol ✓ (also known as a checkmark or tick mark) has different meanings in different cultures: as a sign of agreement, confirmation, to indicate the concepts «yes» or «correct»; and as a sign of refusal, reject, to represent the notions of «no» or «wrong».
The X mark symbol 🗴 (also known as a cross, cross-mark, x sign, ex symbol) is often used in documents as a sign of refusal, reject, to indicate the concept «no» or «wrong»; or as an indicator of a completed task, a finished step, etc.
Note: Be careful when using these symbols in your document! In some countries, the check ✓ or ✗ mark is commonly used to indicate something wrong, incorrect. Another symbol can be used instead of the checkmark, such as the O mark, the plus symbol +, the letter R, etc.
The check mark symbol can also be mistakenly used in place of the
square root symbol, or as a bullet for the
manually created bulleted list.
We strongly recommend avoiding misusing symbols; see the appropriate tips to make perfect documents.
A tick mark and X mark can be inserted in a document Word using several different ways:
The standard way: using the Symbol dialog box:
To open the Symbol dialog box, do the following:
1. On the Insert tab, in the Symbols group, select the Symbol button, and then click More Symbols…:

2. On the Symbol dialog box:
- From the Font dropdown list, choose the Wingdings font,
- Choose a symbol you need:
- A check mark symbol (or a square with check mark symbol):

- An X mark symbol (or a square with a cross symbol):
- A check mark symbol (or a square with check mark symbol):
- Click the Insert button to insert the symbol to the current cursor position.
- Click the Cancel button to close the Symbol dialog box.


Note: You can also select the Segoe UI Symbol font to choose other types of a symbol, for example:
- A checkmark:
- An X mark:


II. Using a shortcut key:
In Microsoft Word, you can use Unicode to insert any of the used symbols:
| Unicode | Symbol | |
|---|---|---|
| The checkmark symbol | Type 2713 and immediately press Alt+X | ✓ |
| The Ballot box with check symbol | Type 2611 and immediately press Alt+X | ☑ |
| The X mark symbol | Type 274c or 274C (does not matter, uppercase or lowercase) and immediately press Alt+X | 🗴 |
| The Ballot box with X symbol | Type 274e or 274E (does not matter, uppercase or lowercase) and immediately press Alt+X | 🗵 |
The quicker way: creating a shortcut key:
Microsoft Word offers a pre-defined shortcut key for popular symbols such as checkmark, or X mark.
To open the Symbol dialog box, do the following:
1. On the Insert tab, in the Symbols group, select the Symbol button, and then click More Symbols….
2. On the Symbol dialog box:
- From the Font dropdown list, choose the font from which you want to insert a symbol (for this example, the Wingdings font),
- Choose the symbol (for example, the check mark symbol),
- Click the Shortcut Key… button:

3. On the Customize Keyboard dialog box, in the Press new shortcut key field, type the key combination you want to use for the symbol (e.g., for the checkmark sign ✓ the combination Alt+O,K), and click the Assign button:

Note: Be careful! You can reassign the assigned already shortcuts in Word. Be sure that after Current assign to: there are no active Word commands. In any case, you can reassign any existing function in Word to a different key.