
Add clip art to your file
Word for Microsoft 365 Outlook for Microsoft 365 PowerPoint for Microsoft 365 OneNote for Microsoft 365 Publisher for Microsoft 365 Excel for Microsoft 365 for Mac Word for Microsoft 365 for Mac PowerPoint for Microsoft 365 for Mac Word for the web OneNote for the web PowerPoint for the web Word 2021 PowerPoint 2021 Publisher 2021 OneNote 2021 Excel 2021 for Mac Word 2021 for Mac PowerPoint 2021 for Mac Word 2019 PowerPoint 2019 Publisher 2019 Excel 2019 for Mac Word 2019 for Mac PowerPoint 2019 for Mac Excel 2016 Word 2016 Outlook 2016 PowerPoint 2016 OneNote 2016 Publisher 2016 Excel 2013 Word 2013 Outlook 2013 PowerPoint 2013 OneNote 2013 Publisher 2013 Excel 2010 Word 2010 Outlook 2010 PowerPoint 2010 OneNote 2010 Publisher 2010 More…Less
Depending on which version of Office you have, you may be able to use an Office library of clip art, or get clip art from the web.
Insert clip art
In the newer versions of Office, there’s no longer a clip art library, but Office still helps you insert clip art.
STEP 1:
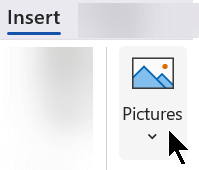
Select Insert > Pictures > Online Pictures
(In Outlook, when you’re using the Reading pane, there isn’t an Insert menu. Click Pop Out  and then you’ll see the Insert menu.)
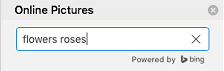
STEP 2:
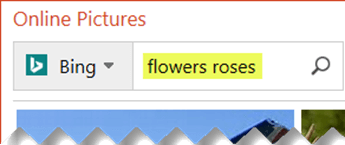
Type a word or phrase to describe what you’re looking for, then press Enter.
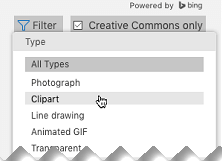
STEP 3:
Filter the results by Type for Clipart.

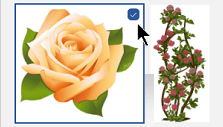
STEP 4:
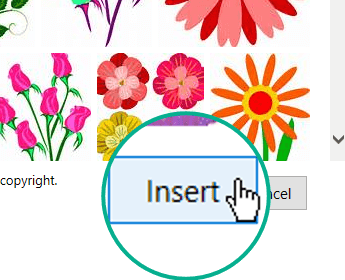
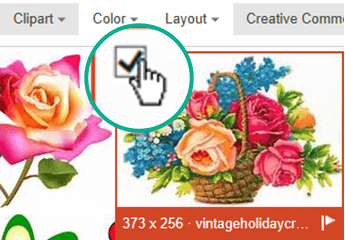
Select a picture.

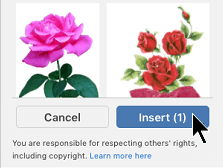
STEP 5:
Select Insert.
That’s it!
The image is inserted in your Office document.

Clip art and copyright
The licensing filter (Creative Commons only or All) can help you choose images that are appropriate for the use you have in mind. (Read about Creative Commons licenses here.)
When using pictures or clip art from Bing, you’re responsible for respecting copyright, and the license filter in Bing can help you choose which images to use.
New kinds of clip art for Microsoft 365
Microsoft 365 doesn’t have traditional clip art anymore, but as a subscriber you get several new kinds of high quality art in its place for free: high-resolution photographs, icons, cutout people, stickers, illustrations, and cartoon people. Select Insert > Pictures > Stock Images to see your options. For more details, see Insert images, icons, and more.
|
Icons are ready-made images that you can insert, pivot, rotate, color, and resize (with no loss of quality). |
|

|
Stickers are whimsical illustrations that can enliven any document. |

|
Cartoon people are cartoon-style drawings. You can mix and match different head/hair, face, and body parts to get just the look you want. |
Voice clips instead of clip art
Looking for information about adding an audio clip to a slide? See Add or delete audio in your PowerPoint presentation.
Insert clip art
In Office 2013 and Office 2016, there’s no longer a clip art library, but Office still helps you insert clip art.
STEP 1:
Select Insert > Online Pictures
(In Outlook, when you’re using the Reading pane, there isn’t an Insert menu. Click Pop Out and then you’ll see the Insert menu.)

STEP 2:
Type a word or phrase to describe what you’re looking for, then press Enter.
STEP 3:
Filter the results by Type for Clipart.

STEP 4:
Select a picture.
STEP 5:
Select Insert.
That’s it!
The image is inserted in your Office document.
Clip art and copyright
The licensing filter (Creative Commons only or All) can help you choose images that are appropriate for the use you have in mind. (Read about Creative Commons licenses here.)
When using pictures or clip art from Bing, you’re responsible for respecting copyright, and the license filter in Bing can help you choose which images to use.
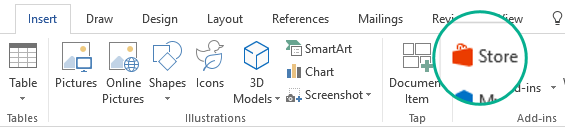
Free image library: the Pickit add-in
Another option is to install an Office add-in named Pickit that puts free, licensed clip art in Office.
Click a section title below to open it and read detailed instructions.
-
Open the Office app you want to add Pickit it to (Word, PowerPoint, or Excel).
-
On the Insert tab, in the Add-ins group, select Store.

The Office Add-ins dialog box opens.
-
In the dialog box, use the Search box to look for Pickit Free Images.
-
Click the Add button for Pickit Free Images.
-
Close the Office Add-ins dialog box.
Pickit may take a few moments to be «loaded» into the Office app. When it’s done, a message appears at the bottom of your app window telling you so.
At the far right end of the ribbon, on the Home tab, you’ll see the circular pink Pickit icon:
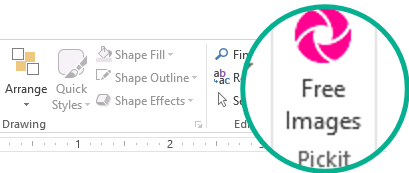
Once Pickit is on your computer, you can find pictures with it as described here:
-
On the Home tab of the Ribbon, in the Pickit section at the far right, select the Free Images button.
The Pickit Free Images task panel opens on the right side of the application window.
-
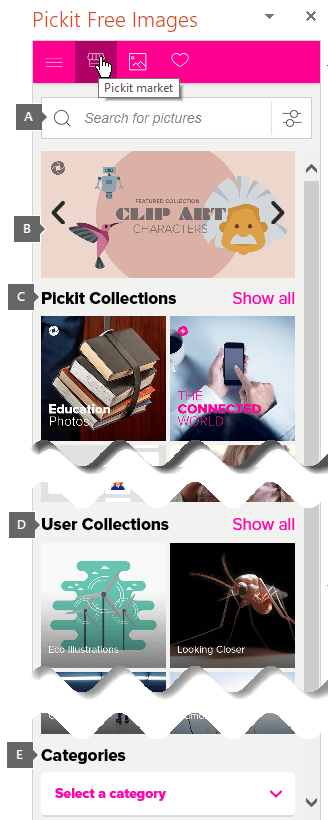
On the pink toolbar near the top, use the second tab, the Pickit market, to browse for images.
Pickit lets you browse images in several ways:
-
There’s a search box (callout A in the picture) where you can type keywords such as flower, clipart, and business.
-
A set of featured collections (B) just below the Search box. The set includes a Clip Art Characters collection.
-
There are 25 collections (C) organized by Pickit.
-
There are numerous user collections (D) to browse.
-
There are 35 categories (E) of images (such animals and pets, cities and places, music and instruments, and transportation) you can choose from at the bottom of the task panel.
Voice clips instead of clip art
Looking for information about adding an audio clip to a slide? See Add or delete audio in your PowerPoint presentation.
-
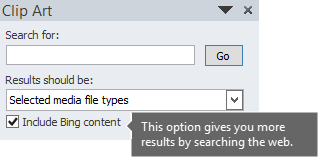
On the Insert tab of the toolbar ribbon, in the Images section, select Clip Art.
(In Outlook, when you’re using the Reading pane, there isn’t an Insert menu. Click Pop Out
and then you’ll see the Insert menu and the Clip Art icon.)The Clip Art task panel appears on the right side of the application window.
-
In the Search for box, type keywords that describe the art you’re looking for.
-
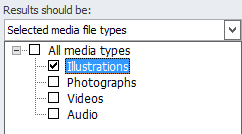
Under Results should be, select the types of media you want included in the search results:
-
Ensure that Include Bing content is selected if you’re connected to the internet and want images from the web included in your search results. *
Turning on this option gives you more search results to choose from. (Otherwise, leave that box cleared, and you’ll only receive search results from the pictures installed on your computer by Office 2010.)
-
Select Go to start the search.
The search results are shown in the task panel.
-
You can scroll vertically if the results don’t all fit in the task pane.
-
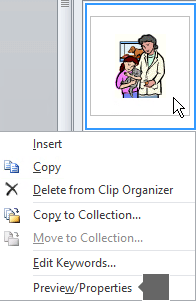
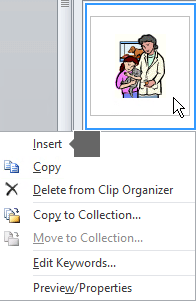
To see a larger version of a thumbnail image in the result list, or to simply see the image if all that is shown is a small red x placeholder, right-click the thumbnail and select Preview/Properties.
While you’re in the Preview/Properties window, you can browse through the images by selecting Previous and Next.
-
-
To insert a picture in your document, right-click the thumbnail image in the task panel, and select Insert.
Once the image is inserted, you can adjust its placement by selecting it and dragging with the mouse.

When you search for clip art and pictures online, you’ll be directed to Bing. You’re responsible for respecting copyright, and the license filter in Bing can help you choose which images to use.
* Bing Image Search filters are based on the highly respected Creative Commons license system. To better understand the licensing options, see Filter images by license type. You’re responsible for respecting the rights of others’ property, including copyright.
In Microsoft 365 for Mac, Office 2021 for Mac, and Office 2019 for Mac, beginning with version 16.19, you can go on the web to find clip art and other pictures.
STEP 1:
Select Insert > Pictures > Online Pictures
STEP 2:
Type a word or phrase to describe what you’re looking for, then press Enter.
STEP 3:
Filter the results by Type for Clipart.
STEP 4:
Select a picture.
STEP 5:
Select Insert.
That’s it!
The image is inserted in your Office document.
The licensing filter (Creative Commons only or All) can help you choose images that are appropriate for the use you have in mind. (Read about Creative Commons licenses here.)
Sorry, clip art isn’t supported in Office 2016 for Mac.
You can use Insert > Pictures to add pictures from your computer or from the Photo Browser.

Microsoft 365 supports Online Pictures, Icons, and 3D objects, and it gets feature updates monthly:
Buy or try Microsoft 365
You can insert clip art from the web in Word, PowerPoint, and Excel, or in OneNote.
Insert clip art in Word, PowerPoint, or Excel
-
Select Insert > Pictures > Stock Images.
Tabs across the top show you the types of pictures you can select from:
-
Images: A large set of high-resolution photographs featuring many different subjects.
-
Cutout People: Photos of people in various poses. The pictures have transparent backgrounds to help them fit easily into your document or to combine multiple pictures.
-
Stickers: Fun, animation-style drawings.
-
Icons (PowerPoint only): Small symbols covering numerous subjects. You can easily change color and resize them with no loss of image quality.
-
Illustrations (PowerPoint only): Many drawings, all in a similar style, covering numerous subjects.
-
Cartoon People (PowerPoint only): A large set of cartoon-style drawings. You can mix and match different parts, such as head/hair and facial expressions.
-
-
Select a tab, then browse the images by scrolling, or enter a term in the search box to filter the set of images.
-
Select an image or images, then choose Insert.
Insert clip art in OneNote
-
Select Insert > Picture > From Online.
-
In the Online Pictures dialog box, type words describing the kind of picture you want (such as roses), and then press Enter.
-
Select the Filter button
and then select Clipart under the Type category. -
Select the image you want to insert, then click the Insert button.
(You can only insert one picture at a time.)
 and then select Clipart under the Type category.
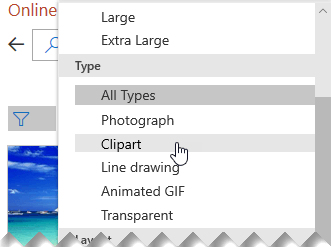
The licensing filter (Creative Commons only or All) can help you choose images that are appropriate for the use you have in mind. (Read about Creative Commons licenses here.)
See Also
Insert images, icons, and more in Microsoft 365
Make or find pictures in Office
Add a drawing to a Word document
Icons: A new kind of clip art
Need more help?
Add clip art to your file
Word for Microsoft 365 Outlook for Microsoft 365 PowerPoint for Microsoft 365 OneNote for Microsoft 365 Publisher for Microsoft 365 Excel for Microsoft 365 for Mac Word for Microsoft 365 for Mac PowerPoint for Microsoft 365 for Mac Word for the web OneNote for the web PowerPoint for the web Word 2021 PowerPoint 2021 Publisher 2021 OneNote 2021 Excel 2021 for Mac Word 2021 for Mac PowerPoint 2021 for Mac Word 2019 PowerPoint 2019 Publisher 2019 Excel 2019 for Mac Word 2019 for Mac PowerPoint 2019 for Mac Excel 2016 Word 2016 Outlook 2016 PowerPoint 2016 OneNote 2016 Publisher 2016 Excel 2013 Word 2013 Outlook 2013 PowerPoint 2013 OneNote 2013 Publisher 2013 Excel 2010 Word 2010 Outlook 2010 PowerPoint 2010 OneNote 2010 Publisher 2010 More…Less
Depending on which version of Office you have, you may be able to use an Office library of clip art, or get clip art from the web.
Insert clip art
In the newer versions of Office, there’s no longer a clip art library, but Office still helps you insert clip art.
STEP 1:
Select Insert > Pictures > Online Pictures
(In Outlook, when you’re using the Reading pane, there isn’t an Insert menu. Click Pop Out and then you’ll see the Insert menu.)
STEP 2:
Type a word or phrase to describe what you’re looking for, then press Enter.
STEP 3:
Filter the results by Type for Clipart.
STEP 4:
Select a picture.
STEP 5:
Select Insert.
That’s it!
The image is inserted in your Office document.
Clip art and copyright
The licensing filter (Creative Commons only or All) can help you choose images that are appropriate for the use you have in mind. (Read about Creative Commons licenses here.)
When using pictures or clip art from Bing, you’re responsible for respecting copyright, and the license filter in Bing can help you choose which images to use.
New kinds of clip art for Microsoft 365
Microsoft 365 doesn’t have traditional clip art anymore, but as a subscriber you get several new kinds of high quality art in its place for free: high-resolution photographs, icons, cutout people, stickers, illustrations, and cartoon people. Select Insert > Pictures > Stock Images to see your options. For more details, see Insert images, icons, and more.
|
Icons are ready-made images that you can insert, pivot, rotate, color, and resize (with no loss of quality). |
|
|
|
Stickers are whimsical illustrations that can enliven any document. |
|
|
Cartoon people are cartoon-style drawings. You can mix and match different head/hair, face, and body parts to get just the look you want. |
Voice clips instead of clip art
Looking for information about adding an audio clip to a slide? See Add or delete audio in your PowerPoint presentation.
Insert clip art
In Office 2013 and Office 2016, there’s no longer a clip art library, but Office still helps you insert clip art.
STEP 1:
Select Insert > Online Pictures
(In Outlook, when you’re using the Reading pane, there isn’t an Insert menu. Click Pop Out and then you’ll see the Insert menu.)
STEP 2:
Type a word or phrase to describe what you’re looking for, then press Enter.
STEP 3:
Filter the results by Type for Clipart.
STEP 4:
Select a picture.
STEP 5:
Select Insert.
That’s it!
The image is inserted in your Office document.
Clip art and copyright
The licensing filter (Creative Commons only or All) can help you choose images that are appropriate for the use you have in mind. (Read about Creative Commons licenses here.)
When using pictures or clip art from Bing, you’re responsible for respecting copyright, and the license filter in Bing can help you choose which images to use.
Free image library: the Pickit add-in
Another option is to install an Office add-in named Pickit that puts free, licensed clip art in Office.
Click a section title below to open it and read detailed instructions.
-
Open the Office app you want to add Pickit it to (Word, PowerPoint, or Excel).
-
On the Insert tab, in the Add-ins group, select Store.
The Office Add-ins dialog box opens.
-
In the dialog box, use the Search box to look for Pickit Free Images.
-
Click the Add button for Pickit Free Images.
-
Close the Office Add-ins dialog box.
Pickit may take a few moments to be «loaded» into the Office app. When it’s done, a message appears at the bottom of your app window telling you so.
At the far right end of the ribbon, on the Home tab, you’ll see the circular pink Pickit icon:
Once Pickit is on your computer, you can find pictures with it as described here:
-
On the Home tab of the Ribbon, in the Pickit section at the far right, select the Free Images button.
The Pickit Free Images task panel opens on the right side of the application window.
-
On the pink toolbar near the top, use the second tab, the Pickit market, to browse for images.
Pickit lets you browse images in several ways:
-
There’s a search box (callout A in the picture) where you can type keywords such as flower, clipart, and business.
-
A set of featured collections (B) just below the Search box. The set includes a Clip Art Characters collection.
-
There are 25 collections (C) organized by Pickit.
-
There are numerous user collections (D) to browse.
-
There are 35 categories (E) of images (such animals and pets, cities and places, music and instruments, and transportation) you can choose from at the bottom of the task panel.
Voice clips instead of clip art
Looking for information about adding an audio clip to a slide? See Add or delete audio in your PowerPoint presentation.
-
On the Insert tab of the toolbar ribbon, in the Images section, select Clip Art.
(In Outlook, when you’re using the Reading pane, there isn’t an Insert menu. Click Pop Out
and then you’ll see the Insert menu and the Clip Art icon.)The Clip Art task panel appears on the right side of the application window.
-
In the Search for box, type keywords that describe the art you’re looking for.
-
Under Results should be, select the types of media you want included in the search results:
-
Ensure that Include Bing content is selected if you’re connected to the internet and want images from the web included in your search results. *
Turning on this option gives you more search results to choose from. (Otherwise, leave that box cleared, and you’ll only receive search results from the pictures installed on your computer by Office 2010.)
-
Select Go to start the search.
The search results are shown in the task panel.
-
You can scroll vertically if the results don’t all fit in the task pane.
-
To see a larger version of a thumbnail image in the result list, or to simply see the image if all that is shown is a small red x placeholder, right-click the thumbnail and select Preview/Properties.
While you’re in the Preview/Properties window, you can browse through the images by selecting Previous and Next.
-
-
To insert a picture in your document, right-click the thumbnail image in the task panel, and select Insert.
Once the image is inserted, you can adjust its placement by selecting it and dragging with the mouse.
When you search for clip art and pictures online, you’ll be directed to Bing. You’re responsible for respecting copyright, and the license filter in Bing can help you choose which images to use.
* Bing Image Search filters are based on the highly respected Creative Commons license system. To better understand the licensing options, see Filter images by license type. You’re responsible for respecting the rights of others’ property, including copyright.
In Microsoft 365 for Mac, Office 2021 for Mac, and Office 2019 for Mac, beginning with version 16.19, you can go on the web to find clip art and other pictures.
STEP 1:
Select Insert > Pictures > Online Pictures
STEP 2:
Type a word or phrase to describe what you’re looking for, then press Enter.
STEP 3:
Filter the results by Type for Clipart.
STEP 4:
Select a picture.
STEP 5:
Select Insert.
That’s it!
The image is inserted in your Office document.
The licensing filter (Creative Commons only or All) can help you choose images that are appropriate for the use you have in mind. (Read about Creative Commons licenses here.)
Sorry, clip art isn’t supported in Office 2016 for Mac.
You can use Insert > Pictures to add pictures from your computer or from the Photo Browser.
Microsoft 365 supports Online Pictures, Icons, and 3D objects, and it gets feature updates monthly:
Buy or try Microsoft 365
You can insert clip art from the web in Word, PowerPoint, and Excel, or in OneNote.
Insert clip art in Word, PowerPoint, or Excel
-
Select Insert > Pictures > Stock Images.
Tabs across the top show you the types of pictures you can select from:
-
Images: A large set of high-resolution photographs featuring many different subjects.
-
Cutout People: Photos of people in various poses. The pictures have transparent backgrounds to help them fit easily into your document or to combine multiple pictures.
-
Stickers: Fun, animation-style drawings.
-
Icons (PowerPoint only): Small symbols covering numerous subjects. You can easily change color and resize them with no loss of image quality.
-
Illustrations (PowerPoint only): Many drawings, all in a similar style, covering numerous subjects.
-
Cartoon People (PowerPoint only): A large set of cartoon-style drawings. You can mix and match different parts, such as head/hair and facial expressions.
-
-
Select a tab, then browse the images by scrolling, or enter a term in the search box to filter the set of images.
-
Select an image or images, then choose Insert.
Insert clip art in OneNote
-
Select Insert > Picture > From Online.
-
In the Online Pictures dialog box, type words describing the kind of picture you want (such as roses), and then press Enter.
-
Select the Filter button
and then select Clipart under the Type category. -
Select the image you want to insert, then click the Insert button.
(You can only insert one picture at a time.)
The licensing filter (Creative Commons only or All) can help you choose images that are appropriate for the use you have in mind. (Read about Creative Commons licenses here.)
See Also
Insert images, icons, and more in Microsoft 365
Make or find pictures in Office
Add a drawing to a Word document
Icons: A new kind of clip art
Need more help?
Want more options?
Explore subscription benefits, browse training courses, learn how to secure your device, and more.
Communities help you ask and answer questions, give feedback, and hear from experts with rich knowledge.
![]()
Загрузить PDF
![]()
Загрузить PDF
Из данной статьи вы узнаете, как вставить клипарт в Microsoft Word на компьютерах под управлением Windows и Mac OS X. В новых версиях MS Office клипарты были заменены изображениями Bing, но в Microsoft Word все равно можно найти и вставить клипарты.
-
1
Откройте документ Microsoft Word. Для этого дважды щелкните по документу Microsoft Word, в который нужно вставить клипарт.
- Также можно создать новый документ; для этого дважды щелкните по значку программы Microsoft Word, а затем нажмите «Новый документ».
-
2
Перейдите на вкладку Вставка. Она находится слева на синей ленте инструментов Word, которая расположена в верхней части окна Word. Откроется панель инструментов «Вставка».
-
3
Нажмите Изображения из интернета. Вы найдете эту опцию в разделе «Иллюстрации» на панели инструментов. Откроется всплывающее окно со строкой поиска Bing.
-
4
Введите поисковый запрос со словом клипарт. Введите ключевое слово, которое описывает нужный клипарт, затем введите слово клипарт, после этого нажмите ↵ Enter. Bing приступит к поиску клипартов, которые соответствуют поисковому запросу.
- Например: чтобы найти клипарт со слонами, введите слоны клипарт и нажмите ↵ Enter.
- У вас должен быть доступ в интернет, чтобы искать клипарты с помощью Bing.
-
5
Выберите клипарт. Щелкните по клипарту, который вы хотите вставить в документ Word. В верхнем левом углу изображения появится галочка, что свидетельствует о том, что клипарт выбран.
- Можно выбрать сразу несколько клипартов.
-
6
Нажмите Вставить. Эта кнопка находится в нижней части окна. Выбранный клипарт будет вставлен в документ Word.
Реклама


-
1
Откройте страницу поиска изображений Bing. Перейдите на страницу https://www.bing.com/images/. Описываемый процесс можно применить в Safari, Google Chrome и Firefox, но не факт, что и в других браузерах.[1]
-
2
Введите поисковый запрос. Введите ключевое слово, которое описывает нужный клипарт, а затем нажмите ⏎ Return. Запустится поиск изображений с помощью Bing.
-
3
Щелкните по Фильтр. Этот значок в виде воронки находится на правой стороне страницы Bing, чуть выше результатов поиска. Под строкой поиска и над результатами поиска отобразится ряд вкладок.
-
4
Щелкните по Тип ▼. Эта вкладка находится под панелью поиска. Откроется выпадающее меню.
-
5
Щелкните по Клипарт. Эта опция находится посередине выпадающего меню и позволит оставить в результатах поиска только клипарты.
-
6
Выберите клипарт. Щелкните по клипарту, который вы хотите вставить в документ Word.
-
7
Сохраните клипарт. Зажмите Ctrl, щелкните по клипарту, а затем нажмите «Сохранить изображение». Клипарт будет сохранен на компьютере.
-
8
Откройте документ Word. Для этого дважды щелкните по документу Word, в который нужно вставить клипарт.
- Также можно создать новый документ; для этого дважды щелкните по значку программы Microsoft Word, а затем нажмите «Новый документ».
-
9
Перейдите на вкладку Вставка. Она находится слева на синей ленте инструментов Word, которая расположена в верхней части окна Word. Откроется панель инструментов «Вставка».
- Не щелкайте по меню «Вставка» в верхней части экрана.
-
10
Нажмите Рисунки. Вы найдете эту опцию слева на панели инструментов. Откроется выпадающее меню.
-
11
Нажмите Рисунок из файла. Эта опция находится в нижней части выпадающего меню.
-
12
Выберите изображение. Для этого щелкните по сохраненному клипарту.
- Возможно, вам придется перейти в папку (на левой панели окна Finder), в которую скачался выбранный клипарт, например, в папку «Загрузки».
-
13
Нажмите Вставить. Эта кнопка находится в нижней части окна. Выбранный клипарт будет вставлен в документ Word.
Реклама


Советы
- Также можно вставить фотографии из фототеки компьютера; для этого нажмите «Вставка» > «Рисунки».
Реклама
Предупреждения
- Многие изображения (клипарты), которые найдет Bing, защищены авторским правом. Их можно использовать бесплатно в личных целях (например, в презентации), но если вы получаете от этого прибыль, ваши действия являются незаконными.
Реклама
Об этой статье
Эту страницу просматривали 40 736 раз.
Была ли эта статья полезной?
Содержание
- 0.1 Метод 1 В Windows
- 0.2 Метод 2 В Mac OS X
- 1 Советы
- 2 Предупреждения
-
- 2.0.1 Вступление
- 2.0.2 Определение
- 2.0.3 Запуск организатора клипов
- 2.0.4 Создание новой коллекции
- 2.0.5 Ручное создание коллекции клипов
- 2.0.5.1 Окно «Добавление клипов в организатор»
- 2.0.6 Добавление клипов с камеры или сканера в коллекцию
- 2.0.7 Удаление коллекции клипов
- 2.0.8 Переименование коллекции клипов
- 2.0.9 Сжатие основного каталога
- 2.0.10 Заключение
-
2 метода:В WindowsВ Mac OS X
Из данной статьи вы узнаете, как вставить клипарт в Microsoft Word на компьютерах под управлением Windows и Mac OS X. В новых версиях MS Office клипарты были заменены изображениями Bing, но в Microsoft Word все равно можно найти и вставить клипарты.
Метод 1 В Windows
-
 Откройте документ Microsoft Word.
Для этого дважды щелкните по документу Microsoft Word, в который нужно вставить клипарт.
- Также можно создать новый документ; для этого дважды щелкните по значку программы Microsoft Word, а затем нажмите «Новый документ».
-
Перейдите на вкладку Вставка. Она находится слева на синей ленте инструментов Word, которая расположена в верхней части окна Word. Откроется панель инструментов «Вставка».
-
Нажмите Изображения из интернета. Вы найдете эту опцию в разделе «Иллюстрации» на панели инструментов. Откроется всплывающее окно со строкой поиска Bing.
- Введите поисковый запрос со словом клипарт.
Введите ключевое слово, которое описывает нужный клипарт, затем введите слово
клипарт
, после этого нажмите
↵ Enter
. Bing приступит к поиску клипартов, которые соответствуют поисковому запросу.
- Например: чтобы найти клипарт со слонами, введите слоны клипарт и нажмите ↵ Enter.
- У вас должен быть доступ в интернет, чтобы искать клипарты с помощью Bing.
- Выберите клипарт.
Щелкните по клипарту, который вы хотите вставить в документ Word. В верхнем левом углу изображения появится галочка, что свидетельствует о том, что клипарт выбран.
- Можно выбрать сразу несколько клипартов.
-
Нажмите Вставить. Эта кнопка находится в нижней части окна. Выбранный клипарт будет вставлен в документ Word.
 Откройте документ Microsoft Word.


 Введите поисковый запрос со словом клипарт.
 Выберите клипарт.

Метод 2 В Mac OS X
- Откройте страницу поиска изображений Bing.
Перейдите на страницу
https://www.bing.com/images/
. Описываемый процесс можно применить в Safari, Google Chrome и Firefox, но не факт, что и в других браузерах.
-
Введите поисковый запрос. Введите ключевое слово, которое описывает нужный клипарт, а затем нажмите ⏎ Return. Запустится поиск изображений с помощью Bing.
-
Щелкните по Фильтр. Этот значок в виде воронки находится на правой стороне страницы Bing, чуть выше результатов поиска. Под строкой поиска и над результатами поиска отобразится ряд вкладок.
-
Щелкните по Тип ▼. Эта вкладка находится под панелью поиска. Откроется выпадающее меню.
-
Щелкните по Клипарт. Эта опция находится посередине выпадающего меню и позволит оставить в результатах поиска только клипарты.
-
Выберите клипарт. Щелкните по клипарту, который вы хотите вставить в документ Word.
-
Сохраните клипарт. Зажмите Ctrl, щелкните по клипарту, а затем нажмите «Сохранить изображение». Клипарт будет сохранен на компьютере.
- Откройте документ Word.
Для этого дважды щелкните по документу Word, в который нужно вставить клипарт.
- Также можно создать новый документ; для этого дважды щелкните по значку программы Microsoft Word, а затем нажмите «Новый документ».
- Перейдите на вкладку Вставка.
Она находится слева на синей ленте инструментов Word, которая расположена в верхней части окна Word. Откроется панель инструментов «Вставка».
- Не щелкайте по меню «Вставка» в верхней части экрана.
-
Нажмите Рисунки. Вы найдете эту опцию слева на панели инструментов. Откроется выпадающее меню.
-
Нажмите Рисунок из файла. Эта опция находится в нижней части выпадающего меню.
- Выберите изображение.
Для этого щелкните по сохраненному клипарту.
- Возможно, вам придется перейти в папку (на левой панели окна Finder), в которую скачался выбранный клипарт, например, в папку «Загрузки».
-
Нажмите Вставить. Эта кнопка находится в нижней части окна. Выбранный клипарт будет вставлен в документ Word.
 Откройте страницу поиска изображений Bing.


 Откройте документ Word.
 Перейдите на вкладку Вставка.


 Выберите изображение.

Советы
- Также можно вставить фотографии из фототеки компьютера; для этого нажмите «Вставка» > «Рисунки».
Предупреждения
- Многие изображения (клипарты), которые найдет Bing, защищены авторским правом. Их можно использовать бесплатно, в личных целях (например, в презентации), но если вы получаете от этого прибыль, ваши действия являются незаконными.
Информация о статье
Эту страницу просматривали 15 043 раз.
Была ли эта статья полезной?
Вставка рисунков с помощью области задач Клип
Кроме того, в Word существуют возможности хранения и открытия различных графических файлов непосредственно в программе. Для работы с изображениями служит область задач Клип. С ее помощью можно работать как с растровыми, так и с векторными изображениями. Чтобы открыть данную область задач, перейдите на вкладку Вставка на ленте и в группе Иллюстрации нажмите кнопку Клип (рис. 6.1).

Рис. 6.1. Кнопка Клип в группе Иллюстрации
Чтобы найти подходящее изображение в области задач Клип (рис. 6.2), наберите в строке Искать ключевое слово, после чего нажмите кнопку Начать. Если оставить строку Искать пустой, программа покажет все доступные изображения.
Рис. 6.2. Область задач Клип
Чтобы ограничить поиск какой-нибудь темой, настройте списки Просматривать и Искать объекты. В первом указываются коллекции, в которых нужно производить поиск, а во втором – типы файлов (картинки, фотографии, звуки и др.).
По умолчанию доступны три коллекции.
• Мои коллекции – в нее входят все папки жесткого диска, содержащие картинки.
• Коллекции Microsoft Office– начинающие пользователи чаще всего работают именно с этим собранием изображений, которое входит в поставку Microsoft Office.
• Веб-коллекции – позволяет расширить собрание картинок Word при помощи изображений, доступных на интернет-ресурсе Office Online (для его использования нужно подключиться к Интернету).
Соответствующие заданным критериям изображения будут отображены в окне предварительного просмотра (рис. 6.3). Вы можете просматривать их при помощи полосы прокрутки.
Рис. 6.3. Изображения, найденные по запросу «компьютер»
Чтобы вставить картинку в документ, сделайте следующее.
1. Установите курсор в нужное место документа.
2. Щелкните на картинке один раз. В результате она будет вставлена в документ.
3. Вы также можете подвести указатель к изображению, щелкнуть на стрелке в правой его части и выбрать команду Вставить (рис. 6.4).

Рис. 6.4. Вставка изображения в документ
Перед вставкой изображения в файл можно просмотреть его в увеличенном размере и изучить его параметры. Для этого сделайте следующее.
1. Подведите указатель к интересующему вас рисунку.
2. Щелкните на стрелке справа от изображения.
3. Выберите строку Просмотр и свойства (рис. 6.5).

Рис. 6.5. Окно Просмотр и свойства
Совет
Для просмотра параметров изображений в диалоговом окне Просмотр и свойства необязательно вызывать его каждый раз для нового рисунка. Чтобы выбрать изображение, воспользуйтесь кнопками = в области Подпись.
Вступление
В данной статье речь пойдет о том, что такое клипы и как работать с ними. И хотя рассматриваемая методика создания и работы с коллекциями клипов не имеет прямого отношения к Microsoft Word 2010, рассматривается она все же применимо к данной программе, в частности, в случае вставки коллекции клипов в документ Word (или любой другой из пакета Office). Следовательно, данная статья будет полезна не только тем, кто изучает Microsoft Word 2010, но и осваивающим другие приложения из состава Microsoft Office 2010.
Определение
Начнем с определения, что же такое коллекция клипов? Коллекция клипов – это папка с клипами, которая задана с определенными признаками. Располагаются коллекции в организаторе клипов. Организатор клипов позволяет собирать и хранить фотографии, видеорипы и еще целый ряд мультимедиа-файлов, при этом расположением этим файлов может быть как жесткий диск вашего компьютера, так и сеть интернет. Добавление клипов можно осуществлять автоматически при помощи организатора клипов, либо вручную. Принцип работы организатора клипов таков, что файлы, находящиеся на HDD вашего PC, напрямую не копируются в коллекцию, напротив , организатор клипов создает для всех файлов мультимедиа специальные ссылки, которые, собственно, и размещаются в папке коллекции, сами же файлы остаются на своих местах. Эти ярлыки затем позволяют вам ускорить работу с избранными файлами мультимедиа – открывать и вставлять их без прямого перехода к месту расположения файлов. По той же причине, что файлы не используются непосредственно в коллекции – вы можете легко удалять ненужные ярлыки, не боясь случайно удалить сам файл.
Запуск организатора клипов
Организатор клипов можно запускать как из любого приложения Microsoft Office 2010, так и вне его. Для этого сделайте следующие действия:
1 способ:
- Откройте вкладку «Вставка»;
- В группе «Иллюстрации» нажмите кнопку «Картинка» — откроется панель «Картинка, в правой части экрана. При желании вы ее можете переместить в любую часть экрана, даже на уровень ленты (чего не позволяют делать многие программы, ведь лента в Microsoft Word 2010, фактически, основная панель инструментов) и изменить ее размер

Рисунок 1. Панель «Картинка»
2 способ:
- Нажмите кнопку «Пуск» на панели задач Windows;
- Найдите пункт «Все программы» — щелкните по нему или подождите секунду и в открывшемся списке выберите Microsoft Office 2010;
- В меню Microsoft Office 2010 выберите пункт «Средства Microsoft Office 2010», а затем – «Организатор клипов (Майкрософт)»
Рисунок 2. Организатор клипов
Создание новой коллекции
Теперь поговорим о том, как создать саму коллекцию, а затем, поэтапно разберем процесс ее «сборки» и правки. Итак, чтобы создать коллекцию, сделайте следующее:
- Запустите организатор клипов (Микрософт). В окне «Список коллекций» можно видеть ваши коллекции (точнее папки с коллекциями и папки в которых хранятся эти папки с коллекциями);
- В окне организатора, выберите «Файл», затем – «Создать коллекцию»;
- В открывшемся окошке «Создание коллекции» введите название будущей коллекции и выберите место ее размещения (в рамках папки «Мои коллекции»)
Рисунок 3. Создание коллекции
На этом пока все, теперь рассмотрим, как автоматически создавать коллекции.
Ручное создание коллекции клипов
Коллекции клипов можно создавать вручную, используя привычный для всех нас способ – найти нужное фото или видео на жестком диске и добавить его в коллекцию. Для этого сделайте следующее:
- В окне организатора клипов, на панели инструментов выберите «Файл»;
- В открывшемся меню, в списке команд наведите курсор на пункт «Добавить клипы в организатор», затем выберите «Вручную»;
- В открывшемся окне (оно примет в заголовке название используемой на данный момент коллекции – в нашем случае это «Collection #1…») «Collection #1 – Добавление клипов в организатор» вы получаете возможность выбрать нужные файлы, подобно тому, как это делается в «Проводнике». Следует отметить, что интерфейс окна во многом схож со стандартным окном Windows Explorer, впрочем, более подробно мы рассмотрим его ниже;
- Выберите нужный файл мультимедиа или папку с файлами и нажмите кнопку «Добавить». Если вам необходимо выбрать ряд файлов в рамках одной папки, используйте комбинацию клавиш — для выделения отдельных файлов в произвольной последовательности и — для выделения «блоком» сразу нескольких файлов
После того как вы нажмете «Добавить» — коллекция будет обновлена и в ней будут находиться только что добавленные файлы мультимедиа (точнее ссылки на них).
Рисунок 4. Добавление клипов в коллекцию вручную
Окно «Добавление клипов в организатор»
Данное окно очень схоже по функциональности и внешнему виду со стандартным окном программы «Проводник» о чем уже упоминалось выше. Тем не менее, оно содержит ряд особенностей, знать которые необходимо при ручной сборке коллекции. Итак, ознакомимся со всеми его возможностями.
- «Адресная строка» – позволяет, как увидеть адрес текущей директории, так и вставить туда скопированный ранее адрес для более быстрого нахождения места расположения нужного файла. Кнопка открытия меню ранее посещенных директорий, позволяет также выбрать нужный адрес и таким образом быстро найти искомый файл
- Кнопки «Вперед» и «Назад» — позволяют перемещаться вперед и назад, подобно действиям, совершаемым в Internet Explorer с веб-страничками. Кнопка открытия меню позволяет выбрать из списка уже посещенную директорию (только более крупную, например, отдельную папку или диск);
- В «Поле поиска» можно задать название искомого файла и затем выбрать нужный из предложенных вариантов;
- В области «Избранные ссылки» — выбираются нужные папки или диски, например, если файл находиться на диске «D», то нужно щелкнуть по пункту «Компьютер», а затем в правой части окна продолжить поиск, выбрав пункт с названием соответствующего диска. Если нажать кнопку «Папки», под областью «Избранные ссылки» откроется область, отображающая папки соответствующие выбранной выше директории (например, только для диска «С»);
- Кнопка «Добавить в» — позволяет добавить файлы мультимедиа в любую из существующих коллекций. Так, если вы случайно наткнетесь на файл, который больше подходит к другой коллекции (например, вы создавали коллекцию танков, из соответствующих фотографий, но вам в процессе попалось пару снимков БМП и БТР, для которых уже создана отдельная коллекция) нажмите кнопку «Добавить в» и выберите в окне «Импорт в коллекцию» нужную папку;
- В поле «Имя клипа» можно ввести название искомого клипа или нажать кнопку открытия меню и выбрать из списка уже ранее использовавшихся клипов;
- Нажав кнопку выбора файлов (над кнопкой «Открыть»), можно выбрать следующие типы файлов – «Все файлы», «Все типы файлов организатора» (задается по умолчанию), «Иллюстрации», «Фотографии», «Звук», «Видео» и «Общие каталоги». Это позволяет детализировать поиск, например, если вы создаете коллекцию из любимых песен, выберите «Звук» и окно «Добавление клипов в организатор» будет отображать только конкретный тип файлов – MP3, Flac, Loseless и т.п.
- Нажав кнопку «Виды», можно изменить размер отображаемых значков, например, если вам нужно подробнее рассмотреть эскизы файлов изображений – выберите «Крупные значки»;
- Кнопка «Новая папка» может пригодиться, если у вас в буфере обмена находиться ряд изображений, для которых вы хотите создать отдельную папку, а затем оттуда добавить их в соответствующую коллекцию;
- Кнопка «Сервис» позволяет использовать сетевой диск
Добавление клипов с камеры или сканера в коллекцию
Клипы в коллекцию можно добавить непосредственно со сканера или камеры, для этого сделайте следующее:
- В окне «Организатор клипов» в панели инструментов выберите «Файл»;
- В списке команд подведите курсор к пункту «Добавить клипы в организатор»;
- В меню «Добавить клипы в организатор» выберите пункт «Со сканера или камеры»;
- В окне «Вставка рисунка со сканера или камеры» в группе устройство выберите сканер или камеру, чьи драйвера установлены на ваш компьютер (дополнительно можно задать качество файла мультимедиа – например, разрешение изображения);
- Нажмите кнопку «Вставить» — теперь новый клип будет отображен в папке «Мои коллекции» в папке с названием сканера
Удаление коллекции клипов
Чтобы полностью удалить определенную коллекцию клипов, сделайте следующее:
- В окне «Организатор клипов» нажмите кнопку «Список коллекций» — в одноименной области справа появиться структурное дерево папок;
- Щелкните правой кнопкой мыши по интересующей вас папке и в контекстном меню выберите пункт «Удалить коллекцию» (после слова удалить в названии команды следует название удаляемой коллекции)
Рисунок 5. Удаление коллекции клипов
Переименование коллекции клипов
Если вас уже не устраивает заданное ранее название для определенной коллекции клипов, вы можете его изменить, на более подходящее. Для этого сделайте следующее:
1 способ:
- В окне «Организатор клипов» нажмите кнопку «Список коллекций»;
- В структурном дереве папок щелкните правой кнопкой мыши по нужной коллекции;
- В контекстном меню выберите пункт «Переименовать (и название коллекции)» (название коллекции в дереве папок будет выделено синим, после чего можно вводить новое название)
2 способ:
- В окне «Организатор клипов» в панели инструментов выберите «Правка»;
- В списке команд выберите «Переименовать коллекцию»
Стоит учесть, что переименовать можно только созданные вами папки, дефолтные же папки (основные коллекции) переименованию не подлежат.
Рисунок 6. Переименование коллекции клипов
Сжатие основного каталога
С целью экономии места, основной каталог организатора клипов можно сжать, при этом затрагиваются только уменьшенные копии изображений (эскизы) и прочие данные о клипах, которые находятся в папках коллекций. Для этого сделайте следующее:
- В окне организатора клипов откройте меню «Сервис»;
- В списке команд выберите «Сжать». Появится окошко «Сжатие», в котором отобразится процесс сжатия, причем, чем больше каталог, тем продолжительнее этот процесс
Учтите, что при сжатии производится внутренняя проверка данных организатора клипов, если же обнаруживаются поврежденные данные, программа автоматические делает попытку их восстановить.
Заключение
На этом первая часть статьи заканчивается, в следующей части мы рассмотрим, как вставлять коллекцию в документ Word, рассмотрим, какие форматы графических изображений поддерживает программа и как пополнять коллекции через интернет.