

![]()
Office Timeline Pro+ is here!
Align programs and projects on one slide with multi-level Swimlanes.
This step-by-step Word timeline tutorial explains how to create professional timelines right inside the popular word processor.
Microsoft Word allows users to build a basic timeline that they can manually customize and adjust to their project’s requirements. However, since the tool is designed mainly for editing copy, it may lack the flexibility that one needs to create more professional-looking visuals and update them easily.
Those who need to constantly create and update project visuals for presentations to clients or executives may find it easier to build their timelines using PowerPoint. On this page, we will show you how to make a timeline both manually in Word and automatically in PowerPoint.
Which tutorial would you like to see?
1. Create a basic timeline.
-
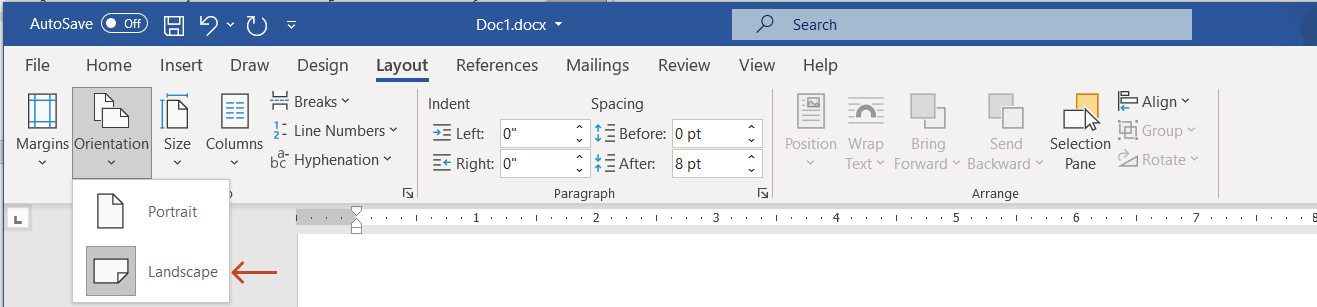
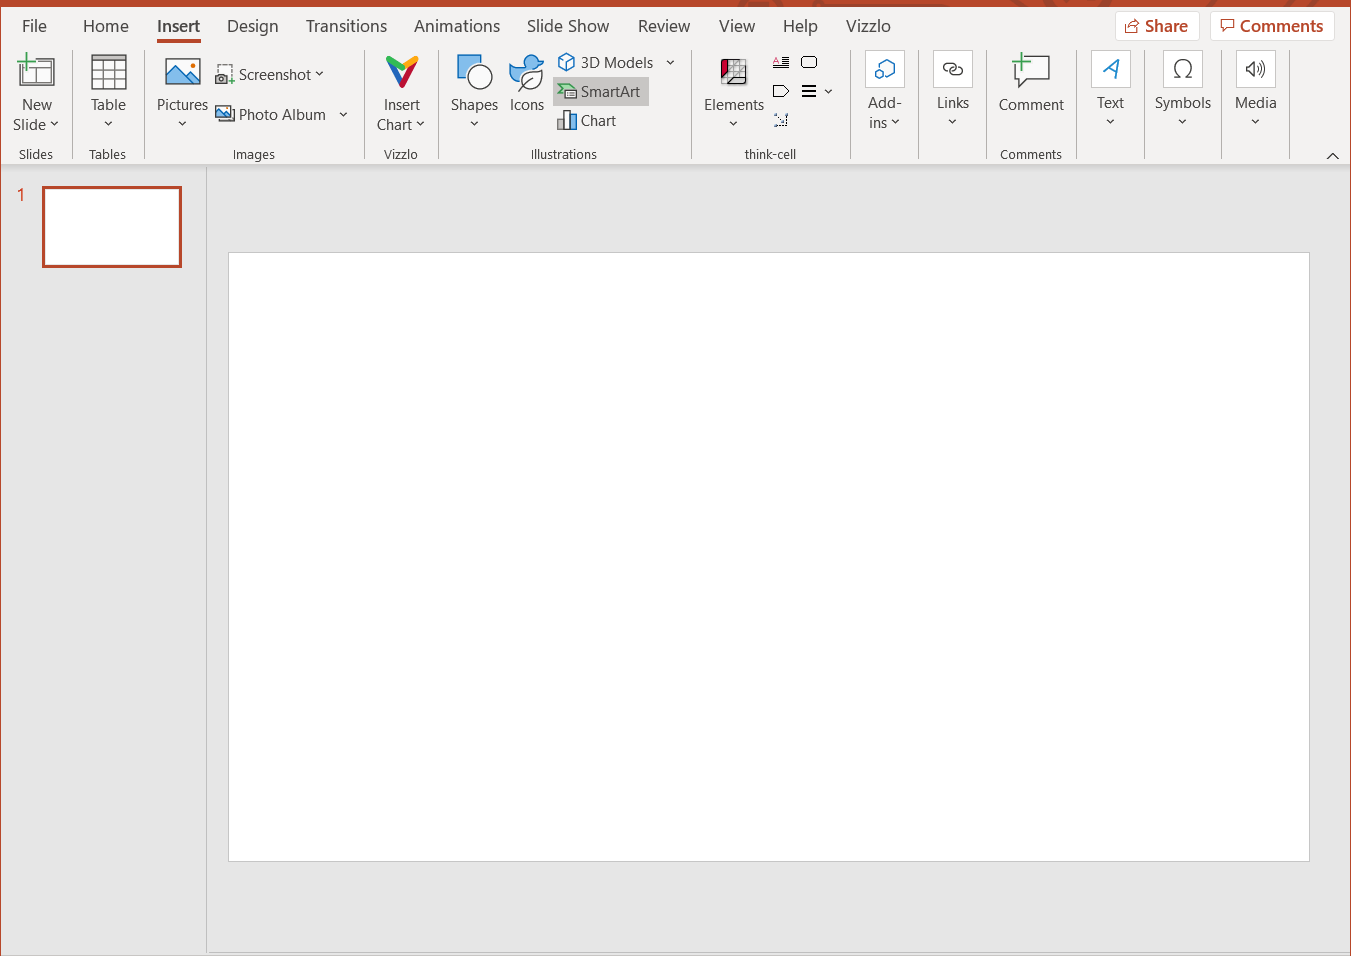
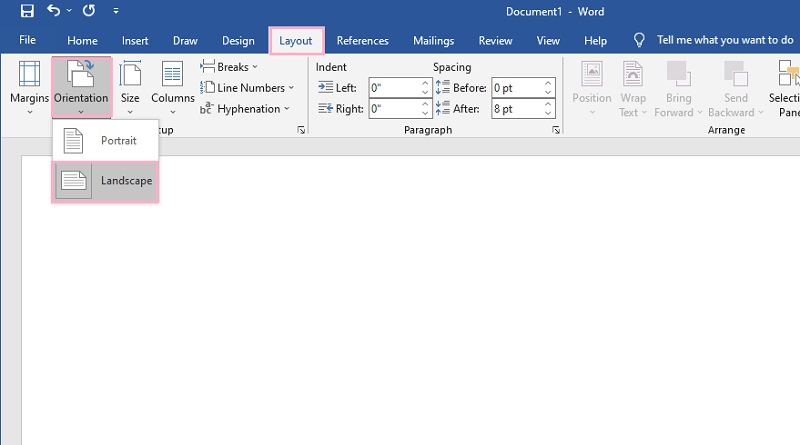
Open a new Word document and change the page orientation from Portrait to Landscape, which will make room for more items to be placed on the timeline. To do so, go to the Layout tab on the Word ribbon and click on Orientation.

-
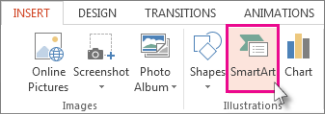
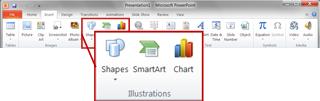
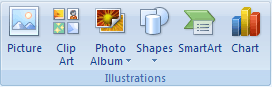
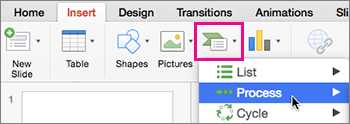
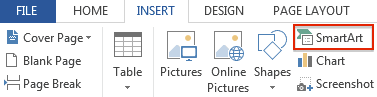
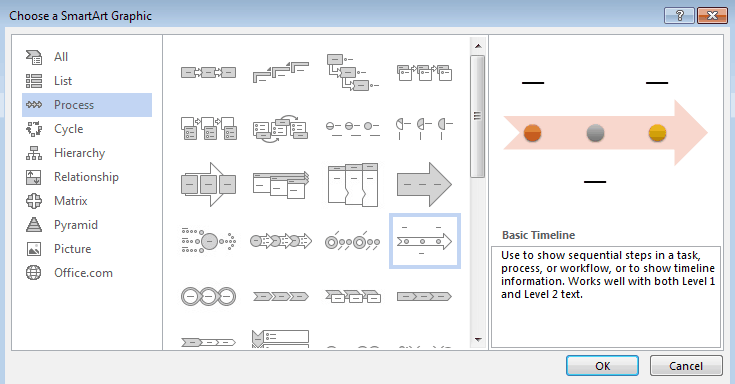
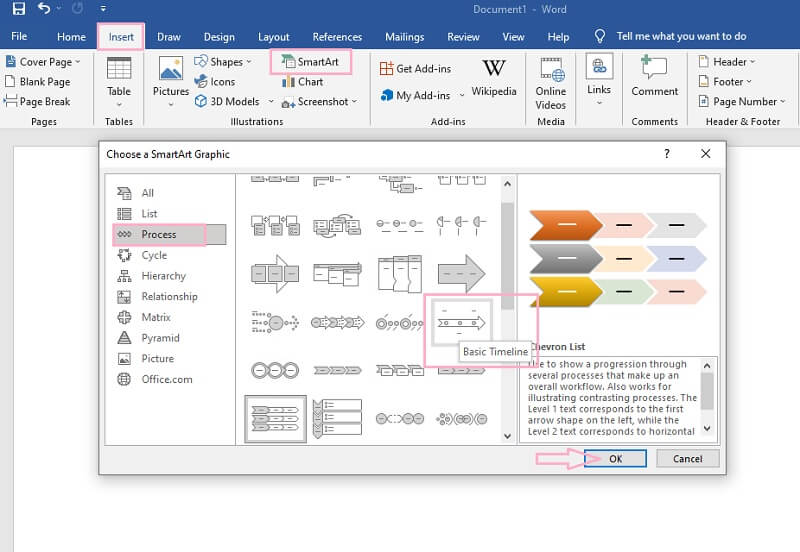
Select the Insert tab and click on the SmartArt button in the Illustrations section.
-
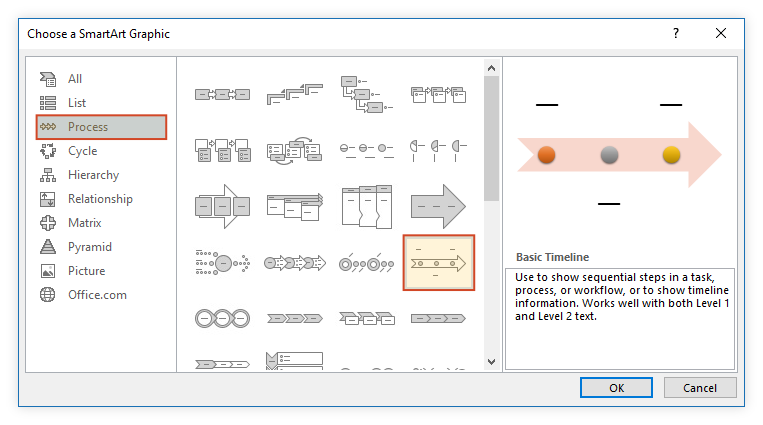
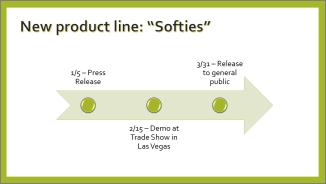
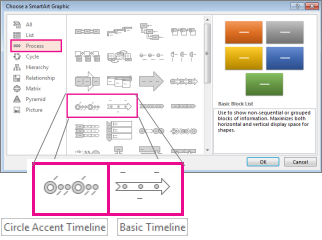
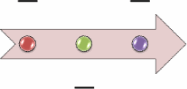
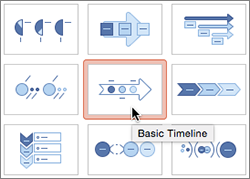
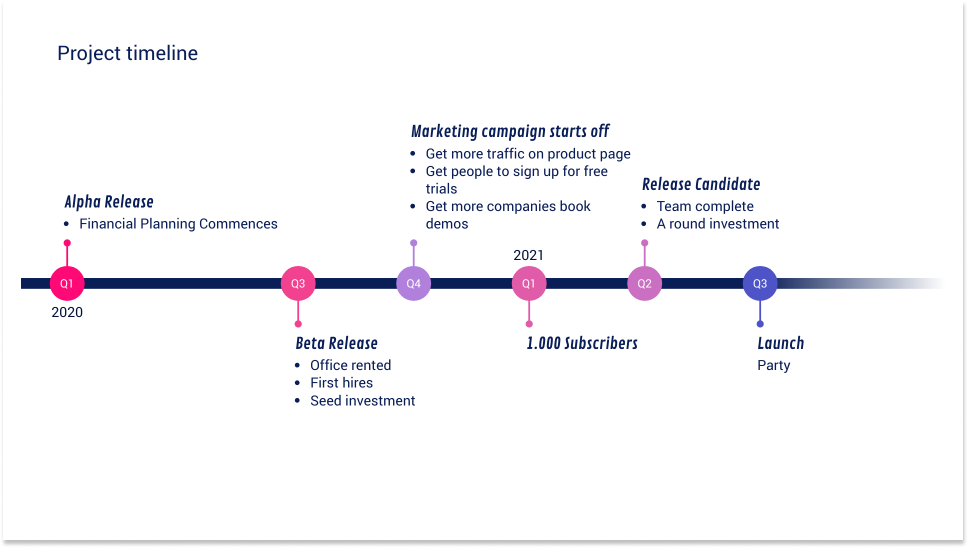
Select the Process category within the window that pops up and pick the graphic type that you want to use for your Word timeline. You have a variety of options to choose from, but for a simple timeline that shows the main milestones of a project, we’d recommend going with the Basic Timeline, which you can see bordered below.
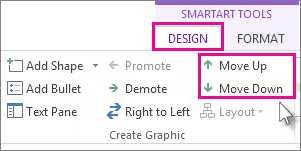
If you want to try out different layouts for your timeline, you can always change the style and colors from the SmartArt Design tab on the ribbon.

2. Enter your data.
-
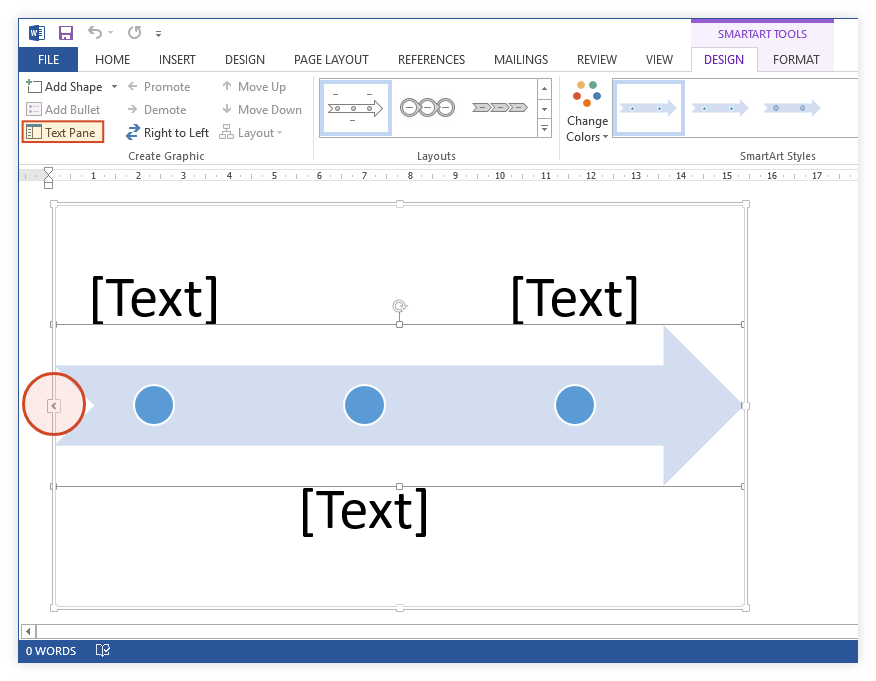
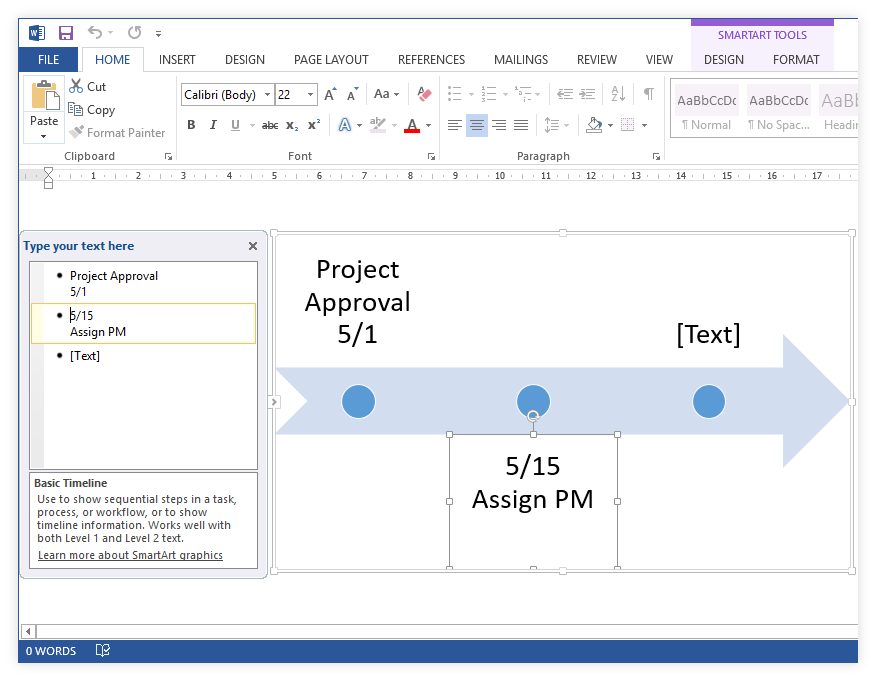
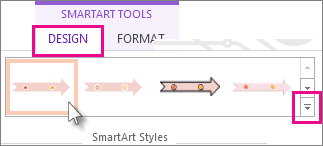
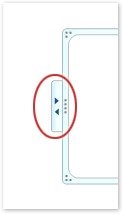
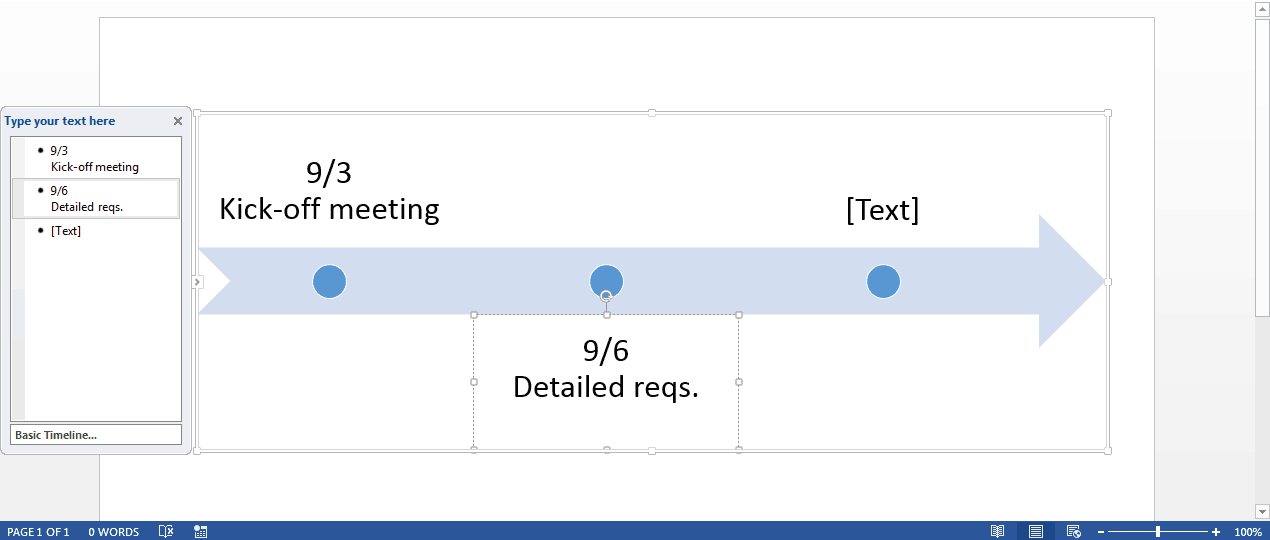
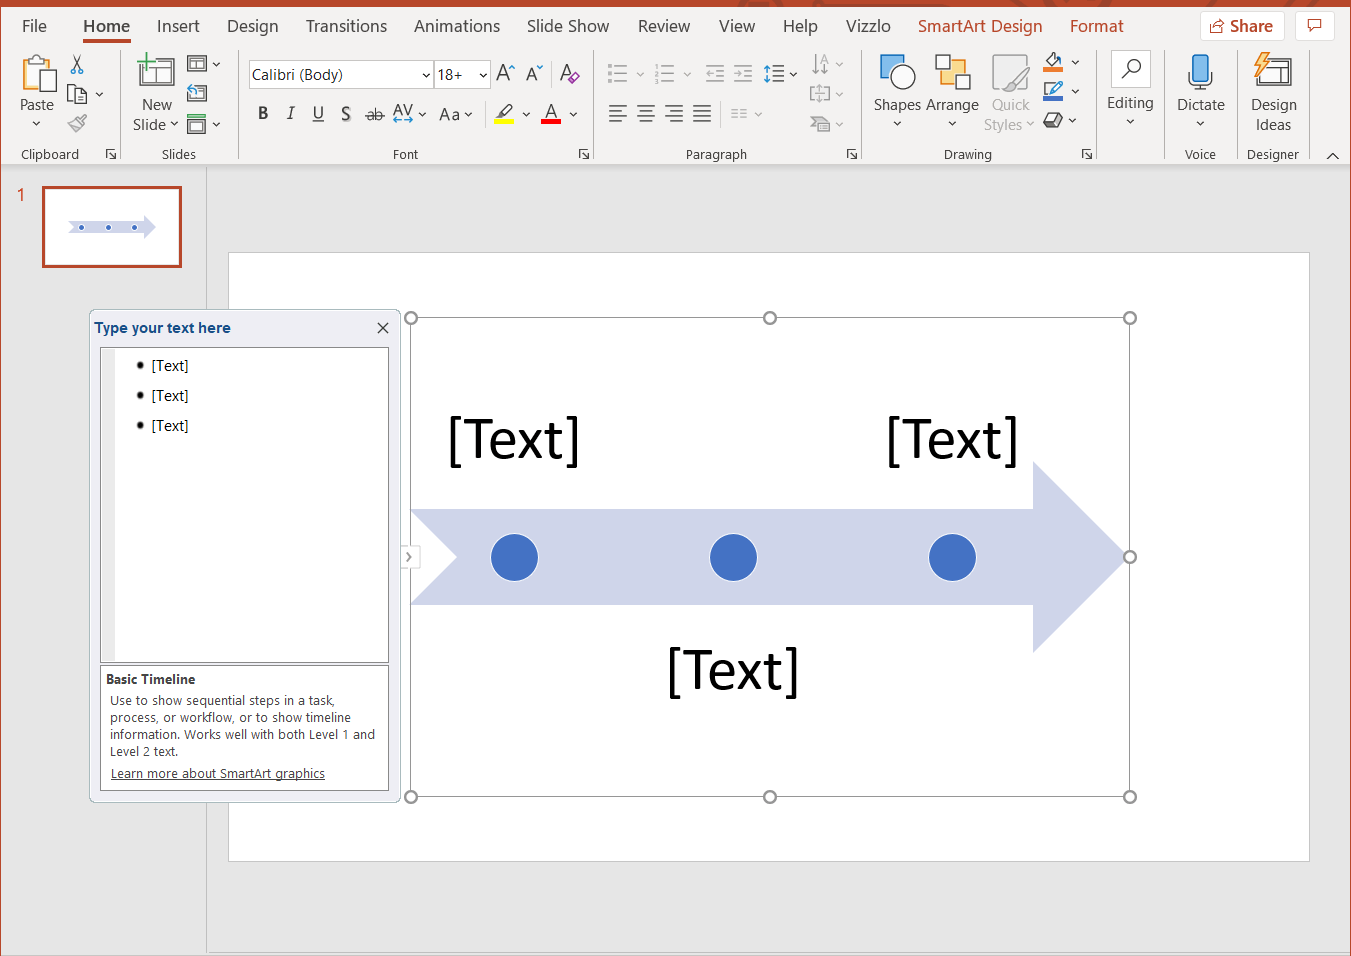
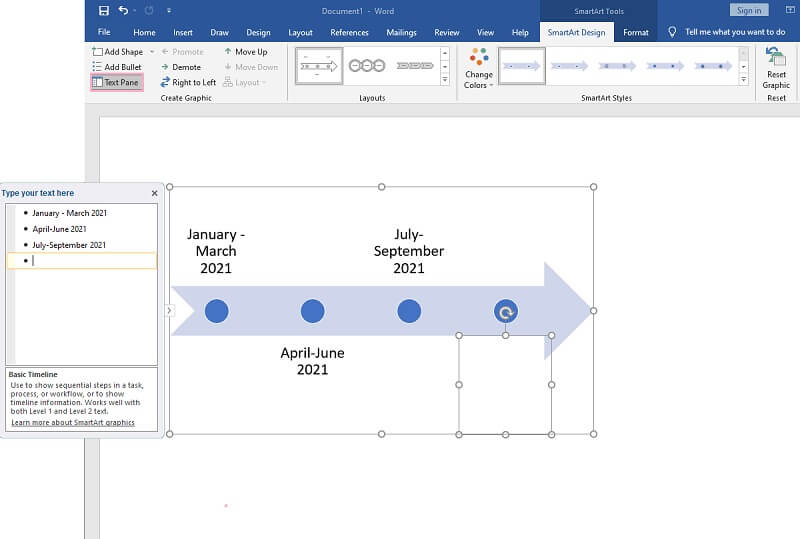
Once Word has generated your basic timeline, open the Text Pane by clicking on whichever of the two areas bordered in the image below. You’ll find that updating the default graphic is much easier this way than entering your data directly in the input fields on the timeline.
-
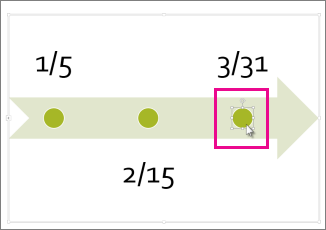
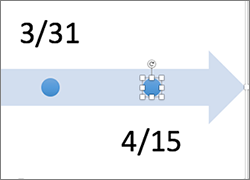
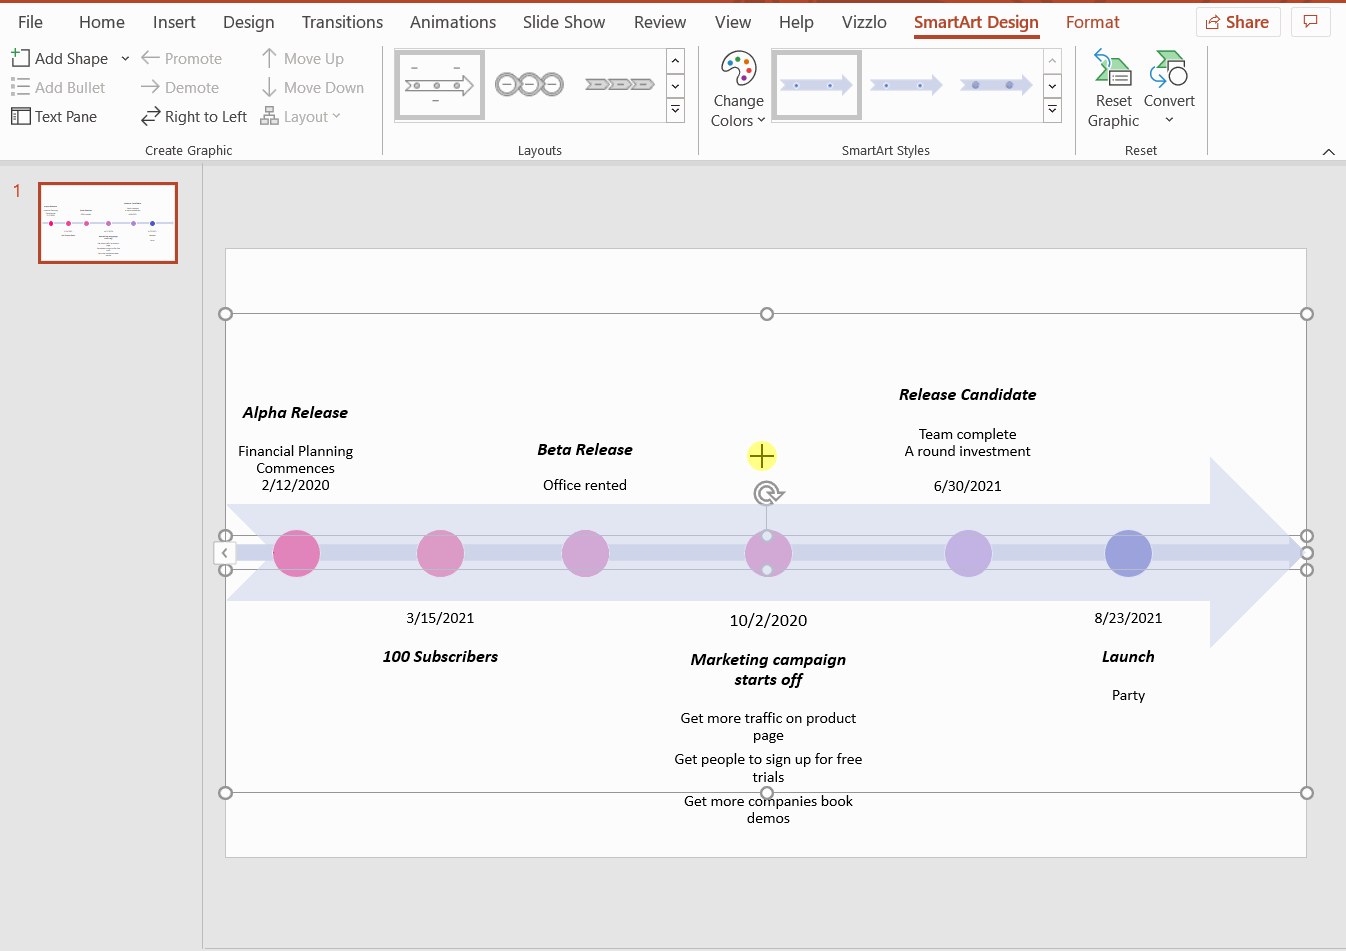
Enter your milestone dates and descriptions inside the Text Pane — the graphic will be automatically updated. To show a milestone’s date below or above its description, you can insert a line break using Shift + Enter.
Note: Since Word is not able to automatically calculate time intervals between milestone dates, your milestones will be placed at equal distances on the timeline regardless of the number of days between them. You have the option of manually dragging them closer or farther from one another, but the graphic will get distorted as you add more items. This is why we recommend leaving them as they are.
-
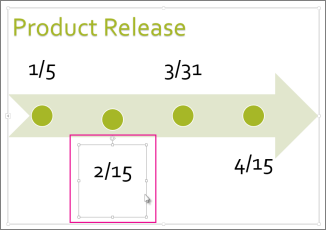
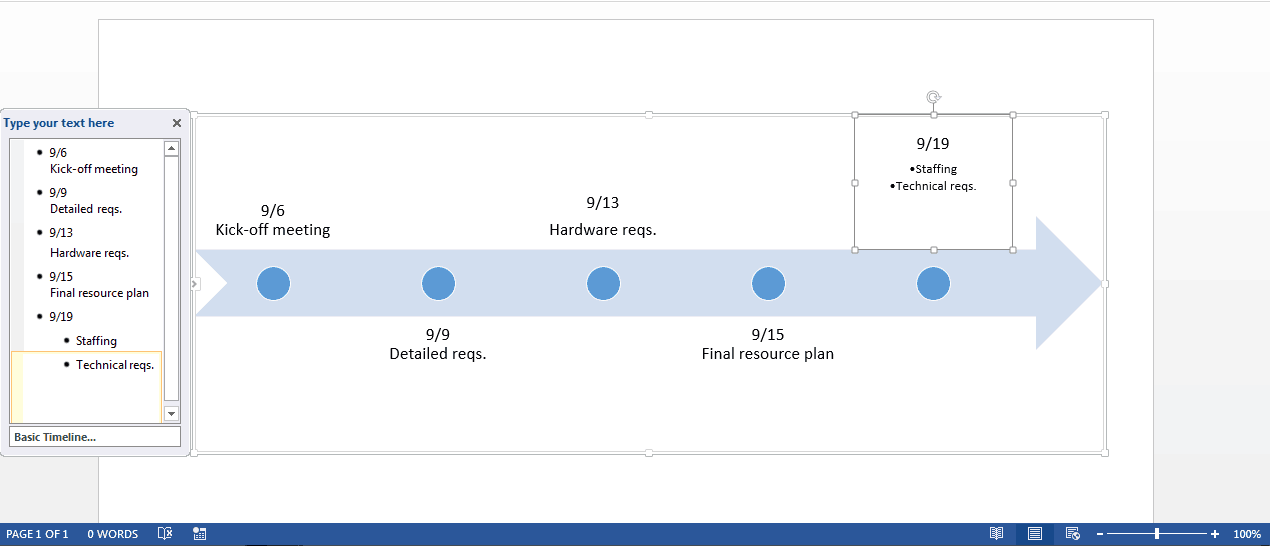
To insert extra events or deliverables on your timeline, simply press Enter after an existing milestone label inside the Text Pane. The more events you add, the more the text size will shrink. This is why a maximum of 7 milestones is recommended to make sure that your data remains legible.
Note: Manually increasing the text size for improved readability may ruin the entire layout of your timeline. A better alternative would be for you to expand the graphic box, which will automatically make the texts larger too.
3. Customize your timeline.
-
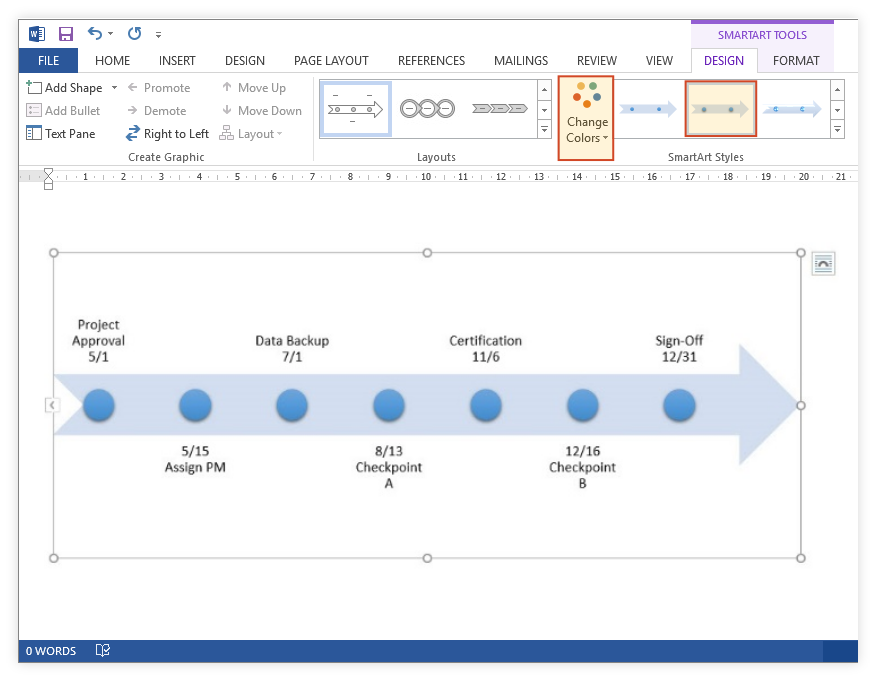
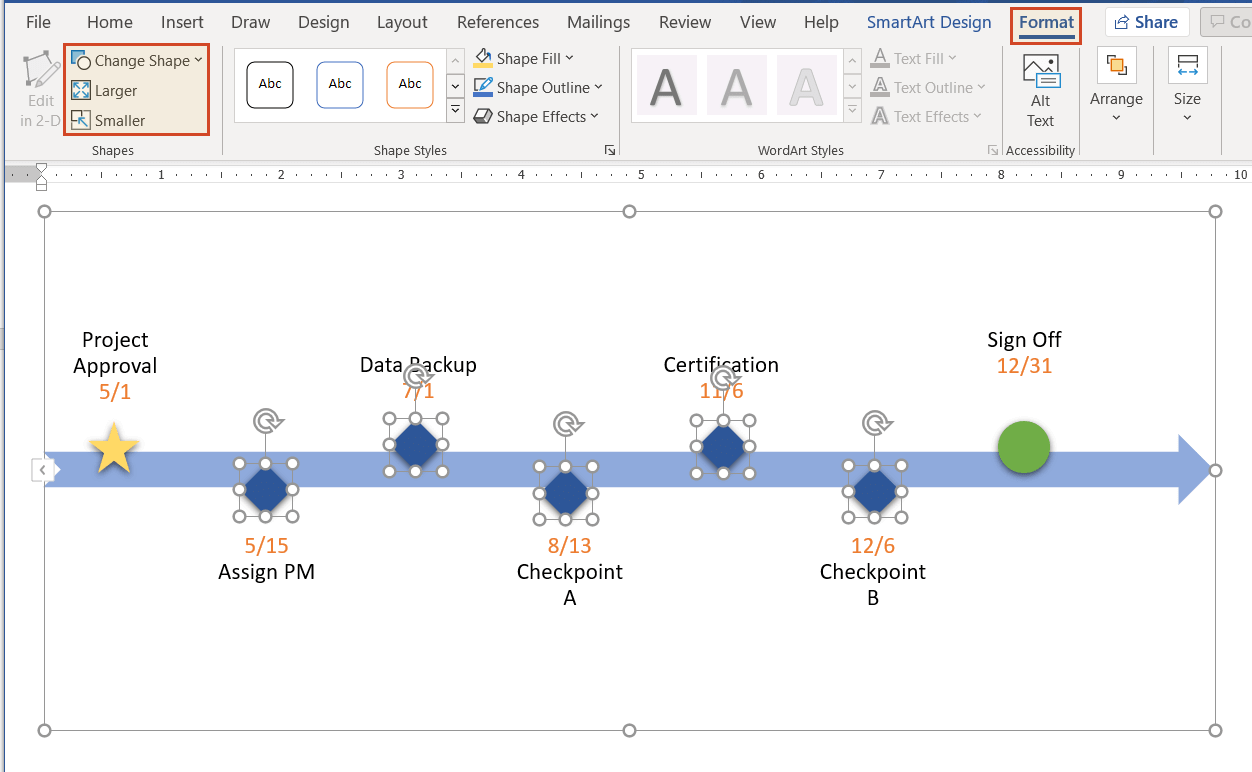
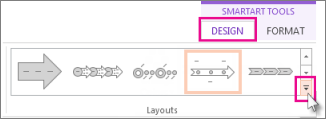
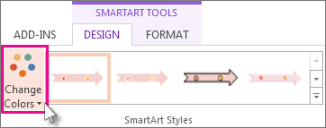
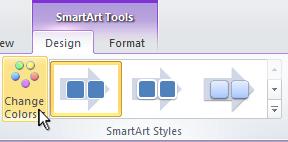
Now that your basic timeline is outlined, you can customize its overall look by changing its primary color theme from the Change Colors dropdown menu or by selecting a different style from the SmartArt Styles section. In our example, we applied the Intense Effect style, which made the milestone shapes more prominent.
-
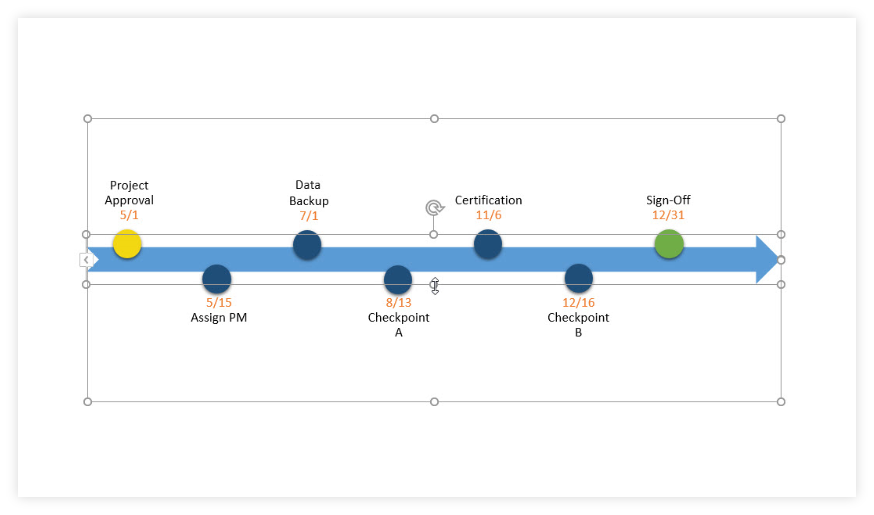
To customize individual items on the timeline, use the formatting options available in the small window that appears once you right-click on the specific element you want to personalize. For example, you can change the color of a milestone or of the arrow-shaped band using Shape Fill, and that of the text using Font Color.
-
Next, you can use Drag & Drop to decrease the width of the arrow shape and move the circles a little higher or lower on the timeline to position them closer to their corresponding descriptions. This should make it easier for your audience to follow the succession of milestones.
-
Finally, to make certain milestones stand out even more, you can also resize them or change their shape using the options in the Format tab. Select more items at once by pressing and holding the Ctrl key while you click on the needed items.
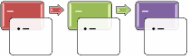
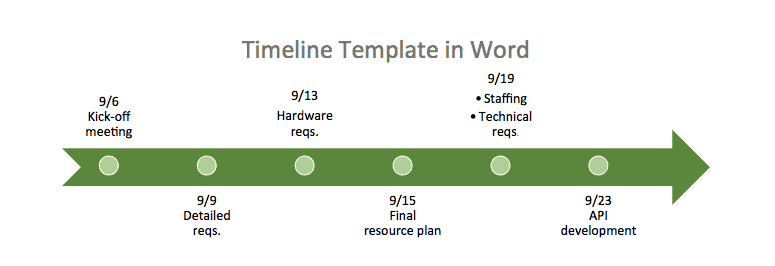
After experimenting with several shape and size options, our MS Word timeline looks like this:


How to make a timeline in PowerPoint automatically
Apart from being time-consuming, manually creating a timeline in Word may also get frustrating if you want to apply custom changes or need to regularly update the visuals for important presentations.
PowerPoint is better suited than MS Word for building visuals to present in client meetings or executive reviews. Below, we will demonstrate how to automatically create and update your graphic using a simple add-in for PowerPoint called Office Timeline. To get started, you first need to install Office Timeline,
which will add a timeline maker tab to the PowerPoint ribbon.
1. Open PowerPoint and enter your data into the Office Timeline Wizard.
-
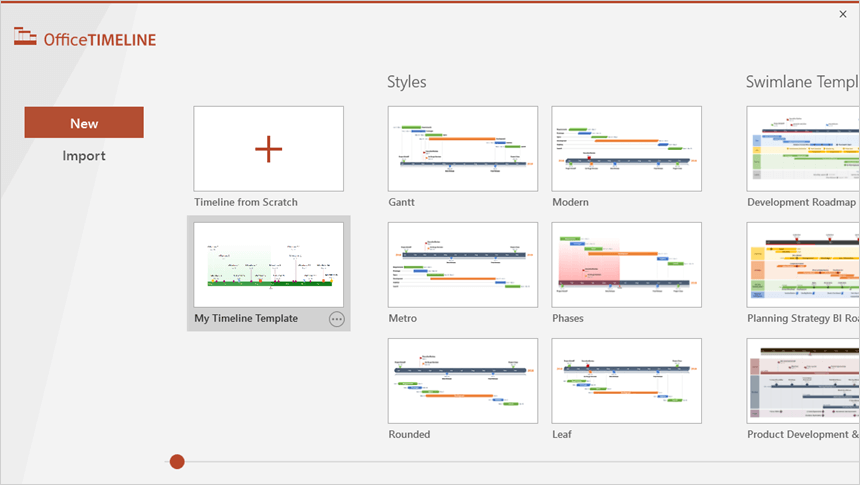
Go to the Office Timeline tab you’ll see on the PowerPoint ribbon and click on New.
You will be taken to a gallery where you can choose from a variety of styles and templates that you can use for your timeline.
-
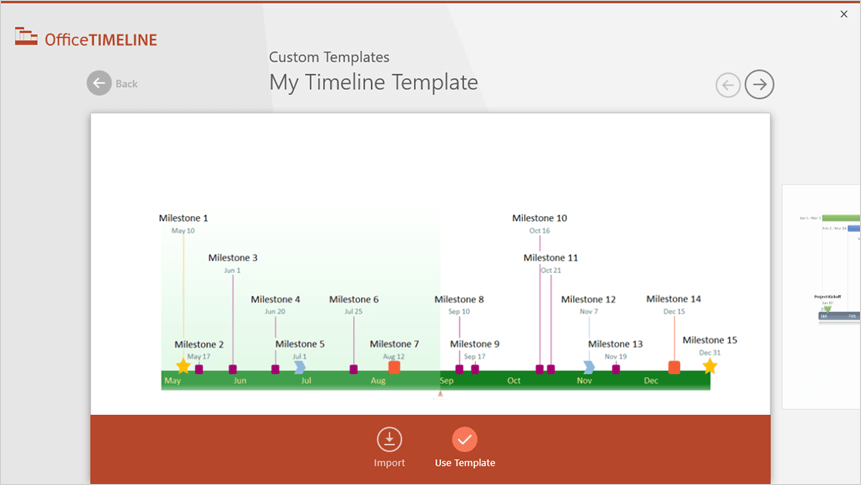
Double-click on the template or style you prefer and then select Use Template in the preview window to open the Data Entry Wizard. For our example, we chose a custom template made earlier, which you can
download here.
-
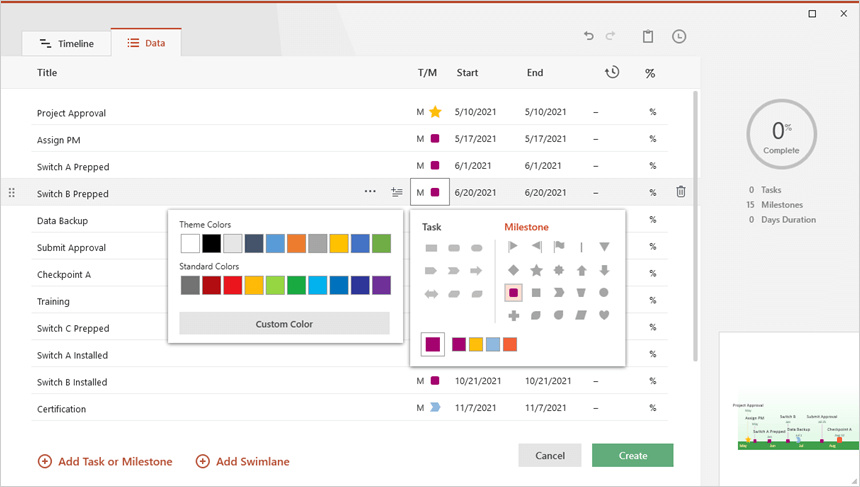
In the Data Entry window, you can either manually enter your milestones and set their dates, or you can copy and paste them from an existing Excel file. This is also a good place to start making a few quick customizations, such as changing the color or shape of each item you’ve added. Once you finish, click the Create button.

2. A new timeline slide will be instantly generated in PowerPoint.
-
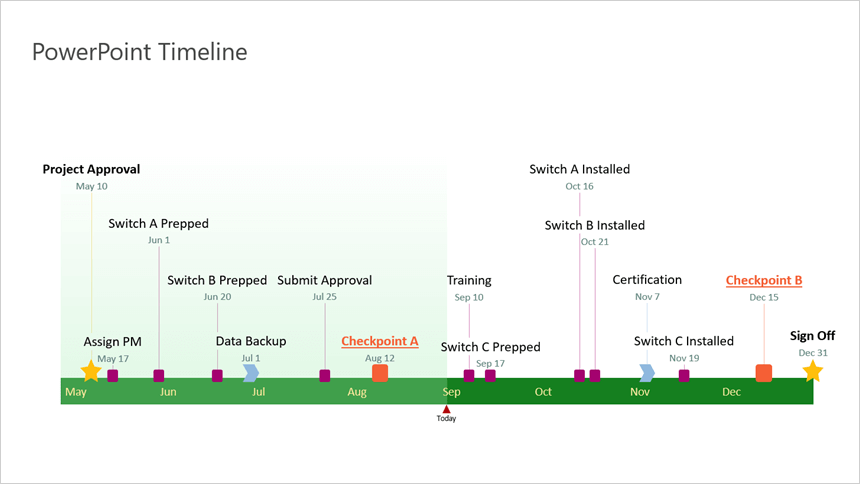
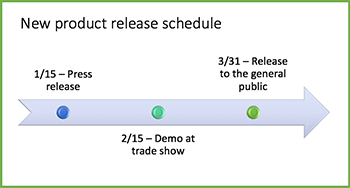
Depending on your template choice and the customizations you make, your timeline can look similar to this:
-
Once you’ve built your timeline, you can easily
restyle or update it automatically
using Office Timeline. For instance, you can change the color, position and date format of any milestone or add new ones on the fly as your plans change, or you can insert tasks as well to create a Gantt chart.
![]()
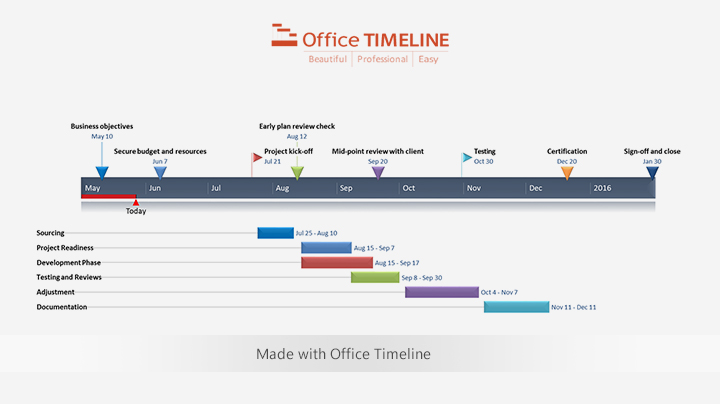
Download auto-generated timeline slide
For more information on
how to make timelines using other office or Google tools, check out our comprehensive tutorials.
Watch how to build a PowerPoint timeline in less than a minute:
![]()
Play Video
FAQs about making timelines in Word
Is there a timeline template in Word?
MS Word does not have any in-built predesigned timeline templates, but there are some online samples that you can download and use with the word processor. You can find them on Office.com (https://templates.office.com/en-us/timelines) or other websites. However, these often prove limited and unsuitable when you work with more complex data or higher customization requirements.
This is why we suggest using PowerPoint timelines instead as they are better suited for professional-looking presentations. Such visuals can be easily produced with specialized automated tools like Office Timeline, helping you save a lot of time.
Where is a timeline in Word?
Word does not have a default timeline template, but you can insert a basic timeline in your document going to the Insert tab and selecting SmartArt. Then, in the Choose a SmartArt Graphic gallery, click Process and select one of the two timeline formats there — Basic Timeline or Circle Accent Timeline.
How do you insert a timeline in Word?
Follow the steps below to insert a timeline in Word:
- Go to Insert, select SmartArt.
- In the Choose a SmartArt Graphic gallery, click Process.
- Select a timeline layout (Basic Timeline or Circle Accent Timeline) and then click OK.
- Edit text and change items format and colors as needed.
- You can also change the layout (SmartArt Design > Layouts) and apply a different style (SmartArt Design > SmartArt Styles).
As an alternative to these rather limited visuals, you can use any of the free templates below to create stylish, more refined timelines that can be easily customized and saved as images.
See our free timeline template collection

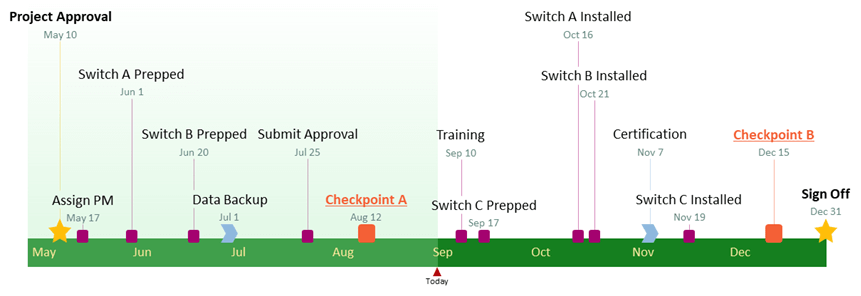
Incident Response Plan
Free, downloadable timeline graphic using hours and minutes to give a clear overview on how an organization needs to plan its reaction to incidents so that outage be limited and activity resumed as soon as possible.

Crisis Management Plan
Professionally-designed timeline example structured in swimlanes that covers all the steps and processes one needs to follow in a crisis management process, from when the crisis occurs to response, business continuity process, recovery, and review.

Swimlane Diagram
Swimlane PowerPoint template that clearly lays out the framework of a project, from scheduling activities to task assignment and resource management.

Marketing Swimlanes Roadmap
Swimlane diagram example that provides a crisp, well-structured illustration of the tasks and milestones of your marketing campaign, according to the phase of the campaign to which they belong.

Marketing Plan
Free marketing timeline model that, once customized, effectively outlines your overall marketing strategy and serves as a solid visual aid to support marketing plan presentations.

Project Plan
Intuitive PowerPoint slide that serves as a quick yet visually effective alternative to complex project management tools to produce clear, well-laid-out plans for launching a project.

Sales Plan
Easy-to-edit sales plan sample for sales leaders, marketers or account executives to lay out objectives against a timeband in weeks; it can be customized to show campaign plans and targets in months, quarters or years.

Example Timeline
Visual template with Today’s Date indicator that helps enterprise workers get a quick start on creating timelines for project reviews, status reports, or any presentations that require a simple project schedule.

Blank Timeline
Generic timeline example that can be easily customized to quickly make an impressive, high-level summary of important events in a chronological order.
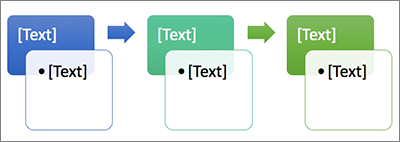
If you want to create a graphical representation of a sequence of events, such as the milestones in a project or the main events of a person’s life, you can use a SmartArt graphic timeline. After you create the timeline, you can add more dates, move dates, change layouts and colors, and apply different styles.
Create a timeline
-
On the Insert tab, click SmartArt.
-
In the Choose a SmartArt Graphic gallery, click Process, and then double-click a timeline layout.
Tip: There are two timeline SmartArt graphics: Basic timeline and Circle Accent Timeline, but you can also use almost any process-related SmartArt graphic.
-
Click [Text], and then type or paste your text in the SmartArt graphic.
Note: You can also open the Text Pane and type your text there. If you do not see the Text Pane, on the SmartArt ToolsDesign tab, click Text Pane.
-
Click a shape in the timeline.
-
On the SmartArt ToolsDesign tab, do one of the following:
-
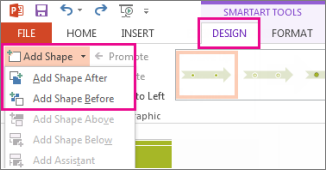
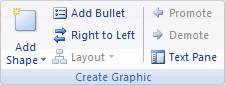
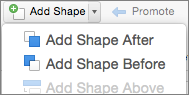
To add an earlier date, click Add Shape, and then click Add Shape Before.
-
To add a later date, click Add Shape, and then click Add Shape After.
-
-
In the new date box, type the date that you want.
-
On the timeline, click the date you want to move.
-
On the SmartArt ToolsDesign tab, do one of the following:
-
To move a date sooner than the selected date, click Move Up.
-
-
To move a date later than the selected date, click Move Down.
-
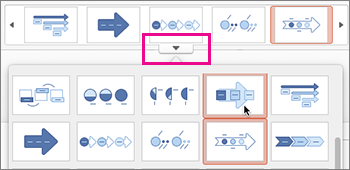
Click the SmartArt graphic timeline.
-
On the SmartArt ToolsDesign tab, in the Layouts group, click More
.Note: To view only the timeline and process-related layouts, at the bottom of the layouts list, click More Layouts, and then click Process.
-
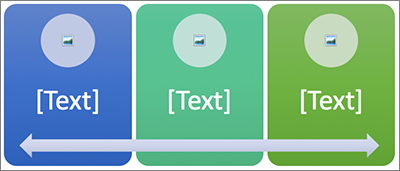
Pick a timeline or process-related SmartArt graphic, like the following:
-
To show progression in a timeline, click Accent Process.
-
To create a timeline with pictures or photos, click Continuous Picture List. The circular shapes are designed to contain pictures.
-
 .
.
-
Click the SmartArt graphic timeline.
-
On the SmartArt ToolsDesign tab, click Change Colors.
Note: If you don’t see the SmartArt ToolsDesign tab, make sure you’ve selected the timeline.
-
Click the color combination that you want.
Tip: Place your pointer over any combination to see a preview of how the colors look in your timeline.
A SmartArt style applies a combination of effects, such as line style, bevel, or 3-D perspective, in one click, to give your timeline a professionally polished look.
-
Click the timeline.
-
On the SmartArt ToolsDesign tab, click the style you want.
Tip: For more styles, click More
, in the lower right corner of the Styles box.
See also
-
Create a timeline in Visio
-
Import and export timeline data between Visio and Project
-
Create a timeline in Project
-
Get Microsoft timeline templates
Create a timeline
-
On the Insert tab, in the Illustrations group, click SmartArt.
-
In the Choose a SmartArt Graphic gallery, click Process, and then double-click a timeline layout (such as Basic Timeline).
-
To enter your text, do one of the following:
-
Click [Text] in the Text pane, and then type your text.
-
Copy text from another location or program, click [Text] in the Text pane, and then paste your text.
Note: If the Text pane is not visible, click the control.
-
Click in an entry in the SmartArt graphic, and then type your text.
Note: For best results, use this option after you add all of the entries that you want.
-
Other timeline tasks
-
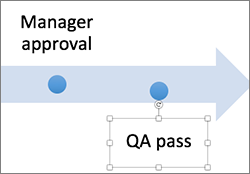
Click the SmartArt graphic that you want to add another entry to.
-
Click the existing entry that is located closest to where you want to add the new entry.
-
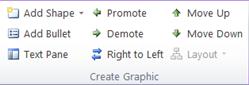
Under SmartArt Tools, on the Design tab, in the Create Graphic group, click the arrow next to Add Shape.
If you don’t see the SmartArt Tools or Design tabs, make sure that you’ve selected the SmartArt graphic. You might have to double-click the SmartArt graphic to open the Design tab.
-
Do one of the following:
-
To insert an entry after the selected entry, click Add Shape After.
-
To insert an entry before the selected entry, click Add Shape Before.
-
To delete an entry from your timeline, do one of the following:
-
In the SmartArt graphic, select the text for the textbox for the entry that you want to delete, and then press DELETE.
-
In the Text pane, select the all of the text for the entry that you want to delete, and then press DELETE.
Notes:
-
To add a shape from the Text pane:
-
At the shape level, place your cursor at the end of the text where you want to add a new shape.
-
Press ENTER, and then type the text that you want in your new shape.
-
-
-
In the text pane, select the entry that you want to move.
-
Do one of the following:
-
To move the entry to an earlier date, under SmartArt Tools, on the Design tab, in the Create Graphic group, click Move Up.
-
To move the entry to a later date, under SmartArt Tools, on the Design tab, in the Create Graphic group, click Move Down.
If you don’t see the SmartArt Tools or Design tabs, make sure that you’ve selected the SmartArt graphic. You might have to double-click the SmartArt graphic to open the Design tab.
-
-
Right-click the timeline that you want to change, and then click Change Layout.
-
Click Process, and then do one of the following:
-
For a simple but effective timeline, click Basic Timeline.
-
To show a progression, a timeline, or sequential steps in a task, process, or workflow, click Accent Process.
-
To illustrate a timeline with pictures or photos, click Continuous Picture List. The circular shapes are designed to contain pictures.
-
Note: You can also change the layout of your SmartArt graphic by clicking a layout option in the Layouts group on the Design tab under SmartArt Tools. When you point to a layout option, your SmartArt graphic changes to show you a preview of how it would look with that layout.
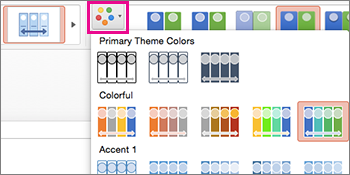
To quickly add a designer-quality look and polish to your SmartArt graphic, you can change the colors or apply a style to your timeline. You can also add effects, such as glows, soft edges, or 3-D effects. Using Microsoft PowerPoint 2010, you can also animate your timeline.
You can apply color combinations that are derived from the theme colors to the entries in your SmartArt graphic.
-
Click the SmartArt graphic whose color you want to change.
-
Under SmartArt Tools, on the Design tab, in the SmartArt Styles group, click Change Colors.
If you don’t see the SmartArt Tools or Design tabs, make sure that you’ve selected the SmartArt graphic.
-
Click the color combination that you want.
Tip: When you place your pointer over a thumbnail, you can see how the colors affect your SmartArt graphic.
-
In the SmartArt graphic, right-click the border of the entry you want to change, and then click Format Shape.
-
To change the color of the entry’s border, click Line Color, click Color
, and then click the color that you want. -
To change the style of the entry’s border, click Line Style, and then choose the line styles you want.
 , and then click the color that you want.
-
Click the SmartArt graphic you want to change.
-
Right-click the border of an entry, and then click Format Shape.
-
Click Fill, and then click Solid fill.
-
Click Color
, and then click the color that you want.
To change the background to a color that is not in the theme colors, click More Colors, and then either click the color that you want on the Standard tab, or mix your own color on the Custom tab. Custom colors and colors on the Standard tab are not updated if you later change the document theme.
To specify how much you can see through the background color, move the Transparency slider, or enter a number in the box next to the slider. You can vary the percentage of transparency from 0% (fully opaque, the default setting) to 100% (fully transparent).
A SmartArt Style is a combination of various effects, such as line style, bevel, or 3-D perspective that you can apply to the entries in your SmartArt graphic to create a unique and professionally-designed look.
-
Click the SmartArt graphic you want to change.
-
Under SmartArt Tools, on the Design tab, in the SmartArt Styles group, click the SmartArt Style that you want.
To see more SmartArt Styles, click the More button
.

 .
.Note: When you place your pointer over a thumbnail, you can see how the SmartArt Style affects your SmartArt graphic.
See also
-
Create a timeline in Visio
-
Import and export timeline data between Visio and Project
-
Create a timeline in Project
Create a timeline
-
On the Insert tab, in the Illustrations group, click SmartArt.
-
In the Choose a SmartArt Graphic gallery, click Process, and then double-click a timeline layout (such as Basic Timeline).
-
To enter your text, do one of the following:
-
Click [Text] in the Text pane, and then type your text.
-
Copy text from another location or program, click [Text] in the Text pane, and then paste your text.
Note: If the Text pane is not visible, click the control.
-
Click in an entry in the SmartArt graphic, and then type your text.
Note: For best results, use this option after you add all of the entries that you want.
-
Other timeline tasks
-
Click the SmartArt graphic that you want to add another entry to.
-
Click the existing entry that is located closest to where you want to add the new entry.
-
Under SmartArt Tools, on the Design tab, in the Create Graphic group, click the arrow under Add Shape.
If you don’t see the SmartArt Tools or Design tabs, make sure that you’ve selected the SmartArt graphic.
-
Do one of the following:
-
To insert an entry after the selected entry, click Add Shape After.
-
To insert an entry before the selected entry, click Add Shape Before.
-
To delete an entry from your timeline, click the entry you want to delete, and then press DELETE.
Notes:
-
To add a shape from the Text pane:
-
At the shape level, place your cursor at the end of the text where you want to add a new shape.
-
Press ENTER, and then type the text that you want in your new shape.
-
To add an assistant box, press ENTER while an assistant box is selected in the Text pane.
-
-
To move an entry, click the entry, and then drag it to its new location.
-
To move an entry in very small increments, hold down CTRL while you press the arrow keys on your keyboard.
-
Right-click the timeline that you want to change, and then click Change Layout.
-
Click Process, and then do one of the following:
-
For a simple but effective timeline, click Basic Timeline.
-
To show a progression, a timeline, or sequential steps in a task, process, or workflow, click Accent Process.
-
To illustrate a timeline with pictures or photos, click Continuous Picture List. The circular shapes are designed to contain pictures.
-
Note: You can also change the layout of your SmartArt graphic by clicking a layout option in the Layouts group on the Design tab under SmartArt Tools. When you point to a layout option, your SmartArt graphic changes to show you a preview of how it would look with that layout.
To quickly add a designer-quality look and polish to your SmartArt graphic, you can change the colors or apply a SmartArt Style to your timeline. You can also add effects, such as glows, soft edges, or 3-D effects. Using PowerPoint 2007 presentations, you can animate your timeline.
You can apply color combinations that are derived from the theme colors to the entries in your SmartArt graphic.
-
Click the SmartArt graphic whose color you want to change.
-
Under SmartArt Tools, on the Design tab, in the SmartArt Styles group, click Change Colors.
If you don’t see the SmartArt Tools or Design tabs, make sure that you’ve selected the SmartArt graphic.
-
Click the color combination that you want.

Tip: When you place your pointer over a thumbnail, you can see how the colors affect your SmartArt graphic.
-
In the SmartArt graphic, right-click the border of the entry you want to change, and then click Format Shape.
-
To change the color of the entry’s border, click Line Color, click Color
, and then click the color that you want. -
To change the style of the entry’s border, click Line Style, and then choose the line styles you want.
-
Click the SmartArt graphic you want to change.
-
Right-click the border of an entry, and then click Format Shape.
-
Click Fill, and then click Solid fill.
-
Click Color
, and then click the color that you want.
To change the background to a color that is not in the theme colors, click More Colors, and then either click the color that you want on the Standard tab, or mix your own color on the Custom tab. Custom colors and colors on the Standard tab are not updated if you later change the document theme.
To specify how much you can see through the background color, move the Transparency slider, or enter a number in the box next to the slider. You can vary the percentage of transparency from 0% (fully opaque, the default setting) to 100% (fully transparent).
A SmartArt Style is a combination of various effects, such as line style, bevel, or 3-D, that you can apply to the entries in your SmartArt graphic to create a unique and professionally designed look.
-
Click the SmartArt graphic you want to change.
-
Under SmartArt Tools, on the Design tab, in the SmartArt Styles group, click the SmartArt Style that you want.
To see more SmartArt Styles, click the More button
.
-
When you place your pointer over a thumbnail, you can see how the SmartArt Style affects your SmartArt graphic.
-
You can also customize your SmartArt graphic by moving entries, resizing entries, adding a fill or effect, and adding a picture.
If you’re using PowerPoint 2007, you can animate your timeline to emphasize each entry.
-
Click the timeline that you want to animate.
-
On the Animations tab, in the Animations group, click Animate, and then click One by one.

Note: If you copy a timeline that has an animation applied to it to another slide, the animation is also copied.
See also
-
Create a timeline in Visio
Create a timeline
When you want to show a sequence of events, such as project milestones or events, you can use a SmartArt graphic timeline. After you create the timeline, you can add events, move events, change layouts and colors, and apply different styles.
-
On the Insert tab, click SmartArt > Process.
-
Click Basic Timeline or one of the other process-related graphics.
-
Click the [Text] placeholders and enter the details of your events.
Tip: You can also open the Text Pane and enter your text there. On the SmartArt Design tab, click Text Pane.
-
Click a shape in the timeline.
-
On the SmartArt Design tab, click Add Shape, and then click Add Shape Before or Add Shape After.
-
Enter the text you want.
-
On the timeline, click the text of the event you want to move.
-
On the SmartArt Design tab, click Move Up (left), or Move Down (right).

-
Click the timeline.
-
On the SmartArt Design tab, point to the layout panel and click the down arrow.
-
Pick a timeline or process-related SmartArt graphic, like the following:
-
To show progression in a timeline, click Accent Process.
-
To create a timeline with pictures or photos, click Continuous Picture List. The circular shapes are designed to contain pictures.
-
-
Click the timeline.
-
On the SmartArt Design tab, click Change Colors, and then click the color combination you want.
Give your timeline a professional look by using a SmartArt style to apply a combination of effects, such as line style, bevel, or 3-D perspective.
-
Click the timeline.
-
On the SmartArt Design tab, click the style you want.

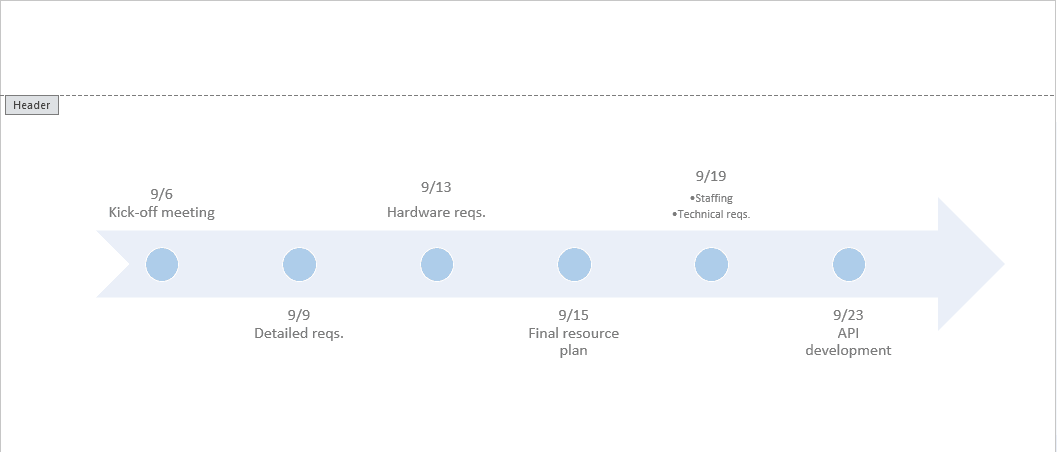
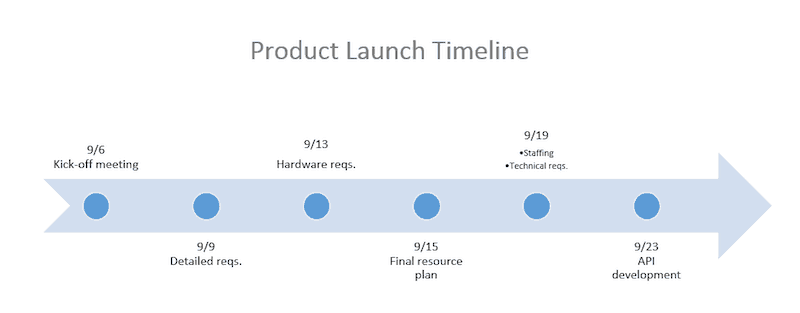
How to Make a Timeline in Microsoft Word
Smartsheet Contributor
Kate Eby
February 18, 2019
A timeline is essential for managing a complex project and juggling dozens of due dates. It allows you to quickly visualize the sequence of events in a project or event, and clearly convey the timing to team members.
In this article, you’ll learn how to make a timeline in Microsoft Word. You can also download a free Microsoft Word timeline template and we’ll show you how to customize it to meet your needs.
And lastly, you’ll see how to create a timeline using Smartsheet, a collaboration and project management tool in a simple spreadsheet layout. You can organize and collaborate on project information in Smartsheet, then integrate with Office Timeline to create beautiful, visual timelines.
How would you like to create your timeline?
Download Our Free Timeline Template in Word
Quickly create a timeline in Word with this free template. Enter your own project information in the text boxes, change the colors, or even choose a different timeline layout.
To learn how to customize this timeline template, scroll down to the “How to Customize Your Timeline in Word” section.
Click here to download a free timeline template in Microsoft Word
How to Make a Timeline in Word
Although Microsoft Word is traditionally used to develop and edit copy, you can still create a visual timeline using SmartArt graphics. You can choose from dozens of timeline layouts and customize the colors to fit your project.
Before you start, we recommend changing the orientation of your Word document from portrait to landscape (go to the Page Layout tab and click Orientation).
Note: We are using Windows running Word 2013 in this example.
Select a Timeline Style
- Open a blank document in Microsoft Word.
- In the Insert tab, click SmartArt.

- You’ll see a pop-up box with different kinds of SmartArt graphics, ranging from lists to processes to pictures. You can choose any layout you like, but for this example, we’ll choose the basic timeline layout (the arrow with the dots in the middle).
Add Project Information to the Timeline in Word
- To add an entry to the timeline, you can either double-click on the [Text] blurbs in the Word document or type directly in the floating box.

- The basic timeline starts off with three timeline entries, but you can add additional events on the timeline by hitting the Enter key after a bullet point in the floating box.
- If you want to add two events on the same date, first type in the date in the floating box. Then, hit Enter and Tab to nest multiple tasks under the same date.
- To delete an entry in your timeline, simply click on the text in the floating box and hit Delete. The timeline will automatically re-adjust.
- To move tasks on the timeline, click on the task in the Word document and click the text box around the words. Drag the text box to the new location.
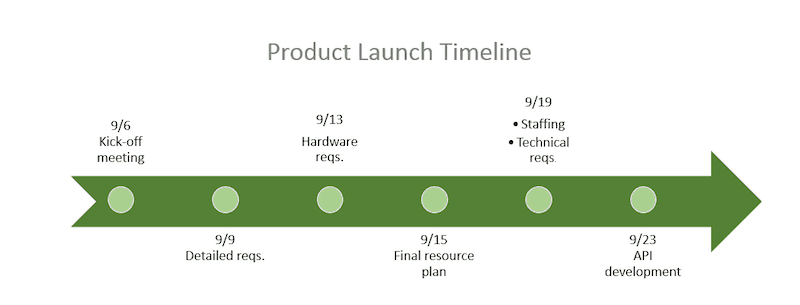
How to Customize Your Timeline in Word
Once you’ve added your project information and dates, it’s easy to modify the timeline. You can add a title, switch to a different timeline layout, and customize the color palette.
Add a Title
- Double-click on the header area of the Word document (the very top of the document).
- You’ll see a line appear with a little grey box that says Header. You’ll also see your cursor appear in the header area. Start typing your timeline’s title here.

- In the Home tab, in the Fonts group, you can change the font size and color. And in the Paragraph group, you can change the alignment of the text.
Choose a Different Timeline Layout
-
Double-click on the light blue part of the arrow.
-
In the Design tab, in the Layouts group, click the bottom arrow on the right side. Here, you can access all the different SmartArt graphic options. Click on the timeline layout you’d like to use.
![]()
Change the Timeline Color
- To change the background color of the timeline, click the image and in the Format tab, click Shape Fill. Select the new background color you’d like.
- To change the color of the circles, click on a circle, hold down Shift and click the other circles. Select Shape Fill again to pick the color you’d like.
- To change the font and font size of the tasks on the timeline, click on the text in the Word document and in the Home tab, in the Font group, adjust the size, type, and color.
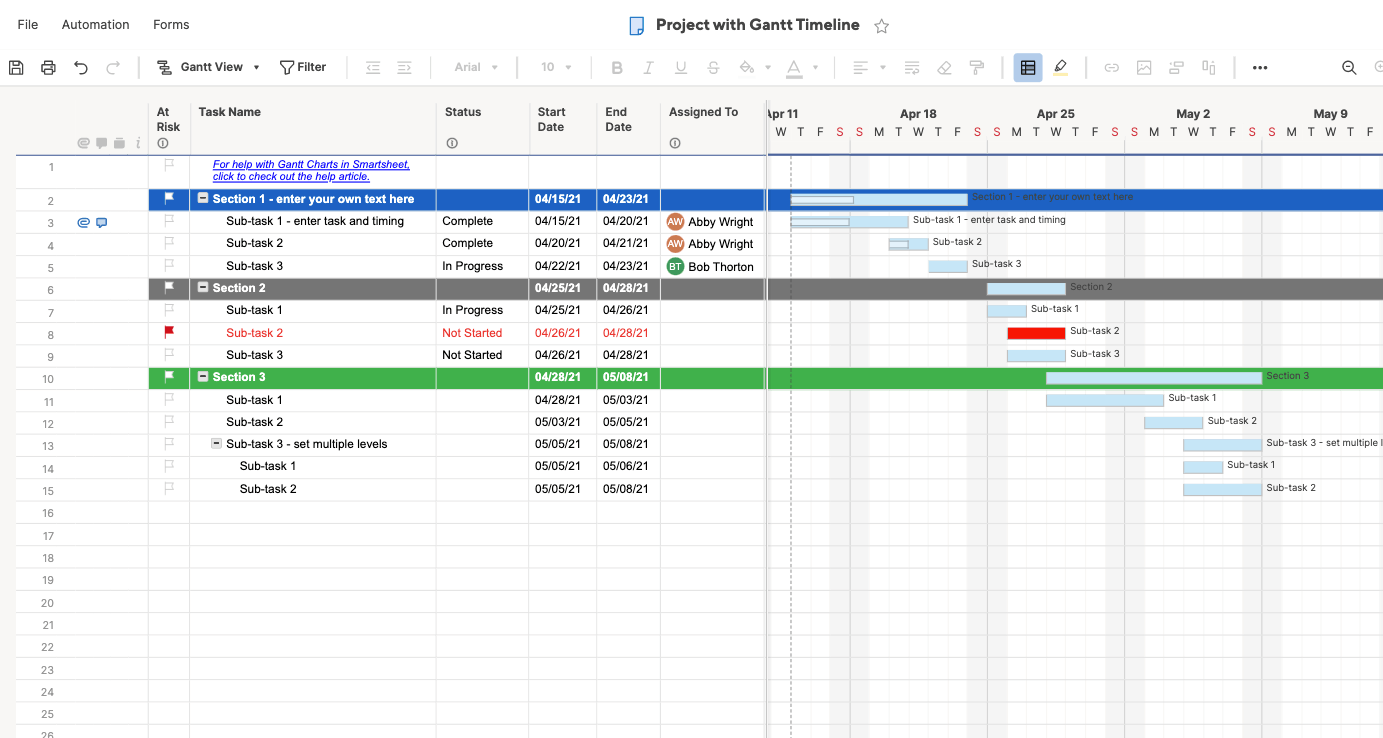
How to Use Smartsheet to Make a Timeline
Smartsheet is a work management tool in a simple spreadsheet layout. With robust communication and collaboration capabilities, Smartsheet makes it easy to collect and organize information with your team and connect with Office Timeline to easily create a visual timeline.
Here’s how to use Smartsheet and Office Timeline:
Choose a Smartsheet Timeline Template
- Log in to your Smartsheet account or start a free, 30-day trial.
Try Smartsheet for Free
- In the Home tab, click the Create New button and click Browse Templates.
- Search for “timeline” and select the Project with Gantt Timeline template.

- Rename the template and choose where to save it.
Enter Your Own Project Information
- You’ll see that the template is already pre-filled with sections, subtasks, and other fields. Simply double-click on the cells to delete the pre-filled copy and add your own timeline information. Use the cells titled Section 1, Section 2 and Section 3 to establish hierarchy.
- Add dates by clicking on a cell in the Start Date and End Date columns and either manually type the date or click the calendar icon to choose a date from the calendar.
- Assign tasks to certain team members in the Assigned To column and convey progress with the % Complete column. You can also flag at-risk tasks in the far left column.

- To delete or add a row, right-click on the cell and select Delete Row or Insert New Row.
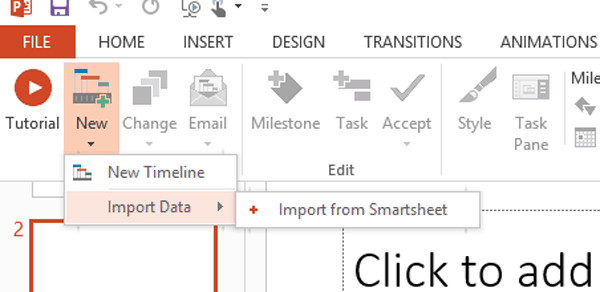
Connect Smartsheet Data with Office Timeline
Connect information stored in Smartsheet with Office Timeline to visually highlight the most important parts of your project. The Smartsheet and Office Timeline integration allows you to easily create a customizable timeline and share the image with others as an image, .PDF, or PowerPoint slide.
Note: You must have Windows and PowerPoint to use Office Timeline. Mac users will need to run Office Timeline using a virtual machine like Parallels Desktop, Fusion, or VirtualBox.
- You can get a free, 15-day trial of Office Timeline, and you can download and install the trial version here. After the trial ends, you’ll need to buy a license to continue using the Office Timeline and Smartsheet integration.
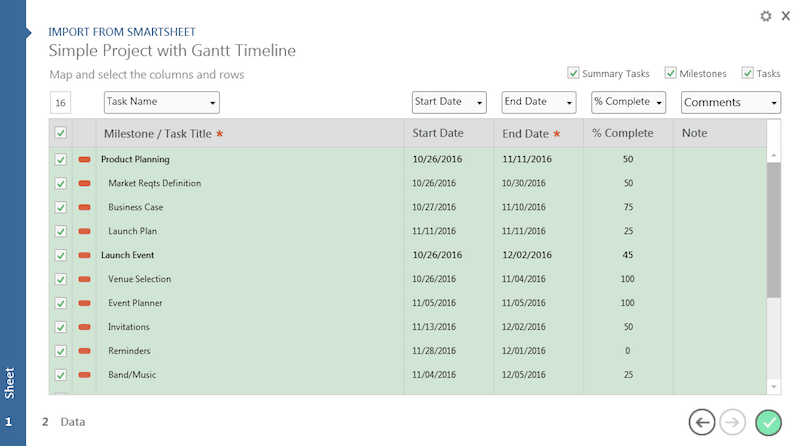
- Open PowerPoint and create a new slide. Click the Office Timeline tab and select New > Import Data > Import from Smartsheet.

- Log in to your Smartsheet account and allow access to Office Timeline.
- Select the sheet you’d like to import then choose if you’d like to include or exclude certain information from your sheet.

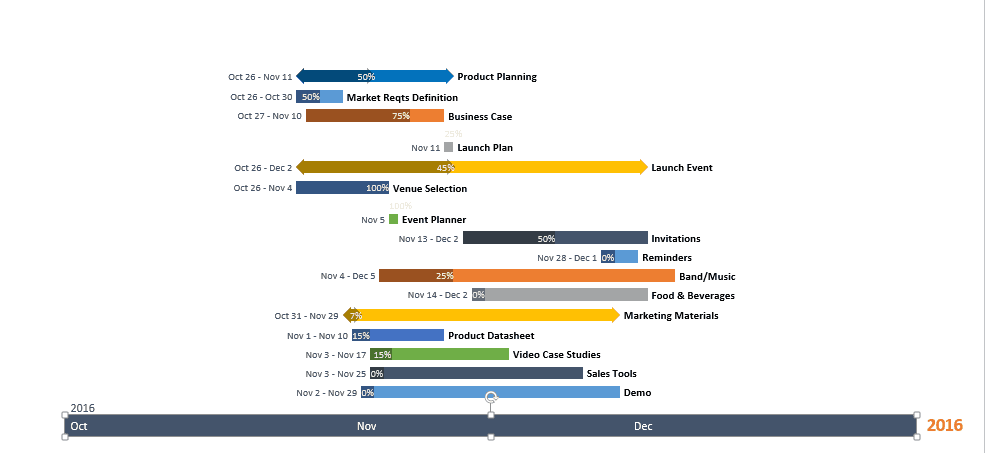
- Office Timeline will automatically generate the timeline for you. You can then change the colors, layout, symbols, font, and more.

Improve Visibility with Real-Time Work Management in Smartsheet
Empower your people to go above and beyond with a flexible platform designed to match the needs of your team — and adapt as those needs change.
The Smartsheet platform makes it easy to plan, capture, manage, and report on work from anywhere, helping your team be more effective and get more done. Report on key metrics and get real-time visibility into work as it happens with roll-up reports, dashboards, and automated workflows built to keep your team connected and informed.
When teams have clarity into the work getting done, there’s no telling how much more they can accomplish in the same amount of time. Try Smartsheet for free, today.
Do you need to create a timeline? A Microsoft Word timeline can help. A Microsoft Word timeline can help. In this tutorial, learn how to make a timeline in Microsoft Word quickly with a template.


Timelines are often used to measure progress in projects and they’re sometimes for planning. There are two types of Microsoft Word timelines that you can use:
- Timelines that show when future events are expected to take place.
- Timelines that show when past events took place.
If you consider making a timeline, choose which timeline is right for your needs.
Once you’ve chosen which timeline is best for you, the next decision is whether you want to add a Microsoft Word timeline to a premium template or make a timeline without a template. In this article, you’ll learn how to make a timeline in Microsoft Word without a template.
Why Make a Timeline in Word?
A timeline is a graphic that shows time passing. So, this can be used in any situation where you need to show the passage of time. Timelines can be used for educational purposes and for professional purposes.
Here are just a few business uses for a timeline:
- Show how long each phase of a project took to complete or a projection of when a project will be completed.
- Reveal when the various stages of a business launch are expected to happen.
- Show a marketing plan and the dates when marketing materials will be published.
- Illustrate milestones in a company’s history.
There are many different uses for timelines. Once you become comfortable with creating timelines, you’ll find your own uses.
The best way to save time when creating a timeline is to use a template. Using a template saves you time because it can be used as your base. All the hard design work is already done.
Creating Your Microsoft Word Timeline (With Unlimited Templates)
To use a template, just download it and add information into it. That’s how easy it is! Premium templates can easily be customized if you need to make changes.
Some templates could include Microsoft Word timelines. If you find one that includes a Microsoft Word Timeline, easily add your own information to the template. You can also add a Microsoft Word timeline you created to a variety of template types.


Envato Elements is a premium subscription service where you can download as many templates as you need. All the templates are professionally designed to look nice and professional. Envato Elements has more than just templates. They’ve got fonts, audio, stock photos, and more.
To have access to these digital assets, just subscribe and pay a low monthly fee. Once subscribed, you’ll have access to thousands of high-quality templates.
Let’s take a peek at some of the various templates of available on Elements.
5 Best Premium Business Microsoft Word Template
All these timelines have a Microsoft Word timeline in the template or would be ideal for adding a timeline to:
1. Business Plan


This business plan template can have a Microsoft Word timeline added to it. The design of this template is simple, making it easy to edit.
The Business Plan template has two pages in A4 size. Use this template in both Microsoft Word and Adobe InDesign.
2. Corporate Business Flyer Vol.44


This Corporate business flyer is easily editable, so you can add a Microsoft Word Timeline to the template. Here are some highlights:
- A4 size
- modern design
- nice layout
3. Company Profile Word Template


Company Profile Word Template can have a Microsoft Word timeline added to show your company timeline or a budget timeline.
This template comes with sixteen pages in A4 size that are print-ready. Everything in this template can be easily edited, including text, colors, and images.
4. Project Proposal


A Microsoft Word timeline can be used in a project proposal to show how long you expect a project to take or how long the finished project took. Here are some highlights of this template:
- easily editable
- A4 size
- comes with four pages
This template has a nice classic design that’ll impress the reader.
5. Business Proposal


In this Business Proposal, you can easily add a Microsoft Word timeline. The timeline could be used to show how long a project will take to complete or how long it’ll take to launch a business. This template comes with 22 pages in A4 size and can be used in both Microsoft Word and Adobe InDesign.
How to Make a Timeline in Word Without a Template
Timeline templates can be useful. But you may not have one available. Do you know how to make a timeline in Microsoft Word without a template?
There are two different ways that you can make a Microsoft Word timeline:
- Draw your own timeline.
- Use SmartArt.
SmartArt is a graphic tool included in many Microsoft Office programs such as Excel, PowerPoint, and Word. SmartArt layouts are more detailed and interactive than ordinary shape tools in Word.
Let’s learn both methods.
Create a Timeline in Microsoft Word By Drawing an Arrow
To create a timeline from scratch (without a template), let’s use a graphic arrow. Let’s get started by creating a simple timeline:
1. Create the Arrow
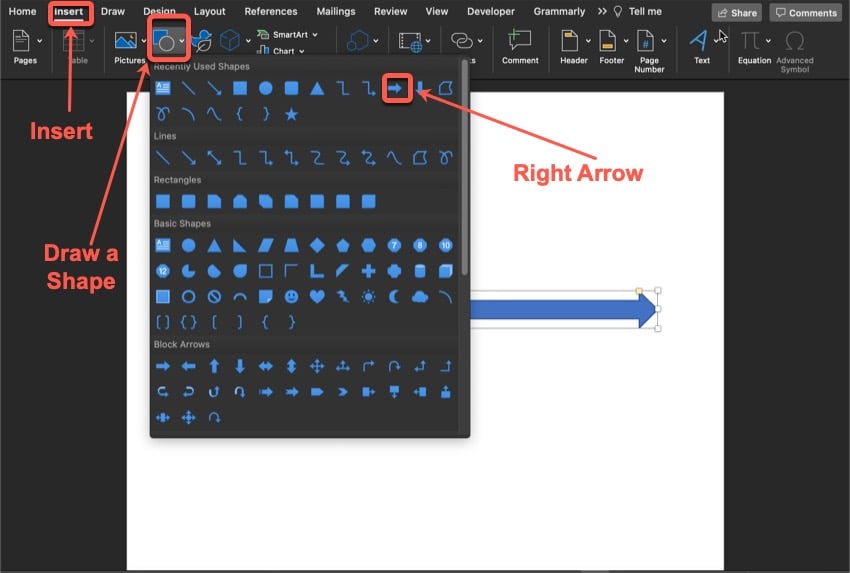


Start with a blank document open in Word. The base of a timeline will be the arrow. To create this base, click on the Insert tab.
In the toolbar, click the Draw a Shape button. When you click on this button, a menu drops down where you can choose what shape you want.
Click on the arrow option and draw a line where you want your timeline to be. Adjust the width and length of the arrow by dragging the handles.
2. Create a Text Box


Part of a timeline is to have points on your timeline that represent events. To create the points, you’ll need to create a text box.
To create a text box, click on the Insert tab. After you click on the Insert tab, click on the Draw a Text Box button in the toolbar.
Now, draw a diagonal line where you want your text box. Then start typing your text.
3. Connect Your Text to Your Timeline


In most timelines, your points are connected to the timeline. To do this, click on the Insert tab.
After clicking on the Insert tab, click on Draw a Shape button in the toolbar. When you click on this button, a menu full of shapes drops down. Click on the line option.


To make the connecting line thicker (or thinner), click on the Shape Format tab. In the toolbar, click on the Format Pane button.
When you click on this button, a sidebar will pop up. Click on the Fill & Line tab. Next, click on the line section of the sidebar. Next, click on the up arrow next to the Width option to make the line thicker.
Your finished timeline should look something like this one:


How to Create a Microsoft Word Timeline With SmartArt
The second method to make a timeline in Microsoft Word is to use a SmartArt timeline. SmartArt has several pre-designed timeline layouts.
Here’s how to make a timeline in Microsoft Word using SmartArt:
1. Insert a SmartArt Timeline


Begin by clicking on the Insert tab above the toolbar. In the toolbar under the Insert Tab, click on the SmartArt button.
When you click on the SmartArt button, a menu drops down. From that menu, click on the Process menu option.
2. Choose the Timeline SmartArt Timeline


After you click on the Process menu option another menu drop down, giving you many SmartArt options for timelines.
From the dropdown menu, select the Timeline icon for the Microsoft Word timeline you want to use. In this example, I’ll use the basic timeline.
3. Customize the SmartArt Timeline


As you can see, the SmartArt timeline design is already complete. There’s no need to draw the various shapes that make up the time.
All you need to do now is customize the timeline as needed by adding the information you need. Here are some various customizations you can make:
- Add text by clicking in the text placeholder and typing your text.
- Change the color of the timeline by clicking on the Change Colors icon in the menu.
- Resize the entire timeline by dragging the handles surrounding the entire timeline to make it smaller or larger.
- Resize a part of the timeline by dragging the handles surrounding that part.
6 Timeline Making Tips for Making Timelines in MS Word
When you’re making your timeline, keep these tips in mind:
- Have a plan. Before making your Microsoft Word timeline, plan what you want to include on your timeline and how you want it to look. Start by deciding whether you want your timeline to show future events or past events. Then, think about how detailed you want your timeline to be.
- Be consistent. When you’re designing your timeline, it looks better if the timelines in your document have a consistent design with your document. If your document is branded, you’ll want to use similar colors and shapes so that your timeline fits with your brand.
- Keep it simple. Also, it’s best not to use a lot of colors. A lot of colors can be distracting. A consistent color scheme for the timeline will look more professional.
- Check the size. When you’re making your Microsoft Word timeline, make sure your timeline fits on one page. If your timeline is on several pages, it can make the timeline hard to follow.
- Make your points clear. When you’re adding point to the timeline don’t abbreviate words. Don’t assume people know what point you’re trying to make. If you’re making a timeline of events, add actual dates to your timeline.
- Keep it traditional. In English-speaking countries people read from left to right. Therefore, it’s best to make your timeline from left to right. This will make it easy for people to read. (If your document is in a language that reads in a different direction, then follow the traditional direction for that language.)
Common Microsoft Word Questions Answered (FAQ)
Many people use only a fraction of the Word’s capabilities. If you’re one of those people, it’s okay to ask questions. Here are some common questions with answers:
These instructions may vary slightly depending on your version of Microsoft Word.
1. Can I Set the Page Size?
Yes. Setting the page is a way that you can customize a Word documents.
To set the page size, select Layout on the menu bar. Then click the Size icon to choose a page size. A menu drops down showing the various paper sizes. Choose the size you want for your document.
If you don’t see the size you need, click on More Paper Sizes at the bottom of the dropdown menu to create your own. This tutorial explains more about page layout:
2. How Do I Add Page Numbers to my Document?
Page numbers can help you keep your document organized. To insert page numbers, begin by click on Insert. Then click Page Number in the toolbar.
From the dropdown menu choose the option for the location of your page numbers. Learn more in this tutorial:
3. How Do I Set the Margins of Pages in Microsoft Word?
Setting the margins can help you customize your template or document. To set your own margins, begin by selecting the Layout option.
Under the Layout tab, click on the Margins icon. When you click on this button, a menu drops down. Choose a preset margin or select the option at the bottom of the menu to create custom margin settings.
4. Does Microsoft Word Have a Spelling and Grammar Checker?
Yes. Spelling and grammar mistakes can make your document look unprofessional. They can also be distracting for the reader.
To use the spelling and grammar spelling checker, click on the Review tab. Under the Review tab. Then click on the Editor icon in the toolbar. A panel appears on the right that’ll take you through your spelling and grammar mistakes and give you the chance to correct them.
For a complete look at how to check spelling and grammar in MS word, study this tutorial:
5. Can I Align Text in Microsoft Word?
Yes. Aligning text can make your document look neater and more professional.
To begin, highlight the text that you want to align and right-click on the highlighted text. A dropdown menu displays. From this menu, click on the Paragraph option. A popup menu appears. Choose a text alignment option in the Alignment field under General.
Find Microsoft Word Templates
Do you want to use Microsoft Word templates? Here are some articles that feature Word templates to make your documents look professional:
Learn More About Microsoft Word
Microsoft Word is a very useful tool. Whether you’re just starting out with Word or just need a Word refresher, we can help. Check out our guide on how to use MS Word, or study one of the tutorials below:
Create Your Own Microsoft Word Timeline
Now that you’ve read how to make a timeline in Microsoft Word, use that knowledge in your current project or in your next project.
For an easy and fast method of creating a Microsoft Word timeline, the SmartArt method is the best. But for complete customization, then the method where you create your own timeline from scratch may be the best. Either way, timelines are a really useful way to show the passage of time and highlight certain events.
If you want to use a premium template for other parts of your project, then Envato Elements is a great timesaver. Plus, the right template will help your project look more professional.
Do you want to learn simple tweaks to take a basic timeline in Microsoft Word from dull to stunning?
The good news is, you don’t need to be an expert in graphic design or contribute extra hours to get the professional timelines you want! With these small changes, you’ll create an eye-catching, custom timeline from scratch that’ll have your coworkers begging for your timeline template!
We’ll walk through not one but two tutorials: creating a basic timeline with SmartArt and with tables. (Because we have to have options!)
Let’s do this!
What Is a Timeline?
One of the most recognized project management tools is the timeline: a chart to help people visualize deadlines, statistics, events, or milestones in chronological order. Project timelines can be simple or packed with details to demonstrate a time period for a given project.
There’s no correct answer to the question of what should or shouldn’t be on a timeline—every company, every industry is different. So instead, ask yourself: What is the most critical information my audience should take away from this timeline?
👉 Check out this guide to explore the elements of a project timeline further.
While you’ve most likely built a timeline in Microsoft Word back in your early career days, there’s a good chance you’ve had to plug your way through a heap of unnecessary functions. 😮💨
We know this feeling all too well. Thankfully, there’s an excellent project management tool that not only creates timelines but skyrockets productivity and planning. We’ll get to that later. 🤓
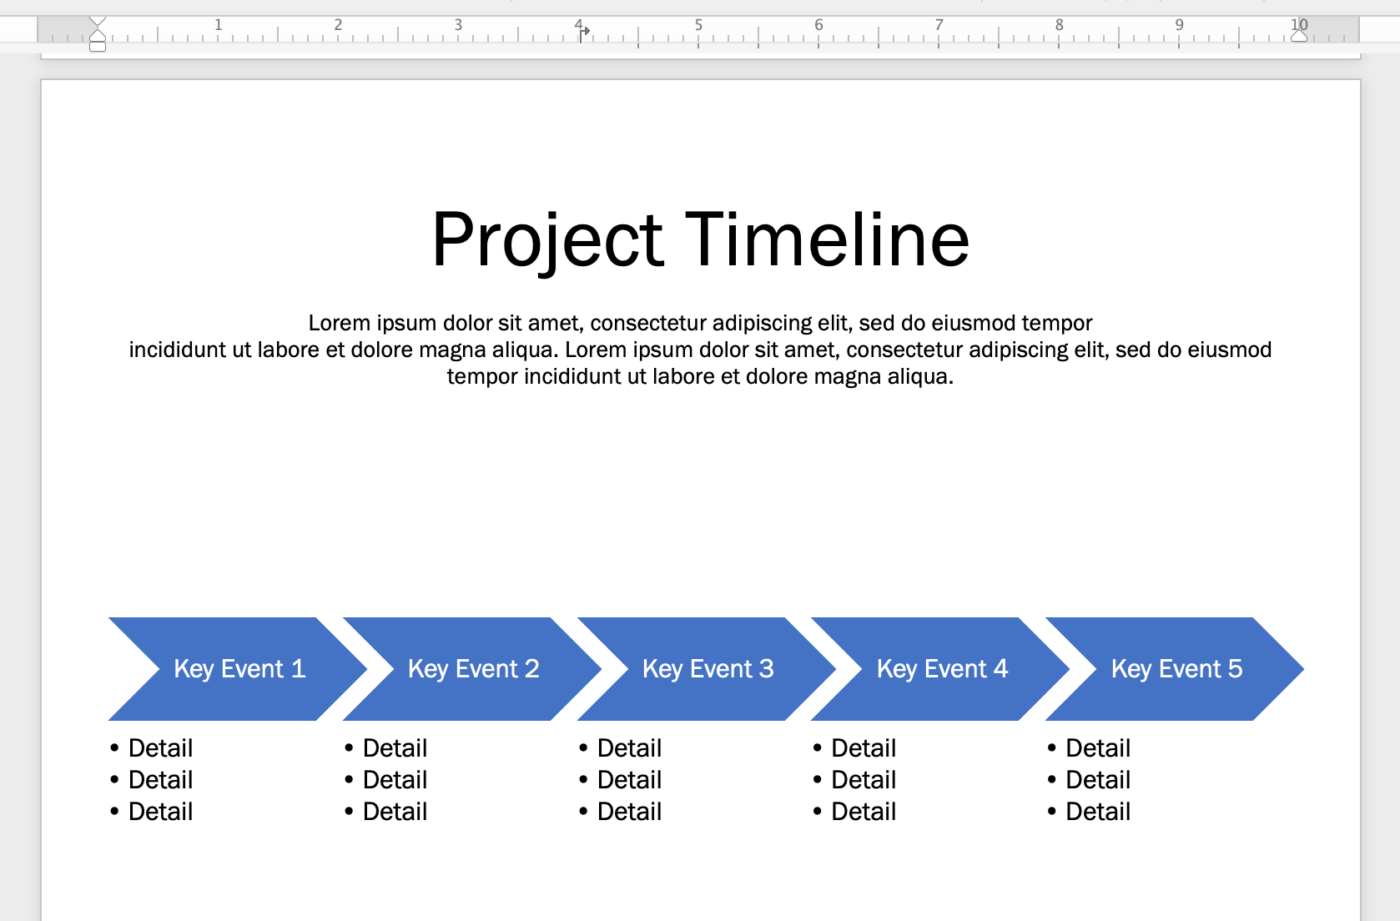
How to Create a Timeline in Word With a SmartArt Graphic
SmartArt Graphics are a diverse set of timeline layouts (or illustrations) available in Word, Excel, PowerPoint, and Outlook, providing different ways to display concepts or data. Since we need a SmartArt graphic to represent sequential information, we’ll use the Process timeline layout (steps in a process or timeline).
With a few simple tweaks, your timeline will:
Go from this…
… to this 🤩
Note: In this tutorial, we use Microsoft Word for Mac Version 16.54. The steps and features may look different if you’re on another platform or version.
1️⃣ Open a new blank document
- Launch Microsoft Word
- Select Blank Document > Create
- Under the Layout tab, select Orientation > Landscape
- Add your document title at the top of the page, align to the center, change the font type (if desired) and increase the font size. In this example, we’re using the Franklin Gothic Book font and size 48
- Add any necessary text below the document title
2️⃣ Insert the SmartArt timeline layout
- Place your cursor below the center of the page to add the timeline layout
- Under the Insert tab, select SmartArt > Process > Basic Chevron Process
- If at any point of this build you’re not vibing with this SmartArt Graphic, you can choose a different timeline graphic from the SmartArt graphic gallery

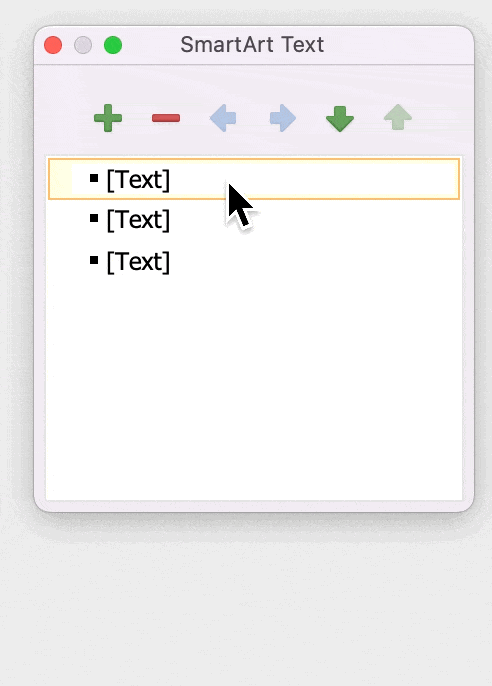
3. Use the SmartArt Text Pane dialog box to add your key information. Press the Return key to add more text fields for key information and Shift to create a bullet point for details underneath the key information
Tip: If you can’t see the SmartArt Text Pane, go to the toolbar, and under the SmartArt Design tab, select Text Pane
4. Change the font by selecting the entire table, then go to the Home tab and change your Font Type and Font Size. In this example, we’re using the Franklin Gothic Book font and size 16
At this point, you have a standard timeline that could be considered “done,” but it’s screaming for color. 🎨
3️⃣ Customize your timeline
Here is a palette we created just for you to design cohesive and professional visual charts and graphs. Remember, you don’t need to be a graphic designer to create gorgeous patterns… you just need to know someone who knows someone. 😉
Below is an actual designer-approved color palette you can save to your desktop! ⬇️

So how do we use this color palette?
- Open the color palette image next to your Word application/browser
- Hold the
Shiftkey and click the first Key Event and the bulleted list below it. Under the Format tab > Shape Fill > More Fill Colors > Eyedropper icon > click on a color to apply

3. Repeat this step for the other Key Events and bulleted lists
Optional: For consistency, change the font color of the bulleted list from Black to White to match the Key Events text color.
Now for the final touch: emojis! 🎉🎉🎉
Emojis add a fun personality to non-verbal communication. If you don’t have any images or icons to add that extra oomph to your timeline document, use emojis! Here’s how:
- Go to the Insert tab > Shapes > Text Box
- Create the Text Box above the first Key Event
- Type whichever emoji you’d like and change the Font Size to 45
- Copy and paste the Text Box you just created and replace the emoji for the next Key Event
- Repeat step 4 for the rest of the Key Events
Are your boxes out of alignment? Here’s another tip: hold the Shift key and click to select the text boxes. Then, under the Shape Format tab > Arrange > Align > Align Middle > use the arrow keys to move all the newly aligned boxes towards your desired location.

Friend, you did it! 🎊💃
Save this as a timeline template for Future You:
- Go to File > Save as Template, and a dialog box will appear
- Enter your calendar template name under Save As
- Add relevant tags under Tags (for Mac users)
- Choose where you want to save your calendar template
- Change the File Format to Microsoft Word template (.dotx)

How to Create a Basic Timeline in Microsoft Word With Tables
It’s a complicated relationship with tables: Everything can go right until a slight miscommunication ruins everything.
Using tables is another option to create a timeline in Word, but it doesn’t have to be complicated—or boring! With a few simple tweaks, your timeline will:
Go from this…
… to this 😍
Note: In this tutorial, we use Microsoft Word for Mac Version 16.54. The steps and features may look different if you’re on another platform or version.
1️⃣ Open a new Word document
- Open Microsoft Word
- Select Blank Document > Create
- Under the Layout tab, select Orientation > Landscape
- Add your document title at the top of the page, align to the center, change the font type (if desired) and increase the font size. In this example, we’re using the Franklin Gothic Book font and size 48
- Add any necessary text below the document title
2️⃣ Insert and format the table
Depending on how many Key Events and the number of project days are needed, here’s a math guide to decide how many Columns and Rows are required for the timeline:
Columns: Number of days + five columns = total number of columns
What’s the “five” for? We’re going to merge five cells to create space for text.
Rows: Number of Key Events = total number of rows
From this point on, there’s no more math involved. 🤝
- Under the Insert tab, select Table > Insert Table
- Type the number of Columns and Rows
- Click and drag the bottom row to the bottom of the page
- Highlight all the table cells (except the first row)
- Under the Layout tab, click Distribute Rows

6. Highlight the first row and change the font size to 9
7. Highlight the first column and change the font size to 12
3️⃣ Add the deliverables/events
- Starting with the first row, highlight the first five columns, and under the Layout tab, select Merge Cells

2. Begin from the second row and add all the Key Events text in the first column
3. Add dates 1-31 to the first row in the table (remember to skip the first column)
Tip: decrease the font size to fit the numbers on the same line or expand the table width
4. Align the Key Events text in the cells by highlighting the first column, and under the Layout tab, click the Align Center icon
5. Repeat step 4 for the dates in the first row

4️⃣ Customize your timeline table
- Click and drag the cells in each Key Event row. Then, under the Layout tab, select Merge Cells
- Place the cursor inside the newly merged cells and under the Table Design tab > Shading > select a color

You could stop here and call it a day, but there’s a simple tweak we can make to the table to make the chart look a little less harsh: adjusting the table borders.
3. Highlight the entire table and under the Table Design tab, select a dotted line in Border Style > Borders > All Borders
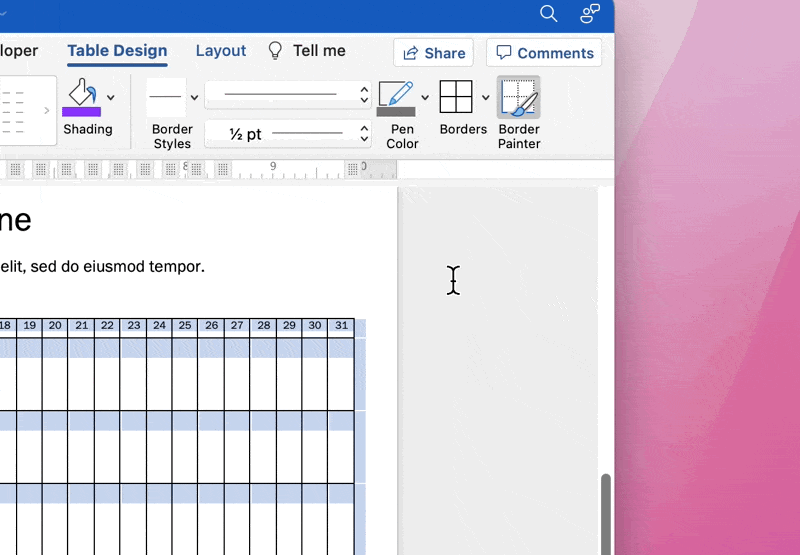
4. To add a line thicker for the outside border, highlight all the cells except the first row and first column. Under the Table Design tab, select the solid line in Border Style > Borders > Outside Borders

You’re all set! 🎉🕺
Save this as a timeline template for Future You:
- Go to File > Save as Template, and a dialog box will appear
- Enter your calendar template name under Save As
- Add relevant tags under Tags (for Mac users)
- Choose where you want to save your calendar template
- Change the File Format to Microsoft Word template (.dotx)
👉 Other related tutorials:
- How To Create A Project Timeline In Excel (2022 Guide)
- How To Create A Fillable Form in Word
- How to Make A Calendar in Word
- How to Make a Timeline in Google Docs
- How to Make a Flowchart in Word
Free Word Timeline Templates
Did you know Microsoft has an online template library? In addition to accessing templates directly from the Microsoft applications, you can browse the online store for free and premium templates. Here are a few free timeline templates you can download right away:
4 Major Drawbacks of Using Microsoft Word to Create Timelines
Although we had fun creating custom timelines with SmartArt Graphics and tables, did that feel a little bit… lengthy?

Even performing the most basic actions to create a simple table took many clicks and careful navigation to complete our Microsoft Word timeline build. Microsoft Word is one of the most popular software available, but it is limited to the demands and changes of a modern workforce.
Here’s what you should know before investing time, energy, and resources in Microsoft Word:
- Although Word is a versatile platform, it’s also time-consuming to get the desired result ⏳
- Microsoft Word is not optimized for ongoing project planning and management with automation capabilities 🤖
- Microsoft Word functions on the toolbar/Ribbon are different version to version 🤯
- Microsoft desktop applications (Word, Powerpoint, Excel, and more) are pricey. The Word app alone starts at $159.99 💰
It seems like you might need a Microsoft Word alternative.
The Big Picture: Creating Timelines in ClickUp
Whether you’ve never heard of ClickUp or have been considering ClickUp as your project management tool, consider this your sign to start today!
ClickUp is the ultimate productivity platform allowing teams to manage projects, collaborate smarter, and bring all work under one tool. Whether you’re new to productivity apps or an expert project manager, ClickUp’s customization can stretch to any team size for consistent collaboration.
Let ClickUp do all the work to create timelines so you can spend more time making decisions that move the needle in your projects.

Things you can do in the Timeline view:
- Customize your Timeline with filtering, grouping, and sorting options
- Look for tasks with the convenient search bar
- Create new tasks by clicking anywhere in your Timeline
- Switch between days, week, or month views
- Easily zoom in or out for high-level overviews
- Open the sidebar to view unscheduled and overdue tasks
- See the full picture of people’s workloads, and more!
- Keep your team aligned and help inform the public visually with ClickUp’s roadmap template
Are you working on multiple projects at one time? ClickUp’s Gantt view will help you manage project Milestones, priorities, and dependencies in a few clicks.

Things you can do in the Gantt view:
- Create a Gantt view from the Spaces, Folders, and Lists level
- Add Folders, Lists, tasks, and subtasks right from the Gantt view sidebar
- Draw lines between tasks to automatically set and visualize dependencies
- Determine how much is required to complete a Folder or List by hovering over the progress bar
- Mark any task as a Milestone, or convert it back to a task
- Edit tasks in bulk without leaving your Gantt view, and more!
Fewer Clicks, More Impact
Your visualization tools are important project assets that shouldn’t take more than an hour out of your week to create. To keep up with project plan changes managers and businesses experience daily, they need the best software—ClickUp!
Create a free account in ClickUp today and say goodbye to finite Word documents! 👋
![]()
Download Article
![]()
Download Article
A timeline is a great way to show progress on a project or event over time. You can also use timelines to display historical milestones, document changes, and even to plan events in the future. Word makes it very easy for you to make a timeline using its SmartArt tools. This wikiHow article will teach you how to visually display a timeline of events in Microsoft Word.
-
1
Change the page layout to landscape mode (optional). Because timelines are displayed horizontally, you’ll have a better-looking timeline if your document is in landscape (horizontal) mode. Here’s how you can do this:
- Click the Layout tab at the top of Word.
- Click Orientation.
- Click Landscape.
-
2
Click the Insert tab at the top of Word. It’s in the upper-left area of Word.
Advertisement
-
3
Click SmartArt on the toolbar. Look for the icon of a green arrow with a white rectangle over it.
-
4
Click the Process menu. It’ll be in the left panel on Windows, or in the sub-menu on a Mac.
-
5
Click a timeline layout. The two timeline options are Circle Accent Timeline (the one with two large circles and two smaller circle) and Basic Timeline (the arrow with three circles inside). Hover your mouse cursor over a timeline preview to see its name, and then click to add it to your document.
- If you’re using a Mac, selecting a timeline layout will insert it into your document. If you’re using Windows, you’ll need to click ‘OK to insert it.[1]
- If you’re using a Mac, selecting a timeline layout will insert it into your document. If you’re using Windows, you’ll need to click ‘OK to insert it.[1]


Advertisement
-
1
Click any of the Text markers. Each dot (or other shape, depending on the Process layout you chose) represents an event in time. To get you started, Word adds some placeholder text to show you where to add your labels. When you click any of these placeholder text entries, you’ll be able to edit that text.
- Clicking the text will bring up the Text Pane on the left side of Word.
- If you don’t see the Text Pane, click Text Pane on the SmartArt Design tab to bring it up.
-
2
Enter the text for this event. This could be the event’s name, a particular date, or both.
- One idea for labeling your timeline is to enter the date as the primary event text, and then add smaller bullet points to summarize what happened on that date. To do this, just type the date (or any other time marker, like a season), press Enter or Return, and then click Add Bullet on the SmartArt Design tab to add your first bullet point.
-
3
Repeat for all other placeholder text. You can also change the name and look of the text the same as you would any other Word text—just highlight the text you want to customize, click the Home tab, and use the «Font» panel options.


Advertisement
-
1
Click one of the timeline markers. Word only inserts a few event markers to get you started. If you need to add more events, start by clicking the marker next to where you want to insert the new event.
- It doesn’t matter if you choose the marker to the left or right of the event.
-
2
Click the SmartArt Design tab. You’ll see this tab in the upper-right area of Word after you click one of the shapes.
-
3
Click Add Shape. It’s in the upper-left area of Word.
-
4
Select Add Shape After or Add Shape Before. Choose the option that represents where you want to add another event marker. This also opens the Text Pane on the left so you can add text to the event.
-
5
Open the Text Pane. If you don’t see the Text Pane on the left side of Word, click any of the event markers (or Text Pane in the toolbar) to open it now. You should now see an empty bullet in the Text Pane.
-
6
Enter the event’s text next to the empty bullet in the Text Pane. You’ll have to add your event’s text in the Text Pane, as adding a new shape doesn’t also add placeholder text.


Advertisement
-
1
Move an event. If an event marker is out of order, you can move it elsewhere on the timeline. Just right-click the event you want to move on the Text Pane and select Move Up or Move Down as needed.
-
2
Change the colors. To modify the colors of the SmartArt timeline:
- Click any element in the timeline.
- Click the SmartArt Design’ tab if it doesn’t open automatically.
- Click Change Colors in the toolbar at the top.
- Select a different color theme.
-
3
Apply a new style. You can add different stylistic and/or 3D effects to your graphics, too. Just click the SmartArt Design tab, click the menu on the «SmartArt Styles tab, and then choose an effect.
-
4
Switch to a different timeline layout. If you’ve decided the Process layout you selected isn’t working for your timeline, you can easily change the layout on the SmartArt Design tab—just scroll through the layouts on the «Layouts» panel and choose the one you want.


Advertisement
Add New Question
-
Question
How do I increase the size of my timeline?

Ravenwolf123
Community Answer
Add the same form you previously chose using SmartArt. Put it below the one you have already made. In the ‘Tell Me What You Want To Do’ search bar, type in ‘shape’, then click ‘Draw A Shape’ or ‘Draw Shapes’. Select the arrow and draw it from the last part of the top section of your timeline to the first part of the second section of your timeline.
-
Question
What do I do after I enter my text?
If you need another text box, just click «Draw Text Box» and draw it wherever you need it! If you are finished, save it and print/publish it.
Ask a Question
200 characters left
Include your email address to get a message when this question is answered.
Submit
Advertisement
Thanks for submitting a tip for review!
Related Articles
About This Article
Article SummaryX
1. Switch your document to landscape mode.
2. Click the Insert tab.
3. Click SmartArt.
4. Click Process.
5. Select a timeline layout.
6. Label the events.
Did this summary help you?
Thanks to all authors for creating a page that has been read 144,636 times.
Is this article up to date?
How to make a timeline in Microsoft Word
This step-by-step Microsoft Word timeline tutorial will show you ways how to make professional timelines right inside Microsoft’s popular text processing tool.
You will be enabled to create a basic timeline that you can adjust and style manually. In the end, you will be able to create a simple graphic suitable for presentations or reports created for your clients. Because Microsoft Word is a widely used text processing tool the benefit is that many of the steps might be familiar to you. On the downside, using Microsoft Word to create a timeline might lack drag and drop simplicity, or the flexibility you need to show more accurate details or update the timeline on a regular basis.
If you need to create and update timelines regularly for your slides and reports, you might use a free online timeline generator. Vizzlo offers an easy-to-use and fast solution PowerPoint add-in that will help you to automate this process. In this tutorial, you can read how to create a timeline using native PowerPoint features and how to use Vizzlo’s free online tool to make a timeline in PowerPoint automatically.
How to make a timeline in Microsoft Word manually using native feature
Create a Simple Timeline
-
Create a new Word document or open an existing presentation and add a new slide
-
In the menu bar, click on the Insert tab and choose the SmartArt button. There you will have the option to choose from different SmartArt Graphics. To create a project timeline, choose from the template section Process and then pick Simple timeline
-
Try out different styles and templates from the selection at any time.

Add your data
By default, the Simple timeline will show 3 milestones and placeholders for your text. Click in the milestone’s [Text] or use the text pane instead. Press Shift + Enter to insert a line break. When you use the text pane, you can easily enter more milestones. Click Enter and you will see another bullet point. Word will adjust the font size automatically depending on the number of events and the amount of text you enter.
As you notice, the milestones are positioned on the horizontal axis with the same distance between them. Irrespective of the dates you inserted.
Customize your timeline
Word offers you many ways to style your timeline. The way you set colors, font properties etc. will affect the perception of your timeline. A client might have their brand colors, font type — all can be adjusted with a few clicks manually.
Before we show you how to change a timeline, note that SmartArt offers you different templates that change the overall look of your timeline. In the menu bar, click on the SmartArt Desgin tab, then open the SmartArt Styles menu and browse the options.

Adjust the font properties of your Events
Word allows you to change the font family, font weight, font color etc. using Rich Text Formatting. Select the text you want to change and use the Rich Text Editor that will then show up.

Change the color of your Milestones
Select any milestone using right-click. This will open a menu in which you can change the fill color, outline color and much more of the selected milestone.
Change the color and width of the timeline axis
It is possible to change the color of the axis just the way you change the color of like you the milestones: right-click on the arrow and use the menu that will then open. Besides the color, you can also change the width of the axis which will help make the milestones stand out more to deliver the message of your timeline.
Change the position of the milestones
You can use drag and drop to change the position of a milestone, vertically and horizontally. Moving the milestones closer to their description text will make it easier for the readers of your graphic to make the right connection between circle and text.
How to make a timeline in PowerPoint automatically
It is certainly possible to create professional looking timeline using Word’s build-in SmartArt features. This approach has a few limitations though. There is no easy way to adjust the position of the milestones by the actual date they represent. Adjust the colors and fonts requires manual work. If you work for different clients that all have their brand guidelines this is time-consuming. An easier way is to use an online timeline generator or a PowerPoint add-in.
Watch hot to build a timeline in less than a minute
График имеет решающее значение для управления графиками при соблюдении сроков, а также для управления сложными проектами в течение периода. Кроме того, вы можете эффективно отслеживать ход выполнения проектов с помощью временной шкалы и наоборот. Не говоря уже о его использовании для изображения исторических вех. С другой стороны, Microsoft Word, вероятно, является самым популярным программным обеспечением для обработки документов, помимо Google docs. Следовательно, вы должны знать как сделать временную шкалу в ворде чтобы иметь возможность выполнять задание в любое время. Как всем известно, почти все компьютерные устройства содержат Microsoft Word, и его редко жалеют.
К счастью, вы нашли эту статью, потому что она не даст вам ничего, кроме эффективного способа построения временной шкалы. Итак, без лишних слов, давайте начнем и насладимся чтением следующей информации ниже.

- Часть 1. Как сделать временную шкалу в Word
- Часть 2. Лучшая альтернатива Word для создания временной шкалы
- Часть 3. Часто задаваемые вопросы о Word и создании временной шкалы
Часть 1. Как сделать временную шкалу в Word
Как упоминалось выше, Microsoft Word является одним из самых популярных программ в мире. По этой причине все знают, насколько это гибко и многофункционально, поскольку его можно использовать даже для создания карт, графиков, диаграмм и временных шкал. Итак, давайте рассмотрим подробные шаги ниже о том, как построить временную шкалу в Word.
1
Установка альбомной ориентации
Прежде всего, давайте установим страницу из портрета в пейзаж. Это связано с горизонтальным требованием временной шкалы. Итак, запустите Microsoft Word и откройте пустую страницу. Затем перейдите к Макет > Ориентация, тогда выбирай Пейзаж.
2
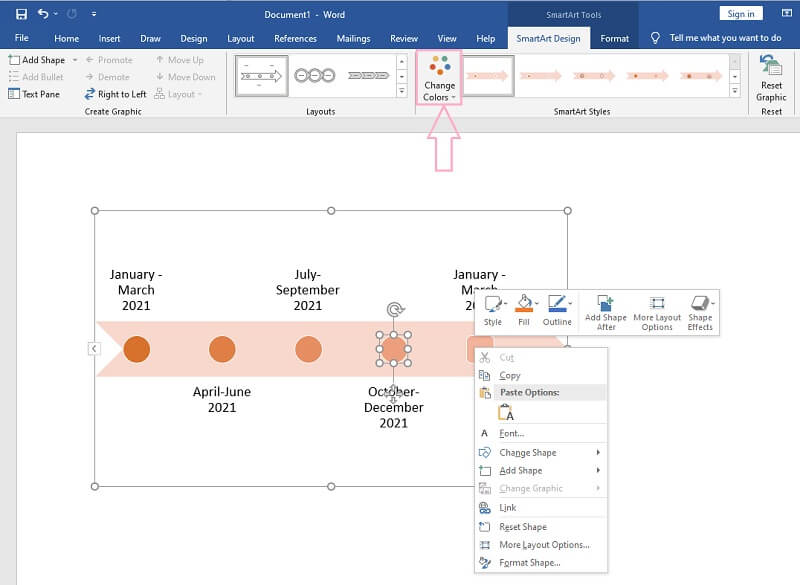
Вставьте шаблон временной шкалы
Теперь начните с вставки шаблона из его СмартАрт особенность. Как? Нажмите на Вставлять вкладку, затем СмартАрт особенность. После этого появится всплывающее окно, в котором вы можете выбрать один из сотен доступных шаблонов. Но для шаблона временной шкалы перейдите к Процесси выберите стрелку с тремя точками внутри, так как это основной шаблон временной шкалы. Как вставить эту временную шкалу в Word? Нажмите ХОРОШО.
3
Пометьте и разверните временную шкалу
Теперь начните называть события, редактируя [Текст] выбор. Перейти к Текстовая панель чтобы развернуть временную шкалу, затем нажмите ВОЙТИ tab с клавиатуры, чтобы добавить события. Однако обратите внимание, что лучше не добавлять более семи событий, так как это сделает вашу временную шкалу размытой.
4
Настройте события
Далее идет настройка событий путем изменения цвета, шрифта и формы. Вы можете пойти и поискать Изменить цвета под Смарт-дизайн изменить цвет. В противном случае щелкните правой кнопкой мыши временную шкалу и настройте ее из заданных пресетов. Вот как можно создать временную шкалу в Word.
5
Вставьте изображения и стрелки (необязательно)
Наконец, у вас есть возможность добавлять стрелки, значки и изображения на временную шкалу. Перейдите на вставку, затем выберите среди иллюстраций, которые вам нужно включить. Затем, наконец, сохраните его, перейдя в Файл, тогда Сохранить как. Нажмите здесь, чтобы узнать, как сделать ментальную карту в ворде.

Часть 2. Лучшая альтернатива Word для создания временной шкалы
Если на вашем устройстве нет Microsoft Word, мы настоятельно рекомендуем использовать MindOnMap. Почему? Потому что этот инструмент картирования разума представляет собой веб-инструмент, который позволяет пользователям создавать карты разума, диаграммы и временные шкалы, не тратя ни копейки, в отличие от высокой цены при использовании Microsoft Word и способов создания временной шкалы с ним. Представьте, что вам не нужно скачивать и в то же время платить за его использование. Кроме того, не стесняйтесь использовать его из-за рекламы, потому что мы клянемся, что вы не увидите никаких рекламных роликов и рекламных акций при его использовании!
The MindOnMap предлагает наиболее интуитивно понятный интерфейс, когда дело доходит до его использования. На самом деле, новичкам помощь не потребуется, так как у него есть собственная функция горячих клавиш. Кроме того, как и Word, этот фантастический онлайн-инструмент для создания карт предлагает потрясающие трафареты, функции и предустановки, которые производят сильное впечатление на пользователей. Поэтому давайте рассмотрим самые простые рекомендации по созданию временной шкалы с его помощью помимо Word.
1
Войдите в свою электронную почту
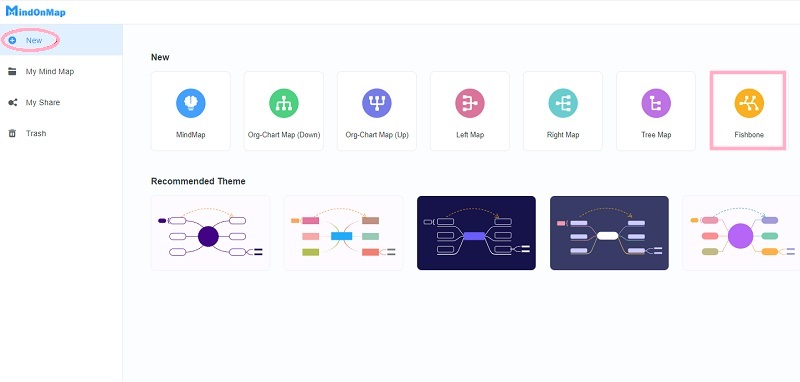
Зайдите в браузер и найдите официальный сайт MindOnMap. Затем войдите в систему, используя свою учетную запись электронной почты после нажатия кнопки Создайте свою ментальную карту. Далее на главной странице выбираем Новый вкладку, чтобы увидеть различные тематические шаблоны и нет. Но так как мы будем работать на временной шкале, пожалуйста, выберите Рыбная кость шаблон.
2
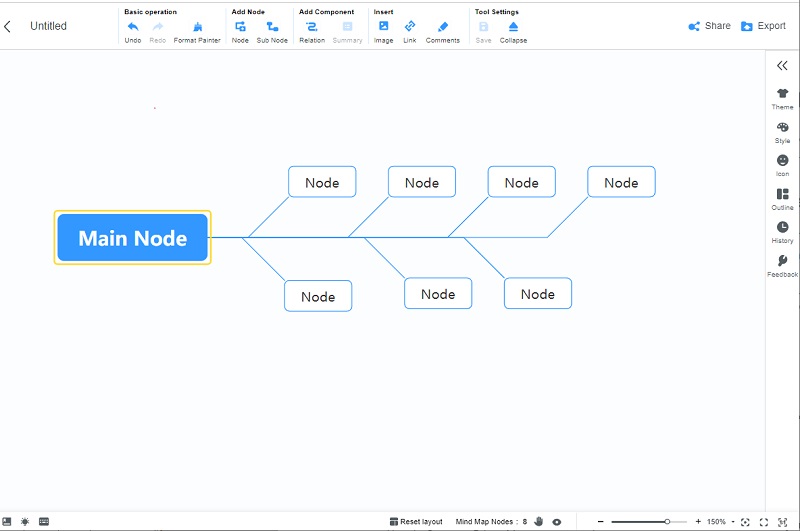
Создайте временную шкалу
Вы увидите один узел, который говорит Главный узел на основном полотне. Нажмите ее, затем нажмите Вкладка кнопку на клавиатуре, чтобы добавить больше узлов для ваших событий.
3
Оптимизируйте временную шкалу
Теперь, как и в случае с процедурой создания временной шкалы в Word, не стесняйтесь оптимизировать временную шкалу. Как? Пометьте узлы для ваших событий и сделайте их красочными, настроив на Строка меню. Начните с Фон, когда вы идете в Тема, тогда Фон.
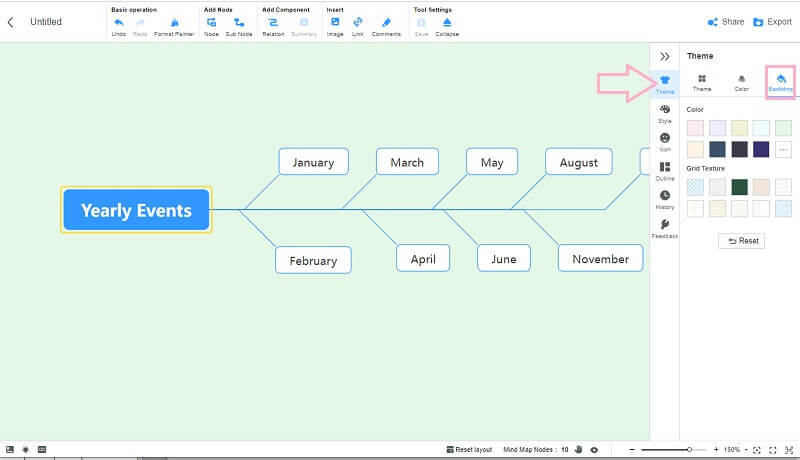
Теперь, чтобы изменить цвет узлов, перейдите к Стиль. Затем выберите узел, которым вы хотите заполнить цвет, и щелкните цвет, который вы выбрали под Форма.
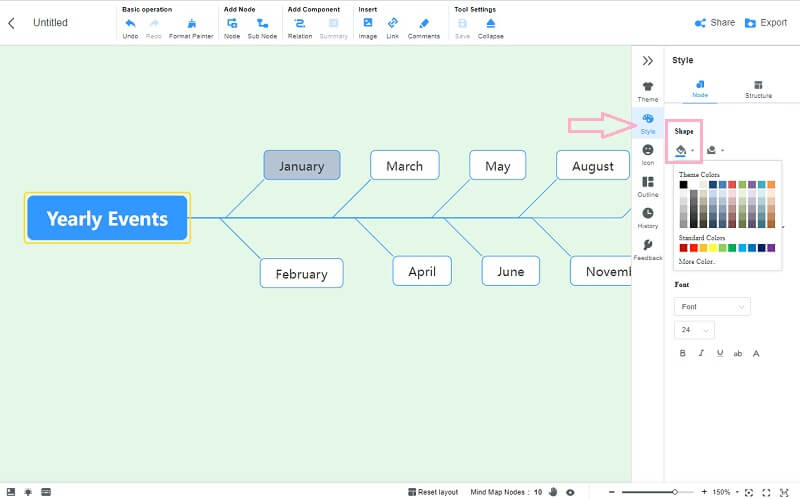
4
Вставка иллюстраций и компонентов
Теперь добавьте на временную шкалу несколько иллюстраций, таких как изображения, комментарии, ссылки и стрелки соединений. Просто перейдите к лентам в верхней части временной шкалы и не стесняйтесь добавлять в соответствии со своими предпочтениями. О, и чтобы добавить несколько значков, вернитесь к Строка меню, и нажмите на Значок выбор.
![]()
5
Поделитесь хронологией
В отличие от того, как вы создаете временную шкалу в Word, MindOnMap обеспечивает совместную работу посредством совместного использования. Если вы хотите, чтобы ваши коллеги видели вашу хронику, нажмите на значок Делиться вкладку, затем настройте отображаемые параметры. Затем нажмите кнопку Скопировать ссылку и пароль, и отправить его своим друзьям.
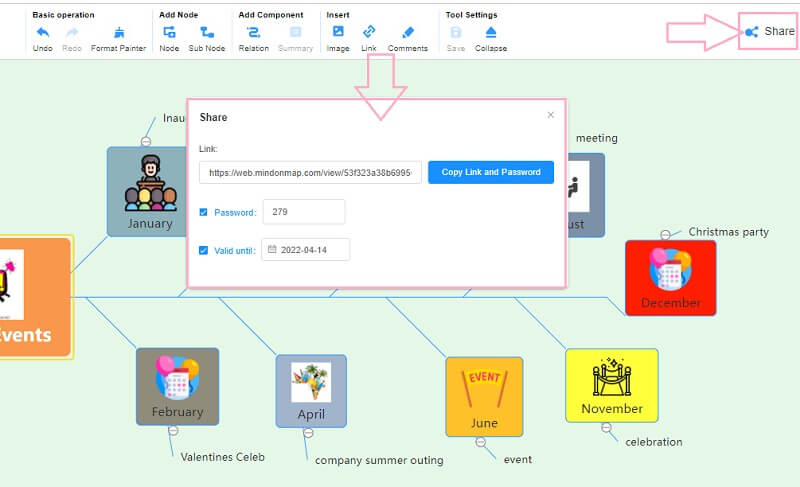
6
Загрузите временную шкалу на свое устройство
Поскольку у вас уже есть учетная запись, все ваши проекты будут храниться под Моя ментальная карта выбор с главной страницы. Однако, если вы хотите иметь его копию на своем устройстве, нажмите кнопку Экспорт кнопка. Сразу после того, как вы выберете формат, вы заметите, что он сразу загрузит файл. Вы также можете использовать этот способ для составить ментальную карту о себе.
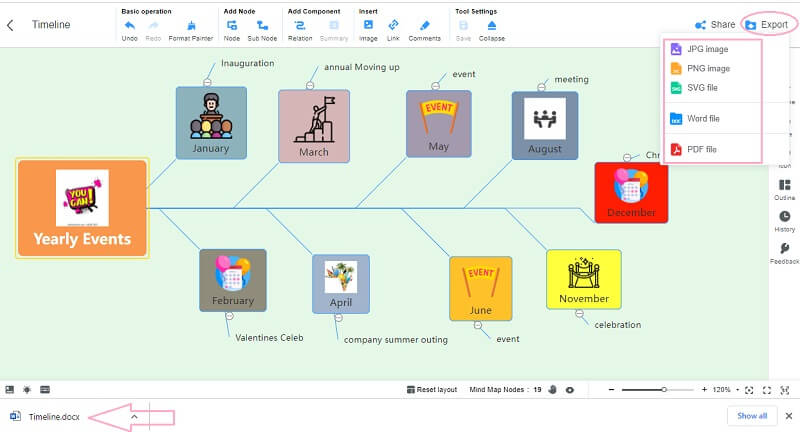
Часть 3. Часто задаваемые вопросы о Word и создании временной шкалы
Как вставить временную шкалу из моей галереи в Word?
Если вы хотите вставить готовую временную шкалу в Word, вы можете перейти во вкладку «Изображения». Однако, поскольку это изображение, вы не сможете его изменить.
Могу ли я сделать временную шкалу с помощью Paint?
Да. Paint — это графический редактор, который содержит основные трафареты, подходящие для создания таймлайнов. Однако для его изготовления потребуется ваше терпение, потому что вам нужно будет использовать ручные процедуры.
Могу ли я использовать временную шкалу, представляя эволюцию человека?
Да. Поскольку эволюция человека имеет своевременный процесс, временная шкала — лучшая карта, которую можно использовать для иллюстрации.
Вывод
Вот и все, подробные шаги о том, как сделать временную шкалу в Word. Теперь вы можете использовать это программное обеспечение для составления расписания или управления проектом по временной шкале. Однако, если вы находите Word неудобным, воспользуйтесь MindOnMap.
Easily create and manage a timeline graphic
Updated on September 11, 2020
When you want to depict an itinerary, schedule, project plan, or milestones, a timeline graphic can be more effective than plain text. Microsoft Word offers built-in tools and layouts to create visually appealing timeline graphics. Here’s how to make a timeline in Word with minimal effort.
Instructions in this article apply to Word for Microsoft 365, Word 2019, Word 2016, and Word 2013.
How to Create a Timeline in Word for Windows
Follow these steps to make a timeline in Microsoft Word for Windows.
-
Open a Word document.
-
Select Insert > SmartArt.
-
The Choose a SmartArt Graphic dialog box displays.
-
Go to the left menu pane and select Process, then choose one of the timeline types.
If this is your first attempt at creating a timeline in Word, select Basic Timeline. After you’re comfortable creating a basic timeline, try something more advanced, such as the Circle Accent Timeline.
-
Select OK. A timeline template is inserted into your document, along with a floating SmartArt Text pane.
-
In the Type your text here pane, select a text box and type or paste the content you want to add to the corresponding timeline section. Each section of the timeline is highlighted when its value is selected.
In the image below, the three default labels were changed to read Beta Release, Testing Phase, and Production Launch to simulate a software development timeline.
-
To add additional items to the timeline, go to the text pane, place the cursor at the end of any text field, and press Enter to create a new line. To delete an item on the timeline, go to the text pane and delete the entire line of text associated with it.
-
By default, all timeline items are displayed at the uppermost level, making each a major or parent milestone. You can demote or promote a timeline item so that it becomes a sub-milestone. Right-click the item and select Demote or Promote.
-
To shift an item to earlier or later in the timeline, right-click it, then select Move Up or Move Down.
How to Create a Timeline in Word for macOS
Follow these steps to make a timeline in Microsoft Word for macOS.
-
Open a Word document.
-
Select Insert > SmartArt or Insert a SmartArt Graphic, depending on the version of Word.
-
Select Process and choose from one of the timeline types offered.
If this is your first attempt at creating a timeline in Word, select Basic Timeline. After you feel comfortable, try something more advanced, such as the Circle Accent Timeline.
-
A timeline template is inserted into the document, along with the floating SmartArt Text pane.
-
Select any text box and type or paste the content you wish to add to the corresponding section. Each section is highlighted when its value is clicked.
In the image below, the three default labels were modified to read Beta Release, Testing Phase, and Production Launch to simulate a software development timeline.
-
To add or remove items from the timeline, select Plus (green) or Minus (red) from the SmartArt Text pane.
-
By default, all timeline items display at the uppermost level, making each a major or parent milestone. You can demote or promote a timeline item so that it becomes a sub-milestone. Select it, then choose the right arrow (Demote) or left arrow (Promote) from the SmartArt Text toolbar.
-
To shift an item to earlier or later in the timeline, select the Move Up or Move Down arrows.
How to Use a Different Timeline Layout
Now that your timeline is in place, perhaps you’d like to switch to a different layout.
Layout changes don’t have to be permanent. Experiment by selecting different options and determining which one is a good fit for your timeline.
-
On macOS, select the timeline so that it’s highlighted and the SmartArt Design section is activated in the Word toolbar. On Windows, right-click the timeline, then select Layout.
-
Thumbnail images representing available timeline and process layouts appear. To view more, select the left and right arrows on macOS, or scroll down on Windows.
-
To see how the timeline will look in a particular layout, select it once. The contents instantly adjust to fit the new format. To return to the original layout at any time, select the Basic Timeline thumbnail.
How to Change the Color Scheme of Your Timeline
After you enter the timeline contents and choose a layout, it’s time to tweak the colors.
Similar to layout changes, color schemes are applied immediately but can be reverted with one click. This allows you to try multiple colors until you find an ideal fit.
-
On macOS, select the timeline so that it’s highlighted and the SmartArt Design tab is activated in the Word toolbar. On Windows, right-click so the context menu appears.
-
On macOS, select Change Colors from the toolbar. On Windows, select Color.
-
A pop-out window appears containing dozens of thumbnail images. Each previews a different color scheme. To instantly apply one to the timeline, select its preview image.
At the bottom of the Change Colors dialog box, there’s a Recolor Pictures in SmartArt Graphic option. This only applies to layouts containing pictures. It doesn’t have an effect on your timeline and can be ignored.
How to Spruce Up Your Timeline With SmartArt Styles
In addition to changing the layout and color scheme of your timeline, Word offers pre-defined SmartArt styles that enhance the visuals further with line styles, 3-D milestone indicators, and more.
To apply a SmartArt style, on macOS, select the timeline so that the SmartArt Design section displays. On Windows, right-click the timeline, then select the Style icon.
From there, select one of the thumbnail images on the right side of the Word toolbar (macOS) or overlaying the timeline (Windows) to see how the respective style looks when applied.
As is the case with layouts and color schemes, these changes are instant and can be reverted by selecting the original style.
Thanks for letting us know!
Get the Latest Tech News Delivered Every Day
Subscribe