
Word 2013
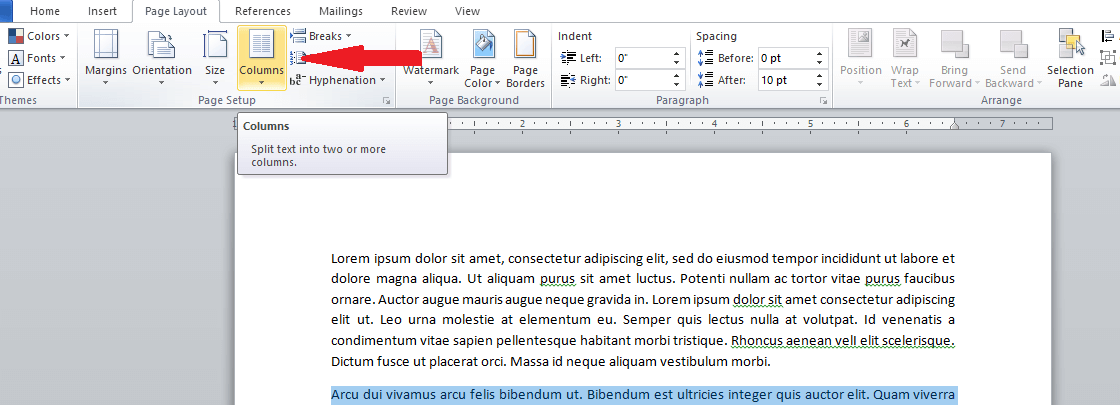
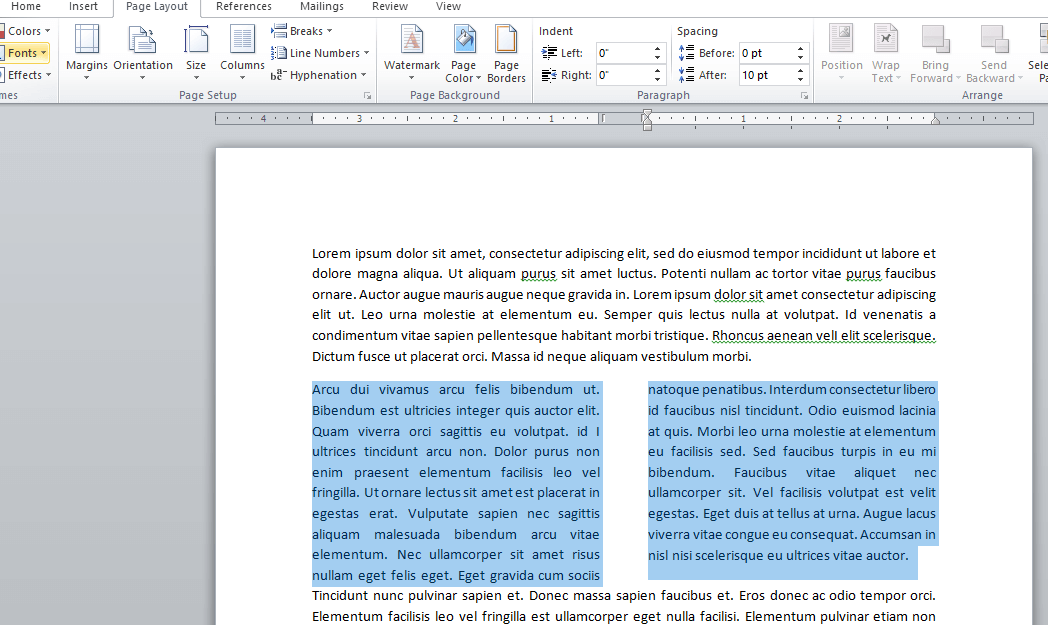
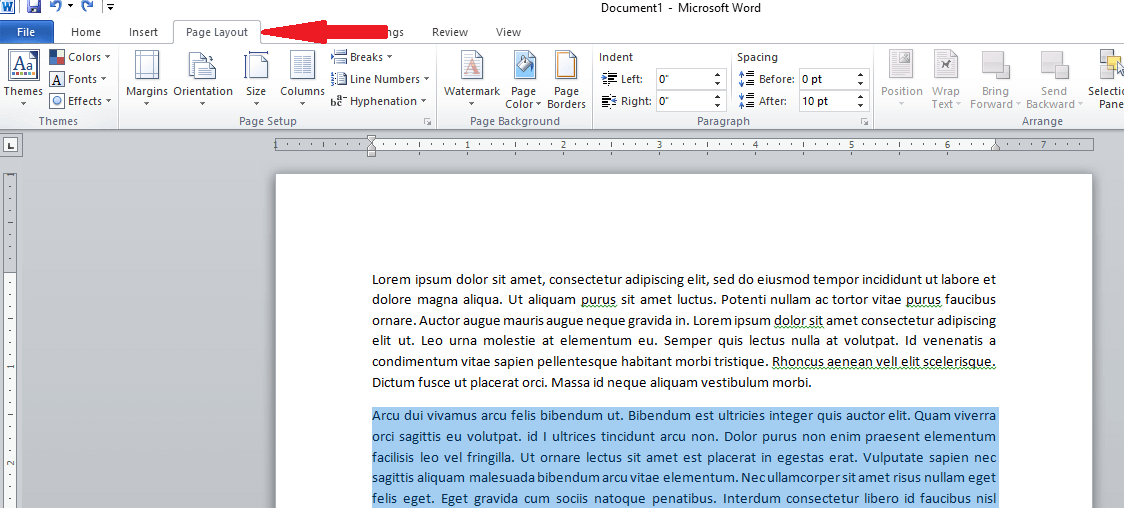
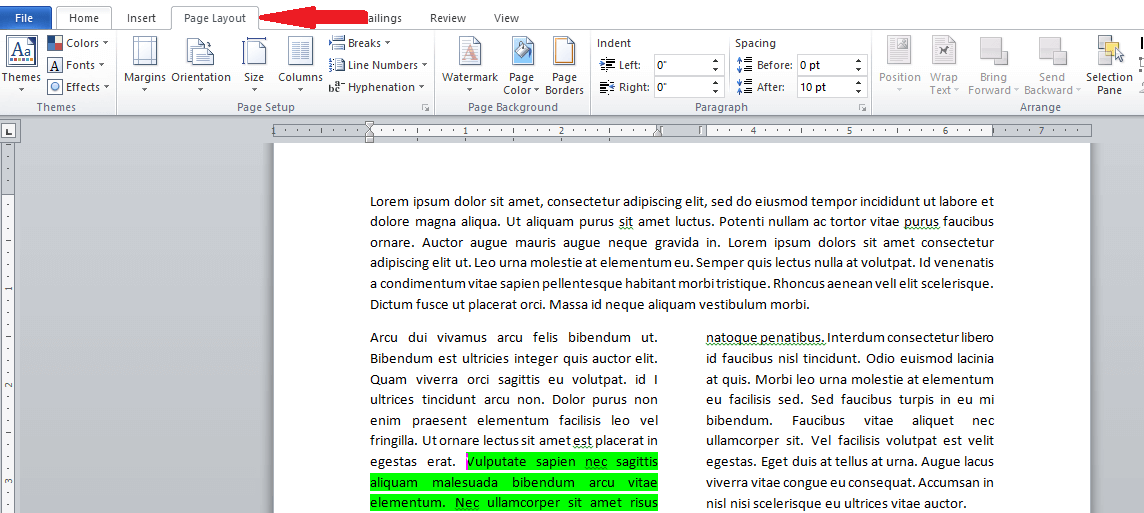
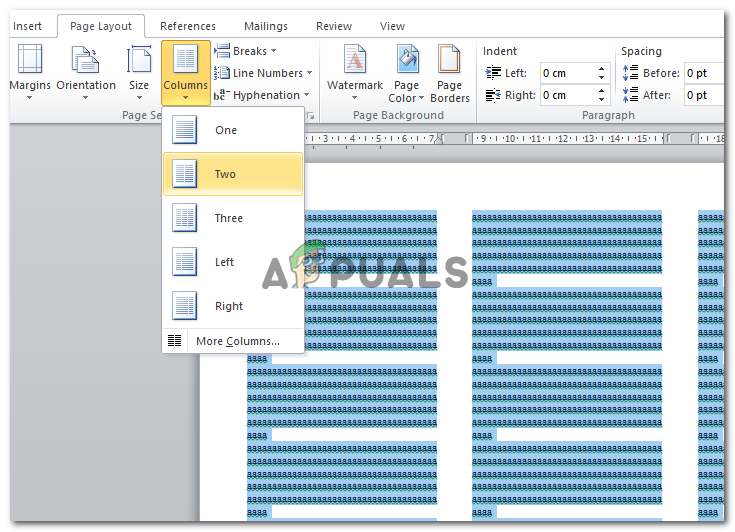
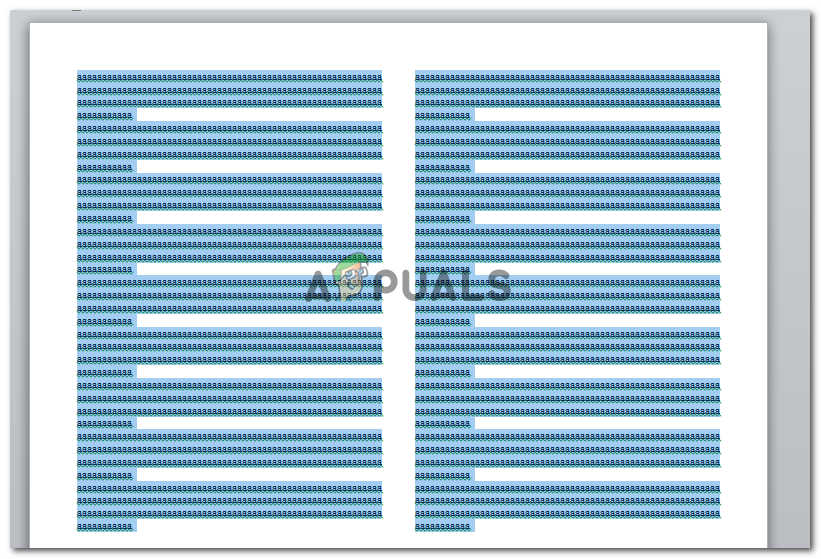
You can format your document in a newspaper-style column layout by adding columns. On the Page Layout tab, click Columns, then click the layout you want.
-
To apply columns to only part of your document, with your cursor, select the text that you want to format.
-
On the Page Layout tab, click Columns, then click More Columns.
-
Click Selected text from the Apply to box.
Word 2016
You can format your document in a newspaper-style column layout by adding columns. On the Layout tab, click Columns, then click the layout you want.
-
To apply columns to only part of your document, with your cursor, select the text that you want to format.
-
On the Layout tab, click Columns, then click More Columns.
-
Click Selected text from the Apply to box.
Need more help?
If two columns are not enough, you can also create three or even more columns in your Word document. Write your text, select it, and go to the Layout tab. Click Columns, and choose Three or click or tap More Columns if you need even more.
Contents
- 1 How do I make 3 columns in Word 2020?
- 2 How do I make 3 column lines in Word?
- 3 How do I make 3 columns in Word Online?
- 4 How do I make columns in one section in Word?
- 5 How do I split a Word document into two columns?
- 6 How do you split a Word document into sections?
- 7 How do you make 3 columns in Excel?
- 8 How do I split a line in Microsoft Word?
- 9 How do I make column borders in Word?
- 10 Why does my word not have Columns?
- 11 Does Microsoft Word Online have Columns?
- 12 How do I make Columns and rows in Word?
- 13 How do you combine one column and two Columns in Word?
- 14 What do you mean by splitting and merging of tables?
- 15 How do I split a Word document into 3 horizontal sections?
- 16 How do I split a Word document into 4 sections?
- 17 How do I split a Word document into 3 equal sections horizontally?
- 18 How do I create a quadrant in Word?
- 19 How do I split one column into multiple columns in Excel?
- 20 How do I convert rows to multiple columns?
How do I make 3 columns in Word 2020?
To create columns in Word, place your cursor where you want the columns to start or select the text to separate into columns. Then click the “Layout” tab in the Ribbon. Then click the “Columns” drop-down button in the “Page Setup” button group.
How do I make 3 column lines in Word?
Choose Page Layout > Columns. At the bottom of the list, choose More Columns. In the Columns dialog box, select the check box next to Line between.
How do I make 3 columns in Word Online?
To add columns to a document:
- Select the text you want to format. Selecting text to format.
- Select the Page Layout tab, then click the Columns command. A drop-down menu will appear.
- Select the number of columns you want to create. Formatting text into columns.
- The text will format into columns. The formatted text.
How do I make columns in one section in Word?
Add columns to a Word document
- To apply columns to only part of your document, with your cursor, select the text that you want to format.
- On the Page Layout tab, click Columns, then click More Columns.
- Click Selected text from the Apply to box.
How do I split a Word document into two columns?
Highlight the text you wish to split into columns. Select the “Page Layout” tab. Choose “Columns” then select the type of columns you wish to apply. For this to fully work, you must have enough text typed to fill the first column before the text will start filling into the second column.
How do you split a Word document into sections?
Divide a Document into Sections
- Place the insertion point where you want the section break.
- Choose the Page Layout tab.
- Click the down-arrow next to the Breaks button. A menu appears.
- Click the type of section break you want. Word inserts the section break.
How do you make 3 columns in Excel?
Work
- Introduction.
- 1If necessary, insert blank columns to the right of the cells you want to convert into multiple columns.
- 2Select the cells you want to convert.
- 3Click the Text to Columns button in the Data Tools group on the Data tab.
- 4Select the Original Data type that best suits your existing data.
- 5Click Next.
How do I split a line in Microsoft Word?
Press and hold down the “Ctrl” key, which keeps your divider line straight. Position the cursor near the left margin under the place you want to divide. Press and hold down the left mouse button and drag the cursor to the right, drawing the divider. Release the mouse button and the “Ctrl” key.
How do I make column borders in Word?
Apply a Border to a Table
- In the table, highlight the cells you want to add a border to.
- On the ribbon, select Table Design.
- In the Borders group, select Borders > Borders and Shading.
- In the Borders and Shading dialog box, customize how the border looks.
- Select OK to save your changes.
Why does my word not have Columns?
Double-check the column settings you have in place to make sure the formatting is configured as required. Select the section of the text you’re working with, then choose “Columns” and “More Columns” from the Page Layout menu tab.
Does Microsoft Word Online have Columns?
Unfortunately, no. Word for the web preserves columns that are already in your document, but it doesn’t yet provide a way to create them. If you have the Word desktop application, use the Open in Desktop App command to open the document and create newsletter-style columns.
How do I make Columns and rows in Word?
Add a row or column
- Click where you want in your table to add a row or column and then click the Layout tab (this is the tab next to the Table Design tab on the ribbon).
- To add rows, click Insert Above or Insert Below and to add columns, click Insert Left or Insert Right.
How do you combine one column and two Columns in Word?
On the Page Layout tab of the ribbon, click Columns > More Columns… Select One column and make sure that “Selected text” is selected in the “Apply to:” dropdown. Click OK. Without changing the selection, paste the picture.
What do you mean by splitting and merging of tables?
Splitting cells is similar to adding a row or column, but it all takes place in one cell instead of a group of cells.Merging cells, however, is similar to deleting a cell and then adjoining it with a neighboring cell.
How do I split a Word document into 3 horizontal sections?
Follow these general steps:
- Open a new document and set the paper orientation and margins the way you want.
- Insert a three-column, single-row table in your document.
- Remove the borders around the table, if desired.
- Format the second (center) column to be rather narrow.
- Adjust the width of the other columns as desired.
How do I split a Word document into 4 sections?
To split a page to 4 parts, you can insert a table to deal with the job.
- Place the cursor at left-top of the page, then click Insert > Table, select 2×2 Table.
- The table has been inserted, then drag right-corner of the table to resize it as you need.
- Insert texts into the columns and rows separately.
How do I split a Word document into 3 equal sections horizontally?
Microsoft Access Divide Word documents into sections using horizontal lines
- Put your cursor in the document where you want to insert the horizontal line.
- Go to Format | Borders And Shading.
- On the Borders tab, click the Horizontal Line button.
- Scroll through the options and select the desired line.
- Click OK.
How do I create a quadrant in Word?
How to make a SWOT analysis Diagram in Word
- Open a new document in Word.
- Add a text box by selecting the Insert tab and clicking the text box option.
- Choose Draw Text Box.
- To create a quadrant, hold Shift and drag your mouse to make a square.
- Right click the text box to format the color.
How do I split one column into multiple columns in Excel?
How to Split one Column into Multiple Columns
- Select the column that you want to split.
- From the Data ribbon, select “Text to Columns” (in the Data Tools group).
- Here you’ll see an option that allows you to set how you want the data in the selected cells to be delimited.
- Click Next.
How do I convert rows to multiple columns?
Highlight all of the columns that you want to unpivot into rows, then click on Unpivot Columns just above your data. Once you’ve clicked on Unpivot Columns, Excel will transform your columnar data into rows.
Sometimes you require to split your text (or a section of it) into concurrent columns, and Word makes it a breeze. Whenever you divide the text into columns, you’ll see that it naturally continues in the column to the right. Any portion of your text may be extracted independently. This may help you organize your concepts and make your newsletter, research paper, or other writing projects more readable. Find out precisely, how to make 3 Columns in a Word document.
- Process of Making 3 Columns in Word
- Process of Making 2 Columns in Word
- Process of Making 4 or More Columns in Word
- Process of Adding Column Breaks
- Conclusion
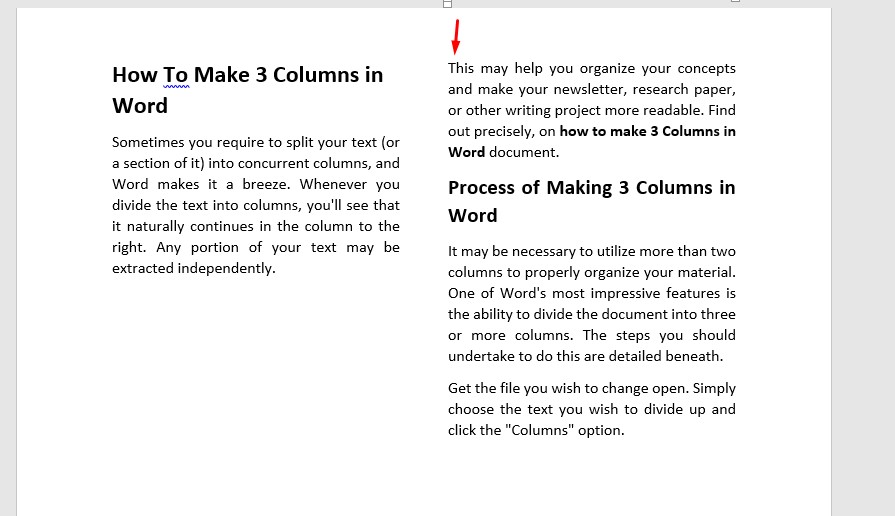
Process of Making 3 Columns in Word
It may be necessary to utilize more than two columns to properly organize your material. One of Word’s most impressive features is the ability to divide the document into three or more columns. The steps you should undertake to do this are detailed beneath.
Get the file you wish to change open. Simply choose the text you wish to divide up and click the “Columns” option.

When you have finished selecting the text that you intend to break into columns in Microsoft Word, hit or press the Layout button that is located on the ribbon interface.
After that, go to the Columns option located in the Page Setup area of the Layout tab by clicking or tapping on it. This will provide a choice of alternatives for you to pick from, from which you will be able to choose the number of columns into which you would want to break your text. Initiate action by selecting 3.

The text that you have picked will automatically be divided into three columns as soon as you choose option Three.
Process of Making 2 Columns in Word
Before you can begin to divide the content of your text into two columns, you will need to either open an existing file in Word or build a new one & include some text in it. When you have finished selecting the content that you wish to separate into columns in Word, hit or press the Layout tab that is located on the bar menu.
After that, go to the Columns icon located in the Page Setup area of the Layout tab by clicking or pressing on it. Clicking this will bring up a menu out of which you can select the number of columns into which you’d prefer to divide your content. Make your selection by pressing or clicking on 2.
Below is a screenshot showing how Word automatically produces two columns and enables your content to flow between them.

You may then start composing new content anyplace in the document’s columns, and it will automatically fill up the empty spaces between them. This rhythm, though, may not be to your taste. See the next section if you need to pinpoint the precise position at which a column splits off.
Process of Making 4 or More Columns in Word
There is a possibility that your writing might need greater than two or three columns. It is fairly simple to put into action; all that is required is the addition of two or three columns.
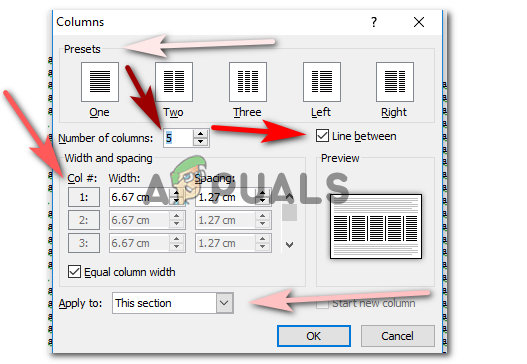
Firstly, your document has to be opened, and then you need to pick the text that will be used for the columns. After that, proceed to the Layout tab, and then look for the Columns option. If you require more than three columns and you decide to click or touch the More Columns button, then Word will create a new window for you that is labeled Columns and it will provide extra options. Find the setting there that’s named “Number of columns,” and change it. After entering the desired number of columns, you should hit the OK box.

Word instantly divides the text you have chosen into the number of columns that you have set. For instance, the result that we received when we decided to divide the content into four columns is as follows:

Process of Adding Column Breaks
You have the ability to regulate precisely where one column starts and another one finishes if that is something you wish to do. Column breaks, an in-built feature of Microsoft Word, accomplish precisely this goal. To insert a column break, you must first select or press at the commencement of the content where you want the new column to appear.

Following that, launch Microsoft Word and navigate to the top menu. Once there, select the Layout option by pressing on it.
Hit or press on the Breaks option that is located in the Page Setup area of the Layout tab. This function displays a list of possible layouts for the Page Breaks & Section Breaks that you have chosen. To use it, hit or press the Column button.
After you have completed the steps outlined above, as you will observe in the demonstration, Word automatically places the beginning of the subsequent column at the location you specified.
Conclusion
Whether you are composing a research paper, an essay for the newspaper, or something else, dividing the material that you are writing into many columns will give it an attractive appearance. This article on how to make 3 columns in Word will assist you in doing that as well as other tasks, such as determining the location of column breaks.
You may find yourself needing to separate your document, or at least part of it, into parallel columns, the good thing is Word makes it easy to do so. When separating the text into columns, it flows from one column and continues to the other one next to it. You can also separate just a part of your text. This is useful for writing a newsletter, a scientific paper, or just separating your content and making it easier to read.
So, in this guide, you will learn how to create columns in Word using different methods.
How to make two columns in Microsoft Word
With this method, you will be able to split your Word document into two separate columns.
- First, we have to open the document we want to edit. It can be a blank document but it needs to have some text first to separate it into columns.
- Select the text that you want to separate into columns.

- Click on the Layout tab (Formerly Page Layout for Word 2007 and 2010)
- Click the Columns button on the Page Setup section

- This opens up a list that lets you select the number of columns you want to separate your text. We will choose two columns.

- Once you have selected two columns, Word will separate your text into two columns.
- The text you write in will go from the left column to the right.


How to make three columns or more in Microsoft Word
Sometimes you are in the need of separating your text into more than two columns. The amazing thing about Word is that it lets you separate it into three or more columns. Here are the steps for doing so:
- Open up the document you want to edit
- Select the text you want to separate into columns
- Click on the Layout tab (Formerly Page Layout for Word 2007 and 2010)

- Click the Columns button on the Page Setup section
- If you need to separate the text into three columns, click on Three, and the text will be separated into 3 columns.

- If you need to have more than 3 columns, click on More columns
- There you will be able to manually enter the number of columns you want.

Pro tip: In this section, you can also specify the Width and Spacing of the columns - You can select if you want to apply the columns to the selected text only, the whole document, or from a specific point forward.


Now you may be asking, “how do I control where the column ends?”. Well, Microsoft Word has a function that lets you do that, and it’s called Break. Let’s break it down
How to make a column break on Microsoft Word
If you are using columns and want the text you have to start atop the next column, you can use a column break. Here are the steps
- Click on the beginning of the text you want to start the next column

- Click the Layout tab (formerly known as Page Layout for Word 2007 and Word 2010)

- In the Page Setup section, you will find the Break button. This will show you the different options for Page breaks and section breaks. In the Page break portion, click on Column

- Now the column will start at the point you have selected


And that’s it! You are now a pro at creating columns in Microsoft Word. You can repeat these steps anytime you need them.
If you are still craving more tips on how to use Word or other Office apps, why don’t you subscribe to our newsletter by entering your email below? You can also check the SoftwareKeep Blog to help you boost your productivity!
Содержание
- Создание колонок в документе Ворд
- Создание колонок в документе
- Примеры использования колонок
- Отмена разбиения на колонки
- Заключение
- Вопросы и ответы

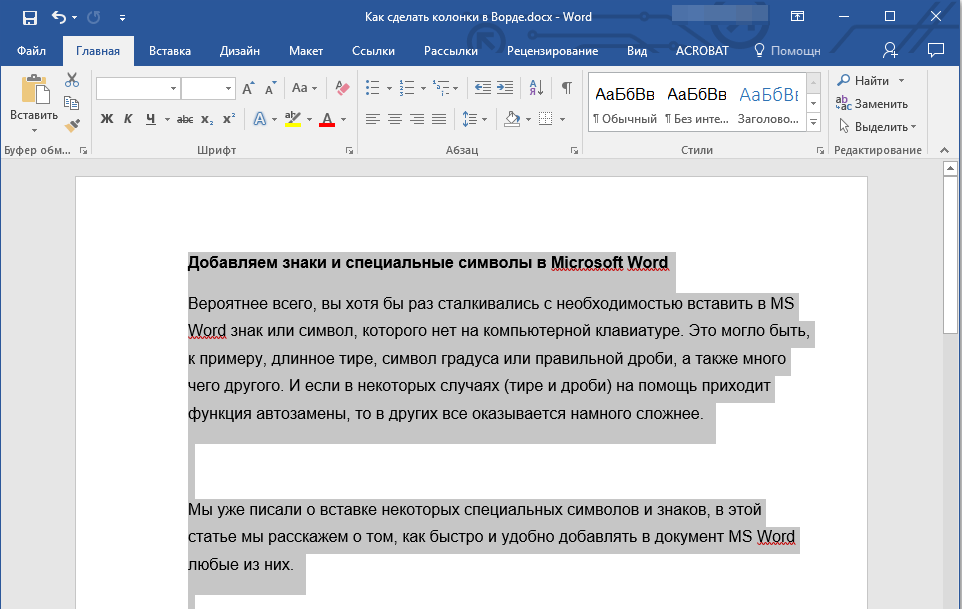
Одной из задач, с которой можно столкнуться при работе в редакторе Microsoft Word, является необходимость разбиения страницы на колонки (столбцы), с видимой границей или нет – это уже не столь важно. В рамках настоящей статьи расскажем, как это сделать.
Создание колонок в документе Ворд
Существует всего один способ создания столбцов в Word, при этом их количество, ориентация относительно полей страницы, ширина и отступы могут отличаться. Сначала мы рассмотрим то, как их создать, а затем кратко пройдемся по возможным вариантами применения данного навыка.
Создание колонок в документе
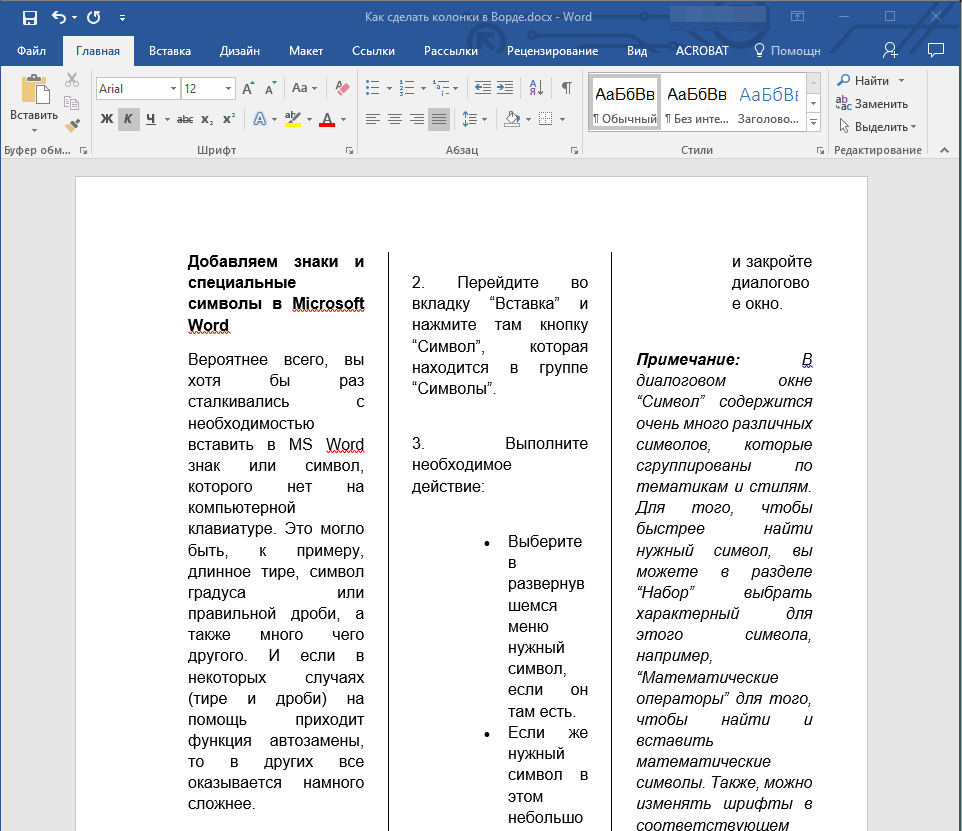
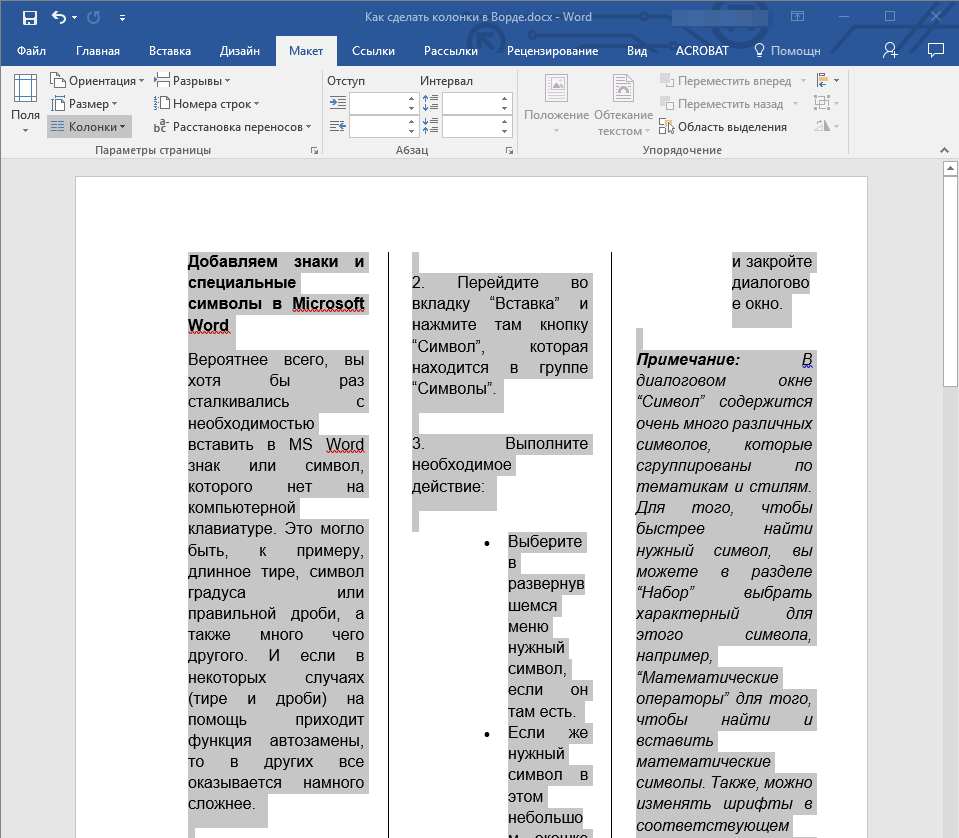
Для того чтобы разбить страницы текстового документа на два и более столбцов, необходимо выполнить следующие действия:
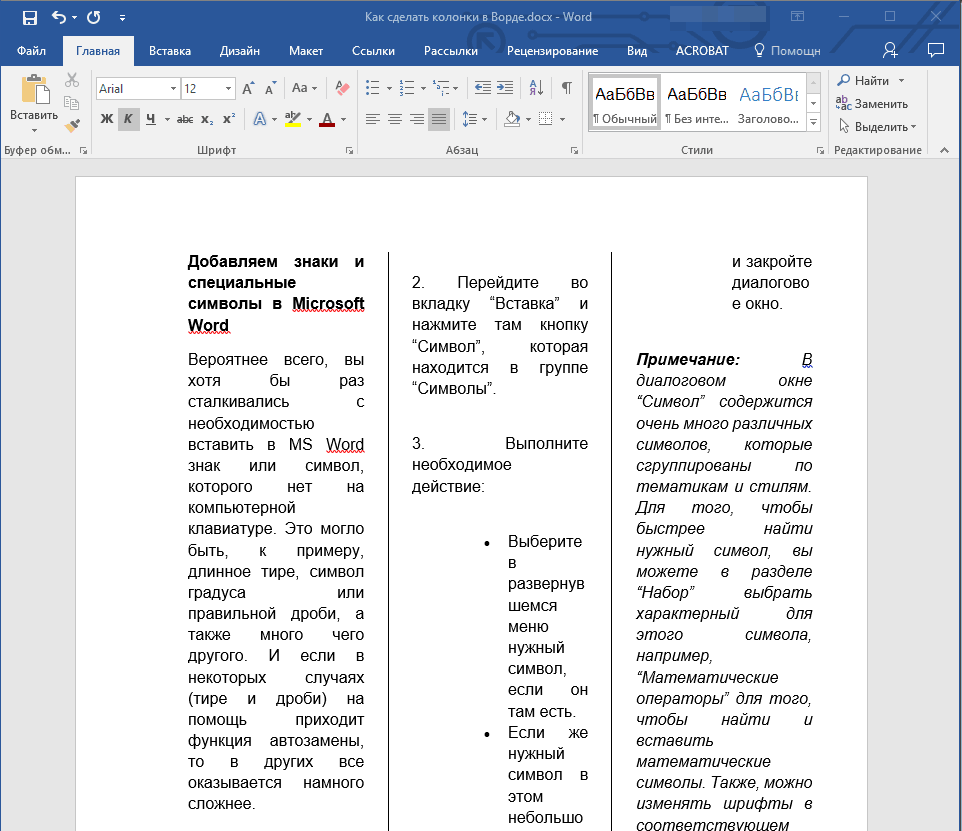
- Выделите с помощью мышки фрагмент текста или страницу, которую требуется разбить на колонки, или нажмите «CTRL+A» для выделения всего документа.

Читайте также: Как выделить страницу / весь текст в Ворде
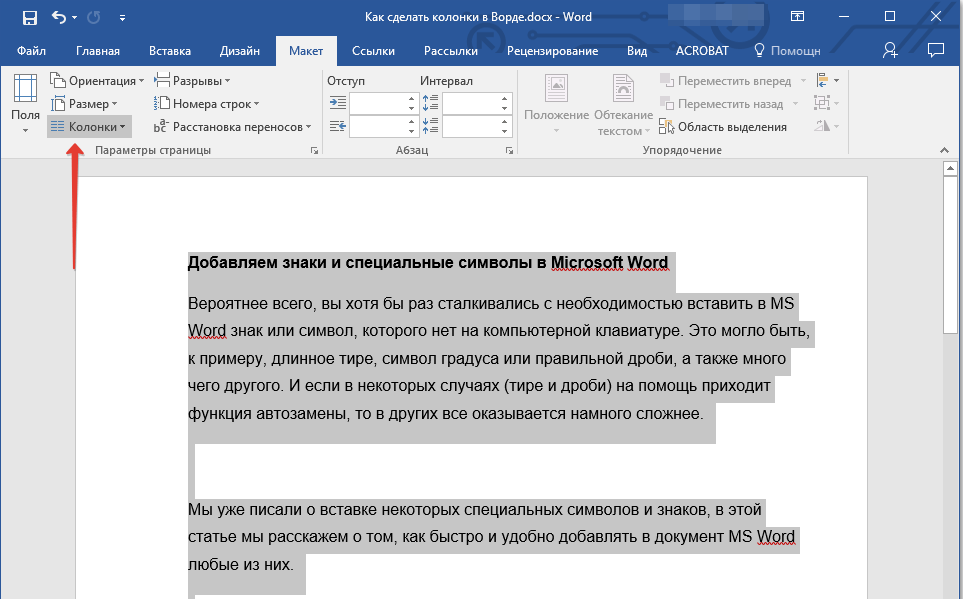
- Перейдите ко вкладке «Макет» и разверните там меню кнопки «Колонки», которая расположена в группе «Параметры страницы», нажав на нее.

Примечание: В версиях Ворд до 2012 года необходимые для решения поставленной задачи инструменты находятся во вкладке «Разметка страницы».
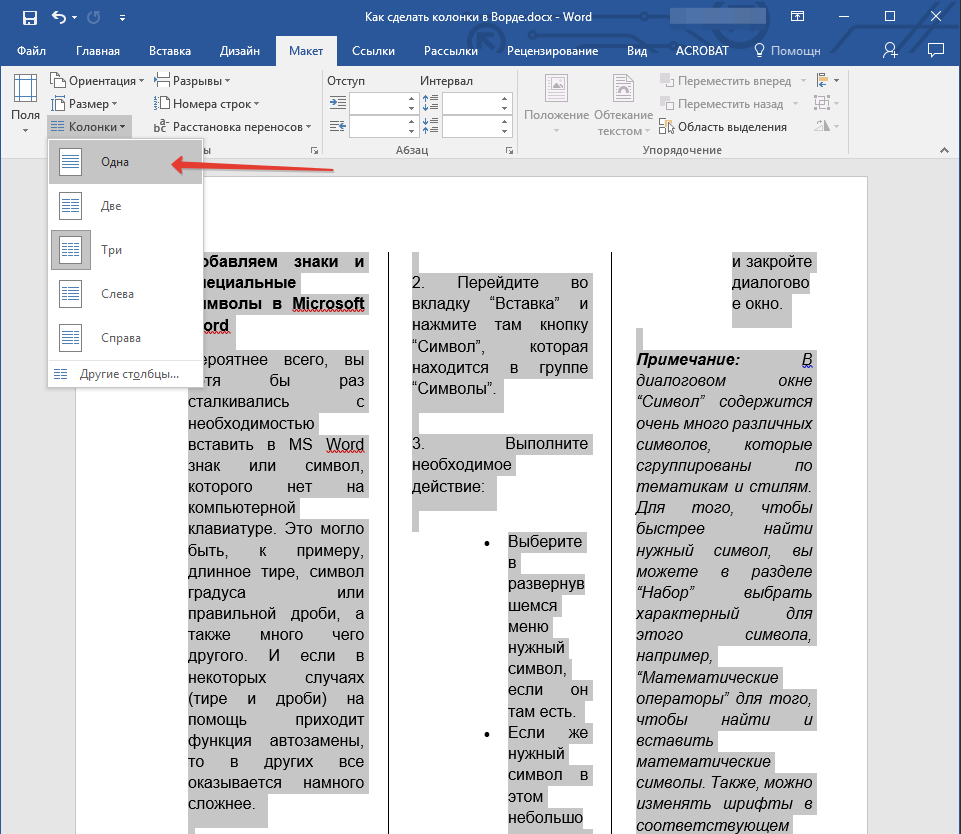
- Выберите в развернувшемся меню желаемое количество колонок. Если указанные по умолчанию значения вас не устраивают, кликните по пункту «Другие столбцы» (или «Другие колонки», в зависимости от используемой версии Microsoft Word).
- Определите необходимое количество столбцов, выбрав его в блоке «Тип», или введите вручную в строке «Чисто столбцов». В разделе «Применить» выберите один из двух доступных пунктов: «К выделенному тексту» или «До конца документа», если вы хотите разделить на заданное число столбцов текстовый фрагмент или весь документ соответственно.

Примечание: Если вам необходимо создать две колонки, размер одной из которых будет меньше другой, а ее расположение «привязано» к одному из полей, выберите соответствующее значение в блоке опций «Тип», ориентируясь на два последних макета («Слева» и «Справа»). Ниже, в блоке «Ширина и промежуток», можно задать подходящие размеры (непосредственно ширину текста и отступ между ним) для каждого из столбцов. Эти же значения можно редактировать и для большего числа колонок.
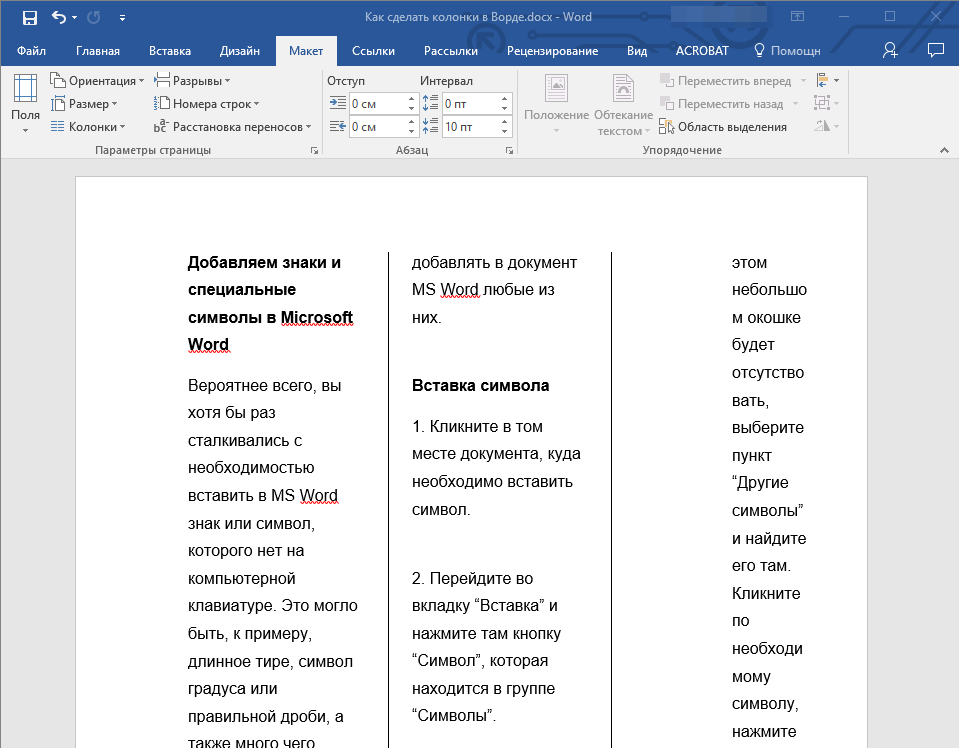
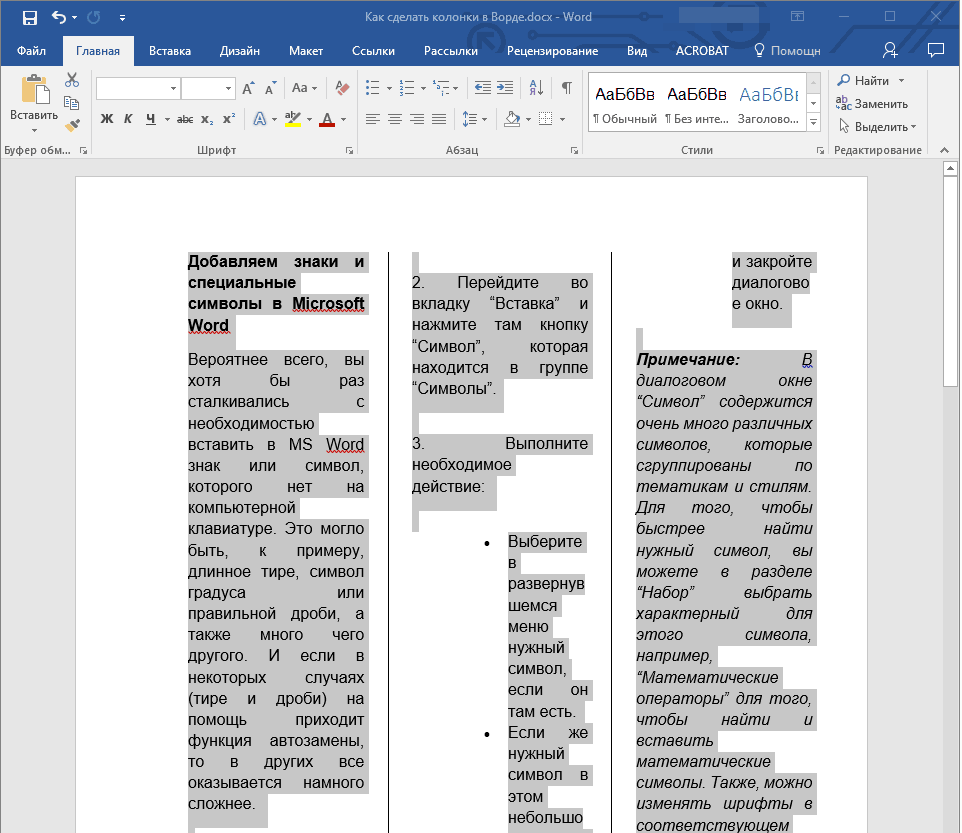
- Сразу после нажатия в диалоговом окне кнопки «ОК» выделенный фрагмент текста, страница или страницы будут разбиты на заданное количество колонок, после чего вы сможете писать текст в столбик.

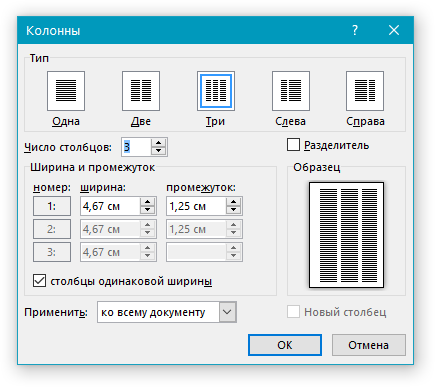

Для того чтобы добавить вертикальную границу, наглядно разделяющую столбцы (например, показав таким образом линию сгиба), снова кликните по кнопке «Колонки» и выберите пункт «Другие столбцы», после чего установите галочку напротив пункта «Разделитель». В этом же окне выполняются необходимые настройки ширины текста в столбцах и расстояния между ними, о чем мы упомянули в примечании выше.

Для подтверждения внесенных изменений нажмите «ОК».

Если вы хотите изменить разметку в следующих частях (разделах) документа, с которым работаете, выделите необходимый фрагмент текста или страницы, а затем повторите вышеописанные действия. Таким образом вы можете, к примеру, сделать на одной странице в Ворде две колонки, на следующей — три, а затем снова перейти к двум.
Совет: Если это необходимо, вы всегда можете изменить ориентацию страницы в документе Word с традиционной книжной на альбомную. О том, как это делается, мы ранее писали в отдельной статье.
Читайте также: Как в Ворде сделать альбомную ориентацию страницы
Примеры использования колонок
Очевидно, что добавление столбцов в Microsoft Word может потребоваться при создании документов, формат которых отличается от стандартных. К числу таковых можно отнести брошюры, буклеты и книги, которые зачастую не только разрабатываются в текстовом редакторе, но и затем распечатываются на принтере. Еще одна оригинальная задача, которую позволяет решить осваиваемая нами сегодня функция текстового редактора, — это создание шпаргалок. На нашем сайте есть отдельные статьи о работе с нетипичными документами, при которой без умения создавать и изменять колонки не обойтись – рекомендуем с ними ознакомиться.
Подробнее:
Как в Ворде сделать буклет / книгу / шпаргалку
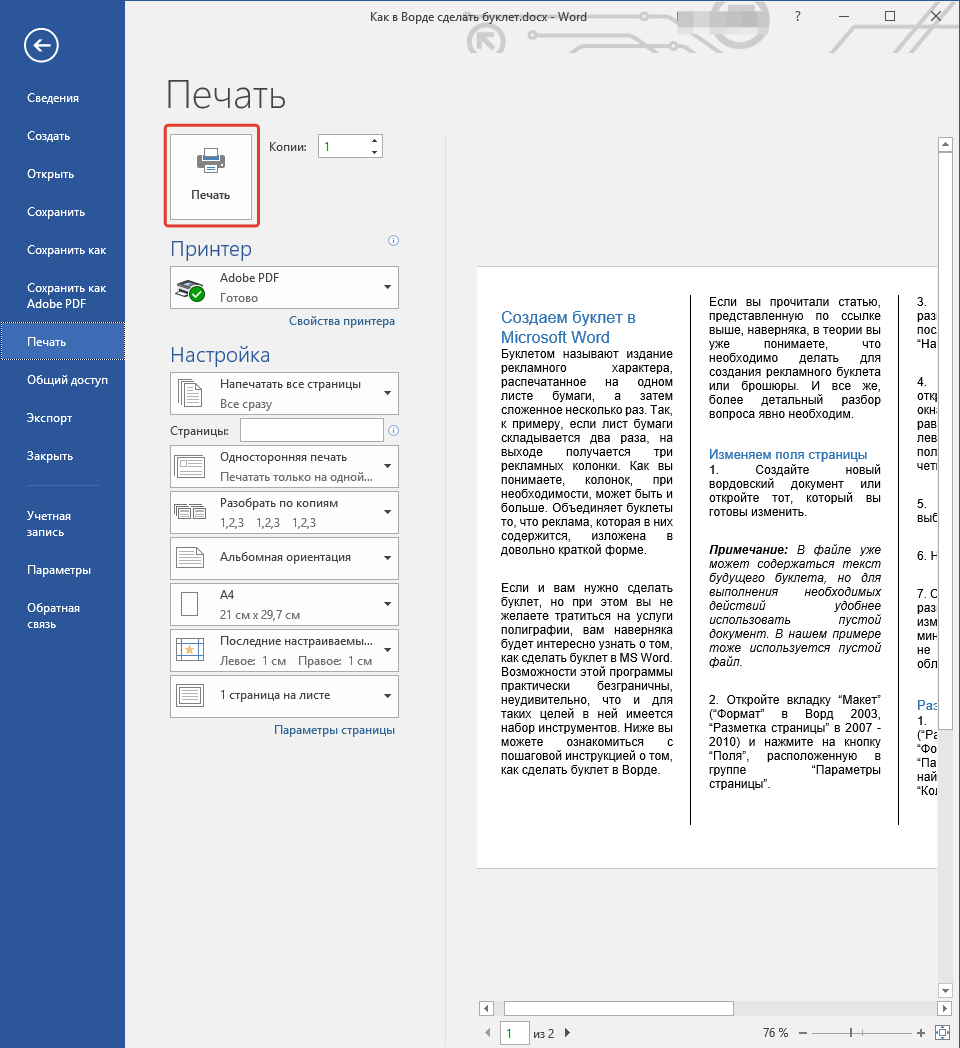
Печать документов в Microsoft Word
Отмена разбиения на колонки
В случае если необходимость в применении столбцов к текстовому содержимому документа отпадет, для ее отмены выполните следующее:
- Повторите действия из пункта №1-2 первой части данной статьи.
- Кликнув по кнопке «Колонки», выберите первый пункт в списке доступных — «Одна».
- Разбиение на колонки исчезнет, а документ обретет привычный вид.
Читайте также: Как отменить действие в Ворде
Заключение
Теперь вы знаете не только о том, как сделать колонки в Microsoft Word, но и в документах какого типа их применение особенно актуально.
Еще статьи по данной теме:
Помогла ли Вам статья?
Практически у каждого документа имеется свой собственный стиль оформления. Особенно разница в оформлении заметна в некоторых журналах и практически во всех газетах, так как в них текст расположен в виде столбцов. Программа Word также позволяет оформить текст таким и образом, и далее мы рассмотрим, как сделать колонки в Ворде.
Сделать колонки в Ворде можно одним нажатием пункта «Колонки», который расположен в секторе «Параметры страницы» в закладке «Разметка страницы». После его нажатия появляется дополнительное меню с готовыми шаблонами, и, выбрав подходящий вариант, мы сразу получаем соответствующую разметку на странице. Выбрав пункт «Другие колонки», мы получим дополнительное окошко настройки колонок, где можно указать свое количество колонок и их размеры. Данную настройку можно применять как для новой страницы, так и для страницы с текстом, который вследствие этого распределиться по столбцам в Ворде.
 Пункт «Колонки»
 Лист с тремя колонками
Также статьи на сайте chajnikam.ru связанные с программой Word:
Как изменить межстрочный интервал в Ворде ?
Как поставить абзац в Ворде?
Как создать рисунок в Ворде?
Как повернуть текст в Ворде?
Как сделать столбцы в Ворде (Word)
Сегодняшняя тема посвящена созданию колонок в программном продукте корпорации Microsoft Office а именно Word.
Если у вас возникла необходимость сделать текст в колонках, то сделать это в Word очень просто. Достаточно перейти во вкладку «Разметка страницы» в главном меню и в настройках страницы выбрать иконку колонки.


Здесь вы можете установить одну, две и три колонки, а также две колонки с большей слева или две колонки с большим с правой стороны.
Если нужно сделать большее количество колонок, то можно воспользоваться расширенными настройками колонок. Для этого снова нажимаем на иконку «Колонки» и из выпадающего списка выбираем последнее ссылку в низу «Другие колонки».
Здесь мы можем указать нужное нам количество колонок, задать их ширину и указать промежуток между ними. Разделить их вертикальной линией, или отметить галочкой, что все колонки будут одинакового размера (зависеть оно будет от количества колонок которые Вы укажете).
В низу вы можете указать, применять эти настройки к целому документу или только с конкретного места.

Во вкладке разметка страницы с помощью иконок «Разрывы» и «Расстановки переносов» можно настроить расстояния между колонками и их размещение.

Возможности MS Word, предназначенного для работы с документами, практически безграничны. Благодаря большому набору функций и множеству инструментов в этой программе можно решить любую задачу. Так, одной из вещей, которые может понадобиться сделать в Ворде — это необходимость разбить страницу или страницы на колонки.
Урок: Как в Word сделать шпаргалку
Именно о том, как сделать колонки или, как их еще называют, столбцы в документе с текстом или без него мы и расскажем в этой статье.
Создаем колонки в части документа
1. Выделите с помощью мышки фрагмент текста или страницу, которую требуется разбить на колонки.

2. Перейдите ко вкладке “Макет” и нажмите там кнопку “Колонки”, которая расположена в группе “Параметры страницы”.

Примечание: В версиях Ворд до 2012 года эти инструменты находятся во вкладке “Разметка страницы”.
3. Выберите в развернувшемся меню необходимое количество колонок. Если доступное по умолчанию число колонок вас не устраивает, выберите пункт “Другие столбцы” (или “Другие колонки”, в зависимости от используемой версии MS Word).

4. В разделе “Применить” выберите необходимый пункт: “К выделенному тексту” или “До конца документа”, если вы хотите разделить на заданное число колонок весь документ.

5. Выделенный вами фрагмент текста, страница или страницы будут разбиты на заданное количество колонок, после чего вы сможете писать текст в столбик.

Если вам нужно добавить вертикальную линию, наглядно разделяющую колонки, снова кликните по кнопке “Колонки” (группа “Макет”) и выберите пункт “Другие столбцы”. Установите галочку напротив пункта “Разделитель”. К слову, в этом же окне вы можете выполнить необходимые настройки, задав ширину колонок, а также указав расстояние между ними.


Если вы хотите изменить разметку в следующих частях (разделах) документа, с которым работаете, выделите необходимый фрагмент текста или страницы, а затем повторите вышеописанные действия. Таким образом вы можете, к примеру, сделать на одной странице в Ворде две колонки, на следующей — три, а затем снова перейти к двум.
Урок: Как в Ворде сделать альбомную ориентацию страницы
Как отменить разбиение документа на колонки?
Если вам нужно убрать добавленные колонки, выполните действия, описанные ниже:
1. Выделите фрагмент текста или страницы документа, на которых нужно убрать колонки.
2. Перейдите во вкладку “Макет” (“Разметка страницы”) и нажмите кнопку “Колонки” (группа “Параметры страницы”).

3. В развернувшемся меню выберите пункт “Одна”.

4. Разбиение на колонки исчезнет, документ обретет привычный вид.

Как вы понимаете, колонки в документе могут понадобиться по многим причинам, одна из них — создание рекламного буклета или брошюры. Подробная инструкция касательно того, как это сделать, есть на нашем сайте.
Урок: Как в Word сделать буклет
На этом, собственно, и все. В этой небольшой статье мы рассказали о том, как сделать колонки в Ворде. Надеемся, что этот материал окажется полезным для вас.
Мы рады, что смогли помочь Вам в решении проблемы.
Задайте свой вопрос в комментариях, подробно расписав суть проблемы. Наши специалисты постараются ответить максимально быстро.
Помогла ли вам эта статья?
Да Нет
When working on MS Word, you can create columns of your text like how it is in brochures. There are two ways to make columns in MS Word. You can either choose a format which already has columns created format. Or, you can make the columns yourself.
The feature of selecting the format type is not available in all MS Word, but you don’t worry about that because even if you can’t select that format, there is something which will help you make columns within your text.
Making Columns By Selecting a Format That Has Columns
When you select a format that shows columns, you can start writing in columns in that document. Like how I selected the brochure format, I was asked to download it. You can download it and start writing your text.
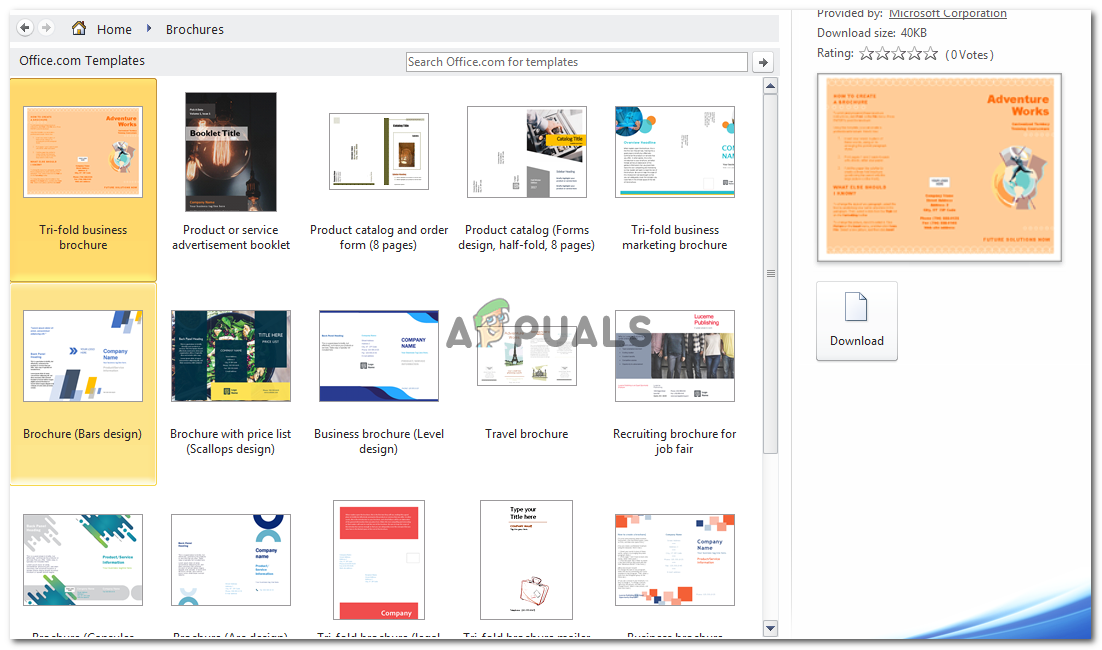
This is how the columns for your Word page now will appear. You can delete the already existing text and replace it with whatever you have to write.
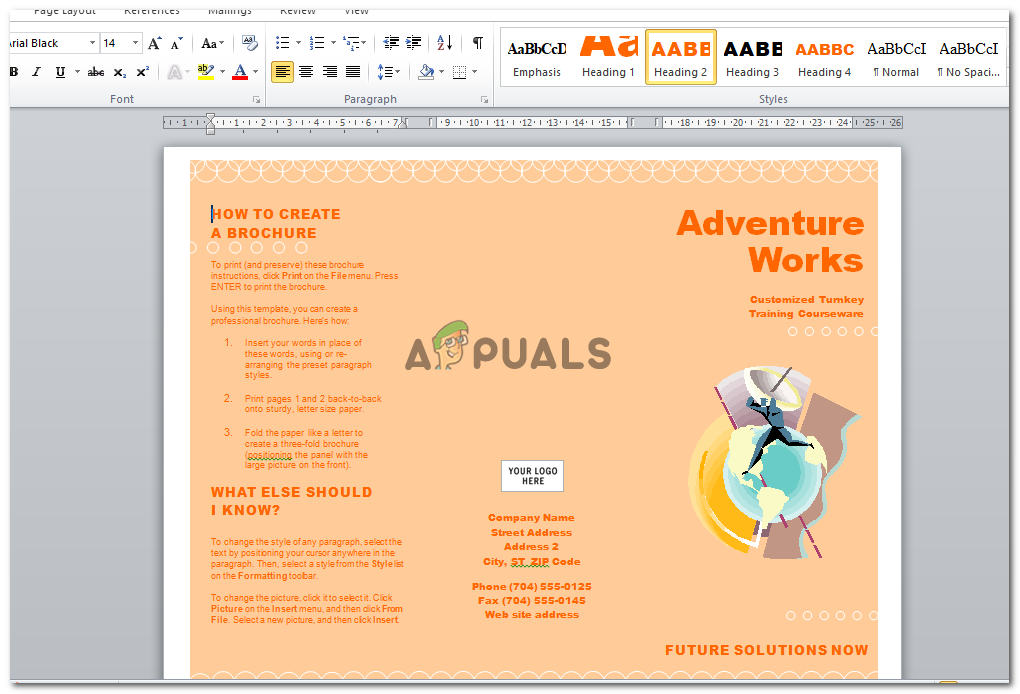
I deleted the text from the format, and wrote something of my own just to show how the columns will now appear. You can keep the background from the format if you like or create something of your own. It is totally up to you.

Columns are used usually when you have to make a brochure, or have to make a magazine oriented project or assignment for college. You can use this way of making columns. The format divides the page into three columns. If you don’t want three columns and want two instead, here is what you can do. This is the second method of creating columns for a Word document.
Making Columns by Using ‘Columns’ in ‘Page Layout’
If you want to reduce the number of columns in the previous example, or want to create columns in a normal page format, here is what you need to do.
Select the whole text.
Locate Page Layout on the tool bar right above. It is next to the Insert option. Click on that And you will be directed to more options for your document.
Click on ‘Columns’ and choose the number of columns you want in your document. You can have up to three columns in your Word file which is the suggested number by professionals. According to the options presented, you can also format your columns positioning. Whether you want one column to be bigger than the other one, or you want both of them to be of equal size.
The option for ‘More Columns’ allows you to make more than 3 columns. This means you can make as many columns as you like.
Clicking on ‘more columns’ gives you these options. I chose 5 columns for my word document.
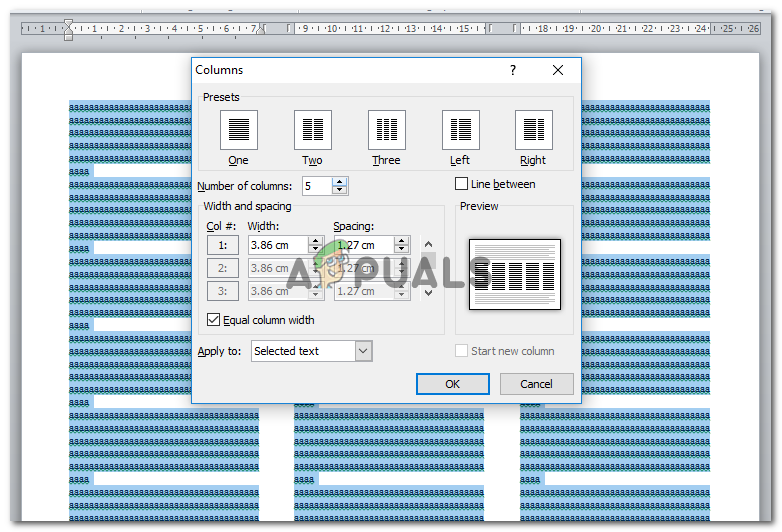
And this is how my work appeared once the 5 columns were created.
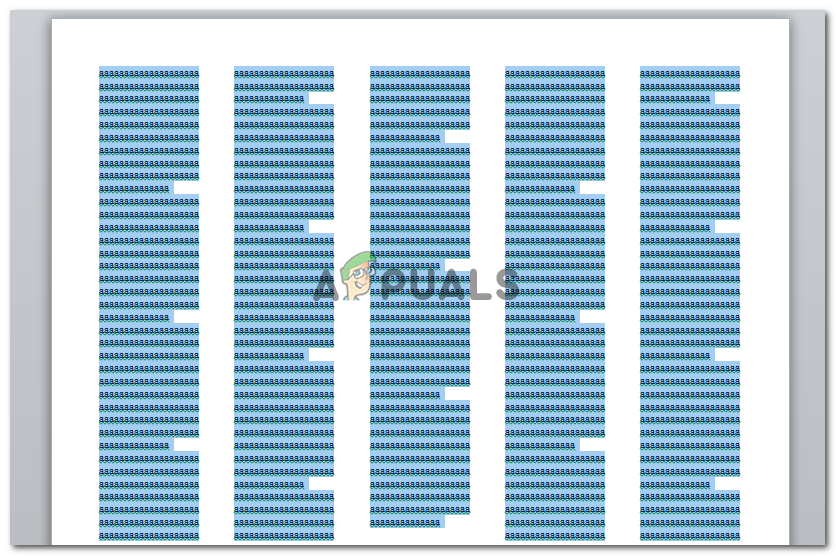
Looks a bit too clustered doesn’t it? Well that also depends on the size of your paper. If you are working on an A4 size sheet, 5 columns might make your work look super clustered. But, if you are working on a larger scale, your work might look different.
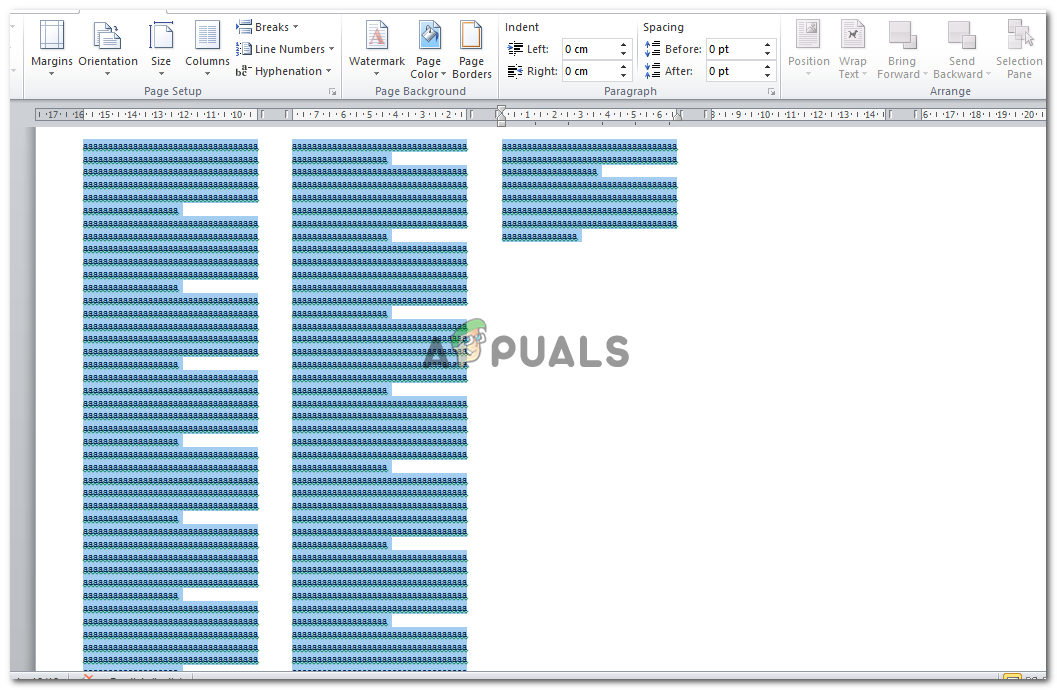
I changed my page size from A4 to A3, and this is how my columns changed in appearance.
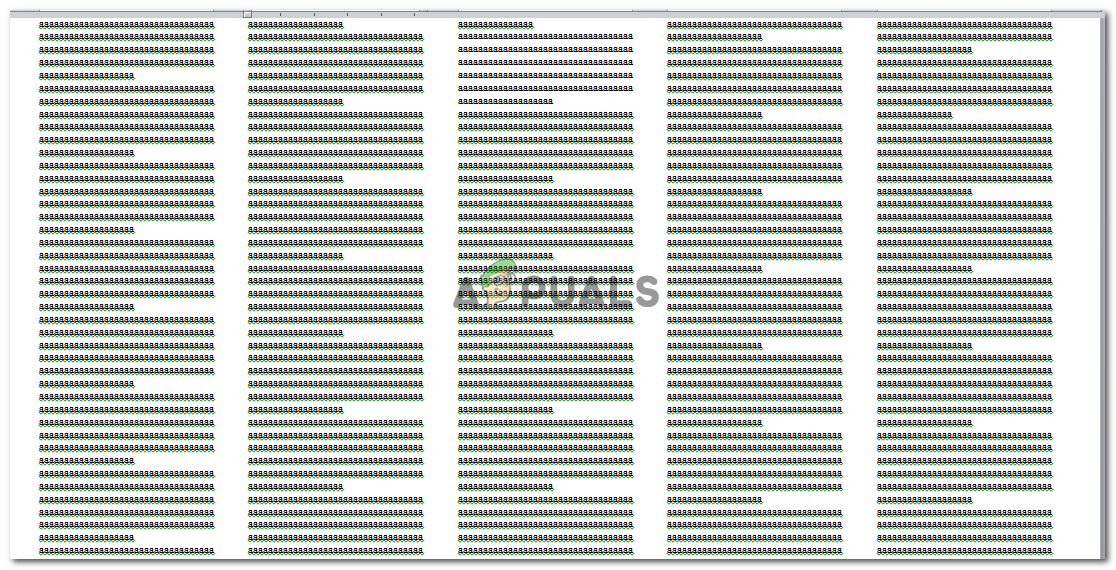
If you add more text to this, your page will look something like this.
You can add lines between your columns, you can create columns at a specific point on your page if you don’t want the whole page to be in columns, and you can also change the width and length of each column according to your requirements. All these options are present when you click ‘More Columns’ under ‘Columns’.

Habiba Rehman
Major love for reading, but writing is what keeps me going. Dream to publish my own novels someday.

Microsoft Word allows you to add one, two, or three columns to your documents. It offers various types of columns as well as custom column breaks you can make. We’ll show you how to do that.
RELATED: How to Remove Section and Page Breaks in Microsoft Word
Create Columns in a New Word Document
To make columns in a new Word document, first, open Microsoft Word on your computer and start a new document.
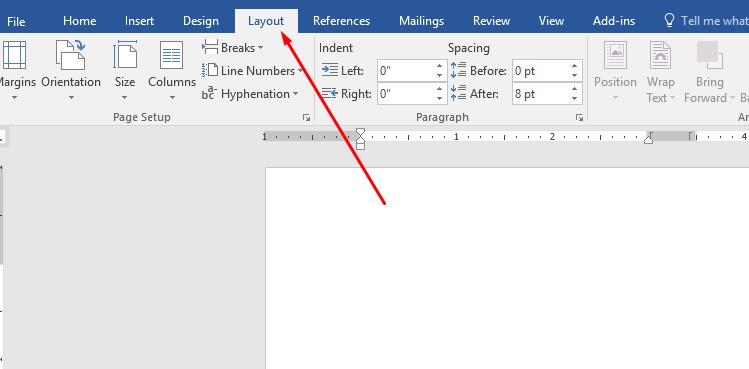
When the document editing screen opens, then in Word’s ribbon at the top, click the “Layout” tab.

On the “Layout” tab, in the “Page Setup” section, click “Columns.”
The “Columns” menu displays various column types you can add to your document. Each column type has a preview beside it, so you know how that column will look in your document.
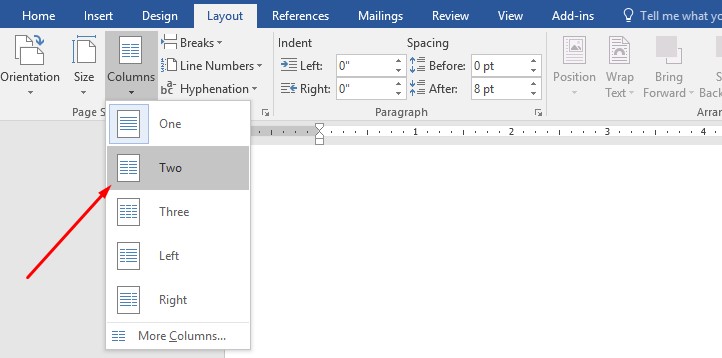
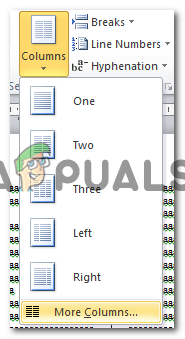
The available column types are:
- One: This keeps only one column in your document, which equates to not adding any columns at all.
- Two: Select this option to add two equal-sized columns to your document.
- Three: This option adds three columns to your document.
- Left: This adds one column to the left of your document.
- Right: This adds one column to the right of your document.
When you have added a column in your document, start typing and your text will be formatted in the column style.
That’s it. You now have columns similar to newspapers or magazines.
Columns in Word use a set width by default, however, you can adjust this width to your liking. That way your columns appear in the exact size you want.
RELATED: How To Adjust Column Size in Microsoft Word
Add Columns With Existing Text in a Word Document
Word allows you to insert columns into an existing document, too. In this method, you can add a column only to your selected text.
To do that, first, open your document with Microsoft Word. In the document, select the text you want to turn into columns.
While the text is selected, in Word’s ribbon at the top, click the “Layout” tab.
In the “Layout” tab, click “Columns.”
From the “Columns” menu, select the type of column you’d like to add to your text.
And instantly, Word will put the selected text into your chosen column type.
Tip: To reverse your action and remove your columns, press Ctrl+Z on Windows or Command+Z on Mac.
You’re all set.
Are you looking to add a column to a table in your Microsoft Word document? If so, it’s equally easy to do that.
RELATED: How to Quickly Add Rows and Columns to a Table in Microsoft Word
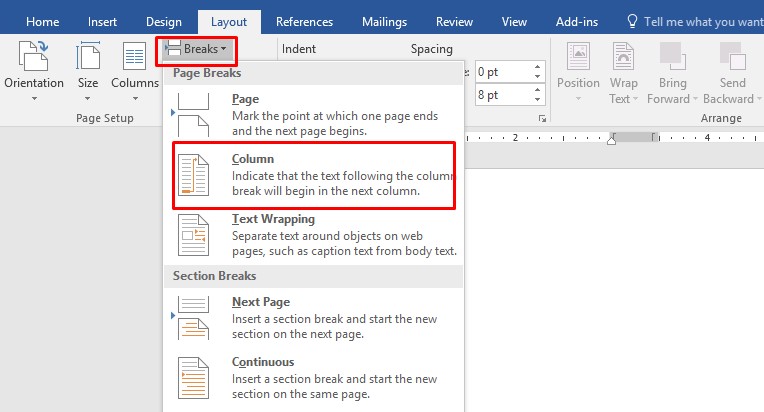
Insert Column Breaks in a Word Document
With a custom column break in your document, you get to specify where the new column starts. This allows you to arrange your text in your columns.
To add a custom column break, place your cursor where you want the new column to start in your document. Anything after the cursor will appear in the new column.
In Word’s ribbon at the top, click the “Layout” tab.
In the “Layout” tab, click “Breaks.”
From the “Breaks” menu, choose “Column.”
Word has now placed the text after your cursor in a new column.
And that’s how you change the layout of your traditional documents to the newspaper and magazine-like styles in Word. Very useful!
If you use Google Docs, you can add columns to your Docs documents, too.
RELATED: How to Create Multiple Columns in Google Docs
READ NEXT
- › 8 Microsoft Word Tips for Professional Looking Documents
- › How to Adjust and Change Discord Fonts
- › BLUETTI Slashed Hundreds off Its Best Power Stations for Easter Sale
- › HoloLens Now Has Windows 11 and Incredible 3D Ink Features
- › The New NVIDIA GeForce RTX 4070 Is Like an RTX 3080 for $599
- › This New Google TV Streaming Device Costs Just $20
- › Google Chrome Is Getting Faster