
We recently looked at how to insert images into shapes in Microsoft Word. Today, we are going to insert text into shapes in Microsoft Word. First, we will insert text using the shape’s built-in text option. Then, we will use WordArt to place text over the shape, which will create the appearance of text inserted into the shape.
Table of Contents
- How to Insert Text into Shapes (Built-In Method)
- How to Use WordArt to Insert Text into Shapes
Watch all the steps shown here in real time!
Explore more than 200 writing-related software tutorials on my YouTube channel.
The images below are from Word for Microsoft 365. These steps also apply to Word for Microsoft 365 for Mac (a.k.a., Word for Mac), Word 2021, Word 2019, Word 2016, and Word 2013 (PC only). These steps don’t apply to Word for the web.
Important Note: This tutorial assumes you have already created your shape. For information about creating shapes, please see “How to Insert and Modify Shapes in Microsoft Word (PC & Mac).”
How to Insert Text into Shapes (Built-In Method)
- Right-click (PC) or Control-click (Mac) the shape and then select Add Text from the shortcut menu.

- Your cursor will be placed in the center of the shape where you can type your text.

How to Modify the Font
- Select the Home tab.

- Select the text and use the font options in the Font group to adjust the (A) font style, (B) size, and (C) color. You can also add (D) text effects and typography (e.g., drop shadows, reflections, ligatures).

How to Modify the Text Position
- Select the Shape Format tab. (Note that this tab only appears when a shape or the text within a shape is selected.

- Select the dialog box launcher in the WordArt Styles group on a PC (see figure 6) or the Format Pane button on a Mac (see figure 7).


- Select the Text Options tab in the Format Shape pane. (PC users should already be in this tab.)

- Select the Layout & Properties button.

- Use the alignment and margin options to adjust the text’s position in the shape. (Note that these position changes are limited. Use the WordArt method shown below for additional placement control.)

- Select the X to close the Format Shape pane.

Pro Tip: Using this method, you can insert text and an image into the same shape. In addition, the order of insertion doesn’t matter; the text will always appear on the top.
If you are going to insert an image into the shape, I recommend doing so before starting this process.
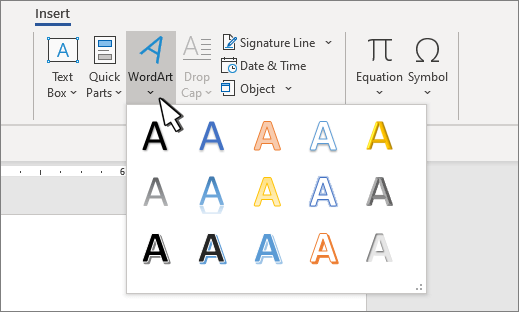
- Select the Insert tab.

- Select WordArt in the Text group.

- Select a style from the drop-down menu. (This style can be modified later.)

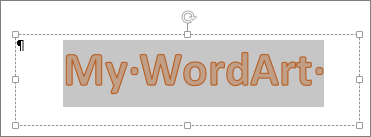
A WordArt text box will appear.

- Type your text into the text box, drag the text box over the shape, and then use the resizing handles to place it over the shape in the desired position.

Pro Tip: Use the Rotation handle at the top of the text box to rotate the text as desired.

How to Modify the Font
- Select the Home tab (see figure 3).
- Select the text and use the font options in the Font group to adjust the font style, size, and color. You can also add text effects and typography (see figure 4).
How to Group the Text and Shape
- Select the WordArt text box and then press and hold the Shift key as you select the shape. Now the text box and the shape should both be selected.

- Right-click (PC) or Control-click (Mac) the text box or shape, and then select Group from the shortcut menu.

- Select Group from the submenu. (If you need to separate the text and shape later, select Ungroup.)

Your shape and text can now be moved throughout your document as one object.
Related Resources
How to Insert and Modify Images in Microsoft Word
How to Save Shapes and Objects as Images in PowerPoint
How to Change the Font, Font Size, and Font Color in Microsoft Word
How to insert Text into a Shape in Word
- Open Word document.
- Insert Shape.
- Right-click and click Add text.
- Type or paste the text into the shape.
- Click outside the shape.
- Save document and exit.
Contents
- 1 Can you type inside a shape in Word?
- 2 How do I make text into a shape in Word?
- 3 How do I write text in a circle in Word?
- 4 How do I turn a text into a shape?
- 5 How do you distort an envelope?
- 6 What is a single path or mesh?
- 7 How do you turn a smart object into a shape?
- 8 How do I make curved text?
- 9 How do you type in strange letters?
- 10 How do you distort the top object of an envelope?
- 11 What is envelope distortion?
- 12 How do I make one path in Illustrator?
- 13 Which tool allows you to make a selection by drawing a freehand shape?
- 14 What does smart object must be rasterized mean?
Can you type inside a shape in Word?
Right-click anywhere in your shape and click the “Add Text” command. This places an insertion point in the shape where you can type your text. Once you’ve added whatever you want to write, the “Format” tab has tools you can use to give your text a little pop with things like text styles and shading.
How do I make text into a shape in Word?
To change the text box shape:
- Select the text box you want to change. The Format tab will appear.
- From the Format tab, click the Edit Shape command.
- Hover the mouse over Change Shape, then select the desired shape from the menu that appears.
- The text box will appear formatted as the shape.
How do I write text in a circle in Word?
To journal within a circle:
- Open up MS Word.
- Click on the Oval shape. Click and drag on your page to make the desired size.
- Double click on the shape.
- Click OK.
- Click on the Text Box.
- Click on the Text Box again.
- Click OK.
- Click on the Text Box and drag it over the circle shape so that it is right over it.
How do I turn a text into a shape?
To convert text into a shape, right-click on the text layer, and choose “Convert To Shape”. Then select the Direct Selection tool (the white arrow tool) by pressing Shift A and click-and-drag the points in the path to give the characters a new shape.
How do you distort an envelope?
Select the text or object that you want to distort and then choose Object→Envelope Distort→Make with Warp. The Warp Options dialog box appears. Choose a warp style from the Style drop-down list and then specify any other options you want. Click OK to apply the distortion.
What is a single path or mesh?
A single path, by definition is a path that does not contain multiple paths. (
How do you turn a smart object into a shape?
You cannot convert a Smart Object to a Shape Layer. The best option is to double-click the Smart Object, which should open it up in Illustrator, then copy it. Jump back to Photoshop and paste it, choosing Shape Layer when the options pop up. Then delete the Smart Object if desired.
How do I make curved text?
Create curved or circular WordArt
- Go to Insert > WordArt.
- Pick the WordArt style you want.
- Type your text.
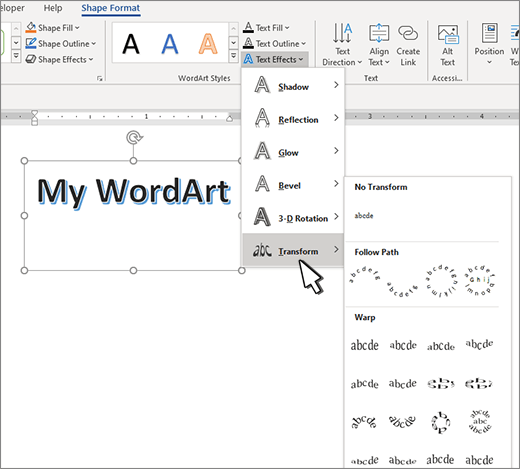
- Select the WordArt.
- Go to Shape Format > Text Effects > Transform and pick the effect you want.
How do you type in strange letters?
The quickest way to enter one quick special character or letter with an accent is with a trick that has been around for a long time. To use it, you hold down the “Alt” key, type a four-digit number starting with zero on the number pad (not on the number keys above the letters), and then let go of the “Alt” key.
How do you distort the top object of an envelope?
To use an object as the shape of the envelope, make sure the object is at the top of the stacking order for the selected object. If it’s not, use the Layers panel or an Arrange command to move it up, and reselect all the objects. Then choose Object > Envelope Distort > Make With Top Object.
What is envelope distortion?
envelope delay distortion: Signal distortion that results when the rate of change of phase shift with frequency over the necessary bandwidth of the signal is not constant.
How do I make one path in Illustrator?
Next, you will join the two paths to create a single closed path.
- Select the Selection tool ( ) in the Tools panel.
- Choose Object > Path > Join.
- Choose Object > Path > Join once more.
- Choose Select > Deselect to see the closed path.
- Choose View > Preview.
Which tool allows you to make a selection by drawing a freehand shape?
Lasso Tools The lasso tool
Lasso Tools
The lasso tool is another selection tool that allows more fine control over the selection area than the basic oval and square marquee shapes. By clicking down and dragging, the lasso tool allows you by freehand to draw the selection line.
What does smart object must be rasterized mean?
You cannot directly edit a smart object. Being “Rasterized” means that it becomes an editable collection of pixels.

Microsoft Word makes it easy to add geometric shapes (and a whole lot more) to your document. You can also add text into these shapes, which is handy when you’re creating flowcharts, network diagrams, mind maps, and so on. This being Word, there are plenty of options for doing this, so let’s take a look.
First, you’ll need to insert a shape by going to Insert > Shapes. We’re going to use a nice rounded rectangle, which by default will be filled in with blue.

Right-click anywhere in your shape and click the “Add Text” command.
This places an insertion point in the shape where you can type your text. Once you’ve added whatever you want to write, the “Format” tab has tools you can use to give your text a little pop with things like text styles and shading.
You can also select the text and use the standard Font, Paragraph and Styles tools on the Home tab to format your text, just as if it were a normal part of the document. When you right click your text, you’ll find the usual quick options as well.
RELATED: How to Position Images and Other Objects in Microsoft Word
If you’d like a little more control over the placement and boundaries of your text, you can add a text box inside your shape instead. When you insert a new image or select an existing image, Word automatically switches you to the “Format” tab. You’ll see two ways here to insert a text box, both of which add a text box in the same way.
Select one of the options and move the cursor over your image. A yellow “+” mark will replace your pointer. Hold down the left mouse button and drag the “+” mark to create a text box. When the box looks about right, release the left click (don’t worry if the text box isn’t exactly the right size or location, you can change it afterward), and your text box will be created.
You can use the handles (the little squares) around the text box to resize it or select the whole text box to move it around within your shape. Add your text and format it in whatever way you want.
There are also text boxes with preset formatting that you can add by selecting your shape and then clicking Insert > Text Box. We’ve only scratched the surface of what you can do with text boxes here, so if you want to know more check out our guide to text boxes and all the things you can do with them.
RELATED: How to Create and Format a Text Box in Microsoft Word
READ NEXT
- › How to Circle Text in Microsoft Word
- › How to Link Text Boxes in Microsoft Word
- › How to Remove Borders in Microsoft Word
- › The New NVIDIA GeForce RTX 4070 Is Like an RTX 3080 for $599
- › HoloLens Now Has Windows 11 and Incredible 3D Ink Features
- › This New Google TV Streaming Device Costs Just $20
- › Google Chrome Is Getting Faster
- › BLUETTI Slashed Hundreds off Its Best Power Stations for Easter Sale
How-To Geek is where you turn when you want experts to explain technology. Since we launched in 2006, our articles have been read billions of times. Want to know more?
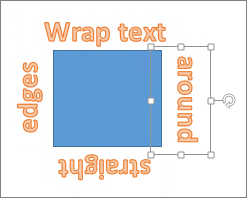
You can use WordArt with a Transform text effect to curve or bend text around a shape. If you want the text to circle the shape, you can also do this, but it’s a little bit more work. You can also insert WordArt multiple times to wrap text around shapes with straight edges.

-
Go to Insert > WordArt, and pick the WordArt style you want.

Note: The WordArt icon is located in the Text group, and it may appear different depending on the version you’re using and the size of your screen. The icon may also look like this
or . -
Replace the WordArt placeholder text with your own text.
-
Select your WordArt text.
-
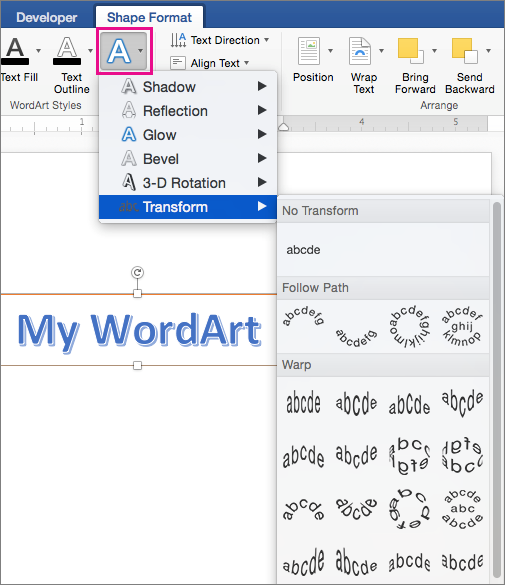
Go to Shape Format or Drawing Tools Format, select Text Effects >Transform and pick the look you want.
 or
or  .
.
Note: Depending on your screen size, you might only see the icons for WordArt Styles.

Advanced techniques
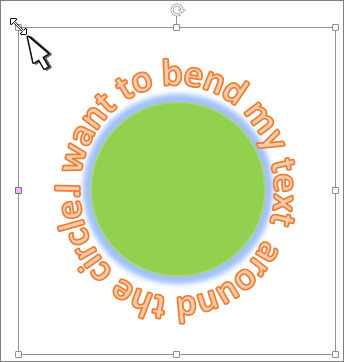
Wrap around a circle To create text that completely circles your shape, choose Circle under Follow Path, and then drag any of the sizing handles until your WordArt is the size and shape you want.
Wrap around straight edges To wrap text around a shape that has straight edges, such as a rectangle, insert WordArt objects for each edge. In this example, WordArt is inserted four times, one for each side of the shape.
Group moves and copy To move or copy multiple WordArt objects as a single shape, see Group or ungroup shapes, pictures, or other objects .
Precise angle control You can control the angle of your WordArt text in relation to your shape with precision by using the Rotate tool.
If you need very precise control or are creating a complex combination of shapes and text, you’ll want to use a third-party drawing or graphics program to create the text around your shape and then copy and paste it into your Office document.
See Also
Add shapes
Insert WordArt
Create curved or circular WordArt
-
Go to Insert > WordArt.
-
Pick the WordArt style you want.
-
Type your text.
-
Select the WordArt.
-
Go to Shape Format > Text Effects > Transform and pick the effect you want.


Advanced techniques
Wrap around a circle To create text that completely circles your shape, choose Circle under Follow Path, and then drag any of the sizing handles until your WordArt is the size and shape you want.
Wrap around straight edges To wrap text around a shape that has straight edges, such as a rectangle, insert WordArt objects for each edge. In this example, WordArt is inserted four times, one for each side of the shape.
Group moves and copy To move or copy multiple WordArt objects as a single shape, see Group or ungroup shapes, pictures, or other objects .
Precise angle control You can control the angle of your WordArt text in relation to your shape with precision by using the Rotate tool.
If you need very precise control or are creating a complex combination of shapes and text, you’ll want to use a third-party drawing or graphics program to create the text around your shape and then copy and paste it into your Office document.
In Word for the web you can see WordArt that’s already in your document, but to add more WordArt you need to open or edit the doc in the desktop version of Word.
You can use the Font features on the Home tab to change the font color and size, and apply bolding, italics, or underlines to your text.
Add text to an AutoShape
- On the Insert tab, in the Illustrations group, click Shapes, and then click the shape that you want.
- Drag to create the shape.
- The shape is automatically selected.
- On the Drawing Tools tab, in the Insert Shapes group, click Edit Text.
- Type the text that you want.
How do I make my font curve?
Create curved or circular WordArt
- Go to Insert > WordArt.
- Pick the WordArt style you want.
- Type your text.
- Select the WordArt.
- Go to Shape Format > Text Effects > Transform and pick the effect you want.
How do I draw a circle in Word 2010?
Draw an oval or circle On the Insert tab, click Shapes. Under Basic Shapes, click Oval. Click where you want the oval to start, and drag to draw the shape. To draw a circle, press Shift while you drag.
How do I curve an image in Word?
Follow these steps:
- Click the photo to select it.
- Under Picture Tools, click the Format tab.
- In the Picture Styles group, point to the Drop Shadow style, which is the fourth style in the first row.
- After you see a preview of the style, click to apply the style.
- Under Picture Styles, click Picture Effects.
How do you curve a sentence in Word?
Choose the Word Art option, then click the text icon that looks the way you want your curved text to look. Click the Drawing Tools Format tab at the top of the window. Choose the Text Effects option, click Transform, then click a curve type from the options on the menu. Adjust the layout options for your curved text.
How do I mirror text in Word?
Use a text box
- Right-click the text box and choose Format Shape.
- Choose 3-D Rotation in the left pane.
- Change the X setting to 180.
- Click OK, and Word flips the text in the text box, producing a mirror image. You can create an upside-down mirror image by changing the Y setting to 180.
How do you use WordArt in Word?
Add WordArt
- On the Insert tab, in the Text group, click WordArt, and then click the WordArt style that you want.
- Type your text in the Text box. You can add a fill or effect to a shape or text box as well as the text in the WordArt.
What is the easiest wood to bend?
Bending qualities of various hardwoods were tested by the U.S. Forest Service and the results show that white oak, hackberry and red oak were ranked as the best woods for steam bending, while soft maple, yellow-poplar and hard maple were ranked as the least compatible with the steam bending process.
Does soaking wood make it easier to bend?
Steaming or soaking the wood in boiling water to soften it. 2. Saw-kerfing or grooving the back of the wood so it will bend easily without danger of splitting or cracking. Depending on the thickness of the wood, this should be kept up for anywhere from one to three hours to make the wood fully pliable.
What is the easiest way to bend wood?
Steps
- Set up your steam box. The steam box can be a wooden box that you construct to hold the wood to be bent, or it can be a piece of PVC or other kind of pipe.
- Set up your form.
- Steam the wood.
- After appropriate time, remove wood from box and place steamed wood in the form.
How long do you soak wood to bend it?
How long do you have to soak wood to bend it? If all you are doing is soaking it, then you need to penetrate all the way through the wood. This will change depending on thickness, however, 24 hours is usually pretty good.
How long do you need to steam wood to bend it?
about one hour
Can you steam bend ash?
With a simple steaming rig and the appropriate bending jig, you can easily bend ash. Air-dried ash that has retained some moisture will be easier to bend than kiln-dried wood. Ash is a hard wood that has been frequently used for curved elements because it bends easily when steamed.
Can you steam bend a 2×4?
Bending something the thickness of a 2×4 can be done, but it is very hard to do. It takes a long time and a lot of pressure and much steam. Also, probably, it will have to be bent several times to get the curve you want depending on the radius of curve required. Build a bending table.
How do you bend plywood without breaking it?
Apply towels or rags saturated with warm water to the crease line and the parts of the plywood that will be under stress. If possible, apply the rags on both sides of the sheet. It could take several days for the plywood to become soft enough to bend.
What wood is good for steam bending?
Popular hardwoods are oak, maple, cherry, birch, walnut, ash and poplar. Common softwoods are pine, fir, spruce, hemlock, cedar and redwood. A steel mold that is placed on the back of the wood while heat bending can help ensure that all the bends and curves are done to the requirements of the project being made.
Can you steam bend maple?
Bending Hard Maple How well suited to steaming and bending for use in chair parts is hard maple.
Can you steam bend teak?
No can do. Only certain woods, such as oak, are suitable for steaming, and then only before being dried. Teak is dried by girdling the tree while alive and standing, so that it dries in the forest. It is then cut and hauled, being lighter when dry.
Can you steam bend Hickory?
Hickory is a hardwood that lends itself well to steam-bending. Steam-bending exposes a stick of wood to steam for a period of time to make it pliable enough to bend without cracking or snapping in two. Therefore, steam-bending is a good technique for making handles for walking canes.
Can you steam bend red oak?
(Red) oak is supposed to be very easy to steam bend. But I’d discourage you to heat/steam bend your first bow. It’s hard enough to get a decent tiller and keep the bow in one piece! Adding another factor of complexity with recurving is for later on when you have more experience with straight bows.
Can you steam bend walnut?
To get the beautiful tones walnut is known for, be sure that you are getting walnut that has not been steamed prior to drying. By using steam, you can bend walnut at will without losing its integrity.
How thick of wood can you steam bend?
The general rule for steam bending wood is 1 hour for every 1 in (2.5 cm) of thickness of the piece of wood that you are processing, but since all woods are different the time can vary. If you don’t steam the wood for long enough, then it will snap when you try to bend it.
What is the most bendable wood?
Oak
Use the WordArt feature to bend and shape words
Updated on February 6, 2021
What to Know
- Use Transform in Text Effects to curve text as you wish.
- Text Effects is part of Microsoft Word’s Word Art Feature.
This article demonstrates how to bend words into an arch or around a shape or image in Word for Microsoft 365, Word 2019, Word 2016, Word 2013, and Word for Mac 2016 and 2011.
How to Curve Text With WordArt
Microsoft Word uses the WordArt feature to curve text:
-
Open a Word document and select Insert > WordArt.
You can also select the WordArt icon from the toolbar. It looks like a capital letter A. However, the icon’s appearance and location vary depending on the version and platform.
-
In the WordArt menu, choose the WordArt style you want. Placeholder text appears in the document. Type your text over the placeholder text.
-
Select the text to display the Drawing Tools tab.
-
Go to either the WordArt Styles or Text Styles group, then select Text Effects, which is represented by a blue and white letter A.
In Word 2016, Text Effects displays when you hover the mouse cursor over it. In earlier versions, it’s clearly labeled.
-
Select Transform.
-
From the submenu, choose from a variety of effects, including curved and bent text. Select an option to apply it to the text.
How to Undo Curved Text
To remove a curved or bent text effect without deleting your text:
-
Select the curved or bent text you want to modify.
-
Select Text Effects.
-
Select Transform > No Transform. The curved or bent text transformation effect is removed.
Thanks for letting us know!
Get the Latest Tech News Delivered Every Day
Subscribe
Add text to a shape
Click Insert > Draw Text Box .
Draw a text box close to the shape.
Click inside the text box, and start typing.
Just so, How do I insert text into a shape in Word?
To insert Text into a Shape in Word, follow these steps:
- Open Word document.
- Insert Shape.
- Right-click and click Add text.
- Type or paste the text into the shape.
- Click outside the shape.
- Save document and exit.
Besides, How do I align text in a shape in Word? Right-click the border of the shape or text box. On the shortcut menu, click Format Shape , and then click Text Box in the left pane. Under Text layout , select the option that you want in the Vertical alignment list.
How do I write text in a circle in Word?
Curve text around a circle or other shape
- Go to Insert > WordArt, and pick the WordArt style you want. …
- Replace the WordArt placeholder text with your own text.
- Select your WordArt text.
- Go to Shape Format or Drawing Tools Format, select Text Effects >Transform and pick the look you want.
Subsequently, Can you curve text in Word? With your text highlighted, click on the “Format” tab in the toolbar. Click the “Text Effects” button. Place your cursor over “Transform.” In the fourth row of the “Warp” section, choose between the “Curve: Up” or the “Curve: Down” option.
How do I fix text in Word?
Method 5: Force Word to try to repair a file
In Word, select File on the Ribbon, and then select Open. In the Open dialog box, click once to highlight your Word document. Select the arrow on the Open button, and then select Open and Repair.
How do you curve text in design space?
Curving Text in Design Space
- Click the Text tool in the Design panel to the left of the Canvas.
- Enter text into the text box, choose your font and font style, and use the Letter Space tool to adjust letter spacing as needed. …
- Click on the Curve tool. …
- Drag the slider to the right to curve the text downward.
How do I curve text in Word without word art?
How to Curve Text in Microsoft Word Without WordArt
- Step 1: Click the Insert tab.
- Step 2: Click the Text Box button and choose your text box type. …
- Step 3: Enter the text into the text box.
- Step 4: Right-click the text box and choose Format Shape.
How do I group a text box and shape in Word?
Group shapes, pictures, or objects
- Press and hold CTRL while you select the shapes, pictures, or objects that you want to group. The Wrap Text option for each object must be other than In line with Text. …
- Go to Drawing Tools or Picture Tools, on the Format tab, in the Arrange group, select Group. , and then select Group.
Why is my text not justifying in Word?
Microsoft Word will not normally justify a single line of text because the command is designed to justify all but the last line of a paragraph. However, you may justify a single line of text as follows: With your cursor in the paragraph or line that you want to justify, press Ctrl-j ( Cmd-j on a Macintosh).
How do I fix text paragraph not justifying problem in Word?
Step 1: Open the desired MS Word document, select the Paragraph you want to justify, then click on the Find option on the upper right corner of the document, and select Advanced Find. Step 2: In the Advanced Find prompt, click on the Replace Tab. In the Find box, enter ^p and click on Replace All.
How do I fix the illegible text symbol in Word?
Go to “File” -> “Options” -> “Advanced” and scroll down until the “General” section is reached. In the “General” section, check the box that says “Confirm file format conversion on open.” Exit Word, and reopen the corrupt document again. The dialogue box will appear.
How do I add text to a shape in Cricut Design space?
Drag the corner of your shape layer to make the shape a bit larger to work with. Move your shape to the front or back, whichever is easier for you to work with. Drag your Text to fill out your Shape. On the Text image, click the Unlock button so you can drag and alter the text.
How do you manipulate text in Cricut Design space?
To edit your text, simply double-click or double-tap on the text. The text box will open. Options to change the font, font style, font size, letter spacing, line spacing, etc.
Can you wrap text in Cricut Design space?
Curving or wrapping text around an object in Cricut Design Space. This tutorial teaches how to shape, wrap, or curve text around an image or object in Cricut Design Space. This can be done directly in Design Space without u…
How do you make shapes stay together in Word?
Regroup pictures, shapes, or other objects
- To regroup shapes and objects, on the Drawing Tools Format tab, click Group > Regroup.
- To regroup pictures, on the Picture Tools Format tab, click Group > Regroup.
How do you overlap shapes in Word?
Select the shapes you want to merge: press and hold the Shift key while you select each shape in turn. (If you don’t select any shapes, then the Merge Shapes button in step 2 will be grayed out.) On the Drawing Tools Format tab, in the Insert Shapes group, select Merge Shapes, and then pick the option you want.
Which type of shape allows you to add text that can be moved around formatted with style and effects?
Text boxes can be useful for drawing attention to specific text. They can also be helpful when you need to move text around in your document. Word allows you to format text boxes and the text within them with a variety of styles and effects. Optional: Download our practice document.
How do you justify text without big spaces in Word 2019?
Method 1: Change Layout Options
- First, click “File” then click “Options” to open “Word Options” dialog box.
- Next click “Advanced” and scroll down to the bottom of the box.
- Click “Layout Options” to bring out more choices.
- Check the “Don’t expand character spaces on a line that ends with SHIFT-RETURN” box and click “OK”.
How do I make text fully justified in Word?
To give your paragraph full justification, press Ctrl+J or click the Justify command button. Fully-justified paragraph formatting is often used in newspapers and magazines, which makes the narrow columns of text easier to read.
How do you make justified text look good in Word?
Right-click on the text, and click Paragraph. On the Indents and Spacing tab, click the drop-down next to Alignment, and click Justified, OK.
What is justify text in Word?
When you justify text, space is added between words so that both edges of each line are aligned with both margins. The last line in the paragraph is aligned left. Click anywhere in the paragraph that you want to justify.
- Reference 1
- Reference 2
- Reference 3
- Reference 4
- Reference 5