

on
May 30, 2006, 12:00 AM PDT
Create a survey form in Word
One of the best ways to gauge user responses and collect data is with a survey. In this Word tip, Mary Ann Richardson explains how to create a customized survey form, step by step.
Word allows you to create forms, which you then can use for
online data entry, to publish on the Web, or to print. Let’s say you would like
to create an evaluation form for your upcoming seminar. You want to include a
number of questions that your attendees can answer online or on the printed
form by selecting check boxes. Follow these steps:
- Open a
blank Word document. - Enter
your first survey question, for example:
I would recommend this seminar to a
colleague. - Right-click
a blank area of the Standard or Formatting toolbar and select Forms. - Position
the cursor on the next line where you want the first check mark to appear. - Click
the Check Box Form Field button on the Forms toolbar and type Strongly
Agree. - On the
next line, click the Check Box Form Field button and type Agree. - On the
next line, click the Check Box Form Field button and type Disagree. - On the
next line, click the Check Box Form Field button and type Strongly
Disagree. - On the
next line, click the Check Box Form Field button and type Does Not Apply.
Follow this procedure for all the questions on your form.
When you have completed the form, follow these steps:
- Click
the Protect Form button. - Go to
File | Save As and enter Survey Form in the Filename text box. - Select
Document Template in the Save As Type: text box. - Click
the Save button.
To open the survey in Word 2003, open the New Document Task
Pane and select On my computer… under Templates. (For
Word 2002, open the New Document Task Pane and select General templates… under
New from template.) On the General tab, select Survey Form, and click OK. The
user can save or print the survey as with any other document.
Miss a tip?
Check out the Microsoft Word archive, and catch up on our most recent Word tips.
Help users increase productivity by automatically signing up for TechRepublic’s free Microsoft Office Suite newsletter, featuring Word, Excel, and Access tips, delivered each Wednesday.
-
Software
Did you know that you can actually create surveys and interactive forms with just your regular MS Word application? Yes, we do know that Word documents don’t technically need these elements since it is “editable” when opened by another user (as long as they have a Word Processor). However, these are useful for instances where users want to add encryption to questions and content. It is also most useful as a secondary choice when PDF is not an available option.
Here is how you can create an interactive survey with Word
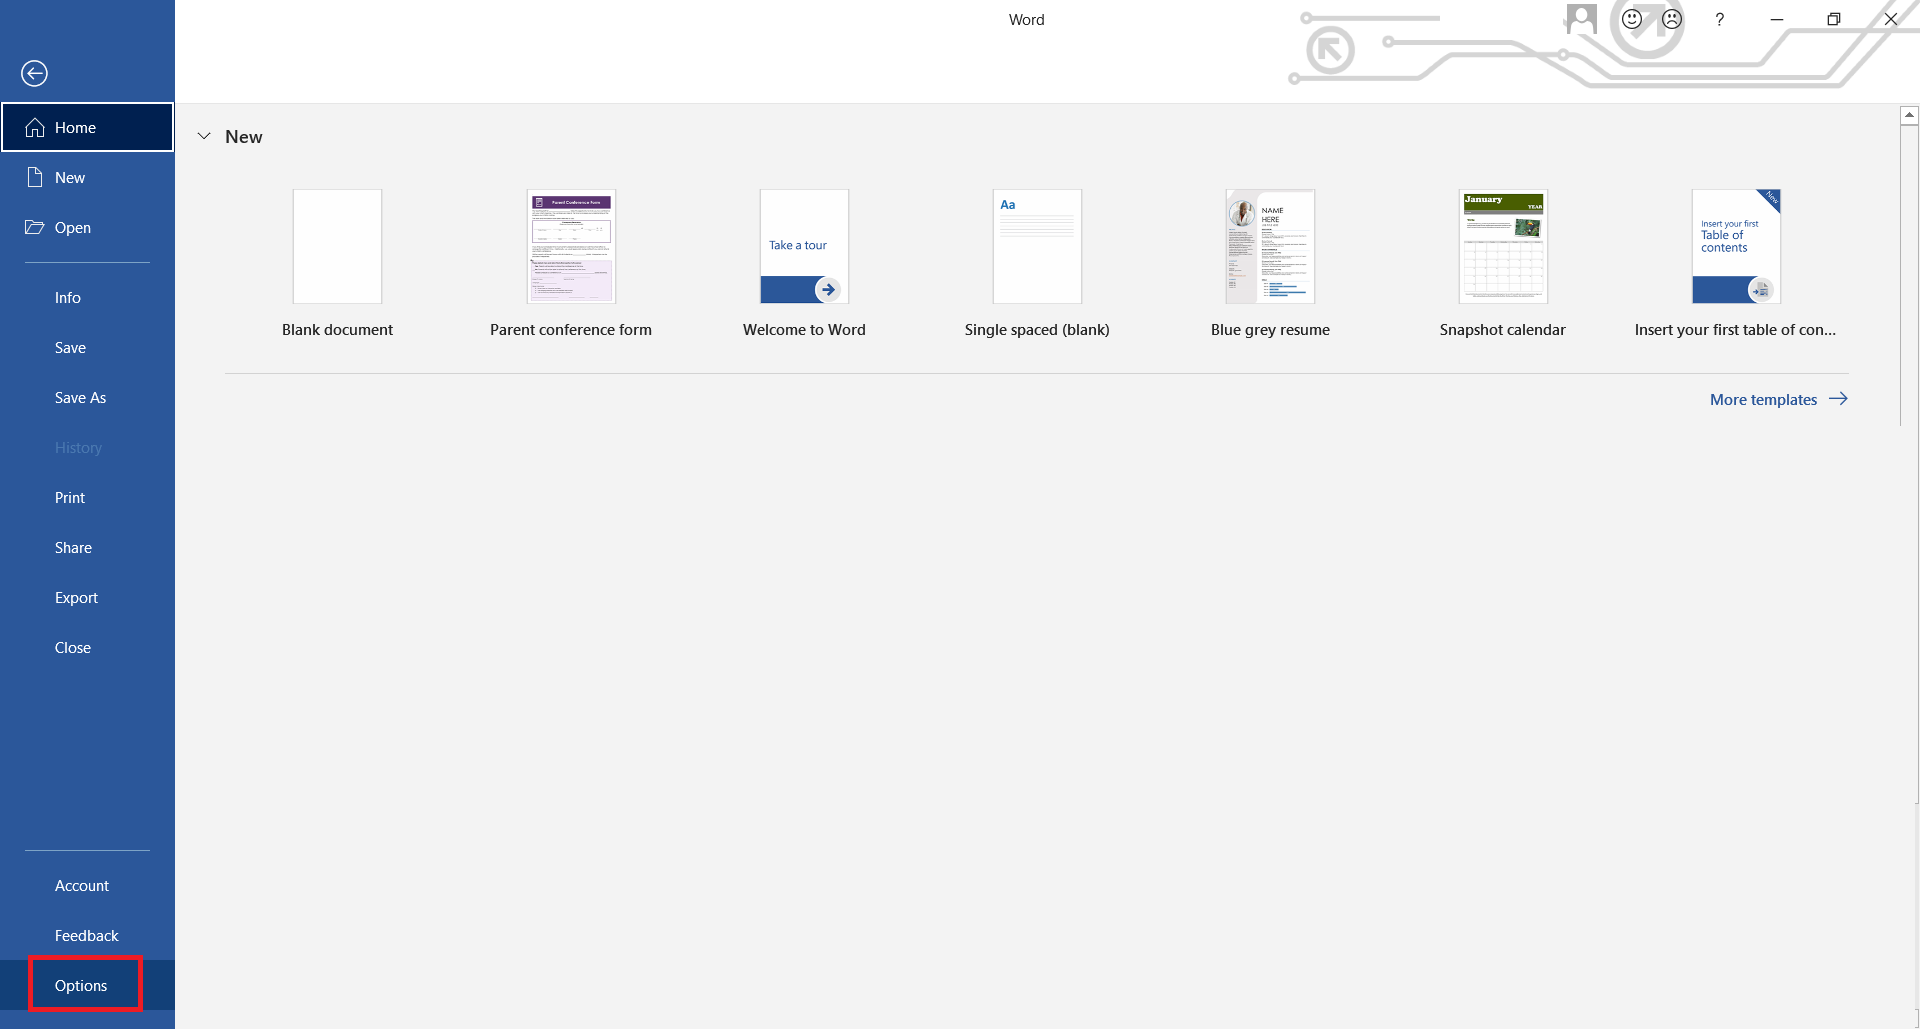
Step one: Enable Developer tools by clicking FILE then click OPTIONS.
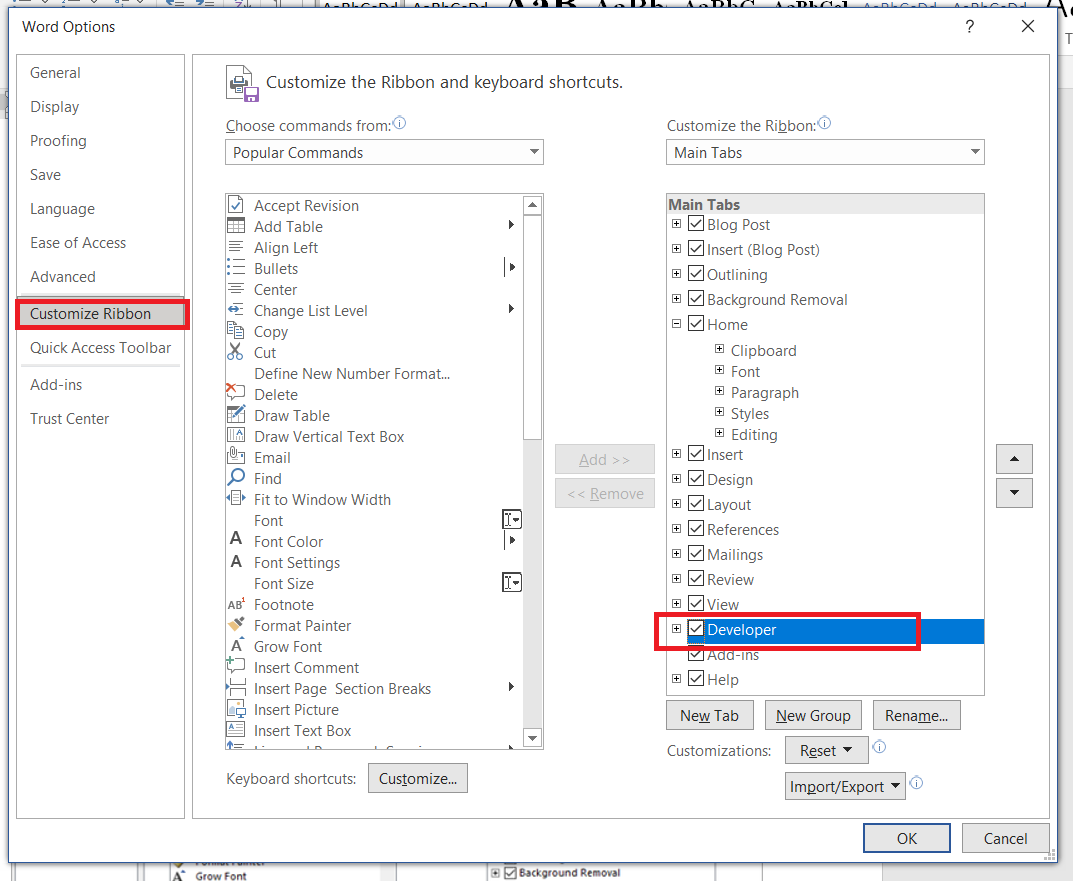
A new window will appear, click CUSTOMIZE RIBBON, then tick the box beside DEVELOPER on the list.
Step two: A new tab will appear on your screen, which is the DEVELOPER tab. Click that tab and select DESIGN MODE. Once you enable this, you can now add a few interactive elements.

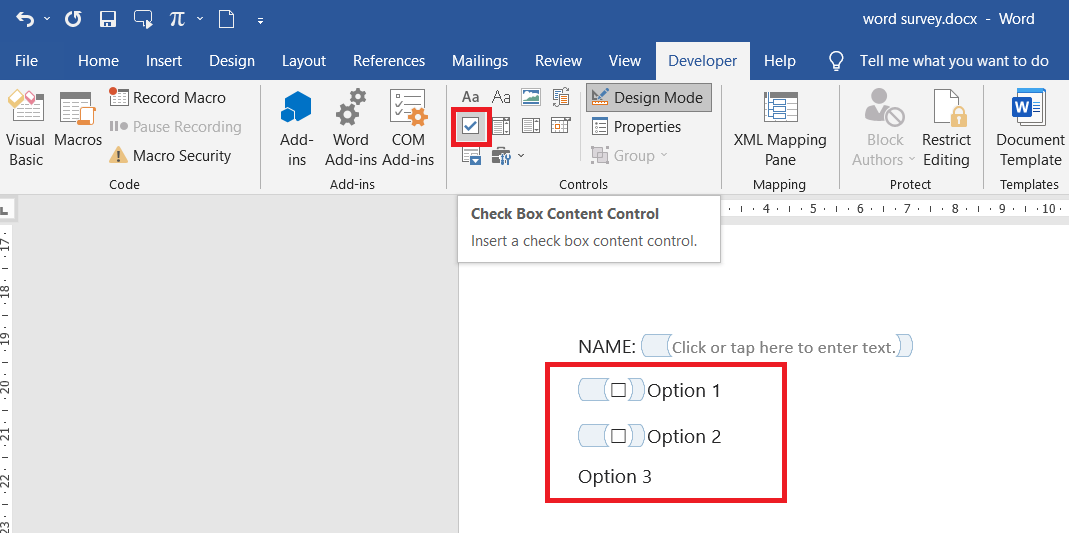
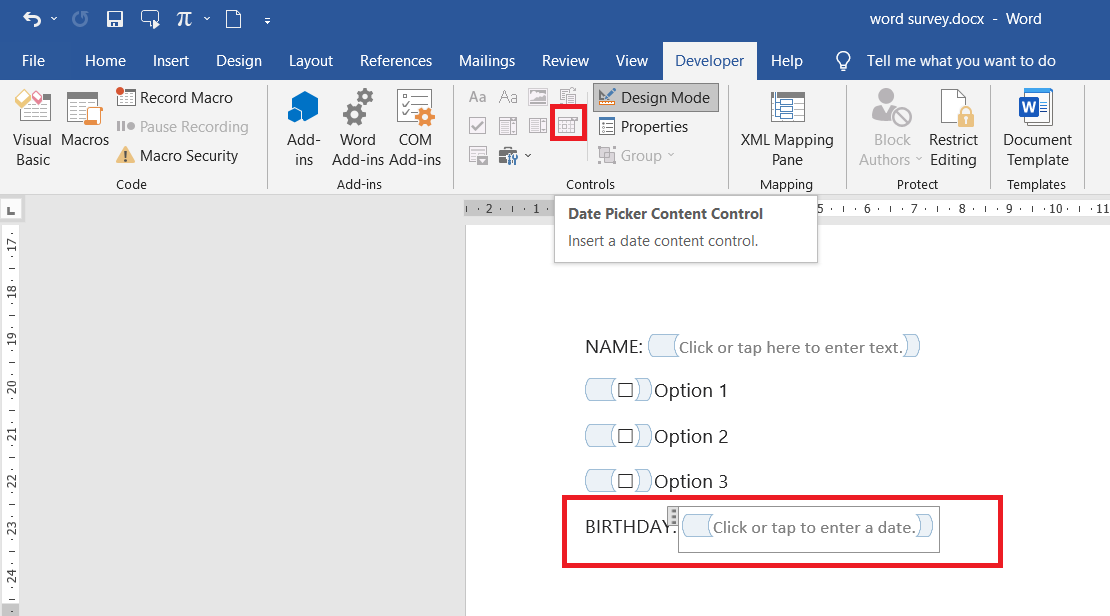
Step three: Add form elements by selecting the control contents. You can add a text box, a checkbox, a calendar, a drop-down list, and even an image.
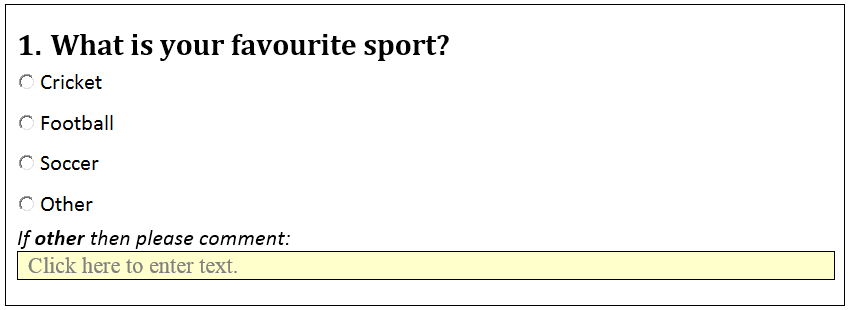
To place a checkbox, click the check icon and click where it should be placed. You can type the options on the left or the right side of the checkbox. The checkbox will look like a box inside a rectangular unit.
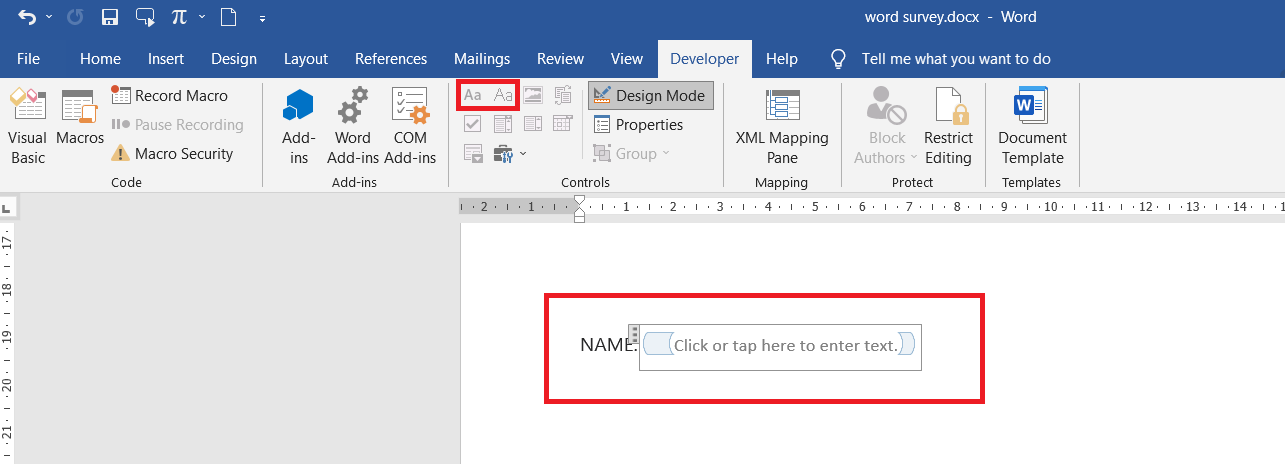
To place a text box, simply click where the text box should be placed then click the Aa icon. It will automatically create a rectangular unit that says “Click here to enter text.” (See figure below).
To place a date selector with a calendar, click the square icon that looks like a mini calendar. This icon is the date field.
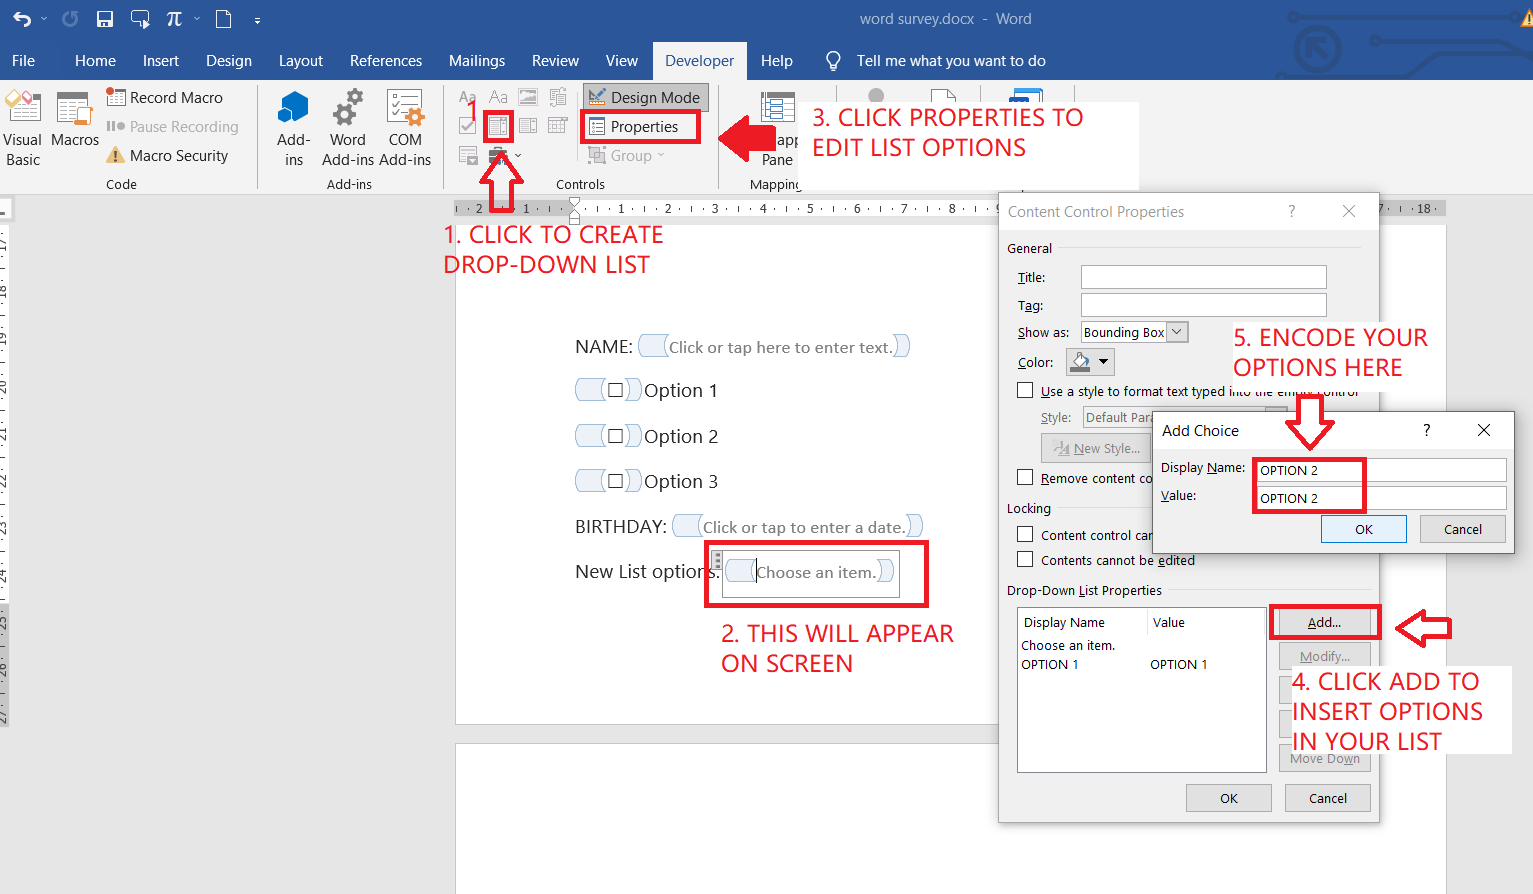
To place a drop-down list on your document, click the area where you will place the list then click the COMBO BOX CONTROL which is the icon beside the checkbox.
Modify the list by clicking PROPERTIES. A new window will appear on your screen. Click ADD to add more options in your list and encode the preferred content. You can also modify it by clicking on the item then click MODIFY.
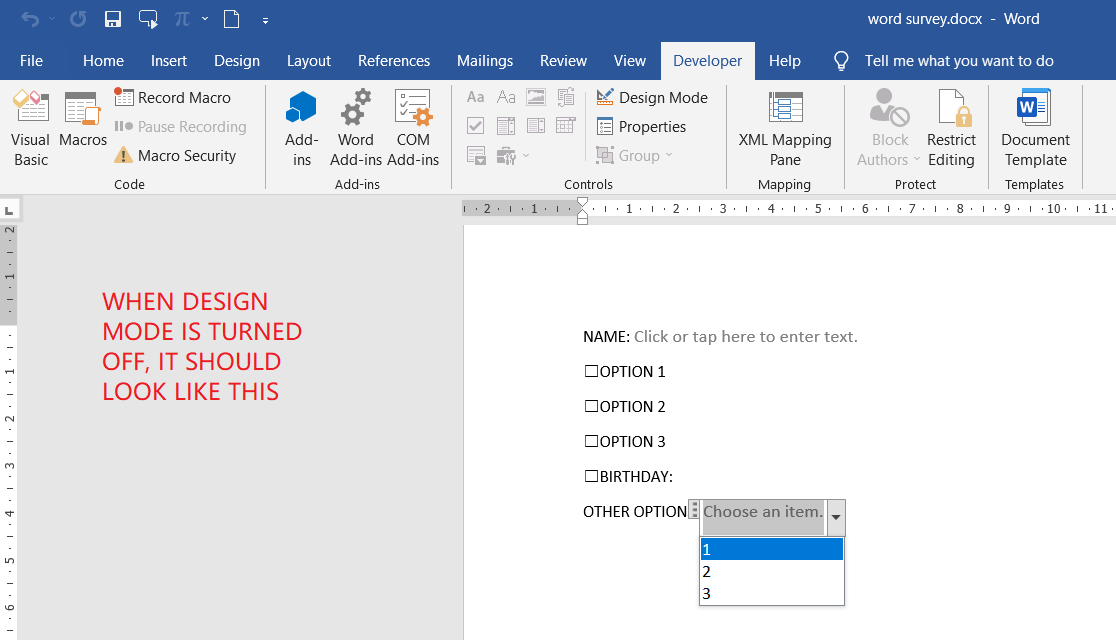
Step four: Now that you’ve added all the elements you want, you can now turn off the DESIGN MODE by clicking it. Once you’ve turned it off, all elements should look like professional interactive form fields.
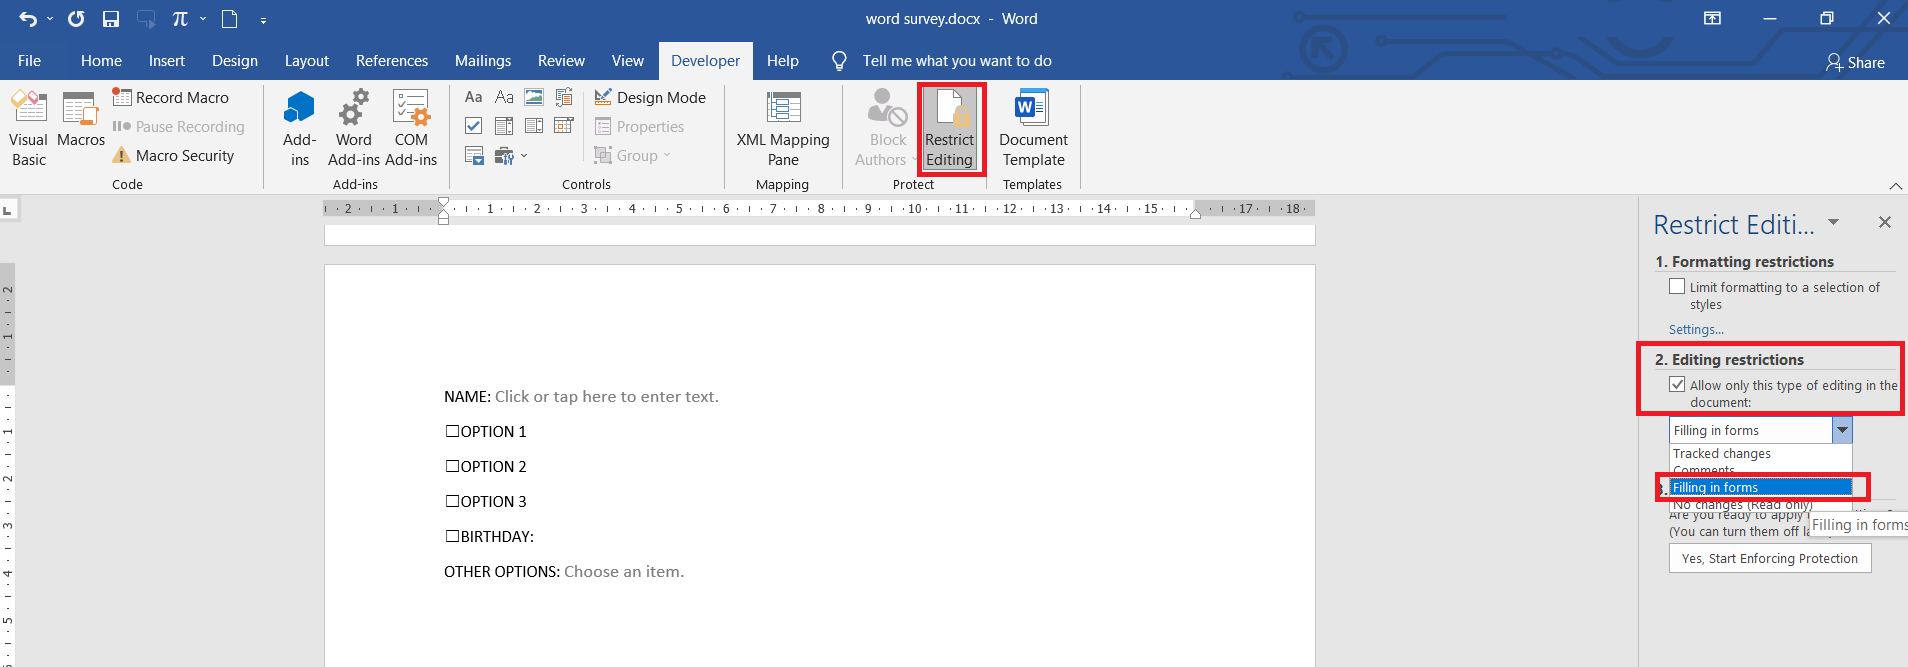
Step five: You can also encrypt and restrict editing of the questions and content by clicking RESTRICT EDITING under the DEVELOPER tab. Enable FILLING IN FORMS then click “Yes, start enforcing protection.”
Other methods of creating a fillable form
Word is convenient for basic users however if this document is needed for international purposes, PDF is still the way to go. If you save your survey in PDF, you will notice that all the elements made from the word will become flat and won’t be able to be “fillable.” To make it interactive, you will need a PDF editor to add the elements. Here’s how to do it with DeftPDF online. Don’t worry, it’s free!
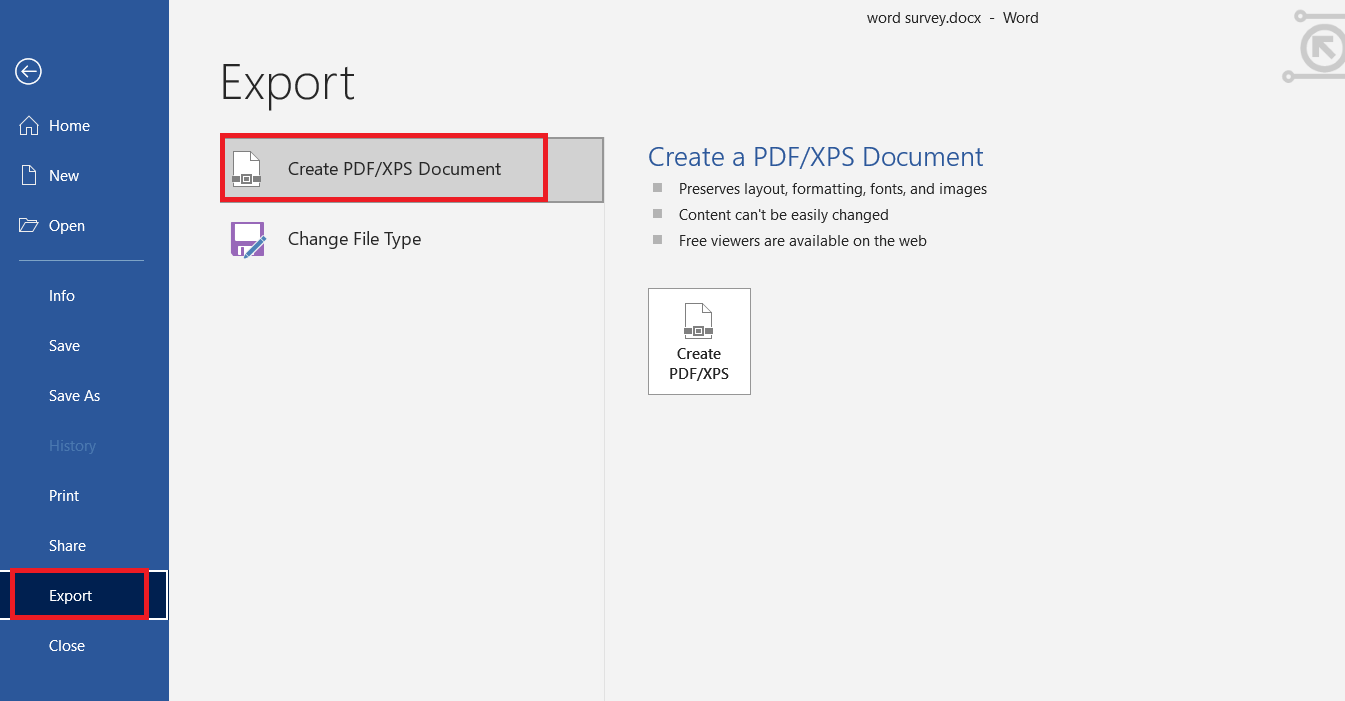
Step one: Save your form into PDF by clicking export to PDF.
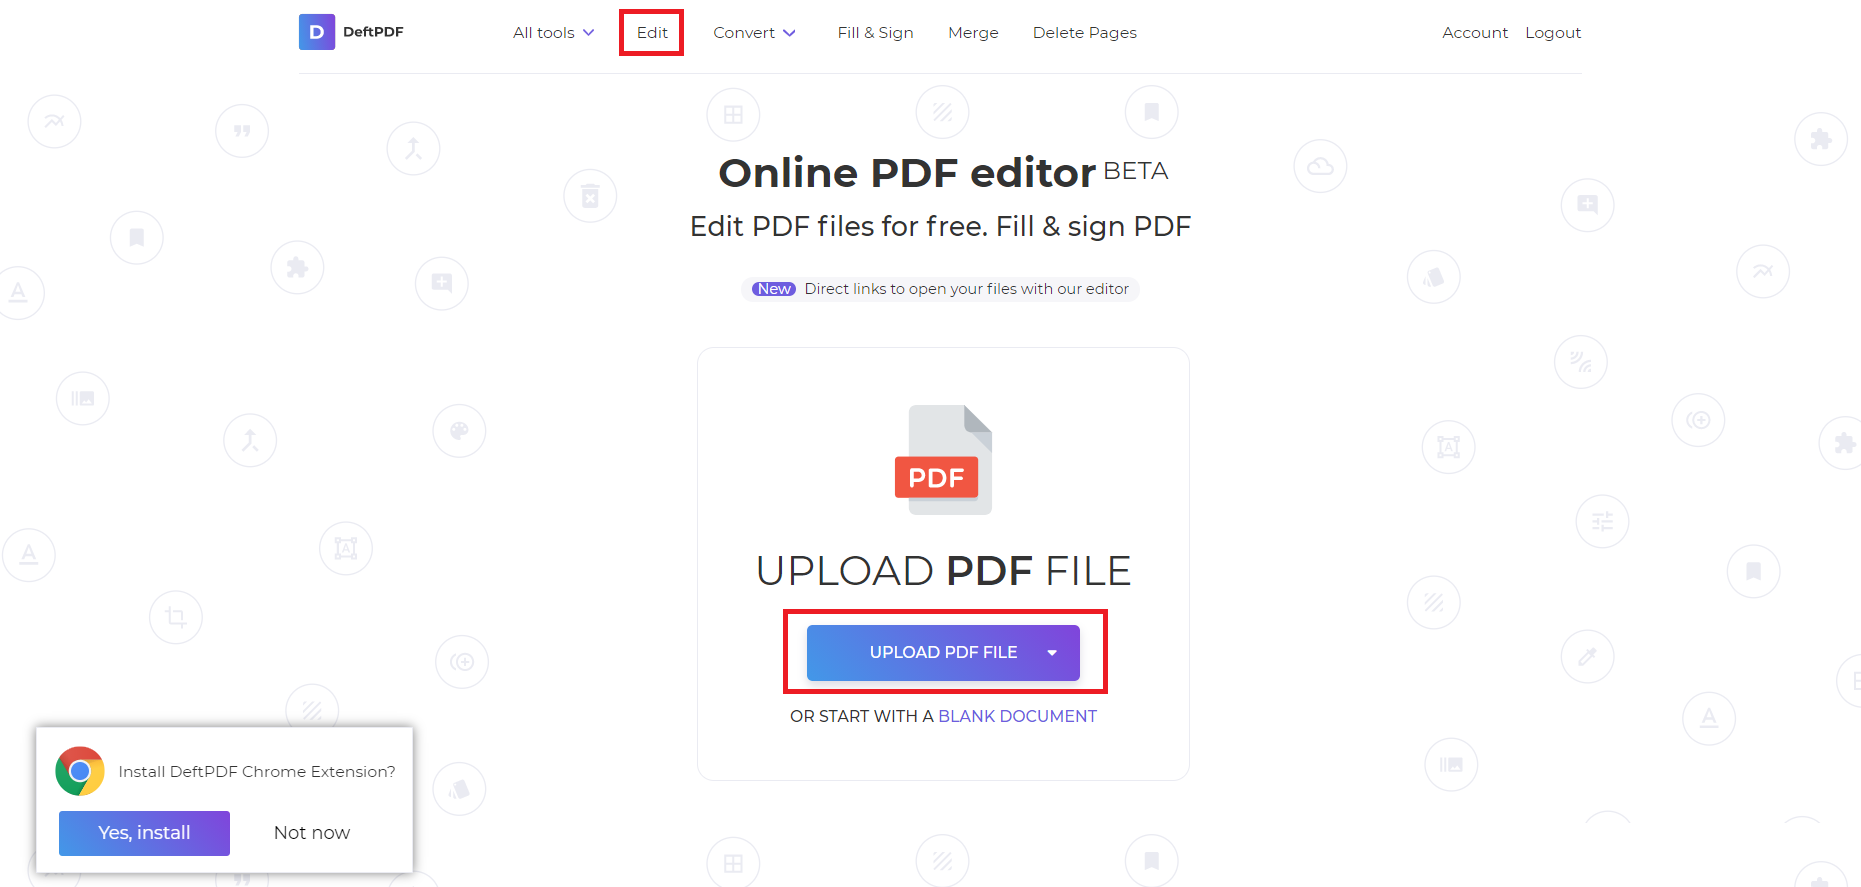
Step two: Upload your PDF file to DeftPDF’s editor
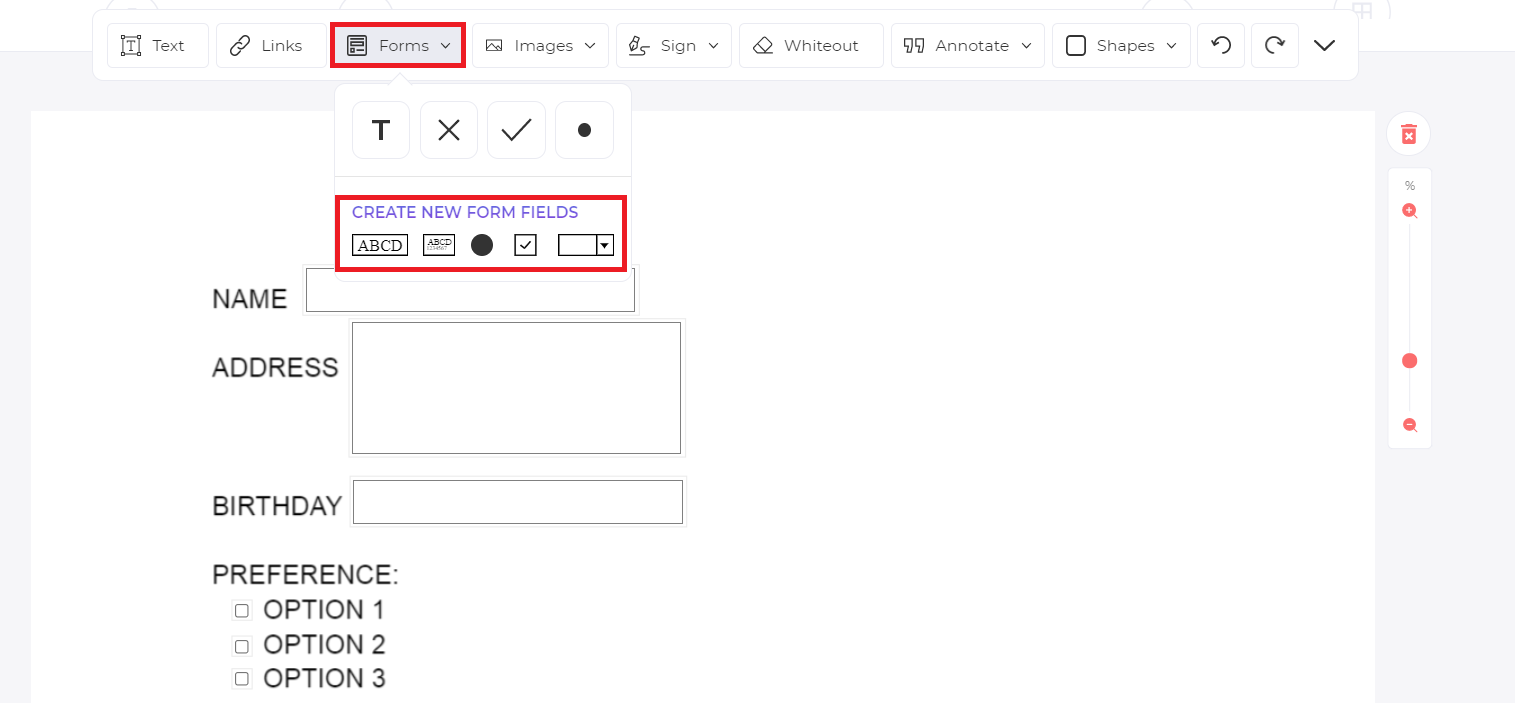
Step three: Add form elements by dragging and dropping them. Use the necessary form tools from the toolbar. You can add text boxes, checkboxes, radio buttons, a drop-down list,s and large text boxes for addresses.
Step four: Save by clicking APPLY CHANGES then download to save your file into your computer. This will then provide you with a PDF document with fully interactive form fields.

Want to get updates and subscribe to our blog? Get weekly e-notifications by creating an account with us: DeftPDF online
![]()
Download Article
![]()
Download Article
This wikiHow will teach you how to create a questionnaire in Word on Windows and Mac computers. You cannot create forms that others can fill out using the web version, but you can create check boxes, text controls, date pickers, and drop-down lists from a computer.
-

1
Open Word and make sure the developer tab is visible. You’ll find this program in your Start menu.
- If you don’t see the developer tab, go to File > Options > Customize Ribbon > Developer (under Main Tabs).
-
2
Create a new document or choose a template. Go to File > New and, if you want a template, search «Forms» in the «Search online templates» text field.
Advertisement
-
3
Insert a text control. If you want to add a block or line of text, you’ll want to add a text control. Go to Developer > Rich Text Content Control or Developer > Plain Text Content Control.
-
4
Add a date picker. If you want whoever is filling out the questionnaire to be able to pick a date on a calendar, go to Developer > Date Picker Content Control.
-
5
Insert a checkbox. Go to Developer > Check Box Content Control.
- You can add almost any sort of question and answer form from the Developer tab. Experiment with the types of questions and answers you can add to the questionnaire, then change or set their properties from Developer > Properties.[1]
- You can add almost any sort of question and answer form from the Developer tab. Experiment with the types of questions and answers you can add to the questionnaire, then change or set their properties from Developer > Properties.[1]


Advertisement
-
1
Open Word and make sure the developer tab is visible. You’ll find this program in the Applications folder in Finder.
- If you don’t see the developer tab, go to Preferences > Ribbon and Toolbar > Customize the Ribbon > Main Tabs > Developer.[2]
- If you don’t see the developer tab, go to Preferences > Ribbon and Toolbar > Customize the Ribbon > Main Tabs > Developer.[2]
-
2
Create a new document or choose a template. Go to File > New or New from Template and search «Forms» for the questionnaire template you want to use.
-
3
Add content controls to your form. From the Developer tab, you’ll be able to insert text boxes, check boxes, and combo boxes. Repeat this step to add as many content controls as you need to.
-
4
Change or set the options for each content control. Click to select a content control, then select Options to be able to set them. You can set common properties like Add Help Text to give hints at each field or set specific properties, like Drop-down enabled to let the user make selections from the menu.[3]


Advertisement
Ask a Question
200 characters left
Include your email address to get a message when this question is answered.
Submit
Advertisement
Thanks for submitting a tip for review!
References
About This Article
Article SummaryX
1. Open Word and make sure the developer tab is visible.
2. Create a new document or choose a template.
3. Insert a text control.
4. Add a date picker.
5. Insert a checkbox.
Did this summary help you?
Thanks to all authors for creating a page that has been read 45,743 times.
Is this article up to date?

 Recently I stumbled upon an issue of creating a quick survey for clients/users. Usually you would want surveys set up in a dedicated web application like Google Forms or Survey Monkey. However, in this case I was limited to MS Word – the doc / docx survey was to be sent via email to clients/users and consolidated. Seemed like a lot of manual work. But why bother when you can use VBA? I created the survey using MS Word ContentControls (text fields, checkboxes etc.) and ActiveX objects (for option / radiobuttons only). Collecting the results was quite easy using VBA. The code is reusable for virtually any survey created this way. Below I explain my approach of making a survey in Word and how to easily consolidate the results using VBA macros (next page of this post).
Designing the survey
Most people don’t put enough effort into designing their surveys – sloppy designs, messed up document structures or simply frequent typo’s and misspelled questions. All these will heavily deteriorate the quality of your survey. Skip this section if you want just the solution/code. If you are still developing your survey, however, I encourage you to at least review the steps for designing a good survey.
When designing your survey always start with the following:
- Draft your targets/objectives – what do you want to achieve with your survey? What information do you want to collect? Make a list of your objectives
- Develop you questions and map them to your list of objectives for completeness. Remove questions that do not map to any objectives. Check if there are any duplicates – questions that provide results for the same objectives in a similar way. Are there any objectives not covered by a single question?
- Review your list of questions – limit the survey to a reasonable amount of questions. Make sure your survey is balanced – not too many questions for a single objective
- Decide each type of question – should they be open questions (text) and which ones should have a limited set of answers (multiple or single choice)
- Draft answers to closed questions
- Review all answers for completeness. Standardize questions with scales. Make sure to organize the answers and sort them appropriately
- Make sure the survey looks clean and structured
- Spelling and grammar – make sure there are no no typos/misspelled words etc.
Insert Word form controls
When you have completed drafting your survey and structuring it you can move on to adding the actual form controls to make you survey interactive and enable automatic results extraction.
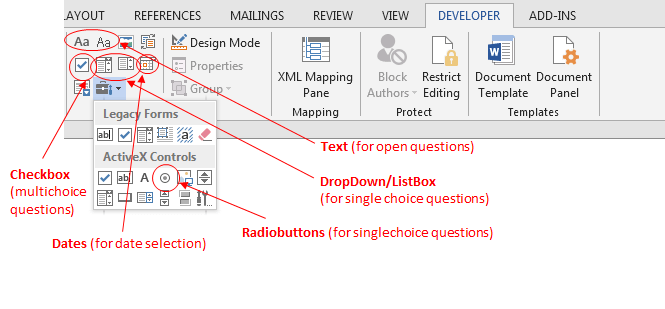
Here is a list of different mapping types of question to the various controls you may use:
| Type of question | Form control to use | Instructions |
|---|---|---|
| Open questions |
|
|
| Open questions – Dates |
|
|
| Singlechoice closed questions |
|
|
| Multichoice close question |
|
|
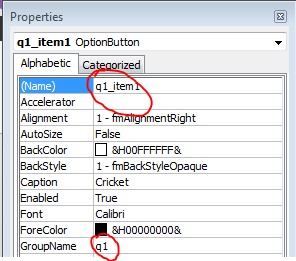
Below a short example of how to correctly configure a Option Button (Radiobutton). Be sure to name the control appropriately and assign the same GroupName to all answers of a single set.
Be sure to test the survey and double-check for any typos and other editing errors twice before dispatching it to your respondents.
Automatically consolidating the results
Now that you have your survey ready it’s time for consolidating the results. If you used the form controls mentioned above you can quickly consolidate your results using the following VBA macro.
Sub ExtractResults()
    Dim folder As String, currFile As String, col As Long, _
        ws As Worksheet, row As Long, isHeader As Boolean, currDoc As Object, wApp As Object
    Set wApp = CreateObject("Word.Application")
    On Error GoTo Finally
    'Get folder with survey results
    folder = BrowseForFolder(ActiveWorkbook.Path)
    Set ws = ActiveSheet

    currFile = Dir(folder & "/")
    'Loop through survey results
    row = 2: col = 1: isHeader = False
    Do While currFile <> ""
        Set currDoc = wApp.Documents.Open(folder & "/" & currFile, ReadOnly:=True)
        LoadFile ws, currDoc, isHeader, col, row
        currDoc.Close SaveChanges:=False
        isHeader = True
        row = row + 1
        col = 1
        currFile = Dir()
    Loop
Finally:
    wApp.Quit
End Sub
Sub LoadFile(ws, currDoc As Object, isHeader As Boolean, col As Long, row As Long)
    Dim contCtrl
    'Section for content controls
    For Each contCtrl In currDoc.ContentControls
        If Not isHeader Then ws.Cells(1, col).Value = contCtrl.Title
        'Text content controls
        If contCtrl.Type = 0 Or contCtrl.Type = 1 Then ws.Cells(row, col).Value = contCtrl.Range.Text
        'Checkbox
        If contCtrl.Type = 8 Then ws.Cells(row, col).Value = contCtrl.Checked
        'Dropdown or Listbox
        If contCtrl.Type = 3 Or contCtrl.Type = 4 Then ws.Cells(row, col).Value = contCtrl.Range.Text
        'Date
        If contCtrl.Type = 6 Then ws.Cells(row, col).Value = contCtrl.Range.Text
        col = col + 1
    Next contCtrl

    'Section for ActiveX radiobuttons (add more if needed)
    For Each fItem In currDoc.Fields
        If fItem.OLEFormat.ClassType = "Forms.OptionButton.1" Then
            If Not isHeader Then ws.Cells(1, col).Value = fItem.OLEFormat.Object.Name
            ws.Cells(row, col).Value = fItem.OLEFormat.Object.Value
        End If
        col = col + 1
    Next fItem
End Sub
Function BrowseForFolder(Optional OpenAt As Variant) As Variant
    Dim ShellApp As Object
    Set ShellApp = CreateObject("Shell.Application"). _
    BrowseForFolder(0, "Please choose a folder", 0, OpenAt)
    On Error Resume Next
    BrowseForFolder = ShellApp.self.Path
    On Error GoTo 0
    Set ShellApp = Nothing
    Select Case Mid(BrowseForFolder, 2, 1)
    Case Is = ":"
        If Left(BrowseForFolder, 1) = ":" Then GoTo Invalid
    Case Is = ""
        If Not Left(BrowseForFolder, 1) = "" Then GoTo Invalid
    Case Else
        GoTo Invalid
    End Select

    Exit Function
Invalid:
    BrowseForFolder = False
End Function
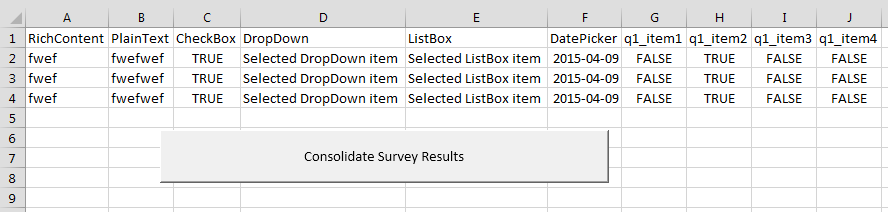
How to consolidate results
- Make sure that all survey results are in a single folder and the consolidation Excel file is in a parent folder
- Execute the ExtractResults VBA macro or click the Consolidate Survey Results in the Excel xlsm file above
- Select the folder with the survey results
- All results will be uploaded to the Excel file
Download example
Want an example of the above survey? Simply download the example below:
Conclusions for making a survey in Word
That’s it! Hopefully making a survey in Word will be much easier for you! I would especially like to stress on the design phase of your survey. As usually you will only get 1 hit for the survey, it is crucial to focus on you targets/objectives when drafting your questions.
Next Steps
Learn how to work with VBA in Word:
Word: Word VBA Tutorial