
Place your cursor in the file at the spot where you want to insert the symbol. Go to Insert > Symbol. Pick a symbol, or choose More Symbols. Scroll up or down to find the symbol you want to insert.
Contents
- 1 How do I make a sign template in Word?
- 2 How do I make a sign template?
- 3 How do I create a banner in Word?
- 4 How do I create an online sign?
- 5 How do I sign a document in Word 2010?
- 6 How do you make symbols on a laptop?
- 7 Is there an app for making signs?
- 8 What app do you use to make signs?
- 9 How do I make a printable banner in Word?
- 10 How can I make a sign online for free?
- 11 What is signage used for?
- 12 What is an example of signage?
- 13 Can you insert signature in Word?
- 14 How do I digitally sign a Word document?
- 15 How do I type é on my keyboard?
- 16 How do I get symbols on my keyboard Windows 10?
- 17 How do I type ñ?
- 18 How do I type a symbol?
- 19 How do you write capital letters on a laptop?
- 20 What is a symbol on the keyboard?
How do I make a sign template in Word?
How to Make Signs With Microsoft Word
- Start Microsoft Word.
- Type “sign” into the “Microsoft Online” option under “Templates.” Press the “Enter” key.
- Click on a sign template to preview it.
- Right-click an image on the sign and select “Change Picture” to change it.
How do I make a sign template?
How to Make Sign Templates for DIY Home Decor Signs
- Step 1: Go to Canva.com.
- Step 2: Click “Create New Design”
- Step 3: Select “Custom Dimensions”
- Step 4: Select the “Text” icon to add text.
- Step 5: Add another text box for more text in a different place or different font.
- Step 6: Add another page if needed.
Create a banner
Click File > New and select Installed and Online Templates under Available Templates. Select the Banners category, then click the banner design that you want — for example, Baby Congratulations. Under Customize and Options, select any options you want. Click Create.
How do I create an online sign?
CustomSigns.com is your go-to destination for making signs online.
- Choose your material/style.
- Pick your size, choose the template you want, or start from scratch.
- Customize with your text and/or images.
- Complete your order.
How do I sign a document in Word 2010?
Microsoft Office 2010
In Microsoft Word, Excel, or PowerPoint, open the document that you want to sign. In the selected Microsoft application, click File. Click Protect Document > Add a Digital Signature. Click Protect Workbook > Add a Digital Signature.
How do you make symbols on a laptop?
How to Make Signs on the Computer
- Choose between a horizontal or vertical format by selecting your page’s orientation.
- Create borders on your pages.
- Add color and texture to your sign.
- Type the words that will go on your sign.
- Select a typeface and point size for your text.
- Make a PDF file to send to the print shop.
Is there an app for making signs?
SmartDraw helps you make signs quickly and easily, even if you’re not a professional designer.Next, easily customize your sign or poster by dragging-and-dropping one of our thousands of ready-made, presentation quality symbols—or add your own logo, picture, or map!
What app do you use to make signs?
Image Creation Tools
- Canva. Canva is a tool that “enables anyone to become a designer.” Free to use and popular among designers and non-designers alike, Canva’s features are great for creating digital signage content:
- Adobe Spark.
- BeFunky Graphic Designer.
- Fotor.
- Pixlr.
- Animaker.
- iMovie.
- VideoShop.
Creating a Banner from a Template
Access Word templates via the “File” menu. Click “New” and search for the keyword “banner” in the search box. Choose a relevant template from the displayed list. You can then edit the banner in any way you wish, changing the preset headings, the font style, or colors.
How can I make a sign online for free?
How To Generate a Signature Online
- Open up this blank signature template with our online tool.
- Click ‘Tools’ (the colorful icon, top right corner) and choose ‘Sign.
- On the next page, click ‘Create Signature.
- Draw, type, or upload your signature, as you please.
- Click ‘Create Signature’ and drag it onto the document.
What is signage used for?
Aside from wayfinding, signage is most commonly used for advertising and marketing purposes. They are used by companies and businesses to advertise their brands, which help increase their presence to customers.
What is an example of signage?
Signage is a term that is defined as all of the visual graphics (public advertisements, billboards, etc.) or groups of graphics that communicate information to the public. A row of billboards along a roadway advertising beer companies, insurance companies, lawyers and nearby restaurants is an example of signage.
Can you insert signature in Word?
To add a signature line to your Word document, click Insert > Signature Line. This icon is usually included in the “Text” section of your Word ribbon menu bar. In the “Signature Setup” box that appears, fill out your signature details. You can include the name, title, and email address of the signer.
How do I digitally sign a Word document?
Open your document and click the File tab. Click Info and then click Protect Document. From the Protect Document drop-down menu, click Add a Digital Signature. Select a Commitment Type, such as created and approved this document, and then click Sign.
How do I type é on my keyboard?
é: Press Ctrl and type “‘” (apostrophe). Release both keys and type “e”. à-è-ù: Press Ctrl and type “`” key (left-hand side, top of the keyboard).
These accents are:
- L’accent aigu (é)
- L’accent grave (à, è, ù)
- L’accent circonflexe or “chapeau” (â, ê, î, ô, û)
- La cédille (ç)
- Le tréma (ë, ï, ü)
How do I get symbols on my keyboard Windows 10?
To insert symbols or kaomoji on Windows 10, use these steps:
- Open a text file, document, or email.
- Use the Windows key + (period) or Windows key + (semicolon) keyboard shortcut to open the emoji panel.
- Click the Omega button to access the symbols.
- Select the symbols you want to insert.
How do I type ñ?
If your keyboard has a numeric keypad, you can type Ñ/ñ by following these steps:
- Enable the numeric keypad by turning on the Num lock key.
- Hold the Alt key then type 164 on the numeric keypad to create a lowercase ñ. For the uppercase Ñ, hold the Alt key then type 165.
How do I type a symbol?
Inserting ASCII characters
To insert an ASCII character, press and hold down ALT while typing the character code. For example, to insert the degree (º) symbol, press and hold down ALT while typing 0176 on the numeric keypad. You must use the numeric keypad to type the numbers, and not the keyboard.
How do you write capital letters on a laptop?
For capital letters, hold down the ‘shift’ key and hold and type the letter. For symbols at the top of a number key, press down the symbol key and then type the symbol. You can use the ‘shift’ key to type any symbol at the top of a key. The ‘caps lock’ key allows you to write in capital letters.
What is a symbol on the keyboard?
Computer keyboard key explanations
| Key/symbol | Explanation |
|---|---|
| & | Ampersand, epershand, or and symbol. |
| * | Asterisk, mathematical multiplication symbol, and sometimes referred to as star. |
| ( | Open or left parenthesis. |
| ) | Close or right parenthesis. |
![]()
Download Article
Digitally sign your Microsoft Word documents with this easy-to-use guide
![]()
Download Article
A digital signature can refer to two different things—using a simple electronic version of your regular hand-written signature, or using a digital signing certificate to add an encrypted stamp of authentication to a document. If you need to add your handwritten signature to a Microsoft Word document, we’ll show you the easiest ways to do so in Windows and macOS. We’ll also show you how to use your digital ID (issued by a certificate authority) to digitally sign a Word document in Windows.
-

1
Open the document in Microsoft Word. Double-click the Word document you want to sign digitally.
- DocuSign allows you to create and use a digital ID at no cost for personal use. Creating an account with DocuSign makes it easy to sign Word documents if you haven’t purchased a certificate from a certificate authority.
- When you sign a document with DocuSign, the signed version of the document will be converted to the PDF format.
-
2
Install the DocuSign add-in. To install DocuSign, do the following:
- Click the Insert tab.
- Click Get Add-ins on the toolbar. You may have to click Add-ins first.[1]
- On a Mac, you’ll click Store…
- Click the search bar in the upper-left side of the window.
- Search for docusign and click Add.
- Follow the on-screen instructions to add the DocuSign add-in.
Advertisement
-
3
Click the DocuSign tab. It’s at the top of the Word window.
-
4
Click Sign Document. You’ll find this in the DocuSign toolbar.
-
5
Click CREATE ACCOUNT. It’s in the DocuSign menu.
- If you already have a DocuSign account, click LOG IN to sign in.
-
6
Sign up for DocuSign. Follow the on-screen instructions to create a DocuSign account. Once you have an account, you’ll be able to use it to sign in.
- During the sign-up process, you’ll have to verify your email address. Click the link in the email from DocuSign and follow the on-screen instructions to verify.
-
7
Log into DocuSign in Microsoft Word. Once you have an account, click Sign Document again and log in with your new DocuSign account in the right panel.
-
8
Click Signature. It’s on the left side of the page. If you already have a DocuSign signature on file, this displays a thumbnail image of your signature next to your mouse cursor. If you do not have a signature on file, this displays a yellow image that says «Sign» next to your mouse cursor.
-
9
Click the spot into which you want to insert your signature. If you already have a signature on file through DocuSign, this places your signature where you clicked. If you do not have a signature on file, this displays a window you can use to create a new signature.
- If you need to create a new signature, follow the on-screen instructions and select Adopt and Sign when prompted.
-
10
Click FINISH. It’s a yellow button near the top of the page. A pop-up window will appear.
-
11
Send the document (optional). If you want to send the document to someone right now, use the first two bars at the top of the window to type the name and email address of the person you want to send the signed document to,
- You can also add recipients by clicking Add Recipient below the bar. Then type the name and email address of the new recipient.
- To skip this section, click NO THANKS. This will simply upload the document to your DocuSign account without emailing it to anyone.
-
12
Click Download document. It’s in the right panel. This redownloads the signed Word document as a PDF file that contains your signature. You can now share this signed version of your document with anyone you wish.


Advertisement
-
1
Create a digital certificate if you don’t already have one. Signing with a digital signature is different than typing or signing your name on a document. When you sign with a digital certificate, you’re including a unique encryption code that validates your identity. Digital certificates are usually assigned by certificate authorities and cost money, but you can create one yourself for personal use.[2]
If you don’t already have a digital certificate and just need a digital ID for personal use, here’s how to create one:- Right-click the Windows Start menu and select File Explorer.
- Navigate to C:Program FilesMicrosoft OfficerootOffice16. If that directory doesn’t exist, try C:Program Files (x86)Microsoft Officeroot instead.
- If Office is installed on another hard drive, replace «C» with the correct drive letter.
- Double-click the SELFCERT.EXE app.
- Type a name for your certificate (such as your full name) and click OK.
- Click OK to confirm.
-
2
Open the document you want to sign in Microsoft Word. Double-click the Word document to open it now.
- If you were sent a document that includes a signature line you need to sign, skip to step 8 to learn how to sign it with your digital certificate.
-
3
Click the Insert tab. It’s at the top of the window. If you need to add a signature line for yourself or someone else to sign, you’ll find the option(s) here.
-
4
Click Signature Line. You’ll see this on the «Text» panel on the right side of the toolbar.
- If you don’t see this, click the icon of a sheet of paper with a pencil instead.
- If your window is not maximized, you might have to click a menu called Text with a blue «A» on the toolbar to see the Signature Line option.
-
5
Add the signature details. The information you type here will vary depending on whether you’re signing the document or creating a signature line that someone else should sign.
- Check the «Show sign date in signature line» box if you’d like the date of the signature to be inserted automatically.
- Check the «Allow the signer to add a comment in the Sign dialog box» box if you’d like to enable comments from whoever signs the document.
-
6
Click OK. It’s at the bottom of the window. This will insert a signature box.
-
7
Right-click the signature line and select Sign. This opens a window you can use to sign on the signature line.
-
8
Type your name or select a signature image. If you want to use an image that contains your actual signature, you can select Select image and choose that image from your computer. Otherwise, just type your name on the line next to the «X.»
- If you’re using a tablet PC, you can use the inking feature to sign with your finger or stylus.
-
9
Click Sign. The «Signature» badge will appear at the bottom of the document next to the word count, indicating that the document has been signed.


Advertisement
-
1
Write your signature on a piece of white paper. If you want to add an image of your own signature to your document, the easiest way is to sign your name on a sheet of paper and scan it into your computer.[3]
Writing with dark ink on a white background will give you the best results. -
2
Scan your signature into your computer. When scanning your signature, save the photo in a common file format like JPG, PNG, or BMP.
-
3
Open the document you want to sign in Microsoft Word. You can do this by double-clicking the Word document on your computer.
-
4
Click the Insert tab. It’s at the top of Word.
-
5
Select Pictures on the toolbar. A brief menu will expand.
-
6
Click This Device (PC) or Picture from File (Mac). Now you’ll be able to browse for your scanned signature.
-
7
Select your signature image and click Insert. This imports your signature into the document.
-
8
Crop the image (optional). If the signature isn’t already cropped, click the image once to open the Picture Format tab, and then click the Crop tool on the toolbar. Drag the black guides in to select just the part of the image you want to keep, and then press Enter or Return to crop.
- After cropping, save the cropped version of the signature so you can easily reuse it in other documents. To do so, right-click the image, select Save as Picture and give the image a name you’ll remember.
-
9
Move your signature to the desired location. If your signature is too large or small, you can drag the corners in or out to resize it.
- Now that you’ve added your signature, click File > Save to save the file with your signature included.


Advertisement
-
1
Export the Word document as a PDF file. If you just want to add a signature to an existing Word document on your Mac, the easiest way to do so is to export the document to the PDF format so you can sign it in Preview. Here’s how:
- Open the document in Word and go to File > Save as.[4]
- Type a name for the file and chose PDF as the file format.
- Click Export.
- Open the document in Word and go to File > Save as.[4]
-
2
Open the PDF file in Preview. Now that you have a PDF version of your document, double-click the file to open it in Preview.
-
3
Click the marker icon to show the Markup toolbar. It’s the icon that looks like a felt tip marker at the top of the Preview window.[5]
-
4
Click the Signature icon. It’s the icon that looks like a cursive signature at the top of the window.
-
5
Choose an option for signing the document. You can create a signature in a few different ways:
- Click Trackpad to create a signature using the trackpad on your MacBook (if applicable). If you choose this option, you can use your finger to create your signature. Press any key after signing and then tap Done.
- Click Camera to take a photo of your actual signature on a sheet of paper. Sign a piece of white paper, align it in the camera when prompted, and then click Done.
- Click Select Device if you want to sign on your iPhone or iPad. This option lets you use your Apple Pencil (if using an iPad) or your finger to sign your phone or tablet. After signing, tap Done and it will magically appear on your Mac.
-
6
Click the signature you just created. It’s in the signature drop-down menu. This will place your signature into the center of the document.
- You may first have to click the «Signature» icon again.
-
7
Drag your signature to reposition it. Click and hold in the center of your signature and drag it to the area you want to place it in.
-
8
Save the file. Once you’ve signed the PDF, click the File menu and select Save to save the version that includes your signature. This saves the document with your electronic signature attached.


Advertisement
Add New Question
-
Question
When I try to save a copy of a digitally signed Word 2007 document, it invalidates the signature. Is there a way of saving without invalidating the signature?

You need to save the document first, and then sign digitally. There is no need to save it again.
-
Question
Our forms have sections with a signature required in each section. But when you complete the next section, it invalidates the signature for the previous section. Is there a way around that?
Then it’s some digital signature issue. You may need to seek technical assistance for that.
Ask a Question
200 characters left
Include your email address to get a message when this question is answered.
Submit
Advertisement
-
One way to add an informal signature to a Word document is by drawing your signature in a program such as Paint, saving it as an image, and then inserting it as image from the Word Insert menu.
Thanks for submitting a tip for review!
Advertisement
About This Article
Article SummaryX
1. Install the DocuSign add-in for Word.
2. Click the DocuSign tab.
3. Click Sign Document.
4. Create and activate your account.
5. Scroll to the place you must sign.
6. Click Signature.
7. Click Adopt and Sign.
8. Click Finish.
Did this summary help you?
Thanks to all authors for creating a page that has been read 782,924 times.
Is this article up to date?
If you’re already a Microsoft 365 subscriber, Word is an excellent application for creating your business’s signage. You can create signs that range from basic to intricate depending on your goals and needs. The best part? With Microsoft Word, you don’t have to be an expert graphic designer to create a professional-looking sign.
How to make signs in Word
Because there’s such a wide variety of possibilities, there isn’t a step-by-step guide that can encompass every type of sign you might need to create. Instead, there are a few key considerations to keep in mind that will help you make your sign as successful as possible.
Jump to:
- Templates
- Page orientation
- Color
- Typography
- Graphics
Templates
One of the easiest ways to make a sign in Microsoft Word is to use one of the included templates. You can find pre-made examples of signs, flyers, brochures, and other marketing materials in the Word template library. Instead of creating something from scratch, use a template as a starting point to create a customized sign without spending a ton of time on formatting.

There are also third-party websites that create templates you can download and add to your Word template library. These templates usually have more intricate or modern designs than the ones Microsoft offers, so might have an easier time finding one that matches your design taste.
Page orientation
If you choose to start with a blank document, the first thing to consider is page orientation. Portrait orientation is best for signage with a lot of information, like flyers, posters, and infographics. Landscape orientation is ideal for signs that have minimal text but are intended to grab someone’s attention. Certificates, yard signs, and maps typically use landscape orientation.
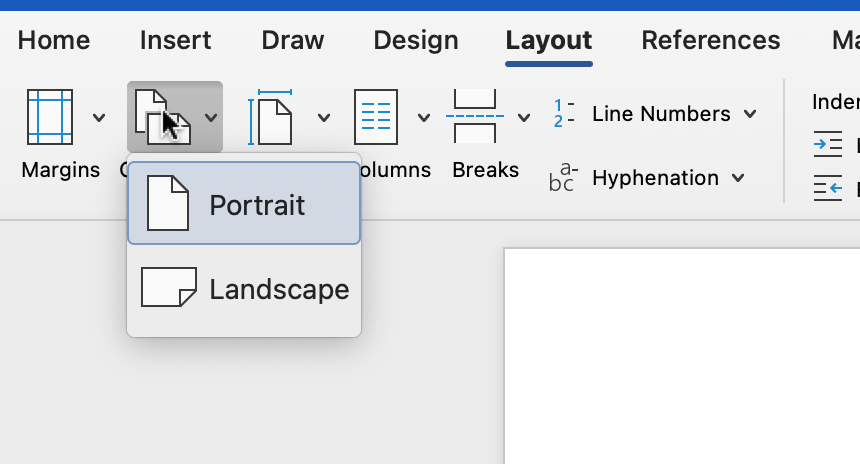
New documents in Microsoft Word are set to portrait orientation by default. To switch to landscape orientation, navigate to the Layout tab on the ribbon toolbar, then select Landscape from the dropdown menu under Orientation.
Color
As with most design materials, color plays a major role in the effectiveness of what you create. Color psychology—how the human brain responds to certain colors—can help guide you if you’re not sure what colors to use in your signage. For example, green signifies health, nature, and affluence, but it isn’t as eye-catching as red or yellow hues.
Similarly, contrast can be a big factor in whether your sign sticks out. If you use several colors with the same tone, your sign will lack the “pop” factor that grabs someone’s attention. For the best results, use a color palette that has a balance of bright and dark colors and creates visual interest.
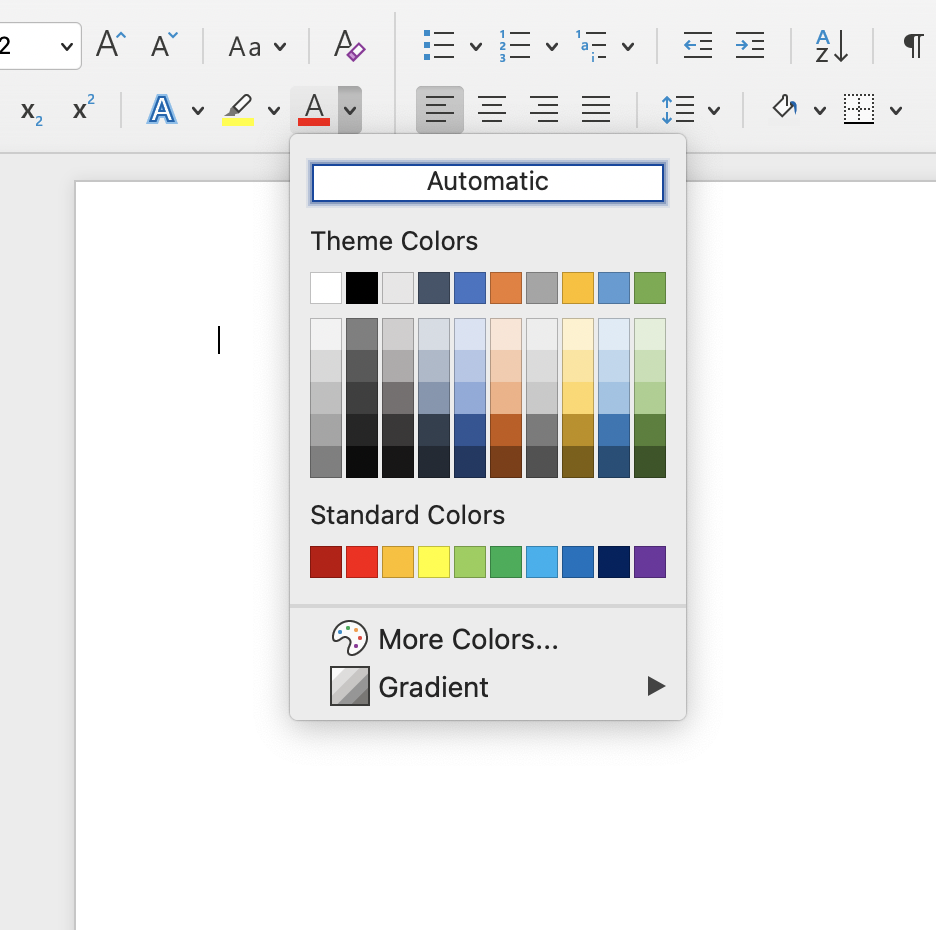
The easiest way to find this balance is to pick colors from different rows in Microsoft Word’s color selection menu. The top row of light shades in the screenshot below would provide a good contrast with the shades on the bottom row, for example.
Ultimately, printing costs may be the biggest consideration when using color in your signage. Black and white print jobs are usually less expensive than printing in full color, so color might not be an option if you’re trying to stretch your budget. In this case, pay careful attention to the other elements of your design: shapes, space, lines, and typography. You can still have a successful design without color if you use these elements strategically.
Typography
You don’t necessarily need to include typography in your sign if your goal can be accomplished by using symbols like arrows, emojis, or icons. However, sometimes text is needed to provide context or clarification. You should use enough text to get your message across, but not too much that it clutters the sign. If you have a lot of information to include, consider putting it on a web page and creating a QR code or shortened URL that someone can access from a mobile device.
Typography font, size, and formatting are also important considerations. For example, a lightweight script font can connote elegance and sophistication, whereas bold block lettering can signify urgency and importance. Play around with different typography styles like the ones in the screenshot below to create balance and guide a viewer’s eye across your sign.

Graphics
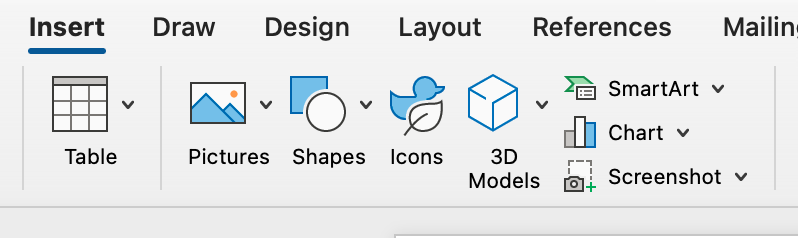
Especially if your sign is limited in terms of typography and color, graphics can make your sign more effective. Shapes, icons, and photos are examples of simple graphic elements that can elevate your sign without much effort. If you really want to take your design to the next level, consider using a 3D model, Smart Art, or chart to create a visual representation of the information you want to communicate through your sign.
You can find all of these options under the Insert tab of the ribbon toolbar:
Similar to typography, however, too many graphics on a sign can be overwhelming and detract from your ultimate goal. In general, it’s best to reserve thirty to forty percent of your design for empty white space.
Alternative graphic design tools
Microsoft Word is a versatile tool that can help you create a wide range of signs, but at the end of the day it’s still a word processing application and not specifically intended for graphic design. Thankfully, you don’t need a professional graphic design application like Adobe InDesign to create advanced signs. There are a number of design tools like Canva, Crello, and Snappa that are specifically for non-designers.

Source: Canva
As you can see in the screenshot above, these tools offer bigger libraries of professionally-designed templates. Some, like Canva, also offer high quality printing services. If you step outside the Microsoft suite of tools, you can create signs that are even better than what you can create with Word.
Read next: Best Digital Marketing Tools for Small Businesses
This article was originally published on November 4, 2009. It was updated by Kaiti Norton.
Microsoft Word is one of the leading word processing platforms. Whether it be for personal, educational, or professional purposes, countless people depend on Microsoft Word to create important documents.
For professionals using Microsoft Word to create contracts, sales proposals, and other documents that require signatures, it’s important to know how to insert a signature in Word. Learning how to do so can save you the hassle of having to print out documents to sign them before scanning them back onto your computer.
Here’s everything you need to know about how to add a signature in Word using Word’s built-in tools or a third-party electronic signature platform like jSign.
Microsoft Word makes it as easy to add a signature to Word documents. By inserting your custom electronic signature, you can sign documents in a matter of seconds without having to print them out.
Follow these steps to quickly insert a signature in Word:
- Write your signature on a blank piece of white paper.
- Scan the signature to your computer, and make sure to save the file as a .bmp, .gif, .png, or .jpg file.
- Open a new Word document, select Insert, click Pictures, then open the image of your signature.
- Use the Picture Tools Format tab to edit the picture as needed.
- Right-click the image in the document and select Save as Picture.
- Open the Word document that you need to sign, click Insert, select Pictures, then choose the image of your electronic signature.
- Drag and drop the image to the appropriate place in the document.
After uploading and editing a picture of your handwritten signature, you can easily insert it into any Word document to sign it quickly without needing to print or scan it.
How to Add a Signature Line in Word
If you are creating a document and need to collect signatures from others, it’s important to know how to add a signature line in Word. A signature line shows recipients where they should sign once they receive the document.
To add a signature line in Word, follow these steps:
- Create a new Word document or open an existing document that you need to add a signature line to.
- Left-click the place in the document where you want to add the signature line.
- Under the Insert dropdown menu, select Signature Line.
- In the dialogue box that appears, select the appropriate options.
- Click OK.
You can repeat this process as needed to add multiple signature lines to a Word document.
Using a Third-Party App to Sign a Word Document
While Microsoft Word offers a few basic features that allow users to insert a signature in Word documents, it doesn’t have the functionality and features that electronic signature platforms like jSign offer.
Third-party apps like jSign offer several additional features that grant users more flexibility when signing Word documents online.
Rather than handwriting your signature and scanning it to your computer, electronic signature platforms let you create a custom e-signature online that you can easily insert into any document, including Word docs. You can also create name and date fields, add signature lines to documents, send documents to recipients to collect signatures, and save your documents to the cloud for easy organization.
jSign also helps protect the authenticity of your documents by taking advantage of technology like blockchain stamping, two-factor authentication, and Certificates of Completion.
Aside from Word documents, platforms like jSign support a variety of file formats, including .pdf, .ppt, .pptx, .xls, .xlsx, .bmp, .png, and .jpg.
How to Sign a Word Document With jSign
jSign makes it easy to insert a signature in a Word document.
After signing up with jSign and creating your electronic signature, follow these steps to sign a Word document:
- Log into your jSign account.
- Open your computer’s file manager, then drag and drop the Word document to upload it to jSign.
- Add yourself to the document as a signer alongside any recipients.
- Insert signature placeholders as needed throughout the document.
- Edit the signature placeholders to insert your electronic signature.
- Save the Word document.
- If necessary, set up due dates and reminders to collect signatures from others in a timely manner.
- Click Finish to send the document to the recipients.
You can repeat this process with other types of files, including PDFs, to sign documents quickly without having to print or scan them.
After signing a document, you’ll receive a Certificate of Completion that includes IP addresses, device IDs, timestamps, and other information to help verify the authenticity of the document.
jSign Features & Benefits
When it comes to signing Word documents, it’s hard to beat jSign’s wide range of user-friendly features. jSign is designed to make it as easy and convenient as possible to sign, send, and organize documents online.
Sign & Send Documents
With jSign, users can upload documents directly from their computer or a compatible cloud storage platform, insert their signatures, and add placeholders for recipients to sign.
When collecting signatures from others, you can set up due dates and reminders, send documents to an unlimited number of contacts, choose from sequential or parallel signing orders, and save signed documents in the cloud for easy access.
Blockchain Stamping
jSign uses blockchain stamping to track documents and create audit trails. All changes made to your document are recorded to help protect against tampering and fraud.
Compliance
When signing documents online, it’s important to use a platform that complies with e-signature laws to ensure your documents are enforceable. jSign is compliant with all major electronic signature laws, including the ESIGN Act and UETA.
Contact Management
With jSign, you can easily add, save, and manage contacts. Whenever you create a document, you can send it to an unlimited number of contacts, making it easy to streamline communications and document workflows.
4 Ways to Sign
jSign users can choose one of four methods to create their custom electronic signatures. You can choose from a list of signature templates, draw your signature, use a signing pad, or upload a picture of your signature.
Sign Up Now
jSign is available as a limited free trial featuring all of its capabilities, and paid plans start at just $9.99 a month.
Join today to start signing documents online!
Choose a Plan

Do you want to add a signature to a contract, a lease agreement, or any other document in MS Word but aren’t sure how to do it?
In this article, I have all the answers for you.
Like most of its other features, MS Word makes adding a signature to any document pretty simple. You don’t even need to manually add a signature line to your documents.
In just a few clicks, Word will add a professional predesigned signature section to your document that is acceptable worldwide.
Let me show you how.
3 Ways To Add A Signature To A Word Doc
We’re living in the digital age where most contracts, agreements, and signed documents change hands over the internet.
This is why businesses use multiple types of signatures in their legal documents depending on the nature of the transaction.
With MS Word you can sign your documents using three different methods.
- Electronic Signatures
- Digital Signatures
- Add A Signature Lines
These are authentic and secure signature types that are not only accepted as your legal signatures but are also good for the environment since they minimize the need for using printed documents.
Let me describe each method in more detail and how you can use it for signing documents in Microsoft Word.
Method#1: Adding An Electronic Signature To MS Word
Adding an electronic signature to your Word document gives it a personal touch and makes it authentic at the same time.
It is also the most common method for singing documents in MS Word and doesn’t take much time once you set it up on your computer.
But what exactly is an electronic signature?
What Is An Electronic Signature?
An electronic signature is an image file of your handwritten signatures that you can add to any document you want.
It is different from digital signatures that I’ll cover later in this article.
To create an electronic signature, you’ll need to physically sign a document and use a scanner to convert it into an image file that can be used in different documents.
Once you have a scanned version of your signatures, you can use it as many times as you want.
Using electronic signatures is a popular practice because of its ease of use and flexibility.
Here’s how you can add an electronic signature to your documents in MS Word.
How To Add An Electronic Signature To A Word Doc
You can add an electronic signature to any Word document by following the steps below.
Step#1: Take a clean piece of white paper and handwrite your signatures with a black pointer or pen. Before signing the paper sheet, I recommend practicing your signature on a separate piece of paper a few times to avoid any mistakes. Using black ink is preferable because of better visibility after scanning.
Step#2: Scan your signature using a scanner machine or mobile phone with a good camera and a scanner app. Scan the document at 600dpi and then save the image in the .PNG format. You’ll need to crop the scanned image to only focus on your signatures.
Step#3 (optional): Open the scanned signature in Adobe Photoshop and copy it using the Magic Wand feature. Now create a new file in Photoshop with a transparent background and paste the signatures to it. This is an optional step but it’s useful because it’ll allow you to use your signatures on documents with colored backgrounds as well.
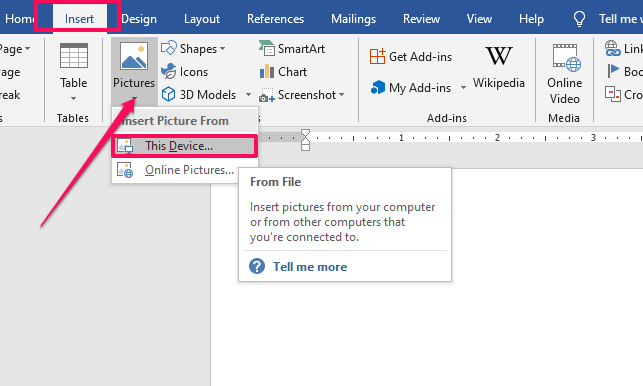
Step#4: Open MS Word and insert the scanned signature int oy our document by click on Insert–>Pictures–>This Device
Step#5: If you haven’t already cropped the image, you can do it in Word as well by clicking on it and using the Crop feature. You can also modify the size and dimensions of the image from this section.
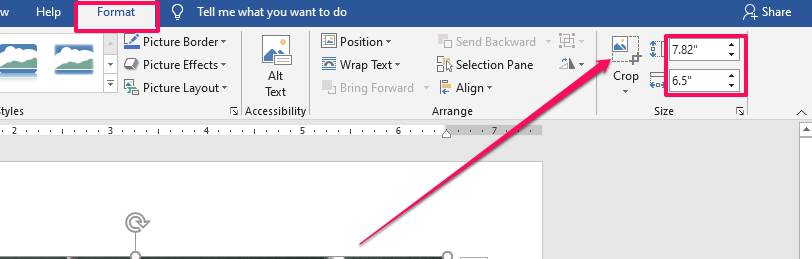
Step#6: You can now simply drag the image with your mouse to the signature section of the document.
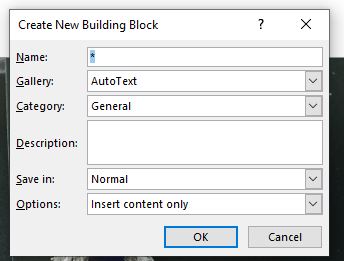
Step#7: If you want to add additional information below your signature like your name, designation, etc. type the text you want to show under the signature image. Then select both the image and the text content, and click on Insert–>Quick Parts (in the Text section)–>Auto Text–>Save Selection to Auto Text Gallery.
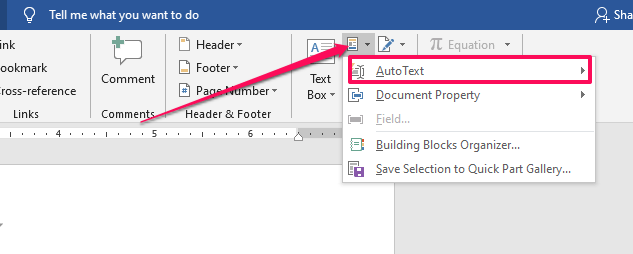
Step#8: In the Auto text pop up, add your name to the Name field, select Auto Text in the Gallery Field, and click Ok.
Step#9: Now whenever you want to add your electronic signatures to a Word document, take your pointer to the right place and click on Insert→ Quick Parts→ Auto Text and choose the name with which you saved your signatures.
That’s it, you can now add your electronic signatures to any Word document you want.
Method#2: Adding A Digital Signature To Word Doc
Another popular way to securely sign your documents in MS Word is to use a digital signature. It’s an encrypted signature method that allows the secure transfer of documents that can only be accessed by authorized persons.
They are based on a unique ID which means there’s no chance of any impersonation or identity theft.
What Is A Digital Signature?
Digital signatures are highly secure encrypted digital IDs that require a valid digital certificate from both the sender and the receiver of the signed document.
Every digital signature has a private key that can only be validated with a public key that comes with a valid digital certificate. When you have a valid digital certificate, you can use it as an authentication method for digital information (including Word documents)
What Is The Difference Between A Digital And An Electronic Signature?
An electronic signature, as I’ve already mentioned, is simply a scanned image of your real-world signatures. Most people mistakenly refer to it as a digital signature.
A digital signature is a technical term used for encrypted signatures backed by a valid digital certificate issued by a reliable third-party certification authority. They’re used to secure Word documents, provide authentication, and protect them from any unauthorized changes.
How To Create A Digital Certificate For Free
You can only get a valid digital certificate from a trusted third-party certification authority (CA). Many independent certificate authorities offer limited time (usually one year) digital certificates for a fee. But you can also get digital certificates from trusted third-party entities for free.
To get a free digital certificate to sign your documents in MS Word, follow these steps (for Windows 10).
- Go to C:Program Files (x86)Microsoft Officeroot (or C:Program FilesMicrosoft OfficerootOffice16 if you’re running the 64-bit version of Office)
- Run the application file SelfCert.exe to open the Create Digital Certificate box.
- Give your certificate a descriptive name and click OK.
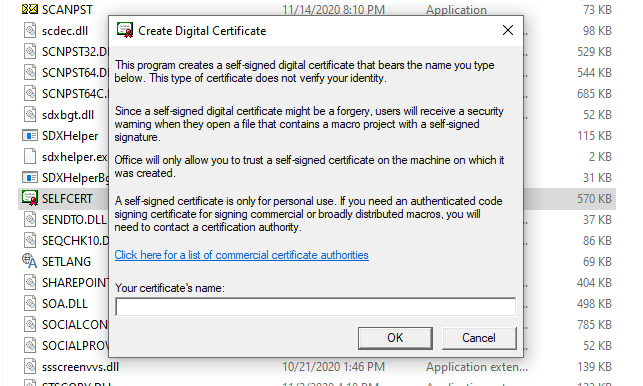
That’s it, you have a valid digital certificate that you can use to digitally sign documents in MS Word. However, this is not verified by a trusted third-party and therefore some organizations might not accept it as a valid certificate.
You can view your certificate in Chrome→ Settings→ Privacy and Security→ Security→ Manage Certificates→ Personal
Let’s now see how you can add a digital signature to Word documents.
How To Add A Digital Signature To A Word Doc
Follow these steps to add a secure digital signature to your documents.
Step#1: Open MS Word and place your cursor where you want to add the digital signature.
Step#2: Click on Insert→ Text→ Signature Line to open the Signature Setup box.
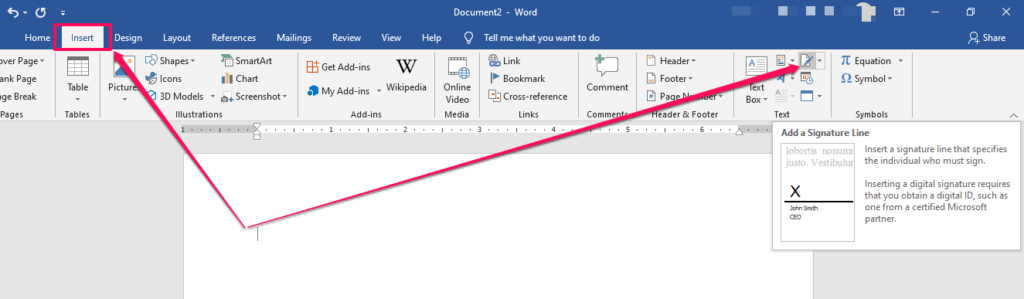
Step#3: Enter the relevant details of the signer in this box (name, designation, email). You can add an instruction note for the signer (or use the default note) along with a comments section, and the signing date.
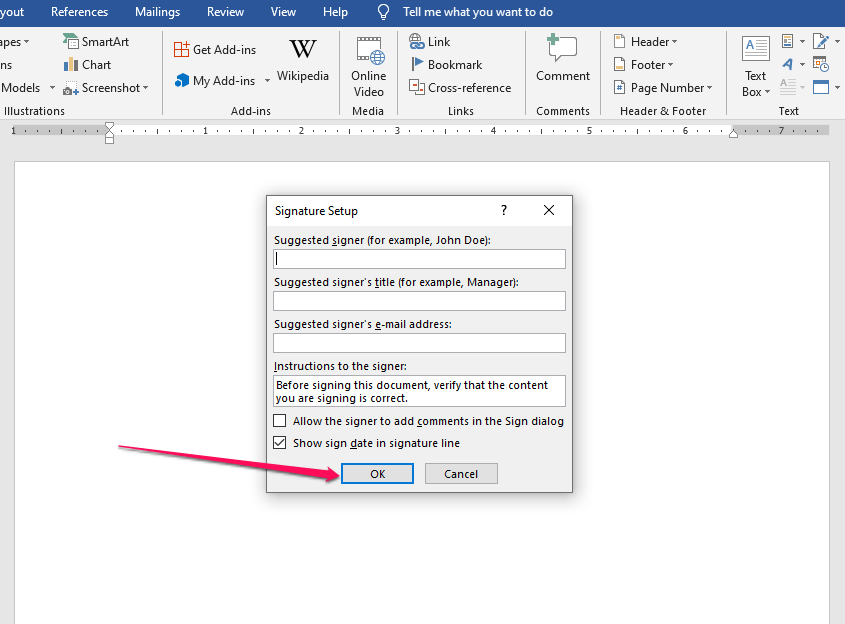
Step#4: Click OK to add a digital signature box to your document.
Step#5: To sign this document, double-click the signature box or right-click and select Sign.
Step#6: You can digitally sign a Word document either by typing your name or by uploading an image of your handwritten signatures. Both options are backed by your digital certificate.
Step#7: You’ll need to save the document before signing it.
Step#8: This will add a digital signature to your document using the certificate you created earlier. The signatures will remain valid as long as no other changes are made to the document.
How to Draw Your Signature
If you have a touch-enabled device, you can draw your signature using your finger, a pen, or a regular mouse.
Here’s how it works.
Step#1: Switch to Print Layout in Word from the View section.
Step#2: Click on Draw and choose your pen type.
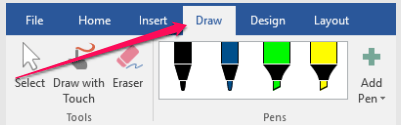
Step#3:Use your pen, finger, or mouse to draw your signature in the appropriate section of the document.
Method#3: Adding A Signature Line To A Word Doc
Sometimes you need to get your documents signed the old fashioned way. You can simply present a document to the signer and ask them to sign wherever they want.
Or you can be a bit more professional and add a signature line to your document so that the signer knows where to sign even if you’re not personally there to guide them.
Unlike the previous two methods, you don’t need a digital certificate or a scanned copy of your signatures for this method to work.
How To Add A Signature Line To A Word Doc
To add a signature line to your Word documents, follow these steps.
Step#1: Take your cursor to the section of the document where you want to add a signature line
Step#2: Click on Insert→ Add A Signature Line to open the Signature Settings box.
Step#3: If you want the signer’s name and designation below the signature line, fill this information in the Signature Settings box. Otherwise, leave it black to display a plain signature line.

You can now print the document and send it to the relevant person for their signatures.
Why It’s Important to Save Your Word Doc as a PDF
No matter what signature method you’re using, make sure you save your Word documents as PDF files once they’re ready to be sent to the signer.
This is important because PDF is a secure document format that does not allow users to make any changes to it. When you send a legal document or a contract that needs to be signed as a PDF file, you can rest assured that no one can edit its content.
Saving a Word document as PDF is really easy in Microsoft Word.
Simply click on File→ Save As and choose .PDF from the file type dropdown.

Keep the original Word document separately so that you can make changes to it in case there’s a need. If that happens, you’ll need to save the Word document in PDF format again before sending it to the relevant person.
How to Change Your Signature in Word
The process for changing your signature in MS Word depends on the type of signature you’re using.
Electronic Signature: If you’re using a scanned image of your handwritten signature for electronically signing documents in MS Word, you’ll need to upload an image file with your new signatures using the same process I described earlier in the Electronic Signature section of this article.
Digital Signature: If you’re using a digital signature, you’ll need to create a new digital certificate using the same process I described in the Digital Signature section. Once you have the new certificate, you’ll need to create a new signature in Word from Insert→ Text→ Add A Signature section.
Signature Line: If there’s a change in the signer’s name or designation, you can change it from the Add a Signature section. Otherwise, leave the signature line untouched.
Are You Ready To Add Your Signature To Word Documents?
As you can see, adding a signature to MS Word documents is quite simple. However, it gives authenticity to your documents, makes them more secure, and adds a professional touch as well. Let me know if you have any questions about the different signature methods I’ve described in this article.