
![]()
Download Article
![]()
Download Article
This wikiHow teaches you how to create a poster-sized document in Microsoft Word for Windows or macOS. Before you get started, make sure your printer is capable of printing larger sizes and that you have the desired paper size. If you can’t (or don’t want to) print the poster from home, you can send or bring the file to a professional printing service.
Steps
-

1
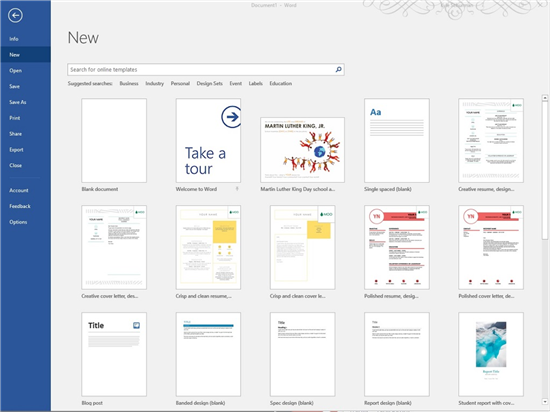
Open Microsoft Word. If you haven’t already done so, launch Microsoft Word from the Start menu (Windows) or Applications folder (macOS). This opens the app to the «New» page.
-
2
Click the Blank Document option. It should be the first option in the list of new file types.
Advertisement
-
3
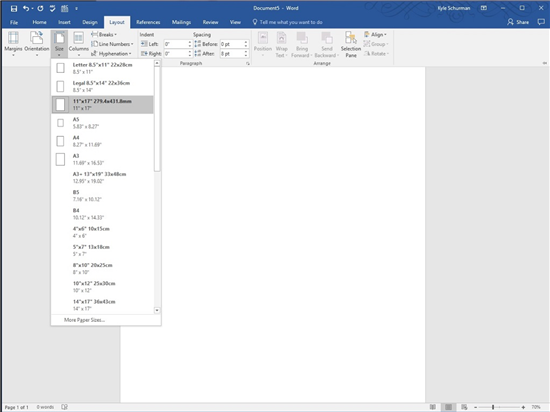
Click the Layout or Page Layout tab. The name of the tab will vary by version, but you’ll always find one of these options at the top of the app.
-
4
Click the Size button on the toolbar. It’s near the top-left corner of the app. This displays different size options for your document.
-
5
Select a size for your poster. Keep in mind that if you’re using a home printer, it may not support larger paper sizes. To specify a custom size, click More Paper Sizes at the bottom of the menu and make your selections.[1]
- If you definitely need a larger poster made, you can create the file, save it to a flash drive, and then print it at a professional printing location like FedEx or Staples.
- A common poster size supported by most home printers is 11×17 inches. You can find 11×17 paper anywhere that sells printer paper.
-
6
Select a poster orientation. If you want your poster to print in landscape (horizontal) mode, click the Orientation menu on the Page Layout tab and select Landscape. If you’re okay with the poster being set up in Portrait (vertical) mode, you can skip this step.
-
7
Create a headline. Many posters have a large text headline at the top. If you’d like to add a headline, follow these steps:
- Click the Insert tab at the top.
- Click Text Box near the top-right corner of Word.
- Select Simple Text Box option to insert a text box.
- Type a few words you want to appear large on the poster.
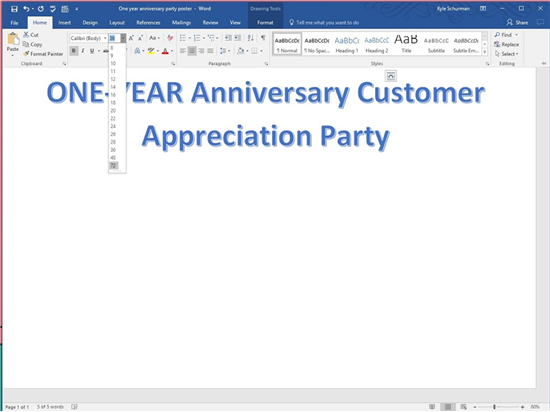
- Highlight the text in your headline.
- Click the Home tab to return to the font options, and then choose an easy-to-read font at a large size. You can also choose colors if you plan to make a color poster.
- Drag the edges of the text box to the desired size. You can also move the text box to another location by hovering the mouse cursor over one of the lines and then dragging.
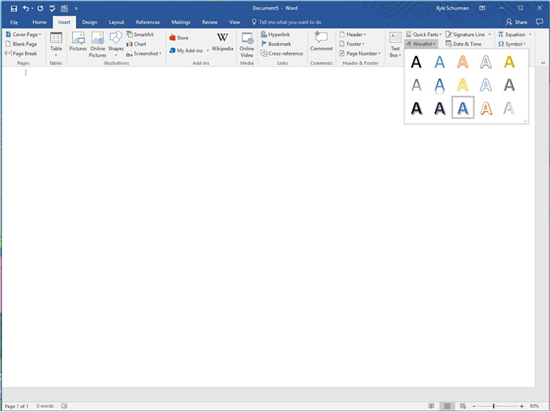
- Another way to insert a headline is to click Word Art on the Insert tab and then select a design. This is a quick way to stylize text without having to specify font colors and sizes. Check out How to Create Word Art to learn more about this feature.
-
8
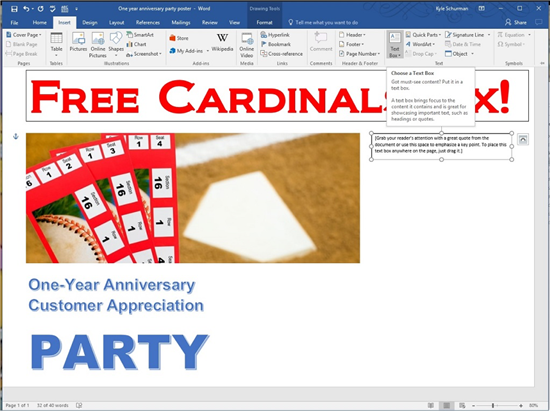
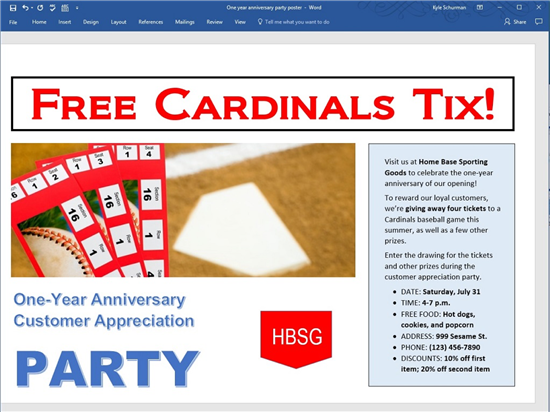
Insert graphics into the poster. If you have a certain photo or illustration you want to include in the poster, you can insert it by clicking the Insert tab and selecting Pictures. If you want the photo to appear below the headline, drag the headline’s text box above the photo.
- You can also insert shapes and customize them. To insert a shape, click the Insert tab and select Shapes. You can then choose a shape and use the mouse to draw it at the desired location. You can type on shapes by double-clicking them to activate the cursor.
-
9
Add regular text. To insert text into your poster, add another text box like you did when creating the headline (on the Insert tab), and then type anything you wish. You can then format the text with the desired fonts and orientation back on the Home tab.
- If you want to add text to multiple areas on the poster, put each block of text into its own text box. This makes it easier to format areas of text individually and move them around if necessary.
- To change the orientation of your text, click one of the orientation options in the «Paragraph» section of the Home tab.
- To learn about wrapping text around images, see How to Wrap Text in Word.
- For tips on orientating text, see How to Change the Orientation of Text in Microsoft Word.
-
10
Save your finished poster. To do so, click the File menu at the top-left corner, select Save As, and then save to your desired location.
-
11
Print the poster. If you plan to print the poster at home, follow these steps:
- Load the appropriate paper size into your printer. Make sure it matches the paper size you selected for your poster.
- Click the File menu at the top-left corner.
- Click Print.
- Select your printer, color preferences, and other settings.
- Click Print.


Advertisement
Add New Question
-
Question
How do I overlap a picture in Microsoft word?

Right-click on the image and click the Options. Press either «send to front» or «send backwards».
-
Question
How do I save the poster as a .JPG file?
Go to File, Save As and choose JPG from the drop-down menu under file name. Click JPG, and you’re done.
-
Question
How do I rotate phrases on my poster?
Left click and hold on the top-right corner (or any corner), then move your mouse.
See more answers
Ask a Question
200 characters left
Include your email address to get a message when this question is answered.
Submit
Advertisement
Video
-
To add a border around the poster, click the Design tab and select Page Borders.
Thanks for submitting a tip for review!
Advertisement
About This Article
Article SummaryX
1. Create a blank document.
2. Click the Layout tab.
3. Click Size.
4. Select a paper size.
5. Design your poster.
6. Save and print.
Did this summary help you?
Thanks to all authors for creating a page that has been read 561,336 times.
Is this article up to date?
To make a poster, you need to open the Graphic Design section and find Poster in the sub-category panel. Click the Poster tab, and the poster templates will show on the below panel. Then, you can select any template, or you can also choose to create a poster from scratch.
Contents
- 1 How can I make a poster?
- 2 What is the best Microsoft program to make a poster?
- 3 How do I make a poster flyer in Word?
- 4 How can I make a poster on my computer?
- 5 How do I make a picture into a poster?
- 6 How do I make a poster in open office?
- 7 How do I create a banner in Word?
- 8 How can I make a poster on my computer for free?
- 9 How do I create a Word template?
- 10 How do you make a 4 up flyer in Word?
- 11 How do I print a banner size in Word?
- 12 How do you make Word A3?
- 13 Can I make a poster from a picture?
- 14 How do you make a pamphlet on Open Office?
- 15 How do I make a poster in LibreOffice?
- 16 How do I Print a poster on multiple pages in Word?
- 17 What is the best free online poster maker?
- 18 How do I make a virtual poster presentation?
- 19 How do you create a layout in Word?
- 20 How do I create a fillable template in Word?
How can I make a poster?
How To Design a Poster From Scratch
- Identify the goal of your poster.
- Consider your target audience.
- Decide where you want to share your poster.
- Select a pre-made poster template.
- Pick a relevant or branded color scheme.
- Include a clear call to action.
- Use varied fonts to create visual hierarchy.
What is the best Microsoft program to make a poster?
For example, Microsoft Publisher enables you to design a poster and print it out from a large printer. Publisher allows you to print posters up to 240-by-240 inches.
How do I make a poster flyer in Word?
How to Create a Flyer in Microsoft Word Using Templates
- In Word, go to the File tab and select New.
- Under the search bar, select Flyers.
- Browse through the free flyer templates Word displays until you find a design you like.
- Choose Create.
- To change the text, select it and type the new information.
How can I make a poster on my computer?
Create a poster
- In the Publication Types task pane, click Banners, do one of the following:
- Under Blank Sizes, click the paper size that you want, or click Create custom page size and create a custom page size.
- Click Create.
- In the Format Publication task pane, do any of the following:
- On the File menu, click Save As.
How do I make a picture into a poster?
How to Create a Poster
- Open Fotor and click “Create a Design” feature, and select “Poster” layout.
- Choose a preset poster design template, and drag and drop your photos onto the template, or create your own template from scratch.
- Manage overlays, backgrounds, and text to maximize your poster design.
How do I make a poster in open office?
- Select “New” from the OpenOffice File menu and then “Drawing.”
- Specify a page size if you want your poster to be a size other than the default letter size.
- Click the “Background” tab.
- Select “Picture” from the Insert menu.
- Add shapes, such as an oval or rectangle, by selecting one from the menu in the right pane.
How to make a banner in Word
- Step 1: Open Microsoft Word.
- Step 2: Search for banner templates.
- Step 3: Open the template.
- Step 4: Edit your template.
- Step 5: Save your banner.
- Step 1: Open a New Document.
- Step 2: Set Page Margin.
- Step 3: Add Text and Images.
How can I make a poster on my computer for free?
How to make a poster in 5 steps:
- Join Venngage – it’s completely free to use!
- Pick a poster template – we have 100s to choose from.
- Change the text, icons, photos, and color scheme using our free Poster Maker.
- Add extra text boxes or new icons to create the perfect poster.
- Share your poster with the world!
How do I create a Word template?
Click the File tab, and then click New. Under Available templates, click New from existing. Click a template or a document that is similar to the one that you want to create, and then click Create New. Make the changes you want to the margin settings, page size and orientation, styles, and other formats.
How do you make a 4 up flyer in Word?
How to Make 4 Party Flyers on 1 Page
- Click on the “New” icon in your word processing program, such as Microsoft Office.
- Double-click “Flyers” and then “Event Flyers.” Select the event flyer template you would like to customize.
- Personalize your event flyer.
- Save your flyer.
Open Microsoft Word. Click the “Page Layout” tab. Click the “Size” button. Click “More Paper Sizes.”
How do you make Word A3?
Just go to Layout | Page Setup | Size and choose A3 from the dropdown. Whenever possible, change the paper size before writing the document.
Can I make a poster from a picture?
With a myriad of sizes and framing options, you can turn any picture into a poster. Let your creativity shine through by designing and printing a custom photo poster from Collage.com.
How do you make a pamphlet on Open Office?
How to Print a Booklet in OpenOffice
- Start OpenOffice.
- Click “Format” and “Page” to open a dialog window.
- Click “File” and “Print,” then select the “Page Layout” tab.
- Click the “Brochure” button, select “Back sides / Left pages” from the “Page sides” drop-down and click “Print” to print the left-side pages.
How do I make a poster in LibreOffice?
LibreOffice Impress
To set up an Impress file for poster design, you need to use the Slide menu: From the Slide menu, hover your mouse cursor over Slide Layout , and then select Blank . This will change the slide to a blank layout that you can use for your poster canvas.
How do I Print a poster on multiple pages in Word?
Select File > Print, then hit the “Print” button. You will see the following page. Select how many pages you want to tile horizontally and vertically (how big) you want the poster, what size paper (letter or legal), and the orientation (portrait or landscape).
What is the best free online poster maker?
The best online poster maker in 2021
- Adobe. Spark.
- Canva. Poster Maker.
- Venngage. Online Poster Maker.
- PosterMyWall.
- Stencil.
- DesignCap.
- Piktochart.
How do I make a virtual poster presentation?
How to design an effective virtual poster
- Follow the conference guidelines. To start off, make sure you have the correct image guidelines prescribed by the conference organizers.
- Pick the right tool.
- Make sure your poster is clear and concise.
- Include interactive media.
- Make your poster accessible.
How do you create a layout in Word?
Click the File tab. Click New, click Maps and Floor Plans, and then under Available Templates, click the template that you want to use. Click Create. On the Insert tab, in the Illustrations group, click CAD Drawing.
How do I create a fillable template in Word?
Tech Tip: How to Create Fillable Forms in Microsoft Word
- Enable Developer Tab. Open Microsoft Word, then go to the File Tab > Options > Customize Ribbon > check the Developer Tab in the right column > Click OK.
- Insert a Control.
- Edit Filler Text.
- Design Mode button again to exit the mode.
- Customize Content Controls.
Вам нравятся необычные плакаты? Вы когда-нибудь мечтали сделать изумительные плакаты самостоятельно? Пришло время воплотить в жизнь мечты. Программа Crello предлагает шаблоны плакатов с предустановленными размерами. Вам не придется изменять размер и обрезать их. Просто сосредоточьтесь на творческом процессе, чтобы нарисовать дизайн.
Редактор Crello включает коллекцию из 10 500+ элементов дизайна. Это как бесплатные, так и платные элементы. Они уникальны и готовы к использованию. Их можно комбинировать, загружать свои собственные изображения и шрифты, менять уже сделанные шаблоны. Творчество поглощает, и процесс создания постеров — это отличный способ провести свое время.

Если вы организовываете вечеринку, собрание клуба или детский праздник, то хотите, чтобы все было идеально. Выполняете огромное количество организационных задач и делаете все возможное, чтобы успеть в срок. Важной вещью, которая помогает продвигать мероприятие, является афиша. Конечно, она должна быть потрясающей — с привлекательным дизайном и отличным текстом.
Есть два варианта: либо вы нанимаете дизайнера, либо делаете все самостоятельно. Если выбираете второй вариант, вы экономите деньги и наслаждаетесь творческим процессом. Убиваете двоих зайцев одним выстрелом. В результате получаете новый опыт и множество великолепных плакатов.
 Обычный плакат
 Обычный плакат
Выберите формат PDF для печати, чтобы сохранить высокое качество плаката.
Не стоит бояться провала. Дизайнеры Crello подготовили 12 000+ шаблонов, среди которых найдется множество плакатов.
Возможно, самое лучшее то, что вы не должны платить за свой рекламный постер. Просто используйте бесплатные фоны, текстовые бейджи, шрифты, маски и другие объекты дизайна. Еще можно купить премиум-элементы за $0,99 каждый. Это разумная цена, потому что вы будете использовать их неограниченное количество раз.
Crello использует файлы cookie, чтобы обеспечить необходимую функциональность сайта и улучшить ваш опыт. Используя наш веб-сайт, вы соглашаетесь с нашей Политикой конфиденциальности
Источник: https://crello.com/ru/create/posters/
Как создать плакат с помощью Microsoft Word
Если вам нужно сделать небольшой или средний плакат, Microsoft Word 2013 будет хорошим выбором, особенно если вы уже знакомы с приложением. Все те же элементы, которые вы использовали бы для создания документа, могут быть использованы для плаката, однако есть несколько потенциальных проблем, на которые стоит обратить внимание.
Макет страницы
Для начала откройте новый пустой документ Word. Нажмите на Макет страницы вкладка, чтобы установить поля размера плаката.
Нажмите на Маржа а также Размер значки на ленте, чтобы установить их по мере необходимости. Если вы не хотите поля, нажмите Пользовательские поля в нижней части раскрывающегося меню Margins и установите для каждого поля значение .
 Все четыре поля и желоб установлены на ноль. Кредит: Снимок экрана любезно предоставлен Microsoft.
Чтобы использовать нестандартный размер страницы, нажмите Больше размеров бумаги В нижней части раскрывающегося меню «Размер» укажите желаемую высоту и ширину, которые измеряются в дюймах.
 Word принимает размеры страницы только от 0,1 до 22 дюймов. Кредит: Снимок экрана любезно предоставлен Microsoft.
Добавление текста
У вас есть два варианта добавления текста на ваш постер. Вы можете просто напечатать текст, как если бы вы были буквой, или использовать текстовые поля.
Если вы вводите много текста, рассмотрите возможность использования двух столбцов, функция доступна в Макет страницы Лента. Это визуально разбивает текст на части, делая его более привлекательным для чтения.
 Столбцы могут быть одинаковой или разной ширины. Кредит: Снимок экрана любезно предоставлен Microsoft.
Текстовые поля идеальны, если на плакате светлый текст, как в приведенном здесь примере. Прежде чем добавлять текстовые поля, нажмите Войти несколько раз, чтобы добавить свободное место на постер. Перемещение текстовых полей и изображений в документе Word может быть проблематичным без свободного места.
Чтобы вставить текстовое поле, нажмите Текстовое окно значок под вкладкой Вставка.
Введите текст, который вы хотите в качестве заголовка, а затем нажмите Ctrl-A выделить это.
Нажмите на Главная и затем измените шрифт, размер шрифта, цвет по мере необходимости.
Если вы хотите, чтобы размер шрифта превышал размер по умолчанию в 72pt, щелкните число и введите нужный размер. Используйте значки в разделе «Абзац» вкладки «Главная», чтобы изменить выравнивание.
 Выровняйте текст по центру, щелкнув значок «Выравнивание по центру». Кредит: Снимок экрана предоставлен Microsoft.
Добавление изображений
Вставьте изображения с вашего компьютера, нажав Картина значок под вкладкой Вставка. Чтобы найти изображения с помощью Bing Image Search, нажмите Фотографии онлайн значок.
Как только изображение окажется на странице, перетащите его в любую нужную вам позицию. Перетащите угловые якоря, чтобы изменить размер изображения. Дополнительные параметры находятся в меню «Формат изображения», в том числе «Обтекание текстом» и «Формат изображения».
 Лента «Формат инструментов изображения» содержит параметры обрезки и редактирования изображений.
Добавьте дополнительные фотографии или текст по мере необходимости. Использовать Увеличить ползунок, чтобы увеличить, чтобы вы могли убедиться, что любые изображения с измененным размером не пикселируются в полном размере. Уменьшите изображение, чтобы сразу увидеть весь плакат.
 Перетащите ползунок «Масштаб» влево, чтобы уменьшить масштаб.
Добавление фона
Белый фон более удобен для чернил вашего принтера, но если вы хотите привлечь внимание людей, цветной фон работает лучше. Хотя в Word есть цвет фона, он не будет виден при печати. Кроме того, вы можете в качестве фона или даже.
Чтобы добавить цвет фона, нажмите Вставить меню, выберите Формы а затем нажмите Прямоугольник.
 Перетащите прямоугольник над страницей, чтобы добавить цветной background.credit: Снимок экрана любезно предоставлен Microsoft.
Перетащите курсор на всю страницу и затем щелкните правой кнопкой мыши форму, чтобы изменить ее заливку и цвет контура. В нашем примере мы используем градиент, который является опцией в дополнение к цветам, которые доступны при нажатии заполнить.
 Щелкните правой кнопкой мыши форму, чтобы изменить ее Style.credit: Скриншот предоставлен Microsoft.
Как только форма выглядит так, как вы хотите, снова щелкните ее правой кнопкой мыши и нажмите Отправить назад а затем выберите Отправить за текстом, Обратите внимание: если вы используете темный фон, вам может потребоваться изменить цвет шрифта на более светлый.
 Отправьте изображение позади текста, чтобы оно оставалось в фоновом режиме. Кредит: Снимок экрана любезно предоставлен Microsoft.
Печать и экспорт
Когда вы закончите плакат, нажмите Ctrl-S чтобы сохранить это. Если вы отправляете плакат на коммерческий принтер, убедитесь, что текст не слишком близко к краям. Обычно вы должны оставить 1/4-дюймовое пространство вокруг краев, чтобы учесть кровотечение во время процесса печати.
Чтобы экспортировать плакат в формате PDF, нажмите файл меню и выберите экспорт.
Чтобы распечатать плакат, нажмите файл меню и выберите Распечатать, Обратите внимание, что большинство домашних принтеров не будут печатать по краю бумаги, поэтому вам придется принять тонкую белую рамку вокруг плаката или подрезать плакат ножницами и линейкой.
 Это наш законченный плакат. Кредит: Снимок любезно предоставлен Microsoft.
Pro Советы по печати
Если ваш домашний принтер не поддерживает большие размеры бумаги, Microsoft предлагает использовать Publisher, который поставляется с Office 2013. Publisher может печатать большие плакаты по частям, которые затем можно собрать и склеить вместе.
Чтобы открыть заполненный документ Word в Publisher, нажмите открыто и изменить Формат меню для Документ Word 2007-2013, После того, как Publisher преобразует файл DOCX, вам может потребоваться настроить положение и размеры изображения, текста..
Источник: https://ru.computersm.com/84-how-to-create-a-poster-with-microsoft-word-59363
Как напечатать надпись для плаката и объявление в Word
Благодаря Word и Publisher можно печатать буквы для плакатов и изменять их размер в пределах от 1-го, до 1638.
Для новичков сложность в том, что не понятно, как сделать буквы больше, если стандартные размеры ограничены 72-м размером шрифта.
- В данной статье рассмотрен вопрос увеличения стандартного размера шрифта, а так же вопрос как создать заголовок WordArt.
- Если Вас интересуют уроки ворд, рекомендую так же ознакомиться с вопросами как вставлять рисунки и схемы.
Как печатать большие буквы
Устанавливаем масштаб поменьше так как мы должны видеть листы и буквы на них, чтобы редактировать надпись.
В Word 2010 в строке состояния находим инструмент — масштаб.
С помощью ползунка или нажимая на кнопку минус уменьшаем размер листа.

1.2. В Word 2003 масштаб можно установить двумя способами — выбрав нужный на панели инструментов.

Выбираем масштаб

В открывшемся окне выбираем масштаб.

В открывшемся окне выбираем масштаб.После того, как мы выбрали масштаб мы можем видеть несколько листов сразу и как будет выглядеть надпись.
2. Меняем размер букв.
Если вы не знаете как увеличить размер букв (больше, чем 72pt), то это достаточно просто.
Стираем то, что написано в окне «Размер шрифта»:
- устанавливаем курсор внутри окна «Размер шрифта»;
- удаляем число обозначающее старый размер с помощью клавиши backspace или delete;
- печатаем новый размер шрифта помня, что верхняя граница, это число 1938 и если набрать 1939, то программа сообщит об ошибке.
2.1. В word 2010 переходим на вкладку «Главная», стираем старый размер шрифта и впечатываем 72, а затем нажимаем Enter.

Меняем старый размер шрифта на новый
2.2. В word 3003 так же нужно стереть шрифт.

Устанавливаем размер шрифта
- Вот, что у меня получилось.

Вот так мы получили заголовок объявления
Работа с надписями WordArt
В ворд 2010 такая возможность отсутствует, зато присутствует в Publisher, где надпись можно напечатать и скопировать в word.
Чтобы сделать текст WordArt, в ворд 2003 включаем панель рисование, для этого нажимаем «Вид» / «Панель инструментов» / «Рисование». Теперь нажимаем на букву А на панели WordArt и выбираем шрифт для текста объявления.

Теперь нажимаем на букву А на панели WordArt
- И теперь можно писать текст полностью или частями…

Иногда приходится писать текст частями
4. После того, как мы получили часть текста ее нужно подвинуть, переместить, но так просто не получится — придется изменить настройки объекта WordArt. Для этого выделяем текст, жмем на выделенном объекте правой кнопкой мыши и выбираем в появившемся окне «Формат объекта WordArt»
Формат объекта WordArt
5. Затем в появившемся окне мы должны перейти на закладку «Положение» и выбрать «По контуру», теперь наш объект мы можем свободно перемещать и увеличивать.
Перейти на закладку Положение и выбрать По контуру
Вывод
Если Вы собрались печатать надпись для плаката в word, то это можно сделать с помощью обычного текста увеличенного в размерах и текста WordArt.
Причем не всегда новая программа обладает лучшими возможностями и устаревшая программа word, может печатать точно так же, просто необходимо знать расположение инструментов.
Источник: http://www.lamer-stop.ru/2010/04/18/kak-napechatat-nadpis-dlya-plakata-i-obyavlenie-v-word.html
Даже если вы новичок в дизайне, создание потрясающего плаката может стать простым и забавным процессом. Эти 10 советов помогут вам создать плакат, который вскружит головы всем.
Плакаты – бесценные средства для создания шумихи и волнения в преддверии события. Привлекательный дизайн плакатов поможет вам продвигать, продавать билеты и передать посетителям атмосферу мероприятия.
1. Начинайте с правильно ПО
Плакаты – это самые простые дизайнерские макеты, состоящие только из одного печатного листа. Вы можете создать плакат, используя практически любую программу, которая имеет возможность настроить страницу для печати (то есть позволяет работать в цветовом режиме CMYK), но некоторые программы лучше подходят для других задач.
Многие профессиональные дизайнеры предпочитают версточную программу, такую как Adobe InDesign, для создания макетов плаката. Это программное обеспечение позволяет вам подготовить свой плакат для печати, установив в настройках файла галочку на «Печать» и добавив отступ по краям страницы, предоставляя вам гибкость для изменения размера страницы вашего макета по мере необходимости.
Photoshop необходим для редактирования фотографий, прежде чем передать окончательный результат в макет InDesign, в то время как векторное программное обеспечение, такое как Illustrator или InkScape, предлагает больше возможностей для создания векторных иллюстраций, логотипов или более сложных эффектов для включения в ваш дизайн.
2. Уточняйте размер постера
Плакаты выпускаются в самых различных размерах, которые варьируются в зависимости от их конечного использования, а также страны, в которой они будут висеть. Зритель будет смотреть на плакат метро с большего расстояния, чем на плакат, прикрепленный к доске объявлений, поэтому вам придется адаптировать масштаб элементов на верстке, учитывая эти параметры.

После того, как вы определили размер своего плаката, привыкните печатать чертежи или разделы вашего дизайна в натуральную величину, чтобы понять, все ли элементы хорошо видно с необходимого расстрояния.
Подборка крутого UI контента за прошедшую неделю #38
3. Создавайте скетч или черновик, прежде чем перейти к разработке
Плакаты – невероятно творческая форма дизайна. Их цель заключается в том, чтобы захватить и удержать внимание.
Поэтому важно узнать мнение как можно большего количества людей об изначальной идее, прежде чем тратить уйму времени и сил на ее воплощение.
Создайте для начала набросок будущего плаката, а лучше несколько, и покажите всем друзьям и знакомым. Пусть они скажут свое откровенное мнение на счет идеи.

4. Найдите стиль, который будет работать
Этот плакат «Music Party» дизайнера Mihyun Sim вписывается в винтажный иллюстрированный стиль, который черпает идеи из народного искусства и дизайна середины века. Этот ностальгический, забавный стиль идеально подходит для музыкального мероприятия.


Определите, что нравится той целевой аудитории, на которую рассчитан плакат. Тогда будет проще понять, на какой стиль ориентироваться при создании дизайна. Выбрав стиль, придерживайтесь его. Довольно часто встречаются плакаты, в которых смешано несколько разных стилей. И выглядит это ужасно.
5. Соблюдайте баланс
Плакаты обычно состоят из сочетания типографики и фотографий или иллюстрированной графики. И между ними нужно соблюсти тот баланс, который позволит и захватить внимание людей, и передать весь необходимый посыл. Например, на этом постере, рекламирующем британский телеканал BBC, дизайнеры решили вовсе разделить пространство пополам, отдав равные части плаката каждой составляющей.

6. Используйте модульную сетку
Это помогает определить, где элементы должны сидеть на странице, а также создать визуальную иерархию, направляя зрителя из точки A в точку B. Сгруппировав некоторые квадраты сетки вместе, вы можете создавать более крупные секции для размещения наиболее видных элементов плаката.

7. Используйте цвет, чтобы привлечь внимание
Иногда не лишним будет и немного перебрать с яркостью цветовой гаммы. Конечно, соблюдайте рамки адекватности и не сочетайте несочетаемое. Но вот что-то такое, как на примере ниже, выглядит довольно интересно.
Новый облик Киева без уродливой рекламы

8. Передайте атмосферу через дизайн
Очень важно, чтобы плакаты давали зрителю прочувствовать вкус того, какова будет атмосфера вашего мероприятия. Используйте цвет, который лучше всего отражает настроение предстоящего ивента.

9. Используя фотографию человека, установите зрительный контакт

10. Сделайте типографию кричащей

Эти правила хороши для создания идеального плаката, но также вам следует полагаться на собственное чувство стиля, знание композиции и правильность использование цветов. Вооружившись этими правилами, вы сможете создать достойный продукт.
Источник: https://say-hi.me/design/10-sovetov-kak-sozdat-poster-zasluzhivayushhij-vnimaniya.html
Делаем афишу на своем компьютере
Все когда-нибудь смотрели на красивые плакаты в соцсетях или на досках объявлений и со временем возникал вопрос, как сделать афишу на компьютере самостоятельно?
Стоит читать ниже и узнать о двух лучших способах решения такой задачи.
Создание афиши с помощью Microsoft Word
Если нужно сделать небольшую или среднюю афишу, Microsoft Word прекрасно справится с этим заданием. К тому же практически каждый пользователь уже знаком с приложением. Все те же элементы, которые используются для создания документа, могут быть использованы для плаката.
Однако есть несколько потенциальных проблем или сложных моментов, на которые стоит обратить внимание.
Макет страницы
Для начала стоит открыть новый пустой документ Word и выполнить такие шаги:
- Перейти на вкладку «Макет страницы» или «Разметка страницы», чтобы задать отступ для плаката.
- Щелкнуть значки «Поля» и «Размер» на ленте, чтобы установить их по мере необходимости. Если поля не нужны вовсе, тогда нажать «Пользовательские поля» в нижней части раскрывающегося меню «Поля» и установить для каждого поля значение 0.

- Чтобы использовать пользовательский отступ страницы, нажать «Другие размеры бумаги» в нижней части раскрывающегося меню «Размер» и указать желаемую высоту и ширину, которые измеряются в дюймах или сантиметрах.

Добавление текста
Есть два варианта добавления текста на постер. Можно просто напечатать текст, или использовать текстовые поля.
Если необходимо ввести много текста, следует рассмотреть вариант использования двух столбцов – функция, доступная на ленте макета страницы. Это поможет визуально разбить текст на части, делая его более привлекательным для чтения. Столбцы могут быть одинаковой или разной ширины.

Текстовые поля будут выглядеть лучше, если задействовать светлый фон и темный текст. Прежде чем добавлять текстовые поля, нужно нажать клавишу Enter несколько раз, чтобы добавить свободное место на постер.
Перемещение текстовых полей и изображений в документе Word может быть проблематичным без доступного свободного места.
Чтобы вставить текстовое поле, достаточно щелкнуть значок «Текстовое поле» на вкладке «Вставка».
Сначала стоит ввести текст, который требуется в качестве заголовка, а затем нажать Ctrl-A, чтобы выделить его. После нужно перейти на вкладку «Главная», и изменить шрифт, размер шрифта и цвет по мере необходимости.
Если есть потребность в том, чтобы размер шрифта превышал величину по умолчанию (в 72pt), следует щелкнуть на число и ввести нужное значение вручную. Есть смысл использовать значки в разделе «Абзац» вкладки «Главная», чтобы изменить выравнивание.

Добавление изображений
Для прикрепления картинок или фотографий, достаточно выполнить такие шаги:
- Вставить изображение с компьютера, щелкнув значок «Рисунок» на вкладке «Вставка». Чтобы найти картинку с помощью поиска Bing, щелкнуть значок «Онлайн-изображения».
- Как только рисунок окажется на странице, перетащить его в любую нужную позицию.
- Переместить угловые якоря, чтобы изменить размер.
- Дополнительные параметры находятся в меню «Формат изображения», включая «Обтекание текстом». Инструмент «Формат» также содержит параметры обрезки и редактирования.
- Добавить дополнительные фотографии или текст по мере необходимости.
- С помощью ползунка «Масштаб» можно увеличить масштаб изображения, чтобы убедиться, что в рисунках с измененным размером не появляются пиксели.
- Уменьшить масштаб, чтобы просмотреть всю афишу.
Добавление фона
- Белый фон более удобен для печати, но чтобы привлечь внимание людей, лучше использовать цветной фон.
- Чтобы добавить цветной фон, необходимо открыть меню «Вставка», выбрать «Фигуры» и нажать «Прямоугольник».


Далее стоит нарисовать курсором фигуру на листе и затем щелкнуть правой кнопкой мыши на форму, чтобы изменить ее заливку и цвет контура. Можно воспользоваться градиентом, который является дополнением к цветам, доступным при нажатии кнопки «Заливка».

Как только форма будет выглядеть так, как запланировано, надлежит снова щелкнуть ее правой кнопкой мыши, нажать «На задний план» и выбрать «Поместить за текстом». Нелишне обратить внимание на то, что если задействован темный фон, может потребоваться изменить цвет шрифта на более светлый.
Печать и экспорт
Когда постер готов, нужно нажать Ctrl-S, чтобы сохранить его. Если запланировано отправить плакат на коммерческий принтер, подобает убедиться в том, что текст расположен не слишком близко к краям. Обычно должно остаться пространство 1/4 дюйма по краям, чтобы учесть особенности принтера во время процесса печати.
Чтобы экспортировать плакат в формате PDF, следует открыть меню «Файл» и выбрать «Экспорт».
Чтобы распечатать плакат, целесообразно открыть меню «Файл» и выбрать «Печать». Полезно обратить внимание, что большинство домашних принтеров не будут печатать по краю бумаги, поэтому придется оставить тонкую белую рамку вокруг плаката или подрезать плакат ножницами вручную.
Adobe Spark Post
Не нужно быть опытным графическим дизайнером, чтобы создавать привлекательные плакаты; все, что нужно, это Adobe Spark Post – бесплатный производитель плакатов, который прост в использовании.
Adobe Spark – это набор инструментов дизайна, который позволяет создавать собственные плакаты, видеоролики и веб-страницы с помощью компьютера или мобильного устройства iOS.
Инструмент для афиш называется Spark Post. Это приложение предлагает широкий спектр шаблонов и макетов, которые можно использовать для создания собственных постеров.

Источник: https://vacenko.ru/delaem-afishu-na-svoem-kompyutere/
Как распечатать картинку на нескольких листах А4?

Печать картинки на нескольких листах А4 позволяет сделать постер, рекламный плакат, большую географическую карту или даже настольную игру при помощи обычного домашнего или офисного принтера. Рисунок можно распечатать даже без установки дополнительных программ – достаточно драйвера устройства и стандартного ПО, входящего в состав операционных систем Windows.
Подготовка к печати
В первую очередь нужно подобрать подходящий рисунок. У картинки должно быть достаточно большое разрешение, чтобы при печати на нескольких листах изображение сохранило четкость. Чем крупнее будет плакат, тем выше должно быть разрешение.
Следующий этап – выбор устройства. Для печати постеров в той или иной мере подходят все принтеры, но одни модели оказываются значительно удобнее других. Приведем пример.
Нередко требуется распечатать большую картинку на нескольких А4 и совместить листы встык. Для этого нужна печать без полей, но такая опция есть не у всех принтеров. Если нужной функции у устройства нет, после печати придется обрезать поля.
Это не всегда удобно, да и размер плаката в результате уменьшается.
Есть ли такая опция у вашего принтера и как ее включить, можно узнать из инструкции. Универсального варианта настроек не существует. В одних случаях достаточно поставить галочку «Печать без полей», в других нужно передвинуть ползунок, увеличив размер изображения на листе и пр. Особенности настройки зависят от производителя и от модели устройства.

Также у некоторых принтеров есть опция «Линии обрезки на полях». Если активировать ее, при печати устройство разметит каждую страницу и укажет часть листа, которую нужно обрезать, и границы повторяющихся фрагментов. Такая разметка удобна, если вы планируете не соединять листы встык, а накладывать друг на друга внахлест и склеивать.
Как напечатать постер на принтере
В большинстве случаев все необходимые настройки можно задать в меню устройства. Алгоритм простой:
- Открыть рисунок и нажать «Печать» или Ctrl+P.
- Выбрать «Свойства», а в открывшемся окне – вкладку «Страница».
- В разделе «Макет страницы» выбрать из списка «Печать постера», нажать «Задать».
- Выбрать оптимальный вариант разбивки: например, 3х3 или 4х4.
Такая настройка позволяет распечатать большой рисунок на нескольких А4 без использования специальных программ. Но, к сожалению, этот вариант подходит не всем: в меню некоторых принтеров не предусмотрена возможность печати постера. В таких случаях без дополнительного программного обеспечения не обойтись.
Печать постера через Paint
Paint входит в состав всех операционных систем Windows и не требует дополнительной установки. С помощью этой программы можно напечатать картинку на нескольких листах А4, не меняя свойства принтера.
Пошаговый алгоритм:
- Откройте картинку в Paint.
- Выберите в меню «Файл», затем «Печать» и «Параметры страницы».
- В открывшемся окне задайте нужную ориентацию – книжную или альбомную. Затем выберите пункт «Уместить» и укажите количество страниц по горизонтали и вертикали. Например, если вам нужен постер из 9 листов А4, выберите значение 3х3.

Чтобы убедиться, что программа правильно разбила картинку на части для печати, используйте предварительный просмотр. Если ошибок нет, можно приступать к изготовлению постера.
С помощью Paint можно напечатать плакат на нескольких листах А4 буквально за 5 минут. Это хорошее решение задачи, если нет времени разбираться в настройках принтера.
Печать через Excel
Распечатать рисунок на нескольких листах А4 можно даже с помощью электронных таблиц.
Откройте чистый документ Excel, перейдите на вкладку «Вставка» и нажмите на кнопку «Рисунок». Затем выберите изображение, которое вы хотите распечатать.

Перейдите на вкладку «Вид» и нажмите «Разметка страницы», а затем растягивайте рисунок, выводя его за маркеры. Изображение при этом можно растягивать по вертикали и горизонтали, меняя пропорции. Чтобы вам удобнее было работать с рисунком, уменьшите масштаб. Это можно сделать, передвигая ползунок в правом нижнем углу программы.

Растяните изображение на нужное количество страниц по горизонтали и вертикали и отправляйте на печать.
Обратите внимание: во вкладке «Файл» – «Печать» можно выбрать книжную или альбомную ориентацию, а также задать размер полей.

Таким образом, с помощью Excel можно распечатать изображение на нескольких листах А4, выбрав подходящие настройки. Предварительный просмотр поможет вам убедиться, что все параметры были заданы правильно.
Дополнительные варианты
Существуют также разнообразные онлайн-сервисы и программы для печати больших изображений на А4. В их число входят Poster Printer, Posteriza, Rasterbator.
У каждой программы есть свои преимущества: например, Poster Printer позволяет указывать при печати поля склейки и обрезки, а Posteriza дает возможность добавить фоновое изображение, текст, рамку.
Стоит изучить эти особенности, чтобы выбрать подходящий сервис.
Некоторые программы, с помощью которых можно распечатать большое изображение на листах А4, не имеют бесплатной версии. Именно поэтому их чаще всего используют люди, которым приходится регулярно делать плакаты, крупные чертежи или карты. Для однократного использования лучше предпочесть бесплатный сервис или один из способов, описанных выше.
Источник: https://tonercom.ru/blog/pechat-na-naskolkih-listah-a4
Как быстро сделать плакат или афишу: 4 бесплатных сервиса

В Canva вы найдёте более 8 000 шаблонов для быстрого создания плакатов. Сервис позволяет настраивать фон и добавлять на плакаты текст, загруженные вами картинки, а также иллюстрации и прочие украшения из библиотеки Canva. Часть шаблонов и декоративных элементов доступна бесплатно, остальные можно покупать по отдельности или получать в рамках платной подписки.
Сервис Canva доступен в формате веб-редактора и приложения для iOS. Версии для Android пока не существует.
2. Desygner

Этот редактор не уступает по возможностям Canva. С помощью Desygner вы тоже можете создавать плакаты и прочую графику, совмещая изображения, тексты, стикеры и другие украшения на одном холсте.
Desygner предлагает сотни бесплатных шаблонов, иллюстраций и снимков в качестве исходников.
Чтобы получить доступ к полной коллекции материалов, а также удобному поиску по ним, нужно оформить платную подписку.
Desygner можно использовать в браузере и программах для мобильных устройств на Android и iOS.
Источник: https://Lifehacker.ru/phoster/
Поиск данных по Вашему запросу:
Если бы у тебя был принтер умеющий печатать на А1 ты бы не задавал таких вопросов. Поэтому сделай всё на а4, или если умеешь на Corel или фотошопе. При печати масштабировать на размер бумаги в принтере и всё. Обычно в настройках печати есть галочка «по размеру бумаги». AlexanderS, нет в OKI такой галочки и не хочет широкоформатный принтер печатать а4 на а1, пожалуйста
Как распечатать в Word плакат из листов А4
Ты зачем отключил JavaScript? Сейчас обижусь и уйду Нужна помощь? Видеокурс 1С:Бухгалтерия 8. Сейчас я вам покажу универсальный способ печати плакатов на обычном принтере А4. Описываемый здесь метод печати больших плакатов прекрасно подходит не только для Microsoft Word, но и для любой программы, из которой можно производить печать.
Распечатать плакат из листов А4 очень просто! Кстати, наряду с этой страницей про печать плакатов из Word, большой популярностью на ArtemVM. Так что рекомендую решить две проблемы за один раз.
Также замечу, что если у вас нет дома принтера, но плакат распечатать всё-таки хочется, вам поможет печать в файл. Обычный принтер есть у многих, а вот широкоформатные плоттеры бывают, как правило, только в специализированных фирмах, занимающихся типографией.
Стоимость такого оборудования по сравнению с обычным принтером А4 достаточно большая, поэтому дома его держать смысла нет. Давайте используем обычный принтер чтобы распечатать большой плакат из листов А4. На фотографии приведён результат печати плаката на листах формата А4.
Принтер обычный. Не обращайте внимание на опечатку на картинке — просто исправлять уже не хочется : Сейчас я покажу как всё это делается на примере печати плаката с картинкой из программы MS Word.
Обратите внимание: настройки принтера у разных принтеров отличаются, но принципы остаются те же самые! Кроме того, я здесь буду показывать печать плаката на примере картинки, но то же самое относится и к тексту, просто набранному в Word.
Если Вы хотите научиться хорошо работать в Word, то Вам обязательно стоит посмотреть видеоуроки , в которых показываются и другие способы решения этой и других задач наиболее эффективным способом.
Прежде всего нужно подготовить обычный документ Word. Я вставил в него картинку, но можно было и текст напечатать. Я использую Word с меню типа Лента. Прежде всего выберите нужный принтер — тот, на котором вы будете печатать плакат. Это важно, поскольку для преобразования обычного документа в плакат из листов А4 мы воспользуемся соответствующей функцией принтера.
Пугаться не стоит, поскольку функция печати плакатов есть почти! Открываете свойства вашего принтера и видите что-то вроде окна, показанного ниже. Конечно, у вас всё может быть немного иначе. Смысл показываемого мной метода печати плакатов из листов А4 основан именно на использовании свойств принтера , а не самого Word или другой программы.
Дело в том, что в этом случае драйвер принтера сам разделит документ на части и увеличит их, что избавляет вас от необходимости делать это вручную. Из всех способов печати плакатов в домашних условиях этот — наиболее простой. Чтобы распечатать ваш документ как плакат из листов А4, вам нужно в свойствах принтера найти пункт, отвечающий за данную возможность.
Пример привожу для своего принтера. После выбора нужного вам размера плаката нужно только сохранить настройки, а затем нажать кнопку печати в Word. Результат печати вы можете видеть на самой первой картинке.
Тут была важная часть статьи, но без JavaScript её не видно! Если вы печатаете текст, который легко масштабируется, то, в принципе, вы можете напечатать плакат, состоящий из любого количества листов А4, которое позволяет выбрать ваш принтер.
Если же вы печатаете картинку , то её оригинальный размер должен быть достаточно велик. В противном случае вы рискуете получить плакат низкого качества.
После печати плаката вам потребуется взять ножницы и обрезать печатные поля, чтобы соединить части плаката листы А4 в одно целое.
Не пытайтесь печатать без полей! Как я писал ранее в одной из предыдущих статей, при печати без полей вы можете потерять часть документа — он просто не пропечатается.
Показан наиболее простой вариант распечатки большого плаката при помощи встроенных в драйвер принтера возможностей.
Наличие такой функции напрямую зависит от используемого принтера! Одним из главных принципов, которым я руководствуюсь на своих учебных курсах, заключается в том, что главное — понять суть, а не просто что-то заучивать!
Если не можете что-то сделать одним способом, то всегда найдётся другой! В данном случае вместо того, чтобы искать как распечатать плакат в Word из листов А4, я предлагаю просто воспользоваться универсальной функцией печати плакатов, встроенную в принтер.
Это гораздо более эффективно и позволяет печатать большие плакаты на обычных листах А4 практически из любой программы.
Автор статьи: Артем Владимирович Меньщиков При использовании материалов этой статьи частично или полностью активная гиперссылка на источник обязательна artemvm.
Индивидуальные курсы 1С:Бухгалтерия 8. Обратный звонок Заказать видеокурс. Курсы 1С Бухгалтерия 8. Учебные видеокурсы. Новый видеокурс 1С:Бухгалтерия 8. Курсы Microsoft Office. Расширенный курс Excel Расширенный курс Word. Помощь в выборе курса.
Помощь в выборе курса Ответы на частые вопросы. Результат печати плаката из листов А4 при помощи Word Обычный принтер есть у многих, а вот широкоформатные плоттеры бывают, как правило, только в специализированных фирмах, занимающихся типографией.
Источник: https://all-audio.pro/c9/datashiti/kak-sdelat-plakat-v-vorde-a1.php
Why pay to have someone else make a poster when you can do it yourself in Microsoft Word? We’ll guide you step-by-step just how to do it.
 |
| © CreditDonkey |
Steps:
- Starting the Poster
- Picking a Poster Size
- Add a Headline
- Adjust the Text Size, Font, and Orientation
- Adding an Art Object
- Adding Secondary Text
- Adding a Logo
- Adding a Colored Background
- Bottom Line
Before starting the project, think about how large you want to make the poster. One common mistake people make when creating posters is making them too small. Larger posters grab the attention of people, as the text and art is easier to spot from a distance. Larger posters also cost more to print, though. Pick a poster size as large as you can afford to print (keeping in mind how many copies you want to make, of course).
Think about what you want to accomplish with the poster, including which message you’re trying to convey, and collect artwork that fits that message. Some people prefer to sketch a general layout of the poster with a paper and pencil to organize their thoughts, while others prefer to do all of the work on the computer screen.
One final piece of advice: Save the project often. You don’t want to have a computer crash destroy the work you’ve done on your poster.
1. Starting the Poster
Though it offers a large number online templates through Word, Microsoft doesn’t offer many business poster templates. (We used templates to show you how to create business flyers and postcards in Word in previous articles.) For this tutorial, we’re going to switch things up a bit and work from scratch.
Start by opening the New window in Word. (If you don’t see the New window when you initially open Word, click the File menu, followed by New.)
In the New window, click Blank Document, and you’ll be able to start with a fresh slate.
2. Picking a Poster Size
For the poster, we want a larger than normal size document. Keep in mind that some home printers can’t handle large paper, so you may need to send this poster elsewhere to be printed (or use a smaller document size).
To change the document size,
Click the Layout menu and click Size.
We’re going to use the 11-by-17-inch document, because we have a photo printer than can handle this size. If you want a larger size, scroll to the bottom of the menu and pick More Paper Sizes.
You can make your poster any size you want. Just make sure your professional printer can handle whatever size you pick and carries the required paper size.
Next, we want to create a horizontally aligned poster. We again click the Layout Menu followed by Orientation. We then click Landscape.
3. Add a Headline
Click the Insert menu followed by either Text Box or Word Art to pick the font style you want to use with the headline.
It’s important to use a large and to-the-point headline to gain the attention of people who see your poster.
Additionally, it’s important to create separate text boxes for whatever text groupings you want to use. This allows you to drag these boxes to whatever location you want in the Word document. Don’t just start typing at the cursor in the upper left corner, or you’ll lose control over the layout. Use the Insert Menu and place text boxes or word art.
4. Adjust the Text Size, Font, and Orientation
Once you’ve created a text box or word art headline, highlight it to adjust the size and orientation. (The text will have a gray background behind it when it’s highlighted.)
Now click the Home Menu and pick the font style and size you want to use.
Think big with the font size, as you want customers to see and read the headline of the poster easily from a distance (this headline is how you’re grabbing attention).
You also can pick a different font size for various letters or words inside the headline. Just highlight the letter or word that you want to change and pick the new text size. You can change the text color and alignment through the Home menu too.
To change the orientation of the text, highlight it. You’ll see a box around it with dots at the corners of the box and on the sides. You can drag these dots to change the size of the text box. To change the location, just place the cursor over the border of the text box. Then click and hold to drag it to the new location. We dragged our first text box to the lower left corner of the poster.
You can add as many text boxes as you want using these commands. We decided to create two headlines, one for the top of the poster and one for the lower right.
5. Adding an Art Object

By default, Word will place the art object in the upper left corner of the document. Unfortunately, you can’t really adjust this position much. You can move the art down the page a little bit by placing the cursor in the upper left corner and hitting Enter a few times before inserting the photo, which is what we did. We could then drag a text box to the blank space above the art.
With the cursor located where you want, click the Insert Menu and click Pictures. Then select the image you want to use from your computer’s hard drive.
To resize the photo, click on it and then drag the dots that appear on the border. As with the text, think big here too. The art image should dominate the viewer’s attention.
6. Adding Secondary Text
Use smaller text in a new text box to explain a bit more about your event. This text doesn’t have to grab the attention of the viewer, because hopefully the larger text and the art already caused them to notice the poster, and they’re now moving in closer to learn more.
Click Insert and Text Box to add the secondary text. You can drag the border of the text box to place it in the desired location and drag the dots to resize it.
Then highlight the sample text in the box and retype the message you want to use. As discussed before, highlight any text to resize it or to choose a new font. We decided to give a bold accent to a few words inside the secondary text.
The text box will have a visible black outline around it by default. To remove this outline, right click on the border of the text box and left click on Outline at the top right in the popup menu. Then click on No Outline. (Or if you want a thicker border, you can do that in the Outline menu too.)
7. Adding a Logo
![]()
We want to add a logo to the bottom of the poster. We don’t have a logo, so we’re going to create a quick and simple logo.
Click Insert and Shapes, followed by the shape you want to use. With the plus-shaped cursor on the screen, click and drag the cursor to create the shape. Once you’ve created the shape, you can resize it by clicking on it and dragging the borders.
You can change the color of the shape by highlighting it and right clicking on it. Then left click on the Fill Menu and pick a new color. You can make other changes to the shape in the same manner.
Then we’ll add our business’ initials inside the logo using a text box.
8. Adding a Colored Background
Finally, we want to add a colored background box behind the secondary text, just to give it a bit more emphasis and attention.
Click the Insert Menu and Shapes. We then clicked on a rectangle shape. With the plus-shaped cursor on the screen, drag the cursor to create the rectangle.
The colored box is now covering our secondary text, but we can edit the box to make it work better.
First, we’ll change the color. Right click on the border of the color box and left click on the Fill Menu near the top of the popup menu. Then pick a color you want to use for the box. We chose a pale blue so the black text would show up nicely.
Next, we need to make sure the text is visible. Right click on the border of the colored box and then left click on Send to Back. In the secondary popup menu that appears, click .
The area behind the text box may now appear as a white box that covers most the pale blue color, but we can fix this as well. Highlight the text. Then right click on the border of the text box and left click on Fill. (Be sure you’re clicking on the text box border and not the colored box border.) Then click on No Fill.
Bottom Line
After you’ve finished your poster and proofread it a couple of times, we’d suggest setting it aside for a few hours and then returning to it. You may find an error after you look at it with fresh eyes, or you may decide to word something a little differently. Make sure the largest areas of text and art grab the attention.
Another smart idea with a poster is to expand it to fill your entire computer screen. Then step back several feet and look at the poster. Do the right areas grab your attention?
Once you’ve finished your tweaks and given it a final proofreading look, you’re ready to have the poster printed. If you’re going to have the poster printed at a professional printer, we’d suggest shopping around for quotes, especially if you’re only looking for a few prints. Cost quotes can vary quite a bit for small print runs.
Additionally, if you’re going to hang the printer in a window in your store, you may want to hang two posters back-to-back. This means the poster will be visible to people outside the store looking in the window, as well as people inside the store looking out through the window. You don’t want a blank white paper visible on either side of the window.
Note: This website is made possible through financial relationships with some of the products and services mentioned on this site. We may receive compensation if you shop through links in our content. You do not have to use our links, but you help support CreditDonkey if you do.
the posters have become one of the elements currently most usedsince they allow the user can capture information in it so that it can be transmitted to other people in an easy and fast waywhich makes it an excellent choice for announce an event or offer your services and products.
They have also become a very helpful element, especially for those people who loses an object, a pet or a family memberas posters can request help in the search for the missing individual.
Microsoft Word not the best tool of all create these bannerssince there are many programs specialized designs in thisbut if it becomes a very good alternative for create conventional posters in a very simple way, to do this follow in detail everything that we will teach you in the post.
What Word tools and features are useful for making posters?
The posters in Word can be created in different ways, either using the pre-made templates of the program or making them yourself from scratchbut you should keep in mind that performing these posters from scratch means more work.
According to all this, here we show you what tools and functions are necessary to create these elements in the word processor:
- Use pre-designed Word templates.
- Use the insert tab to add images, shapes and other items you want.
- Use the layout tab if you want make it from scratch, Either for set margins, size, orientationamong others.
- The function of header.
- You must use the function “Save as” Y “To print” once you have finished the poster.
Steps to make a poster in Microsoft Word like an expert
There are two main forms of power. create these banners from Microsoft Wordwith which you can start transmit some specific information to other people. Therefore, you will be able to design either from the predesigned templates of the program or completely from scratch, follow each of the steps that we are going to indicate below:
From pre-designed templates
- Once you have entered Microsoft Wordyou must select the tab “File, Archive” and in the drop down menu “New”.

- Then another window will appear with all the templates available in the system, to make your search easier and faster you must write “Poster” in the system browser and press the key “Enter”.

- As you can see, a new page where you can find different templates to create your posters, in this case you just have to do click on the one you like.

- When you have selected it, a window will open with the template description and the button “To create” which you must select so that it opens in the text sheet.

- Then it will appear the template entered in the text sheet. When you have reached this point the next thing will be to start replace each part of the template. If you click on the image you can delete it and add a new image, in this case the one you need, the same happens with each part of the text.

- In this way, all you have to do is change each of the parts. from the poster to completionwhen you have finished and have the poster what do you wantthe following will be save it and print it in case you have a printer connected to your computer.
- Otherwise you will have to store it in an external memory to print it later. To save it you can press “Ctrl + G” or enter “File” > “Save As” and there you select the location where you want to store it. In this way you will created your first poster in Word.

Right from the start
the other way to power creating these banners from Word is from scratch, This procedure is usually a little more tedious in the making since you will be the one who takes care of flesh out the posterso you will have to start it completely from scratch.
To do this, you will need to perform the steps that we are going to indicate below:
- the first thing will be start a new document in Word.
- When you have entered the text sheet you must click on the tab of “Provision” so you can have the tools of margins, size, column and orientation at your disposal.
- Here you must choose the option “Size”, The first step will be to choose the poster sizePlease note that if you have a home printer perhaps do not allow you to print in large dimensionsalthough you can find a way to print it on a industrial machine if you need it large.
- At this point you should choose the size of the posterfor this you can select some of the options available there or click on “More paper size” to have other options.

- common size of posters to be printed on domestic machines is of So you must enter these measurements and click on “To accept”.

- The next thing is to select sheet orientationin case you want print it horizontally then you should select the option of “Orientation” and choose “Horizontal”, now if you want it to print on vertical just skip this step as it comes with that orientation by default.

- next thing will be to create the headerkeep in mind that these types of posters are usually characterized by presenting a large text header at top of sheetin some cases this usually goes in the center of the sheet.
- To insert the header you must click on the tab “Insert”.
- There select the item of “text box” which is on the right side of your screen.
- Here you can choose the painting that you like the most, although it is best to select the “Simple text box”.

- A once inserted into the sheet you should write the title What do you want the banner to have?
- When you have written it you must select everything and go to the tab of “Start” to have the font options. Here you must choose the type of font you want and its size, as well as the colors of the letter.
- You may drag text box buttons so you can adjust the size you want and get the most suitable location for the header.

- Another way to create a header is by clicking on “wordart” located in the tab “Insert”, This option is located right next to the “Text box”. This is an easier and faster way to create the title since you won’t have to specify neither the style of the letter, size, nor color.
- To do this, you simply have to enter said tool and choose the model you like best.

- In this image you can see a comparison between both models, text box or word art. In this case you can work with the one you like the most.

- once you have defined title, the next will be to insert an imagekeep in mind that this will depend on the design that you want to give it, you can also add text first and then the image.
- To be able to insert an illustration you must click on the “Insert tab” and select the item from “Images”.

- Here it will be opened to you windows explorer where you will have to find the location of the image you want add to text sheet. When you have inserted it, it will appear as follows:

- You can also insert shapes in the text, to do this select the item of “Shapes” in “Insert” and there you choose the one you like the most to add it to the text sheet.

- Now you can add textyou can do this below the image or on it, for insert the text again use the “Text box”, here you can locate it above the image to write on it.

- Once you have finished your banner and have added all the necessary details, the next thing is to click on “File, Archive” Y “Save as”, this will allow you store it on your computer. You can too “Print it out” if you so wish.
Tips to create your posters in Word and make them more visually appealing
from a while ago posters have started to be used much more frequently around the worldthis is how you can currently see in the avenues, shopping malls, airport and many other places. They take care of display an information referring to a product or service in order to attract more customers.
All this has led to today the competition between those who make these banners is getting bigger and more competitiveso it is important that you have the basics of how to create a professional poster.
It is because of that here we are going to teach you the best tips so you can start designing the best posters today:
Define your main ideas

Please note that these Posters must be direct and precise with the information that you want to convey on them. So you must be very clear about what audience is addressed and what is the message you really want to convey in it.
Take into account your target audience

It is essential that the information contained therein is aimed primarily at your target audiencesince they will be the ones who offer you the best results. Note that it is very different capture the attention of a child to that of an adult, or that of an athlete with that of a doctor, that’s why you should define your ideas very well to attract people’s main attention to which is focused.
Be careful with the font you choose

When it’s made an ad that will be targeted to a large audience it’s necessary that the font chosen is legible, has an adequate size and correct use of uppercase, lowercase and accents. Keep in mind that this will be your cover letter, so depending on it will be the results you get.
Add only valuable information
It is understood that you may want convey many ideas and information to the publicbut in this kind of elements the secret is to be direct and express only what is really interesting and worthwhile. If your company is about earn moneythen it is best to indicate there possible amounts to winthis being a factor very conspicuous to most people.
Combine the text with the images correctly
It is essential that both images and text are well configured with each otherkeep in mind that the disorders in this type of elements are not favorable. The text must have a color that matches the imageavoiding that the image overshadows the text or vice versa.
Use quality images

Images are the component. most valuable of any postersince on many occasions people get carried away by them and not so much for the text that appears there. Also, if the image has managed to attract the person’s attention, they will stop to read the text of the image. This means that the illustrations that you add to the poster must be of quality and that directly reflects what you want to convey.
Be creative
Finally, it is very important that you are completely creative with your design, avoid copying other third party designs as this will not bring you good results. Here you must use your imagination and use colors, styles, fonts that you think can generate an impact image. If it is a product, highlight it and do not forget to place its main function.
List of websites where I can download resources to make my poster in Word
Today you can find different types of websites that they can offer you from images, fonts, templates and other resources to help you create very professional posters with excellent quality. So if you like working with Microsoft’s word processor.
Here we are going to leave you several alternatives so that you can download elements for each of your posters:
OpenPhoto.net
This online tool will offer you one of the most complete image banks on the net, he will allow you download images completely free which you will be able to add in Word to create your own posters. Here you will find thousands of photography of all types and sizes.
blockposters.com
As its name indicates, on this website you will find one of the largest poster pads on the market. Here you can get a lot of free templates which you can use in Microsoft Word. In addition, you will also get a large number of models of them that will serve you to Get an idea or guide you if you are starting with this type of design.
UrbanFonts.com
With City Fonts you will have the opportunity to get with the best collection of free typographic fonts, so you can get different types of sources according to your needsEither for use in images, text sheet, videos, among other. Here you will find chinese, russian, spanish, greek, arabic style typographyamong many others.
Commons.Wikimedia.org
This is another one of the web portals who is in charge of offering you a lots of images from different categories So you can download for free to your computer or mobilethey can be used in different programs such as Microsoft Word, among others. Here you will not only have the opportunity to get photographs of all types, but also very varied icons.
Templatesonline.com
Here you will also have the opportunity to get some templates for free to bring about your poster designs, which you will be able to use directly in the Microsoft program. Ideal for those users who do not like to start to work from scratch.
FontDiner.com
Finally, we present you another website that will offer you a great variety of fonts so you can start inserting into each of your designs. Here you can get yourself style of modern and old letters, such as those of the 50s and 60sall these types of letters can be used in videos, photos and documents. It is available for windows and mac.
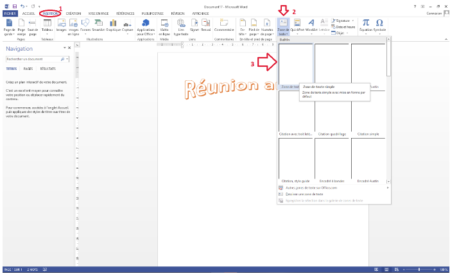
Creating a poster with Word seems much easier than Photoshop or other photo software. I hear people say, “It’s not made for that!” Or “The most boring posters are made on Word!” But you know what, those people actually didn’t bother to go further in the matter. By digging well in the features of this good old Word, we can get an enticing visual rendering that has nothing to envy of the quality of a photo editing software. So, forget about all these terrible posters that are difficult to lay out on a page. Instead, follow the 3 steps that I’ll give you here to create a beautiful poster with Word 2013.
Making a poster in Word: add both a design and catchy title
First of all, you have to create a new document. Start by clicking on “File”, then “New”, and choose “Blank Document”. Here, we must already consider the formatting of all the content and therefore, display the margins (in green line). To do this, go to “View” and untick “Rulers”.
Note that before creating a poster, you must first define the format. In this example, we chose an A4 format of 21 by 29.7 cm in real size.
To add a title in the document, just go to the “Insert” tab in the Menu bar at the top, and then go to “WordArt”. We then obtain a kind of text box on the document – where we can put our title. Obviously, we can add as much content as we wish, but we must be mindful of the presentation – whether it’s an ad poster, a recruitment poster, a promotional poster, etc. (For more types of posters and when to use which, click here).
In this practical case, we will add effects to embellish the title. Thus, in the “Format” tab, then in the “Text Effect” category, we chose the “Transform” option. There, we got a long list of transformation options.
Insert the content or message of the poster
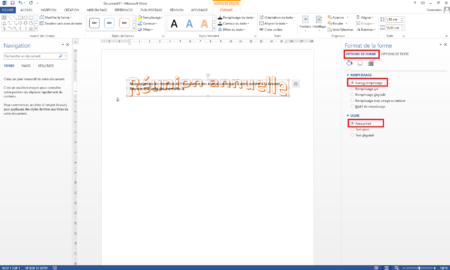
You have to consider the background and the form of the message to create a appealing poster with Word. Do you want to know the secret? To add the message, we’ll not type the text directly in the document, but we’ll insert a text box. To do this, we always go to “Insert”, then to “Text box”, then we choose “Simple text box”. The text box is more practical and appropriate because you can move it anywhere in the document.
It should be noted that a text box background is white by default. It distinguishes itself when interacting with other elements. It is therefore recommended to make it transparent to anticipate some adjustments to be made later.
To make the background of a text box transparent, just right click on the text box and choose “Format Shape” from the drop-down list. A dialog box opens to the right. In “Shape Options”, you must pick “No Fill” in “Fill” and “No Line” in “Line”. It’s as simple as that!
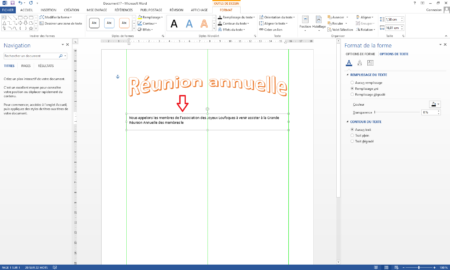
To center the text (and it is also valid for the title), just select it and go to “Home”, then “Paragraph”, and center it (as you center a text in a Word document).
It’s important to remember that creating a nice poster on Word implies perfect alignment with margins. By stretching the text box on the left and on the right, the text will then align well on the page when the green line appears.
To change the font, size, and colour of the characters, it’s the same as with the usual texts in Word (in the font, size and colour bar at the top). You just need to select the text and customise it with all the choices of modifications.
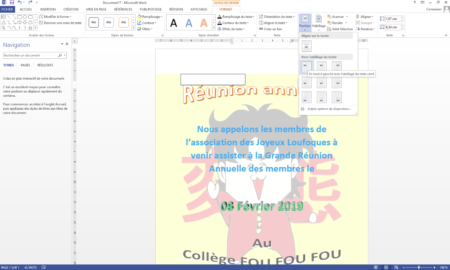
To insert additional information on the poster (in this example: date, place, participation fees), you can choose either text box or WordArt. As we chose WordArt, we can always style the text. To do this, click on “Form format” in the drop-down list and then “Text options” this time. And as always, we can adorn our text at will.
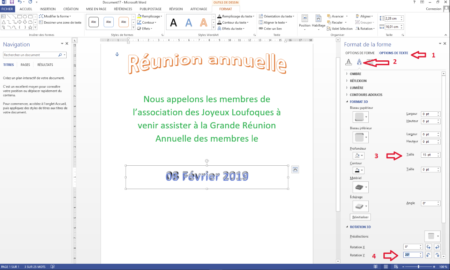
At this stage, we should not overload our poster and still ensure that each text is legible. We must therefore strive to choose appropriate colours.
Add a background image
Last step to create an outstanding poster with Word: add a background image.
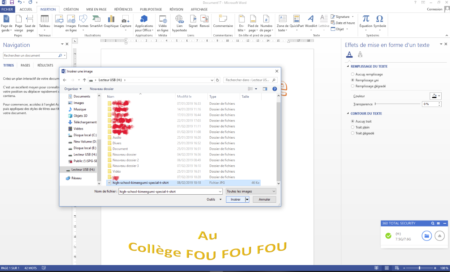
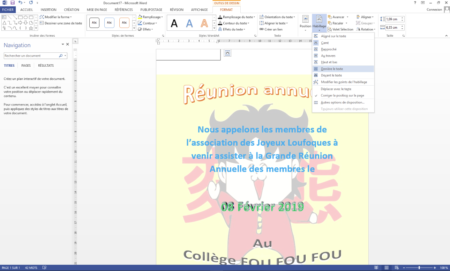
Simply go to “Insert”, then click on “Image”. There, you just have to browse the files and insert the image you want. To make it really a background image, click on the small square at the top right of our image to display “Layout Options”. Then you choose “Behind the text”. Then, select the image and right-click to display the drop-down list. This time, you click on “Image format”. To format the image, click on “Crop”.
We can then enlarge the image, but there will always be empty bands at the top and bottom of the document. To fill them, we will insert a text box (same procedure as mentioned above). But even in this text area, it will not completely cover the empty strips. Oh yes! When we want to create a poster with Word, we are faced with this kind of concern. But rest assured, it can be adjusted: to fix it, we first need to go in the “Format” tab, then in “Position”, and finally choose “With text wrapping”. And Ta-daaa!
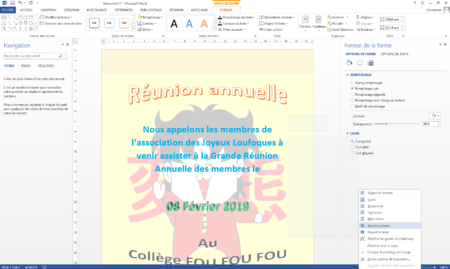
Now, to position this text box behind the text, we still go to “Format”, but this time in “Arrange”, then we choose “Behind the text”.
We will then assign a colour to the text box, one that is close to the colour of the image. To do this, you have to right click on it, then on “Form format” in the drop-down list. In the “Form Format” dialog box on the right, you just choose the right colour and adjust the transparency. Now we can enlarge this text box until we cover all the empty bands. 
That’s it. Creating a poster with Word is pretty elementary, isn’t it?
At this point, you still have to take precautions: be sure to save this new poster created in Word – in PDF format. Thus, its formatting won’t change! Simple precaution.