
Use footnotes and endnotes to explain, comment on, or provide references to something in a document. Usually, footnotes appear at the bottom of the page, while endnotes come at the end of the document or section.
If you’re in Reading View, switch to Editing View by clicking Edit Document > Edit in Word for the web.

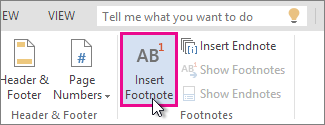
Add a footnote
-
Click where you want to add the footnote.
-
Click Insert > Insert Footnote.

Word inserts a reference mark in the text and adds the footnote mark at the bottom of the page.
-
Type the footnote text.
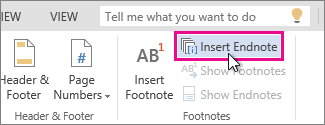
Add an endnote
-
Click where you want to add the endnote.
-
Click Insert > Insert Endnote.
Word inserts a reference mark in the text and adds the endnote mark at the end of the document.
-
Type the endnote text.
Customize your footnotes and endnotes
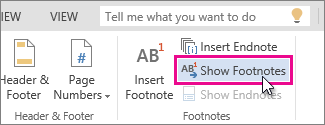
To customize a footnote or endnote:
-
Click the reference number or mark in the body of the text or click Insert > Show Footnotes(for endnotes, click Insert > Show Endnotes).
-
In the footnote/endnote view, click Format Footnotes or Format Endnotes to display the Format Options dialog, where you can change the size, font, and indentation of one or all of your footnotes or endnotes.

Note: If you want to convert footnotes to endnotes or the other way around, use the Open in Word command and convert them there. When you save the doc in Word, it’s saved where you opened it in Word for the web.
Need more help?
Want more options?
Explore subscription benefits, browse training courses, learn how to secure your device, and more.
Communities help you ask and answer questions, give feedback, and hear from experts with rich knowledge.
To leave a note in a Word document, select a word or line of text, click “New Comment” on the Review tab and type your comment in the text box. In Word 2013, press “New Comment” with the text cursor already inside a comment to leave a reply.
Contents
- 1 Is there a Notes template on Word?
- 2 How do I create a Word template?
- 3 What is a note template?
- 4 How do I create a letterhead template in Word?
- 5 How do I create a fillable form in Word?
- 6 What’s the best note-taking app?
- 7 How do you take notes?
- 8 What are the note-taking methods?
- 9 Can you make a letterhead on Word?
- 10 Does Microsoft Word have letterhead templates?
- 11 How do I create a PDF letterhead in Word?
Is there a Notes template on Word?
This Word notes template is a great tool for students to help them learn to take effective notes in their classes. Use notes template in Word to record progress or to-dos for home or personal plans, too. Download a note taking template in Word on your computer or tablet today to quickly access for your next project.
How do I create a Word template?
Click the File tab, and then click New. Under Available templates, click New from existing. Click a template or a document that is similar to the one that you want to create, and then click Create New. Make the changes you want to the margin settings, page size and orientation, styles, and other formats.
What is a note template?
Templates are predesigned notes or outlines that allow you to pull text, patient information, or MacPractice data into a Note. Unlike Categories and Parts, which are holding areas for information, Templates are the actual predesigned Note.
How do I create a letterhead template in Word?
Create a Letterhead Template in Microsoft Word
- Lay Out the First Page. Create a new, blank document.
- Lay Out the Second Page. Use the Show Next button on the Header and Footer toolbar to go to the Second Page Header.
- Close Up and Save.
How do I create a fillable form in Word?
Tech Tip: How to Create Fillable Forms in Microsoft Word
- Enable Developer Tab. Open Microsoft Word, then go to the File Tab > Options > Customize Ribbon > check the Developer Tab in the right column > Click OK.
- Insert a Control.
- Edit Filler Text.
- Design Mode button again to exit the mode.
- Customize Content Controls.
What’s the best note-taking app?
The best note-taking apps
- Microsoft OneNote for a free note-taking app.
- Evernote for the ultimate digital notebook.
- Apple Notes for Apple users.
- Google Keep for Google power users.
- Notion for collaboration.
- Obsidian for power note-takers.
How do you take notes?
Here are some tips on how to take good notes.
- Write down key facts. If you have a teacher who writes notes on the board, that’s a bonus: You can copy them down.
- Don’t overdo it. Don’t go crazy taking notes, though: You’ll be frantic if you try to write down every word that’s said in class.
- Ask.
- Compare.
- Copy.
- Organize.
What are the note-taking methods?
- The Cornell Method.
- The Outlining Method.
- The Mapping Method.
- The Charting Method.
- The Sentence Method.
Can you make a letterhead on Word?
Microsoft Word has all the tools you’ll need to make a great template. You’ll find it easy to recreate your design elements for your custom letterhead. Open a new Word document and save it as a template.You’ll be able to pull up the document and print your custom letterhead whenever you want to use it.
Does Microsoft Word have letterhead templates?
Easily customize this personal letterhead example template for your preferences by using built-in themes and colors. This personal letterhead template for Word is sleek, modern, and ready to customize.
How do I create a PDF letterhead in Word?
How to Import Your Letterhead into MS Word Documents
- Scan your existing letterhead.
- Save the scanned letterhead in a picture format.
- Create your Word document as you normally would.
- From the Menu at top, select “Insert > Watermark…”
Содержание
- Вставка примечаний в документ
- Изменение примечаний в документе
- Изменение или добавление имени пользователя в примечаниях
- Удаление примечаний в документе
- Вопросы и ответы
Примечания в Microsoft Word — отличный способ указать пользователю на допущенные им ошибки и неточности, внести дополнения в текст или указать на то, что и как нужно изменить. Особенно удобно использовать эту функцию программы при совместной работе над документами.
Урок: Как в Ворде добавить сноски
Примечания в Word добавляются в отдельные выноски, которые отображаются на полях документа. Если это необходимо, примечания всегда можно скрыть, сделать невидимыми, а вот удалить их не так просто. Непосредственно в этой статье мы расскажем о том, как сделать примечания в Ворде.
Урок: Настройка полей в MS Word
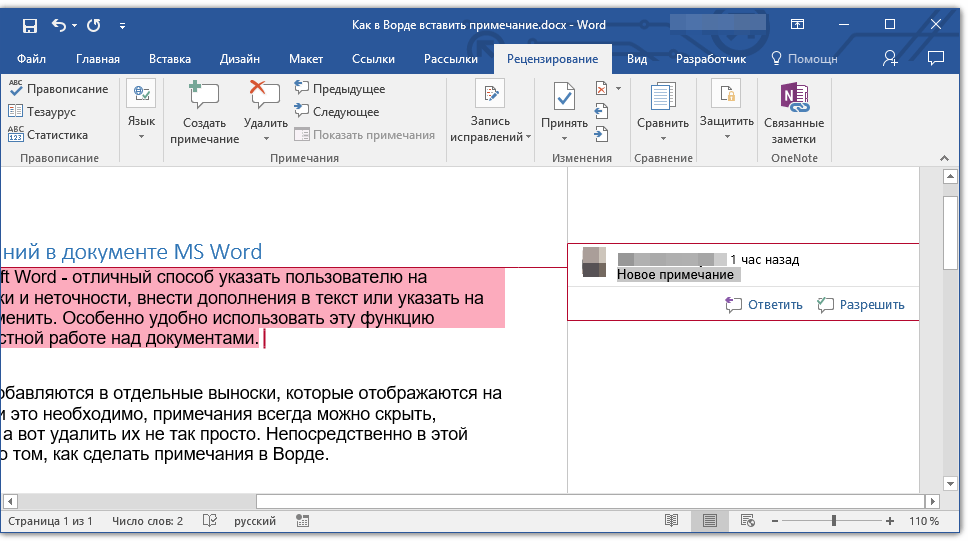
Вставка примечаний в документ
1. Выделите фрагмент текста или элемент в документе, с которым нужно связать будущее примечание.
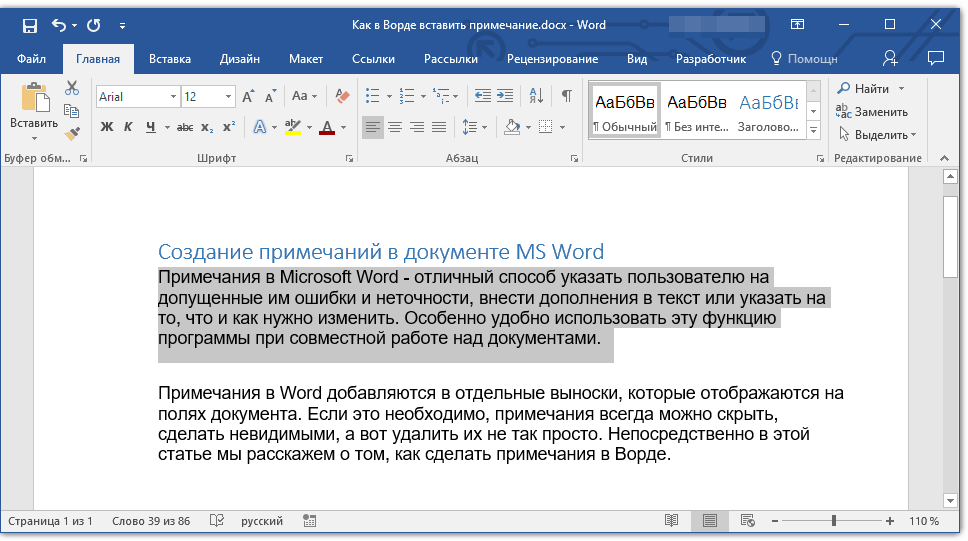
- Совет: Если примечание будет относиться ко всему тексту, перейдите в конец документа, чтобы добавить его там.
2. Перейдите во вкладку “Рецензирование” и нажмите там кнопку “Создать примечание”, расположенную в группе “Примечания”.
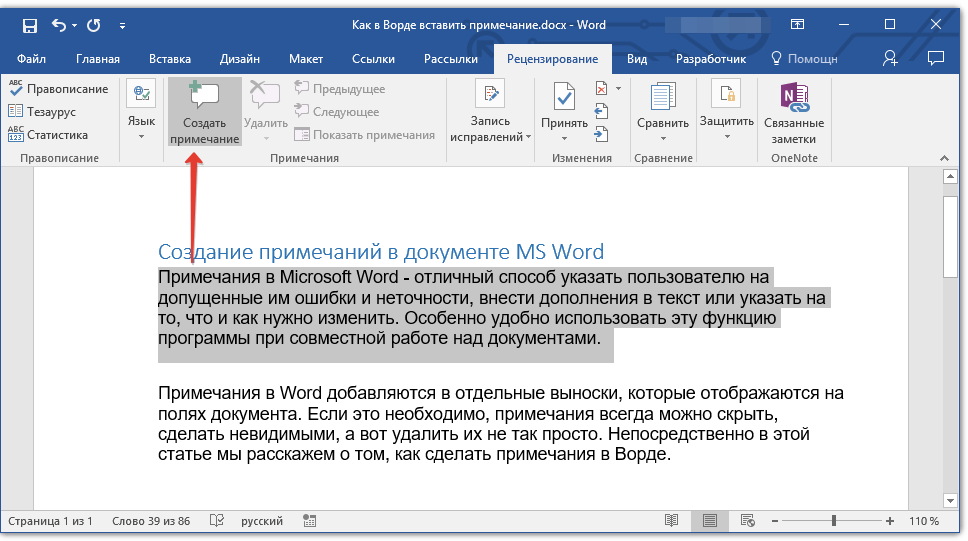
3. Введите необходимый текст примечания в выноски или области проверки.
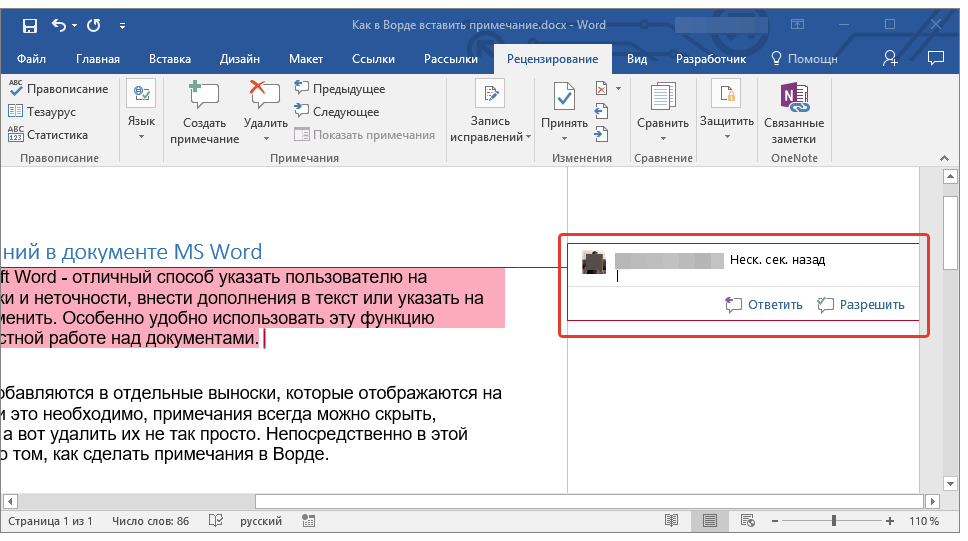
- Совет: Если вы хотите ответить на уже существующее примечание, кликните по его выноске, а затем уже по кнопке “Создать примечание”. В появившейся выноске введите необходимый текст.

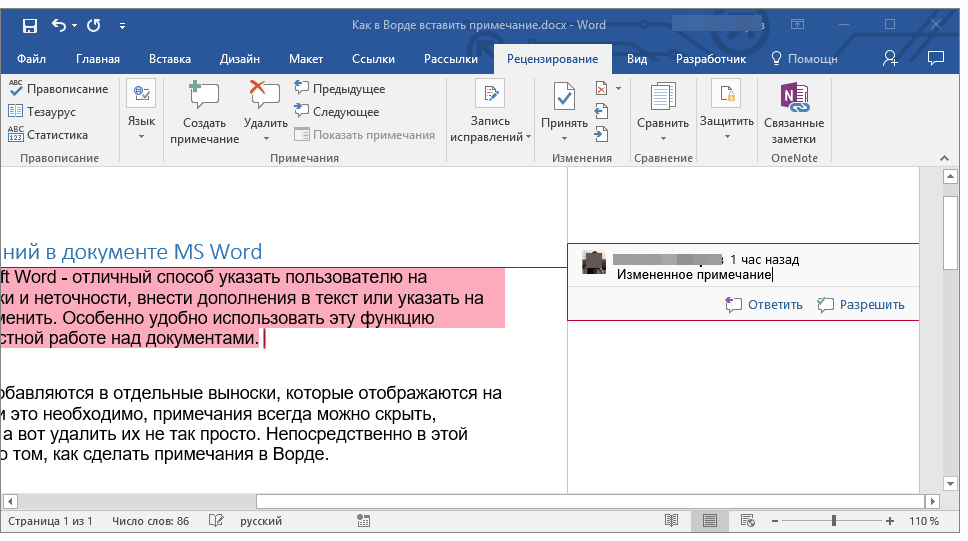
Изменение примечаний в документе
В случае, если примечания на отображаются в документе, перейдите во вкладку “Рецензирование” и нажмите на кнопку “Показать исправления”, расположенную в группе “Отслеживание”.
Урок: Как в Ворде включить режим правки
1. Кликните по выноске примечания, которое необходимо изменить.

2. Внесите необходимые изменения в примечание.
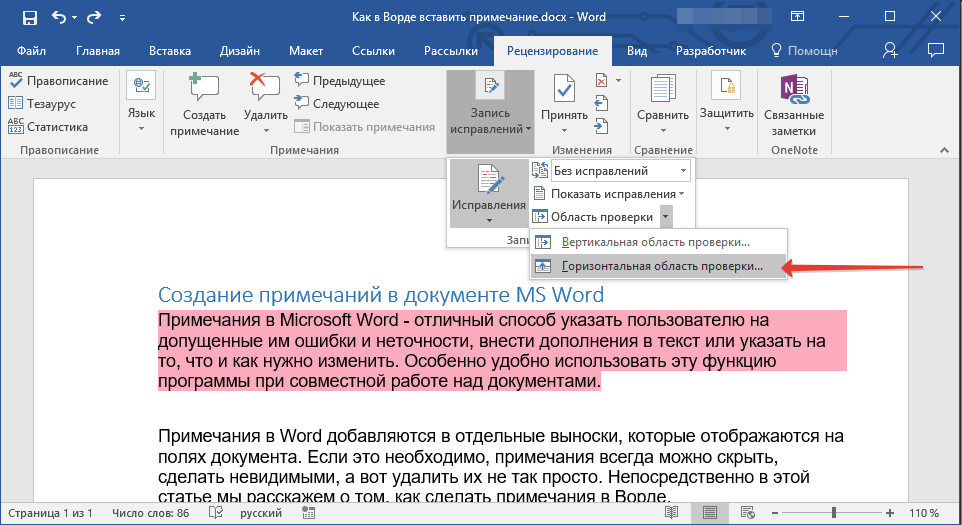
В случае, если выноски в документе скрыты или же отображается только часть примечания, изменить его можно в окне просмотра. Чтобы отобразить или скрыть это окно следует выполнить следующие действия:
1. Нажмите кнопку “Исправления” (ранее “Область проверки”), которая расположена в группе “Запись исправлений” (ранее “Отслеживание”).
Если необходимо переместить окно проверки в конец документа или нижнюю часть экрана, кликните по стрелке, расположенной около этой кнопки.
В выпадающем меню выберите “Горизонтальная область проверки”.
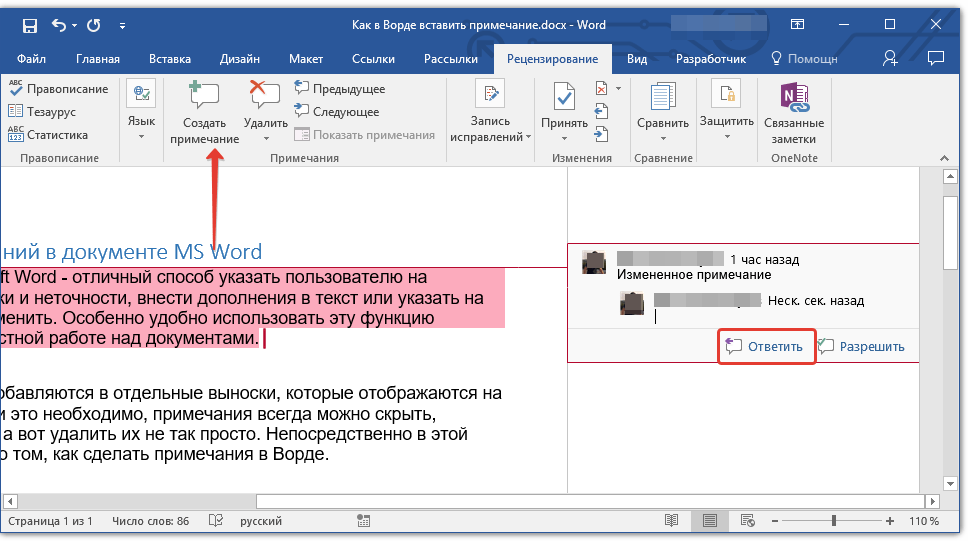
Если вы хотите ответить на примечание, кликните по его выноске, а затем нажмите на кнопку “Создать примечание”, расположенную на панели быстрого доступа в группе “Примечания” (вкладка “Рецензирование”).
Изменение или добавление имени пользователя в примечаниях
Если это необходимо, в примечаниях всегда можно изменить указанное имя пользователя или добавить новое.
Урок: Как в Word изменить имя автора документа
Чтобы это сделать, выполните следующие пункты:
1. Откройте вкладку “Рецензирование” и нажмите на стрелку возле кнопки “Исправления” (группа “Запись исправлений” или “Отслеживание” ранее).
2. Из выпадающего меню выберите пункт “Сменить пользователя”.
3. Выберите пункт “Личная настройка”.
4. В разделе “Личная настройка Office” введите или измените имя пользователя и его инициалы (в дальнейшем именно эта информация будет использоваться в примечаниях).
ВАЖНО: Имя и инициалы пользователя, введенные вами, изменятся для всех приложений пакета “Microsoft Office”.
Примечание: Если изменения в имени пользователя и его инициалах использовались только для его комментариев, то применены они будут только к тем комментариям, которые будут сделаны после внесения изменений в имени. Ранее добавленные комментарии не будут обновлены.
Удаление примечаний в документе
Если это необходимо, вы всегда можете удалить примечания, предварительно их приняв или отклонив. Для более детального ознакомления с данной темой рекомендуем вам прочесть нашу статью:
Урок: Как удалить примечания в Ворде
Теперь вы знаете, зачем в Word нужны примечания, как их добавлять и изменять, если это необходимо. Напомним, что, в зависимости от используемой вами версии программы, названия некоторых пунктов (параметров, инструментов) могут отличаться, но их содержание и местонахождение всегда примерно одинаков. Изучайте Microsoft Office, осваивая новые возможности этого программного продукта.
![]()
Download Article
Multiple easy-to-follow ways to add footnotes in Word
![]()
Download Article
Footnotes allow you to cite sources or explain a concept in detail without sidetracking the main text. Word makes managing footnotes easy, as new footnotes are numbered automatically, and the footnotes area expands and shrinks dynamically based on the amount of text. Give your document a professional feel by strategically using footnotes to clarify information and credit your sources.
-
1
Click the «References» tab. This is located at the top of the window, typically between «Page Layout» and «Mailings». This tab lets you insert various reference tools, such as a table of contents, footnotes and endnotes, citations, captions and more.
-
2
Place your cursor where you want the footnote to appear. By default, footnotes will be designated by increasing superscript numbers. Place the cursor where you want the number to appear.
Advertisement
-
3
Click the «Insert Footnote» button. This is located in the «Footnotes» section of the «References» tab. The footnote number will be inserted, and a separator bar will be added to the bottom of the page. Your cursor will automatically be taken to the footnote at the bottom of the page so that you can fill it out.
- An endnote is like a footnote except the reference occurs at the end of the document. By default, endnotes are numbered with Roman numerals (i, ii, iii, etc.).
- Alternatively, you can press Ctrl + Alt + F to create a footnote, or Ctrl + Alt + D to create an endnote.
-
4
Change when your footnotes numbering resets. By default, your footnotes will increase in number throughout your whole document. You can change this so that the numbers restart every page or at section breaks in the document.[1]
- Click the Menu button in the bottom-right corner of the «Footnotes» section. This will open the «Footnote and Endnote» window. In the «Format» section, use the «Numbering» drop-down menu to select when you want the footnote numbers to restart.
- You can insert section breaks into your document by clicking the «Page Layout» tab, clicking the «Breaks» button in the «Page Setup» section, and then selecting the type of break you’d like to insert. Besides changing the way footnotes are numbered, section breaks are great for making layout changing to specific portions of a document.
-
5
Change your footnote formatting. If you’d rather have symbols instead of numbers, want the footnotes to appear below the text instead of at the bottom of the page, or want the numbering to start at a different number, you can change this from the «Footnote and Endnote» window. Click the Menu button in the bottom right-corner of the «Footnotes» section to open it.
- Click Symbol… to choose a symbol from the Symbol menu. You can choose any character from any font, though the «Symbols» font will open by default.


Advertisement
-
1
Switch to Print Layout view. Click View and select Print Layout.
-
2
Place your cursor where you want the footnote to appear. Your footnote will appear at the cursor, so place the cursor at the end of the text that you want to create a footnote reference for.
-
3
Insert the footnote. Click the «Document Elements» tab, and then click the «Footnote» button in the «Citations» section. A footnote will be inserted at your cursor and you will be taken to the footnote text section to enter the contents of the footnote. The footnote text will be at the bottom of the same page as the footnote, separated by a line.
- Alternatively, you can press Command + Option + F to create a footnote, or Command + Option + E to create an endnote.
-
4
Change your footnote formatting. If you’d rather have symbols instead of numbers, want the footnotes to appear below the text instead of at the bottom of the page, or want the numbering to start at a different number, you can change this from the «Footnote and Endnote» window. Click Insert and select Footnote.
- Click Symbol… to choose a symbol from the Symbol menu. You can choose any character from any font, though the «Symbols» font will open by default.
- By default, your footnotes will increase in number throughout your whole document. You can change this so that the numbers restart every page or at section breaks in the document. In the «Format» section, use the «Numbering» drop-down menu to select when you want the footnote numbers to restart.
- You can apply your formatting changes to just your selected text, the current section, or your entire document.
- Click Symbol… to choose a symbol from the Symbol menu. You can choose any character from any font, though the «Symbols» font will open by default.


Advertisement
-
1
Switch to Print Layout view. Click View and select Print Layout.
-
2
Place your cursor where you want the footnote to appear. Your footnote will appear at the cursor, so place the cursor at the end of the text that you want to create a footnote reference for.
-
3
Insert the footnote. Click Insert → Reference → Footnote… to open the «Footnote and Endnote» window. Select «Footnote», and then choose your numbering option. You can have Word number your footnotes automatically, or you can choose a custom symbol to insert.
- In Word 2004/2008, click Insert → Footnote….
- Alternatively, you can press Ctrl + Alt + F to create a footnote, or Ctrl + Alt + D to create an endnote in Windows. On a Mac, press Command + Option + F to create a footnote, or Command + Option + E to create an endnote.
-
4
Enter your footnote text. Your footnote will be created and you will be taken to the footnote text section at the bottom of the page. You can enter the text you want for the footnote, and then click back in your document when you are finished.


Advertisement
Add New Question
-
Question
Why is my first footnote printing on the next page?

A header or footnote is applied to all pages when put in a document. Unless it is a page number generated by the document (which you select). Otherwise, the header and footnote follows you through all of your pages.
-
Question
How do I insert more information into a footnote that already exists?
You can double click on an existing footnote to edit it.
-
Question
When I create a footnote for a word, does it appear each time I use the word?
No, it doesn’t. Footnotes are bound to locations in the document, not to words. This means that, even if you change the word or the text around the footnote, the footnote remains where it is.
Ask a Question
200 characters left
Include your email address to get a message when this question is answered.
Submit
Advertisement
Video
Thanks for submitting a tip for review!
About This Article
Article SummaryX
1. Click References.
2. Click the desired location.
3. Click Insert Footnote.
4. Select a number format.
5. Select a symbol.
6. Click Insert.
Did this summary help you?
Thanks to all authors for creating a page that has been read 808,785 times.
Is this article up to date?

You can add comments and annotations to Microsoft Word documents, allowing you to collaborate with others. Here’s how.
They say that writing is mostly rewriting. Whether you use Microsoft work for work or for creative writing, if you have a document you need to edit, annotating the text can be an effective way of keeping track of the changes you need to make.
Thankfully, Microsoft Word comes with annotation tools built-in. These allow you to quickly and easily add notes to your document and keep track of changes.
Adding Comments
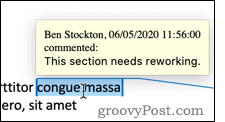
Annotations in Word are done by adding comments. This creates a highlighted area of text that you can hover over to read the attached comment. You can also view the comments in a panel at the side of the page. Each comment includes the author of the comment and the time it was created or edited.
There are several ways you can insert comments into your Microsoft Word document.
Using the Ribbon Bar
First of all, highlight the text you want to annotate in your Word document.
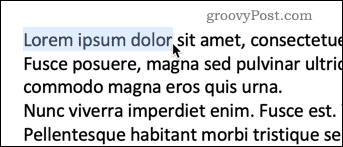
Under the Review tab on the ribbon bar, press on the Comments button and click New Comment.

Your text will now have a colored background, and the cursor will move to the comments pane, ready for you to start typing your annotation.
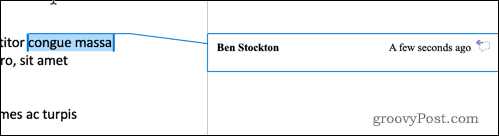
Type in your annotation and it will be visible in the comments pane. You can also hover over the highlighted text to bring up a pop-up box with your comment.
There are four other options under the Comments section, allowing you to make changes to your comments, as well as switch between them.
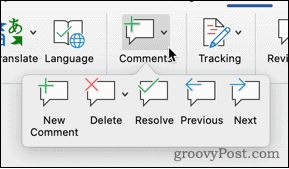
The Delete option gives you the option to remove the current comment, all comments, or just comments by the currently visible author.
Previous and Next allow you to navigate through the document from one annotation to the next, rather than having to search through the content for the next highlighted section.
Resolve allows you to mark an annotation as completed. For example, if the annotation suggested rephrasing a sentence, you could mark it as resolved once you’ve made the change. The comment is then grayed out, but will otherwise remain visible on your document.

The highlighted text also changes to a paler color so you can differentiate between resolved and unresolved annotations. You can’t mark a comment as resolved until you’ve made a change to the highlighted text.
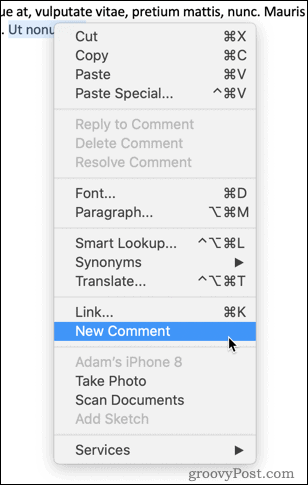
Right Click to Add Comments
If you just want to add a new comment rather than resolving, deleting, or navigating through them, then you can quickly do this through the context menu.
Highlight the text you want to annotate, and right-click. Choose New Comment and your comment is created in the same way as before.
Using the Comments Button
There’s also a dedicated comments button in the top-right corner of the Word window.

Clicking on this button brings up the option to create a new comment, or to navigate to the previous or next comment in the document.

With all of these methods, if you don’t highlight any text before creating a new comment, Word will automatically select the single word at the cursor position.
If you want to annotate more than a single word, you must highlight the entire section before creating your comment.
Changing Author Name
Word automatically uses the name associated with your Word application as the author’s name for all of your comments. You may prefer to use a different name, however.
For an individual document, you can change this by clicking on File > Info.
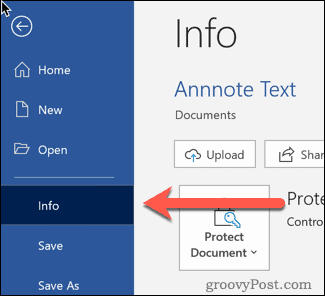
To the right of the page towards the bottom you will see a section labeled Related People.
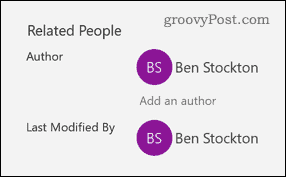
Right-click on your author name and choose Edit Property.

You can then type in the author’s name of your choosing.

If you want to change this permanently across all of your Word documents, then click File > Options.

In the Personalize your copy of Microsoft Office section, type in the User Name you want to use.

Check the Always use these values regardless of sign in to Office box to ensure that the author name you set takes precedence over your sign-in credentials.
Other Annotation Methods
Comments are a simple and effective way of annotating your Word documents. There are other options you could try too, such as inserting footnotes and endnotes into Word.
Using these techniques can help you minimize the time spent editing Word documents. Other tips such as creating a table of contents in Word or rearranging pages in your Word documents can also help to boost your productivity.
![]()

Whether you use Microsoft Word for personal or professional writing, sometimes you may want to add supplemental notes to sections of your work. Maybe you want to make a side comment on one of your arguments, or you need to cite another author’s work without distracting from the main text. Luckily, Word has useful tools for adding footnotes and endnotes to your writing.
Note: We’re using Microsoft Word 2016, but Word has supported footnotes and endnotes since at least Word 2007. Depending on the version of Word you’re using, the menus we walk through in this guide may look a little different. But don’t worry—the features and functions are the same.
What Are Footnotes and Endnotes?
Footnotes and endnotes are both ways of adding extra bits of information to your writing outside of the main text. Think of them like verbal asides, only in writing. You can use footnotes and endnotes to add side comments to your work or to cite other publications like books, articles, or websites. The only difference between footnotes and endnotes is where they appear in your document.
As the name suggests, footnotes are attached to the bottom of the page containing the sentence they correspond to. Endnotes, on the other hand, are added to the end of a section or document. Which one you should use in your writing depends on your personal preference or—if you’re writing for school or work—your organization’s publication standards.
Fire up Microsoft Word, and then open the document to which you’d like to add footnotes (or create a new document if you’re just getting started). Switch to the “References” tab on Word’s Ribbon.

Here, you’ll find a bunch of useful features for annotating your text, including tools for inserting a table of contents, adding citations, and generating a bibliography. The second group on this tab contains the footnote and endnote features we want.
To add a footnote, place your insertion point in your text where you want the footnote to appear, and then click the “Insert Footnote” button.
Word adds a small superscript number where you placed the insertion point.
And then immediately shifts focus to the footnote pane and places the insertion point at your new footnote, so you can start typing it right away.
Footnotes appear at the bottom of the page beneath a short horizontal line. Each time you add a footnote on this page, another number will be added to the list.
Once you’ve added your footnotes, you can hover your cursor over each sentence’s reference marker to see a preview of the footnote within the text.
You can also quickly tab between footnotes in both the main text and the footnote list at the bottom of the page by clicking the “Next Footnote” button in the navigation bar.
Or, click the dropdown menu arrow on the “Next Footnote” button to select a different navigation option. You can choose to go to the previous footnote or navigate to the next or previous endnote.
The steps for inserting endnotes are essentially the same. Place your insertion point where you’d to annotate, and then click the “Insert Endnote” button on the “References” tab of Word’s Ribbon.
Just like with footnotes, Word attaches a superscript number containing an endnote. But this time, the list of notes it generates appears at the end of the current section or the end of the document (you can customize where they appear, and we’ll talk more about that in a bit).
How to Configure Footnotes and Endnotes in Word 2016
Word has basic default settings for footnotes and endnotes, but you can adjust these settings at any time from the menu on the References tab.
Click the arrow in the lower right corner of the “Footnotes” menu.
This brings up a Footnote and Endnote window where you can customize the location, appearance, and format of all your footnotes and endnotes.
Change the Location of Footnotes and Endnotes
By default, Word puts footnotes at the bottom of the page and endnotes at the end of the document, but you can change where these notes appear.
Under “Location” in the Footnote and Endnote menu, find the “Footnotes” option (it should be selected by default when you first open the menu). Open the dropdown menu to the right of that option and you can change your footnote location to either the bottom of the page or below the text. If you choose the latter option, Word places your footnotes immediately after the main body of text instead of at the bottom of the page.
To change the default location of endnotes, select the “Endnotes” option, and then open the dropdown menu to its right. There, you can change endnote placement to the end of the current section or the end of the document.
Convert Footnotes to Endnotes (and Vice Versa)
Another option is to convert all of your footnotes to endnotes or vice versa. Instead of changing each one individually, this option lets you change them all at once. If you’re working on a document with a lot of notes, this option can come in handy.
Under the “Location” section of the Footnote and Endnote menu, click the “Convert” button.
The Convert Notes dialog box pops up, giving you three options: 1) Convert All Footnotes to Endnotes, 2) Convert All Endnotes to Footnotes, and 3) Swap Footnotes and Endnotes. Select the option you want, and then click the “OK” button.
Change the Layout of Footnotes and Endnotes
By default, Word creates footnote and endnote lists with the same layout as the page on which they appear. However, you can adjust this from the Footnote and Endnote window by clicking the “Columns” dropdown menu and selecting the number of columns you’d like to use.
You can set your footnotes and endnotes to display in up to four different columns on the page.
Customize the Format of Footnotes and Endnotes
Word also lets you choose from several options for formatting how your footnotes and endnotes are numbered. It’s generally a good idea to choose a different numbering system for each note type, especially if you’re using a combination of footnotes and endnotes in the same document. This helps you and your reader quickly distinguish between the two at a glance.
In the Format section, click the dropdown arrow to the right of the “Number Format” option. Select your desired number format.
You can also label your notes with a custom symbol instead of a standard numbering system. Next to the Custom Mark option, click the “Symbol” button.
The Symbol menu will open. Select the symbol you’d like to use to label your notes, and then click the “OK” button.
Your selected icon should appear in the “Custom Mark” box, and Word will now use this symbol to label your notes.
By default, Word numbers footnotes and endnotes in individual series starting at “1” (or a, i, I, etc.) and continuing throughout the document. However, you can customize both the starting point and continuity of your notes.
If you want your footnotes or endnotes to start somewhere other than the first number in the series (for example, 2 instead of 1), click the arrows in the “Start At” dropdown box to increase or decrease the beginning value. One example of where this might be useful is if you’re writing a book that contains endnotes and you’re saving each chapter as a separate Word document. You could configure each chapter’s document to start numbering endnotes where the last chapter left off.
To change the continuity of your numbering series, click the dropdown menu arrow next to the “Numbering” option.
You’ll see three options for numbering your footnotes and endnotes: Continuous, Restart Each Section, and Restart Each Page. If you want your footnotes and endnotes to be numbered continuously from the beginning of your document to the end, select the “Continuous” option. If you’d prefer to have your notes numbered by chapter or section, select the “Restart Each Section” option. Or select “Restart Each Page” to number your notes by page.
Apply Your Changes to the Document
After configuring the above options, you’ll need to select how you want your changes applied to your document. At the bottom of the menu, click the dropdown menu arrow next to the “Apply Changes To” option.
If you want your changes to apply to every page and section of your document, select the “Whole Document” option. Or select “This Section” to apply changes only to the section of the document you’re currently in. (Note that this option will not appear if you have no section breaks in your document.)
Once you’re satisfied with your settings, click the “Apply” button in the bottom right of the menu.
You can also insert a new footnote using your selected settings by clicking the “Insert” button in the lower left corner of the menu.
How to Cross-Reference Footnotes and Endnotes in Word 2016
If you want to use the same footnote or endnote more than once throughout your text, there’s an easy way to do it without having to insert the same thing over and over again.
Place your insertion point where you want a reference inserted into the text. On the References tab, click the “Cross-Reference” button.
In the Cross-Reference window, choose either “Footnote” or “Endnote” from the “Reference Type” dropdown menu.
Next, click the “Insert Reference To” dropdown menu.
The “Footnote Number” option inserts the number of the footnote in regular text, while the “Footnote Number (Formatted)” option inserts the number of the footnote in superscript. The “Page Number” option inserts the number of the referenced page instead of the footnote number. The “Above/Below” option inserts either the word “Above” or “Below” depending on where the original footnote appears in relation to the cross-reference. Select your desired option.
Word lets you create hyperlinks between cross-references so you can easily find the same footnote everywhere it appears in your document. The “Insert as Hyperlink” option is checked by default, so you can click any cross-reference and automatically be taken to the part of the document containing the original footnote. We recommend leaving this option checked, but you can uncheck it if you prefer.
Under the “For Which Footnote” option, select the footnote you’d like to cross-reference, and then click the “Insert” button at the bottom of the menu.
READ NEXT
- › How to Add Footnotes in Google Docs
- › How to Cross-Reference in Microsoft Word
- › Learn These Microsoft Word Features to Make College Easier
- › How to Create Your Own Bibliography Template in Microsoft Word
- › This New Google TV Streaming Device Costs Just $20
- › HoloLens Now Has Windows 11 and Incredible 3D Ink Features
- › How to Adjust and Change Discord Fonts
- › BLUETTI Slashed Hundreds off Its Best Power Stations for Easter Sale
 Please Note: This commodity is written for users of the following Microsoft Word versions: 97, 2000, 2002, and 2003. If y’all are using a later version (Word 2007 or later), this tip may not piece of work for you. For a version of this tip written specifically for afterward versions of Word, click here: Using Not-Printing Notes.
Using Not-Press Notes
Word has a text attribute that has been around since the early days of Word for DOS. Hidden text is an aspect that allows you lot to enter data that you can easily suppress. Y’all tin can plow it off so information technology does not announced on the screen, or you lot can turn information technology off so it doesn’t print. To format text every bit hidden, follow these steps:
- Select the text you want hidden.
- Select Font from the Format menu. Word displays the Font dialog box. (Encounter Figure ane.)
- Click on the Subconscious check box. (The check box isn’t subconscious; information technology is named «Subconscious.»)
- Click on OK.
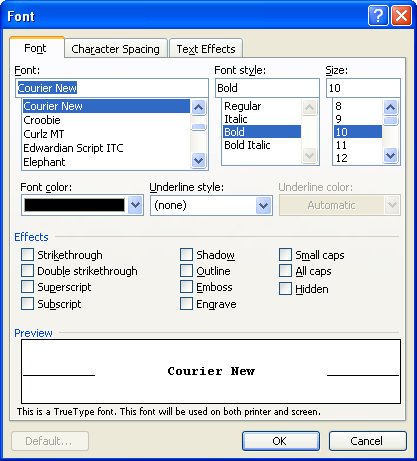
Figure 1. The Font tab of the Font dialog box.
Subconscious text shows on the screen with a dotted underline. Unfortunately, this is easy to miss as you lot are reading the document on the screen, then it is a skilful thought to use a text color to highlight your hidden text. For instance, information technology could be green also equally subconscious. In this way, your notes and messages are much harder to miss. You tin even define a character or paragraph style that has the hidden attribute set, along with the colour attribute to make the text more noticeable. You tin can command whether hidden text is displayed or printed. To control the display of hidden text on the screen, follow these steps:
- Choose Options from the Tools menu. Word displays the Options dialog box.
- Make sure the View tab is selected. (See Effigy 2.)
- Articulate the Subconscious Text check box if you don’t want it displayed, select the cheque box if you do want information technology displayed.
- Click on OK.
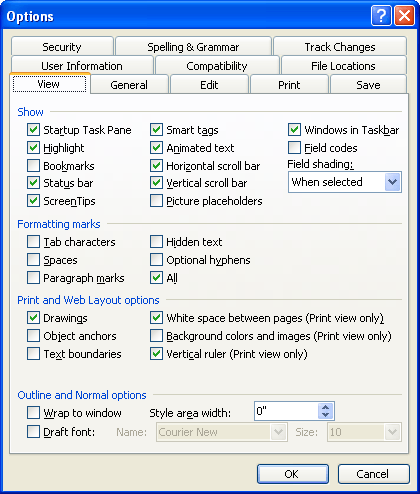
Figure ii. The View tab of the Options dialog box.
Controlling the press of hidden text is an entirely different matter. Discussion allows you to control whether subconscious text is printed with your document. To do this, follow these steps:
- Select Options from the Tools menu. Word displays the Options dialog box.
- Make sure Print tab is selected. (Run across Effigy 3.)
- Click on the Subconscious Text check box. If the cheque box is selected Word prints hidden text.
- Click on OK.
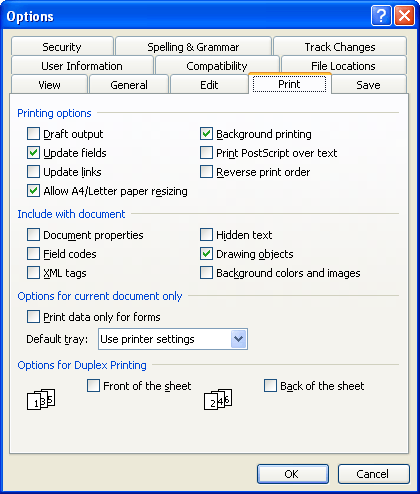
Figure 3. The Print tab of the Options dialog box.
WordTips is your source for cost-effective Microsoft Give-and-take preparation. (Microsoft Word is the most pop word processing software in the world.) This tip (1135) applies to Microsoft Discussion 97, 2000, 2002, and 2003. You can notice a version of this tip for the ribbon interface of Word (Discussion 2007 and afterward) here: Using Not-Printing Notes.
Author Bio
With more than than 50 not-fiction books and numerous magazine articles to his credit, Allen Wyatt is an internationally recognized writer. He is president of Sharon Parq Associates, a computer and publishing services company. Acquire more well-nigh Allen…
More than FROM ALLEN
Guidelines for Laser Printer Letterhead
Plan on using printed letterhead in your laser printer? Here are some tips and cautions about doing so.
Discover More than
Searching for Special Hyphens
Word allows you to utilize a couple of different types of hyphens in your certificate, each with a different purpose. If you lot …
Discover More
Working with Master and Subdocuments
Word has long had the capability of establishing relationships between documents by designating some as principal documents …
Discover More
More WordTips (menu)
Chop-chop Displaying the Font Dialog Box
Desire to chop-chop format some text in your document? Select, right-click, and brand a selection, and you can get to the …
Discover More
Changing Strikethrough Lines
Want to change the way a strikethrough line appears? It’south not every bit like shooting fish in a barrel as you think, as you find out in this tip.
Discover More
Engraving Text
Word allows you to format your text in a number of unlike ways. One rather esoteric style to format your text is by …
Observe More than
This tutorial shows how to insert footnotes and endnotes in Microsoft Word using the tools in the ribbon.
Manually inserting individual footnotes and endnotes in Word is relatively straightforward: type a superscript number in the main text and then scroll to the bottom of the page, section, or document to type your note.
But manually inserting notes can get tricky if your document is more than a couple of pages long or has a lot of notes because you also have to manually update number sequencing and text placement as notes are added or deleted.
That’s when Word’s footnote and endnote tools really come in handy. These tools automatically maintain sequential note numbers, create space for endnotes at the end of the document or section, and make sure that your footnotes stay with their associated text—even if that text moves to a different page. Best of all, the tools are easy to use.
The images below are from Word for Microsoft 365. The steps also apply to Word 2021, Word 2019, Word 2016, Word 2013, and Word 2010. However, your interface may look slightly different in those older versions.
This tutorial is available as a YouTube video showing all the steps in real time.
Watch more than 150 other writing-related software tutorials on my YouTube channel.
Don’t miss the three benefits of using Word’s footnote and endnote tools explained at the end of this tutorial.
1. Place your cursor where the superscript number for the first note should appear.

2. Select the References tab in the ribbon.

3. Select the dialog box launcher in the Footnotes group.

4. Select Footnotes or Endnotes in the Footnote and Endnote dialog box.

5. Select the note’s location from the drop-down menu.

You can also choose additional options in the Footnote and Endnote dialog box such as number formatting and whether the numbering applies to the whole document or to a specific section.
6. Select the Insert button to create the first note.

After Word creates the superscript number, your cursor will automatically move to the note location selected in the Footnote and Endnote dialog box.
7. Write your note.

8. Double-click on the number before the note to return to the location of the corresponding superscript number in the main text.

9. Place your cursor where the superscript number for the next note should appear in the text and then select Insert Footnote or Insert Endnote in the Footnotes group in the ribbon to insert the next note.

The options you selected in the Footnote and Endnote dialog box during step 5 will be maintained.
10. Save your document to save your new footnotes or endnotes.
Here are three benefits to keep in mind when working with footnotes and endnotes in Word:
1. You can use footnotes and endnotes in the same document. If you choose to use both, the first type inserted will be assigned superscript numbers and the second type inserted will be assigned superscript letters. However, these options can be changed in the Footnote and Endnote dialog box (see figures 4 and 5).
2. If you move the text connected to footnotes or endnotes, the sequencing of the superscript numbers (or letters) and the notes themselves will be automatically updated. Additionally, if you add or delete footnotes or endnotes between existing notes, the sequencing of the superscript numbers (or letters) and the notes themselves will be automatically updated.
3. You can modify the style of all the footnotes or all the endnotes, plus the reference numbers and the separator lines that appear above the notes.
Related Resources
How to Convert Individual Footnotes to Endnotes in Microsoft Word (and Convert Individual Endnotes to Footnotes)
Three Ways to Insert Superscripts and Subscripts in Microsoft Word
How to Insert Citations in Microsoft Word
Updated March 15, 2022
Footnotes are short notes at the bottom of the page that provide explanations, additional comments, or an understanding of a particular word or phrase in the document content. Endnotes are the same as footnotes but appear at the end of an entire section or document.

Footnotes or endnotes in the document must be formatted according to the requirements accepted by your college, university, company, established on the project, etc.
The number or symbol inserted in the document content to refer to a footnote or endnote is called a reference mark. Footnotes appear on the same page as their reference marks, and endnotes appear at the end of the document or section (see more about their customization below). In most views, footnotes or endnotes are separated from the body text by a note separator line (see how to change a note separator line).
The numbering is always correct if you insert footnotes or endnotes using the Word’s Footnote and Endnote functionality. Even after changes are made to the document, Word automatically moves the footnotes to the correct page and renumbers them accordingly.
Note: You can use footnotes and endnotes in the same document.
Insert a Footnote or Endnote
Word offers several useful features to insert footnotes and endnotes. You can:
- Insert the Footnote with the default format using the Insert Footnote button
- Insert the Endnote with the default format using the Insert Endnote button
- Insert the Footnote and Endnote using shortcut keys
- Insert the Footnote and Endnote using the custom format
Note: To reference a single footnote or endnote multiple times in the document text with the automatic numbering, you can use cross-references.
Insert the Footnote using the Insert Footnote button
To insert the Footnote with the format used by default (Word’s default format or last saved format for the footnotes in the document), do the following:
1. Place the cursor where you want to insert the reference to the footnote.
2. On the References tab, in the Footnotes group, click the Insert Footnote button:

Word inserts the footnote at the bottom of the current page with the format used by default (superscript number of the 1, 2, 3, … numbered list). The cursor is positioned next to the inserted footnote. E.g.:
3. Enter what you need in the footnote. You can modify text style, size, color as you want using the same features as for the regular text:

Note: See how to format footnotes and endnotes for more details.
4. Double-click the number or symbol at the beginning of the footnote to return to the place in the document where you inserted a reference mark.
Insert the Endnote using the Insert Endnote button
To insert the Endnote with the format used by default (Word’s default format or last saved format for the endnotes in the document), do the following:
1. Place the cursor where you want to insert the reference to the endnote.
2. On the References tab, in the Footnotes group, click the Insert Endnote button:

Word inserts the endnote at the end of the document with the format used by default (superscript number of the i, ii, iii, … numbered list). The cursor is positioned next to the inserted endnote. E.g.:

3. Enter what you need in the endnote.
Note: See how to format footnotes and endnotes for more details.
4. Double-click the number or symbol at the beginning of the endnote to return to the place in the document where you inserted a reference mark.
Insert the Footnote and Endnote using shortcut keys
You can use the following keyboard shortcuts to insert footnotes and endnotes in a Microsoft Word document:
- Press Alt+Ctrl+F to insert a footnote.
- Press Alt+Ctrl+D to insert an endnote.
Insert the Footnote and Endnote with custom format
To insert the Footnote and Endnote in the document with the custom format, do the following:
1. Place the cursor where you want to insert the reference to the footnote or endnote.
2. On the References tab, in the Footnotes group, click the dialog box launcher:

3. In the Footnote and Endnote dialog box:

- In the Location section:
- Select Footnotes and the location:
- Bottom of page (used by default)
- Below text – if there is a space between text and a bottom margin on the page, it can be placed right after text. For example:

- Select Endnotes and the location:
- End of section
- End of document (used by default)
To insert endnotes at the end of each chapter or other parts in the document, add a section break (see how to work with breaks in Word) for each chapter or part and select the End of section option.
- Click the Convert… button to convert all footnotes to endnotes, or vice versa (see converting footnotes and endnotes below).
- Select Footnotes and the location:
- In the Footnote layout section (available only if the Footnote is selected in the Location section), select the layout from the Columns dropdown list.
As for the regular text, Word offers to create columns for the footnotes and endnotes.
- Match section layout – use the same number of columns as the document text
- 1 column
- 2 column
- 3 column
- 4 column
For example:
- Match section layout:

- 1 column:
- In the Format section:
- Choose the format you need from the Number format dropdown list:

- 1, 2, 3, … (used by default for footnotes)
- a, b, c, …
- A, B, C, …
- i, ii, iii, … (used by default for endnotes)
- I, II, III, …
- *, †, ‡, §, …
- Type the Custom mark or select it by clicking the Symbol… button to open the Symbol dialog box:

Select the symbol you need in the Symbol dialog box and click the OK button.
In English, a footnote or endnote is usually indicated by a superscript number immediately following the text or phrase to which the note refers. For some requirements, a superscript number should be placed between parentheses, for example: [1].
Note: We strongly recommend checking the requirements you need to follow. For example:
- The Chicago style allows using symbols, such as the asterisk (*) or the dagger (†), instead of numbers if there are a few footnotes in the document (see how to add different reference marks for more details).
- The American Psychological Association (APA) style and Modern Language Association (MLA) style don’t recommend using symbols as footnote identifiers.
- Optionally, select the number you need to start numbering in the Start at field.
For example, if you have several documents containing different chapters or parts of the voluminous project, you can start footnotes from a specific number in the current document.
- From the Numbering dropdown list, select one of the options:
- Continuous (used by default)
- Restart each section
- Restart each page
- Choose the format you need from the Number format dropdown list:
- In the Apply changes section, from the Apply changes to dropdown list, select one of the options:
- This section
- Whole document


4. Enter the text you need in the footnote or endnote:
5. Double-click the number or symbol at the beginning of the note to return to the document content.
Converting Footnotes and Endnotes
Word can convert footnotes to endnotes, and vice versa:
- To convert one footnote to an endnote, right-click the footnote, then click Convert to Endnote in the popup menu:

- To convert one endnote to a footnote, right-click the endnote, then click Convert to Footnote in the popup menu.
- To convert all footnotes to endnotes or convert all endnotes to footnotes, do the following:
1) Right-click any of the footnotes or endnotes, then select Note Options… in the popup menu:
2) In the Footnotes and Endnotes dialog box, click the Convert… button:

3) In the Convert Notes dialog box, choose the option you need:

- Convert all footnotes to endnotes (is active if there is at least one footnote in the document)
- Convert all endnotes to footnotes (is active if there is at least one endnote in the document)
- Swap footnotes and endnotes (is active if there are at least one footnote and one endnote in the document)


Select all footnotes in the document
To select all footnotes in the document, click inside any footnote, then press Ctrl+A.
To select all endnotes in the document, click inside any endnote, then press Ctrl+A:

Edit and move footnotes and endnotes
To edit a footnote or endnote, click inside the note and make corrections.
To move a footnote or endnote from one location in the document to another, do the following:
1. Select the reference mark in the document.
2. Do one of the following to cut the selection:
- On the Home tab, in the Clipboard group, click the Cut button:

- Right-click the selection and choose Cut in the popup menu.
- Press Ctrl+X.

3. Place the cursor in the new location.
4. Do one of the following to paste selection:
- On the Home tab, in the Clipboard group, click the Paste button.
- Right-click and choose Paste in the popup menu.
- Press Ctrl+V.
Word moves the reference mark and the note to the correct place; also, it renumbers footnotes and endnotes.
Move among footnotes and endnotes
To move among footnotes and endnotes, on the References tab, in the Footnotes group, click the Next Footnote button, then select one of the options:

- Next Footnote,
- Previous Footnote,
- Next Endnote,
- Previous Endnote.
Notes:
- To move to the next footnote, you can just click the Next Footnote button in the Footnotes group on the Reference tab.
- See more about navigating in the document.
Display footnotes or endnotes
To display the note’s content in the Word document, do one of the following:
- On the References tab, in the Footnotes group, click the Show Notes button to display the list of footnotes or endnotes:

If there are footnotes and endnotes in the document, Word asks which type of notes you want to see:

- Double-click a reference mark in the document’s body to display its corresponding footnote or endnote.


Note: If you hover the mouse over a reference mark in the document text, a tooltip appears with a full footnote or endnote text, so you don’t need to scroll up and down to check footnotes and endnotes as you read or write:

Remove the Footnote and Endnote
To delete the footnote or endnote in the Word document, select its reference mark (number or symbol that refers to the footnote or endnote), and press the Delete key.
Note: If you delete the text and the number from the footnote or endnote pane, it does not delete the number in the document text itself. Word still thinks the deleted footnote or endnote is still active. You need to delete the original reference mark in the document.
After removing any note, Microsoft Word automatically renumbers the footnotes and endnotes.