
When you add several tables and figures or any other objects in your report, it is a best practice to create a list of tables and figures or lists of other objects in the report’s preface. In academic writing, this is a must-have section of your report. Like the table of contents, you can also generate a list of tables and figures or any other objects in Microsoft Word.
Table of Contents
Step 01: Add captions to tables and figures
The lists of tables and figures or lists of any other objects are generated from the captions you added for those objects in your report. If you haven’t added captions yet, you can learn how to add captions in Microsoft Word fro the following post.
How to add Captions in Microsoft Word
Step 02: Insert list of tables and figures
After you add a few captions to tables or figures in your document, you generate a list of those objects.
To generate a list of tables and figures or any other objects;
- Place the cursor where you want to add the list.
- Go to the References tab
- Click Insert Table of Figures in the Caption group
- In the Table of the Figures dialog box select the relevant Caption Label (Table, Figure, & Equation, etc…)
- Do the necessary formatting using the available options in the Table of Figures dialog box,
- Click OK.
The following animation demonstrates the above steps for creating a list of tables and figures.
Updating the lists
You need to update these lists in order to include the tables and figures or other objects you added later in the report. To update these lists,
- Click anywhere in the middle of the list to be updated
- Go to the References tab
- In the Caption group, click Update Table
- In the Update Table of Figures dialog box select the Update Entire Table option
- Click OK.
 As shown in this tutorial, you can quickly create a list of tables or figures in Microsoft Word if you used Word’s caption tool to number your tables and figures. (See “How to Insert Figure Captions in Microsoft Word” for step-by-step instructions on using the caption tool.)
We will also look at how to update the list as you add, move, or delete tables or figures.
Terminology Note: This tutorial uses the terms list of tables and list of figures, which are common terms in the publishing industry. However, Word refers to a list of tables or figures as a table of figures.
This tutorial is also available as a YouTube video showing all the steps in real time.
Watch more than 200 other writing-related software tutorials on my YouTube channel.
The images below are from Word in Microsoft 365 (formerly Office 365). The steps are the same in Word 2021, Word 2019, Word 2016, and Word 2013. However, your interface may look different in those older versions of the software.
Remember that these steps will only work if you used Word’s caption tool to number your tables or figures before creating the list.
- Insert your cursor where you want to place your list.
- Select the References tab in the ribbon.

- Select Insert Table of Figures from the Captions group.

- Select a visual style from the Formats menu in the Table of Figures dialog box. (The From Template option is based on the styles established in your current template.)

- Select Figure or Table from the Caption label menu. (There is no option for listing figures and tables together.)

- Ensure that Include label and number is checked if you want the label (i.e., Figure or Table) and the number to be included in the list. (Recommended)

- (Optional Step) Select additional options concerning page numbers and the tab leaders, which are the dots, dashes, or lines that appear before the page numbers.

Pro Tip: The Web Preview section shows how your list will look if you convert your Word file to a web page.
- Select the OK button.

- Manually type a title above your list.

- Save your file to save your changes.
The next section shows how to update a list of tables or figures.
How to Update a List of Tables or Figures
Word will not automatically update your list as you add or delete tables or figures. Instead, you can manually trigger updates, as necessary.
- Right-click the list and select Update Field from the shortcut menu.

- Select Update entire table from the Update Table of Figures dialog box.

- Select the OK button.

Your updates should appear immediately.
- Save your file to save your changes.
Important Note: Word’s caption tool, which inserts table titles and figure captions, will automatically number new tables and figures as you add titles and captions (e.g., Table 1, Table 2, Table 3). However, Word will not automatically update the numbering if you move or delete tables or figures.
See “How to Update Table and Figure Numbers in Microsoft Word” to learn how to force an update after moving or deleting a table or figure.
Related Resources
How to Create and Customize Charts in Microsoft Word
How to Insert and Modify Images in Microsoft Word
Three Ways to Insert Tables in Microsoft Word
How to Change the Style of Table Titles and Figure Captions in Microsoft Word
How to Cross-Reference Tables and Figures in Microsoft Word
How to Reference Tables and Figures in Text
Updated December 14, 2022
Word can generate a list of all the tables in a document. Like a Table of Contents, this list of tables or Table of tables can include page references or links to each table.
A Table of tables can be useful for creating a proper appendix or reference within more formal documentation. It can be handy to have a list of all the tables used in a document either for publication or just for ‘in-house’ reference use during writing.
Before you can add a Table of tables to your document, you must add captions to all the tables in your document, as described in Adding Captions in Word. Yes, there is an alternative way making the list from styles but captions works better because each table gets a individual label.
Two Tables in Word
Before we begin, lets try to sort out a linguistic mess. Word has two features both called ‘tables’.
Table – a list of captions etc within a document e.g. Table of Contents, Table of Figures etc.
table – a grid of boxes or cells placed in a Word document from Insert | Table.
Normally the two are separate and it’s clear from the context which one we’re talking about.
For this article we’ll try to make it clear which ‘table’ we’re talking about by using the term ‘list’ but mostly with a capital letter ‘Table’ for the list and lower case ‘table’ for the grid. E.g. a Table of tables.
Slightly less confused? Good, let’s get on with it.
Making a simple Table of tables
Once you have some tables captioned in the document you can make a reference Table of them.
Click where you want the Table to appear (most likely as an appendix or close to your Table of Contents).
Go to References | Captions | Insert Table of Figures (yes, ‘Figures’) to bring up the “Table of Figures” dialog.
First thing to do is change the Caption Label from Figures to table. And lo! you have a Table of tables!
The “Print Preview” and “Web Preview” panes show how the Table will appear. By default, page numbers are displayed and aligned to the right, although you can change this by deselecting the appropriate checkboxes.
The “Tab leader” dropdown changes what appears between the text and the right-aligned page numbers.
“Use hyperlinks instead of page numbers” for the web preview gives you a clickable table with links to each table in the Word document.
Table Formats
The “Formats” drop-down list directly affects the appearance of the Table of tables. The available options are:
- From template
- Classic
- Distinctive
- Centered
- Formal
- Simple
Select a format to see how it will look in the preview panes. Most people use ‘From template’ because that will match the font etc in the current document or template.
To design a custom Table of tables layout, select “From template” and click the “Modify” button to create your own style.
When you are happy with the layout, click “OK” to build your Table of tables. Word will search for the captions, sort them by number, and display the Table of tables in the document.
Word déjà vu
If all this seems familiar, that’s because it’s almost exactly the same as the ‘Table of Contents’ and Table of Figure options. In fact, a Table of tables uses the same underlying Word technology as Table of Contents (the {TOC } field).
All Word’s Table of Contents options
Four Word tricks to shrink a Table of Contents
Table of Contents basics in Word

John A Trax Jr, Getty Images/iStockphoto
If you have a lot of tables, chances are you’ll want to document them. You can do so with minimal effort thanks to Word’s referencing feature. By giving your tables captions, you can easily generate a list of tables (and figures). The captions serve as descriptive titles, and you can use them to generate a list anywhere in the document, as easily as you would a table of contents.
There’s a monkey wrench though: The default settings rely on built-in captions for each table, and each caption displays a sequential number. That’s great if that’s what you want–but if it’s not, you’ll have to work a bit harder. In this article, I’ll show you how to generate both lists: one displaying the same caption and sequential numbers and one containing unique names and no sequential numbers. You can also apply both techniques to a list of figures.
I’m using Word 2016 on a Windows 10 64-bit system, but this technique works in older versions. The browser version will display the list, but the features needed to generate the list aren’t available. You can work with your own Word document or download the demonstration .docx or .doc file.
LEARN MORE: Office 365 Consumer pricing and features
The easy way
The easiest technique generates a list of built-in captions and sequential numbers. With a little work, you can add custom captions and remove the numbers. The only thing you must do either way is give each table a title using the Caption property. Let’s work through a simple document with a few tables. To add a caption, click anywhere inside the first table and then do the following:
- Click the References tab.
- In the Captions group, click Insert Caption.
- To retain the default settings (Figure A) click OK. As you can see in Figure B, Word adds the default caption–Table 1–above the table.
Figure A
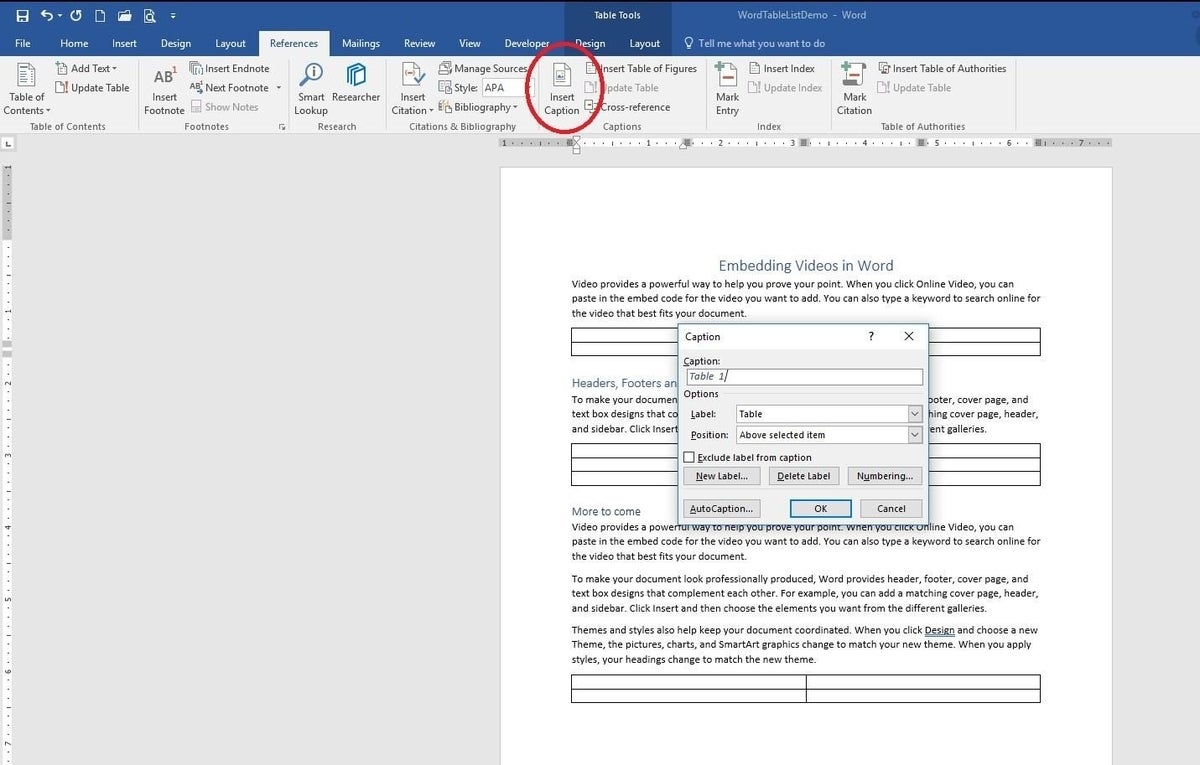
Retain the default settings.
Figure B

Word displays a caption above the table.
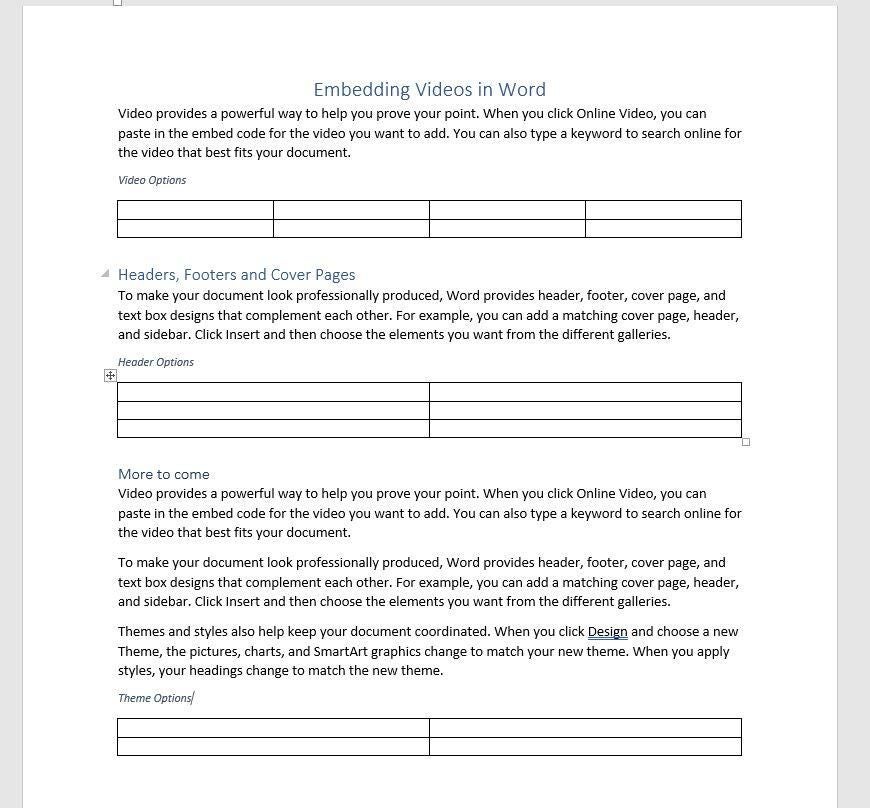
Repeat this process for the remaining tables. When you’re done, you’re ready to add the list of tables to your document. You can put the list anywhere you like. In a technical document, a list of tables usually follows the table of contents. For this example, we’ll generate the list at the end of the document, as follows:
- Double-click at the end of the document.
- Click the References tab.
- In the Captions group, click Insert Table Of Figures.
- In the resulting dialog, choose Table from the Caption Label dropdown (Figure C).
- Uncheck the Use Hyperlinks Instead Of Page Numbers option.
- Click OK to return the document and the list shown in Figure D.
Figure C

You want to list tables.
Figure D

With almost no work, you can generate a list of tables.
Using the default settings, this feature quickly creates a list of tables, but the captions are limited. They aren’t descriptive and they include a sequential number. You might want something more meaningful.
SEE: 30 things you should never do in Microsoft Office (free PDF) (TechRepublic)
http://www.techrepublic.com/videos/video-how-to-rotate-text-in-microsoft-word/
Add meaning
Fortunately, adding custom captions and removing the sequential numbers requires only a few additional steps. First, if you’re actually working the example, remove the captions you added in the last section. Simply select and delete them or close and reopen the document without saving it. Next, click anywhere inside the first table, click the References tab, and then click Insert Caption, as before. To add the custom caption, do the following:
- Click New Label.
- In the resulting dialog, enter the text (Figure E).
- Click OK.
- Make sure the Position setting is correct–most likely you’ll want to use Above Selected Item. When you choose New Label, Word switches the position.
- Click OK to return to the document.
Figure E

Add a custom caption.
As you can see in Figure F, the caption displays the custom text and a sequential number. To remove the number, select it and delete it–it’s that simple. Figure G shows all three tables with custom captions and no sequential numbers. If you add all three captions and then go back to remove the values, you’ll notice that each caption is numbered 1. That’s because each caption is unique. As a result, the values aren’t functional.
Figure F

The caption is more meaningful, but it still includes the sequential number.
Figure G
Remove the sequential numbers from each caption.
Try to generate a list of tables as you did before. Notice that the Caption labels option now offers your custom labels. Because your captions are unique, choosing one of them will list only that table. Be sure to choose Table as you did before. Oops… you probably weren’t expecting to see the error shown in Figure H, were you? Adding custom captions is only half of the solution.
Figure H

This error means Word can’t find any table captions to list.
Luckily, the fix involves only a few extra clicks. Once again, use the Insert Table Of Figures option to display the Table Of Figures dialog (Figure C). Choose Table and uncheck the Use Hyperlinks Instead Of Page Numbers option as before. Instead of clicking OK, click Options. In the resulting dialog, check the Style option, as shown in Figure I, and click OK twice (and confirm to replace the existing list if prompted) . Figure J shows the results.
SEE: Microsoft Office: Full version comes to the Windows Store (TechRepublic)
Figure I
Use a table style instead of the caption labels to generate the list .
Figure J

The list displays meaningful names and no values.
Choosing this option changes the list element from labels to styles–specifically, Word’s built-in Caption style. You can use both techniques to generate a list of figures.
Send me your question about Office
I answer readers’ questions when I can, but there’s no guarantee. Don’t send files unless requested; initial requests for help that arrive with attached files will be deleted unread. You can send screenshots of your data to help clarify your question. When contacting me, be as specific as possible. For example, “Please troubleshoot my workbook and fix what’s wrong” probably won’t get a response, but “Can you tell me why this formula isn’t returning the expected results?” might. Please mention the app and version that you’re using. I’m not reimbursed by TechRepublic for my time or expertise when helping readers, nor do I ask for a fee from readers I help. You can contact me at susansalesharkins@gmail.com.
Some requirements demand listing figures, tables, and other visual objects at the end of a document. They are named List of Figures and List of Tables. Microsoft Word offers the functionality named Table of Figures that helps generate and update a list of the captions for pictures, charts, graphs, diagrams, slides, photos, or other illustrations of the document, along with the numbers of the pages on which the captions appear.
Table of Figures pretty much like Table of Content:
- Is helping readers and reviewers navigate to the visual objects in the document,
- Is generated from the figure and table captions or other object captions. All captions you need to include in the appropriate Table of Figures should be added using the Caption functionality.
Depending on the selected type of objects (captions label), the list generated by Table of Figures may contain:
- List of figures (see How to create automatic numbers and captions for figures: images, pictures):

- List of tables (see How to create automatic numbers and titles for tables):

- List of custom objects, labeled in the Caption functionality as a separate item. E.g., a List of photographs (see How to insert numbers, captions, and cutlines for photographs):


Note: See how to transform captions and titles for including or excluding different text parts to the Table of Figures.
Prepare items for a List of Tables or Figures
Before starting a Table of Figures functionality in Word, ensure that all visual objects have captions (or at least style you will use for creating a list). These allow Word to recognize and include them in the appropriate list.
You can create a list of objects and add a caption to the missed object later. Don’t forget to update caption numbering and already created lists!
Create a List of Figures or Tables in Word
To create a list of some objects in a Word document, position the cursor to insert the list. Then, on the Reference tab, in the Captions group, click the Insert Table of Figures button:

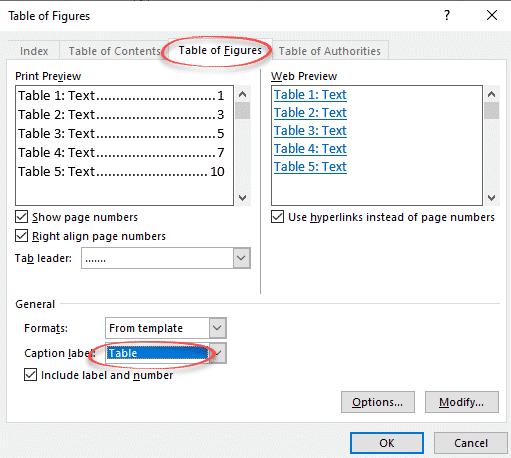
In the Table of Figures dialog box, on the Table of Figures tab (is displayed by default, all other tabs are grayed):

- In the General section (we recommend starting from this section because its options can change the selected parameters in other sections):
- From the Format dropdown list, select a visual format:

- From template is based on the styles established in the current template
- Classic
- Distinctive
- Centered
- Formal
- Simple
Note: Choose any proposed formats and see how the new list will look in the Print Preview section. E.g., the Formal format:

- From the Caption label dropdown list, select the type of items you want to include in the Table of Figures:
- (none)
- Figure (selected by default) – see how to create captions for figures,
- Equation – see how to create captions for equations,
- Table – see how to create captions for tables,
- Any other label (in this example, My Caption, Photo) was created using the New Label… button of the Caption dialog box. E.g., see how to create captions for photographs.
Note: There is no option for listing different labels in that list, such as figures and tables together. See how to create a list of all captions in the document below.
- Ensure that the Include label and number check box is selected if you want the label (i.e., Figure or Table) and the number to be included in the list. E.g.:
- With the selected Include label and number check box, the list displays the entire captions:
- With unselected Include label and number check box, the list displays only text from captions:
- From the Format dropdown list, select a visual format:


See all the changes and choices in the Print Preview and Web Preview sections:
- In the Print Preview section (all changes in that section can be changed by the selected options in the General section):
- Clear the Show page numbers check box if you prefer to hide page numbers from the list:
If you deselect this option, all other options in the Print Preview section will disappear.
- Clear the Right align page numbers check box to display page numbers right after items text:
If you deselect this option, you can’t choose the tab leader for page numbers.
- From the Tab leader dropdown list, select the tab leader you need. You can select dots, dashes, or lines that appear before the page numbers:
- Clear the Show page numbers check box if you prefer to hide page numbers from the list:
- In the Web Preview section (shows how your list will look if you convert your Word file to a web page):
- Clear the Use hyperlinks instead of page numbers check box if you prefer to see the same view as in Print Preview:


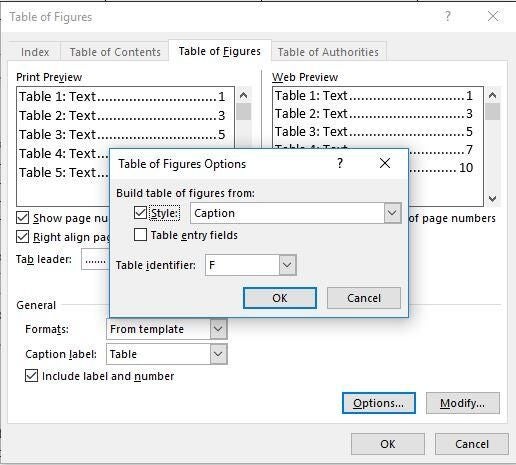
Create a list for the style or Table entry fields
In the Table of Figures dialog box, on the Table of Figures tab:
- Click the Options… button to use styles and Table entry fields for the Table of Figures instead of caption labels:

In the Table of Figures Options dialog box:
- Select the Style from the dropdown list (check box will be selected automatically) to add all text with the selected style in a Table of Figures:
Note: The Style dropdown list contains all styles already used in the Word document.
So, Word creates a list of all text blocks in a document with that style. E.g., if you select the Caption style, you will see all captions in a List:

Note: You can create a custom style for some titles or blocks of text and include them in the list. See some examples below.
- Select the Table entry fields check box to insert Table of Contents entries (see how to create and use the Table of Contents Entries):

For example, if you have the table titles in the separate line of the label and number, you can create the Table entry fields for such tables:

***

So, the List of Table will display specified titles:

Note: The issue of this example can also be solved using the transformation of the captions and titles.
- Select the Style from the dropdown list (check box will be selected automatically) to add all text with the selected style in a Table of Figures:


Customize the Table of Figures style
In the Table of Figures dialog box, on the Table of Figures tab:
- Click the Modify… button to modify a predefined style for a Table for Figures.
In the Style dialog box:
- In the Styles list, is selected a style that Word will use for a created Table,
- In the Preview field, check how the style looks,
- Under Preview, the main options for the style are listed:

- Click the Modify… button to change the style.
In the Modify Style dialog box, make changes you need, then click the OK button:

For example, the Table of Figures with double spacing and indentation for the long captions:

See how to customize the Table of Figure style for more details.


Add a title to the custom Table of Figures
After inserting a new Table of Figures, manually type a title above the list. E.g.:

Attention! We highly recommend checking the formatting requirements, accepted by your college, university, company, or established on the project, etc. For example:

See also how to customize the Table of Figures style.
Empty Table of Figures or Table of Tables
After creating a Table of Figures, Word can create a message “No table of figures entries found”:
![]()
The leading cause for this message is that Word could not find the text with the Caption style for the selected caption label (e.g., Figures, Tables, etc.).
To solve that problem, check the style for items captions such as figures and tables which you want to be displayed in the Table of Figures.
Don’t forget to update captions and any related items in a document!
Update a List of Tables or Figures
Microsoft Word inserts Table of Figures as a field:
So, you can change the TOC field using switches.
Word will not automatically update any Table of Figures after adding, deleting, or modifying included items and pages. To manually update them, follow the next steps:
1. Click on the list and do one of the following:
- On the References tab, in the Captions group, click the Update Table button:

Note: Only if your cursor is positioned on any of the generated Tables (Table of Figures, Table of Content, etc.), that button is not grayed.
- Right-click the list and select Update Field from the shortcut menu:


2. In the Update Table of Figures dialog box, select elements you need to update:

We recommend selecting the Update entire table option always.
3. Click the OK button to start updating.
Note: See how to turn on or turn off highlighting of fields in a Word document to display all fields in a document with a gray background.
Edit an existing Table of Figures or Table of Tables
If you need to modify an existing Table of Figures, you can:
- Delete existing Table of Figures and create a new one,
- Edit an existing field.
To edit the existing Table of Figures, follow the next steps:
1. Do one of the following:
- Click anywhere on the Table, then on the References tab, in the Captions group, click the Insert Table of Figures button.
- Select all the lines of the Table, then right-click on the selection and choose Edit Field… in the popup menu:

In the Field dialog box, click the Table of Contents… button:

Note: The button is visible only if you have selected all the existing Table of Figures lines.
2. In the Table of Figures dialog box, on the Table of Figures tab, select the options you need.
Be careful! Word opens the Table of Figures dialog box with default options. All the options selected for the existing Table disappear.
Delete a Table of Figures
To delete a List of Figures (List of Tables, or List of any objects), select all the lines of a Table of Figures and press Delete.

Highlights
- Before adding a list of tables in your Word document, you need to add captions to them.
- You can add a list of tables in Word from the references ribbon.
- The method of adding a list of tables in an MS Word document is the same as adding a list of Figures.
Working on a report and want to add a list of tables to it? If you want to know how to add list of tables in Word, read this article.
If you are searching how do I automatically insert a list of tables in word, here is the answer. This is a quick guide on how to insert a list of tables in MS word documents.
If your Microsoft Word document has many tables and figures in the appendices, you need to create a separate list of tables and figures in it. This how-to will make creating lists of tables less time-consuming.

Before adding a list of tables in a Word document, make sure you have given appropriate captions to them. But if you haven’t, follow the below steps to add captions to tables.
Firstly, click on the table and then click on REFERENCES.

Then in the REFERENCES tab, click on the Insert caption.


Repeat this process for all the tables in your Word document. After captioning all the tables, you are ready to insert a list of tables into it.
Steps To Insert List Of Tables In Word
- Type the heading List of Tables, assign the Heading 1 style, and click where you want to insert the list.

- Click on REFERENCES and then click List of figures.

- In the resulting dialog, choose Table from the Caption Label dropdown.
- Uncheck the Use Hyperlinks Instead Of Page Numbers option.
- Click OK.

You will see that the list of tables has been added successfully.

How To Update List of tables In Word
If you add, delete, change, or move captions, use Update Table so the list of tables reflects your changes.
- Click on the list of tables in your document. This will highlight the entire list.
- Click References > Update Table.

- Note: Update Table becomes an option only when you click the table of figures in your document. You can also press F9 to modify your list of tables.
- Select an Update in the in the Update Table of Figures dialog box.
- Select Update page numbers if you need to adjust the page numbers.
- Select Update entire table if you have moved tables or altered captions.

- Click OK.

Back to top button
Follow these steps…
(1) Give all your tables a caption.
(2) Click your cursor at where you’d like to place your List of Tables.
Its traditional location in a technical document is right after the Table of Contents (if any) and after the “List of Figures” (if any).
(3) Select the References tab from the main menu. Then click Insert Table of Figures to display the Table of Figures dialog box:

(4) Clear the “Use hyperlinks instead of page numbers” check-box if you do not want to jump to a HTML destination accidentally.
(5) Select the “Show page numbers” check-box. Select the “Right align page numbers” check-box. Select a Tab Leader from the drop-down list.
(6) Select “Table” from the Caption Label drop-down list to display table captions in the Print Preview box. Then select the related “Include name and number” check-box:

(7) Select a template from the Formats drop-down list.
(8) Click OK to display your List of Tables at where your cursor is.

by almirah
This article will show you how to create a list of tables automatically in Microsoft Word 2010
Automatic List of Tables
What’ that?
What do we mean by creating a List of Tables automatically in Microsoft Word 2010? Yes, it simply means that you don’t need to type your List of Tables manually. Instead, Microsoft Word 2010 will do it for you with a few clicks. To do this, all your tables in your document have to be properly captioned, so that the software will recognize your table captions and put them in your list of tables. That’s it.
Beside for a List of Tables, this feature can also be used for other lists. For example, List of Figures, List of Appendices, and List of Equations. The requirement is the same, you have to caption them properly.
 |
Microsoft Word 2010 Plain & Simple
Get the guide that makes learning Microsoft Word 2010 plain and simple! This full color, no-nonsense book shows you the quickest ways to solve a problem or learn new skills, … Only $29.96 |
Caption Your Tables
The first thing you need to do if you want to create an automatic List of Tables is to caption all tables you have in your document. Not only this will produce table captions with a consistent look, it’ll also number your tables in the right order. Follow these steps to caption your tables:
- Type in the name of your table (usually at the top of the table)
- Position your mouse cursor at the beginning of the table name (before the first letter) and click Insert Caption under Reference menu
- In the appearing Caption window, select Table for the Label box (click New Label and type in the label you want, if that has not been available). You’ll see that Table 1 will appear in the Caption box
- Click OK
- Position your mouse cursor between the table number and the first letter of table name and press Tab once on your keyboard (you can adjust the tab later on).
Not seeing the format of your Table caption as you want? Never mind, we’ll fix that soon. For now, this shows you how to use Caption facility to label tables in Microsoft Word 2010. Try this first with other tables to see how it works.
Format the Table Caption
If the table caption you’ve just created is not the right format for your, customize it with the following steps:
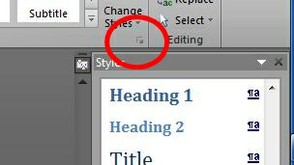
- Expand the Style panel by clicking its small arrow at the bottom right corner of its box (Style is under Home menu) — top image on the right
- Position your cursor on one of the table caption you’ve created and you’ll see in the Style panel that Caption style will selected (scroll down the panel if you can’t see it)
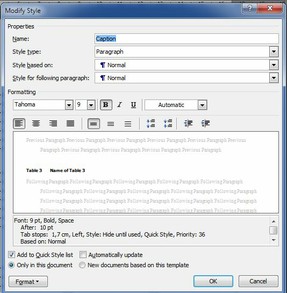
- Right click the Caption style to find Modify
- In the appearing Modify Style window (bottom image on the right), you can do any formatting you want
- You may need to set Tab position (under Format) so that there is a reasonable space between table number and the first letter of table name
- Click OK when you are done.
Activating Style Panel
Caption Modify Style Automatic List o…
Create Your List of Tables
You can create your List of Tables anytime during your writing. But, I usually add my List of Tables at last after I captioned all the tables I have in my document.
To create your List of Tables, follow these steps:
- Position your mouse cursor at location where you want to display your List of Tables
- Under Reference menu, click Insert Table of Figures
- Clear the box next to ‘Use hyperlinks instead of page numbers’
- Make sure you select Table for Caption label box
- Click OK.
You List of Tables has just been created!
Updating Your List of Tables
What if you add more tables to your document after you’ve created your List of Tables? That’s not a problem at all.
- Caption all your tables as directed.
- Right click your List of Tables
- Click Update field
- You can then select ‘Update page numbers only’ or ‘Update entire tables’
- Click OK.
Updated: 01/04/2012, almirah
Thank you! Would you like to post a comment now?
1
Disclosure: This page generates income for authors based on affiliate relationships with our partners, including Amazon, Google and others.

Word for Microsoft 365 Word 2021 Word 2019 Word 2016 Word 2013 Word 2010 More…Less
You can list and organize the figures, pictures, or tables in your Word document by creating a table of figures, much like a table of contents. First add captions to your figures, and then use the Insert Table of Figures command on the References tab. Word then searches the document for your captions and automatically adds a list of figures, sorted by page number.
Before you begin
Before you create a table of figures, you must add captions to all the figures and tables that you want included in your table of figures. For more information, see Add, format, or delete captions in Word.
Insert a table of figures
-
Click in your document where you want to insert the table of figures.
-
Click References > Insert Table of Figures.

Note: If your Word document is not maximized, the Insert Table of Figures option might not be visible. Some minimized views show only the Insert Table of Figures icon
. -
You can adjust your Format and Options in the Table of Figures dialog box. Click OK.

 .
.Update a table of figures
If you add, delete, change, or move captions, use Update Table so the table of figures reflects your changes.
-
Click on the table of figures in your document. This will highlight the entire table.
-
Click References > Update Table.
Note:
Update Table becomes an option only when you click the table of figures in your document. You can also press F9 to update your table of figures. -
Select an Update in the in the Update Table of Figures dialog box.
-
Select Update page numbers if you need to adjust the page numbers.
-
Select Update entire table if you have moved figures or altered captions.
-
-
Click OK.

See Also
Add, format, or delete captions
Create a table of contents
Insert a table
Need more help?
Want more options?
Explore subscription benefits, browse training courses, learn how to secure your device, and more.
Communities help you ask and answer questions, give feedback, and hear from experts with rich knowledge.
I’m writing one of those things where you have to provide a list of all the tables and pictures at the beginning of the text. I know how to insert caption for a picture, but I’m not sure as to how can I do that for a table or some miscellaus object, in a way that I can get a list of them all afterwards ?
Can anyone give a hint or two ?
Usually I do these things manually, but this document is getting big.
asked Jun 15, 2010 at 16:06
![]()
Try this. It’s taken from an old MS support article (a more up-to-date version can be found here).
- Click where you want to insert the table of figures.
- On the Insert menu, point to Reference, click Index and Tables, and then click the Table of Figures tab.
- In the Caption label box, click the type of caption label you want to compile in the table of figures.
-
Do one of the following:
- To use one of the available designs, click a design in the Formats box.
- To design a custom table of figures layout, choose the options you want.
-
Select any other table of figures options you want.
answered Jun 15, 2010 at 16:18
![]()
AndyAndy
3,0173 gold badges20 silver badges28 bronze badges
3