
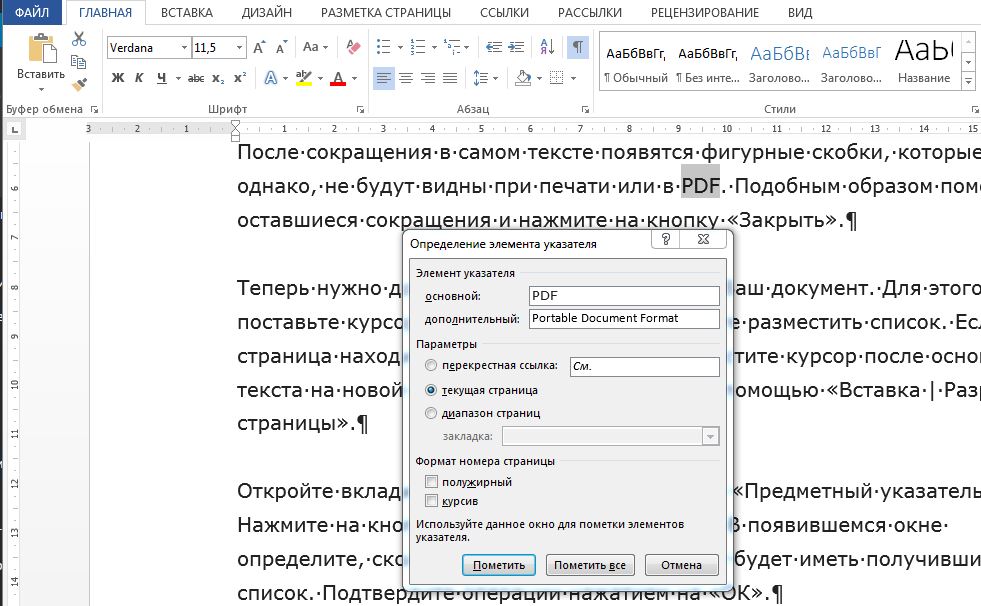
Для начала внесите все сокращения в Предметный указатель. Для этого выделите нужные слова или аббревиатуры и нажмите комбинацию клавиш ++. Появится небольшое окно, в котором выделенное слово уже будет внесено в поле основного элемента указателя. В поле «Дополнительный» внесите описание сокращения и нажмите на кнопку «Пометить».
 После сокращения в самом тексте появятся фигурные скобки, которые, однако, не будут видны при печати или в PDF. Подобным образом пометьте оставшиеся сокращения и нажмите на кнопку «Закрыть».
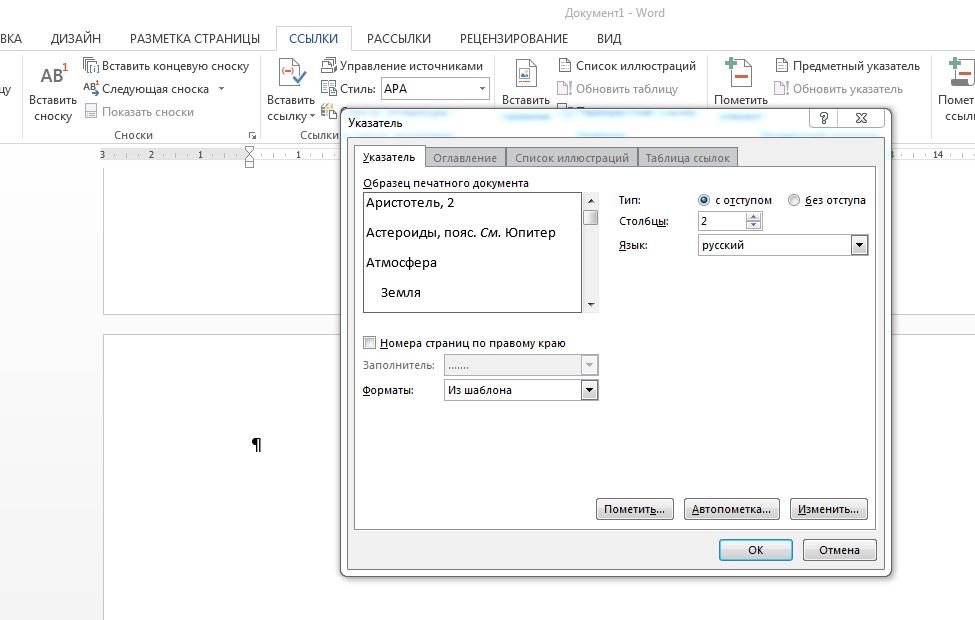
Теперь нужно добавить список сокращений в ваш документ. Для этого поставьте курсор на ту страницу, где вы хотите разместить список. Если эта страница находится в конце документа, разместите курсор после основного текста на новой пустой странице, создав ее с помощью «Вставка | Разрыв страницы».
 Создать список сокращений. В текстовом редакторе Word Вы можете быстро и легко создать список применяемых в тексте сокращений
Откройте вкладку «Ссылки» и найдите группу «Предметный указатель». Нажмите на кнопку «Предметный указатель». В появившемся окне определите, сколько столбцов и какой формат будет иметь получившийся список. Подтвердите операции нажатием на «ОК».
При работе с документом вы можете добавлять элементы в список, следуя данной инструкции.
Фото: компания-производитель
Что такое указатель? Это перечисление терминов, названий и даже фамилий, которые упоминаются в документе.
Процесс создания указателя в Word состоит из двух этапов.
На первом этапе происходит отбор слов или словосочетаний, которые должны быть включены в указатель. (Разумеется, этот этап предполагает, что у вас уже есть из чего отбирать эти слова, другими словами, что у вас имеется готовый документ.)
Чтобы отметить элемент текста для включения в указатель, выполните следующие действия.
1). Выделите текст, который нужно поместить в указатель. Это может быть слово, словосочетание или иной фрагмент текста. В любом случае будущий элемент указателя надо выделить.
2). Выберите команду Вставка–Ссылка–Оглавление и указатели. Появится диалоговое окноОглавление и указатели.
3). Щелкните на ярлычке вкладки Указатель.
4). Щелкните на кнопке Пометить. Появится диалоговое окноОпределение элемента указателя. Обратите внимание, что выделенный в документе текст появляется в поле Элемент указателя основной.
5). Щелкните либо на кнопке Пометить, либо на кнопке Пометить все.
Кнопка Пометить предназначена для пометки данного написания слова и включения его в указатель. Применяйте эту кнопку, если хотите отметить только те включения данного слова, которые, как вам кажется, окажут читателю максимальную пользу. Кнопка Пометить все заставляет Word искать и отмечать все включения данного слова. Применяйте этот параметр, если хотите, чтобы читатель сам решил, какие случаи использования данного термина важны, а какие – нет.
Можете также поэкспериментировать с другими параметрами диалогового окна.
6). Продолжайте просматривать свой документ, выискивая, что еще можно вставить в указатель. Диалоговое окноОпределение элемента указателя остается открытым, так что вы можете продолжить работу над созданием указателя. Выделите текст в документе, затем щелкните в открытом, но неактивном, диалоговом окне Определение элемента указателя. Выделенный текст появится в поле Элемент указателя основной. Щелкните на кнопке Пометить или Пометить все, чтобы продолжить создание указателя.
7). Закончив, щелкните на кнопке Закрыть. Диалоговое окноОпределение элемента указателя исчезнет.
Второй этап – это, собственно, создание указателя.
1). Установите курсор в то место документа, где должен находиться указатель.
2). Выберите в меню команду Вставка–Ссылка–Оглавление и указатели.
3). Щелкните на ярлычке вкладки Указатель.
Стиль указателя можно выбрать в раскрывающемся списке Форматы. Посматривайте на окно Образец печатного документа, чтобы видеть, какие изменения происходят с вашим указателем.
С помощью списка Колонкивы можете указать Word, на сколько колонок разбить указатель. В принципе, стандартным считается использование двух колонок, однако это дело вкуса.
4). Щелкните на кнопке ОК. Аккуратный указатель занял достойное место в отдельном разделе вашего документа.
Создание сноски.
1). Установите курсор в то место документа, где должна находиться сноска.
2). Выберите в меню команду Вставка–Ссылка–Сноска. Вы увидите диалоговое окно Сноски.
3). В группе Положение щелкните на кнопке-переключателе Концевые сноски, если вам нужна концевая сноска.
4). В группе Положение щелкните на кнопке-переключателе Сноски, если вам нужна обычная сноска.
5). Щелкните на кнопке Вставить.
6). Вводите текст сноски. Сюда вы можете поместить все, что может находиться в документе: схемы, графики, картинки.
Чтобы удалить сноску, выделите соответствующую ей цифру и нажмите клавишу . Word удалит сноску и сам изменит нумерацию оставшихся сносок.
Дата добавления: 2016-07-27; просмотров: 1391;
Похожие статьи:
Глоссарий
по текстовому редактору WORD

Глоссарий
Редактор текста
Текстовый процессор
WORD
Блок, абзац, текст
Форматирование
Редактор текстов— это программное средство для ввода и модификации текстовых файлов или текстовых документов.
Текстовые редакторы предназначены для работы с текстовыми файлами в интерактивном режиме. Они позволяют просматривать содержимое текстовых файлов и производить над ними различные действия — вставку, удаление и копирование текста, контекстный поиск и замену, сортировку строк, печать.
Вернуться в начало

Текстовый процессор — мощный текстовый редактор, который может создавать файлы, не являющиеся текстовыми.
Современные текстовые процессоры помимо форматирования шрифтов и абзацев и проверки орфографии включают возможности, ранее присущим лишь настольным издательским системам, в том числе создание таблиц и вставку графических изображений.
Наиболее известными примерами текстовых процессоров являются Microsoft Word и OpenOffice. org Writer.
Вернуться в начало

WORD — это приложение Windows, предназначенное для создания, просмотра, модификации и печати текстовых документов. WORD — одна из самых совершенный программ в классе текстовых процессоров, которая предусматривает выполнение сотен операции над текстовой и графической информацией. C помощью WORD можно быстро и c высоким качеством подготовить любой документ — от простой записки до оригинал-макета сложного издания.
Вернуться в начало
Блок— это выделенная инверсией последовательность символов. Свойства: начало и конец блока.
Абзац— набор строк, выделяемый наличием отступа красной строки.
Текст— в общем плане связная и полная последовательность символов.
Вернуться в начало

Форматирование— в компьютерном наборе изменение внешнего вида текста, его частей: шрифтового оформления (гарнитура, начертание и кегль шрифта, выравнивание текста по левому или правому краю либо по центру, изменение ширины набора и размера абзацного отступа и т. п.); преобразование текста в строки, абзацы и полосы.
Вернуться в начало

on
September 5, 2018, 1:23 PM PDT
3 ways to add glossary terms to a Microsoft Word 2016 document
Microsoft Word offers no built-in feature for creating a glossary, but don’t let that stop you from defining terms in a Word document. Just use one of the three methods below.
We may be compensated by vendors who appear on this page through methods such as affiliate links or sponsored partnerships. This may influence how and where their products appear on our site, but vendors cannot pay to influence the content of our reviews. For more info, visit our Terms of Use page.

A glossary is an alphabetical list of terms and their definitions found in documentation relating to a specific subject. They usually occur after the body of the document–at the end of a single document or at the end of several chapters. Considering a glossary’s popularity, it’s odd that there’s no built-in feature for automatically generating one. You could enter one manually, but that’s inefficient and unnecessary.
In this article, I’ll show you three easy ways to define words at the source, rather than creating a traditional glossary:
- Use a hyperlinked bookmark to display a ScreenTip.
- Use a simple ScreenTip (without a bookmark).
- Use an Endnote.
I’m using Office 365’s desktop version of Microsoft Word 2016, but all three methods will work in earlier versions. You can’t insert a ScreenTip in the browser; you can insert an EndNote. The browser edition won’t display existing ScreenTips or Endnotes. You can work with your own document or download the demonstration .docx and .doc files.
1. ScreenTip with bookmark
Just because most glossaries appear at the end of the document, doesn’t mean they must. In fact, if users read the document on screen, they probably won’t want to bounce back and forth between the text they’re reading and a glossary at the end of the document (I wouldn’t). Perhaps the quickest solution is to add ScreenTips.
SEE: Microsoft SharePoint: A guide for business professionals (Tech Pro Research)
If you’re not familiar with Microsoft Word ScreenTips, they’re small windows of information that pop up automatically when you move the cursor over hyperlinked text. Fortunately, they’re easy to create: You create a bookmark for the text and connect a link that contains the definition to the bookmarked text.
The first step is to bookmark the text as follows:
- You can add a ScreenTip to a word, phrase, image, and most objects. Select the appropriate text. In this case, select Video in the example document shown in Figure A.
- Click the Insert tab, and then click Bookmark in the Links group.
- In the resulting dialog, enter a name, such as BMGlossaryVideo (Figure B), and click Add. Names must start with a letter and can’t contain spaces, but they can contain numbers.
Figure A

Select the text.
Figure B

Name the bookmark.
The second step is to link the ScreenTip to the bookmark:
- With the text still selected (select it again if necessary), choose Select Link from the bottom of the Link dropdown (also in the Links group).
- The selected word is displayed in the Text to display field. Click ScreenTip to the right.
- In the resulting dialog, enter the definition–The recording, reproducing, or broadcasting of moving visual images–and click OK (Figure C).
- Click Place in This Document to view the bookmarks.
- Select BMGlossaryVideo (Figure D) and click OK.
Figure C

Enter the term’s definition.
Figure D

Connect the bookmark to the link.
To review the definition of Video, simply move the cursor over the hyperlinked term, as shown in Figure E.
Figure E

The ScreenTip displays the definition.
2. ScreenTip without a bookmark
Technically, you don’t need to bookmark the text to add a ScreenTip, but bookmarks are useful in other ways. Depending on the complexity of your document, you might find bookmarked glossary terms helpful. If not, you can delete that step, and add the ScreenTip definition as follows:
- Select the appropriate text; this time select Professional.
- Click the Insert tab, and then click Link in the Links group.
- From the dropdown list, select Insert Link.
- In the resulting dialog, click ScreenTip.
- Enter the definition–A person engaged or qualified in a profession–in the resulting dialog and click OK (Figure F).
- You must enter something in the Address control; it won’t show, so enter NA, and click OK.
Figure F

Enter a definition.
The lack of a bookmark has one disadvantage. If a user clicks what appears to be a hyperlink, Microsoft Word will return an error message. That doesn’t happen with the bookmark technique because the bookmarked word is the hyperlink. Everything’s working as it should.
3. Use an endnote
One of the disadvantages of the ScreenTip feature is that it’s only available with links. As shown in the first two methods, you can work around the actual link, but I don’t know how to get rid of the Click + Click to follow link text in the ScreenTip window. It can be a bit confusing for the reader. By adding an endnote, you can display a definition with its term that displays only the definition–no follow the link text. To illustrate this method select Themes and Styles and do the following:
- Click the References tab and click Insert Endnote in the Footnotes group.
- Word will insert the footnote at the bottom of the page. Enter the definition (Figure G).
- When you hover over the term in the document, Microsoft Word will display the endnote text in a small window.
Figure G

Enter the definition.
The disadvantages are obvious: The term has an endnote number, and there’s an endnote (or list of endnotes) at the end of the document.
Managing ScreenTips
If you don’t see the ScreenTip, you probably need to enable the option. To do so, click the File tab, click Options in the left pane, and then choose General in the left pane. Then, in the User interface options section, choose the appropriate option:
- Show feature descriptions in ScreenTips
- Don’t show feature descriptions in ScreenTips. (This turns off enhanced ScreenTips, which we won’t cover in this article.)
- Don’t show ScreenTips.
When you link something, Word automatically applies the Hyperlink style. Depending on the document’s formality, you might not want linked terms in a blue, underlined font. You can modify that style, but remember, readers will lose that visual clue that there’s something more available. They might find the ScreenTip by accident, but unless they know to look for defined terms, they might not realize the definitions are so easily accessible. In addition, changing the style removes the formatting from all links, not only ScreenTip links. There are many reasons not to remove the formatting, but you have that choice.
To remove the formatting from your document, open the Styles pane by clicking the dialog launcher for the Styles group. Find the Hyperlink style in the list, and hover over it to display the style’s dropdown list. From that list, choose Modify. The resulting dialog shows the current formatting. Click the Underline icon to remove the underline, choose Automatic from the Font Color dropdown, and click OK. You can undo this change by clicking Ctrl+z if you do so immediately.
Stay tuned
The three tips in this article don’t include a traditional glossary of terms at the end of the document. In a subsequent article, I’ll show you how to create a traditional glossary.
Send me your question about Office
I answer readers’ questions when I can, but there’s no guarantee. Don’t send files unless requested; initial requests for help that arrive with attached files will be deleted unread. You can send screenshots of your data to help clarify your question. When contacting me, be as specific as possible. For example, “Please troubleshoot my workbook and fix what’s wrong” probably won’t get a response, but “Can you tell me why this formula isn’t returning the expected results?” might. Please mention the app and version that you’re using. I’m not reimbursed by TechRepublic for my time or expertise when helping readers, nor do I ask for a fee from readers I help. You can contact me at susansalesharkins@gmail.com.
See also
- How to add a traditional glossary to a Microsoft Word document (TechRepublic)
- Three running total expressions for Excel (TechRepublic)
- Microsoft readies test versions of redesigned Outlook for Windows, Outlook on the Web (ZDNet)
- Here’s how you can still get a free Windows 10 upgrade (ZDNet)
- Five tips for using Outlook 2016’s AutoComplete list efficiently (TechRepublic)
- How to use VBA to select an Excel range (TechRepublic)
- This is not your father’s Microsoft(CNET)
- Office Q&A: How to handle end-of-sentence spacing in Microsoft Word (TechRepublic)
- How to match colors using PowerPoint 2016’s eyedropper tool (TechRepublic)
-
CXO
-
Microsoft
Table of Contents
- What is glossary in MS Word?
- Where do you put glossary in a document?
- Where is the glossary?
- How do you insert a glossary in Word?
- How do I create a glossary in word?
- How do I automatically create a glossary in word?
- What do you find in glossary?
- How can glossary help you?
- What does a glossary show?
- How are a dictionary and glossary different?
- What is the plural of glossary?
- What is a glossary page?
To get started, position the cursor where you want the glossary to appear. Then, click the References tab, and then click Insert Table of Authorities in the Table of Authorities group. In the resulting dialog, choose (none) from the Tab Leader dropdown. Click OK, and you can see the resulting glossary in Figure D.
What is glossary in MS Word?
Microsoft Word offers no built-in feature for creating a glossary, but don’t let that stop you from defining terms in a Word document. A glossary is an alphabetical list of terms and their definitions found in documentation relating to a specific subject.
Where do you put glossary in a document?
You place the glossary at the beginning of the document, just after the table of contents (or, if applicable, the list of figures or list of abbreviations). Readers of your dissertation can then first look through the key terms before they actually read your dissertation in full.
Where is the glossary?
The glossary is often found at the end of a book or article and is usually in alphabetical order. A glossary can also come at the end of a chapter or even in footnotes.
How do you insert a glossary in Word?
How do I automatically create a glossary in word?
The simplest way to create a glossary is to type your glossary by hand at the end of your document. Word has no built-in method of creating a glossary automatically, but you can use hyperlinks or the Table of Authorities functionality to create a glossary for one or more documents.
What do you find in glossary?
A glossary is an alphabetical list of specialised or technical words, terms or abbreviations and their definitions, usually related to a specific discipline or field of knowledge.
How can glossary help you?
A glossary helps users know the right words so that they can be effective with their searches. In other words, unless you know the terms you’re looking for, and can articulate them correctly, it will be hard to find them through search.
What does a glossary show?
Traditionally, a glossary appears at the end of a book and includes terms within that book that are either newly introduced, uncommon, or specialized. In a general sense, a glossary contains explanations of concepts relevant to a certain field of study or action.
How are a dictionary and glossary different?
Dictionary is a compilation of words and their meanings and usages. It is highly useful for the student and the writer alike. On the other hand, a glossary is nothing but a word list. It is a list of words that appear in a particular chapter or a lesson. This is the main difference between the two words, namely, dictionary and glossary.
What is the plural of glossary?
The plural form of glossary is glossaries . Find more words! Figures, tables, and glossaries of terms promote an understanding of the materials presented. Of late, for example, there has been an emphasis on re-editing texts and providing footnotes, glossaries and notes.
What is a glossary page?
glossary page. Geography Glossaries Page. A glossaryis an alphabetical list of termsin a particular domain of knowledgewith the definitions for those terms. Traditionally, a glossary appearsat the end of a book and includes terms within that book which areeither newly introduced or at least uncommon.
Google search for a Word Glossary Template turned up this nice, long, and very informative article on How to create a glossary in Microsoft Word.
It’s too long to copy and paste the whole thing, but the beginning of the article really does spell it out for you.
The simplest way to create a glossary is to type your glossary by hand at the end of your document. Word has no built-in method of creating a glossary automatically, but you can use hyperlinks or the Table of Authorities functionality to create a glossary for one or more documents.
Option 1: Create your glossary manually
This option is the simplest. Go to the end of your document, and type your glossary. You can use a table with or without borders, or you can put the term and its definition in separate paragraphs.
If you put the term and its definition in paragraphs one after the other, it is a good idea to define a style for the term (called, say, GlossaryTerm) and another for the definition (called, say, GlossaryDefinition). Set each one to be followed by the other, so that when you press Enter, Word automatically formats the next paragraph in the right style.
Для начала внесите все сокращения в Предметный указатель. Для этого выделите нужные слова или аббревиатуры и нажмите комбинацию клавиш [Alt]+[Shift]+[X]. Появится небольшое окно, в котором выделенное слово уже будет внесено в поле основного элемента указателя. В поле «Дополнительный» внесите описание сокращения и нажмите на кнопку «Пометить».
 После сокращения в самом тексте появятся фигурные скобки, которые, однако, не будут видны при печати или в PDF. Подобным образом пометьте оставшиеся сокращения и нажмите на кнопку «Закрыть».
Теперь нужно добавить список сокращений в ваш документ. Для этого поставьте курсор на ту страницу, где вы хотите разместить список. Если эта страница находится в конце документа, разместите курсор после основного текста на новой пустой странице, создав ее с помощью «Вставка | Разрыв страницы».
Откройте вкладку «Ссылки» и найдите группу «Предметный указатель». Нажмите на кнопку «Предметный указатель». В появившемся окне определите, сколько столбцов и какой формат будет иметь получившийся список. Подтвердите операции нажатием на «ОК».
При работе с документом вы можете добавлять элементы в список, следуя данной инструкции.
Фото: компания-производитель
Answer
- First open the document you want to add the dictionary to and click the “Tools” menu item.
- From the Tools menu, select “Options.”
- In the Options dialog box, select the “Advanced” tab and under the “Word Options” heading, click the “Dictionaries” button.
- In the “Dictionaries” dialog box, click the “New” button.
How to Edit Your Custom Dictionary in Microsoft Word
How do you make your own dictionary?
There are a few ways to make your own dictionary. One way is to use an online dictionary service. Another way is to use a word processor and create a dictionary file.
How do I import a custom dictionary into word?
There are a few ways to import a custom dictionary into word. The easiest way is to use the “File” menu and select “Import…” Then, select the file you want to import and click “Open.
How do I automatically create a glossary in word?
There are many ways to create a glossary in word. One way is to use the “Glossary” command on the “Tools” menu.
How do I add multiple words to dictionary in word?
There are a few ways to add multiple words to your dictionary. One way is to use the “Add Word” button on the main dictionary page. Another way is to use the “Add New Term” button on the search results page.
Where is the dictionary box in word?
The dictionary box is located in the upper right hand corner of the word document.
Where is the dictionary in Outlook?
Outlook 2013 and Outlook 2016 include a built-in dictionary.
How do you display a definition for the selected word?
There are a few ways to display a definition for the selected word. One way is to open up the definitions panel and click on the word’s icon. Another way is to use the keyboard shortcut Ctrl+F (or Cmd+F on a Mac) and type in the word’s definition.
How do you show a definition in word?
You can use the definition lookup feature in most word processors.
How do I create a list of KeyWords in word?
There are a few ways to do this. One way is to use a search engine like Google or Bing and type in the keywords you’re looking for. You can also use a tool like Keyword Planner to help you find keywords that are popular among your target audience.
Where is the custom dictionary stored in Windows 10?
The custom dictionary is stored in the %USERPROFILE% AppDataLocalMicrosoftWindowsDictionaries folder.
Why can’t I add to dictionary in word?
There are a few reasons why you might not be able to add to the dictionary in Word. One possibility is that you don’t have the correct permissions set up for the dictionary. You can check this by opening Word and going to File > Properties. In the General tab, make sure that the “Allow Editing of This File” checkbox is checked.
What is dictionary in MS word?
Dictionary is a collection of word definitions.
Can I make my own dictionary?
Yes, you can make your own dictionary. There are a few different ways to go about it. The easiest way is to use an online dictionary. There are many free online dictionaries available, such as Google Dictionary and Merriam-Webster Online Dictionary. Another option is to use a word processor or text editor and create your own dictionary. You can find instructions for creating your own dictionary online or in books like The Oxford English Dictionary.
How do you create a dictionary image?
There are a few ways to create a dictionary image. One way is to use the built-in dictionary in Google Photos. To do this, open Google Photos and go to the “Dictionary” section. On the left, you will see a list of dictionaries. Select the one you want to use and click on the “Create” button. Another way to create a dictionary image is to use a online dictionary. To do this, go to https://www.dict.
How do you create a data dictionary?
There is no one definitive answer to this question.

Asked by: Pa Martsenko
asked in category: business and finance Last Updated: 13th November, 2020
To get started, position the cursor where you want the glossary to appear. Then, click the References tab, and then click Insert Table of Authorities in the Table of Authorities group. In the resulting dialog, choose (none) from the Tab Leader dropdown. Click OK, and you can see the resulting glossary in Figure D.
See further detail related to it here. Moreover, where does a glossary of terms go in a document?
A glossary, also known as a vocabulary or clavis, is an alphabetical list of terms in a particular domain of knowledge with the definitions for those terms. Traditionally, a glossary appears at the end of a book and includes terms within that book that are either newly introduced, uncommon, or specialized.
Also, where do you put the glossary? “A glossary is a list of technical terms or abbreviations that may be unfamiliar to some readers. Those terms used more than once should be listed in a glossary, which is usually placed before the bibliography, i.e. towards the end, but can be place at the end of the preliminary pages (if it is a short glossary).
In this manner, what is an example of a glossary?
glos·sa·ry. Use glossary in a sentence. noun. The definition of glossary is a list of words and their meanings. The alphabetical listing of difficult words in the back of a book is an example of a glossary.
How does a glossary look?
A glossary is a dictionary of terms specific to a certain subject. A biology textbook might have a glossary in the back, so you can quickly look up all those technical words. The glossary is often found at the end of a book or article and is usually in alphabetical order.