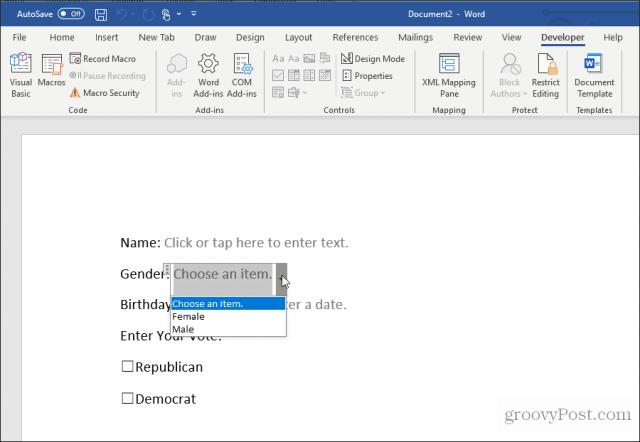
To create a form in Word that others can fill out, start with a template or document and add content controls. Content controls include things like check boxes, text boxes, date pickers, and drop-down lists. If you’re familiar with databases, these content controls can even be linked to data.
Show the Developer tab
If the developer tab isn’t displayed in the ribbon, see Show the Developer tab.
Open a template or a blank document on which to base the form
To save time, start with a form template or start from scratch with a blank template.
-
Go to File > New.
-
In Search online templates, type Forms or the type of form you want and press ENTER.
-
Choose a form template, and then select Create or Download.
-
Go to File > New.
-
Select Blank document.
Add content to the form
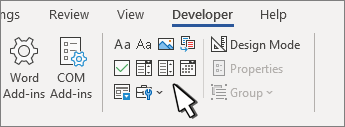
Go to Developer, and then choose the controls that you want to add to the document or form. To remove a content control, select the control and press Delete. You can set properties on controls once inserted.
Note: You can print a form that was created using content controls, but the boxes around the content controls will not print.
In a rich text content control, users can format text as bold or italic, and they can type multiple paragraphs. If you want to limit what users add, insert the plain text content control.
-
Click or tap where you want to insert the control.
-
Select Developer > Rich Text Content Control
or Plain Text Content Control
.
To set specific properties on the control, see Set or change properties for content controls.
A picture control is often used for templates, but you can also add a picture control to a form.
-
Click or tap where you want to insert the control.
-
Select Developer > Picture Content Control
.
To set specific properties on the control, see Set or change properties for content controls.
Use building block controls when you want people to choose a specific block of text. For example, building block controls are helpful when you need to add different boilerplate text depending on the contract’s specific requirements. You can create rich text content controls for each version of the boilerplate text, and then you can use a building block control as the container for the rich text content controls.
-
Click or tap where you want to insert the control.
-
Go to DeveloperBuilding Block Gallery Content Control
(or Building Block Content Control).
-
Select Developer and content controls for the building block.
-
Click or tap where you want to insert the control.
To set specific properties on the control, see Set or change properties for content controls.
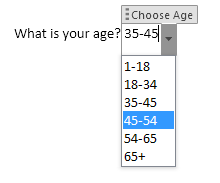
In a combo box, users can select from a list of choices that you provide or they can type in their own information. In a drop-down list, users can only select from the list of choices.
-
Go to Developer > Combo Box Content Control
or Drop-Down List Content Control
.
-
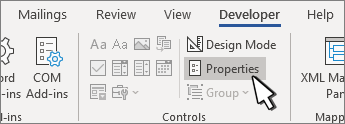
Select the content control, and then select Properties.
-
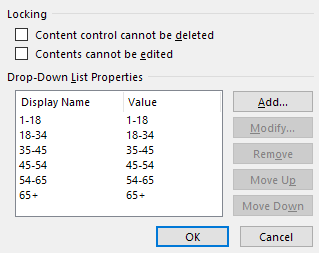
To create a list of choices, select Add under Drop-Down List Properties.
-
Type a choice in Display Name, such as Yes, No, or Maybe.
Repeat this step until all of the choices are in the drop-down list.
-
Fill in any other properties that you want.
Note: If you select the Contents cannot be edited check box, users won’t be able to click a choice.
-
Click or tap where you want to insert the date picker control.
-
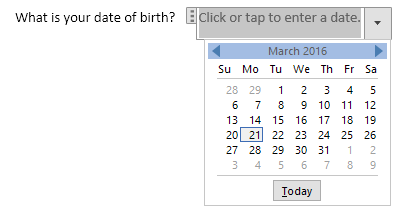
Select Developer > Date Picker Content Control
.
To set specific properties on the control, see Set or change properties for content controls.
-
Click or tap where you want to insert the check box control.
-
Select Developer > Check Box Content Control
.
To set specific properties on the control, see Set or change properties for content controls.
Legacy form controls are for compatibility with older versions of Word and consist of legacy form and Active X controls.
-
Click or tap where you want to insert a legacy control.
-
Go to Developer > Legacy Forms
drop-down.
-
Select the Legacy Form control or Active X Control that you want to include.
Set or change properties for content controls
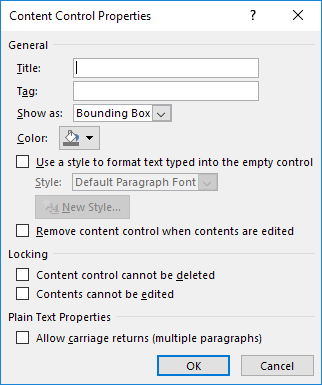
Each content control has properties that you can set or change. For example, the Date Picker control offers options for the format you want to use to display the date.
-
Select the content control that you want to change.
-
Go to Developer > Properties.
-
Change the properties that you want.
Add protection to a form
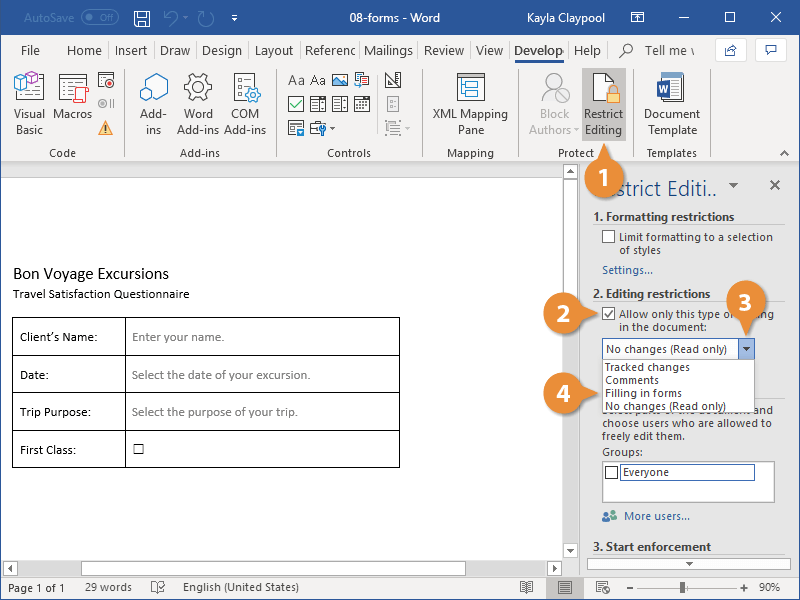
If you want to limit how much others can edit or format a form, use the Restrict Editing command:
-
Open the form that you want to lock or protect.
-
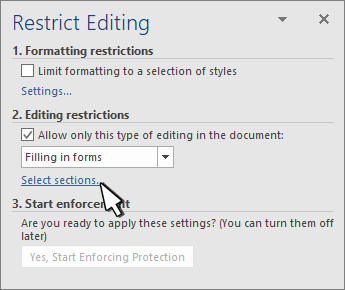
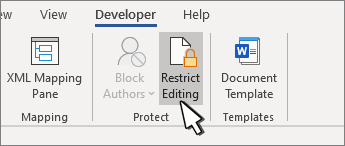
Select Developer > Restrict Editing.
-
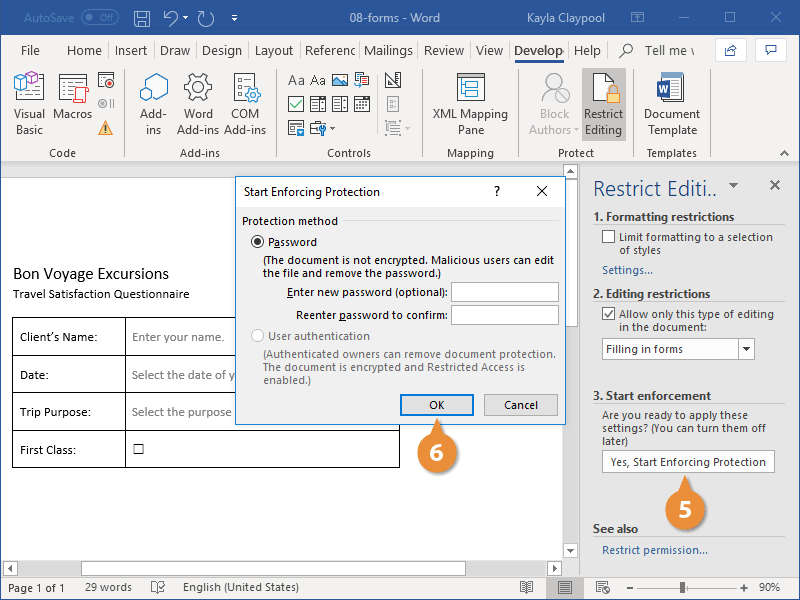
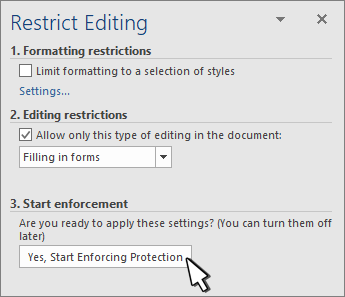
After selecting restrictions, select Yes, Start Enforcing Protection.
Advanced Tip:
If you want to protect only parts of the document, separate the document into sections and only protect the sections you want.
To do this, choose Select Sections in the Restrict Editing panel. For more info on sections, see Insert a section break.
Show the Developer tab
If the developer tab isn’t displayed in the ribbon, see Show the Developer tab.
Open a template or use a blank document
To create a form in Word that others can fill out, start with a template or document and add content controls. Content controls include things like check boxes, text boxes, and drop-down lists. If you’re familiar with databases, these content controls can even be linked to data.
-
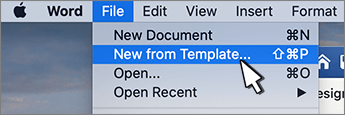
Go to File > New from Template.
-
In Search, type form.
-
Double-click the template you want to use.
-
Select File > Save As, and pick a location to save the form.
-
In Save As, type a file name and then select Save.
-
Go to File > New Document.
-
Go to File > Save As.
-
In Save As, type a file name and then select Save.
Add content to the form
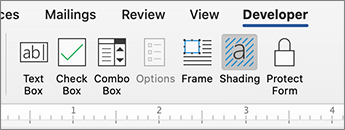
Go to Developer, and then choose the controls that you want to add to the document or form. To remove a content control, select the control and press Delete. You can set Options on controls once inserted. From Options, you can add entry and exit macros to run when users interact with the controls, as well as list items for combo boxes, .
-
In the document, click or tap where you want to add a content control.
-
On Developer, select Text Box, Check Box, or Combo Box.
-
To set specific properties for the control, select Options, and set .
-
Repeat steps 1 through 3 for each control that you want to add.
Options let you set common settings, as well as control specific settings. Select a control and then select Options to set up or make changes.
-
Set common properties.
-
Select Macro to Run on lets you choose a recorded or custom macro to run on Entry or Exit from the field.
-
Bookmark Set a unique name or bookmark for each control.
-
Calculate on exit This forces Word to run or refresh any calculations, such as total price when the user exits the field.
-
Add Help Text Give hints or instructions for each field.
-
OK Saves settings and exits the panel.
-
Cancel Forgets changes and exits the panel.
-
-
Set specific properties for a Text box
-
Type Select form Regular text, Number, Date, Current Date, Current Time, or Calculation.
-
Default text sets optional instructional text that’s displayed in the text box before the user types in the field. Set Text box enabled to allow the user to enter text into the field.
-
Maximum length sets the length of text that a user can enter. The default is Unlimited.
-
Text format can set whether text automatically formats to Uppercase, Lowercase, First capital, or Title case.
-
Text box enabled Lets the user enter text into a field. If there is default text, user text replaces it.
-
-
Set specific properties for a Check box.
-
Default Value Choose between Not checked or checked as default.
-
Checkbox size Set a size Exactly or Auto to change size as needed.
-
Check box enabled Lets the user check or clear the text box.
-
-
Set specific properties for a Combo box
-
Drop-down item Type in strings for the list box items. Press + or Enter to add an item to the list.
-
Items in drop-down list Shows your current list. Select an item and use the up or down arrows to change the order, Press — to remove a selected item.
-
Drop-down enabled Lets the user open the combo box and make selections.
-
-
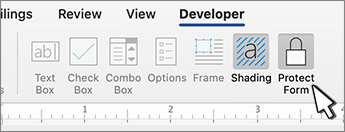
Go to Developer > Protect Form.
Note: To unprotect the form and continue editing, select Protect Form again.
-
Save and close the form.
If you want, you can test the form before you distribute it.
-
Protect the form.
-
Reopen the form, fill it out as the user would, and then save a copy.
Show the Developer tab
-
On the right side of the ribbon, select
, and then select Ribbon Preferences.
-
Under Customize, select Developer .
Open a template or a document on which to base the form
You can start with a blank document and create your own form. Or, to save time, you can start with a form template.
-
Go to File > New from Template.
-
In the left pane, expand Online Templates, and then select Forms.
-
Double-click the form template that you want to use.
Add content controls to the form
-
In the document, click where you want to add the control.
-
On the Developer tab, under Form Controls, select Text Box, Check Box, or Combo Box.
-
To set specific properties for the control, select Options, and then configure the properties that you want.
Note: To create a list of drop-down items in a combo box, select the combo box placeholder, click Options, and then add the items that you want to appear in the drop-down list.
-
Repeat steps 1 through 3 for each control that you want to add.
Add instructional text (optional)
Instructional text (for example, «Type First Name») in a text box can make your form easier to use. By default, no text appears in a text box, but you can add it.
-
Select the text box control that you want to add instructional text to.
-
On the Developer tab, under Form Controls, select Options.
-
In Default Text, type the instructional text.
-
Make sure that Fill-in enabled is selected, and then select OK.
Protect the form
-
On the Developer tab, under Form Controls, select Protect Form.
Note: To unprotect the form and continue editing, click Protect Form again.
-
Save and close the form.
Test the form (optional)
If you want, you can test the form before you distribute it.
-
Protect the form.
-
Reopen the form, fill it out as the user would, and then save a copy.
Creating fillable forms isn’t available in Word for the web.
You can create the form with the desktop version of Word with the instructions in Create a fillable form.
When you save the document and reopen it in Word for the web, you’ll see the changes you made.
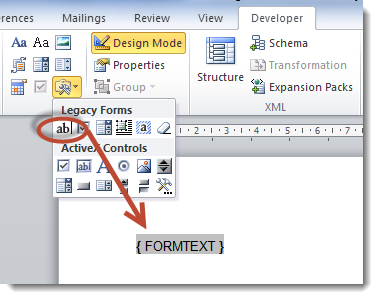
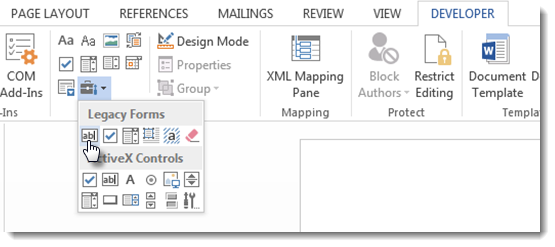
Click in your Word document wherever you wish to insert a Form Field. On the Legacy Forms menu click the first icon to insert a Form Field. Right-click on the Form Field and select Properties. Then provide a name for the field in the Bookmark section.
Contents
- 1 How do you create forms in Word?
- 2 How do I create a fillable form?
- 3 How do I make a fillable form in word and not editable?
- 4 How do I save a Word document as a fillable template?
- 5 How do I create a fillable PDF form in Word?
- 6 How do I create a fillable form in Word 2007?
- 7 How do I edit fields in Word?
- 8 How do I insert a GREY text field in Word 2016?
- 9 How do I make just certain fields editable in Word?
- 10 Can you turn a Word document into a fillable form?
- 11 Can you make a Word document fillable?
- 12 How do I save a PDF with fillable fields?
- 13 How do I create a fillable PDF form XChange editor?
- 14 What is the best software for creating fillable forms?
- 15 How do I link a fillable field in Word?
- 16 How do I insert a text field in Word 2016?
- 17 How do I create a field template in Word 2007?
- 18 How do I create a fillable checkbox in Word 2007?
- 19 How do you insert headings in Word?
How do you create forms in Word?
To create a form in Word that others can fill out, start with a template or document and add content controls.
Start with a form template
- Go to File > New.
- In Search online templates, type Forms or the type of form you want and press ENTER.
- Choose a form template, and then select Create or Download.
How do I create a fillable form?
How to create fillable PDF files:
- Open Acrobat: Click on the “Tools” tab and select “Prepare Form.”
- Select a file or scan a document: Acrobat will automatically analyze your document and add form fields.
- Add new form fields: Use the top toolbar and adjust the layout using tools in the right pane.
- Save your fillable PDF:
How do I make a fillable form in word and not editable?
To make a document un-editable, first, select all the text in the document by pressing Ctrl+A. Once all of the text is highlighted, click “Restrict Editing” in the “Protect” group on the “Developer” tab.
How do I save a Word document as a fillable template?
Saving and Using a Form
- Press F12. Word displays the Save As dialog box.
- Using the Save As Type drop-down list, select Word Template.
- If necessary, change to the directory where the template is to be stored.
- In the File Name field, enter the name under which you want this template saved.
- Click on Save.
How do I create a fillable PDF form in Word?
Create a Fillable PDF Form from a Word Document
- Open the Word document that you want to make into a PDF form.
- Go to File -> Print, make sure “Adobe PDF” is selected as your printer, and then click the Print button.
- Word will ask you where to save the PDF file you’re creating.
How do I create a fillable form in Word 2007?
How to Create a Fillable Form in Word 2007
- Add the developer tab to your top Microsoft Word navigation.
- Open a new Word template.
- Enter design mode to tell Word 2007 that you are designing a form.
- Add the form content.
- Adjust the properties of your contents.
- Save your form as a template or document.
How do I edit fields in Word?
Edit a field
Right-click in the field, and then click Edit Field. Change the field properties and options. For information about the properties and options available for a particular field, see List of field codes in Word or search on the field name in Help.
How do I insert a GREY text field in Word 2016?
Select and highlight the text box, and then select your preferred shape style for the text box. To apply a gray fill color, click the “Shape Fill” button and click on your preferred shade of gray in the color-picker tool.
How do I make just certain fields editable in Word?
On the Review tab, in the Protect group, click Restrict Editing. In the Editing restrictions area, select the Allow only this type of editing in the document check box. In the list of editing restrictions, click No changes (Read only). Select the part of the document where you want to allow changes.
Can you turn a Word document into a fillable form?
You can create a fillable form in Word itself, so that other people can fill out the form without editing the underlying document. You can also use Adobe Acrobat and other PDF tools to convert a Word document to an editable form that anyone with PDF-compatible software can fill out.
Can you make a Word document fillable?
To do this, click on “File” tab > “Options” > “Customize Ribbon“. Then under the “Customize Ribbon”, select the “Developer” checkbox and click “OK”. Step 2: Open a Word document and you will be able to make the Word document fillable.
How do I save a PDF with fillable fields?
How To Save Fillable Form Data in PDFs
- Having a filled out copy of the form isn’t just good “for your records,” it’s also useful if you notice a typo or small mistake after printing out the form.
- Fill out the form.
- Click on File > Save, or just press Ctrl+S.
- Close the file.
- That’s all you need to do!
How do I create a fillable PDF form XChange editor?
Creating a Fillable PDF Form
With your file open in PDF-XChange Editor, go to the tab on the ribbon. Form Use the appropriate Form Fields options to add your desired fields. You can rename a field by right clicking on the field and choosing Rename Field…. Click on a field to resize or re-position it.
What is the best software for creating fillable forms?
Recommendations for Best Fillable PDF Form Designer Tools
- Foxit PDF Editor. This is one of the top PDF form designer tools capable of designing highly-quality fillable PDF forms with ease.
- Nitro PDF Pro. Nitro PDF Pro is one of the most popular PDF editors on the market.
- PDF Studio.
- Adobe Acrobat DC.
How do I link a fillable field in Word?
Click where you want to refer to the form field. Press Ctrl+F9 to insert field braces { } (do not type { } yourself, that won’t work!) Press F9 to hide the field code. When you protect the document for forms, enter something in the form field and press Tab, the reference(s) elsewhere in the document will be updated.
How do I insert a text field in Word 2016?
Add a text box
- Go to Insert > Text Box, and then select Draw Text Box.
- Click or tap in the document, and drag to draw the text box the size that you want.
- To add text to a text box, select inside the text box, and then type or paste text. Notes:
How do I create a field template in Word 2007?
in the top left of the Word window and then click on Save As > Word Template from the popup menu. When the Save As window appears, click on Trusted Templates in the left window. Then enter a file name for the template and click on the Save button.
How do I create a fillable checkbox in Word 2007?
Under the Developer tab, click Legacy Tools button in Controls group and select the “Check Box Form Field” control. It will insert a clickable checkbox at your cursor’s location. By default, the checkbox is unchecked.
How do you insert headings in Word?
To add a heading style to text in Word, select the text, choose the Home tab in the ribbon, and in the Styles box, pick the heading style you want. When you save your document in another format for download, such as HTML or PDF, Word retains the headings styles, so everyone can still get the benefits of your headings.
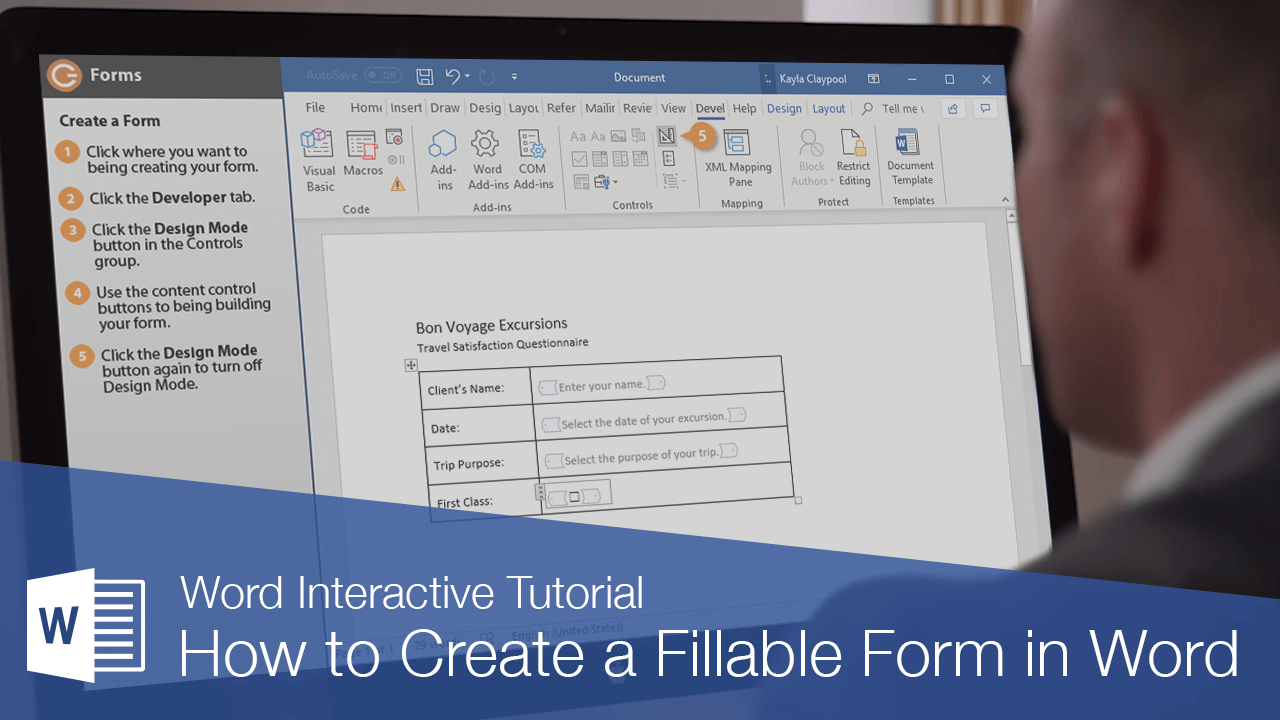
You can use Word to create interactive digital forms that other people can fill out on their computers before printing or sending them back to you. It takes a little preparation but keeps you from having to decipher messy handwriting! Some of the tools you will use when creating a form include:
- Templates: Forms are normally saved as templates so that they can be used again and again.
- Content controls: The areas where users input information in a form.
- Tables: Tables are often used in forms to align text and form fields, and to create borders and boxes.
- Protection: Users can complete the form fields without being able to change the form’s text and/or design.
Show the Developer Tab
Before you can create a form, you’ll need to turn on the Developer tab to get access to the advanced tools.
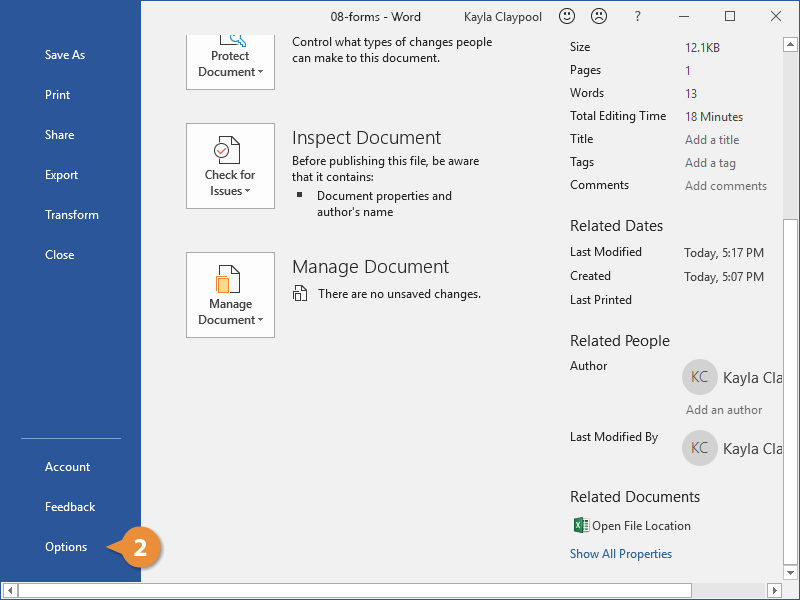
- Click the File tab.
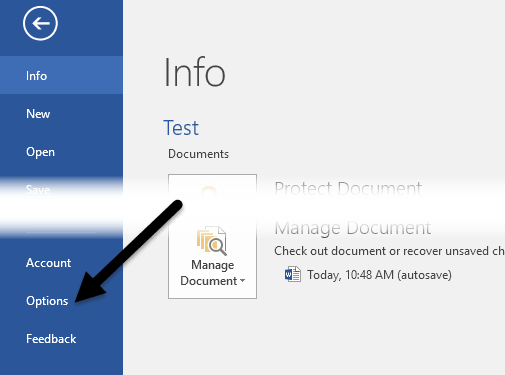
- Select Options.
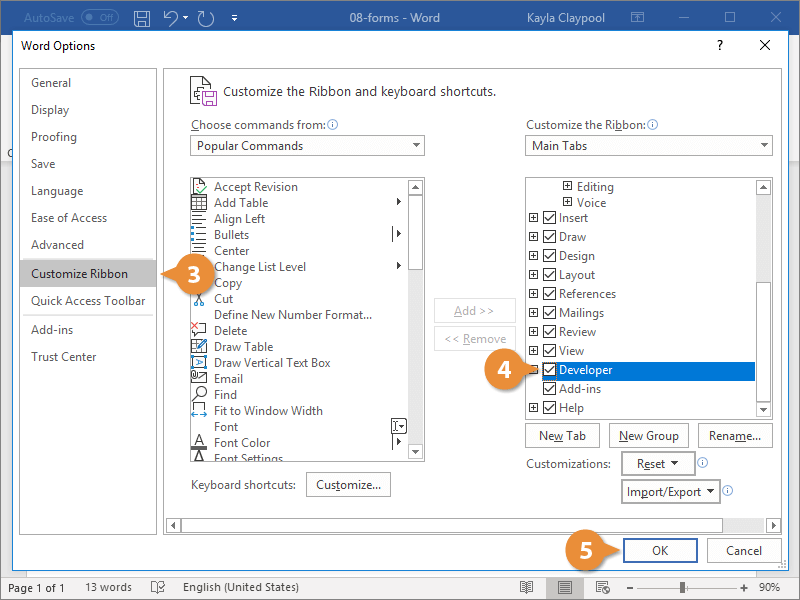
The Word Options window opens.
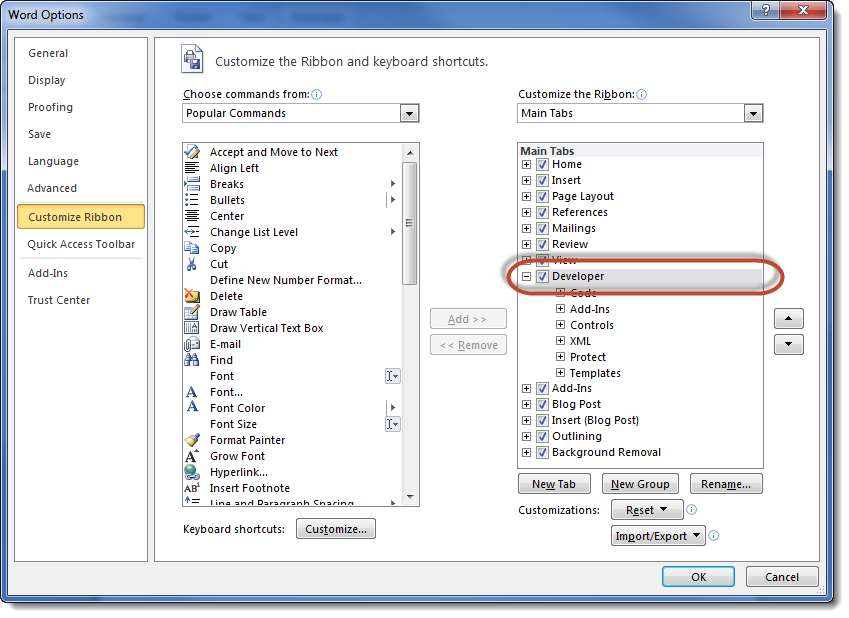
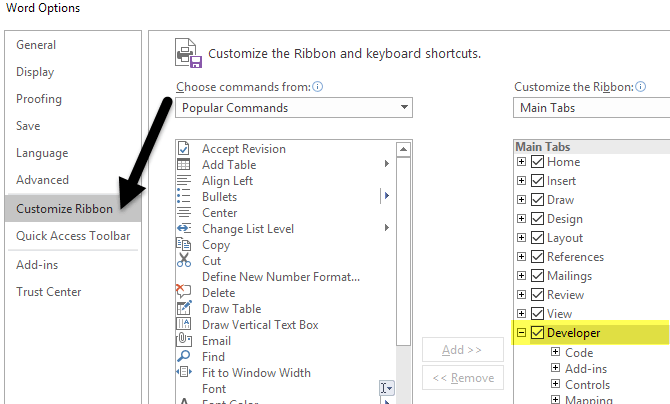
- Click the Customize Ribbon tab on the left.
The column on the right controls which ribbon tabs are enabled.
- Check the Developer check box.
- Click OK.
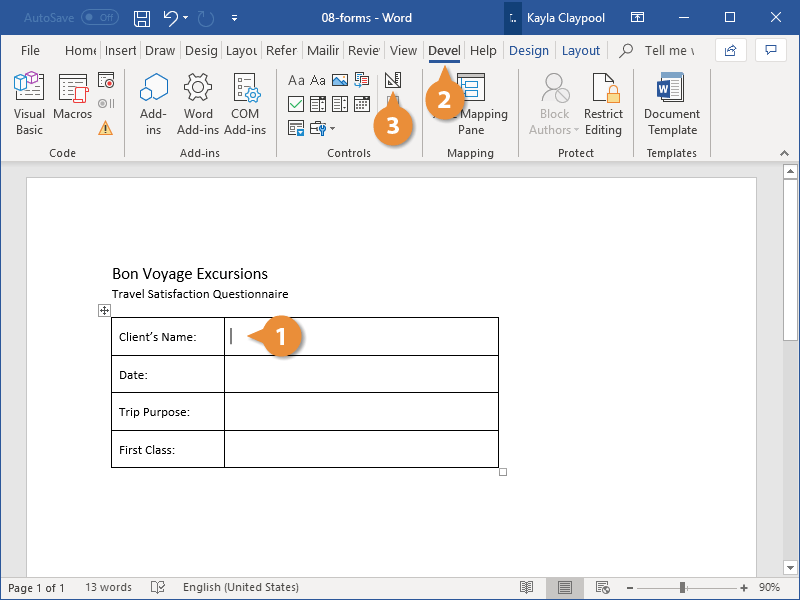
The Developer tab now appears on the ribbon. In addition to advanced tools for macro recording, add-ins, and document protection, we now have access to form controls.
Create a Form
Once you’ve enabled the Developer tab, and created the layout and structure of the form, you can start adding form fields to your document with Content Controls.
- Place the text cursor where you want to insert the form field.
- Click the Developer tab on the ribbon.
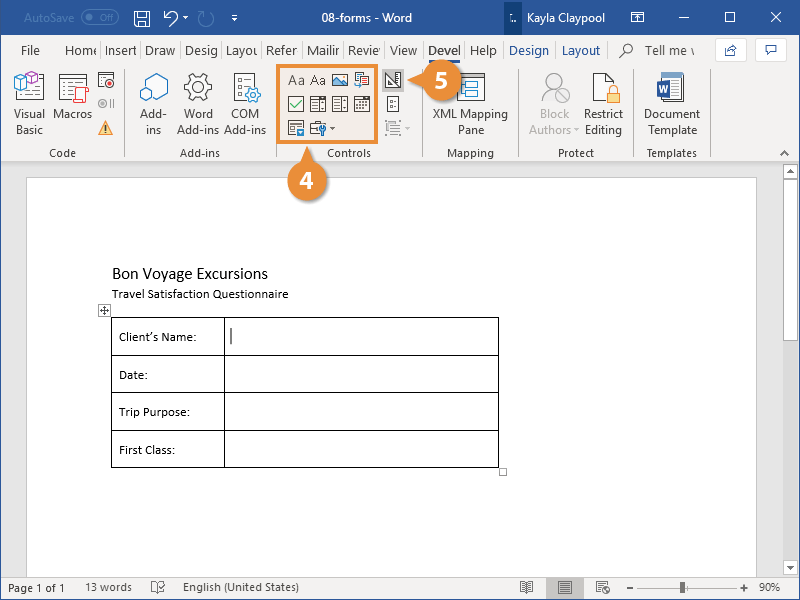
The Controls group contains the different kinds of content controls you can add to a form, as well as the toggle button for Design Mode.
- Click the Design Mode button in the controls group.
While Design Mode is active, controls you insert won’t be active, so clicking a check box to move it around won’t also check it. You can also customize placeholder text for some controls.
- Click a Content Control buttons to insert the selected type of control.
The content control is inserted.
Select a form field and click the Properties button on the ribbon to edit a control’s options. Depending on the type of control you’ve inserted, you can change its appearance, set up the options in a list, or lock the control once edited.
- When you’re done, click the Design Mode button again to exit Design Mode.
You leave Design Mode, and the content controls that you’ve inserted can now be used.
Types of Form Controls
There are many different types of form controls you can add to a form that will allow people to add different types of responses.
Finalize a Form
When you’re ready to distribute a form so others can fill it out, you can restrict the form so that content controls cannot be removed or changed by those filling it out.
- Click the Restrict Editing button on the Developer tab.
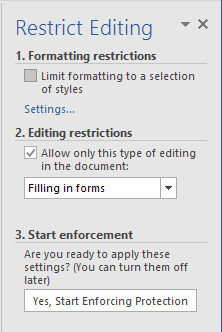
The Restrict Editing pane appears on the right.
- Check the Editing restrictions check box.
- Click the Editing restriction list arrow.
- Select Filling in forms.
When this option is enabled, the only change that anyone else can make to this document is the filling in of form fields. They won’t be able to move, delete, or edit the fields themselves until protection is turned off.
- Click the Yes, Start Enforcing Protection button.
A password is not required to start enforcing protection, but you can add one if you’d like to prevent just anyone from turning this protection off.
- Enter a password (optional), then click OK.
The document is now restricted, and anyone you send it to will only be able to fill in the forms.
FREE Quick Reference
Click to Download
Free to distribute with our compliments; we hope you will consider our paid training.
If you use forms at work, you’ll love the convenience of interactive or fillable forms in Microsoft Word. Forms that you can fill out make gathering information easy.
With a fillable form, all you’ve got to do is create a form in Word. Then you can use it over and over again. There’s nothing to print, so interactive forms are good for both your budget and the environment.
If you want a fillable form that also looks good, then begin with a template in Word. Form templates for Microsoft Word are available in Envato Elements and GraphicRiver.
In this tutorial, you’ll learn how to create a fillable form in Word, so you can reap all the benefits of an interactive form.
Find Great Form Templates on Elements
Fillable forms in Word have a variety of uses. Human resources use forms to capture employee and consultant information. Organizations use forms to register members, students, or clients. You also use forms to take orders for your products and services. Those are only a few examples of how useful fillable forms are.
Ideally, you want your Microsoft Word forms to be consistent with your branding. Well-designed forms reflect your credibility and professionalism. That’s why you want to avoid generic-looking forms. Want to know how to make a fillable form in Word that’s aligned with your visual brand?
The easiest way is by using templates for Word with pre-built tables or forms. One awesome source for Word templates is Envato Elements. Elements has an irresistible offer: for one low monthly fee, you get unlimited downloads of the millions of creative assets in its library. These include:
- Word templates
- fonts
- graphics
- photos
- and more
Whatever you need to make your forms look as good as possible, you can find in Elements.
If you need to create only one form, then a better source for Word templates is GraphicRiver. It’s got the same massive library of creative assets but on a pay-per-use basis. For the one-off project in Word, GraphicRiver is a terrific and budget-friendly option.
How to Create Fillable Forms in Word
You may be wondering, «How do I make a fillable form in Word?» Let me take you step-by-step through how to create a fillable form in Word.
Note: In the following tutorial, I’m using Microsoft Word for Mac version 16.48. If you’re using a different version, then the steps and interface may be different. But these steps should still be helpful for you.
1. Show the Developer Tab
As a first step, make sure that the Developer tab is showing up for you. This may be hidden by default. If you don’t see the Developer tab, follow these steps:
Go to Word > Preferences.
The Word Preferences menu opens. Click on the Ribbon & Toolbar button.
The Ribbon & Toolbar menu pops up. Under Main Tabs, scroll down and check Developer. Click Save.
The Developer tab should now be visible.
2. Determine the Layout and Structure of the Form
The next step is to determine the layout and structure of the fillable form. This will depend on what information you want to capture. You may want to sketch this on a sheet of paper first.
When you know what the form will look like, create a table in Word. By creating your form as a table in Word, it’ll be easier for you to keep things aligned and organized. The cells of the table are the form fields. Keep this in mind as you create your interactive form. This tutorial shows you the steps for how to make a table in Word:
Another option is to use a Word template with a pre-built table as a form. This way, the form has already been professionally designed. All you’ve got to do is to customize the form in Word according to your needs. Remember that the form template must have been built as a table so that you can make the form interactive in Word.
In the steps that follow, I’m going to create a form from scratch by first creating a table in Word:
Now, it’s time to make this a fillable form in Word.
3. Add Form Fields With Content Controls
You create a fillable form in Word by adding form fields. There are different types of form fields with content controls, depending on the types of responses you’re looking for.
Under the Developer tab, you’ll see buttons for creating a Text Box, Check Box, and Combo Box (or drop-down form field).
Let me show you how to create each type of form field:
How to Add a Word Fillable Form Text Box
Place the cursor where you would like to create a text field. Click on the Developer tab, then the Text Box button.
A text box is created. To change the text box settings, click on Options. The Text Form Field Options menu opens.
Here, choose various settings. For example, you’ve got several Text Types to choose from:
- Regular Text
- Number
- Date
- Current Date
- Current Time
- Calculation
Add a Default Text for the form field to guide respondents in filling out the form. You can also specify the Maximum Length and Text or Number Format.
When you’re happy with the settings, click OK. Repeat for each text box you want to create.
How to Add a Check Box to a Fillable Form in Word
Next, let’s make check boxes. First type the text for the check box items. Then, place your cursor in front of the first item. Go to Developer > Check Box.
A check box appears where your cursor was. Again, change the check box settings by clicking on the Options button.
The Check Box Form Field Options menu opens. Here you can determine whether the Default Value for the check box is Not Checked or Checked. Specify the Check Box Size and other options. When you’re done setting up the check box options, click OK.
Repeat these steps for the other check boxes.
How to Create a Drop-down Field in a Fillable Form in Word
Finally, let’s add a drop-down field in our form. Place the cursor where you want the drop-down menu to be, then go to Developer > Combo Box.
To add the drop-down menu items, click on the Options button. The Drop-Down Form Field Options menu opens.
Type a drop-down item, then click the + sign.
Repeat for each drop-down item you want to include in your fillable form. When you’re done, click OK.
Only the first drop-down item will appear. You’ll see the rest when you test the form.
4. Finalize the Form
Before using the fillable form in Word, it’s a good idea to first test it. To do this, click the Protect Form button on the Developer ribbon.
Now that the form is protected, fill the form fields like your respondents would. You’ll notice that the drop-down menu items appear when you click on the field or the arrow beside it.
When you’re happy with how the fillable form works, finalize the document by formatting the page. Click Protect Form again to un-protect it, so you can edit the document. Now’s the time to change fonts, colors, add logos, and format the form as you wish.
This is what my final fillable form looks like:
You may also decide to remove the shading for each form field. To do so, go to Developer > Shading.
I’m going to keep the Shading on, to make it clear to my respondents where they’re supposed to type in their answers. That’s because I deleted the borders of my table to give my form a cleaner appearance. If you keep the table borders, then it makes sense to switch off the form field Shading.
5. Use and Distribute Fillable Forms in Word
Once the fillable form in Word is completed, share it with your users or respondents. Do this by sharing the fillable form as an email attachment.
First, make sure that the form is protected. This ensures that other users won’t be able to edit the form when you share it with them.
Next, click on Share > Share a Copy.
In the menu that opens, click Email as Attachment.
This launches your default email application with the fillable form attached.
3 Top Form Templates for Word (Unlimited Downloads from Elements)
If you want a form with an impressive design, it’s best to start with a form template for Word. Templates with built-in forms are designed by professional graphic designers. This means the biggest—and hardest—design decisions have already been made for you. By customizing the colors and fonts and adding your logo, you can make the template truly your own.
Below are a few form templates for Word that look great:
1. Clean Business Registration Form Template
The Clean Business Registration Form template for Word allows you to gather basic personal information and contact details. It’s useful for registering employees, clients, members, vendors, and more. This form template comes in A4 size. You’ve got the option of customizing it with your branding colors. The template comes in Microsoft Word files, as well as files for InDesign, Adobe Illustrator, and Photoshop.
2. Order Form
Receive orders for your products or services with this Order Form for Word. This A4-sized template uses paragraph styles, making it easy to edit in Microsoft Word. It also comes in Adobe InDesign files, if you’re more comfortable editing in that application. A file guide is included to help you customize this template.
3. Client Questionnaire
Impress your clients with this Client Questionnaire template that looks anything but generic. Editable in both Microsoft Word and Adobe InDesign, this form template comes in A4 size. A 34-page guide walks you through how to edit and use the template files.
More of the Best Word Templates for Your Business or Organization
Now you know how to create a fillable Word document. But aside from fillable forms, your business or organization needs other types of documents. Using templates for MS Word helps you create professional-looking documents quickly. Premium Word templates are designed to be easy to customize, so you end up with materials that are coherent with your brand.
Here are more Word templates you can customize to easily create impressive documents for your business or organization:
Learn More About Using Microsoft Word for Your Business and Personal Needs
Whether for personal or business use, MS Word lets you create various kinds of documents. But with power comes complexity, so it can take time to learn how to use its robust features.
The best place to start is with our ultimate guide, Learn How to Use Microsoft Word (Beginner Tutorial Guide). It takes you from the basics of opening and creating Word files, to more advanced skills like comparing and merging two Word documents.
These Word tutorials will also help:
Enhance Your Workflow With Fillable Forms in Word
You’ve seen how convenient it is to use an interactive, fillable form. And now, you know how to create your own fillable form in Word.
Take it up a notch by starting with a Word template, such as those from Elements or GraphicRiver. These professionally-designed templates for Word are sure to impress your clients, employees, or members.
For unlimited downloads of Word templates, take your pick of the vast options in Envato Elements. For one small monthly subscription, you get unlimited downloads of anything you want in its massive library. These include photos, fonts, graphics, as well as sound effects, music, and stock video. If you create many marketing and communication materials, Elements gives you massive value.
For one-off projects, GraphicRiver is another massive library of Word templates and other creative elements. But with GraphicRiver, you pay only for each single use of each item. It’s an affordable way of getting the same professional results.
Configuring a Word Merge in SmartSimple is a three-step process:
- Create the MS Word document that will be used as the template. This page describes the process to add form fields to your Word document.
- Upload the Word document to a SmartFolder. (See Uploading Word Merge Document to a SmartFolder for instructions.)
- Create the Special — MS Word Merge custom field that maps the SmartSimple fields you wish to merge to the Word template.
Your Word document will contain Form Fields which are linked to «Bookmarks.» The SmartSimple Word Merge field will be configured to match the bookmarks up with SmartSimple variables in the third step.
In this step, you will add the Form Fields and assign Bookmarks to each field in your Word document that is to be merged. The steps vary slightly in different versions of Word.
Note that SmartSimple's Word Merge feature works with all versions of MS Word. As opposed to using the user's version of Word to create the merged document, the merge is performed by SmartSimple's Word Merge engine using an programmatic object compatible with MS Word (all versions). Once the merge is launched, SmartSimple streams the resultant document back to the client’s browser where the extension of the streamed document (*.doc, *.docx, etc.) will trigger the launching of MS Word. If the user does not have MS Word on a Windows machine, the process will simply open whatever program is associated with the document's extension.
Take note of all the Bookmarks that you add to the Form Fields below. They will be used in step 3: creating an MS Word Merge custom field.
Contents
- 1 MS Word 2000-2003
- 2 MS Word 2007
- 3 MS Word 2010/2013
- 3.1 Word 2010
- 3.2 Word 2013
- 3.3 Preparing Template for List View Export
- 4 See Also
MS Word 2000-2003
- From the View Menu select Toolbars and enable the Forms Toolbar
- Click in your Word document wherever you wish to insert a Form Field.
- On the Forms Toolbar click on the first button to insert a Form Field into your document:
- Right-click on the Form Field and select Properties. Then provide a name for the field in the Bookmark section.
MS Word 2007
- Click on the Menu button and select Word Options
- In the Popular section, select Show Developer Tab in the Ribbon
- Click in your Word document wherever you wish to insert a Form Field.
- On the Developer Menu select the Legacy Tools icon which is in the Controls section:
- On the Legacy Forms menu click the first icon to insert a Form Field.
- Right-click on the Form Field and select Properties. Then provide a name for the field in the Bookmark section.
MS Word 2010/2013
- Click in your Word document wherever you wish to insert a Form Field.
- Click on the Developer tab.
-
- If the «Developer» tab is not visible, click on File > Options > Customize Ribbon, and check off the «Developer» tab in the right hand frame.
- On the Developer tab, click on the Legacy Tools button:
.
- Click on the Text Form Field button
Word 2010
Word 2013
- A Text Form Field will be inserted at the cursor location.
- Right-click on the Form Field and select Properties. Then provide a name for the field in the Bookmark section.
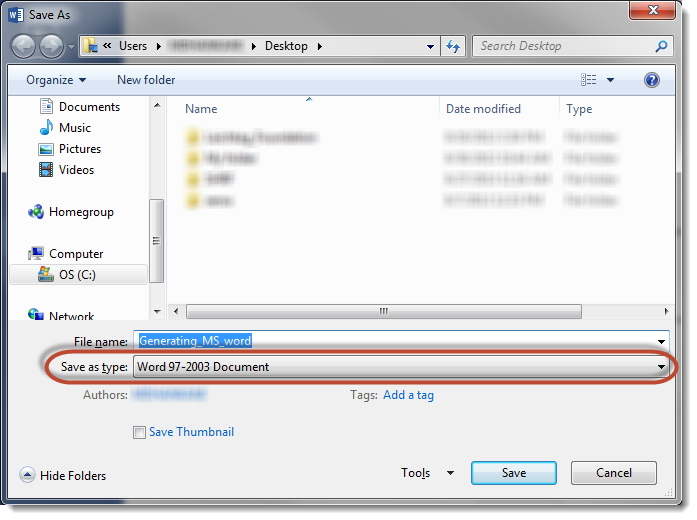
In Word 2013, the document must be saved as a «Word 97-2003 Document»:
Preparing Template for List View Export
List View Export to a Word Merge field required the fields used be Word Merge instead of the old bookmarks which is described above. This method will also work for Word Merge fields used outside of the list view.
To ensure the list view export functions, fields must be created using the following:
- In Word 2007 and higher, select Mailings from the ribbon menu.
- If you haven’t already, click on Select Receipients then Use Existing List.
- When the Select Data Source dialog box appears, select a blank Excel document (or any existing Excel document you have accessible). This will enable the required buttons.
Note: If you do not rename the field, then the data merged within will be the same for all like-named fields.
See Also
To set up a Word merge:
- Step 1 — Create the MS Word document that will be used as the template.
- Step 2 — Upload the Word document to a SmartFolder.
- Step 3 — Create a Special — MS Word Merge custom field.
Advanced Word Merge Features Include:
- Exporting List View Results to Microsoft Word
- Uploading a MS Word Merge Document to a Custom Field
- Including Tables in a Word Merge Document
- Using ReportProperty with a Word Merge Document
- Including Check Boxes on an MS Word Merge Document
- Including XML on an MS Word Merge Document
- Using Conditional Logic on a MS Word Merge Document
Did you know that you can create forms in Word that people can fill out? When you hear about fillable forms, it is almost always related to Adobe and PDF documents because that’s the most popular format.
However, Word is also quite a powerful tool and you can use it to quickly create forms that you can either print or send via email, etc. If you need to create a survey that will go out to many people and you want all the responses tallied for your automatically, it might be best to use Google Docs to create the survey.
In this article, I’ll show you how to create a form with text boxes, check boxes, a date picker and a list box. You can also make your forms a lot better looking if you use tables to organize everything.
Enable Developer Tab
By default, you can’t create forms in Word unless you enable the Developer tab in the ribbon. Since it’s not used by a lot of people, Microsoft disabled it by default. To enable the tab, click on File and then Options.
On the left-hand side, click on Customize Ribbon and then check the Developer box in the right-hand list box.
Click OK and click on the tab in the ribbon. The section we are most interested in is Controls.
Creating a Form in Word
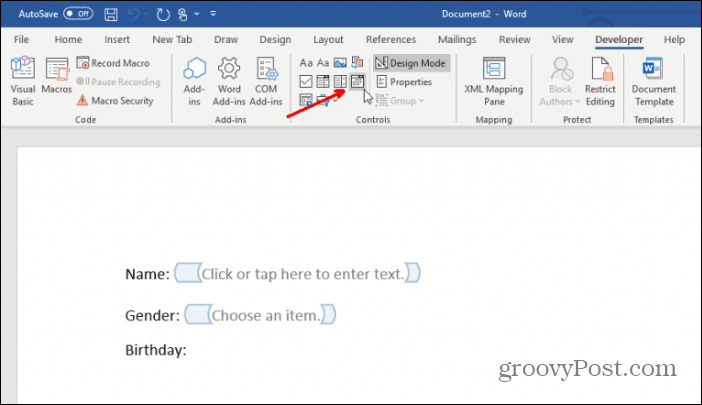
The Controls section has about eight different controls that can be added to your Word document: Rich Text, Plain-Text, Picture, Building Block Gallery, Checkbox, Combo Box, Drop-Down List, and Date Picker.
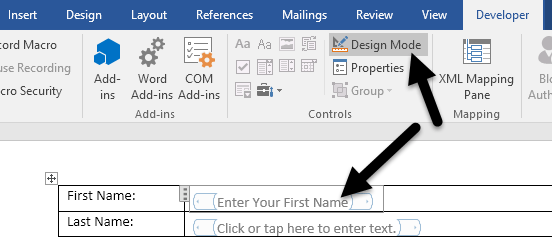
To insert a control, just click on it and it will appear wherever your cursor was located. In my example below, I created a table and added two plain-text boxes for first name and last name.
By default, each control has its own filler text. For a plain text control, it is Click or tap here to enter text. You can edit this text for any control by clicking on the Design Mode button that is to the right of the control icons.
You’ll see some blue placeholders appear on the left and right of any controls you have added to your document. Select the text and change it to whatever you like. Click on the Design Mode button again to exit the mode.
Next, click on your newly added control so that it is highlighted and then click on Properties, which is directly below the Design Mode button. Each control will have a standard set of options with custom options at the bottom based on what type of control it is.
Here you can give the control a title, change the color, style the text and specify whether or not the control can be edited or deleted. At the very bottom are the control specific options, which for the case of a plain text control, is whether you want to allow multiple lines or not. That last option is useful if you need someone to type in a paragraph of text.
So what’s the difference between a plain-text control and a rich text control? Well, not much. In a rich text control, you can change the font/color settings for each word individually, whereas the plain-text control will apply the formatting to all the text. You would think the plain-text control would not allow bold, font changes or color changes, but it does.
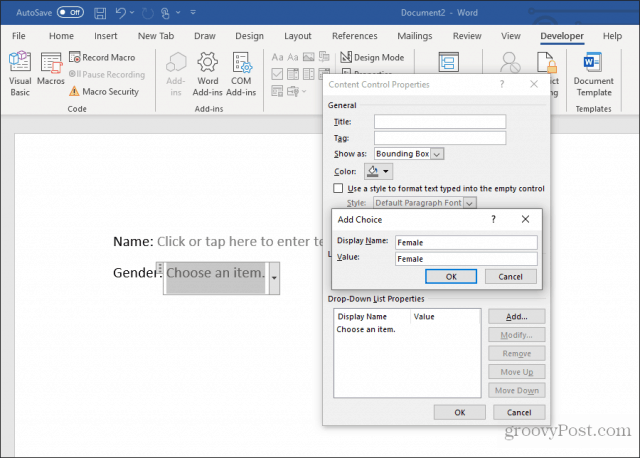
Next, I went ahead and added a drop down list control to my form. You’ll see it says Choose an item and that’s it. In order to add items to the list, you have to click on Properties.
Click the Add button and then type in a name for your choice. By default, the Display Name and Value will be the same, but you can change it if you like. There really is no reason to change the value unless you are writing Word macros and refer to the controls in code.
Once you have added all your choices, go ahead and click OK and you’ll now be able to select the options from the drop-down list.
The only difference between the dropdown list control and the combo box control is that the latter allows the user to enter their own value if they please. In the dropdown list, you have to choose from one of choices in the list. In the combo box, you can either choose from the list or type in your own value.
The date picker control works just like any date picker you have probably used on airline booking sites, etc. When you click on it, a calendar appears and you can simply click on the date to select it.
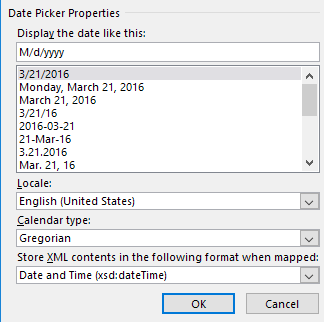
If you click on the Properties button, you’ll see that there are quite a few options for the date picker control.
You can choose a different format to display the date and choose a different calendar type. The picture control is another nice option that will allow users to insert a picture easily.
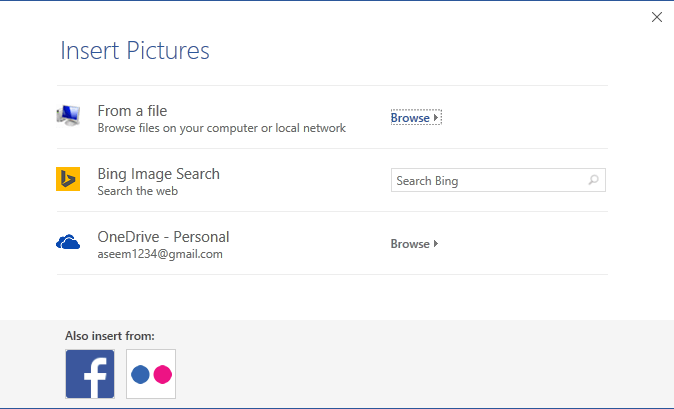
When the user clicks on the image, a dialog will appear where they can choose a picture from their computer, from Bing image search or from OneDrive. They also have options for Facebook and Flickr.
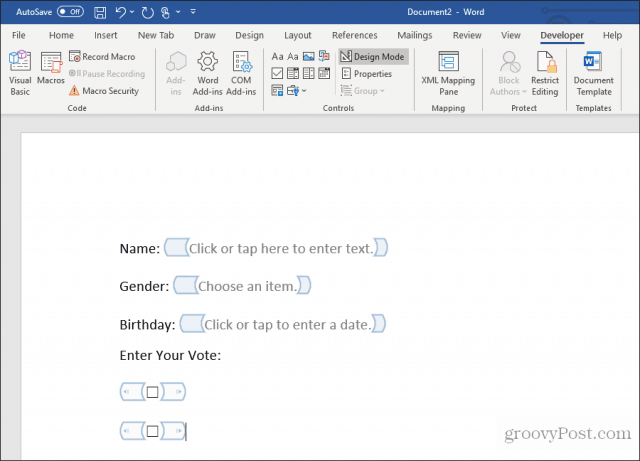
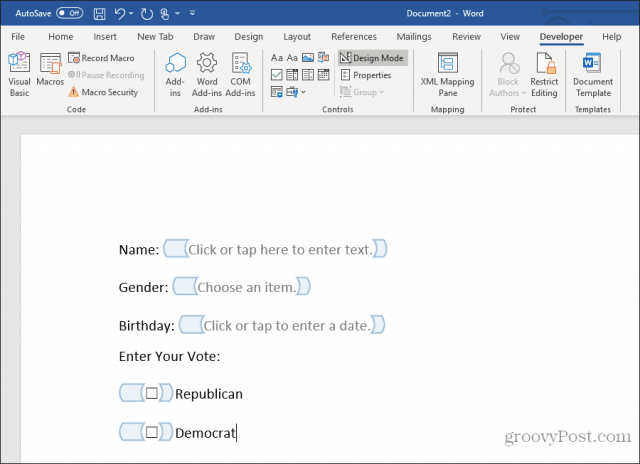
Now let’s add a few checkboxes to our document. Note that when you add a checkbox and try to type text into it, it will tell you that the selection is locked. I believe this is by design. You have to click next to the checkbox and then type in your text.
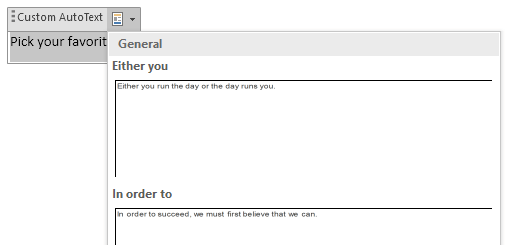
Lastly, you can insert a building block control, which lets you pick content from Quick Parts and AutoText. If you don’t know what I’m talking about, check out my post on how to use AutoText and Quick Parts in Word. In my example, I added some quotes to a custom AutoText and then linked the control to it via the Properties dialog.
Once you have all the controls in your document the way you want, it might be a good idea to protect the document so that user can only fill out the form fields and that’s it. To do this, click on Restrict Editing on the Developer tab.
In the pane that shows up on the right, click on the dropdown under Editing restrictions and choose Filling in forms. Make sure to check the Allow only this type of editing in the document box.
Click Yes, Start Enforcing Protection and then enter a password if you like. Now only the form fields will be editable and everything else locked/protected. The user can easily use the TAB key to move between the different form fields.
Overall, Word isn’t the greatest tool for making forms, but it’s decent and probably more than enough for most people. If you have any questions, feel free to comment. Enjoy!
Sometimes we need to make a questionnaire to collect information. In order to protect the format and contents of the questionnaires, we can use Form Field.
1. Open your word document and click the position where you want to insert a form field. Then click the Insert tab → the Forms drop down button.
2. There are three types of form fields for choice: Text Form Field, Check Box Form Field and Drop-Down Form Field.
3. Here we take Text Form Field as an example.
Select Text Form Field. Then double click it to pop up an options dialog, where we can set the text Type, Default text and Maximum length, etc.
When we have finished, click OK.
4. Then we select Protect Form, and the text outside the form field will be not editable.
Three types of Form Fields are used in different ways:
Text Form Field: To input text in the form field, including words, numbers, symbols and so on. For example, name, major and school, etc.
Check Box Form Field: To check or uncheck to indicate Yes or No. For example, participate or not.
Drop-Down Form Field: To select from the drop-down menu only. For example, female, grade and age, etc.
We can select any of them according to actual needs.
For all, easy your work with WPS office suite. Free download WPS Office for PC, Mobile, Windows, Mac, Android, iOS online.
Although Word is most commonly used for creating documents, it can also be used for capturing data like a form. Word Forms do not require any programming knowledge. These are easy to create and will work across ALL versions of Word.
The Need for Word Forms
This is very useful for conducting quick surveys or quizzes where you want to control the responses. Of course, there are more sophisticated methods and tools available for bother these scenarios, Word is familiar to everyone and almost guaranteed to be available on every desktop. Hence it is a compelling option even today (2017).
How to create Word Forms?
Two steps. Create the survey by inserting editable items (form fields) and then lock the document so that only the form can be filled.
Adding fields to Word Forms
There are three types of fields.
- The new type of fields which are better looking and more interactive.
These do not work with older versions of Word. - The solution is to use the built-in form fields.
These are available with any version of Word. So compatibility is never an issue. - ActiveX controls
These are more sophisticated but not guaranteed to be available on every PC. ActiveX controls are being phased out globally. These are used by programmers who want to extend Word and add business functionality to it.
In short, we will use the built-in Word Forms and related fields. To use these, we have to enable the developer tab.
Enable developer tab in Office 2007
File – Word Options – Popular – activate the Show developer tab option.
Enable developer tab in Office 2010 onwards
Open Word. File – Options. Click Customize Ribbon. In the list on the right side, scroll and identify the Developer item. This item is not selected by default. Select it and close the dialog.
Using Form Fields
Open the briefcase icon dropdown under Developer Tab – Controls group.
We will use only the upper part called Legacy forms. We have various types of fields available. Simple text, checkbox and box.
Create a document and choose a field. Let us add a text field for capturing the name.
The word Name is typed manually. Now select Text form field from the legacy tools area. Notice that the field is added with gray background. The width of this field looks small but it expands automatically.
Let us add another textbox for duration. To keep things simple, we will use another text field.
Let us add the leave type. Choose the Drop-down form field. Once added, double click inside the field to add various leave options.
Now let us add a Check box form field. We will ask whether it is Paid or unpaid leave. Double click on the field to change the default to Checked (means Paid leave).
Now the form looks like this.
Restricting form filling in Word Forms
Right now the form is in edit mode. The captions and structure can be changed. We cannot type inside the fields properly. Checkbox cannot be unchecked and the dropdown does not appear.
Here is how you can make it a fillable form. With Office 2007, Choose Protect Document from the Review tab. Choose Restrict Formatting and Editing option. For newer versions of Office, the Restrict editing option is directly available in the Review tab.
Now a new window (pane) opens. Choose the Allow only this type of editing checkbox and choose the Filling in Forms option from the dropdown.
Now click the Yes, Start enforcing protection button. Specify a password and type it again to confirm it.
Now it is a real form.
How to fill Word Forms?
Click on any field to fill it. You cannot click and edit any other area in the Word file.
Dropdowns can be selected and checkboxes can be enabled or disabled.
How to save the data from filled Word Forms?
You will send this form as attachment to multiple people. They will fill it and then send it back to you. Unfortunately, you cannot extract data from multiple filled forms. You have to do it one-by-one. Here is a filled form.
In order to save only the data from the form, follow these steps:
- Go to File – Options – Advanced
- Scroll down and choose the checkbox as shown below. Left side is Office 2007 and right side is newer versions of Word.
Now the saved file will be just a TXT file containing the comma delimited data. A preview is also shown before saving.
Practical Usage
This method works ever since Word was created. Although newer methods are available now, this method may still come in handy for quick and easy data capture.
***
There are two simple methods to create fillable fields in Word. One is to create custom fields. The other is to use developer tools and the various data-entry controls that are available there.
Whenever there’s a need for fillable forms, people often turn toward advanced PDF editors with interactive form tools. However, not many people realize that it’s simple to create fillable forms in Word.
There are two methods to do this in Word. One is to use text boxes throughout and then creating custom fields. The other is to use developer tools and the various data-entry controls that are available there.
Which Option Should You Choose?
The method you use depends on what kind of form you’re creating.
You should use the custom field method if the form:
- Has only text fields to fill out
- You don’t mind training your users how to fill out custom fields
- You need forms filled out quickly
You should use developer tools if the form:
- Requires drop-down lists or checkboxes
- You’re sending an individual file to each user
- You don’t want to have to train users on how to use the form
Once you’ve decided which approach you want to take, you can learn how to use each option below.
Create Fillable Forms In Word with Custom Fields
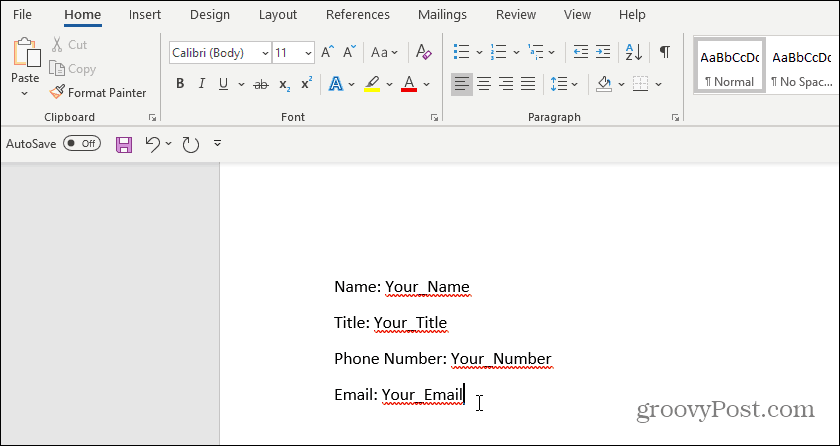
Creating a fillable form with fields is very simple. First, create your form by typing the name for each field and filler text for where the answers should go.
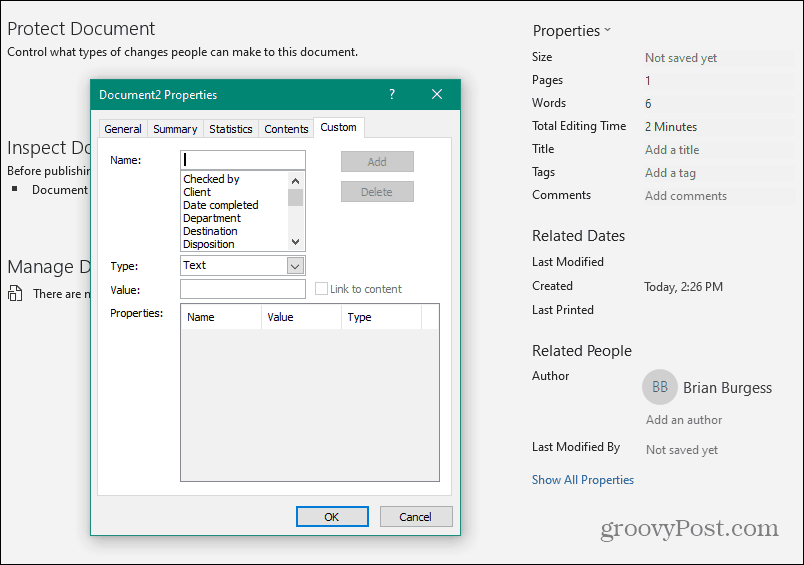
Next, you’ll need to create custom fields for data entry. To do this, select File, Options, and Properties. Then, under Properties, select Advanced Properties.
This will open a Document Properties dialog window. Select the Custom tab.
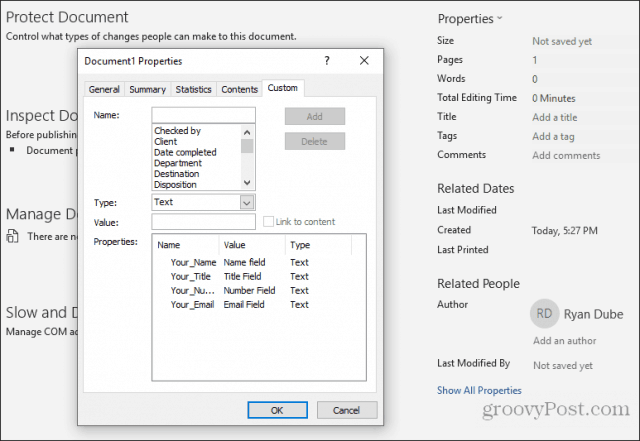
This window is where you’ll create each custom field that will go into your fillable form. Then, one at a time, name each field and give it an initial value.
Select Add to add each field, and then continue by entering all of the fields in your form.
Select OK when you’re done.
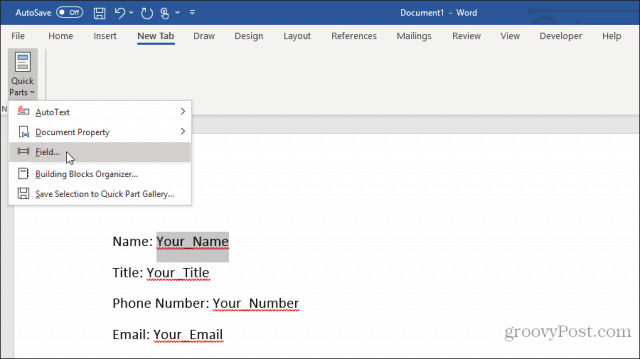
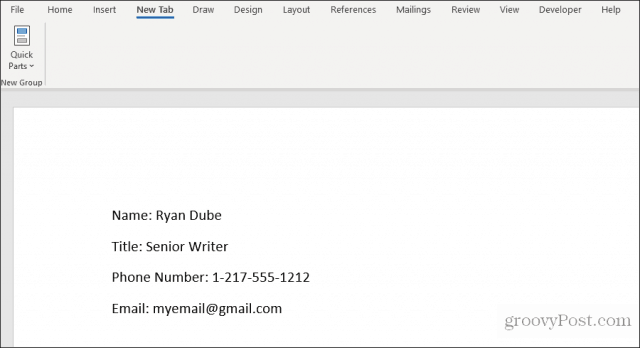
In your document, highlight the first field in your form. Then, in the Word menu, click on the Insert menu, click the Quick Parts dropdown, and select Fields. If Quick Parts doesn’t appear under the Insert menu, you’ll need to add Quick Parts to the ribbon to access the Field item.
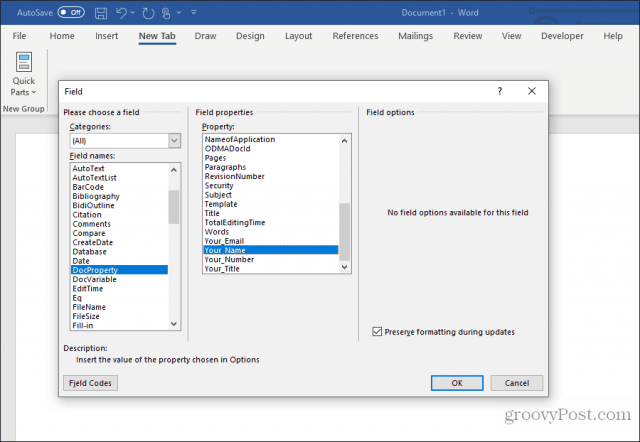
Click on DocProperty under Field names in the pop-up window, and click on Your_Name (or whatever you named the field) under Property.
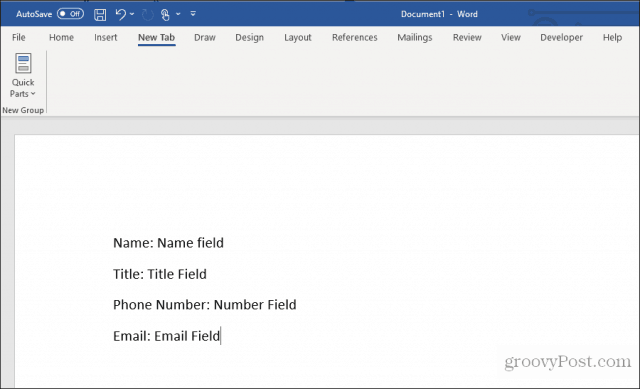
Continue this process for all remaining fields in your form until they’re all converted to fields.
You can learn more about using custom fields in a variety of ways to automate your documents.
Filling out a Form with Custom Fields
Now, all your users need to fill out the form is to go through all of the custom fields and enter the values.
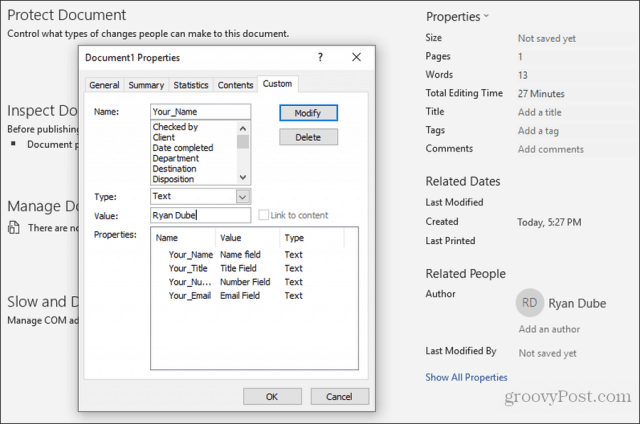
To do this, they’ll need to select File, Options, and Properties. Under Properties, select Advanced Properties. This will open a Document Properties dialog window. Select the Custom tab.
In the Document Properties window, your users need to select each of the properties, enter the correct value for those fields, and select Modify.
After entering the custom fields’ values, clicking OK will add those values to the correct fields in the form.
You can update each form in the field by right-clicking on it and selecting Update Field. Or, you can select all of the fields and press F9.
Once they’re all updated, the customized Word form will contain all the answers entered into the custom fields.
Your user can then save the form and send it to you with all the fields properly filled out.
As you can see, this approach saves a lot of time because all of the field values can be entered quickly in one place.
Create Fillable Forms In Word with Developer Tools
If you need a more versatile form, then you’re better off using developer tools in Word to create the required form entry fields. Before you can do this, you’ll need to enable the developer menu in Word.
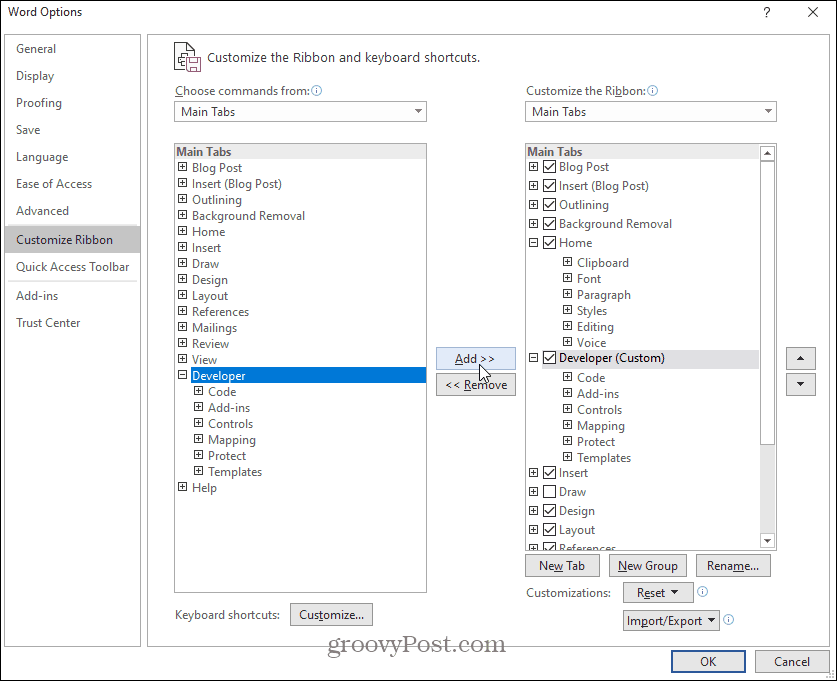
Select the File menu, and select Options. In the Word Options dialog window, select Customize Ribbon from the left navigation pane. Under Choose commands from, select Main tabs. If Developer is already displayed in the right pane, select the checkbox to enable it. If it isn’t, select Developer in the left pane and select the Add>> button to add it to the right pane.
Select OK to finish. Now you should see Developer appear in the Windows menu.
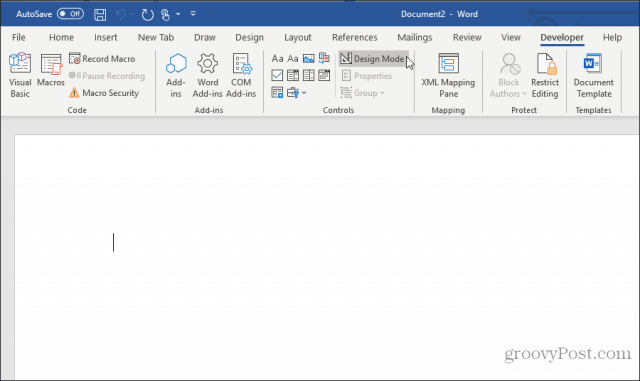
Open a new Word document by selecting File from the menu, select New, and choose Blank document.
Select Developer in the menu, and select Design Mode.
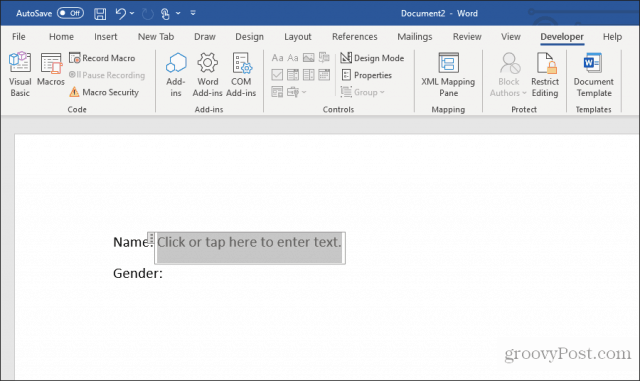
Insert a Text Field
For a text field entry, choose the Plain Text Content Control.
This will insert a text entry box into the fillable form.
Insert a Drop-Down List
To add a dropdown box entry, select Drop-Down List Content Control.
This will insert a drop-down list into the fillable form. However, to fill out the list box, you need to set up the list. To do this, right-click the drop-down list control and select Properties. In the Content Control Properties box, select the Add button to add new items to the list.
When you’re done, select OK. Now you’ll see the drop-down list appear in your fillable form.
You won’t see the dropdown list while you’re creating the form in Design Mode. But you can select Design Mode to turn it off and test what the drop-down list will look like.
Insert a Date Picker
Another useful tool to use for a fillable form in Word is the Date Picker Content Control. Select this to add a date picker option in your form.
You don’t have to do anything to customize this control. It’ll work as required to let the user choose a date for this field.
Insert Check Boxes
The next control that’s useful in a fillable form is the Check Box Content Control.
First, insert the number of checkboxes you need in your form after writing the question above it.
Next, type the text for each selection beside each checkbox.
Testing Your Fillable Form in Word
You can add any number of controls throughout your fillable form to suit your needs. When you’re finished, select Design mode from the Controls menu to turn off Design Mode and see your finished fillable form.
Test all of the controls in your form to ensure that they work as you expect.
As you can see, creating a fillable form in Word isn’t as difficult as it may seem. The approach you choose depends on the complexity of the form and the types of responses you’re looking for.
Give it a try and see what kind of form you can create in Word using either of the two methods above.

 or Plain Text Content Control
  .
. .
. (or Building Block Content Control).
 or Drop-Down List Content Control
  .
. .
. .
. drop-down.

 , and then select Ribbon Preferences.
