
Tutorials
A family tree (also known as a pedigree chart) is an illustrative diagram with mini photos, word art, and other components demonstrating family history and relationships in a chart format. It is important in establishing lineages in a conventional tree format. In medicine, the detailed pedigree charts are referred to as genograms.

Similar to a game like 4 Pics 1 Word, a sample family tree incorporates photos that people take or artwork that people draw to illustrate the various members in a lineage. Creating a family tree is a common project in academic levels like grade 1. Family trees can be quite big to include distant ancestries or small enough to map out only a few generations. Feel free to read our guide below on how to create a transparent family tree in various MS Office word Versions (Microsoft Word 2003, Microsoft Word 2007, Word 2010, Word 2013, Word 2016, Word 2019, Word 2021) or other platforms, along with enjoying free downloads of online templates.
In ten clear steps we will be creating a family tree for Tom’s family
Step 1
Start the Microsoft Word application. Go to the office button click on it at the drop-down of option; select new, then click on the blank document option.

Step 2
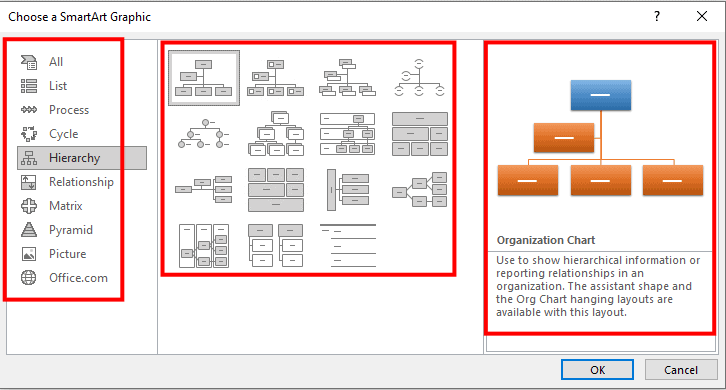
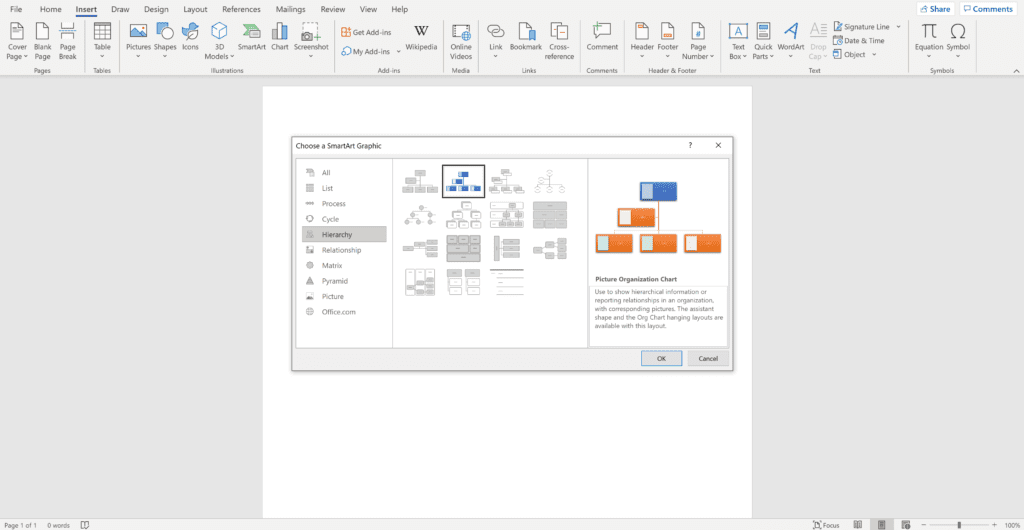
Click the insert option on the toolbar. Select the Smart Art button and click. This will open a drop-down options box for you to make your choice.

Step 3
Click the “Hierarchy” link in the left column of SmartArt options. Select one of the Hierarchy diagrams, such as “Organizational Chart” It is already set up to look like the branches and leaves of a printable family tree. Click the “OK” button and Microsoft Word will insert a small chart with placeholder text boxes and a text-input box onto the Word page.

Step 4
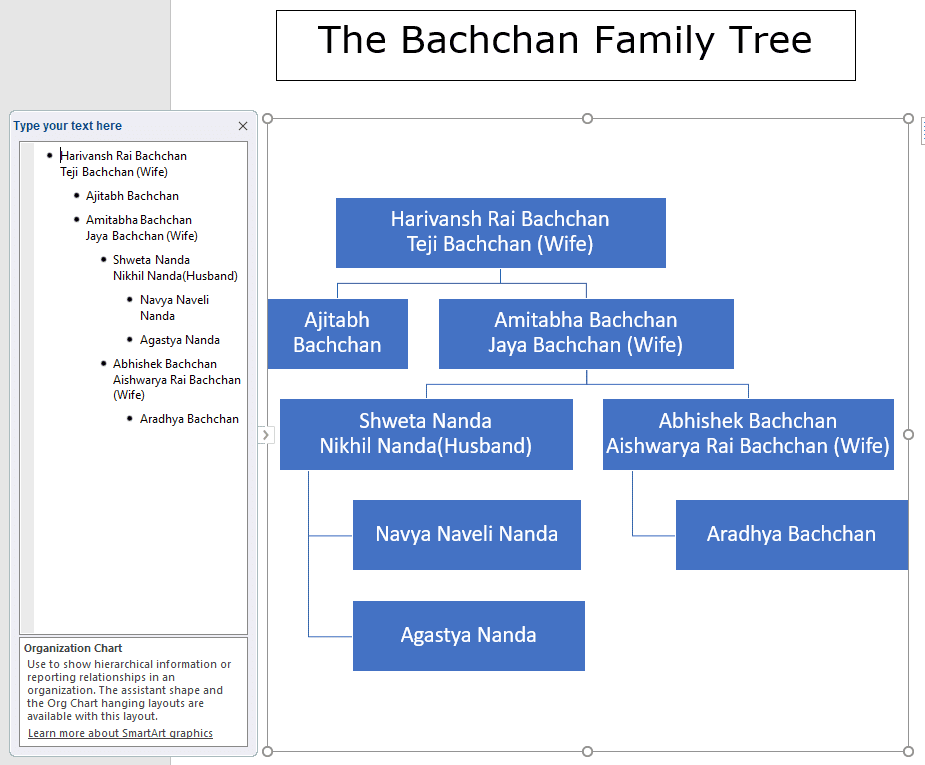
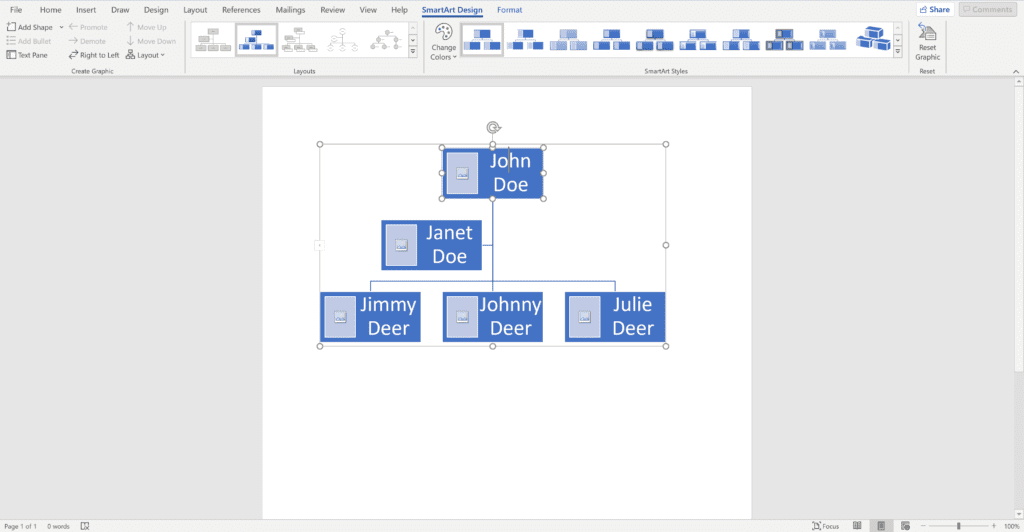
You have to start your family line by naming members from as far as you can remember. Let’s take an example for this simple chart. In the topmost box or shape specify the name of your earliest ancestor – in this case, Tom. Type the name directly into the shape or box on the family tree diagram.

Step 5
Drag down the next shape or box and place it below the previous box. Type in the name of the next family member who was born after Tom. Additionally, you can input other relevant details about the members along with their names – date of birth, place of birth, etc.

Step 6
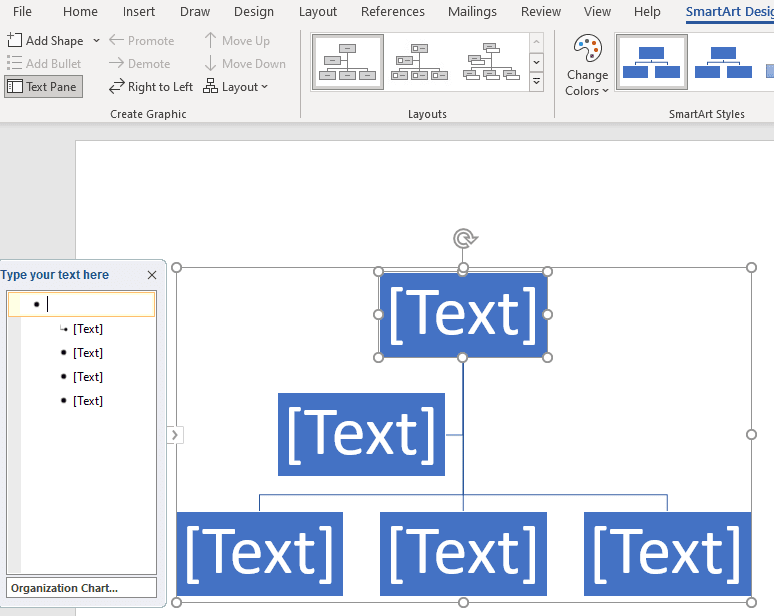
In the Review tab, click on SmartArt tools and Ribbon. Doing so will tell you which ribbon is active. If you click elsewhere, the ribbon will not appear. You’d have to click on the family tree all over again to be able to see the options all over again. When the ribbon appears, you can personalize the tree further. You can also see our family tree in Word.

Step 7
To add the name and details of the next family member on the tree, you have to click the “Add Shape” button on the ribbon and choose one of the options, either “Add Shape Before” or “Add Shape Below.” In case you’d like to add more effects, click on the ‘Create Graphic’ section of the ribbon. [ Builder Family Tree in pages ]

Step 8
Extend the size of the tree to better fit the Word page by clicking a corner of the shape, holding down the cursor, and dragging the shape out toward the edge of the page. As you add boxes to the tree, Microsoft Word automatically adjusts the tree smaller so it stays within the size you create on the page. Trees with many branches, leaves, and levels may have a small business type.

Step 9
Format the tree’s appearance by clicking the “Change Colors” button on the ribbon or cycling through the SmartArt Styles section of the ribbon. Choose a color to suit your preference.

Step 10
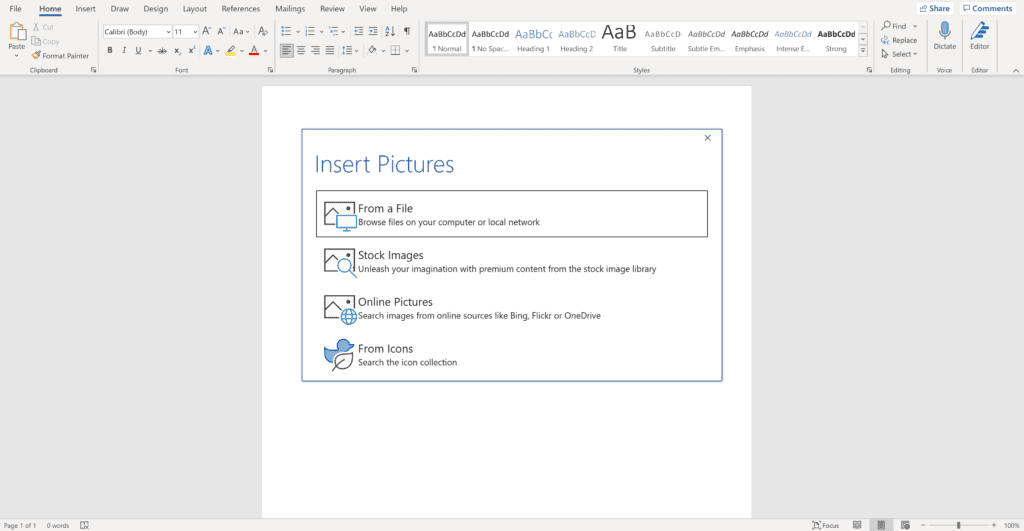
You can add images too. The process is simple. Click on the ‘Insert’ tab followed by a click on the ‘Pictures’ button. A dialog box will appear, browse through your computer and go to the location to select the relevant image, double click it, and then drag it into the box which has the family member’s name on it.
Step 11
Save the file when the family tree is complete by selecting “File” and “Save.”
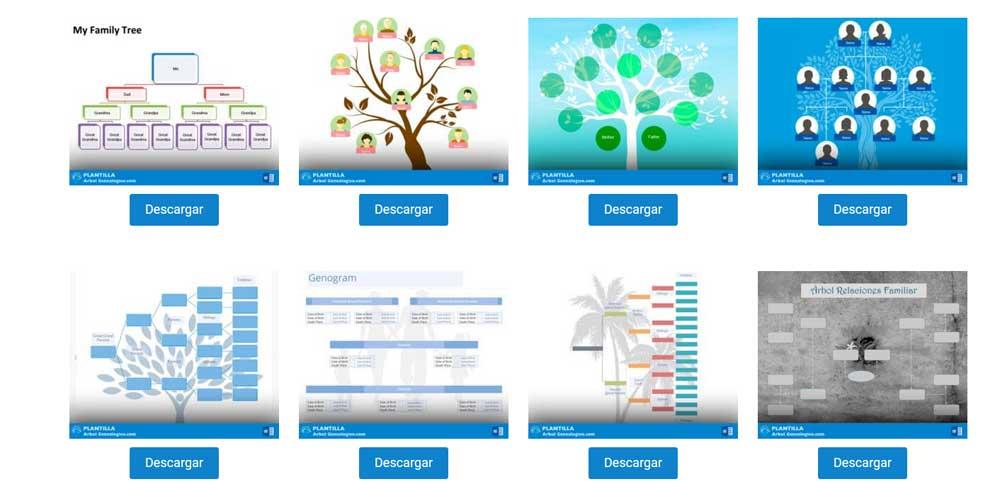
Here are some of the family trees templates in Word
Seven Generation Family Tree Template

Details
File Format
- MS Word
- Google Docs
- Apple Pages
Download
Four Generation Family Tree Template

Details
File Format
- MS Word
- Excel
- Apple Numbers
- Apple Pages
Download
Modern Family Tree Template

Details
File Format
- Excel
- Google Docs
- MS Word
- Apple Numbers
- Apple Pages
Download
Sample Blank 10 Generation Family Tree Template

Details
File Format
- MS Word
- Apple Pages
Download
Family Tree Chart Template

Details
File Format
- Apple Pages
- Google Docs
- Excel
- MS Word
- Apple Numbers
Download
Blank 7 Generation Family Tree Template

Details
File Format
- MS Word
- Google Docs
- Apple Pages
Download
Genealogy Family Tree Template

Details
File Format
- MS Word
- Google Docs
- Excel
- Apple Numbers
- Apple Pages
Download
Blank 10 Generation Family Tree Template

Details
File Format
- MS Word
- Google Docs
- Apple Pages
Download
Three Generation Family Tree Template

Details
File Format
- Apple Pages
- Google Docs
- MS Word
Download
Sample 5 Generation Family Tree Template

Details
File Format
- MS Word
- Google Docs
- Apple Pages
Download
Printable Large Family Tree Template

Details
File Format
- Google Docs
- MS Word
- Apple Pages
Download
Photo Family Tree Template

Details
File Format
- MS Word
- Google Docs
- Excel
- Apple Numbers
- Apple Pages
Download
8 Generation Family Tree Template

Details
File Format
- Apple Pages
- Google Docs
- MS Word
Download
Blended Family Tree Template

Details
File Format
- MS Word
- Google Docs
- Apple Pages
Download
Printable Family Tree for Kid’s Template

Details
File Format
- MS Word
- Google Docs
- Apple Pages
Download
Blank 3 Generation Family Tree Template

Details
File Format
- MS Word
- Google Docs
- Apple Pages
Download
Family Tree Template With Siblings

Details
File Format
- MS Word
- Google Docs
- Apple Pages
Download
Family Tree Template for Kid’s

Details
File Format
- MS Word
- Google Docs
- Apple Pages
Download
Family Tree of Generations Template

Details
File Format
- MS Word
- Google Docs
- Excel
- Apple Numbers
- Apple Pages
Download
9 Generation Family Tree Template

Details
File Format
- Apple Pages
- Google Docs
- MS Word
Download
Blank 4 Generation Family Tree Template

Details
File Format
- MS Word
- Google Docs
- Apple Pages
Download
Simple Family Tree With Photo Template

Details
File Format
- Google Docs
- MS Word
- Pages
Size: A4, US
Download
Basic Family Tree Template Free Download

Details
File Format
- Google Docs
- MS Word
- Pages
Size: A4, US
Download
Blank Mini Family Tree Word Template

Details
File Format
- Google Docs
- MS Word
- Pages
Size: A4, US
Download
There are hierarchical, matrix, and horizontal types of simple family trees. We will be creating the hierarchical type, particularly today using the instrumentality of the Family Tree Microsoft Excel application.
Large / Big Family Tree Template

Details
File Format
- Google Docs
- MS Word
- Pages
Size: A4, US
Download
Free Example of Family Tree Diagram

Details
File Format
- Google Docs
- MS Word
- Pages
- Editable PDF
Size: A4, US
Free Download
Sample Family Tree Chart Template

Details
File Format
- MS Excel
- MS Word
- Numbers
- Pages
- Editable PDF
Size: A4, US
Free Download
Simple Transparent Family Tree Template

Details
File Format
- MS Excel
- MS Word
- Numbers
- Pages
Size: A4, US
Free Download
Blank Family Tree Editable Template

Details
File Format
- MS Excel
- MS Word
- Numbers
- Pages
Size: A4, US
Free Download
Basic Online Family Tree Template

Details
File Format
- MS Excel
- MS Word
- Numbers
- Pages
Size: A4, US
Free Download
Complete Drawing of Family Tree Template

Details
File Format
- MS Word
- Pages
- Editable PDF
Size: A4, US
Free Download
Large Family Tree Map Template

Details
File Format
- MS Word
- Pages
- Editable PDF
Size: A4, US
Free Download
Family History Tree Template
 njparksandforests.com
Family Word Art Tree Template
 pbs.org
Details
File Format
Size: 321 KB
Download
More in Tutorials
A family tree or a pedigree chart is an illustrative diagram. It has components that demonstrate the history of a family. It uses a chart form to show the relationships of the family members. Using the conventional tree format establishes important lineages.
MS Word makes it easy to create family trees. For creating a family tree, you have two choices:
2 Methods to create a family tree using Microsoft Word:
- Use Shapes
- Use SmartArt
We will show you both methods in simple, step-by-step instructions.
Let us begin.
Method #1: Use Shapes
This method uses simple shapes like ovals, rectangles, and lines, to create the family tree.
Step #1: Open a Word Document
Open a new document or an existing document.
Navigate to where you want to position the family tree.
Make sure there is adequate free space available on the page for the tree.
Step #2: Set up a Title for the Family Tree
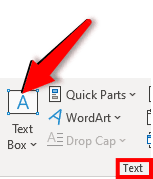
Click on the Insert tab in the top menu bar to change the ribbon.

In the section Text, click on the Text Box icon.

A menu for Built-In Text boxes appears.
Select Simple Text Box.
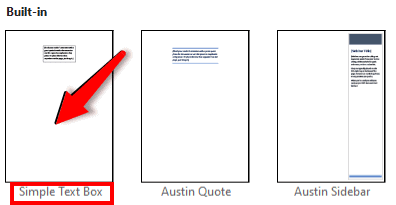
A text box will appear in the document.
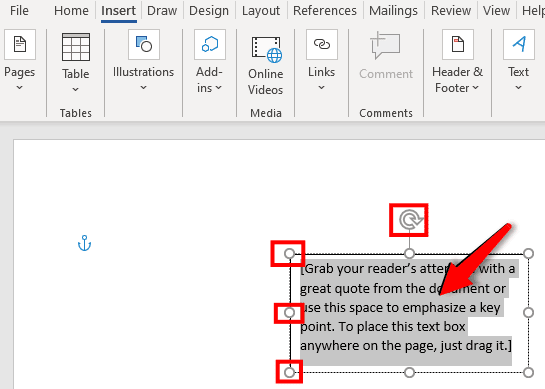
Use the handles, which are on the corners and top (indicated in red in our image) to reposition and reshape it, by clicking and dragging these handles.
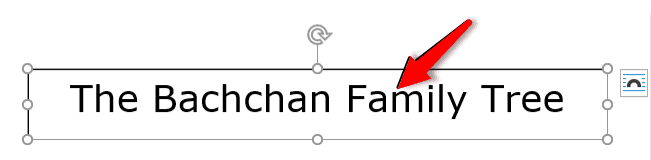
Select the text inside the text box by double-clicking on it, and change it to represent the title.
Step #3: Insert Shapes
Click on the Insert tab in the top menu bar to change the ribbon.

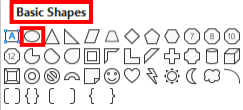
In the section Illustrations, click on the Shapes icon.
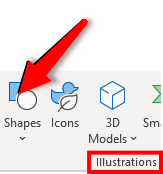
This opens the Shapes menu.
Select a suitable shape from Basic Shapes.
Note: We have chosen the Oval shape for this example. You may choose any shape.
Step #4: Format the Shape
Click on the shape you have chosen.
Once you click on a shape, that window will close, and your cursor will change to a cross.
Position this cross where you want the shape to be placed, and click.
Click and drag your cursor to form an oval shape, however big you want it.
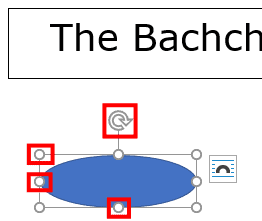
Use the handles, which are on the corners and top (indicated in red in our image), to change the position and size of the shape.
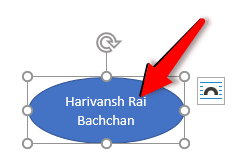
Step #5: Enter Text in the Shape
Click on a shape you want to edit.
Right-click on an empty space inside the shape to open a menu.
Click on the Add Text icon.

The cursor appears inside the shape.
Enter your required text.
Note: You may have to change the shape’s size to fit your text.
Step #6: Add More Shapes
Click on a shape.
Right-click on an empty space inside the shape to open a menu.
Click on the Copy icon.
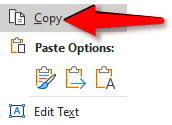
Right-click on an empty space inside your document to open a menu.
Under Paste Options, click on the Keep Source Formatting icon.
(You will also find the Paste Options in your Home tab ribbon.)
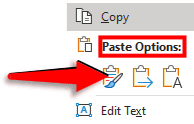
A copy of the shape will appear.
Use the handles to change the position of the new shape.
Note: You can also use CTRL+C and CTRL+V to copy and paste the shape.
Step #7: Add More Shapes
Repeat Step #6 to add as many shapes as you want.
Step #8: Change the Text inside the Shapes
Click on the shape you want to edit.
Right-click on an empty space inside the shape to open a menu.
Click on Edit Text.
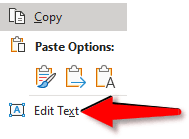
Change the text to your requirement.

Repeat for all the shapes.
Note: You can also click on the shape and select the text to edit it.
Step #9: Add Lines
Click on the Insert tab in the top menu bar to change the ribbon.

In the section Illustrations, click on the Shapes icon.

This opens the Shapes menu.
Select a suitable line from Lines.
Note: We have chosen the simple ‘Line’ from the menu. You can choose any other.
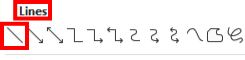
The cursor changes to a cross.
Position the cursor where you want the line to start.
Click and drag the cursor to form a line.
Note: While dragging the cursor, keeping the Shift key pressed on your keyboard allows you to draw horizontal, vertical, or 45-degree lines. You can use CTRL+C and CTRL+V to copy and paste lines.
Draw lines to annotate your family tree.
Use handles to resize the lines.
Add more lines to complete the family tree.
Method #2: Use SmartArt to Create a Family Tree
This method uses built-in graphics to draw a family tree template.
Step #1: Open a Word Document
Open a new document or an existing document.
Navigate to where you want to position the family tree.
Make sure there is adequate free space available on the page for the tree.
Step #2: Set up a Title for the Family Tree
Click on the Insert tab in the top menu bar to change the ribbon.

In the section Text, click on the Text Box icon.
A menu for Built-In Text boxes appears.
Select Simple Text Box.

A text box will appear in the document.

Use the handles, which are on the corners and top (indicated in red in our image) to reposition and reshape it.
Select the text inside the text box by double clicking on it and change it to represent the title.

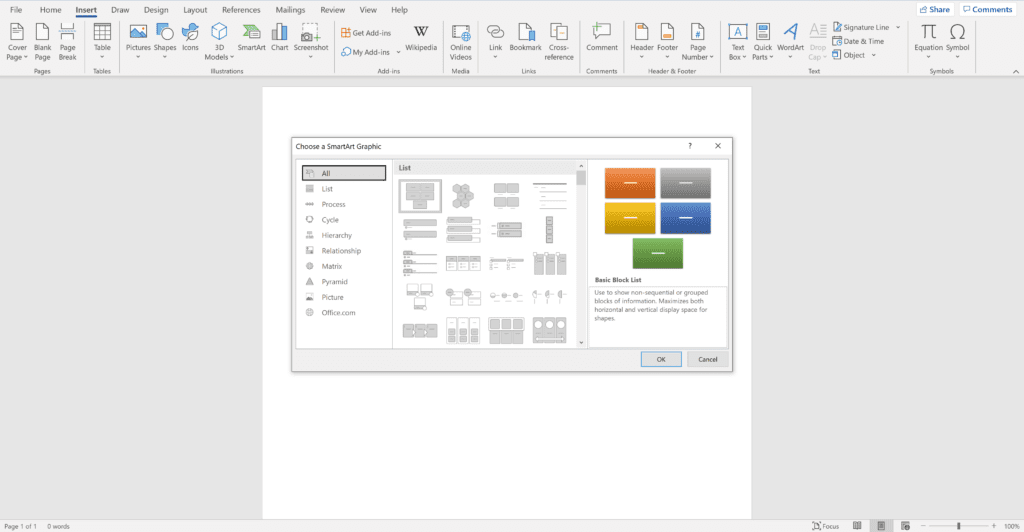
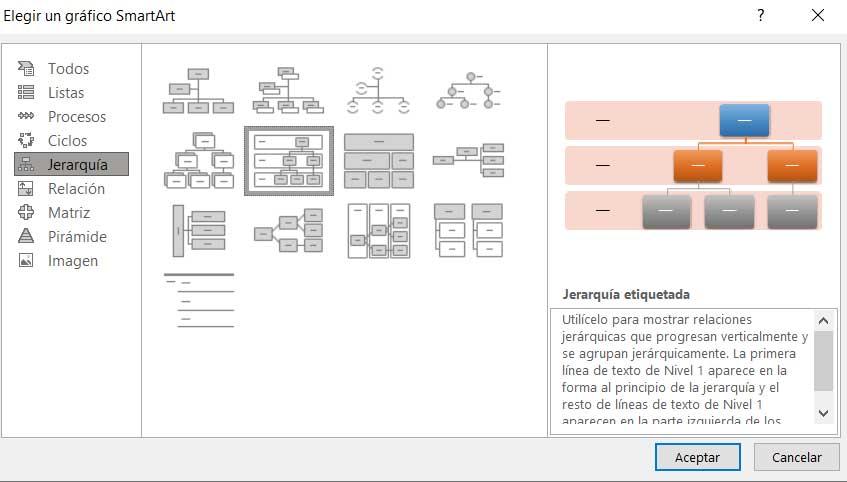
Step #3: Insert a SmartArt Graphic
Click on the Insert tab in the top menu bar to change the ribbon.

In the section Illustrations, click on the SmartArt icon.

This opens the SmartArt dialog box.
In the left pane, select the Hierarchy icon.
The middle pane shows many graphics for hierarchical relationships, like family trees.
Select the one most suitable to your requirement.
For this example, we have selected the first graphic. You can select any other.
The right pane shows an image of the graphic and its explanation.
Click on the OK button at the bottom.
The dialog box closes, and the graphic appears in the document.
The ribbon at the top changes to SmartArt Design.
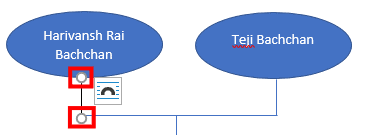
Step #5: Add More Shapes
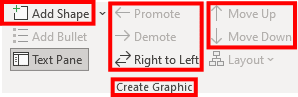
In the ribbon, use the Add Shape, Promote, Demote, Right to Left, Move Up, and Move Down icons in the Create Graphic section to add and position more shapes.
- Add Shape: Adds a new shape below the selected shape.
- Promote: Promotes the selected shape to an upper level.
- Demote: Demotes the selected shape to a lower level.
- Right to Left: Transposes the graphic. You can toggle the transposition.
- Move Up: Moves the selected shape to the left of its adjacent shape.
- Move Down: Moves the selected shape to the right of its adjacent shape.
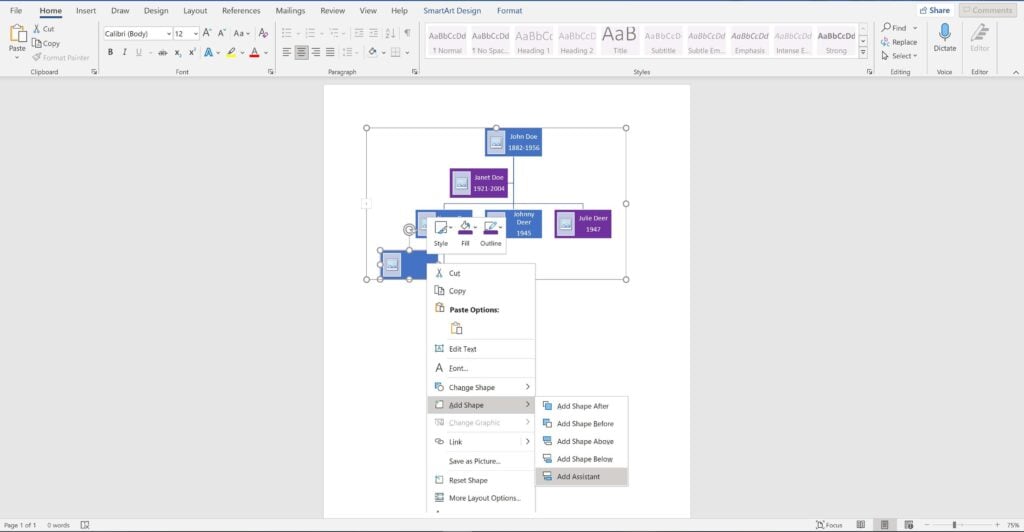
You can also add shapes by right-clicking an empty space inside a shape to open a menu.
Click on Add Shape Below or Add Shape After to add a suitable shape.

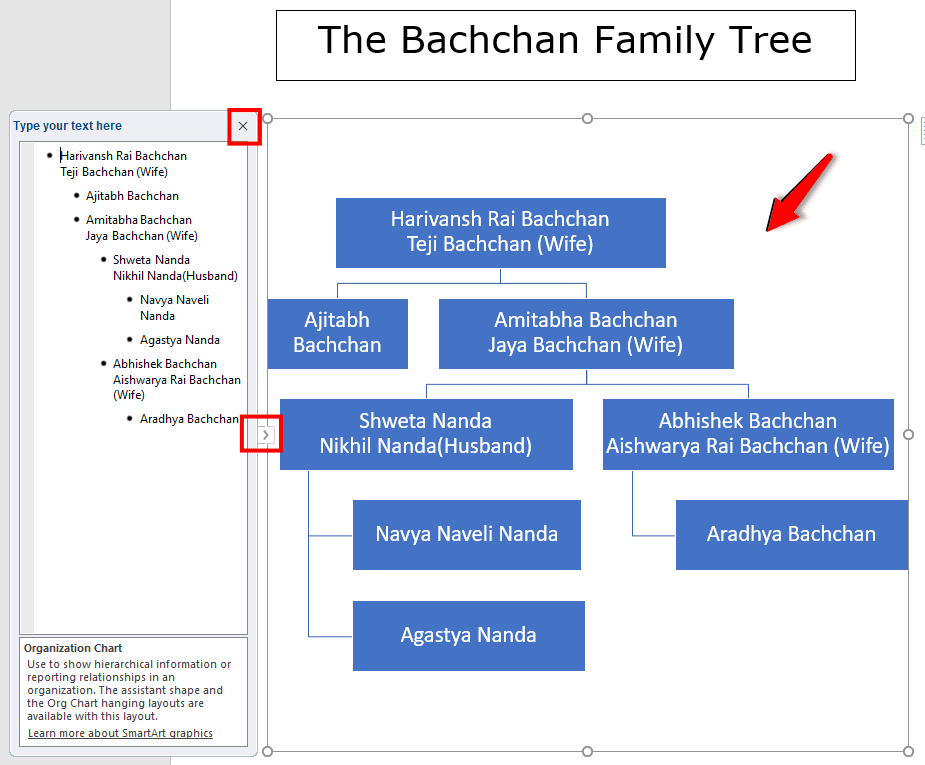
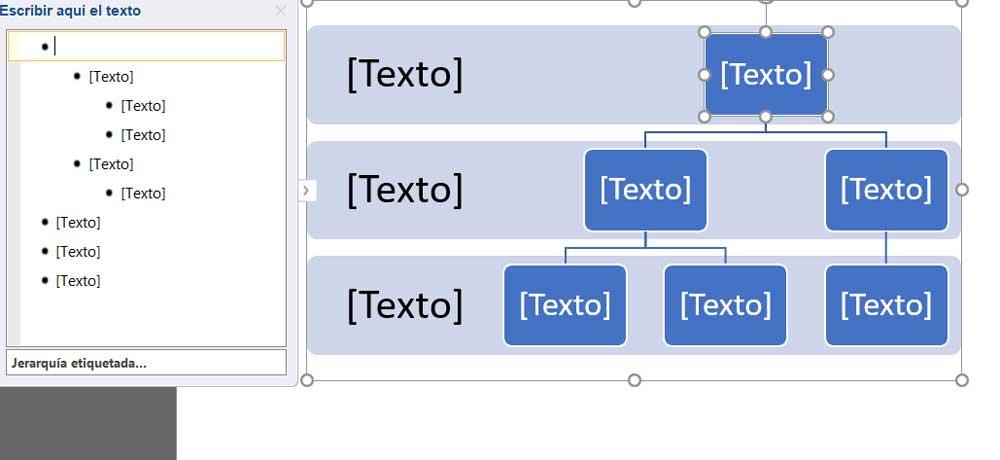
Step #5: Edit the Text in the Graphic
Replace the “Text” with your required text in the open window on the left.
Text in the graphics will change accordingly.

Repeat for all shapes in the graphic.
Note: You may have to change the shapes’ sizes to accommodate your text.
Step #6: Close the Text Editing Box
Click on the X on top of the ‘Type your text here’ box to close it.
To reopen and close the text editing box, click the graphic and click the arrow to the extreme left of your graphic.
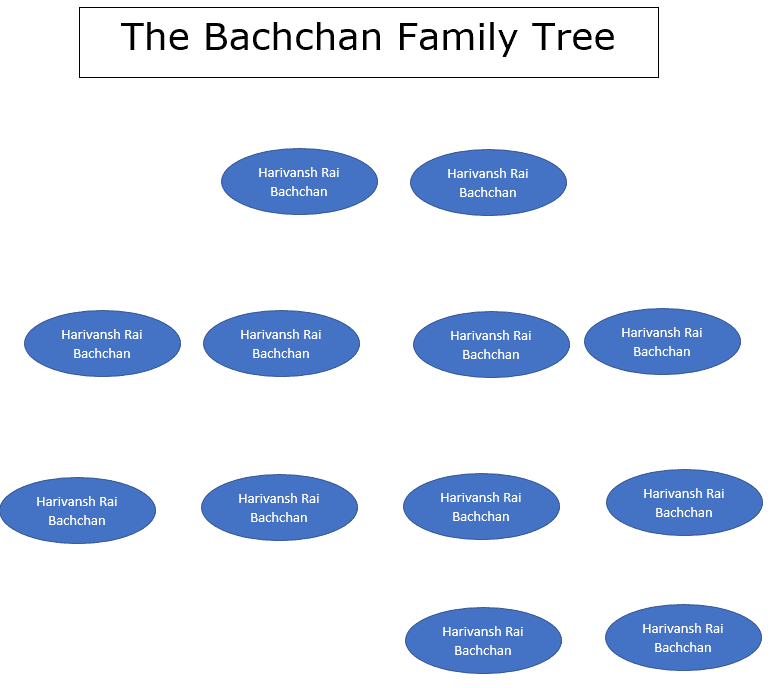
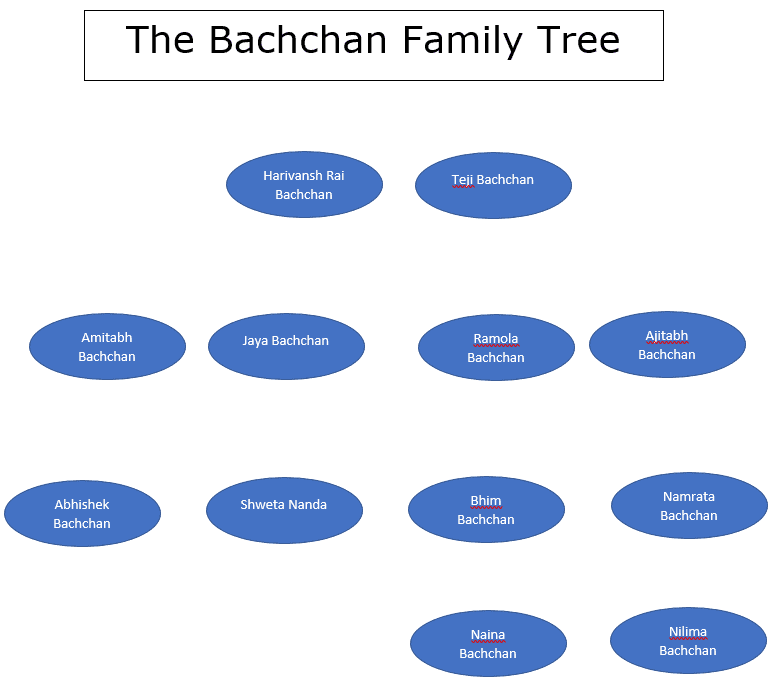
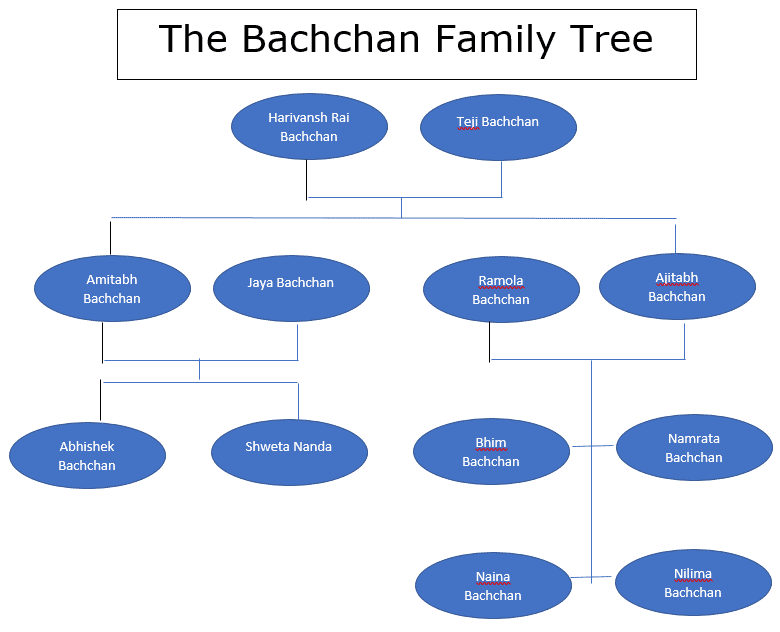
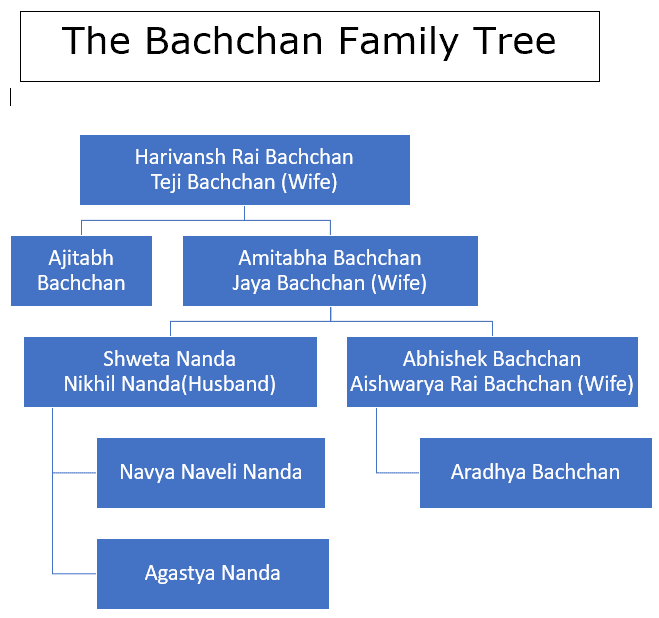
The family tree now looks like this:
Conclusion
We have shown you two methods of creating a family tree. Both methods allow you plenty of flexibility to create the family tree that best suits your requirements.
Содержание
- 1 Как сделать генеалогическое древо своими руками
- 1.1 С чего начать
- 1.2 Поиск информации о родственниках
- 1.3 Какие бывают виды генеалогического древа
- 1.4 Как можно оформить родословное дерево
- 1.4.1 Семейная шкатулка
- 1.4.2 Родовое дерево из подручных материалов
- 1.4.3 Генеалогическое древо в альбоме
- 1.4.4 Декоративная подставка с фоторамками
- 1.5 Как работать с шаблоном генеалогического древа
- 1.6 Заполнение шаблона в Movavi Фоторедакторе
- 1.7 Метод 1 Создание генеалогического древа на основе шаблона
- 1.8 Метод 2 Создание древа с помощью SmartArt (в Excel 2007 и более новых версиях)
- 1.9 Метод 3 Создание генеалогического древа в книге Excel
- 2 Советы
- 2.1 Family Tree Builder
- 2.2 GenoPro
- 2.3 RootsMagic Essentials
- 2.4 Gramps
- 2.5 GenealogyJ
- 2.6 Древо Жизни
- 2.7 Помогла ли вам эта статья?

Хотите провести исследование и узнать об истоках своей семьи? Задали построить генеалогическое древо в рамках составления портфолио для школы? Или подумываете создать семейное древо своими руками, чтобы порадовать близких?
В нашей статье вы найдете не только советы по поиску информации о предках, но и различные варианты оформления древа. Мы также подготовили для вас два шаблона для заполнения генеалогического древа: для детей и для взрослых.
Как сделать генеалогическое древо своими руками
С чего начать

Прежде чем начать работу, вы должны определить для себя, зачем все это нужно. От вашего ответа зависит ход проекта – будет ли это глубокое исследование, или вы просто поделитесь с детьми еще живыми в памяти историями о своих родителях, бабушках и дедушках.
Четко поставленная цель поможет вам быстрее достичь конечного результата.
Продумайте план, разбейте его на мелкие этапы – так вы сможете легко отслеживать прогресс, что, в свою очередь, добавит еще больше мотивации и положительных эмоций.
Поиск информации о родственниках
Как только вы решили, насколько далеко в историю вы хотите углубиться, наступает самый загадочный этап – сбор сведений о современных родственниках и далеких предках. Вы наверняка узнаете много смешных и трогательных историй, найдете дальнюю родню, разбросанную по всему миру и, может, даже раскроете некую семейную тайну. Чтобы найти как можно больше информации о том, как составить генеалогическое древо семьи, воспользуйтесь следующими способами:
- Опрос близких
Начните поиски с опросов ближайших родственников. Организуйте семейные посиделки за чаем с бабушками и дедушками – они будут рады поделиться ценными воспоминаниями. Устройте видеоконференцию с теми, кто живет в других городах и странах, или просто напишите им в соцсетях или по почте.
- Разбор семейного архива
Тщательно изучите все документы, письма и дневники, которые сохранились в вашей семье. В свидетельствах о рождении, браке и смерти, паспортах, трудовых книжках и дипломах вы найдете ответы на ключевые моменты, важные для родословной. Эти записи помогут восстановить информацию, которую не смогли вспомнить близкие. Просмотрите старинные фотографии: возможно, бабуля забыла рассказать о ее троюродном деде. И уже на этом этапе вы можете выбрать фотокарточки для вашего родословного дерева.
- Поиски в интернете
Посмотрите различные генеалогические сайты и смежные ресурсы с исторической информацией. Так, сайт «Подвиг народа» предоставляет открытый доступ к архивным документам о подвигах и наградах всех солдат Великой Отечественной войны 1941–1945 гг.
Зарегистрируйтесь на нескольких тематических форумах. Например, на форуме «Всероссийское генеалогическое древо» есть возможность поиска определенного человека по фамилии, регионам и странам.
Попробуйте найти дальних родственников вашего поколения в Одноклассниках или ВКонтакте. Но не забывайте, что в правильном генеалогическом исследовании любая информация должна подтверждаться архивными справками.
- Сбор сведений в ЗАГСах и архивах
Если вы ищете информацию о заключении брака, датах рождения или смерти, обращайтесь в органы ЗАГСа. Если родственник имеет какое-то отношение к армии, например, является ветераном ВОВ, делайте запрос в военкомат по месту жительства, службы или призыва. Но имейте в виду: чтобы получить свидетельства умерших родственников, необходимо доказать свое родство с ними, предоставив среди прочего ваше свидетельство о рождении.
При генеалогическом поиске в архивах не стоит надеяться на быстрый результат. Процесс может растянуться на месяцы и даже годы. Зато информация, которую вы найдете, может значительно продвинуть ваше исследование.
- Обращение к специалистам
Если вы не хотите тратить время на построение генеалогического древа, обратитесь к профессионалам. Сотрудники архивов, дизайнеры и специальные компании помогут найти нужную информацию и составить семейное древо. Кроме того, с их помощью вы сможете создать родословную книгу, фильм-презентацию и даже фамильный герб.
Какие бывают виды генеалогического древа
Существует несколько методов составления древа.
- Нисходящее древо
Схема семьи формируется от предка к потомкам. Такой способ оформления позволяет наглядно проследить историю рода с отдаленных времен до наших дней.

- Восходящее древо
Составляется от человека к его предкам. Такая структура будет особенно удобна тем, кто еще не завершил поиски сведений и последовательно идет от известного к неизвестному.

- Круговая таблица
Строится по кругу, в центре которого размещается один из потомков. Второй, внешний, круг делят пополам и записывают в нем мать и отца. В третьем круге, разрезанном на четыре части, указывают бабушек и дедушек. Затем добавляется четвертый круг, который делится на восемь частей, и т.д. Такой вид древа встречается довольно редко, однако подобное расположение данных – самое компактное из существующих.

Как можно оформить родословное дерево
- Генеалогическое древо на компьютере
Программы для создания генеалогического древа помогут сэкономить время и получить гарантированный результат. Воспользуйтесь онлайн-сервисом MyHeritage или программами GenoPro, Family Tree Builder или Древо Жизни. Выберите шаблон, введите данные по вашей родословной и наслаждайтесь результатом.
Вы также можете найти или самостоятельно нарисовать пустое древо для заполнения в формате .doc (для программы Word) или .psd (для Photoshop).
- Генеалогическое древо своими руками
Подойдите творчески к оформлению результатов родословного дерева. Мы подобрали для вас несколько примеров для вдохновения:
Семейная шкатулка
Для каждого предка заводится шкатулка или выделяется одна ячейка, в которую помещаются документы, фото, предметы. Открыв такую шкатулку, можно прикоснуться к прошлому и узнать, каким человеком был ваш предок.

Родовое дерево из подручных материалов
Такой вариант оформления отлично подойдет для проекта в садик или школу.

Генеалогическое древо в альбоме

Декоративная подставка с фоторамками

Как работать с шаблоном генеалогического древа
Мы подготовили два шаблона, которые понравятся и детям, и взрослым.
Открыть шаблон древа для взрослых
Открыть шаблон древа для детей
С шаблонами можно работать как в электронном виде, так и в печатном:
- Распечатайте пустой шаблон и добавьте туда рисунки или фотографии себя и своих предков.
- Воспользуйтесь любым графическим редактором и вставьте отсканированные снимки в шаблон. Распечатайте полученный результат.
Заполнение шаблона в Movavi Фоторедакторе
В программе Movavi Фоторедактор вы сможете не только редактировать снимки и вставлять их в шаблон, но и реставрировать старые фотографии.
Посмотрите наш образец заполнения шаблона, чтобы узнать, как правильно составить родословное дерево.
- Запустите программу Movavi Фоторедактор.
- Если вы хотите отреставрировать фотографию, потерявшую вид от старости, откройте изображение в программе, перейдите во вкладку Реставрация и нажмите кнопку Реставрировать в правой части экрана.
- Чтобы настроить цвета и четкость, перейдите во вкладку Улучшение фото. Измените необходимые параметры. Сохраните полученный результат.
- Чтобы добавить снимок в шаблон, нажмите Файл –>Открыть и выберите скачанный шаблон для заполнения. Затем перейдите во вкладку Вставка картинки, нажмите Вставить изображение и откройте нужную фотографию. Чтобы изменить размер вставленного снимка, потяните за углы пунктирной рамки. Поверните фото при помощи кнопки с изображением стрелок. Если вы довольны результатом, нажмите Применить.
- Как только вы вставили все изображения, нажмите Сохранить в правом нижнем углу программы.
Метод 1 Создание генеалогического древа на основе шаблона
-

Создайте новый документ из шаблона. Нажмите на кнопку Файл и выберите опцию Создать из шаблона, если она присутствует. В некоторых версиях Excel необходимо нажать кнопку Файл и выбрать опцию Создать, после чего появится панель, в которой можно будет выбрать шаблоны.
- Поищите шаблон генеалогического древа.
Шаблон генеалогического древа не предустановлен в программе, поэтому вам потребуется доступ к интернету, чтобы найти его. Введите в поисковое поле фразу «генеалогическое древо», чтобы изучить варианты, доступные для бесплатного скачивания. Если в программе вы не видите поискового поля, поищите его под надписью «Microsoft Office Online», «Office.com», «Шаблоны в сети» (в зависимости от версии Excel).
Перейдите к категории шаблонов «Личные», а затем поищите здесь шаблон генеалогического древа.
- Если вы пользуетесь Excel 2007 или более старыми версиями программы, у вас не будет такой категории шаблонов. В таком случае в сети можно поискать неофициальные шаблоны или просто перейти к другим методам создания генеалогического древа, которые указаны ниже.
- Попробуйте воспользоваться базовым шаблоном генеалогического древа.
Выберите шаблон с названием «Генеалогическое древо», в котором использованы ячейки зеленых оттенков для указания сведений о ваших родственниках. В данном шаблоне есть место для вас лично и еще для четырех поколений ваших предков. Он отлично подойдет для школьного проекта, но не для углубленного генеалогического исследования. Чтобы воспользоваться им, просто выделяйте соответствующие зеленые ячейки и вводите имена ваших родственников.
- Чтобы добавить ячейки для ваших братьев и сестер, скопируйте «свою» ячейку в другую пустую ячейку в той же колонке, чтобы придать ей такой же цвет и формат. Аналогичным образом можно скопировать ячейки родителей, чтобы создать ячейки такого же цвета и формата и занести в них сведения о своих тетях и дядях.
- Создайте более информативное генеалогическое древо.
Если вы работаете над более углубленным генеалогическим проектом, попробуйте использовать второй вариант шаблона генеалогического древа с разноцветными ячейками. Он создан с использованием опций SmartArt, которые появились в программе, начиная с версии Excel 2007 и выше.
Здесь все также можно заполнить ячейки с именами родственников, но еще присутствуют и дополнительные возможности.
- Кликните по области с надписью «Сведения». Откроется отдельный лист с информацией о соответствующей семейной паре. Так у вас появится возможность отредактировать генеалогическое древо через простой и компактный список сведений. В данном шаблоне на отдельных листах можно ввести сведения о пяти поколениях ваших родственников, после чего информация на главном листе с генеалогическим древом обновится автоматически.
- При необходимости в шаблон можно добавить новый лист (по кнопке + внизу страницы) для сведений о других родственниках, которых также требуется включить в генеалогическое древо. В таком случае вам потребуется вручную настроить формат нового листа и дополнительных ячеек фамильного дерева, а также создать перекрестные ссылки в ячейках со сведениями.

 Поищите шаблон генеалогического древа.
 Попробуйте воспользоваться базовым шаблоном генеалогического древа.
 Создайте более информативное генеалогическое древо.
Метод 2 Создание древа с помощью SmartArt (в Excel 2007 и более новых версиях)
- Нажмите на кнопку SmartArt на панели инструментов вкладки «Вставка».
В современных версиях Excel присутствует опция «SmartArt», которая позволяет создавать более привлекательные схемы. Нажмите на кнопку «SmartArt», которая расположена в группе кнопок «Иллюстрации» вкладки «Вставка».
- В зависимости от используемой версии Excel, данная кнопка может сразу отображаться на панели инструментов, а может быть скрыта в раскрывающемся списке.
-
Создайте иерархию. Теперь, когда перед вами открылось окошко с опциями SmartArt, выберите на его левой панели раздел «Иерархия». Затем выберите стиль иерархии, который вам больше нравится и на листе появится соответствующая схема.
- Заполните схему данными своего генеалогического древа.
Созданную вами схему можно двигать и увеличивать, как любой другой объект в Excel. Кликните по каждому элементу схемы, чтобы ввести в него данные вашего генеалогического древа.
- Как вариант, чтобы отредактировать генеалогическое древо, используйте текстовую панель, которая появится, когда вы выберете подходящую вам схему. Любые изменения в текстовой панели будут моментально отражаться во внешнем виде схемы.
 Нажмите на кнопку SmartArt на панели инструментов вкладки «Вставка».

 Заполните схему данными своего генеалогического древа.
Метод 3 Создание генеалогического древа в книге Excel
-
Выберите фигуру для вставки. Сначала создайте новую книгу Excel. Затем выберите в меню вкладку Вставка и нажмите на кнопку Фигура в группе кнопок «Иллюстрации». Выберите прямоугольник, овал или любую другую фигуру.
- Нарисуйте фигуру на странице.
Кликните мышью на листе и растяните выбранную фигуру, чтобы «нарисовать» ее. Чтобы получить идеальный круг или квадрат, удерживайте клавишу
⇧ Shift
, когда рисуете фигуру.
-
Введите в фигуру информацию о себе. Кликните по фигуре, которая будет располагаться в основании вашего древа и запишите в нее свое имя. Отредактируйте размер шрифта, его цвет и прочие настройки фигуры, прежде чем переходить к следующему шагу.
-
Скопируйте и вставьте отредактированную фигуру, чтобы создать дополнительные ячейки генеалогического древа. Выделите ранее нарисованную фигуру и скопируйте ее клавишами ^ Ctrl+C (или ⌘ Cmd+C в Mac). Вставьте столько копий, сколько понадобится, повторными нажатиями комбинации клавиш ^ Ctrl+V.
-
Расположите фигуры так, чтобы получилось генеалогическое древо. Выделите и перетащите каждую ячейку, чтобы схематически расположить все ячейки в виде генеалогического древа. Обычно фигуру с вашим именем располагают в основании, над ней ставят еще две фигуры для ваших родителей, выше еще по две фигуры для каждого из них и так далее. Кликните по каждой из фигур и внесите в них данные об именах ваших родственников.
-
Вставьте соединительные линии. Вернитесь к вставке фигур и выберите там зигзагообразную соединительную линию. Кликнете по исходной точке и растяните линию до конечной точки, чтобы соединить между собой две фигуры с именами (родителей). Как и ранее, линию можно скопировать, чтобы потом переместить копии и соединить парами остальные фигуры.
-
Внесите в генеалогическое древо дополнительные сведения. Если захотите, в генеалогическое древо под каждым именем можно внести дни рождения, годы жизни или иные примечания. Это можно сделать как в той же самой фигуре с именем, так и в ячейках, расположенных ниже этой фигуры (для этого кликните по соответствующей ячейке и введите необходимую информацию).

 Нарисуйте фигуру на странице.


Советы
- В PowerPoint также есть бесплатный шаблон генеалогического древа
Информация о статье
Эту страницу просматривали 10 817 раза.
Была ли эта статья полезной?
Некоторым людям нравится погружаться в историю собственной семьи, отыскивать информацию о своих предках. Потом эти данные можно использовать для составления генеалогического древа. Лучше всего начинать это делать в специальной программе, функционал которой и сосредоточен на подобном процессе. В этой статье мы разберем самых популярных представителей подобного софта и детально рассмотрим их возможности.
Family Tree Builder
Распространяется данная программа бесплатно, но присутствует премиум доступ, который стоит небольших денег. Он открывает набор дополнительных функций, но и без него Family Tree Builder можно комфортно использовать. Отдельно стоит отметить красивые иллюстрации и оформление интерфейса. Визуальная составляющая часто играет большую роль при выборе софта.
Программа предоставляет пользователю список шаблонов с оформлением генеалогических деревьев. К каждому добавлено краткое описание и характеристика. Еще присутствует возможность подключения к интернет-картам для создания меток важных мест, в которых происходили определенные события с членами семьи. Family Tree Builder можно скачать с официального сайта.
Скачать Family Tree Builder
GenoPro
GenoPro включает в себя множество различных функций, таблиц, графиков и форм, которые помогут в составлении генеалогического древа. Пользователю остается только заполнить необходимые строки информацией, а программа сама все систематизирует и рассортирует в оптимальном порядке.
Здесь нет шаблонов по составлению проекта, а дерево отображается схематически с помощью линий и знаков. В отдельном меню доступно редактирование каждого обозначения, также это можно сделать при добавлении персоны. Немного неудобным является расположение панели инструментов. Значки слишком маленькие и свалены в одну кучу, но к этому быстро привыкаешь во время работы.
Скачать GenoPro
RootsMagic Essentials
Стоит отметить, что данный представитель не оснащен русским языком интерфейса, поэтому пользователям без знаний английского будет сложно даваться заполнение форм и различных таблиц. В остальном же эта программа отлично подходит для составления генеалогического древа. В ее функционал входит: возможность добавления и редактирования персоны, создание карты с семейными связями, добавление тематических фактов и просмотр автоматически созданных таблиц.
Кроме этого пользователь может загружать фотографии и различные архивы, которые связаны с определенной персоной или семьей. Не переживайте, если информации получилось слишком много и поиск по древу уже осуществляется тяжело, ведь есть для этого специальное окно, в котором все данные рассортированы.
Скачать RootsMagc Essentials
Gramps
Данная программа оснащена тем же набором функций, что и все предыдущие представители. В ней вы сможете: добавлять персон, семьи, редактировать их, создавать генеалогическое древо. Помимо этого доступно добавление различных важных мест на карту, событий и другого.
Скачать Gramps можно совершенно бесплатно с официального сайта. Обновления выходят часто и постоянно добавляются различные инструменты для работы с проектом. На данный момент ведется тестирование новой версии, в которой разработчики подготовили много интересного.
Скачать Gramps
GenealogyJ
GenealogyJ предлагает пользователю то, чего нет в другом подобном софте – создание подробных графиков и отчетов в двух вариантах. Это может быть графическое отображение, в виде диаграммы, например, или текстовое, которое сразу же доступно для печати. Подобные функции пригодятся для ознакомления с датами рождений членов семьи, средним возрастом и так далее.
В остальном же все остается по стандарту. Вы можете добавить персон, редактировать их, составлять древо и выводить таблицы. Отдельно еще хочется заметить временную шкалу, на которой отображаются в хронологическом порядке все события, внесенные в проект.
Скачать GenealogyJ
Древо Жизни
Эта программа была создана русскими разработчиками, соответственно, присутствует полностью русифицированный интерфейс. Отличается Древо Жизни детальной настройкой древа и других полезных параметров, которые могут пригодиться во время работы над проектом. Кроме всего присутствует добавление рода, если дерево будет идти до того поколения, когда такое еще существовало.
Еще советуем обратить внимание на грамотную реализацию сортировки и систематизации данных, что позволяет мгновенно получать различные таблицы и отчеты. Программа распространяется платно, но пробная версия ничем не ограничена, и вы можете скачать ее, чтобы протестировать весь функционал и определиться с покупкой.
Скачать Древо Жизни
Читайте также: Создаем генеалогическое древо в Фотошопе
Это не все представители подобного софта, но самые популярные включены в список. Мы не советуем какой-то один вариант, а рекомендуем ознакомиться со всеми программами, чтобы определиться, какая из них будет идеально подходит под ваши запросы и нужды. Даже если она распространяется платно, все равно можно скачать триал-версию и пощупать программу со всех сторон.
Мы рады, что смогли помочь Вам в решении проблемы.
Задайте свой вопрос в комментариях, подробно расписав суть проблемы. Наши специалисты постараются ответить максимально быстро.
Помогла ли вам эта статья?
Да Нет
A family tree is a descriptive diagram that represents family relationships in the form of a chart. It is useful for establishing lineages in a traditional tree format that is easy to understand, even for children. Creating a family tree in Microsoft Word can be a great way to kickstart your journey in genealogy. The powerful diagramming tools and hierarchical approach of Word make these trees perfect for beginners. Read on to know about the steps that can help you make a family tree in word.
Step 1: Select the Blank Document
- Open the ‘Microsoft Word’ application on your computer.
- If you are using the latest Microsoft Office, you will be given many different options. Choose “Blank Document” to begin.
- If you are using a version older than Word 2013, click the Office/File button on the top-left corner and click “New”. Select the option of “Blank Document”.
Step 2: Select the SmartArt Option
The basic structure of the family tree will be made by using this special tool in the Word.
- Click the “Insert” tab on the main menu.
- Select the “SmartArt” option. This will open a dialogue box with several different options to make your family tree.
Step 3: Select the Hierarchy Option
- Click the “Hierarchy” tab on the left-hand menu. This will give you some hierarchical charts to choose from.
- Select the option of “Picture Organizational Chart”. The structure of this chart is quite similar to that of a family tree.
- Click “OK” to insert the chart on the blank document.
Step 4: Enter the Names of Family Members
The inserted family tree will have three generations. You can take them as your grandparents, parents, and yourself.
- Click the topmost box and enter the name of your grandfather.
- Then, click the box underneath the top box and type in the name of your father.
- Now, move to the box representing 3rd generation and enter your name.
Step 5: Add New Family Members

For adding a new box, you need to select a box that is already there at that level. For example, if you want to add a box for your mother, you will have to select the box of your father.
- Select the box representing the father in the family.
- Click on the “Add Shape” button on the top left of the screen. This will add the new box to the tree.
- Click on the new box and type in the name of your mother.
Step 6: Add Details of Family Members

It is incredibly easy to add information, like birthday and place of birth, to your family tree in Microsoft Word.
- Click the family member for which you want to add the information.
- Type the new details and the Word will keep adjusting the font on its own.
- If this doesn’t happen, select the newly-added information, click the Home tab on the main menu, and reduce the font.
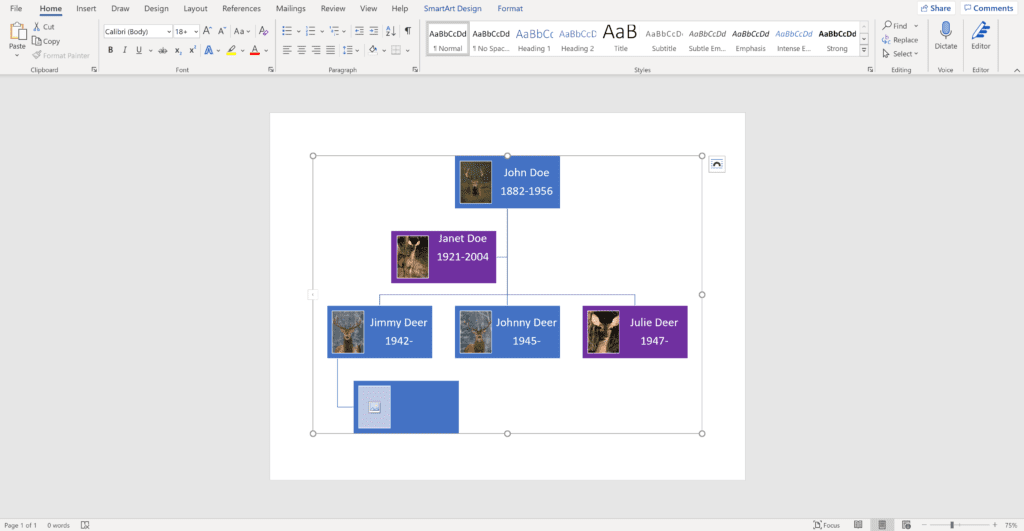
Step 7: Add Pictures of Family Members
This is a really fun addition to any family tree and will enhance its visual appearance.
- Click the image icon on a family member and wait for the dialogue box to appear.
- Select the option of “From a File” in the dialogue box.
- Navigate through your computer’s data to find the picture of your choice and select it.
- Click “OK” to add an image to your family tree.
Step 8: Use Colors to Represent Gender

Using different colors for different genders can be an excellent way to increase the readability of your family tree.
- Select and right-click the box of a family member.
- Click the “Fill” option on the menu that appears.
- Choose the color of your choice and bring a new dimension to the tree.
Step 9: Add New Generations
- Select the family member on the chart from where you want to add a new generation.
- Click on the “Add Shape” drop-down menu on the top left of the screen.
- Select the option of “Add Assistant” from the menu. This will create a new level in the family tree.
Step 10: Change Orientation to Landscape
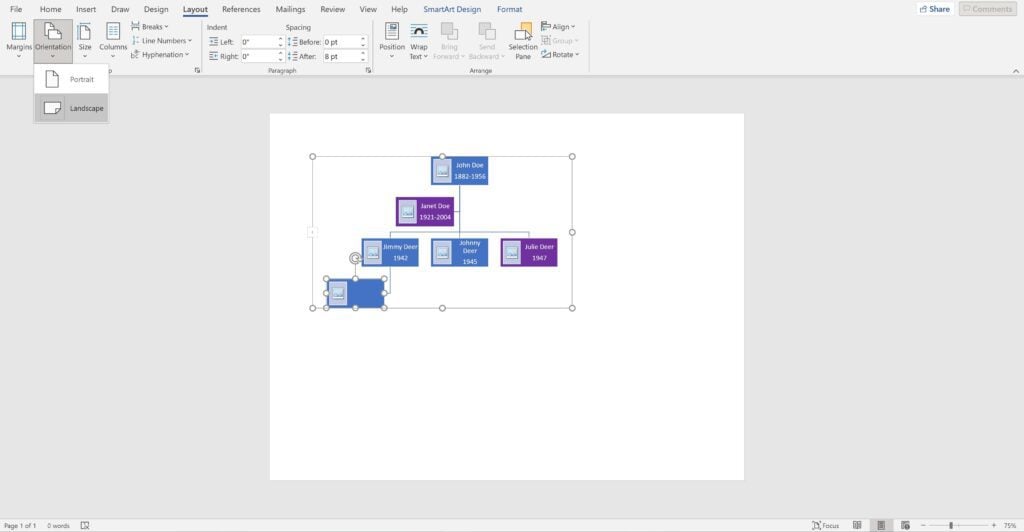
When the family tree starts growing, it can be difficult to see it (completely) in standard settings. Therefore, you will need to make some changes to the layout.
- Select the “Layout (or Page Layout)” from the main menu.
- Click “Orientation” and a drop-down menu will appear.
- Change the orientation from “Portrait” to “Landscape”.
Step 11: Adjust the Size of the Family Tree
It is important to change the size of your tree if it’s going beyond the layout of the page. This method allows you to do this on the go.
- Select the family tree.
- Click on any of its corners and drag the entire tree outwards or inwards. This will trigger the Word to automatically adjust the family tree according to the new height.
Step 12: Save the Family Tree
Once your family tree is complete, don’t forget to save it or all your hard work will be wasted.
- Click the Office/File button top-left corner to open a drop-down menu.
- Click “Save” from the menu to save the document. Alternatively, you can press “Ctrl+s” for this purpose.
The Legal Stuff
Please keep in mind that when you click our links and make purchases, we may receive a small commissions. This does not impact our reviews and comparisons as I try my best to keep things fair and balanced, in order to help you make the best choice for you.
If you belong to the group of people who want to know how to make a family tree in Word, then the following post will be of interest to you. In it you will learn how to perform this function and be able to count on this program for such work, you are invited to take the time necessary to clarify your doubts and learn how to do it in case you do not know.

Drawing up the family tree in Word
Making this tree in Word is not complicated at all for those who have this program on their computers. With Word you can do very well using its tools to describe both the links between relatives and the names of each of them, all this is achieved with good precision and in a way that everything looks very visual, for this there are some tools of the mentioned program that will allow you to do this task.
To start the task of how to make a family tree in Word, you must initially have the information you need to make a good layout of your tree, you must start with the capture of all the ideas in a small document, Microsoft Word is the best alternative to illustrate the past of a family in the fastest and easiest way. Since this program is being named, you might be interested to know How to make an index in Word and thus know a little more.
The steps to follow to create a family tree in Word
1. It is important to start with the clarity of the information that is available, having a design for it is something that will guarantee success in this task and in the preparation of any other type of document. You should have everything you need on hand and it is also recommended to make a quick sketch in advance so that you can make the tree much better.
2. Open the Word program and go to the insert option. This is located exactly in the upper bar in tab number 3. Once you have located it, press a click and a set of options will appear immediately. The one you should use is the one that says “Smart Art”.

3. Immediately when you see the diagram, you must choose the option called «Hierarchy», just as you do so you will see that a set of boxes appear that are organized in the form of a pyramid.

4. The options used to organize all this data are a few. The family tree can be given a format based on squares or circles and these can be horizontal or vertical. All these details should go hand in hand with that information that you have right at the time of starting the development of it and this should be as accurate as possible.
5. When you are going to edit the text, a panel will immediately appear in which you can draw different lines. They could go down or up according to the people who join the tree. They can be relatives who have the same origins and then the lineages are separated to expand the saga of each family.
6. The genealogical tree that is made in Word does not have a design that makes it very long, you only need to place a design on the page which must be horizontal and if you want to incorporate much more information or also want them to be added more pages can be made so that all names are related as they should be.
By following these steps you will learn how to make a family tree in Word and you will be able to give it away on certain occasions, be they births, marriages or other family occasions.


A Family Tree in Word.
Contents
- How to Create a Family Tree in Word
- Step 1: Open a New Page in Word
- Step 2: Enter the Relevant Data
- Step 3: Build the Family Tree
- Step 4: Add Visual Details
- Step 5: Save and Export
- How to make a family tree in Word?
- How to make a family tree template?
How to Create a Family Tree in Word
Genealogy refers to the way a family is related to each other. One of the best ways to document these types of relationships and keep track of family history is by using a Family Tree. Below you will find a simple step-by-step to create one with Word.
Step 1: Open a New Page in Word
Once Word is open, it opens to a blank page. This is the base where you will build the Family Tree.

Step 2: Enter the Relevant Data
Add the names of family members, their date of birth, and their relationships. You may decide to add other details such as place of birth and date of death, if you know them.
Step 3: Build the Family Tree
Now is the time to shape the data and create a family tree. To do it:

- save lines between the names so that they conform the structure of the tree.
- add arrows to link each pair of nodes.
- add circles as boxes where to locate each name of the tree.
Step 4: Add Visual Details
If you want to provide more information or decorate the tree, add some visual details. Add colors, shading, images, borders, etc.
Step 5: Save and Export
After you’ve finished your family tree, save it in the format you want. Saving it as a PDF will allow you to easily share it with someone.

How to make a family tree in Word?
How to make a family tree in Word – YouTube
Step 1: Open a Microsoft Word document.
Step 2: Choose a family tree template. Templates are found in the Default Templates section by clicking File>New.
Step 3: Once you’ve chosen a family tree template, you can add family names to fill it out by clicking on the default names.
Step 4: Add additional details, such as last names, dates of birth, and relationships, by right-clicking on the tree and selecting the “Add Details” option.
Step 5 – Use the buttons at the bottom of the window to change the style of the tree. You can choose from different shapes, styles, and sizes.

Step 6 – Use the toolbar to format the tree, such as changing colors, font size, aligning names, etc.
Step 7: Save the family tree in .doc format. Click File -> Save As -> and choose the desired format. Your family tree has been saved successfully. Now you can share it with family and friends!
How to make a family tree template?
How to make a family tree step by step Maintain clarity and order, White space is your friend, Opt for easy-to-read fonts, Use the minimum necessary elements, Choose harmonious colors, but sufficiently contrasting, Add details (photographs, etc.) ) to customize it, Study the structure of your family tree before you begin.
Step 1: Choose the type of family tree:
You must choose between a tree in a Straight line, a tree in an Ascending line or a tree in Route. The Straight Line Tree will show all family members in a direct line of the person at the bottom of the tree. The ascending tree will do the same thing, except that it will display all members in an upline line from the person at the bottom of the tree. The online tree in Path will show direct line family members as well as upline members.
Step 2: Gather the information:
Now is the time to collect as much information as possible about your ancestors. This may include some data such as dates of birth, dates of death, place of birth, place of death, etc.
Step 3: Design the scheme:
It’s time to design the family tree. To do this, first draw a vertical line from the top of a blank piece of paper to represent the person at the base of the tree. Then, add horizontal lines each time a family member’s details are added, labeling each line with a name. Finally, add date and place labels where necessary.

Step 4: Include custom details:
Now that you have the basic outline of the family tree, you can now customize it with some details. You can add photos, colors or even the history of family members to help tell the best story.
Step 5: Printing and sharing the family tree:
Once you’ve finished designing your family tree, it’s time to print it out and share it with the family. This can be done in person or by sending a copy by email. You can also post your family tree online for everyone to see.
И это то, что те из вас, кто несколько раз садился перед этим приложением, наверняка знают обо всем, что оно нам предлагает. Это не только будет полезно при создании слов, строк и абзацев текста, но и пойдет гораздо дальше. Одной из основных причин всего этого является огромная поддержка, которую мы имеем для добавления объектов всех видов. Таким образом, у нас будет возможность вставить изображения , видео, таблицы , графики и другие графические элементы к нашим документам здесь.

Это открывает широкие возможности для получения максимальной отдачи от Microsoft «s Word . Кроме того, это позволяет нам создавать более сложные документы, как в случае, который касается нас в этих строках. Как мы упоминали ранее, мы собираемся показать вам два способа создания персонализированного генеалогического древа в Microsoft. Текстовый редактор . Один из них использует элементы, включенные в саму программу, а другой — внешний объект.
Создайте генеалогическое древо в Word с помощью SmartArt
В основном из-за морфологии, которую предлагает нам этот тип дерева, мы собираемся использовать ряд предопределенных объектов в текстовом редакторе. Этим мы хотим сказать вам, что составить генеалогическое древо которую мы ищем здесь, мы собираемся использовать функцию, называемую SmartArt Word. Это элемент, который мы находим в меню «Вставка» основного интерфейса приложения и который предоставляет в наше распоряжение несколько дизайнов в виде организационной диаграммы.
Полезность этих графических элементов велика, но теперь, в отношении их морфологии, это идеальное решение для создания этого генеалогического дерева, которое нас интересует в этих линиях. Нам нужно только нажать на кнопку, соответствующую функция, чтобы увидеть различные дизайны что мы можем использовать.
Из-за специфического аспекта этих генеалогических деревьев, которые мы комментируем, возможно, типы SmartArt, которые нас больше всего интересуют, — это те, которые мы находим в Списки и иерархия разделы. В то же время мы должны учитывать, что после того, как мы выбрали дизайн в программе, у нас есть множество параметров для настройки их. Это, очевидно, позволит нам определить его содержимое, а также размер каждого из элементов ветки или его цвет.
Все это позволит нам добиться ярких проектов в виде генеалогического древа, имея лишь немного терпения и минимальные знания текстового редактора Word.
Создание генеалогических деревьев с помощью шаблонов
Но это не единственное решение, которое мы можем использовать для достижения цели, которую мы ищем. В Интернете мы можем найти шаблоны для редактора Word с которым можно выполнять все виды личных проектов. Они представляют нам серию предопределенных дизайнов этой конкретной темы, чтобы мы могли персонализировать их и добавить свои данные. Мы говорим вам это, потому что мы можем найти некоторые шаблоны, специально разработанные для нас, чтобы создать собственное генеалогическое древо .
Наглядный пример всего этого можно найти по этой ссылке шаблоны для ворд . Здесь мы находим ряд элементов этого типа, из которых можно выбрать, чтобы получить искомый результат.
If you want to create a family tree, you can use Microsoft Word. By using Word, you can choose to download a family tree template or you can use the hierarchy function to create a family tree from scratch. After you download the template or create the hierarchy, you will only need to enter your family information to complete the tree.
Open Microsoft Word and click the Office button located at the top, left-hand corner of the screen.
Click «New» when the Office menu opens. The «New Document» dialogue box will open; you can create a new document or template here.
- If you want to create a family tree, you can use Microsoft Word.
- The «New Document» dialogue box will open; you can create a new document or template here.
Enter «family tree» or «genealogy» in the search bar at the top of the «New Document» box. A list of family tree templates will open.
Click a template to preview a larger version of it. After you find a family tree template you want to use, click the «Download» button. The template will open in a new Word document.
Delete the sample information from the family tree and type your family information.
Click the Office button and select «Save As» after you finish entering your family information. Enter a name for your family tree and click «Save.»
- Click a template to preview a larger version of it.
- Click the Office button and select «Save As» after you finish entering your family information.
Open a new Word document and click the «Insert» tab located in the Word ribbon at the top of the page.
Look to the «Illustrations» section of the ribbon and click the «SmartArt» button. A dialogue box labelled «Create a SmartArt Graphic» will open.
Click the «Hierarchy» tab located in the left pane of the dialogue box and click one of the hierarchy types to insert. Any of the hierarchies will work for creating a family tree. Click «OK.»
Add boxes to the hierarchy so you can add extra family members. To add a box, right-click over the hierarchy and select «Add shape.» Select where you want to add the shape—before, after, left, right, below or above. Repeat this step to add additional boxes. If you need to delete a box, select the box and press «Delete.»
- Look to the «Illustrations» section of the ribbon and click the «SmartArt» button.
- To add a box, right-click over the hierarchy and select «Add shape.»
Enter the family names in the hierarchy. Highlight the sample text in the hierarchy and replace it with the name of a family member. Repeat this for each box until you have completed your family tree.