Click the “Title” button in the “Styles” group under the “Home” tab on the main menu ribbon to automatically apply a title style to your title text. Click the “Subtitle” button in the “Styles” group to automatically apply the recommended subtitle style to the selected text.
Contents
- 1 How do you create a title in Word?
- 2 How do I make a fancy title in Word?
- 3 Where is the title bar in Microsoft Word?
- 4 How do I add a title to a table of contents in Word?
- 5 How do you shade text in Word?
- 6 Where is the title bar in Windows 10?
- 7 What is the title bar in Word 2016?
- 8 What does title bar look like?
- 9 How do I insert a title style in a table of contents?
- 10 How do you make titles appear in table of contents?
- 11 Do you include title page in table of contents?
- 12 How do I use dictation in Word?
- 13 Is there a note taking template in Word?
- 14 How do I get rid of widow orphan control?
- 15 Where is the widow orphan control in Word?
- 16 How do you put a box around a border in Word?
- 17 How do I add a title bar?
- 18 Which toolbar is on the title bar?
- 19 How do I change my Windows title?
- 20 What is title bar in Word document?
How do you create a title in Word?
Inserting the Document Title in Your Document
- Position the insertion point where you want the title to appear.
- Display the Insert tab of the ribbon.
- Click the Quick Parts tool in the Text group and then choose Field.
- In the Categories list, choose Document Information.
- In the Field Names list choose Title.
How do I make a fancy title in Word?
Create a title style in Word to save time and mouse clicks
- Open a blank document and type Title.
- Select Title and click the Bold and Center buttons on the Formatting toolbar or Home tab.
- Change the font to 22 points.
- Click anywhere in your title text.
Where is the title bar in Microsoft Word?
We will start with the Title bar, which is located at the very top of the screen. On the Title bar, Microsoft Word displays the name of the document you are currently using.
How do I add a title to a table of contents in Word?
(3) To add a Heading to the Table of Contents, highlight the added heading on the document, and click on the correct “Heading” button ( e.i. Heading 1, or Heading 2, etc.) at the “Styles” Section from the “Home” Tab.
How do you shade text in Word?
Apply shading to words or paragraphs
- Select the word or paragraph that you want to apply shading to.
- On the Home tab, in the Paragraph group, click the arrow next to Shading.
- Under Theme Colors, click the color that you want to use to shade your selection.
Where is the title bar in Windows 10?
The title bar is at the top of every window in Windows 10. This includes three buttons at the top right corner of the window and a title for each open window. There are a number of ways you can customize the title bar with a few extra software packages and the options included in Windows 10.
What is the title bar in Word 2016?
name of current document
Title Bar: The title bar displays the name of current document. For the first time it is document when you saved your document the will display on the title bar. C. Sign in: Here you can use most of Microsoft word functionality.
What does title bar look like?
A title bar is a small strip that extends across the top of a window. It displays the title of the window and typically includes the close, minimize, and maximize buttons. In macOS, these buttons are on the left side of the title bar, while in Windows, they are on the right.
How do I insert a title style in a table of contents?
To verify that the Title style will now be added to the Table of Contents:
- Choose the References tab.
- Click Table of Contents.
- Choose Insert Table of Contents…
- Click the Options… button.
- Scroll through the Available styles: list to make sure that the Title style now shows up and that it has the desired TOC level.
How do you make titles appear in table of contents?
To customize your existing table of contents:
- Go to References > Table of Contents.
- Select Custom table of contents.
- Use the settings to show, hide, and align page numbers, add or change the tab leader, set formats, and specify how many levels of headings to show.
Do you include title page in table of contents?
The Table of Contents should appear after the title page in the document. To create the Table of Contents manually, start a new page right after the title page.The Table of Contents should be on its own page. Do not include the introduction or a dedication on the same page as the Table of Contents.
How do I use dictation in Word?
Dictate in Word For the Web
Open a document and click the Dictate icon on the Home Ribbon and dictate your text. When finished, click the icon again to turn off Dictation. To see other languages available for dictation, click the Down arrow next to the Dictate icon and choose the language you’d like to use.
Is there a note taking template in Word?
Organize your notetaking with this notes template in Word. With place for a title and bullet points, a Microsoft Word note taking template is perfect for lectures, important meetings or teleconferences, sales pitches, and more.
How do I get rid of widow orphan control?
How to Turn the Widow Orphan Control Setting On or Off in Microsoft Word
- Open a document in Word.
- Select everything with Ctrl + A.
- Click the Home tab.
- Click the Paragraph button.
- Select the Line and Page Breaks tab.
- Click Widow/orphan control to remove the checkmark.
- Click OK.
Where is the widow orphan control in Word?
Control widow and orphan lines
On the Format menu, click Paragraph, and then click the Line and Page Breaks tab. Select the Widow/Orphan control check box.
How do you put a box around a border in Word?
Boxing text or paragraphs
Select the text you want to box in. Choose the Borders and Shading command from the bottom of the Border menu. The Borders and Shading dialog box appears. If you want to apply the border to only text (words) and not to the entire paragraph, choose Text from the Apply To drop-down list.
How do I add a title bar?
There are two ways to change title bar for your activity:
- Design time (that is, change title in AndroidManifest. xml file).
- By coding (that is, you can code to change the activity title).
Which toolbar is on the title bar?
The toolbar that is present on the left of the title bar is most frequently used commands in the application. Toolbars are mostly present in the word, office suite, web browsers and other such computing languages. Mostly, the toolbar hides the menu bar by default.
How do I change my Windows title?
Right-click on one of the selected windows commands and click Change Window Title. You can also use the Actions button to select the Change Window Title option. Set a common Window title for the selected windows that your want to change and click OK. The windows titles are changed to the new title that you’ve assigned.
What is title bar in Word document?
• Title Bar: A horizontal bar at the top of an active document. This bar displays the. name of the document and application. At the right end of the Title Bar is the Minimize, Maximize and Close buttons. •
Introduction
The saying «Meet on clothes …» is not alien even to text documents. When opening a file in a Microsoft Word text editor for the first time, absolutely any user’s attention is focused on the title page. A beautiful beginning — a presentable cover is an impetus to action, a desire to get acquainted with the content. Sometimes a well-designed title page will say much more than the text below it. A multifunctional Word application, which is one of the best Microsoft products, is able to provide the user with some very attractive modern “titles” embedded in the capabilities of the program. Using ready-made layouts, the user needs only to fill in empty columns. In the article below, we consider a method that helps to insert not only the standard title page into a document, but also create a unique design of the first page.

The use of ready-made «titles»
To make the title page in Word, the user, among other main menu commands, must find a subsection responsible for inserting various elements. After switching to the “Insert” command, click on the “Pages” subsection, which contains a link that opens the “Title pages”. As a result, several possible options appear on the screen, which are templates. After the user is determined with the best option, you can confirm your decision by clicking on the layout with the mouse button.
It is important to know that you can insert the cover page not only at the beginning of the document. At first glance, the possibility of creating a «title bar» in any place that only the user likes, may seem like a very dubious action. However, as practice shows, this kind of manipulation perfectly complements the huge documents that have many separate chapters or sections. If necessary, the user can make their own title page for each of them.

Creating an original cover in a text editor Word
Despite the fact that in order to insert into Word a standard template that complements the document as a presentable cover, it will take only a few seconds, simple layouts created by the developers of the application may not always satisfy the requirements of the potential user. The user can, using a huge toolkit of the software product, create his own unique “title”.
To do this, you need only a few minutes of free time. Initially, you need to use a combination of function buttons, Ctrl + N will allow you to create a new document. Next, you will have to decide on a more acceptable color scheme and drawings (pictures), if they are in the cover. If desired, the title page can be made white. The decision to paint the background with a certain color will be realized by adding color. To do this, you need to place on the blank sheet your favorite autoshapes and fill them with the desired color.
The next stage helps to place several text blocks on the cover, all of which together will allow you to create a ready-made base, which can later be inserted into any part of the document and filled in with appropriate words. For this, the software product is supplied with “express blocks” located in the main menu of the program in the category “Insert” (section “Text”). After clicking on the command, a variety of different blocks will appear on the screen, ready-made software solutions can be inserted in any place of the created template. Among other elements, most users of the Word editor have “Date”, “Theme” and “Annotation” on their covers.

After it was possible to safely insert all the necessary blocks with text, the user can change the color, size and font in the same way as when working with simple text. The color of the letters is important, since when creating a dark background, black characters by default will simply be lost.
This work on the creation of a unique title page can be considered complete, now you just need to save the page template. By the way, the new “title” will be located in the same place as the standard layouts. You can find it by viewing to the end of all the program cover options. To save, you need to select everything that the title page contains, then in the «Insert» category, go to the «Pages» section, open the «Title Pages» and select the item «Save the selection to the cover page collection» in the list of actions.
The user will only have to insert in the appropriate columns of the dialog box that opens the name of the new “title” and a specific description (if necessary). Confirm your decision by clicking on the «OK» button.
You can check the correctness of the done manipulations by reviewing the list of stored “title” templates. A new cover should be placed at the very end, immediately after the standard sheets.
Conclusion
Multifunctional software product Microsoft Word has an unlimited number of possibilities. Anyone can insert standard presentable title covers into their documents, and those who want to use exclusively unique “title-holders” of their own creation can use the program’s tools and create exactly what they need.
Содержание
- Создание заголовка с помощью встроенных стилей
- Заголовок 1
- Заголовок 2
- Создание собственного стиля и сохранение его в качестве шаблона
- Вопросы и ответы

Некоторые документы требуют особого оформления, и для этого в арсенале MS Word содержится довольно много средств и инструментов. В числе таковых различные шрифты, стили написания и форматирования, инструменты для выравнивания и многое другое.
Урок: Как выравнивать текст в Ворде
Как бы там ни было, но практически любой текстовый документ невозможно представить без заголовка, стиль которого, конечно же, должен отличаться от основного текста. Решение для ленивых — выделить заголовок жирным, увеличить шрифт на один-два размера и на этом остановится. Однако, есть ведь и более эффективное решение, позволяющее сделать заголовки в Word не просто заметными, а правильно оформленными, да и просто красивыми.
Урок: Как изменить шрифт в Ворде
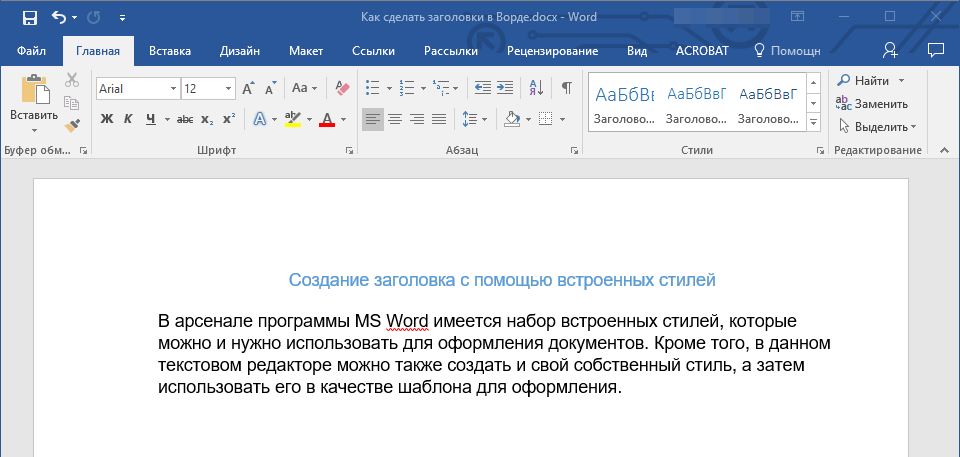
Создание заголовка с помощью встроенных стилей
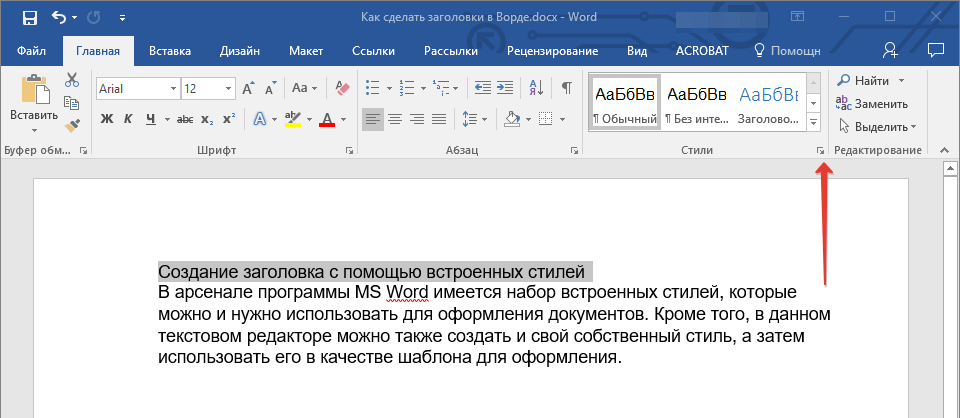
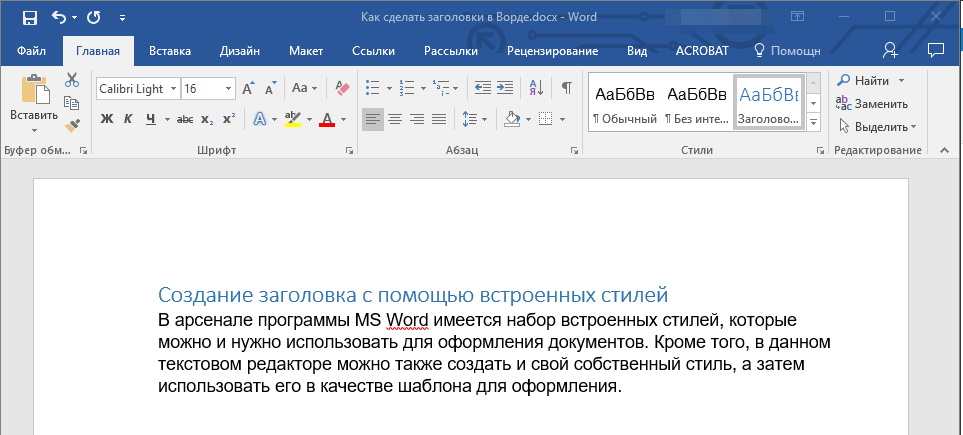
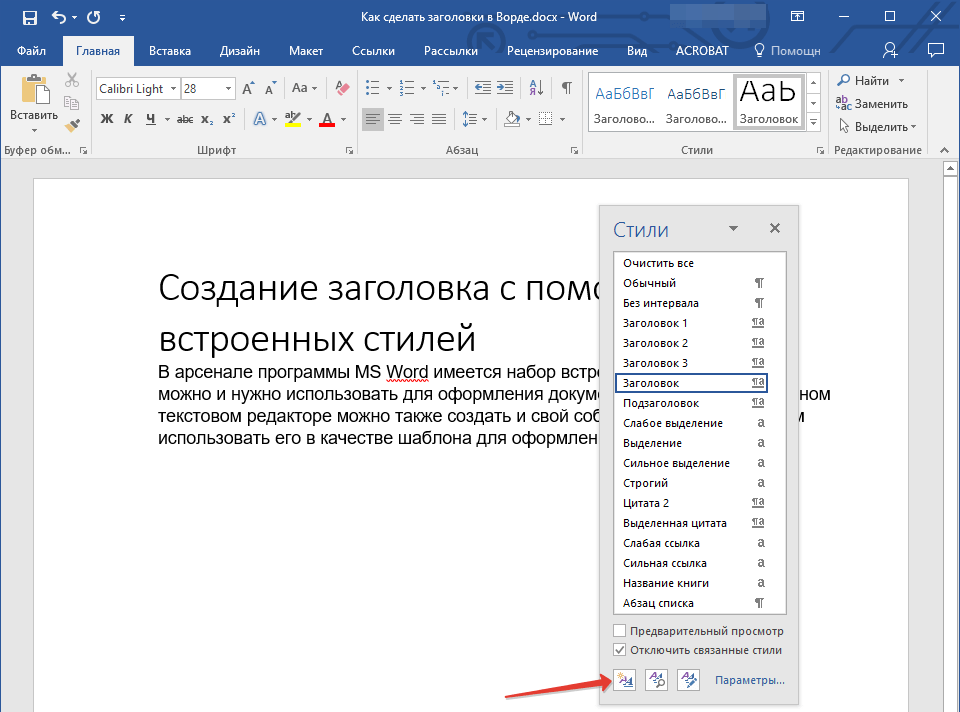
В арсенале программы MS Word имеется большой набор встроенных стилей, которые можно и нужно использовать для оформления документов. Кроме того, в данном текстовом редакторе можно также создать и свой собственный стиль, а затем использовать его в качестве шаблона для оформления. Итак, чтобы сделать заголовок в Ворде, выполните следующие действия.
Урок: Как в Word сделать красную строку
1. Выделите заголовок, который необходимо оформить должным образом.

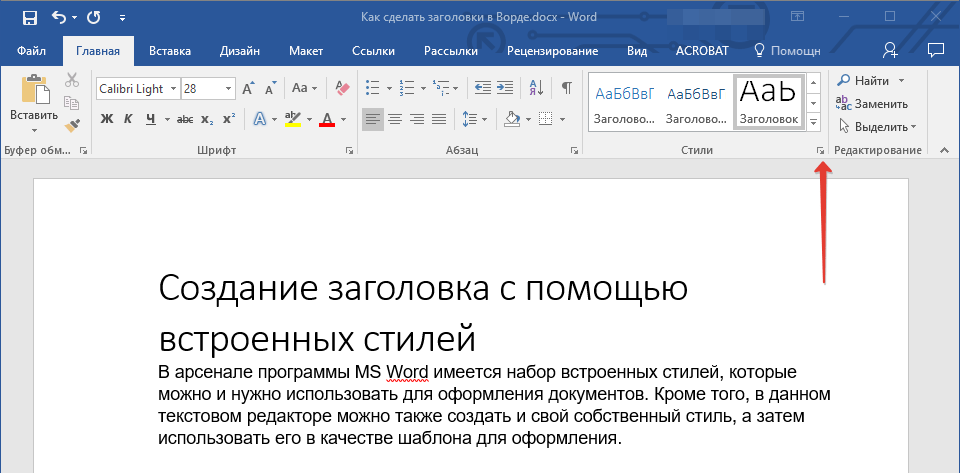
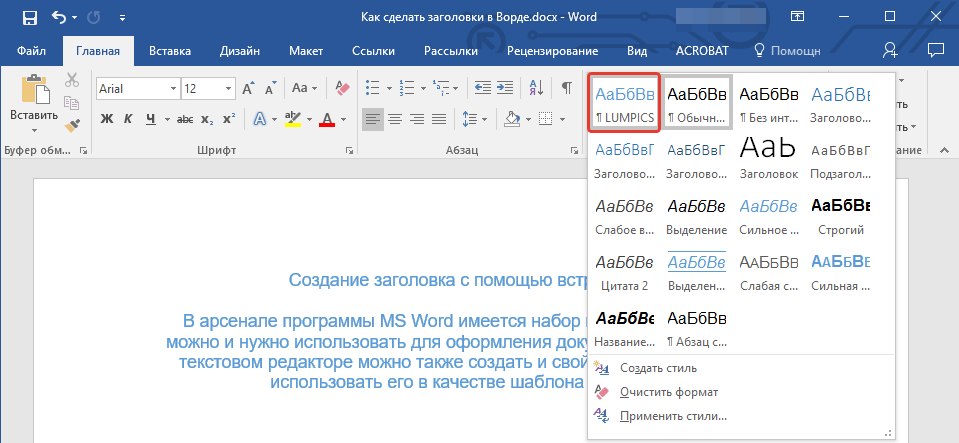
2. Во вкладке “Главная” разверните меню группы “Стили”, нажав на небольшую стрелочку, расположенную в ее правом нижнем углу.
3. В окне, которое откроется перед вами, выберите необходимый тип заголовка. Закройте окно “Стили”.
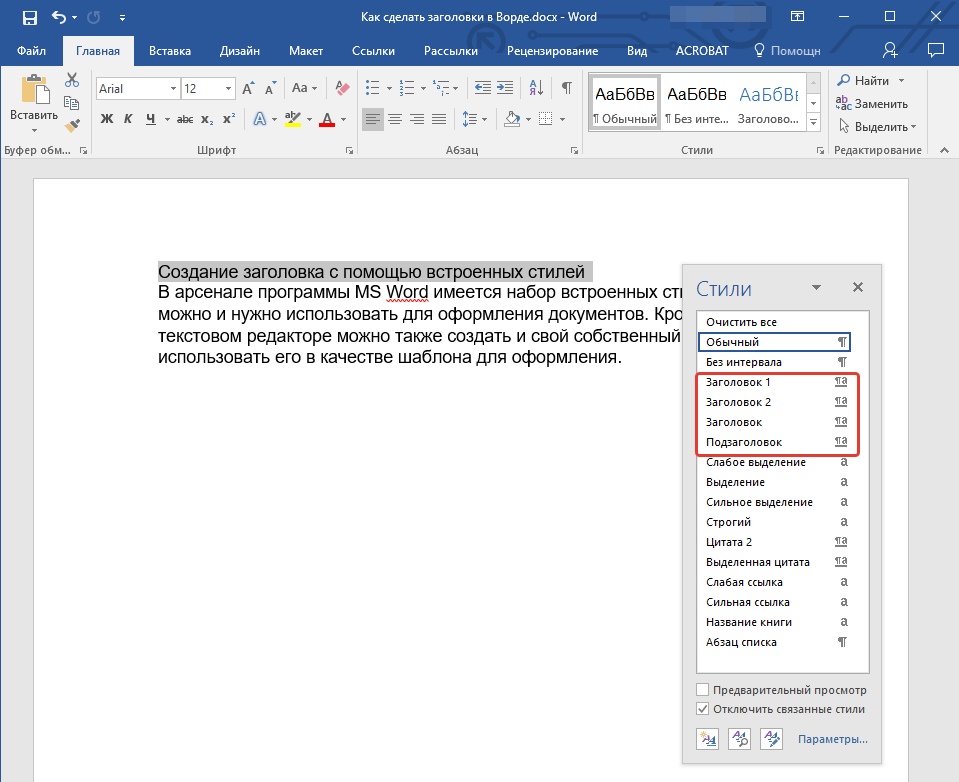
Заголовок
это основной заголовок, идущий в самом начале статьи, текста;

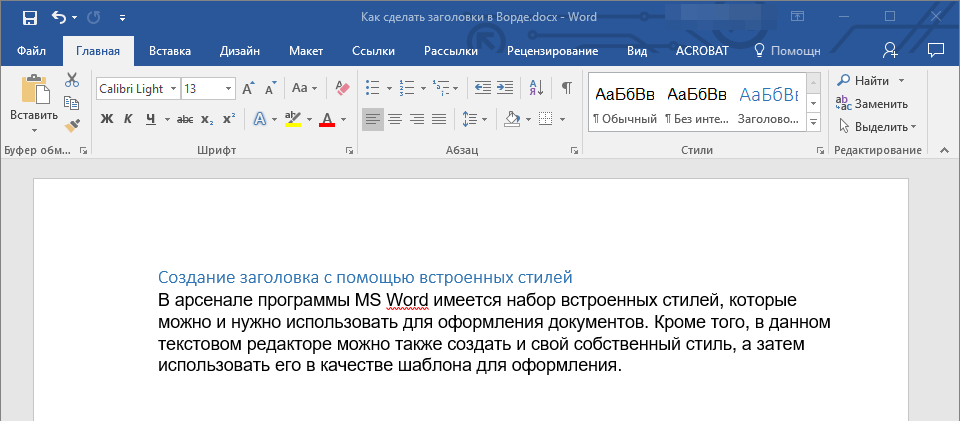
Заголовок 1
заголовок меньшего уровня;
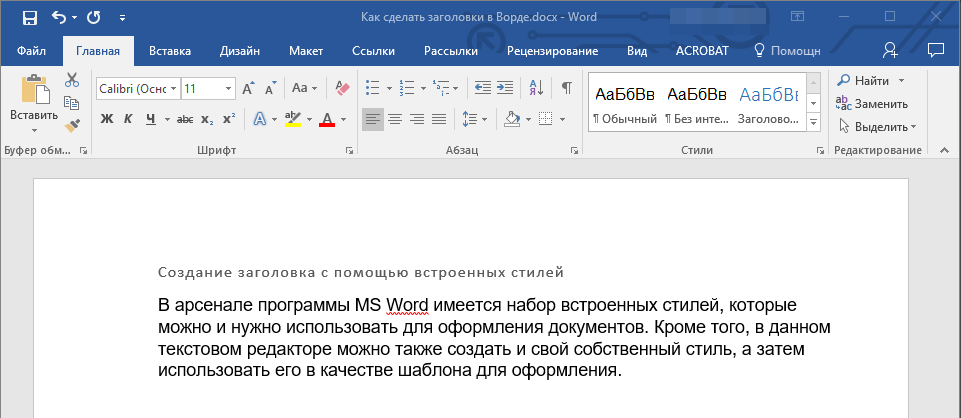
Заголовок 2
еще меньше;
Подзаголовок
собственно, это и есть подзаголовок.
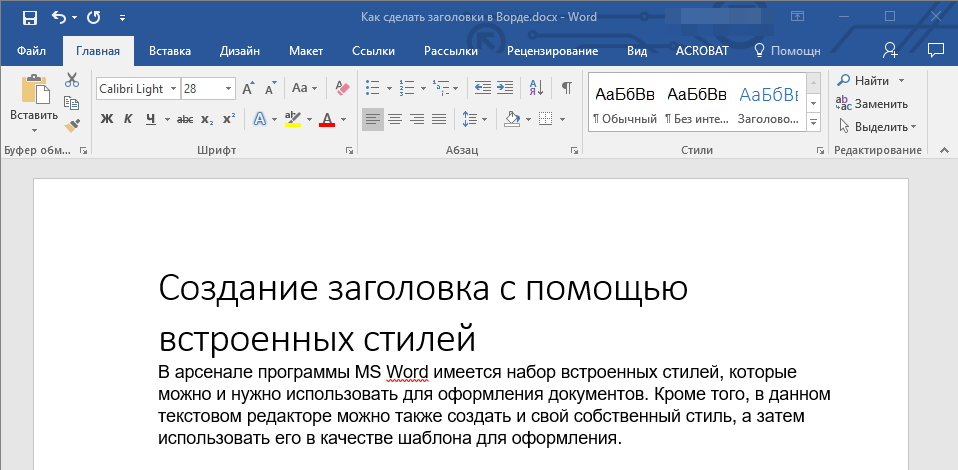
Примечание: Как можно заметить со скриншотов, стиль заголовка помимо изменения шрифта и его размера также изменяет и междустрочный интервал между заголовком и основным текстом.
Урок: Как изменить междустрочный интервал в Ворде
Важно понимать, что стили заголовков и подзаголовков в MS Word являются шаблонными, в их основе лежит шрифт Calibri, а размер шрифта зависит от уровня заголовка. При этом, если у вас текст написан другим шрифтом, другого размера, вполне может быть такое, что шаблонный заголовок меньшего (первого или второго) уровня, как и подзаголовок, будут мельче, чем основной текст.
Собственно, именно так получилось в наших примерах со стилями “Заголовок 2” и “Подзаголовок”, так как основной текст у нас написан шрифтом Arial, размер — 12.
- Совет: В зависимости от того, что вы можете себе позволить в оформление документа, измените размер шрифта заголовка в большую сторону или текста в меньшую, дабы визуально отделить одно от другого.
Создание собственного стиля и сохранение его в качестве шаблона
Как было сказано выше, помимо шаблонных стилей, вы также можете создать свой собственный стиль оформления заголовков и основного текста. Это позволяет переключаться между ними по необходимости, а также использовать любой из них в качестве стиля по умолчанию.
1. Откройте диалоговое окно группы “Стили”, расположенной во вкладке “Главная”.
2. В нижней части окна нажмите на первую кнопку слева “Создать стиль”.
3. В окне, которое перед вами появится, задайте необходимые параметры.
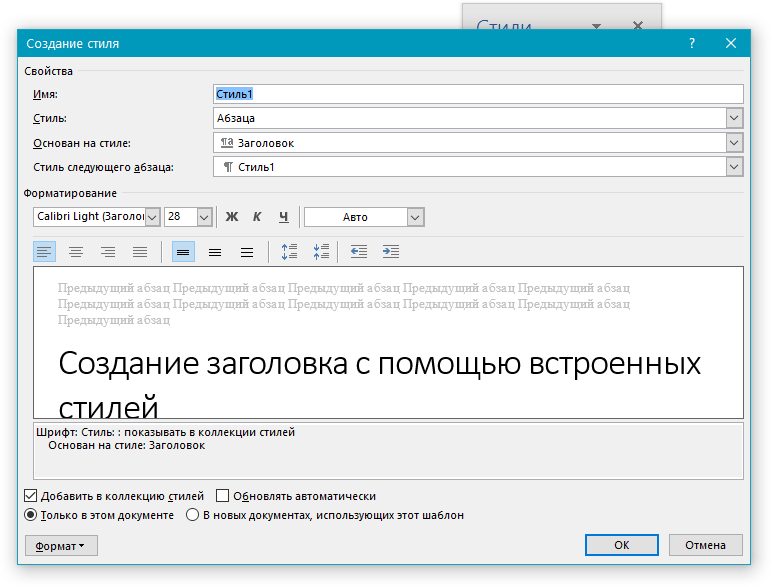
В разделе “Свойства” введите название стиля, выберите ту часть текста, для которой он будет использоваться, выберите стиль, на котором он основан, а также укажите стиль для следующего абзаца текста.
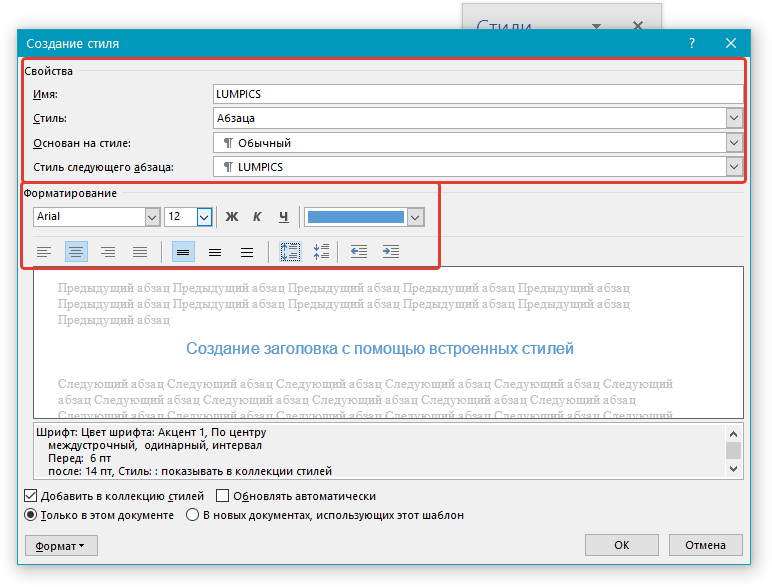
В разделе “Формат” выберите шрифт, который будет использоваться для стиля, укажите его размер, тип и цвет, положение на странице, тип выравнивания, задайте отступы и междустрочные интервалы.
- Совет: Под разделом “Форматирование” находится окно “Образец”, в котором вы можете видеть то, как будет выглядеть ваш стиль в тексте.
В нижней части окна “Создание стиля” выберите необходимый пункт:
- “Только в этом документе” — стиль будет применим и сохранен только для текущего документа;
- “В новых документах, использующих этот шаблон” — созданный вами стиль будет сохранен и станет доступен для использования в дальнейшем в других документах.
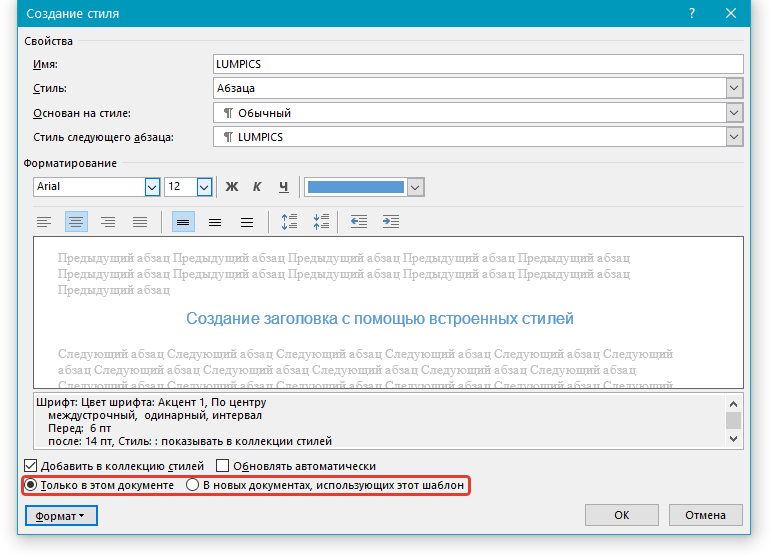
Выполнив необходимые настройки стиля, сохранив его, нажмите кнопку “ОК”, чтобы закрыть окно “Создание стиля”.
Вот простой пример стиля заголовка (хотя, скорее, подзаголовка), созданного нами:
Примечание: После того, как вы создадите и сохраните свой собственный стиль, он будет находится в группе “Стили”, которая расположена во вкладе “Главная”. Если он не будет отображаться непосредственно на панели управления программы, разверните диалоговое окно “Стили” и найдите его там по названию, которое вы придумали.
Урок: Как сделать автоматическое содержание в Ворде
На этом все, теперь вы знаете, как правильно сделать заголовок в MS Word, используя шаблонный стиль, доступный в программе. Также теперь вы знаете о том, как создать свой собственный стиль оформления текста. Желаем вам успехов в дальнейшем изучении возможностей этого текстового редактора.
This tutorial explains how to add a document title to a Microsoft Word document. The title ensures that your Word documents and resulting PDFs are more accessible for everyone.
A document title provides an easy-to-read title for all your students, including those using a screen reader. If the title is set, a screen reader states the title instead of the filename.
Ideally, you want to set the document title in the original source, but if you don’t have it, edit the PDF with Adobe Acrobat (not Adobe Reader).
- Add a Document Title to Microsoft Word
- Set the Document Title in Adobe Acrobat
Add a Document Title to Microsoft Word
Word provides a simple (yet somewhat hidden) way to add a document title.
How to Add a Document Title to a Word Document – Video Transcript (PDF)
Note: Update the original Word document if you have it; there’s always the chance you’ll need to make more edits. If you don’t edit the original, you’ll find yourself repeatedly fixing the resulting PDFs, which can be a huge waste of time.
- Copy the Heading 1 of your document to use as your title. (Optional)
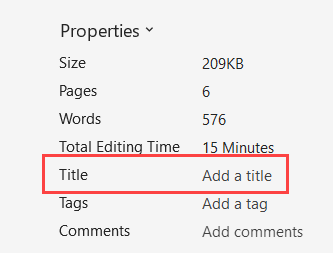
- Go to File > Info > Properties > Title.

- Click “Add a title” and paste your Heading 1 into the textbox.
- Or, type in an easy-to-read title for your document (e.g., “ENGR 101 Fall 2021 Syllabus”).
- Save the document.
- Use Save As to convert to a PDF and successfully transfer the title to the PDF.
Set the Document Title in Adobe Acrobat
If you don’t have the original Word document for your PDF, you can still fix its missing title in Adobe Acrobat. Note: You cannot edit the title with Adobe Reader.
- Open the PDF in Adobe Acrobat.
- In the Search tools textbox on the right, start typing “Accessibility” to search for Acrobat’s accessibility features.

- Select Accessibility Check to check the accessibility of your PDF.

The Accessibility Checker panel opens on the left to show the accessibility issues Acrobat found with your PDF.
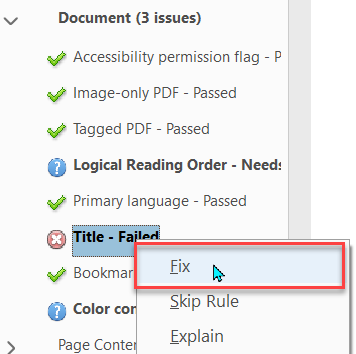
- Click the greater than symbol (>) next to “Document (# issues)” to open that section.

Note: Adobe Acrobat consistently flags two warnings (issues) within the Document section. Hence, if you see a number greater than 2, there’s likely an error in your PDF.
- Within the Document section, right-click Title – Failed, then choose Fix from the context menu.

-
No Title in Original Source
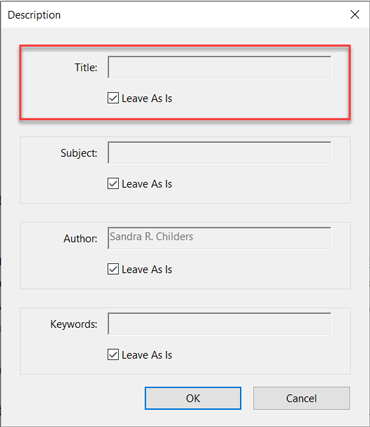
If no title was set in the original source, a Description dialog window appears. The top section shows the missing title.

- Uncheck the “Leave As Is” checkbox and enter an easy-to-read title.
- Click OK to set the title.
- Save the PDF to keep your changes.
-
Title Set, but Not Set in PDF
If a title was set in Word but unsuccessfully set in the PDF (e.g., the Save As function wasn’t used to convert), then selecting Fix will auto-fix the title. However, you should always confirm the title is easy to read.
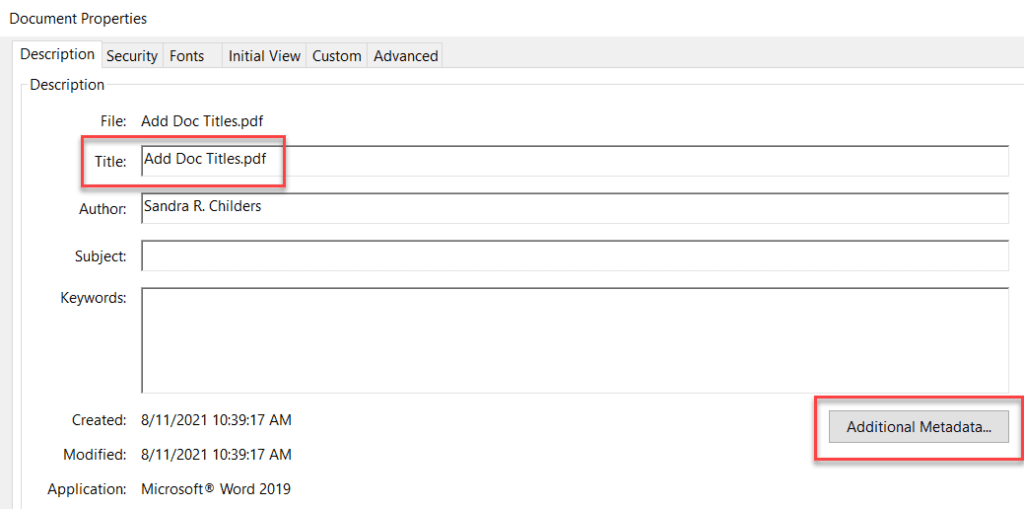
- In Acrobat, go to File > Properties and view the Title on the Description tab.

- If the Document Title is not easy to read (or includes a filename), click the Additional Metadata… button at the middle-right of the dialog window.
- Then, update the Document Title field to an easy-to-read title.

- Click OK once you’ve updated the Document Title.
- Click OK to update the PDF document properties.
- In Acrobat, go to File > Properties and view the Title on the Description tab.
-
- Save your changes.


Now, the PDF should display that title within the PDF tab. Additionally, when a student has multiple tabs open, it’s easy to find the document they need. (Even if they’re using a screen reader.)

Conclusion
Every document uploaded to Canvas needs a Document Title. This title helps your students find the correct document more easily and removes that pesky error shown in Canvas. (It’s a win-win!)
This tutorial is part of the Accessibility Series. More tips to come on how to get and keep your documents and web pages accessible!
Reader Interactions
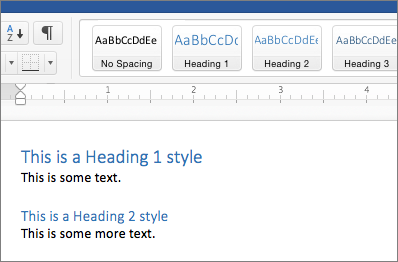
Headings make text stand out and help people scan your document.
The simplest way to add headings is with heading styles. Using heading styles means you can also quickly build a table of contents, reorganize your document, and reformat its design without having to manually change each heading’s text.
-
Select the text you want to use as a heading.
-
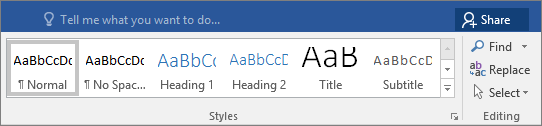
On the Home tab, move the pointer over different headings in the Styles gallery. Notice as you pause over each style, your text will change so you can see how it will look in your document. Click the heading style you want to use.

If you don’t see the style that you want, click the More button
to expand the gallery.
 to expand the gallery.
Tip: You can change the font and formatting of a heading style. Just select the heading text you want to customize, modify its styles the way you want, and then on the Home tab, in the Styles group, right-click the heading style that you customized and click Update Heading to Match Selection. Every time you apply that heading style in your document, the heading style will include your customizations.
Styles can do a lot more, including a table of contents. Here’s a short video on why to write first and format later using Styles.

Headings can make text stand out and help people scan your document. The simplest way to add headings is to use heading styles.
-
Select the text you want to use as a heading.
-
On the Home tab, click the heading style you want to use.
If you don’t see the style you want, click a left, right, or down arrow to see more available styles.