
if you want to share posts or stories on Instagram, you can do it more easily than you imagine from the application or web itself, so we will tell you how you can share your own posts on Instagram, those of other users, your stories or those of others, as well as Reels, IGTV and do it on other social networks. Thus, it will be much easier for you to reach others by making known what interests you.
You will discover what it consists of repost of Instagram stories and how you can use it, as well as activate the possibility that other people can do it with yours. This is a functionality of the social network that allows you to share the stories of other people in yours and customize them to your liking. Discover all the ways to give greater visibility to contents of the best-known app and social network of images to other users or people who do not use the service, we will tell you about it in the next few lines.
Share on Instagram
If you want to share on your own social network, you have several possibilities at your fingertips, so we will tell you how to do it in each of them. The first thing you have to do is be in the content that interests you to show it to the people you care about. The options on both the app and the web are very similar.
own publications
If you want to share your own posts, you’ll need to go to your profile and find the one you’re interested in sharing. It can be the most recent or any other. below the post you will find, next to the comments the share arrow. If you press him, you can show it to whoever you want. You will reach a new screen where you can search for a person in your search engine or where different names appear, and you click send to whoever you want. You can also give create a group to send it to more people.
If you want post it to your story, the option will appear in it. If you give it, several customization options will appear before sending. You can mention another person or indicate your location by pressing on the photo. Above you will have options to write something, apply filters or do whatever you want before you hit publish.

Posts from other users
To do this with other people’s posts, you’ll need to go to the own publication from the home screen, the user’s profile, in the search or from wherever it appears. From there, you will also find the option to to share. You will have to choose the people you want to show it to.
Likewise, if it allows you, you can do it in your own story with the same customization options as in your publications. If it is a private account, some people may not see this content and it will not allow you to show it in your Stories.
own stories
If you want to share your own history, you must go to it and you will find the option to send to and select the person to whom you want to communicate it. You can also give plus and select to make it as a post to keep more time on your posts (instead of limiting it to 24 hours) or share on to be shared in other external services such as email, Telegram or Instagram Direct.

If you want, you can highlight your story in the option of stand out and make it display even more by choosing the name you want to give it and clicking add. It is something that will give more visibility to the Stories that you like the most or that you want to categorize.
stories of others
If you want to give it more visibility, you just have to go to the content (it will appear on the person’s profile or at the top of the page where the other Stories are). Once you do, next to send message you will see the option to to share. You can choose the person to whom you want to show the story or search if it is easier for you and hit send.

The repost is an Instagram function through which you can repost other people’s stories as long as you have been mentioned. In this way, you will be able to republish what this person has shown by customizing the new content to your liking with some text or other customization option. You just have to, once they notify you, access history of the other person and where you put the notice of add this content to your story give it and so you can publish it adapting it to your liking.
What there is no option to post stories from other people if they haven’t mentioned you, one thing you can do in this case is make a screenshot of what interests you, edit it so that it is as you want and send it to your stories from the create option. If you act in time you will find yourself with the same option of Send on the screen after capture. If you hit it on time and select that option you will be able to select the stories option as one of the sharing options. Thus, just by making a capture and giving send you can do it. When you edit it, you can mention the person who made the original publication and customize it to your liking.
You can also resort to third-party applications that allow you this possibility, as is the case with Story Saver for Instagram. You have to download the application, register, put your data, give the content what interests you now Download. This will be stored in a gallery of the app and you can share it directly or edit it. You can find similar tools, but this is one of the best known and once you get familiar with it, it will not cost you anything to use it.

If you want someone else share your stories, when you create one, write text and mention any person (with @), so when you publish it, it will notify them and it will appear on top of the photo Add this content to your story. If you give it you can share it as you want. It is a good way to give new impressions about a certain image, situation or whatever you want.

reels
Reels are videos of various clips of 15 seconds that include audio, effects or other ideas that are very attractive to many users. They are in a specific section and you can view them whenever you want. You can even create your own.
If you want share reels, you just have to go to the corresponding section and select the arrow to the right of the one that interests you. There you can send it to whoever you want or add it to your story. You just have to choose the person or create a group. If you click on the 3 points that are a little further down, you can click on share on and select an external service in which you can highlight it. You can too create a remix of the Reel with your content and publish it to make it even more original.

IGTV
To do the same thing on IGTV, you just have to go to the application and in the content that interests you, you can give the option to to share and select the person you want to show it to or add the video to your story (it will appear just above the names and below the search engine). If you give it, the video will appear with the possibility of removing the sound, adding Stickers, changing the background, adding text and different options to personalize. When it’s how you like it, you hit send.
Just below the share option, you can give the 3 points, share on and choose the service that interests you. After that you only have to choose the person, write the recipient or whatever corresponds and confirm so that it is sent. Thus, you can show them to whoever you want regardless of whether they use this service or not, being a good way to communicate your interests, what you like or news that catches your attention.

Share on other social networks
Another thing you can do from Instagram is to make your content known on other social networks, such as Facebook, or even on WhatsApp statuses, so we will tell you how you can do it easily.
In WhatsApp States
if you want it to be seen your history in WhatsApp States, you will have to click on the bottom of the page to share on and select WhatsApp. From there, you’ll select My Status at the top of the page and click OK. There the publication will appear that you can customize to your liking with the WhatsApp options, putting emoticons, text or changing the background color.
To show yours in the States of WhatsApp, you will have to go to it and in the 3 configuration points you will give share on, you select WhatsApp, my status, you can choose the visibility that you will give it and then the screen will appear with the status as it would be. You can change it to your liking.
If you want to introduce the someone else’s status or post in WhatsApp you can also do it if it is public. In the states you will see it from the 3 configuration points and share on, following the steps just like in yours. It will be seen by pressing the 3 points to the same option at the top of the new small screen that you will see. You follow the same steps.

On Facebook
If you want to publicize your publications in Facebook, you can give from the content itself in the 3 configuration points to post to other apps and select Facebook. On the same site, you can also share on and the news options, your groups and other Facebook options will appear. Also, in More, in Stories Settings you can activate the option. To do it with others’ posts, you will have to give the 3 points, the option to share will appear and you will give the service that interests you.

To do this with your history in Facebook, you will only have to go to it and at the bottom of everything on the screen the Facebook icon will appear. If you give it, you can indicate where you want to share and you will finish the configuration. You can select if you want to always do it on the social network or just once. If you haven’t decided yet, hit now no. To do it with other people’s story, you will have to go to the 3 points, share on and select the social network service that interests you (news or groups).
An interesting feature of Microsoft Word allows you to generate the summary of documents in one click. This is one of the first needs after writing a document. To do this, you must properly prepare for it during the writing of the content. This article summarizes in detail the easiest way to make a summary in Word.
Preparing the summary
The secret to making a summary in a few clicks is to plan it. Indeed, deciding to make one at the last minute, when your document is already finished, could require a little more work. How then to go about it? First of all, the ideal is to have the plan of your document with the titles and subtitles in focus.
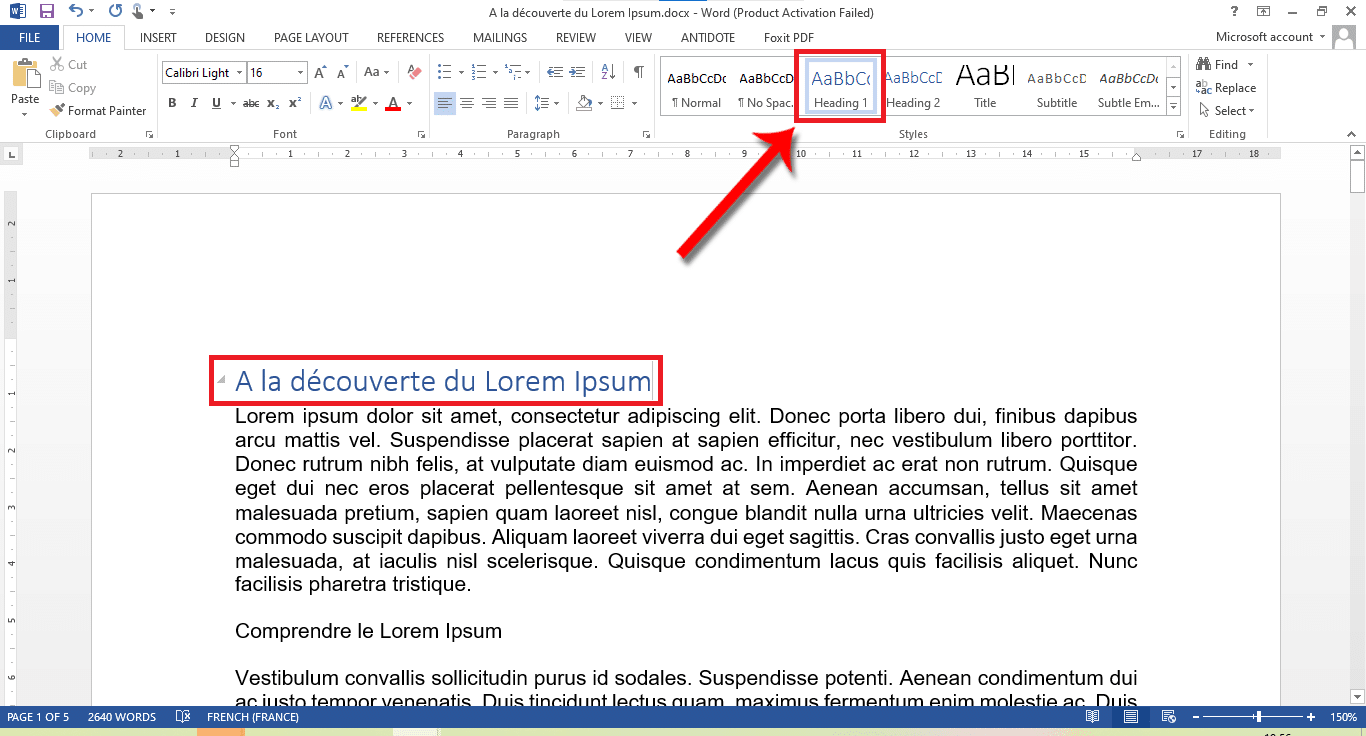
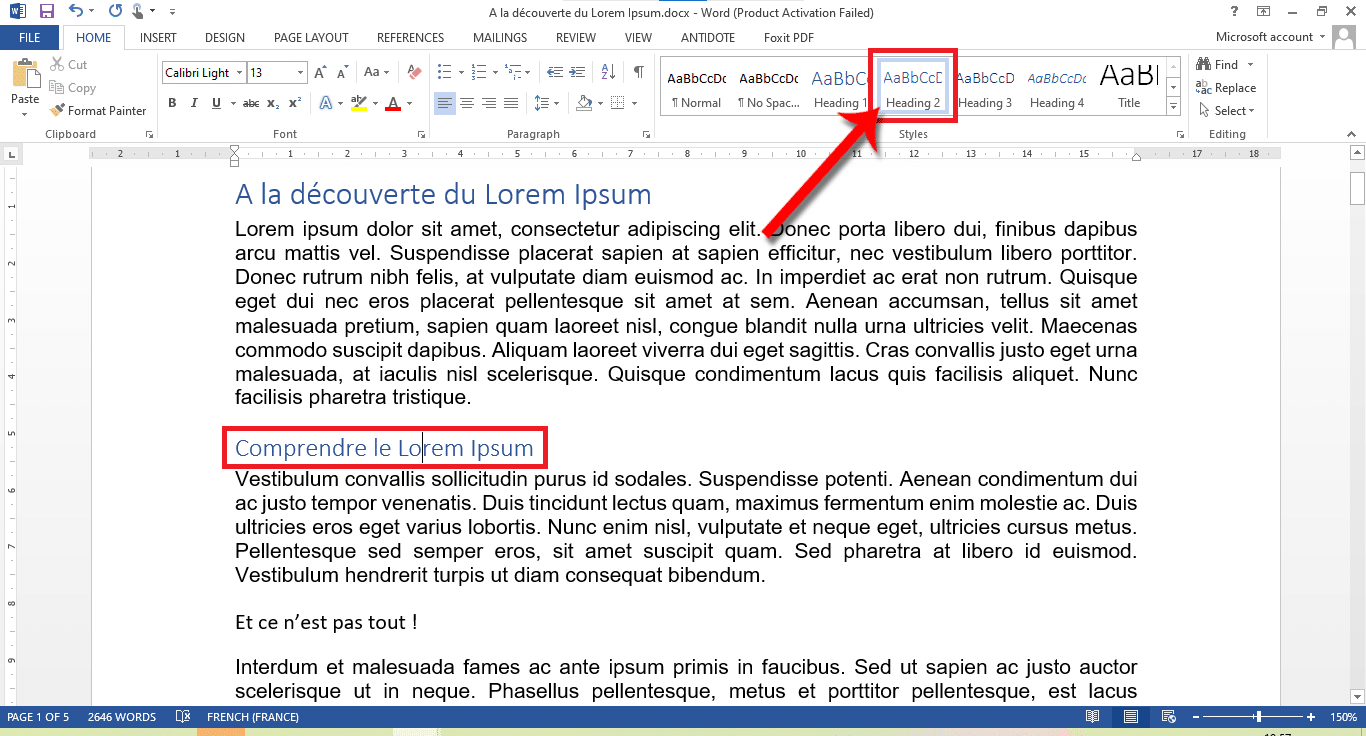
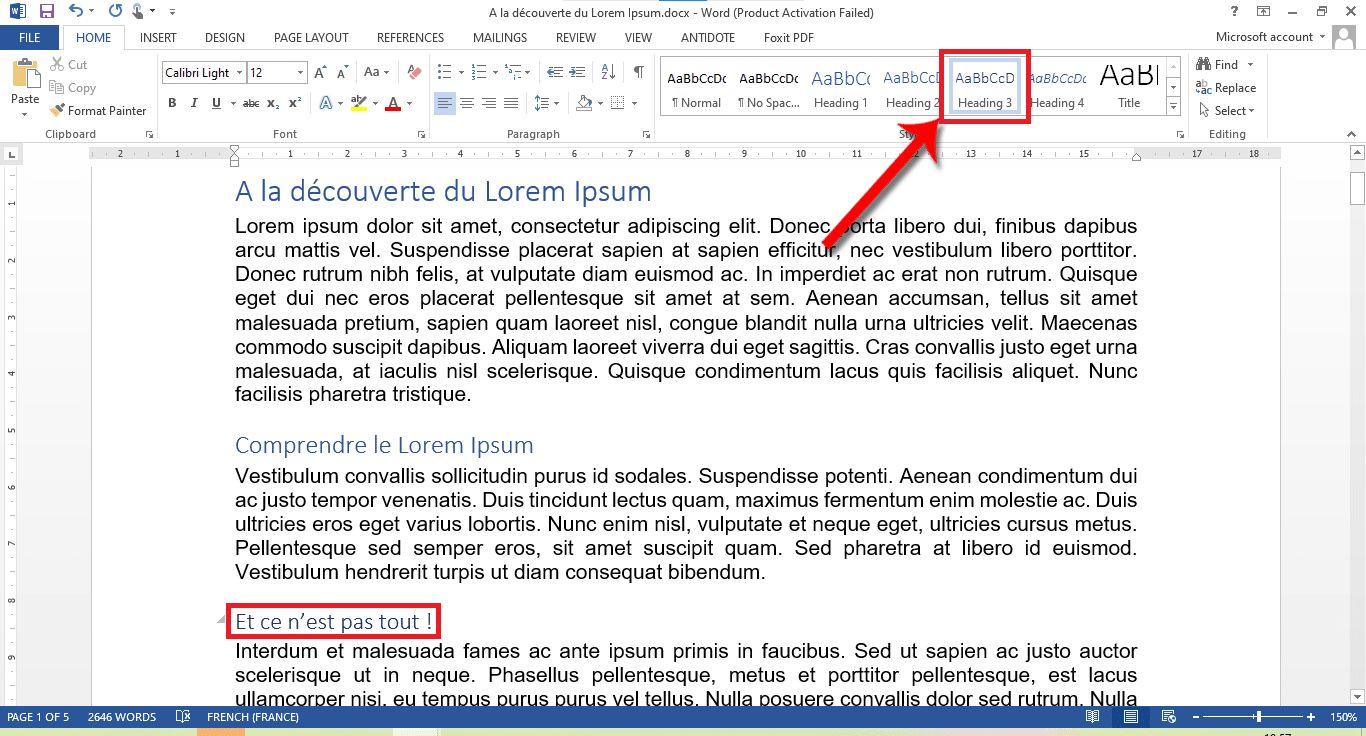
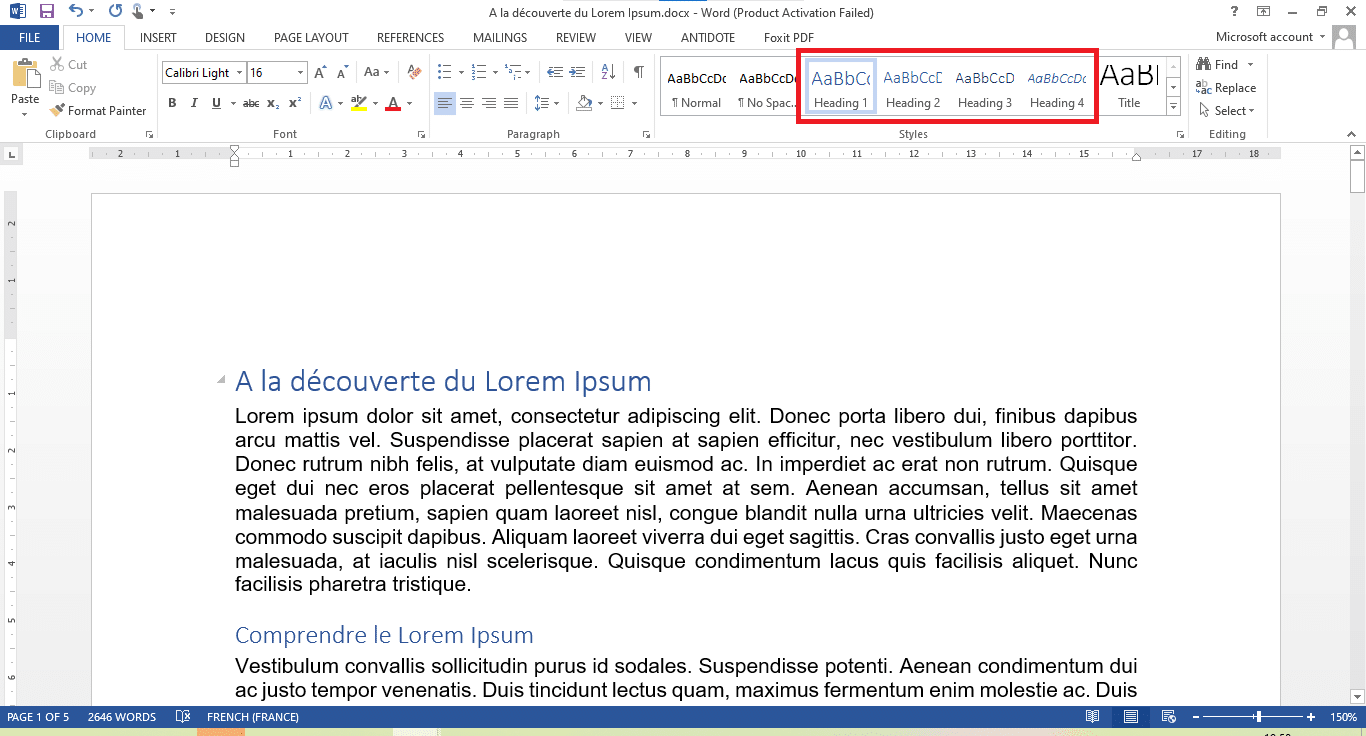
Once you manage to identify them and their hierarchical level, you can start preparing the summary. The idea is to give them special formatting that will help Microsoft Word identify them as an item in the summary. It should be understood that Microsoft Word offers a hierarchy in terms of level of titles that it has labeled “Title 1”, “Title 2″… Within your document, all the titles of the same hierarchy must therefore have the same level of styles .
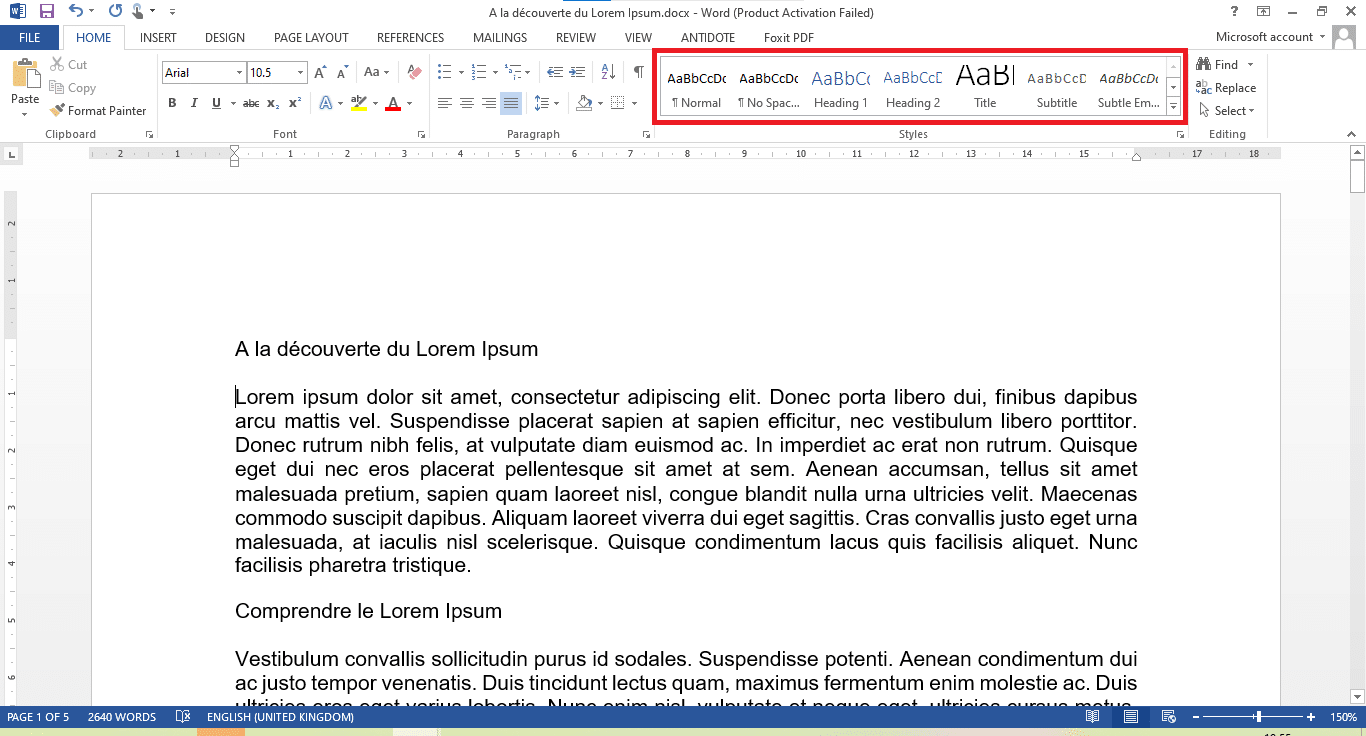
- To do this, when you get to the level of the first level headings, select the heading you are interested in and, in the styles section of the home tab, click on “Heading 1”.
- Do the same for the second level titles, choosing “Title 2”.
- Always proceed in the same way for level 3 titles, this time choosing “Title 3”.
Don’t worry if you don’t already see the “Title 3”, “Title 4” style… As you use a title level, the next title level will automatically unlock .
Changing the Appearance of Heading Styles
The proposed size, font and color do not suit you? No problem. You can customize them to your liking. It will suffice to:
- Right-click on the style concerned “Title 1”, “Title 2”… and click on “Edit / Modify).
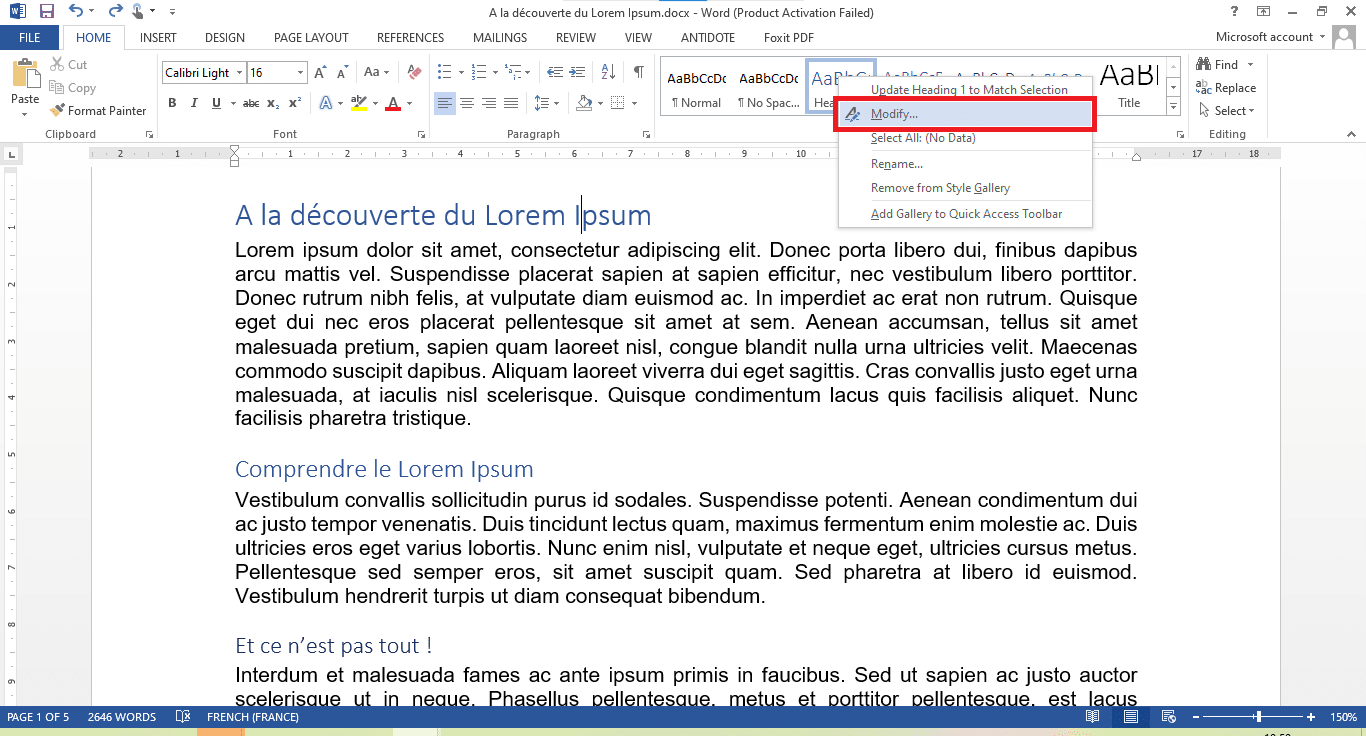
- The customization window for the chosen style will appear following this action. So go ahead as you see fit and end up clicking “OK”.
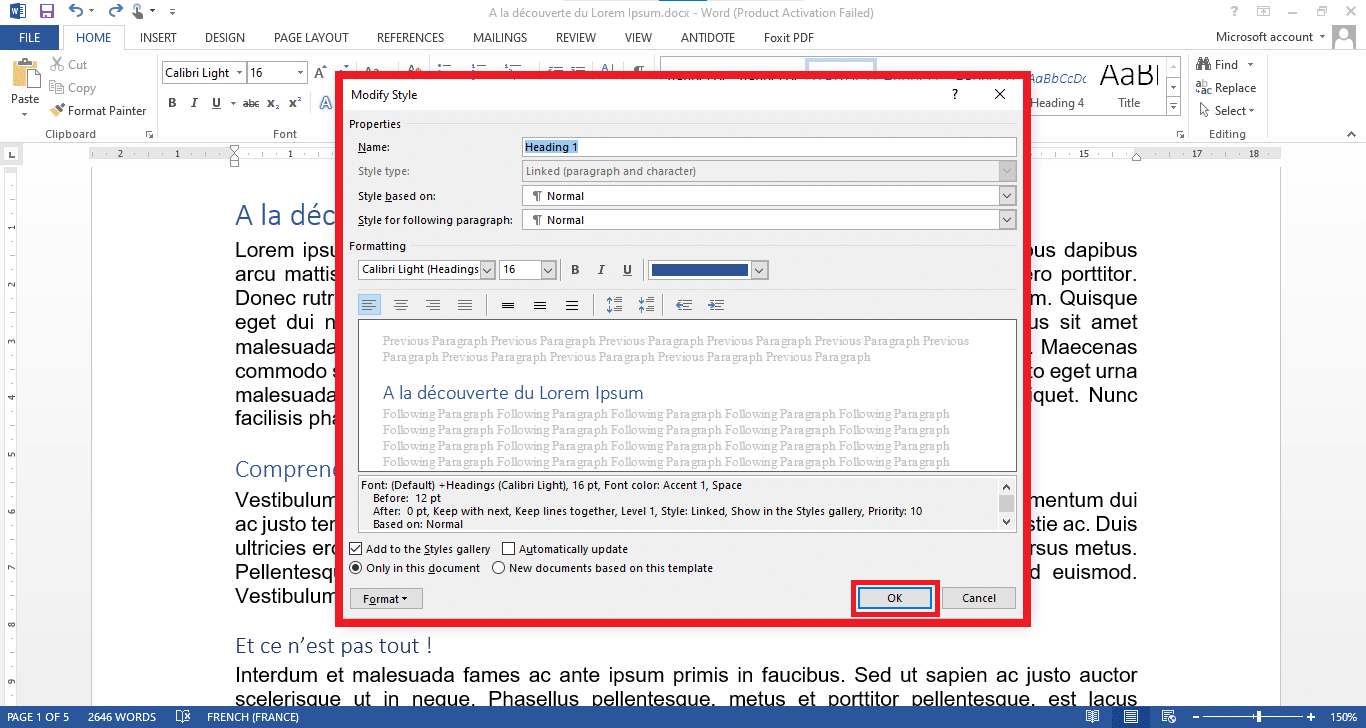
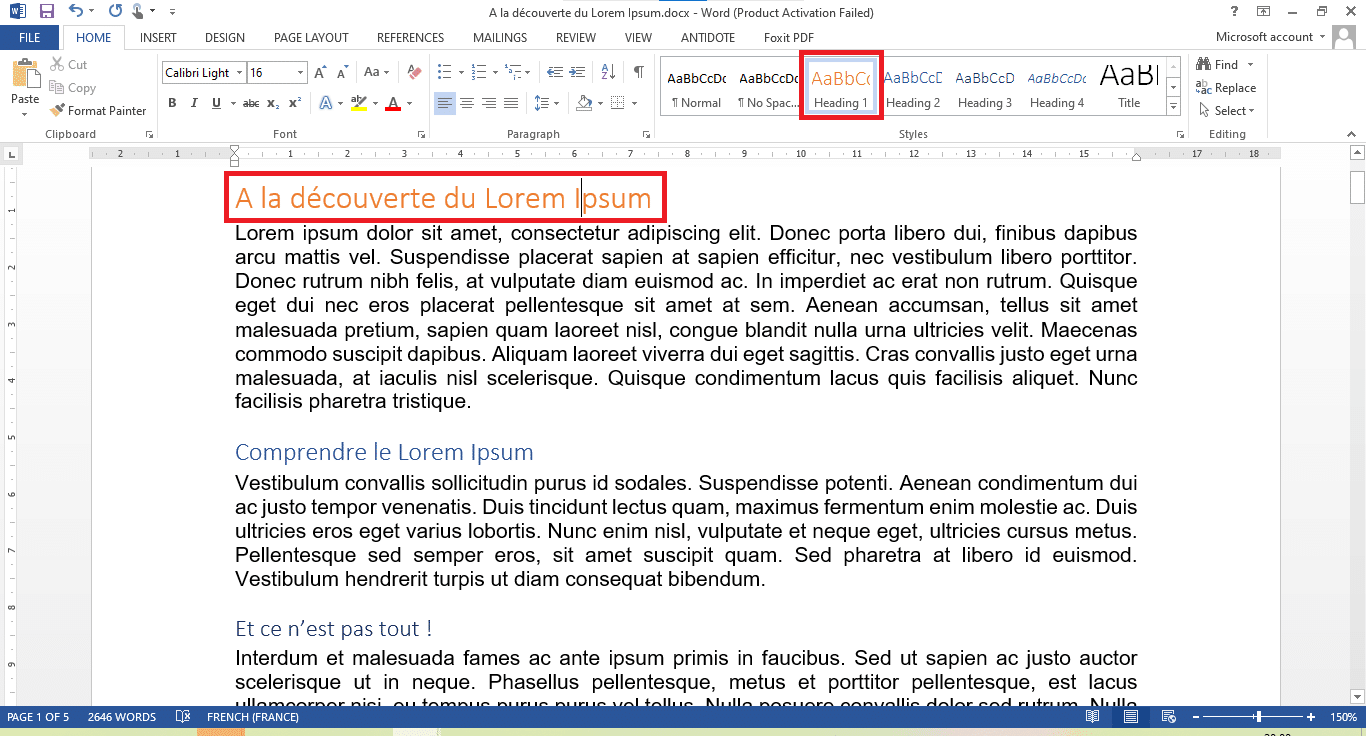
- You will then see the result automatically apply to the relevant heading levels.
READ ALSO : HOW TO ENABLE TWO-STEP VERIFICATION ON WHATSAPP?
Creation of the summary
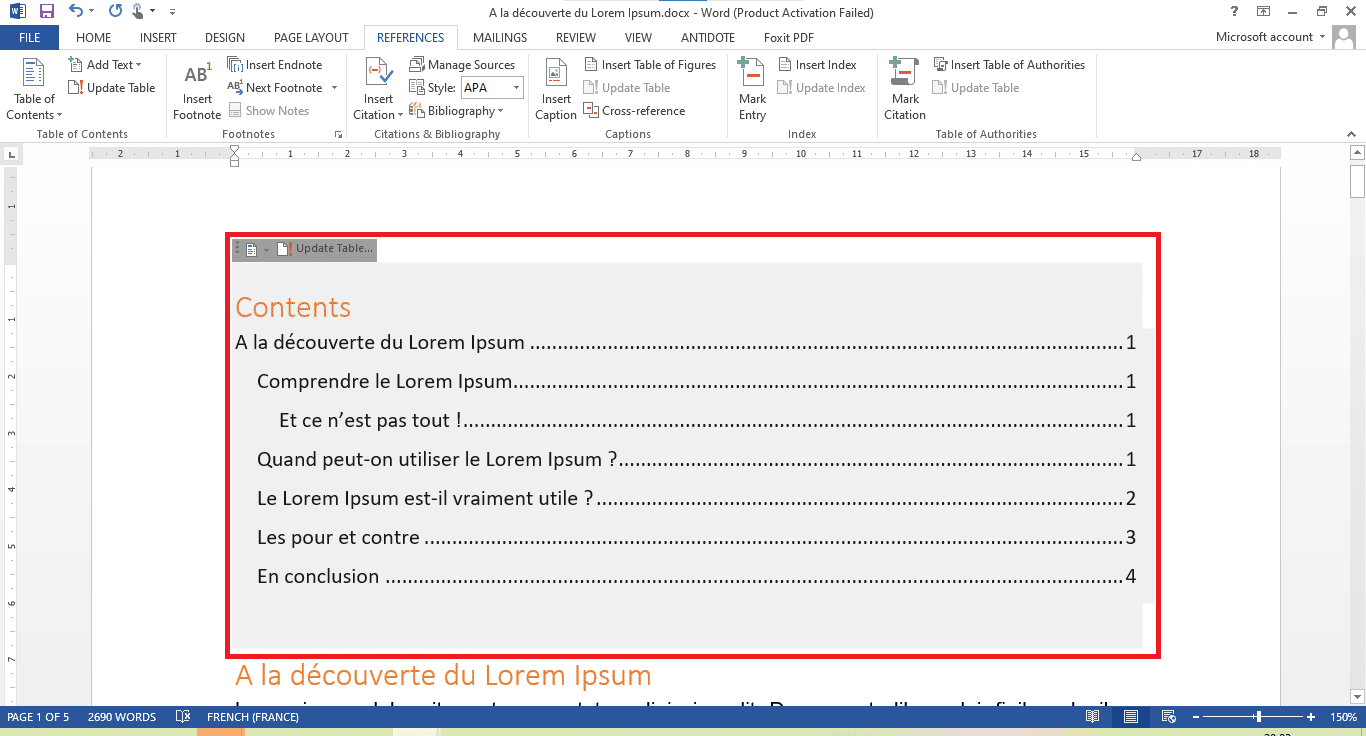
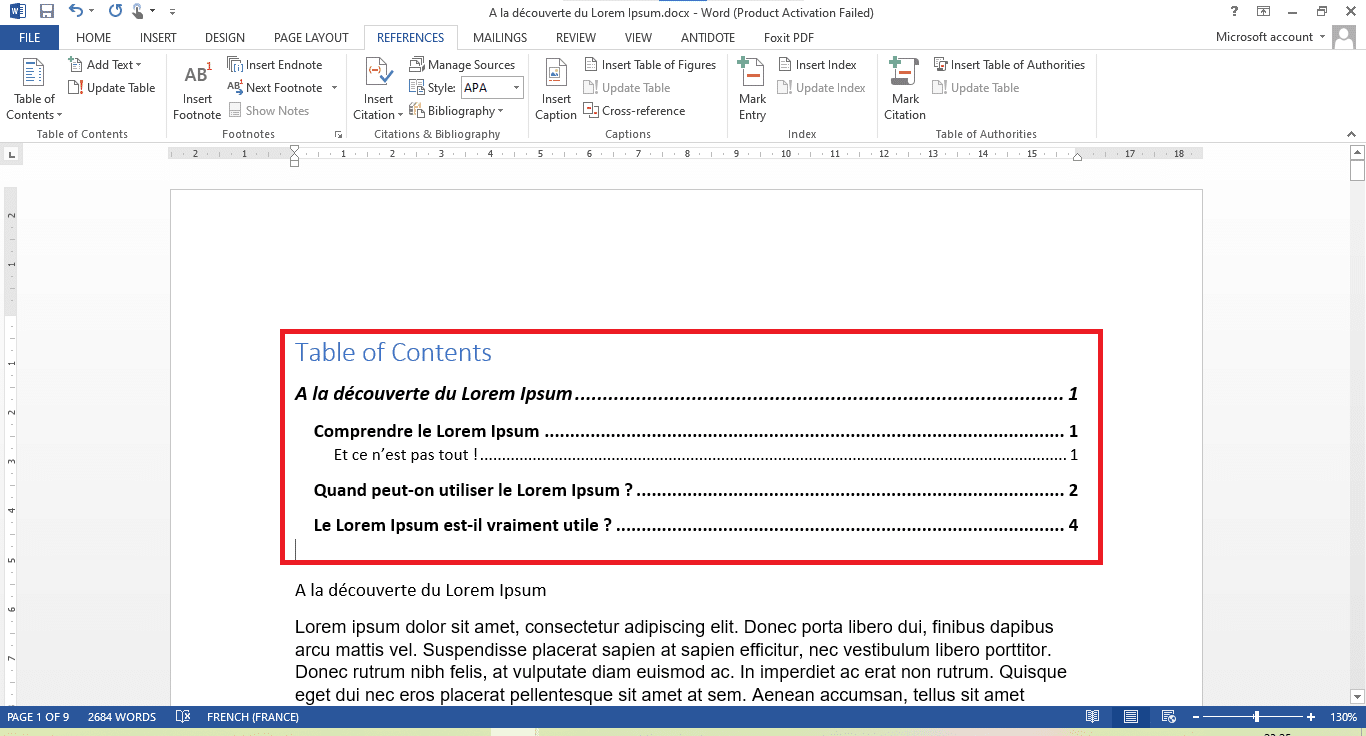
Once your document is fully written, all your titles linked to the styles that you have (perhaps) personalized, you can create the summary. At this stage, most of the work has already been done. Now position the mouse cursor where you want the summary to appear and:
- Go to the “References / References” tab on the menu ribbon.
- Click on “Table of Contents / Table of Contents”.
- Choose a summary template (by clicking on it) from the three proposals that are made to you.

- If you’ve done everything correctly so far, the summary should take shape before your eyes.
How to properly configure the table of contents?
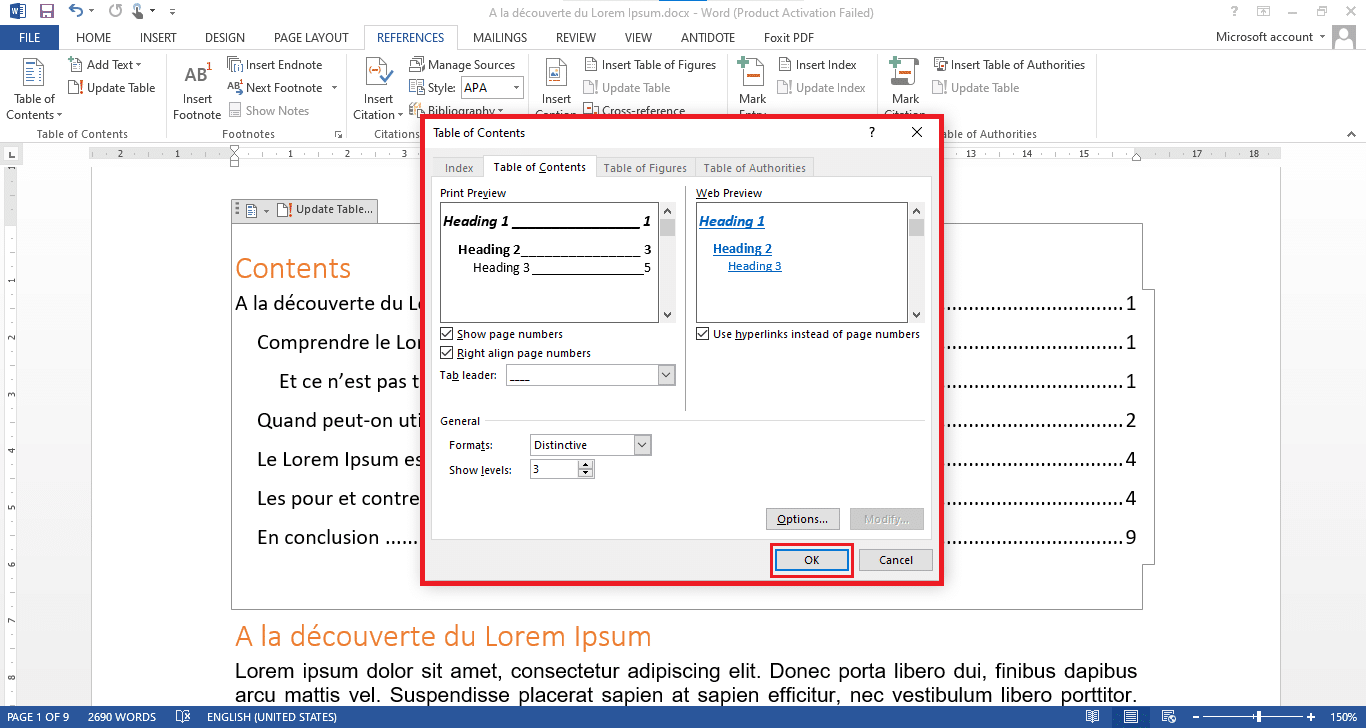
Now that you have generated the table of contents that corresponds to your document, you will probably want to modify its appearance. Fortunately, Microsoft Word offers this type of modification on the summaries. Here’s how:
- Go to the “References / References” tab on the menu ribbon.
- Click on “Table of Contents / Table of Contents”.
- Click on “Customize the Table of Contents / Custom Table of Contents…”.

- Now you have the free choice to modify the parameters available within the window that appears. Once finished, click on the “OK” button.
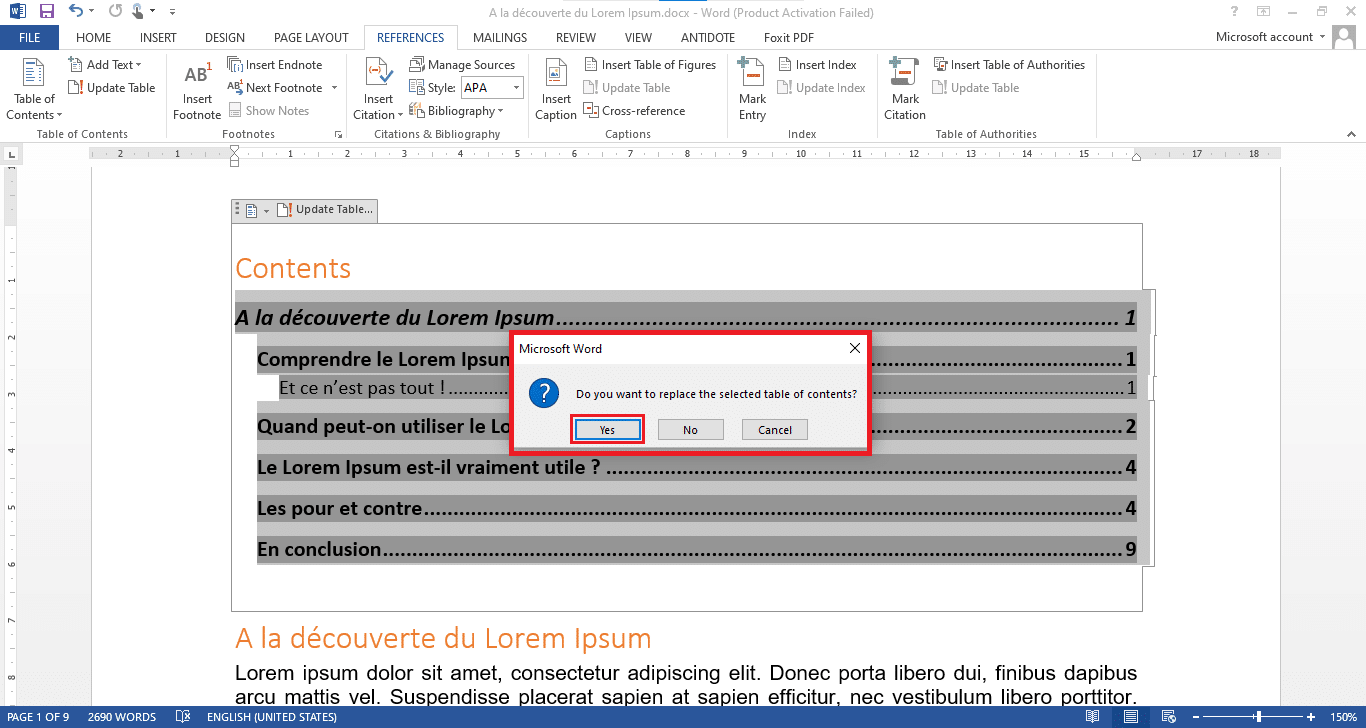
- Word will ask you if you want to replace the first table of contents generated. Simply choose YES.
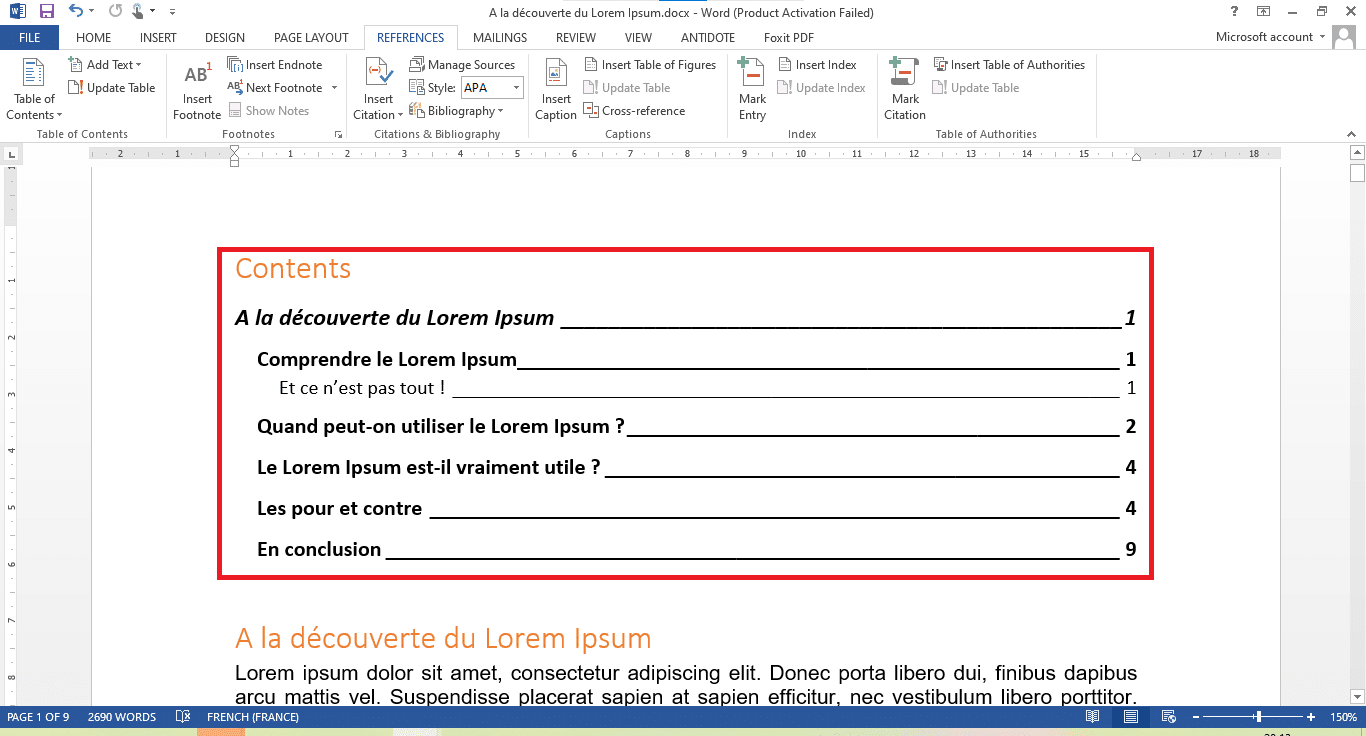
- And you will be able to see the changes made.
The automatic update of the summary
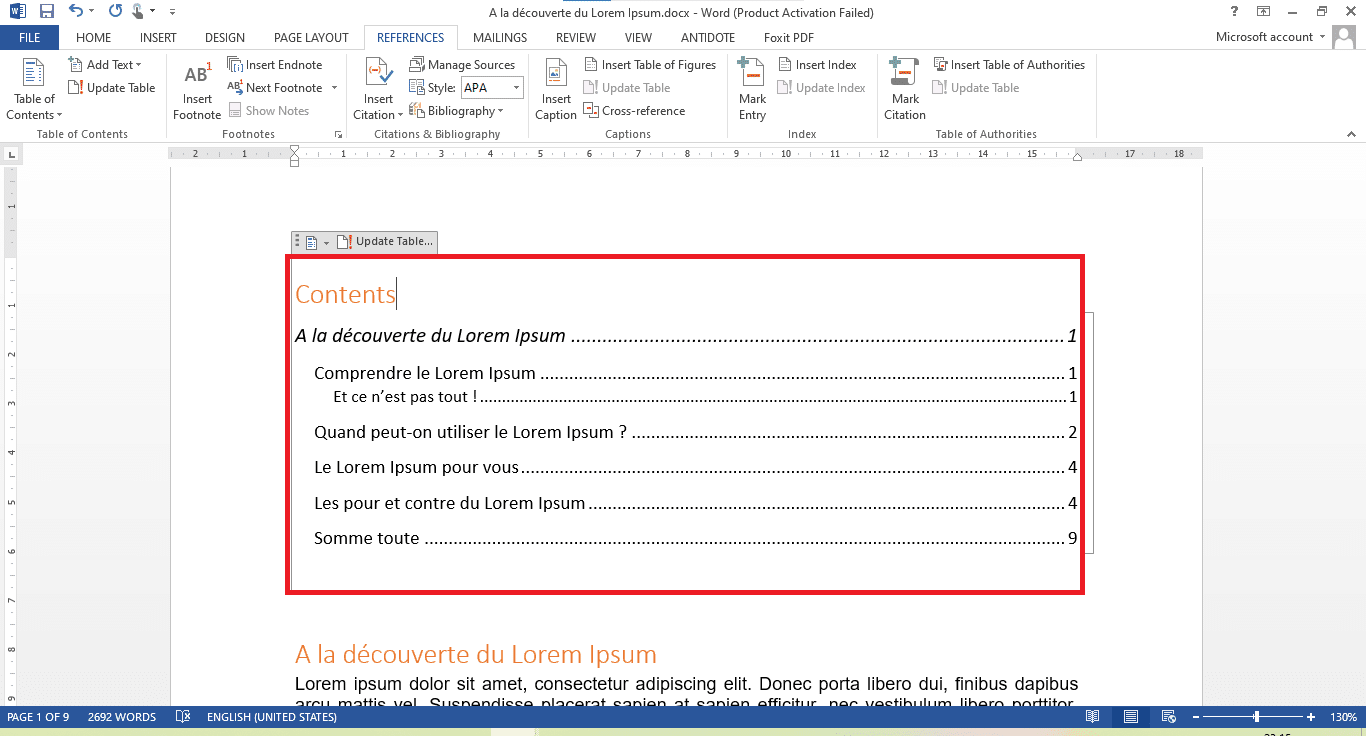
The Word Table of Contents is great for helping you automatically update your table of contents based on the content of your document. Even if you have hundreds of pages, you only have to click to update the summary. Therefore, if you happen to modify your document and the summary is turned upside down, do not panic. Do this instead:
- Position the cursor at your table of contents to display its selection frame. Locate and click on the “Update table of contents” option located at the top of the bounding box.

- Word will ask you if you want to update the entire table or just the page numbers. Choose the appropriate option (here the entire table) and click on “OK”.
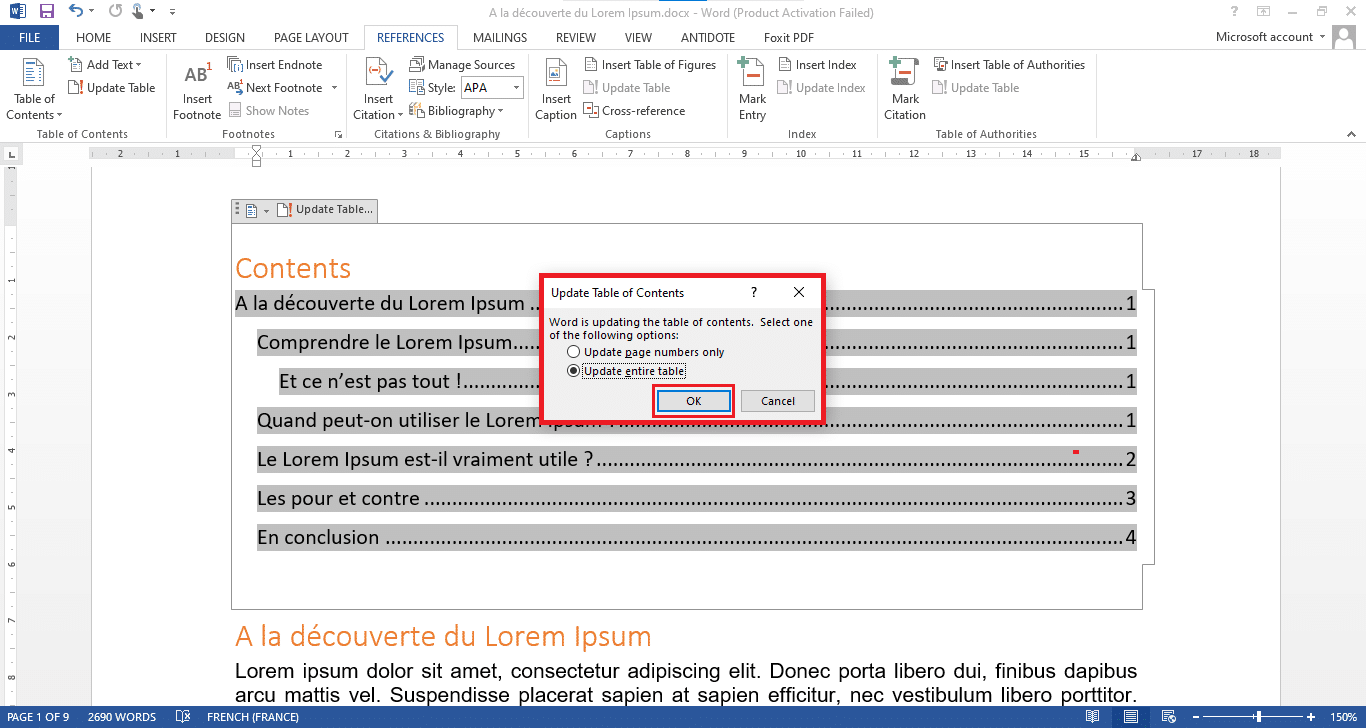
- The table of contents will automatically adapt to new titles added or deleted.
What if I have finished writing my document?
Yes, it may happen that you are now at the end of your document and you remember the summary. Do not panic, there is a solution that may be useful to you. Here, it will be a question of generating a table of contents that you will fill in yourself. The process is as simple as before, just that it will require some extra work, because you will need to know each title and the corresponding page in order to rewrite them without fail (it is possible to use copy-paste).
- Go to the “References / References” tab on the menu ribbon.
- Click on “Table of Contents / Table of Contents”.
- Choose “Manual Table / Manual Table”.
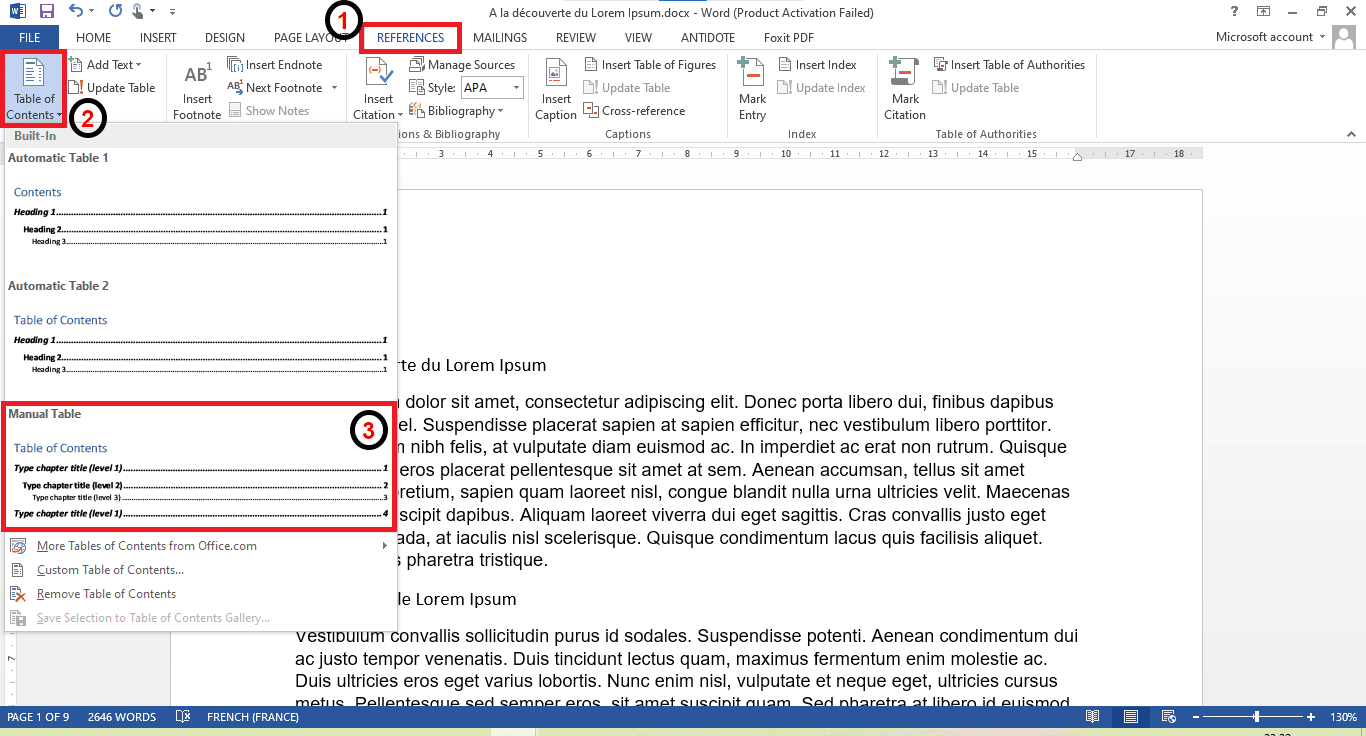
- Microsoft Word will then generate a table of contents that you will have to fill in on your own.
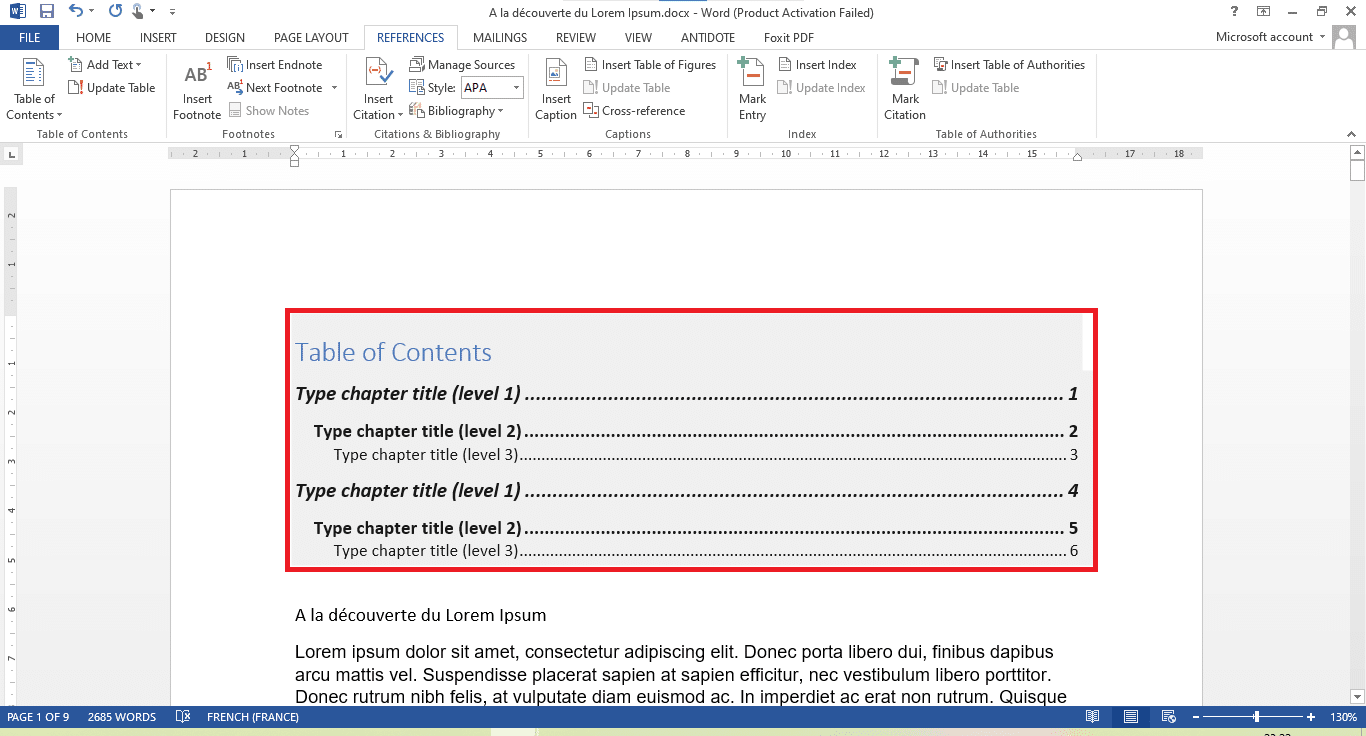
- So pay attention to the titles and the number of the pages where each title is located in order to fill them in properly. Don’t hesitate to duplicate the proposed title models in order to obtain a number of lines that corresponds to the number of titles present in your document.

A cool feature in Microsoft Word 2007 is it lets you Automatically summarize articles and find key points of the document so you don’t have to read the entire thing.
A cool feature in Microsoft Word is it lets you Automatically summarize articles and find critical points of the document, so you don’t have to read the entire thing. This saves you time and gets you to the main points in a lengthy document.
Note: Here, I’m using Word 2007, but the feature was discontinued in 2010.
Summarize a Microsoft Word 2007 Document
Open the document you want to summarize and click on the Office button.

Then click Word Options.

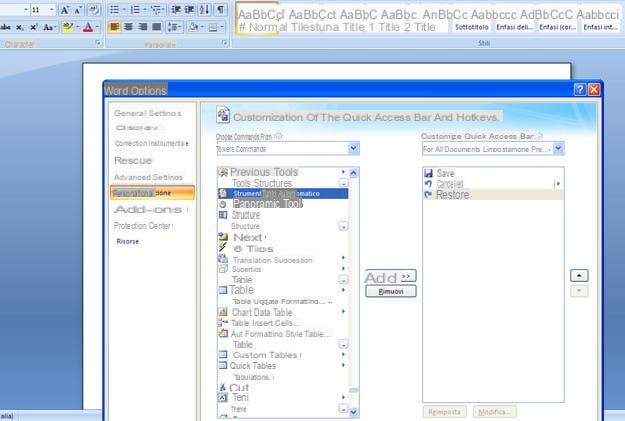
Word Options comes up. Click on Customize from the sidebar.

Open the “Choose Commands From” dropdown menu and select the “All Commands” option.

Scroll down from the list of commands and find AutoSummary Tools, click on Add and click Ok.

Click on the AutoSummarize Tools button from the Quick Access toolbar and click on AutoSummarize.

The AutoSummarize dialog box opens and shows you different options. You can select the type of summary you want and the length of the summary too.

The Highlight Key Points feature picks commonly used words and phrases from the document and highlights them.

Insert Executive Summary option will put the abstract of the document on top.

Create a new document option will use the summary above and paste it into a new document. Lastly, hiding the everything option will paste the summary of the document and will remove any extra material.
![]()
Preliminary information

Before getting to the heart of this guide and explaining, in practice, how to summarize with Word, let me give you some more guidance on the terms and ways in which this can happen.
To begin with, you need to know that all automatic summary systems, not just Word’s, use a artificial intelligence to extrapolate the important parts of the papers. The goodness or otherwise of the final summary strictly depends on the manipulation carried out by the AI which, using the original text available, must be able to «understand» its meaning and to return a synthesis of it at least legible.
Unfortunately, this does not always happen because, however precise it may be, artificial intelligence is still the result of an algorithm, which is not in any case comparable to the power of «human» synthesis.
For this reason, if you really intend to summarize your papers using a prepackaged program, be sure to reread the result and make any necessary changes.
The theme of this guide will be, precisely, to explain how to make an automatic summary of the documents, both using Word 2007 (the latest version of Word to have a feature of this type, eliminated starting from Office 2010), and using some alternative software and websites.
How to make a summary with Word 2007
How do you say? Have a copy of Word 2007 and would you therefore like to take the opportunity to summarize a particularly long document? There are no problems: the aforementioned version of Word, in fact, is the last to have the tools to create the automatic summary of the texts.
However, this does not always guarantee an appreciable result: as I explained earlier, in fact, the algorithms for generating automatic syntheses of written texts may, at times, not be effective, especially if there are words in the document that are not included in the dictionary of the program, if it is made in mixed language or, again, if it deals with multiple topics (which are difficult to distinguish from artificial intelligence).
If, despite that, you still want to try make a summary with Word, then proceed as follows: after opening the program, click on the button with the Office logo located at the top left and choose the item Word options give the menu that you come purpose.
Now, go to the section Customization located in the left sidebar, set the item All commands give menu to tendin Choose commands from and double-click the entry automatic summary tools, to add the AutoSummary tool to the Word Quick Access Toolbar. To save the settings, click on OK.
Now you can start creating automatic summaries of your documents in Word 2007: open the document you want to create a summary, then click on the button Automatic summary present in the Quick Access Toolbar of Word (top left) and, later, on the item Automatic summary located in the menu that appears.
In the window that opens, select the type of summary that you want to obtain from your document (highlighting key points, inserting the abstract at the beginning of the document, inserting the abstract in a new document or highlighting the abstract within the document), together with the length in percent compared to the original document (I advise you not to go below 25%, to obtain a result that is at least legible), and click on the button OK to view the final result.
Other methods for making an automatic summary
If you don’t have it available Word 2007, you will be pleased to know that it is possible to obtain the automatic summary of a document using some alternative systems, always with the necessary limitations. Here are some of them.
LibreOffice Writer
Writer, the text editor of the office suite LibreOffice (open source, free and compatible with Windows, macOS and Linux), allows you to automatically create theabstract, that is the summary table, of a particularly long document. In order for the synthesis to be efficient, it is essential that the file to be worked on is divided into chapters and, if provided, in sub-chapters of various levels.
Clearly, such a summary is not equivalent to a linear summary, as the inclusion of the chapters and paragraphs to be displayed for each level is done automatically, but it represents a valid tool for quickly creating summaries of theses, reports and other particularly long documents.
So, if you haven’t already done so, start by installing LibreOffice on your computer: connected to the suite’s website, click on the button Scaricate la versione xxx and wait for the program installation file to be downloaded to your computer. If you use a Mac, download theTranslated user interface in cittàn, which you can obtain by clicking on the button of the same name located on the download page of the program.
Once you have everything you need, if you use Windows, start the .msi package previously downloaded and follow the guided procedure that is proposed to you: then click on the button NEXT twice in a row, press the buttons Install and, to exit the installation program, click on the button end.
I invented a Mac, open the first of the two packages you downloaded earlier (eg. LibreOffice_xx_MacOS_x86-64.dmg) and, using the Finder window that appears on the screen, drag theicon LibreOffice in the folder Applications Mac. Next, right-click on the icon you just copied and select apri twice in a row, in order to bypass the restrictions imposed by macOS on software from non-certified developers.
After starting the program for the first time, close its main window by pressing the key combination cmd + q (or by going to the menu LibreOffice> Quit LibreOffice) and, after finishing it, launch the second package you downloaded, which should be called LibreOffice_xx_MacOS_x86-64_langpack_it.dmg.
Now, right click on the package LibreOffice Language Pack, select the voice apri from the proposed context menu, click on the button apri, Then Install and apponi il segno di spunta accanto alla voce /Applications/LibreOffice.app. Finally, click the button again Install And that’s it.
If a warning about the permits, award-winning Yes, identify me, type in the Mac administration password and click on the button OK twice in a row. For more information about downloading and installing LibreOffice, please also consult the specific guide I have dedicated to the topic.
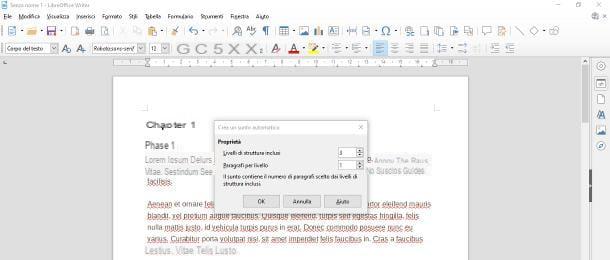
Once the installation of LibreOffice is complete, start it and click on the icon LibreOffice Writer to launch the word processing program. Once you have reached the next screen, click on the button apri (l’icona della folder at the top left) or use the menu File> Open to choose the document on which to intervene and, after importing it, go to the menu File> Send> Create Auto Summary …, to start creating the summary.
At this point, using the window that appears on the screen, define the number of structure levels included (i.e. whether to include chapters (1), sub-chapters (2) or even lower levels) and the number of paragraphs to show for each level included. When you are done, click on the button OK to create a new document containing the automatic abstract.
Online services
If not even the previous solution was able to satisfy your needs, you can try, as a last resort, to create a summary of your document using a series of online services designed for the purpose.
However, I must warn you that the result, in this case, may not always be satisfactory: it is very important that the artificial intelligence of the chosen website is able to understand, as far as possible, the meaning of the text, and this may not happen in some conditions (multilingual texts, multi-topic, with varied arguments, full of slang or dialectal expressions, and so on). Take that into account.
If you still think it is appropriate to give at least one attempt, then I recommend that you consider one of the portals that I propose below.
- TLDR This — if you have never heard this «slang» before, know that its meaning is too long; didn’t read (i.e. it’s too long, I haven’t read it). The homonymous site allows to synthesize documents, articles and other literary works of various types in some key points, using a powerful artificial intelligence algorithm. TLDR This is able, in most cases, to do its duty very well, however it is only functional for documents written in English. It’s free.
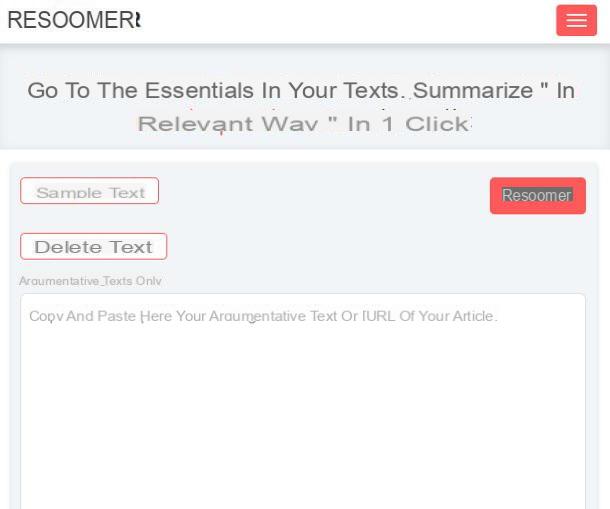
- Resoomer — it is a portal dedicated to argumentative texts and documents which, within a couple of clicks, is able to create a summary in a fully automatic mode, or by manually defining points or keywords. It supports various languages, including cittàn, and is free.
- Summazer — it is a service very similar to the one seen above which allows, within a couple of clicks, to obtain an automatic summary of a text of your choice (also in cittàn). It can be used upon free registration to the service.
How to summarize with Word
We generally see the synoptic tables reflected as text boxes within which we can express a great variety of ideas, but in a simplified and concrete way. Today I will teach you how to make or create a summary table in Word step by step and you will look like an expert with these text boxes.
How to Make or Create a SYNOPTIC TABLE in Word Step by Step
Normally, in Word we will not directly find the option to create a synoptic table , but we can draw the keys until we complete the design that you want. You can also create summary tables in Powerpoint if you find it difficult to work in Word.
Index( )
- How to make or create a synoptic table in Word and that it fits me well?
- Do you know how to organize a summary table?
- What does a summary table include?
- What is a synoptic table normally used for?
How to make or create a synoptic table in Word and that it fits me well?
Before starting, we must establish a logical structure that goes according to the order of events in the topic to be discussed. It is essential that you know how to summarize and analyze well the text that you will place so that you can divide the space on the page and organize it well.
- The first thing you should do is go to the top of Word and click on ‘ ‘ Insert ”
- Being there you will be able to see a series of options, but only ” ‘Shapes ”or ‘ ‘ ‘ Forms ” will work for you in this case
- You must look for the keysthat appear in the box and you will place them as the text must be extended or reduced.
- You can place them all and then add content or do it as they are placed. If you’re copying information from a web page or another document, it’s important to know how to deformat that textto maintain the aesthetics of your work.
If you know how to organize it, it can be very easy for you since you only have to adjust the size of the text and place the keys and you will be able to obtain a very well done synoptic table thanks to Word.
Word gives us the freedom to use all the tools in our favor and thus modify them at any time. When finished, you may want to convert that document into a JPG or PNG image to display it more easily in a presentation or on your social networks.
Do you know how to organize a summary table?
For your table to be well organized, the text must be divided hierarchically, this means according to the importance of the content, it must go from the most relevant to the least important. Normally we usually only place keywords or important texts that lead us to investigate the topic further, but in a summarized way.
Remember that it must begin with a title on the left side and from there it begins to break down with complementary ideas and small concepts. At MiraComoSeHace.com we want you to be able to create a good transition with consistency so that the receiver manages to capture the given information.
What does a summary table include?
As well as many other things, the synoptic charts have their parts which you have to know how to work so that they fit us well, but what would they be?
There are the supraordinates that consist of important elements that include others of lesser relevance, they are normally used to highlight secondary things. The coordinates have the same order and are classified in the same order, since they all have the same importance and other keys with more data do not come out of them.
The subordinates go after the supraordinates and from there information continues to spread much more, but in a comprehensive and precise way to be understood.
The correct order of the synoptic table must be from top to bottom or from left to right. Not necessarily all of them must be made up of keys, but other figures can also be used, but not in the traditional method. If you don’t think you can do it using this medium, you can Google some online generators to make your job easier.
What is a synoptic table normally used for?
This is considered a type of educational tool that helps the student to understand information much better. In some jobs it is also used to simplify a matter and be able to be precise with it. Another very useful tool is concept maps , which you can also do in Word.
The synoptic tables can be of great help to you if you know how to do them correctly, otherwise your information will not be issued correctly, so the expected objective will not have good results.