
Author:
Joan Hall
Date Of Creation:
26 July 2021
Update Date:
7 April 2023

Content
- Option 1: Electronic only
- Option 2: For printing
- Method 1: A4 size
- Method 2: Standard notebook format
- Blank notebook sheets
- Notebook sheets with handwritten text

Option 1: Electronic only
If you need to make a notebook sheet exclusively for working with Word on a PC, without the need to print a document, you just need to turn on the grid display in it and configure it correctly. For this:
See also: How to turn on the grid in Word
- Go to the tab «View» and check the checkbox «Grid»located in the tool group «Display».
- The pages of the document will be «lined» in a cell that does not go beyond the margins. Initially, there is no possibility of changing its size, for this you need to add some object, for example, a shape. This can be done in the tab «Insert»using the corresponding menu in the group «Illustrations».

See also: How to insert a shape in Word
- If the tab is not automatically opened immediately after that «Format», double-click the left mouse button (LMB) on the added object and go to it.
- In the tool group «Arrange» expand the button menu Align and select the last item «Grid options».
- Set the desired horizontal and vertical dimensions in the block «Grid step»… For a standard squared notebook sheet, this is 0.5 * 0.5 cm, but if you wish, you can make 1 * 1 cm.
Click on «OK» in order for the changes to take effect. You can delete the added shape.


On this, the task can be considered solved, but only partially — no matter what size the grid has, it will initially be inconvenient to type text on it. The location of letters and words, lines and paragraphs will depend not on the added cell, but on the selected font, its size and set spacing.

All of these values will have to be adjusted manually until a perfect match is achieved. You can do it yourself using the instructions provided on the links below.
More details:
How to change the font in Word
How to adjust line spacing in Word
How to resize margins in a Word document
As we mentioned above, the grid with guides is not printed, but this limitation can be bypassed — it is enough to take a screenshot of such a document at a scale of 100%, and then set the resulting image as the background. We talked about this in more detail in separate articles.

More details:
How to print a grid in Word
How to change the background of a page in Word
Option 2: For printing
Much more often it is required to make a notebook sheet not only or not so much for interacting with it directly in Word, but for printing. The grid is not displayed on a paper copy, and therefore the solution in this case would be to create a table or change the background mentioned above. Consider two different types of sheet — A4 size and like in a notebook, that is, having almost half the size and, which is also possible, stitched.
See also: How to make a table in Word
Method 1: A4 size
To make a notebook sheet out of pure A4 (in appearance, not in format), do the following:
- Open the tab «Insert» and expand the button menu «Table»… Select item «Insert Table».
- Specify the following parameters:
For a cage measuring 1 * 1 cm:
- Number of columns: 16;
- Number of lines: 24.
For a cell measuring 0.5 * 0.5 cm:
- Number of columns: 32
- Number of lines: 49.
Press to confirm «OK».
Important! These values are suitable if the document uses «Regular» margins — the size of the top and bottom is 2 cm, left — 3 cm, right — 1.5 cm.
- Further, despite the fact that we have set the desired number of rows and columns, the cell sizes will still need to be specified independently. To do this, select the entire table by clicking on the square element located in its upper left corner, then right-click (RMB) and select the item «Table Properties».
- In the window that opens, go to the tab «Line», check the box next to «height» and enter in the field 0.5 or 1 cm, depending on which cell sizes you created the table for in the second step of the current instruction.
- Go to the tab «Column», check the box next to «Width» and enter 0.5 or 1 cm in the corresponding field. Click on the button «OK» in order for the changes to take effect.
- If desired, the appearance of the table borders can be changed, for example, by making them blue, as is often the case in notebooks, or dashed. The tools necessary for these purposes are present in the tab «Constructor»available when the table is selected. We will not focus on the design here, as we talked about this earlier in a separate article.
Read more: How to change the color of a table in Word
- Having finished with the design, you can proceed to printing a document that looks like a notebook sheet in a cage.
Read more: How to print a document to Word


This method, unlike the one we considered in the first part, allows you to create a paper copy of a notebook sheet in A4 format, but in electronic form it is completely unsuitable for work — each cell is a separate cell of the table, and therefore it will not work to write over it.
Method 2: Standard notebook format
The method, which we will consider next, allows you to create both blank notebook sheets and whole notebooks with ready-made notes, for example, synopses.
- The first step is to resize the sheet. To do this, go to the tab «Layout», expand the button menu «The size» and select «Other paper sizes …».
- Enter the following values:
- Width: 16.5 cm;
- Height: 20.5 cm.
Press to confirm «OK».
- Next, you need to customize the fields. To do this, in the same tab «Layout» expand the menu of the button of the same name and select from the list that opens Custom Fields.
- Set the following parameters:
- Top: 0.5 cm;
- Bottom: 0.5 cm;
- Left: 2.5 cm;
- Right: 1 cm.
When finished with the setting, press «OK».
- Follow the steps No. 1 — 5 of the first part of this manual («Option 1: Electronic only»). This time, the size of the cell must be set exclusively 0.5 * 0.5 cm — this is exactly what corresponds to a standard notebook.


If you do not plan to print the resulting notebook sheet, on this the problem from the title of the article can be considered solved, but if you want to print it, or even add text to the pages that is as close to handwritten in appearance as possible, go to the next instructions.
Blank notebook sheets
Having previously followed all the recommendations from the previous part of the article, do the following:
- For a page with grid enabled and configured, set the scale to 100%.
- In any convenient way, take a screenshot of it, carefully selecting along the contour or only then cutting off the finished file, and save it to your PC.
- Set the resulting image as the background of the page. We previously wrote about how to do this in a separate article.
Read more: Set your image as background in Word


If you plan to write on notebook sheets by hand, proceed to printing them. You must first activate the item in the display parameters «Print background colors and pictures».

Next, having prepared the printer for work, go to the section «Print» and configure the desired settings. Be sure to select «Manual Printing on Both Sides», click on the button «Print» and follow further prompts.

The resulting pages will need to be cropped a little, removing the margins on which the cell is not displayed.
Notebook sheets with handwritten text
Using the layout of the notebook page we created in the previous part of the article, as well as one of the third-party fonts that imitate handwriting, you can create an almost perfect analogue of the abstract. Of course, you will have to try a little to collect the resulting sheets in a notebook, gluing them with tape, putting them in a cover and securing them with staples, but this is not as difficult as it might seem. We have previously discussed this procedure in all details in a separate article.
Read more: How to take notes in Word

Create a booklet or book
-
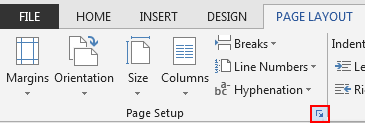
Go to Layout and select the Page Setup dialog launch icon at the bottom-right corner.
-
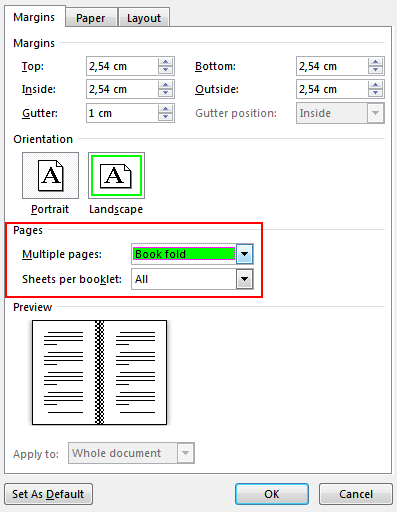
On the Margins tab, change the setting for Multiple pages to Book fold. The orientation automatically changes to Landscape.
Tip: If you have a long document, you might want to split it into multiple booklets, which you can then bind into one book. Under Sheets per booklet, choose how many pages to print per booklet.
-
Select and increase the value of Gutter to reserve space on the inside fold for binding.
-
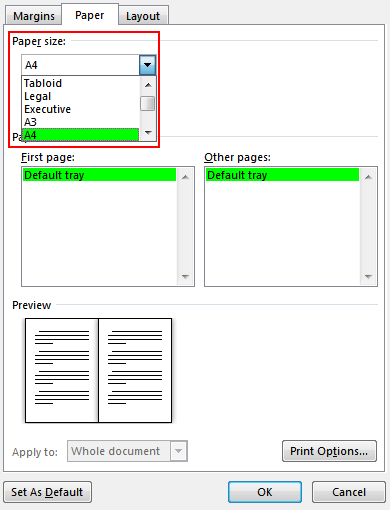
Go to the Paper tab and select the Paper size. The final size of the booklet is one half width of the paper size.
Tip: You can add many embellishments to your booklet’s appearance. For example, to add borders to every page, on the Layout tab of the Page Setup window, click Borders.
-
Click OK. If your document already has content, the text is formatted automatically, but you might need to adjust objects like images and tables manually.
Print settings for booklets
When you print the booklet, check the print settings to make sure you print on both sides of the paper and flip the papers correctly for the printing to work as intended.
-
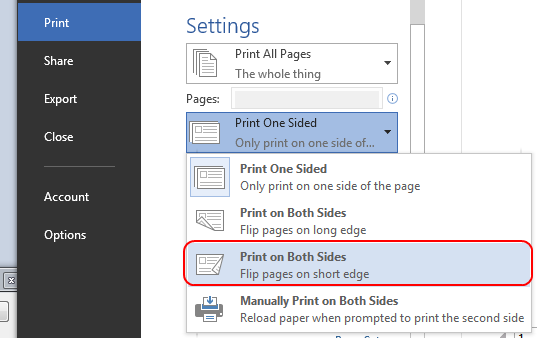
Go to File > Print.
-
If your printer supports automatic printing on both sides, change Print One Sidedto Print on Both Sides. Choose the option Flip pages on short edge to avoid printing the second side of each sheet upside down.
-
If your printer doesn’t support automatic printing on both sides, select Manually Print on Both Sides, and feed the pages back to the printer when prompted. To avoid pages from printing upside down, flip the sheets on the short edge of the paper according to your printer’s instructions.
Tip: For a professional touch, consider adding page numbers in the header or the footer. For more info, see Add page numbers.
See Also
Create a booklet using a Word template
Booklet: Page numbering tips.
Create different headers or footers for odd and even pages
Get Microsoft publishing templates
Create a booklet or book
-
Go to Layout > Margins > Custom Margins.
-
Change the setting for Multiple pages to Book fold. The orientation automatically changes to Landscape.
Tip: If you have a long document, you might want to split it into multiple booklets, which you can then bind into one book. Under Sheets per booklet, choose how many pages to print per booklet.
-
To reserve space on the inside fold for binding, increase the width of the Gutter.
-
You can add many embellishments to your booklet’s appearance. For example, to add borders to every page, on the Layout tab of the Custom Margins window, select Borders.
-
Select OK.
If your document already has content, the text is formatted automatically, but you might need to adjust objects like images and tables manually.
-
Go to File > Page Setup and check the paper size. Keep in mind that the final size of the booklet is one half of the paper size. Make sure your printer is stocked with paper of the right size.
Print settings for booklets
When you print the booklet, check the print settings to make sure you print on both sides of the paper and flip the papers correctly for the printing to work as intended. If your printer supports automatic printing on both sides, follow these steps.
-
Click File > Print.
-
Under Two-sided, select Booklet.
Tip: For a professional touch, consider adding page numbers in the header or the footer. For more info, see Add page numbers.
Note: If your printer doesn’t support automatic printing on both sides, you’ll need to print each page manually.
See Also
Create a booklet using a Word template
Booklet: Page numbering tips.
Create different headers or footers for odd and even pages
Get Microsoft publishing templates
Click “view” at the very top of your page when you open a new document in Word. Select “Notebook Layout.”.
When taking notes in class, Microsoft Word is frequently used. However, we frequently don’t make use of this potent tool because we are unfamiliar with all of MS Word’s features.
The “Notebook Layout” view in MS Word is one illustration of how taking notes can be made much more useful. It is very simple to do and can improve your ability to take effective notes and study effectively from those notes.
Click “view” at the very top of your page when you open a new document in Word. ” Select “Notebook Layout.”.
Navigate to Layout and click the Page Setup dialog launch icon in the bottom-right corner. Set the book fold under Multiple pages under the Margins tab. The orientation switches to landscape automatically.
Select the Page Setup dialog launch icon under Layout in the bottom-right corner.
Change the Multiple pages setting for the book fold option under the Margins tab. Landscape is selected as the new orientation by default.
A helpful hint is to divide a lengthy document into several booklets that you can later bind together to form a book. Under Sheets per booklet, choose the number of pages to print per booklet.
Does Word have a lined paper template?
You can print your own lined paper with customized line colors and line heights using the lined paper templates in Word. Since a table was used to create the template, you can alter the row heights or borders by first selecting the desired rows or columns, then choosing Table Properties from the context menu.
When I needed to use some lined paper but couldn’t find any, I realized that some websites offered printable versions of the paper. We previously used Word to make various printable graph paper templates, so we applied the same method to make some plain but helpful lined paper (by adding borders to tables in Microsoft Word).
With 32 mm left and top margins, this lined paper is college ruled and has rows that are 7.1 mm wide.
With 32 mm left and top margins, this lined paper has a wide grid with 8 points and 7 mm rows.
How do I make a Word notebook template?
Launch Microsoft Word to begin creating notebooks and journals. Open Microsoft Word from the Start menu or your desktop. On the Page Layout tab, click You will see a Page Setup option on the drop-down. dot. Paragraph formatting is required. dot. Select the Home tab. dot. Select “Tab” from the menu. dot. Save the new look. Construct your paragraph line.
Writing is a pastime for many people. Some people enjoy writing for fun, while others must do it for documentation’s sake. While some people enjoy keeping notebooks and journals, others feel compelled to keep them because their memories frequently fail them. Nonetheless, if you are up for it, creating journals and notebooks can be enjoyable.
You can choose to make your own templates for your notebook or journal by doing the following, although there are a few that you can download online.
Open Microsoft Word from the Start menu or your desktop.
What is the name for the layout of books?
Interior book design, also known as “typesetting,” is a skill. It involves all of the choices that affect how readers experience the information in your printed book, including fonts, spacing, chapter heading styling, margins, etc.
“I’ve seen far too many books with beautiful covers but poorly written interiors. When you open it, the food inside looks dull and brown, despite the excellent packaging. My appetite has vanished, even though it may still be nourishing.”.
Erik Spiekermann, one of the most renowned book designers and typographers in the world, says as much. The craft of creating a book’s interior is known as “typesetting” or book layout design. It involves all of the choices that affect how readers perceive the information in your printed book, including fonts, spacing, chapter heading styling, margins, etc. A book layout designer will take care of all of this for you and create a print format that meets the demands of your genre’s readers.
Many authors undervalue the significance of this step and fail to recognize how the design of a book’s layout can actually make the difference between a good and bad reading experience. The font, type size, line spacing, chapter headings, and margins used in a strong book interior should all work together harmoniously to create a pleasing visual whole. Naturally, the more diverse the book’s content (charts, illustrations, photographs, recipes, poems, etc.) the better. the more vital the typesetter’s work becomes.
How do I make a notebook layout in Word?
Click “view” at the very top of your page when you first open a new document in Word. ” Select “Notebook Layout. You will then see a lovely illustration of a notebook page with a “Title” margin at the top and the date and time already entered.
When taking notes in class, Microsoft Word is frequently used. However, we frequently underutilize MS Word because we are unfamiliar with all of its features.
The “Notebook Layout” view in MS Word is one illustration of how taking notes can be made much more useful. It is incredibly simple to do and can improve both your ability to take effective notes and your ability to study more effectively from those notes.
Click “view” at the very top of your page when you open a new document in Word. ” Select “Notebook Layout.”.
I want to make a Word template for a notebook.
Launch Microsoft Word to begin creating notebooks and journals. Microsoft Word can be accessed from the desktop or Start menu. the Page Layout tab. You can select Page Setup from the drop-down menu. dot. Format the line of the paragraph with a dot. Go to the Home tab. Choose the Tab option. dot. Save the new look. Establish your paragraph line.
People who enjoy writing are numerous. Some people enjoy writing for fun, while others must do it for documentation’s sake. Others feel compelled to keep journals and notebooks because their memories frequently fail them in the most inconvenient situations, while some people enjoy keeping them. Nonetheless, if you are up for it, creating journals and notebooks can be enjoyable.
While there are a few templates available for your notebook or journal to download online, you can also decide to make your own by doing the following:
Open Microsoft Word by going to your desktop or Start Menu.
How can I make a Word document appear like a journal?
To the right of the words “Page Setup” at the bottom of the menu, click on the tiny drop-down arrow. Subtract all of the margins from the width of your book. Activate the Home tab to do that. Click the tiny arrow next to “Styles,” then select the Note Line style by clicking the drop-down arrow. Decide on “modify.
The steps below will show you how to create note lines in Microsoft Word without using multiple underscores, which frequently result in improper formatting when used for blank lines in books that readers can write on, such as a journal or workbook.
We’ll then configure the note line’s formatting.
To add lines to the document, change the paragraph line style to “note line” and press “Tab” once.
How do I make a paper layout in Word?
Select a section’s paper size by clicking Page Setup under Document on the Format menu. Choose a paper size from the Paper Size list, then click OK. Selected sections can be selected from the Apply To list.
In Word for Mac, you have the option to select a predefined paper size from a list and alter it for all of the pages in your document, a single page, or a single section. Additionally, the default paper size for brand-new documents is changeable.
Word uses the standard margins and paper size that are saved in a template (normal.dotm) when you create a new document. You can change the defaults Word uses when you create a new document if you frequently use a different paper size (for instance, US Legal). You can use this document to set your new default margins if your current document is already set up with the margins you desire.
You can also design a custom paper size and select various paper sources for the pages in your document in Word 2016 for Mac. Choosing different paper trays enables you to use different paper for your first page, which could be a different color or heavier weight than the other pages.
Does Microsoft Word include a template for a notebook?
Make a digital notebook by taking notes using this simple daily note template. Use this simple, minimalist note-taking template for Word to organize your ideas and tasks. Using the free OneNote app, you can use this note template to automatically sync notes across all of your devices.
I need to know how to make a notebook layout in Word.
Click “view” at the very top of your page when you first open a new document in Word. ” Select “Notebook Layout. When you click on it, a nice image of a notebook page will appear with the title inscribed in the top margin and the date and time already entered.
The majority of the time, we use Microsoft Word to take notes in class. Our inability to fully utilize MS Word, however, is a result of our lack of familiarity with all of its features.
Using the “Notebook Layout” view in Microsoft Word is one example of how taking notes can be much more useful. It is incredibly simple to do and can improve your capacity to take insightful notes and study effectively from them.
When you first open a new document in Word, click “View” at the very top of the page. Pick “Notebook Layout.”.
How do you plan the layout of a book?
Designing the Ideal Layout SIZE in 9 Simple Steps for a Book You must first comprehend the kind of project you are handling. dot. BINDING. What kind of sturdy soft-cover binding you’ll be using for your book is an additional important factor to take into account. dot. OUTLINE. dot., lines, and margins dot. TYPOGRAPHY. dot. TEXT COPY dot. images. dot. navigation.
At PrintingCenterUSA, we make it a priority to streamline every step of the designing, ordering, and printing of your projects. To help you create a print-ready PDF file, we also offer templates and content. We can take your recipe book, children’s book, memory book, photo book, business book, etc. and deliver a gorgeous, expertly produced item right to your door if you take advantage of our abundance of design resources.
It can be difficult to design the layout for your book, though. It’s time to put your magazine, catalog, or program’s content together into a visually appealing package after you’ve already put in a lot of effort creating it. For you to finish your project, we’ve provided some simple instructions and advice. You will be completely prepared to self-publish your book if you combine these suggestions with our free templates and online design tool.
Every book is special and deserving of individual attention. Consistency in book layout treatment is crucial to establishing authority, legibility, and nuance. Create an outline for your project, establish some ground rules, then plug in and go. The solution must be so natural and well-done that the reader doesn’t even consider the layout. Nothing should detract from your work; the goal is to present your content to the reader or viewer as clearly as you can.
In Word, how do I create a notebook layout?
When you first open a new document in Word, click “View” at the very top of the page. Decide on a “notebook layout.” When you do, you will see a lovely illustration of a notebook page with a top margin labeled “Title” and the date and time already entered.
When taking notes in class, Microsoft Word is frequently used. Our inability to fully utilize MS Word, however, is a result of our lack of familiarity with all of its features.
Using MS Word’s “Notebook Layout” view is one example of how taking notes can be made much more useful. It is very simple to do and can improve your ability to take effective notes and study effectively from those notes.
When you open a new document in Word, go to the very top of your page and click “view. Decide on “Notebook Layout.”.
Is there a way to make a Word document resemble lined paper?
Now that you have a line sheet, you can simply copy it and paste it in a document in Microsoft Word online. Sheet. That’s all. Thanks for watching the article.
Why is the Word notebook layout no longer available?
The notebook layout feature is no longer available in Word for Mac’s more recent releases. However, Charles Kenyon offers a free template for a notebook template on his website. To access that template file, download it from there and extract the Zip file.
How do I use Microsoft Word as a notebook?
Let’s start by creating a new notebook document in the office project gallery. You can see that the document is set up with tabs for lined paper, like a notebook.
To make your Word document look like a notebook, you will need to start by modifying the document background. Go to the “Design” tab on the ribbon menu, and select “Page Color”. Select a light tan color as your background.
Next, go to the “Insert” tab and select “Shapes”. From here you can choose either a rectangle or an ellipse shape, then adjust the size so it matches the size of the page. Give the shape a light tan color, and reduce the transparency until it appears slightly darker than the page color.
Finally, add a “Ruled Line” shape to your document. You can adjust the line weight and color to create a more realistic notebook paper look. Repeat this process until you have the desired amount of lines.
This will give your document a more notebook-like appearance.
Does Word still have notebook Layout?
Yes, Microsoft Word still has notebook layout, which is available in all versions of the software. The notebook layout provides an arrangement that allows for easy organization of documents and pages.
It is composed of sections, which you can further divide into smaller pages. The notebook layout also includes a simple method for copying and pasting content from one page to another, making it easier to create outlines or documents with multiple pages.
To access the notebook layout, open a new or existing Word document, then select the Layout tab. From there, choose the “Notebook” layout option. You can then start organizing your document into sections, as well as add images, tables, and other elements.
Can you get lined paper on Word?
Yes, you can get lined paper on Word. Microsoft Word has a built-in template that can easily be used to create lined paper. To get lined paper on Word, open a new document in Microsoft Word, and then select “Page Layout” > “Page Background” > “Watermark.
” You should see a drop-down menu with an option for “Lined Paper. ” If you select this option, Word will create a lined paper style document, with horizontal lines spaced at specific intervals. You can also customize the font, size, and spacing of the lines by clicking on “Format Watermark” in the Page Background tab.
Additionally, you can download a variety of lined paper templates for Word from the Microsoft Office website, or other online sources, that you can use to create lined documents with more specific lines and customization options.
How do I make a lined paper template in Word?
You can make a lined paper template in Microsoft Word with the ‘Table’ tool.
First, start a new Word document and select ‘Insert’ at the top of the page. From the drop-down menu, select ‘Table’. You will be prompted with a dialog box to specify the dimensions of the table.
To make your lined paper, you want to make the cells narrow and numerous. Input ‘1’ in the ‘Number of Columns’ and ‘400’ in the ‘Number of Rows’. This will create a table with 400 rows, one column. Click ‘OK’.
Once the table is created, you will still need to customize it to get the look of a lined paper. When you are in the table, click anywhere inside the table and click ‘Table Properties’ at the top of the page.
This will launch a dialog box. Under the ‘Table’ tab, under ‘Options’, you want to make sure the ‘Allow Row to Break Across Pages’ is not checked. This will make sure the entire table appears on one page.
After this, move to the ‘Row’ tab. Here you will want to adjust the row heights. Click the ‘Specify Height’ checkbox and enter a size of ‘8’ in the ‘Row height is’. Click ‘OK’.
You can make additional modifications to the table through the ‘Table Tools’ Format tab. Here you can adjust lines, add shading, and more.
Once your desired modifications are made, simply just type something into each of the cells and ‘Save As’ a template. This will make it so whenever you open the template again, it will be lined and ready for use.
With this method, you can make a lined paper template in Microsoft Word.
How do you put writing lines in Word?
To put writing lines in Microsoft Word, you will need to first click the “Insert” tab. From there, click the dropdown menu labeled “Shapes. ” On the sidebar that appears, select the “Lines” option. This will open a new set of shapes in the center of the page.
If you would like a writing line, click the “Line” option near the top of the list.
You can also customize your writing lines by changing the thickness, length, and direction of your line. To do this, you will need to right-click on the line you have chosen and select “Edit Shape” in the drop-down menu that appears.
From here, you can adjust the line’s length, thickness, and direction. You can also rotate the line to any angle you prefer.
Once you are finished adjusting your line to your desired specifications, simply click “OK” in the bottom-right corner of the pop-up window. This will save your changes and insert the writing line into your Word document.
How do I print my own lined paper?
The easiest way to print your own lined paper is to create it using a word processing program such as Microsoft Word, Pages, or Google Docs, and then print it off from your printer directly. When creating your document, start by formatting the number of columns you want.
If you plan on writing on both sides, you’ll need to set up a left and right margin. Next, set up your lines by selecting the ruler bars at the top. Select your font, size, and line spacing preferences, and mark off your guidelines for the lines (use the small square and triangle buttons on the ruler to drag the guidelines down onto the paper).
Once you’ve finished setting up your document, you’re ready to print. Simply hit ‘print’ and your lined paper will come out of your printer. If you need to customize your paper further, you can look into downloading a lined paper template or using a graphics program to design your own.
How do I get the notebook layout in Word?
If you are looking to create a notebook-style layout in Microsoft Word, there are a few different ways to go about doing so.
The first option would be to search for template options that are pre-designed to replicate a notebook look. You can find these templates in either the “New” or “Sample” tab of the Home page in Microsoft Word.
You may also be able to find template options through an internet search.
Another option available to you would be to manually format a notebook layout within Microsoft Word. You can add a lined or dashed border around the page, and if you have a page with multiple columns, you can also adjust each column’s width and spacing to further mimic the look of a notebook.
Once the basic layout is designed, you can experiment by adding more graphical elements such as clipart to enhance the notebook look.
If the goal is to replicate an age-old feel for the notebook, you can also adjust the font of the text to a more antiquated style. Lastly, to complete the notebook layout, you can add a title and subtitle to the top of the page, as well as a date for each document.
By following these tips, you can easily create a notebook-style layout in Microsoft Word.
Does Word have a notebook paper template?
Yes, Word has a notebook paper template that you can use to create documents that look like they have been written on a physical notebook. To access the template, open Word, click File, then select New.
On the right side of your screen, you will see a search bar at the top of the page. In the search bar, type in “notebook” and press enter. This will bring up a list of notebook paper templates. Select the one that you want and Word will open a new document with the notebook paper template ready to use.
You can customize the template by adding text, images, and formatting it however you want.
Does OneNote have lined paper?
Yes, OneNote does have a lined paper template. This can be found in the “Page Templates” section when you create a new page, under the “Organize and Structure” section. Just select the “Lined Paper” template from the list of available templates.
This template will create a page with standard blue lines, like a standard sheet of lined paper. You can then type or hand-write your notes directly into the template. To change the line spacing or color of the lines, right-click the template and select “Page Color and Rule Lines”.
This will open a dialog box in which you can customize the size, space and color of the lines on the page. You can also choose whether or not to add margins. Once you’re happy with your lined paper template, you can save it off as a template to use again in the future.
How do you type on a line in Word without moving the line?
If you need to type on a line in Microsoft Word without moving the line, you can use the textbox feature. To do this, go to the Insert tab on the ribbon, then select Text Box > Draw Text Box. This will allow you to draw a textbox anywhere on the document.
When you have the text box where you want it, click inside the text box and start typing. The text box will keep the text that you type within the boundaries of the box instead of moving the line the text is on.
How do you put a decorative border around a text box in Word?
To put a decorative border around a text box in Word, start by putting the text box within your document. To do this, go to the “Insert” tab and choose either the Text Box or the Drawing Tools Format tab, depending on your version of Word.
Then, click “Draw Text Box” and draw the text box in your document. Once the text box is in place, select the box, then access the “Drawing Tools Format” tab. From there, you can use the Shape Outline drop-down menu in the Shape Styles section to choose your desired border style.
Finally, adjust the color, weight, and other formatting options for the border as desired to make a decorative box around the text box.
What is text box in MS Word?
A Text box in Microsoft Word is a graphical element used to create a frame around an area of text. Text boxes are used to draw attention to particular blocks of text, pull together different pieces of text, help group together certain elements, or to create a visual design element.
Text boxes offer a variety of options and visual effects, such as drop shadows, 3D effects, or semi-transparent colors. They also act as a container, letting you move or resize particular chunks of text in a document.
To insert a text box, click the Text Box button in the Insert tab and select a text box style. Once created, you can move, size, and modify the text box as desired. You can also add text and other forms of information, including text formatting, images, and shapes.
Text boxes are a powerful designing tool for adding interesting but professional elements to any document.
How do I get the notebook layout in Word?
When you open a new document in Word, go to the very top of your page, and click “view.” Choose “Notebook Layout.” When you do, you will get a nice representation of a notebook page with a top margin marked “Title,” and the date and time already added.Sep 4, 2011
How do I create a simple template in Word?
Click the File tab, and then click New. Under Available templates, click New from existing. Click a template or a document that is similar to the one that you want to create, and then click Create New. Make the changes you want to the margin settings, page size and orientation, styles, and other formats.
Can you make a diary on word?
Click ‘Start’ : Word Diary Creator application can automatically create a Microsoft Office Word document includes a calendar and daily diary,them can be connected with each other.
Does Microsoft have a diary?
Here you go, the Diary fulfills it all. Diary is a simple application which lets you write daily thoughts/ideas/memories with a simple user interface. Add a visual touch to your memories attaching a photo. The auto-save feature saves your entries as you type with out the hassle of another save button.Mar 4, 2013
What is a journal paper format?
Most journal-style scientific papers are subdivided into the following sections: Title, Authors and Affiliation, Abstract, Introduction, Methods, Results, Discussion, Acknowledgments, and Literature Cited, which parallel the experimental process.Oct 2, 2014
Does Word still have notebook layout?
Word, however, no longer offers the «notebook layout feature«, which allowed one to organize work into notebooks with multiple tabs.Jun 16, 2020
Is there a notebook template for Word?
Use this accessible daily notes template to take notes and to make a digital notebook. Organize your thoughts and tasks with this clean, minimal note-taking template for Word. You can use this notes template to automatically sync notes across your devices, using the free OneNote app.
What happened to Word notebook Layout?
Notebook Layout no longer exists in the newer versions of Word for Mac . . . However, Charles Kenyon provides a free template for a Notebook Template on his website, download that from there, extract the Zip file to access that template file . . . Standard Disclaimer: This is a non-Microsoft website.Jan 5, 2020
What are templates in MS Word?
In Microsoft Word, templates are pre-designed documents that you or someone else (such as Microsoft) creates to use as a pattern for a project. The template could be for a business card, brochure, resume, presentation…the list goes on.Jan 22, 2020

Related
How do you make a Microsoft Word template?
-
Open a document that will function as the base for your template. Click on the Office button and select Open from the menu. Double-click on the name of the file you need. If you want to create a template from a blank document, click the Office button, choose «New» and double-click the blank document icon.
Related
How do you insert a template in Microsoft Word?
-
Microsoft Word Templates. While in the document that you want to use as a template, place your cursor where you want the field inserted. To insert a field in MS Word 2007, go to the Insert tab of the ribbon. Click on Quick Parts, and then click Field. If you are creating a template in Word 2003 or an earlier version,…
Related
How do you make a memo template in Microsoft Word?
-
Click START, then point to Programs and MS-Office. Click MS-Word. Click on File > New. From the available Templates, click Memos. Select the Memo style of your choice. Preferred styles are Contemporary or Elegant. Double-click the memo style to download it.Your memo will download to Word.
Related
What is a Microsoft Word document template?
-
For those unfamiliar with templates, here’s a quick explanation: A Microsoft Word template is a type of document that creates a copy of itself when you open it. This copy has all of the design and formatting of the template, such as logos and tables, but you can modify it by entering content without altering the original template.
Related
What is a word diary template and how to use it?What is a word diary template and how to use it?
A word diary template is really useful when you are looking to keep an account of your tasks and activities. It could be your studies or domestic chores or details about your meal intake. Usually, the diary is maintained for daily activities but some of the templates even offer you to keep a weekly log.
Related
Are You planning to maintain a diary?Are You planning to maintain a diary?
Usually, the diary is maintained for daily activities but some of the templates even offer you to keep a weekly log. Are you too planning to maintain a diary? Well, you can save yourself much of the hardwork here by taking to Word templates especially created for diary documents. You can also see Baby Book Templates.
Related
Are there any free daily planner templates available?Are there any free daily planner templates available?
We offer following 21 Free Daily Planner Templates in MS Word, MS Excel and in PDF format to enable you plan and manage your Day to Day Working efficiently. You can also checkout our collection of Attendance Sheet Templates to keep track of your attendance as well.
Related
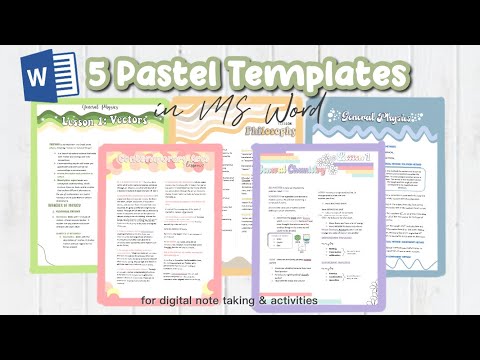
What are notebook and Journal templates in word?What are notebook and Journal templates in word?
Notebook and journal templates in Word are pre-formatted Microsoft Word document files used for making (yeah, you guessed it! 😀 ) notebook and journal designs. As a graphic design file, it contains all the text, image, layout, and formatting elements needed to create a notebook or journal.