
Show the Developer tab
If the developer tab isn’t already visible, see Show the Developer tab.
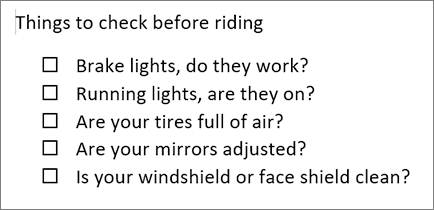
Make your list
-
Type the list.
-
Go to Developer and select the Check Box Content Control at the beginning of the first line.

-
To change the default X to something else, see Make changes to checkboxes.
-
Copy and paste the check box control at the beginning of each line.
-
Select a checkbox to put an X (or other character) in the check box.
Add hanging indentation
If some list items are more than one line long, use hanging indents to align them.
-
Select the list. Bullets or numbers won’t look selected.
-
Go to Home and select the Paragraph dialog box launcher
. -
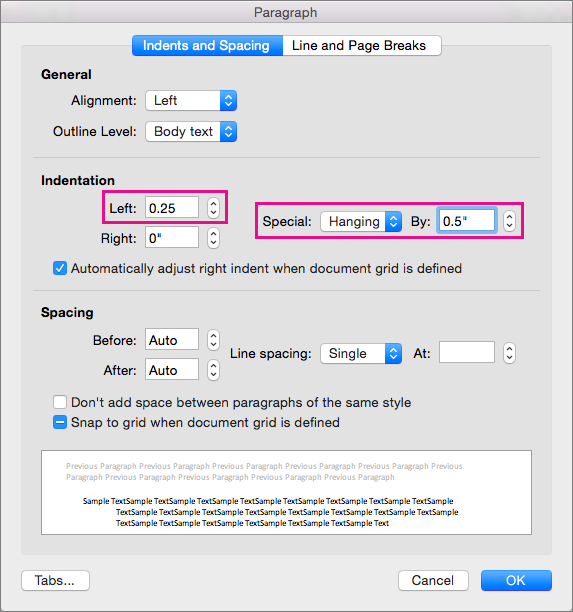
Under Indentation, in the Left box, type 0.25.
-
Under Special, choose Hanging.
-
For By, Word sets a default value of 0.5 inches. Change this if you want your additional lines indented differently.
-
Select OK when finished.
 .
.Lock the text and controls to prevent changes
-
Select the list and checkboxes.
-
Go to Developer >Group > Group.
To unlock the list, select the list and choose Group > Ungroup.
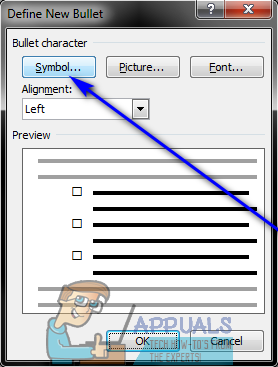
Create a print only list
-
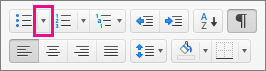
Go to Home and select the down arrow next to the Bullets button.
-
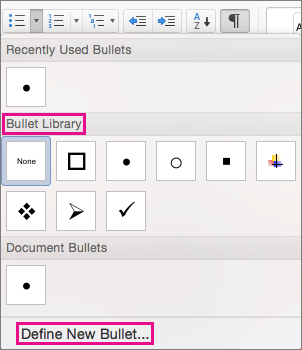
In the drop down menu, select Define New Bullet.
-
Select Symbol and find a box character. If you don’t initially see one, change Font to Wingdings or Segoe UI Symbol.
-
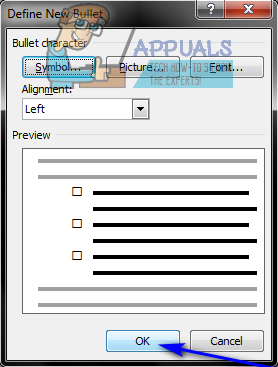
Select OK twice, and create your list.

Make a checklist you can check off in Word
To create a list that you can check off in Word, add content controls for checkboxes to your document.
Show the Developer tab
For more info if the developer tab isn’t already visible in Word, see Show the Developer tab.
Make your list
-
Create your list.
-
Place you cursor at the start of the first line.
-
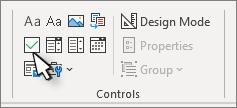
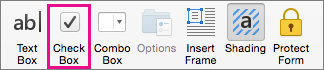
Go to the Developer tab, and then click Check Box.
-
If you want a space after the check box, press Tab or Spacebar.
Use a Tab character if you want to format the list item with hanging indentation, like Word applies to bulleted lists.
-
Select and copy (⌘ + C) the check box and any tabs or spaces.
-
Place the cursor at the start of the each list item, and paste (⌘ + V ) the copied check box and characters.
-
Paste the checkbox at the start of each line in your list.
Add hanging indentation
If some of the list items are longer than one line, use hanging indentation to align them.
-
Select the list.
-
Go to Format and select Paragraph.
-
Under Indentation, type 0.25 in the Left box.
-
In the Special list, choose Hanging.
For By, Word sets a default value of 0.5 inches. Change this if you want your additional lines indented differently.
Make a print only check list
You can replace the bullets or numbers in a list with another symbol, such as a box can be checked on a printed version of your document.
-
Select the entire list.
-
Select Home and select the arrow next to Bullets.
-
Select Define New Bullet.
-
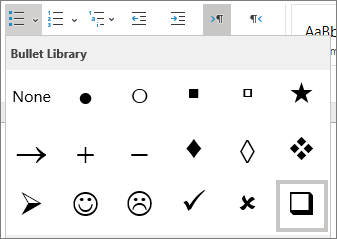
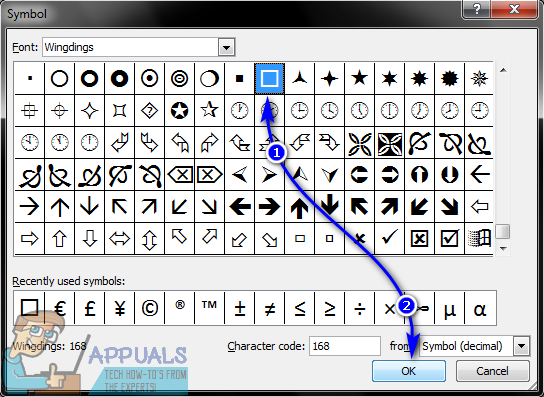
Select Bullet, and choose a symbol from the table of symbols.
For more choices, in the Font box choose a symbol font, such as Wingdings.
-
Select a symbol to use, such as an open box (
) or a three-dimensional box (). -
Select OK, and then select OK again.
 ) or a three-dimensional box (
 ).
).Word for the web supports only the on-paper form of checklist.
-
Write your list, and then select it.
-
On the Home tab, choose the down-arrow next to the Bullets list to open the bullet library, and then choose the checkbox symbol.
It is entirely possible for users to create entire checklists in Microsoft Word. Using Microsoft Words and the wide, wide range of features the word processor has to offer to users, you can comfortably create a checklist with as many items as you want that you can then check off. Planning a trip and need to make a checklist for everything you need to get done before you can head off? Planning to cook something using a recipe and need to make sure you perform every single step and do so in the right order? These are exactly the kinds of situations that simply scream checklist, and you can quite easily make a checklist using Microsoft Word.
Users can create two different kinds of checklists using Microsoft Word – checklists with check boxes and check marks instead of bullets or numbers (this is the recommended kind of checklist for users looking to create a checklist and then print it out so that they can check off the items on it by hand) and lists that you can check off in Word itself (this is the recommended kind of checklist for users who want to be able to check items off the list in Word itself instead of printing the checklist out, and this kind of checklist requires users to add a content control to the checklist they create).
The ability to create checklists exists of all versions of Microsoft Word – from Microsoft Word 2007 all the way up to Microsoft Word 2016. However, the exact steps you need to go through in order to create a checklist in a Microsoft Word document vary slightly between the different versions of Microsoft Word. Without further ado, here’s how you can create a checklist of basically any version of Microsoft Word that is currently and commonly used:
Create a bulleted checklist with check boxes instead of bullets
If you are simply looking to create a checklist with check boxes that you can create and then print out so that you can check the items off by hand, you can create a bulleted checklist with check boxes instead of bullets and then print it. In order to do so, you need to:
- Launch Microsoft Word and create a new document.
- Type out the list of items (using bullets or numbers) you want to create a checklist out of.
- Once you have typed out the entire list, highlight and select it. The bullets or numbers you used for the list will not be highlighted, but don’t worry.
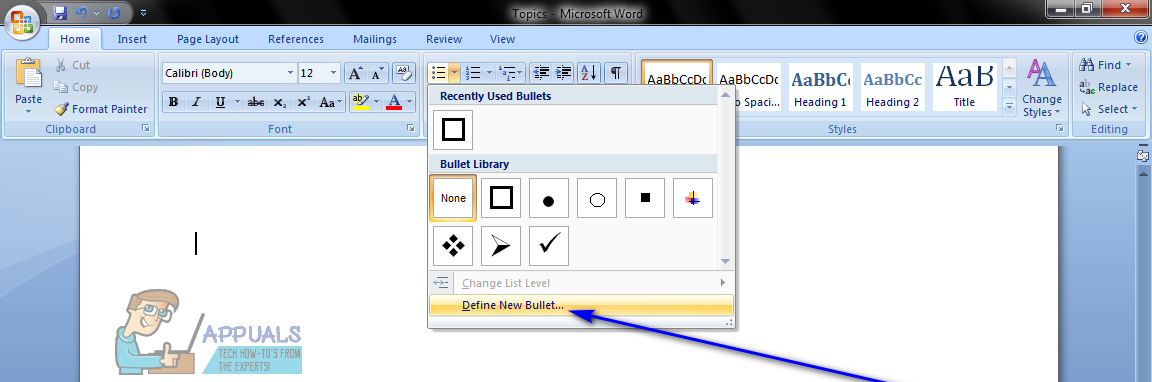
- Navigate to the Home tab in the toolbar, and click on the arrow next to the Bullets option in the Paragraph section.
- Click on Define New Bullet….

- Click on Symbol….

- Open the dropdown menu located right next to Font: and click on a symbol font installed on your computer (Wingdings, for example) to select it.

- Scroll through the list of available symbols, looking for a symbol that either is a check box or resembles one enough to be passed off as one and function as one. If you don’t find such a symbol in the font you selected, simply switch to a different symbol font. Once you find the check box you want to use, click on it to select it and click on OK.
- Click on OK in the Define New Bullet dialog. As soon as you do so, every item in the list you typed out will have a check box next to it, turning the list into a checklist.
Once you have your checklist, you can simply save the Word document and print the checklist out if you want to.
Create a checklist you can check items off of in Word
On Microsoft Word, you can also create a checklist you can interact with using Word itself – you can save the checklist as a Word document and then check items off it on your computer using Word. To create a checklist you can check items off of in Word, you need to:
On Microsoft Word 2007
- Launch Microsoft Word and create a new document.
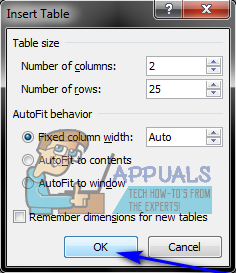
- Navigate to the Insert tab in the toolbar, click on Table in the Tables section and click on Insert Table….

- Type 2 into the Number of columns field, and type however many rows you want to have in the table for however many items your checklist has into the Number of rows field. Once done, click on OK and your table will be created.

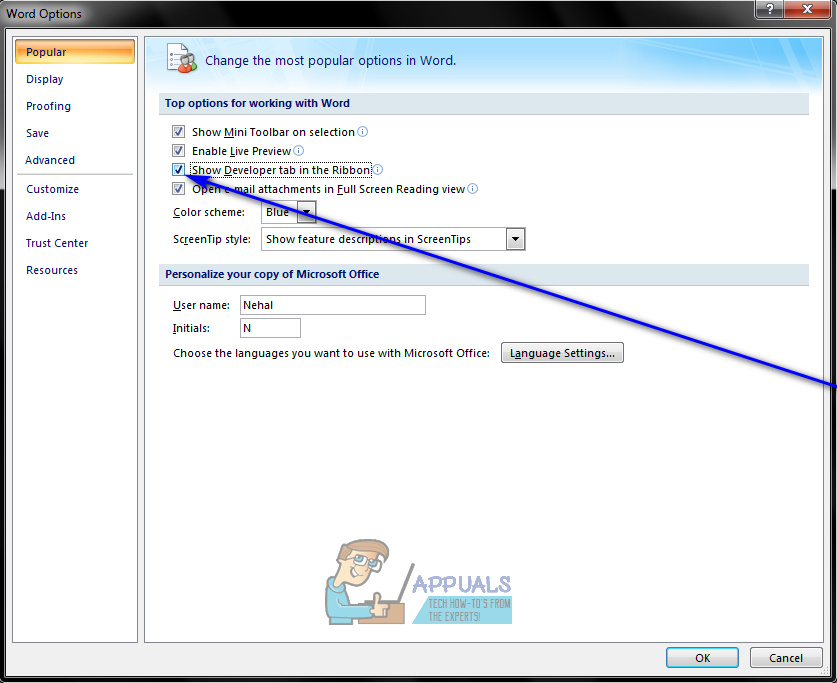
- Click on the Microsoft Office logo button in the top left corner of your screen, click on Word Options in the resulting menu and, in the Popular tab, enable the Show Developer tab in the Ribbon option by checking the check box located directly beside it. Once done, click on OK.

- Click on the top left cell of the table you created in step 3, navigate to the Developer tab in the toolbar and click on Legacy Tools in the Controls section.
- Click on Check Box Form Field under Legacy Forms. Once you do so, a check box should appear in the top left cell of the table. If the check box has a gray background, click on Legacy Tools in the Controls section of the Developer tab, and click on Form Field Shading to disable it and remove the gray background.
- One by one, click on every single cell of the table you want to have a check box in, and press Ctrl + Y in each one to insert a check box.
- Once you have added a check box to every single cell in the left column, start typing the items that make up your checklist in each of the cells in the right column.
- Right-click on the table, hover over AutoFit and click on AutoFit to Contents to select it.
- Right-click on the table, click on Table Properties, navigate to the Table tab, click on Options, type a number representing the amount of space you want there to be between a check box and the checklist item it corresponds to (the recommended number is 0.02) into the Left and Right boxes, and click on OK.
- In the Table tab of Table Properties, click on Borders and Shading, navigate to the Borders tab, click on None under Setting, and click on OK. Any borders you see on the table after doing so will only be to show you where the outlines of the table lie – these will not be visible in any prints.

At this point, you will have successfully created a checklist in Microsoft Word 2007. However, to be able to check items off this checklist by simply clicking on their corresponding check boxes, you need to lock the document. With the document locked, however, you will only be able to check items off the checklist – you will not be able to edit any other parts of the document unless you first unlock the document. To lock a checklist so that you can check items off it in Microsoft Word, you need to:
- Click on Design Mode in the Controls section of the Developer tab to make sure that it is disabled.
- Click on Protect Document in the Protect section of the Developer tab, and click on Restrict Formatting and Editing.
- Under Editing restrictions, enable the Allow only this type of editing in the document option by checking its check box.
- In the list of available editing restrictions, select Filling in forms.
- Under Start enforcement, click on Yes, Start Enforcing Protection.
- Assign a password to the document (so that only users who know the password can unlock the document) by typing a password into the Enter new password (optional) field, and then confirming the password. If you choose to skip this step and not assign a password, anyone will be able to unlock the document and edit it.
Once done, you will be able to check items of your checklist by simply clicking on their corresponding check boxes. If you want to edit any other parts of the document, you can simply unlock it by clicking on Protect Document in the Protect section of the Developer tab, clicking on Restrict Formatting and Editing and clicking on Stop Protection in the Protect Document dialog. If you do unlock the document containing the checklist, be sure to lock it afterwards to be able to continue checking items of the checklist.
On Microsoft Word 2010, 2013 and 2016
- Click on File > Options > Customize Ribbon.
- Open the dropdown menu located directly under Customize the Ribbon: and click on Main Tabs to select it. In the Main Tabs list that appears, enable the Developer option by checking the check box located directly beside it, and click on OK.

- Click on + to expand the Developer tab, and then on + to expand the Controls section of the Developer tab, click on the Check Box Content Control option and then click to the right of the box.
- Select Check Box Content Control and click on OK.
- Click on the Check Box Content Control button in the Controls section of the Developer tab to insert a check box wherever your mouse cursor is and create a new checklist on that position in the document.
- Press the Right Arrow key twice and then type whatever you want to be the first item on your checklist right next to the check box that was inserted.
- Highlight and select the check box and checklist item combination you just created, and press Ctrl + C to create a copy of the check box content control.
- Move to the next line and press Ctrl + V to paste the check box content control you copied over in the last step, and simply type the next item on your list in place of the copied checklist item. Repeat this step and keep on repeating it until you have created your entire checklist.
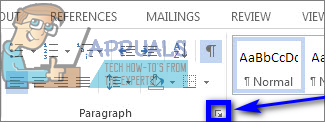
- Select the checklist you just created and click on the Paragraph dialog box launcher in the Paragraph section of the Home tab.

- Type 0.25 in the Left field under Indentation, select the Hanging option under Special, and click on OK once you’re finished.

Next, you need to actually lock the checklist (and the document that contains it) so that you can check items off the list using Microsoft Word itself. To do so:
- Select the checklist you created.
- Click on Group and then on Group in the Controls section of the Developer tab.
You will now be able to directly check items off your checklist in Word by simply clicking on the check boxes located directly next to the items you want to check off. If you would like to change anything else in the checklist, however, you are going to have to unlock it by selecting the checklist and clicking on Group and then on Ungroup in the Controls section of the Developer tab. If you do unlock the checklist, be sure to lock it again once you’re done editing it, otherwise you will not be able to check items off it in Microsoft Word.

Kevin Arrows
Kevin Arrows is a highly experienced and knowledgeable technology specialist with over a decade of industry experience. He holds a Microsoft Certified Technology Specialist (MCTS) certification and has a deep passion for staying up-to-date on the latest tech developments. Kevin has written extensively on a wide range of tech-related topics, showcasing his expertise and knowledge in areas such as software development, cybersecurity, and cloud computing. His contributions to the tech field have been widely recognized and respected by his peers, and he is highly regarded for his ability to explain complex technical concepts in a clear and concise manner.
Have you been wondering how to add a checklist in Word? You have arrived at the right place. You can add checklists (or checkboxes) to your Word documents with bulleted lists or via the checkbox control in the Developer menu. Let’s explore both ways to create a checklist in Microsoft Word.
Want to add a checklist to a PDF? You need to make the PDF editable first. Learn how to convert the PDF to Word!
Content
- How to Make a Checklist Using Bullet Points
- How to Insert a Checklist Using Developer Options
- Frequently Asked Questions
How to Make a Checklist Using Bullet Points
One of the easiest ways to add a checkbox in your Word document is with bullet points. The option to do this is not visible by default. You will have to add the checkbox style to the bulleted list before you can use it in your documents.
Note: checkboxes that are added using bullet points aren’t clickable – you cannot check or uncheck them digitally. They’re best suited for printable documents.
Follow the steps below to use bullet points to add a checkbox to your Microsoft Word document
- Go to the “Home” tab in your Word document.
- Click on the downward arrow next to the bullet list toolbar button and select “Define New Bullet” from the menu.

- Click on the “Symbol” button in the window that shows.

- Click on the drop-down box next to “Font” in the Symbol window that appears and select “Wingdings 2.”

Tip: learn how to insert a degree symbol in your Word document.
- Type “163” in the “Character code” box to quickly find the checkbox symbol. Select it and click the “Ok” button. You can also find and use other signs, like a circle, for your checkbox.

- You need to perform the above steps only once. After adding the checkbox to the bullet list options, you can insert it anytime into your document by clicking on the downward arrow next to the bullet list in the “Home” tab and selecting the “checkbox bullet” from the list.

- The checkbox will be added to your document.

Tip: learn how to add a video to your Word document.
How to Insert a Checklist Using Developer Options
If you want to add checkboxes that can be used digitally to a Word document, you will have to use the “Check Box Control” feature in the Developer tab. This method allows you to customize what can be entered into the checkbox.
We have broken down the steps to add an editable checklist into three sections for easier understanding.
1. Enable the Developer Tab
First, enable Developer options in Microsoft Word as shown below. This is a one-time requirement.
- Click on the “File” tab at the top.

- Go to “Options” in the sidebar.

- Click on “Customize Ribbon” in the sidebar and select “Main Tabs” from the “Customize the Ribbon” drop-down menu.

- Scroll down the available list, check the box next to “Developer,” then click on the “OK” button to save the change. You will see the Developer option in the top bar.

Note: to add the Developer tab on macOS, go to “Word Menu → Preferences,” select “Ribbon & toolbar → Customize the ribbon → Main tabs,” then check the Developer box and save the changes.
2. Add Check Box Control
After enabling the Developer options, follow these steps to add an interactive checkbox to your document:
- Click on the “Developer” tab in the top bar of your document.

- Place your cursor in the location where you want to add a checkbox, then click on the “Check Box” icon in the Controls section.

That’s it. A checkbox will show up in the document. You can click on it to fill the checkbox.
3. Customize Check Box Control
By default, if you click on a checkbox, it will get filled with an “X.” You can keep this behavior as it is, but if you wish to choose a different symbol to fill the checkbox, follow the steps below.
- Click on the checkbox that you added to your document to select it.

- Click on the “Properties” option in the Controls section under the Developer tab.

- In the Content Control Properties window, click on the “Change” button next to “Checked symbol” under Check Box Properties.

- Choose the desired symbol from the list. If you want to set a checkmark inside a box, search for character code 82 in Wingdings 2 in the Symbol window, select it, then click “OK” to save the changes.

Tip: Working on a document late at night? Be sure to enable dark mode in Word.
Frequently Asked Questions
What does the Developer tab in Word do?
The Developer tab in Word gives a user access to additional controls and functions like visual basic, macros, text boxes, date picker control, the ability to group items, document templates, and much more.
How do I create a checklist in Word 2010?
You can create a checklist in all Word versions, including Word 2010, using bullet points and Developer options as described above.
Can I create a checklist in Google Docs?
Yes. In your Google Docs document, click on the Checklists icon in the top bar to add a checkbox.
Image credit: Pixabay. All screenshots by Mehvish Mushtaq.

Mehvish Mushtaq
Mehvish is a tech lover from Kashmir. With a degree in computer engineering, she’s always been happy to help anyone who finds technology challenging. She’s been writing about technology for over six years, and her favorite topics include how-to guides, explainers, tips and tricks for Android, iOS/iPadOS, Windows, social media, and web apps.
Subscribe to our newsletter!
Our latest tutorials delivered straight to your inbox
If you are trying to be productive and organized, you probably use checklists. They are made for any purpose and any event. Many applications allow you to create checklists. But what if you want to create your personalized one? In this article, you will find how to create a checklist in Word documents using bullets or fillable fields.

Why use checklists
A checklist is a list of all the tasks you need to do, the information you want to learn, or things you need to take somewhere. On such lists, you can check the tasks and the extent: not started, in progress, done, need help, etc. Regardless of the purpose and content of the checklist, it helps to:
- Keep everything in mind. Because of the large amount of information, small details and things can just get forgotten. The best way to avoid this is to write everything down on a checklist.
- Be organized. While making a to-do list, you can range your tasks properly in advance. For example, you can stop by the store on your way home, so you don’t have to go there on purpose.
- Save your resources. Being well organized, you save time and money. Shopping with a checklist prevents impulse buying and therefore helps you save money.
Checklists can be completely different: to-do lists, daily cleaning checklists, shopping lists, travel checklists, birthday party planning checklists, habits trackers, etc. The apps Friday, Todoist, Trello, Toggl Plan, Google Tasks, and others allow tracking the tasks and making checklists. However, users often want to create their personal checklists or visually arrange things as they see fit. In this case, it is possible to make a checklist in Word documents.
Let’s see how to create a checklist in Word documents using ONLYOFFICE Document Editor.
How to create a checklist in Word documents using bullets
A bullet is a standard tool to create checklists in your document. It can be used as a sort of checkbox. However, checklists created this way are suitable for working in paper form. You can make a checklist with bullets, print it out, and then mark your tasks by hand. Place it near your workplace so that they are always in plain sight.
To create a checklist in Word using bullets, follow these simple steps.
Step 1: Write the things you need to do.
Step 2: Add bullets.
Highlight your list. Go to the Home tab —> Click the arrow near Bullets —> Select Bullets. It is better to use ones with blank space in the checklists.
Step 3. Make the bullets more visible. Click the arrow near Bullets —> Choose List Settings and change the size of the bullets. Click OK.
In this case, the bullets will be larger, and it will be more comfortable to check them after completing the task.
Now the list is ready. Save it and print it out, then stick it in a visible place.
How to make a checklist in Word document with fillable fields
To make checklists that can be filled out digitally, you can use fillable fields. ONLYOFFICE allows you to do it directly in the text editor. Watch the video about ONLYOFFICE forms and their functionality:
Now let’s make a fillable template for the checklist using the ONLYOFFICE forms.
Step 1. Create a blank document in .docxf format. This is a format that supports adding fillable forms.
Step 2. Add fields for the day.
Since we are creating a completely fillable checklist, we will first create fields where the user can select the day of the week.
Go to the Form tab —> Select Combo Box.
The field will appear where the cursor is. Then, set it up in the right-side toolbar. In the placeholder, we specify Day of the week. And in the tip, Select a day of the week. The tip will appear on the screen when the user hovers over the field.
In the Value Options field, add days of the week. To do this, enter each option in the field below, and press Plus, so all the options that the user can select will appear in the list.
In the Combo Box, the user can also add his own option. This is useful if the to-do list relates to a birthday or party, for example.
Step 3. Create fields for tasks.
Now let’s make fields where you can enter tasks. Go to the Form tab —> Select text field.
As in the previous step, fill in Placeholder and Tip in the right-side toolbar. Then check Fixed size field. Resize the box manually, like an ordinary shape.
Now that one field is ready, we can copy and paste it for the other tasks.
Step 4. Add checkboxes.
When your task is completed, it should be marked. To do this, let’s add checkboxes to our checklist.
Place the cursor where you want to add a checkbox. Then, go to the Form tab —> Checkbox. Add all other checkboxes in the same way.
Our checklist will reflect the degree of completion of the task, so we will create two more columns of checklists. Also, we will add the name for each column: Not started, In progress, Completed.
In the Form tab, you can also change the color of the field and format it to your taste. Go to Highlight Settings and change the color.
Now the checklist is ready. Save it in OFORM format to fill it out online. Or choose PDF format to fill the checklist in any software.
Get the ready-to-use template for a checklist, or visit our library to find more document forms:
GO TO LIBRARY

Learn how to easily create a checklist in Microsoft Word. We’ll show you how to make both a printable and a fillable checklist.
If there’s one thing that can help you get multiple tasks done it’s a checklist. And if you prefer to use digital tools rather than a physical pen and paper, consider Microsoft Word for this job.
You can create two types of checklists in Word depending on your needs. First, is a list with empty boxes that you can print and mark off items as you go. Second, is a list with boxes that you can fill in Word itself as you complete your tasks.
Both types of checklists have their purpose and show we’ll show you how to create each one.
If you want to print your checklist you can pop empty boxes or circles next to your list items. Then, put the list on the fridge for your family’s chores, hand copies out to your students for your class, or take it with you to the supermarket.
There are various ways you can create a printable checklist, so we’ll show you one of the fastest methods.
- Open a blank word document.
- Move to the first line where you want to add a list item.
- Go to the Home tab, click the drop-down list for Bullets, and choose the empty circle for the bullet type.

- When the circle displays, type your first list item. Each time you hit Enter or Return after a list item, a new empty circle appears, ready for your next list item.
- You can make the circles bigger so they’re easier to mark with checkmarks or X’s. Select one of the circles which will highlight them all. Then use the size drop-down box in the Font section of the ribbon on the Home. If you choose a larger size for the circles, this will not affect the size for the rest of your text.


Pick Different Symbols
If you want to make your checklist more fun and or just use something besides circles, you can make a custom bullet list.
- Go to the Home tab, click the drop-down list for Bullets, and choose Define New Bullet.

- Click Symbol.
- In the pop-up window, choose a different Font style such as Wingdings which offers a variety of basic and funky symbols.
- Pick the symbol you want to use, click OK, and then OK once more.


You can then start a new bullet list using the symbol or if you already had the circles as described above, they’ll transform to the symbol you chose.

You can then print your checklist as you would any other Word document with File > Print.
Create a Fillable Checklist in Microsoft Word
If you want to keep your checklist on your computer and mark the items off there, you can use a Word form control check box. This lets you just click the box to mark your items.
- Open a blank Word document.
- Before you add a list item, go to the Developer tab and click the Check Box in the Controls section of the ribbon. (If you don’t see this tab, head to our tutorial for how to add the Developer tab in Office.)

- When your check box appears, move your cursor outside of it to the right and enter your list item.
- Hit Enter to go to the next row and do the same thing: Add a Check Box, move to the right of it, and enter your item.


Save your checklist with File > Save or Save As. When you’re ready to use your checklist, just click the check box and an X will be placed in it.

Make Your List and Check it Twice
If you enjoy creating things like this in Word, then this tutorial should get you off to a great start! Whether you want a printable checklist or a fillable one, it’s easy enough to create a checklist in Microsoft Word and worth it when it’s time to use it. Also, check out how to sort lists in Word alphabetically.
![]()