
If you’re writing a longer document, you might want to add chapter headers. If nothing else, they make it much easier to find a particular section in a document quickly. Some universities also require them in theses and dissertations.
Luckily, they’re also reassuringly easy to add in Microsoft Word, as we will explain in this post.
Step One: Apply Heading Styles
Microsoft Word can automatically generate chapter/section headers based on the headings in your document. But to do this, you need to apply Heading styles first.
These can be found in the Styles gallery on the Home tab (or via the Styles pane). Usually, you would use ‘Heading 1’ for the main headings in your document. So what you need to do is:
- Find ‘Heading 1’ in the Styles gallery

The ‘Styles’ gallery. If you need to apply specific formatting options, right click and select ‘Modify’

- Select formatting as required and click ‘OK’ to update the style
- Go through your document applying ‘Heading 1’ to all chapter headings


Step Two: Adding Section Breaks
Next, you will need to add section breaks between each chapter. This will let you apply a different header to each section of the document. The process here is:
- Find the start of the first chapter in your document and place the cursor before the heading
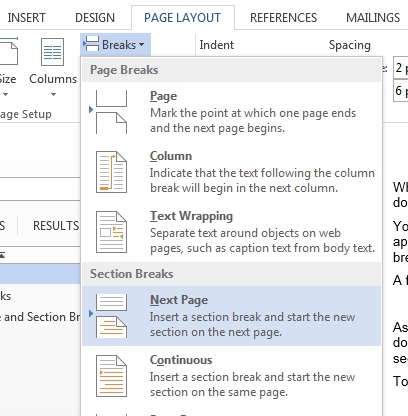
- Go to ‘Page Layout’ and select ‘Next Page’ from ‘Section Breaks’ in the ‘Breaks’ menu

Adding section breaks. - Repeat this for each chapter in your document
Step Three: Adding Headers
And now, the moment of truth! This step can be broken down into two parts. First, you need to make sure that the headers in each section are separated. To do this:
Find this useful?
Subscribe to our newsletter and get writing tips from our editors straight to your inbox.
- Go to the first chapter in your document
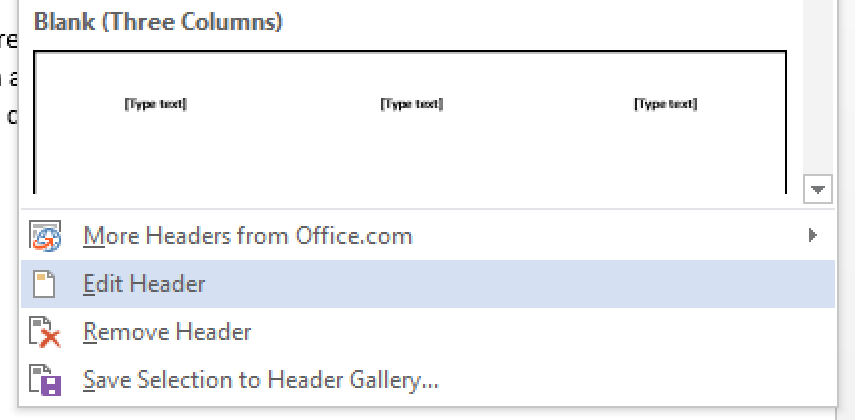
- Open the header by double clicking the space at the top of the page or going to Insert > Header & Footer > Header > Edit Header

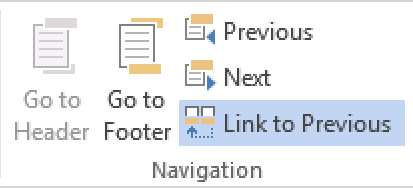
Editing headers. - Once the header is open, go to Design > Navigation and deselect ‘Link to Previous’

Unlinking sections. - Repeat for each chapter or section in the document
This will let you apply a separate header in each section. All you need to do is:
- Open the header in the first section/chapter
- Go to References > Captions > Cross-reference

Cross-referencing. - In the new window, select ‘Heading’ under ‘Reference type’
- Pick the relevant heading from the list available and click ‘Insert’

Adding chapter headers. - Repeat for each chapter/section in the document


This will add the chapter title to the page header throughout each section. Keep in mind, though, that you will need to change the headers if you revise the chapter titles during editing, as they do not update automatically.
Once this is done, your document will look superbly professional.
Add a new chapter heading or subheading — Word 2010
New chapter
The template contains 3 sample chapters. Add your chapters by deleting the sample chapter heading and entering the text for your heading. Or, to create an additional chapter, follow these steps:
- Click where you want to insert the new chapter heading and insert a page break (see Section and Page Breaks).
- In the Styles Pane, click Heading 1 style. The word “Chapter” and the chapter number will appear.
- Click after the chapter number and enter the text for the chapter heading.
New subheading
Follow these steps to create a new subhead within a chapter:
- Type in the text for the subheading.
- Click the style that appears in the Style Area left of the subheading.
- In the Styles Pane, click the style you want to apply. Use “Heading 2” for a first-level subheading, “Heading 3” for a second-level subheading, etc.
Once you learn these instructions on how to split Word documents, you’ll have no problems reviewing large Word files, finding a specific chapter, or extract just one part of the text to change it later.
When you split Word documents into smaller files based on chapters or headings in your file, you get subdocuments. They are connected to the main file, and by changing or adding text to one of the subdocuments, you’ll notice that change in the main file. Also, you can even split subdocuments into separate files.
Even though options for splitting Word document are not instantly visible when you open your file in Microsoft Word, this process is pretty straightforward. First, as a little reminder, let’s go over making chapters in Microsoft Word.
How to make chapters in Microsoft Word?
To split a Word document, you’ll need to have a hierarchy of headings. When your file is divided into several chapters or parts of the text with headings, you can easily split it into separate files.
Options for marking headings are visible when you open Microsoft Word, and they are in the Home tab of your window. If you already have chapters in your document you want to save as a separate file, read the instructions in the following. Also, if you want a separate file of part of the chapter, you can add heading one on beginning desired text and ending. It will act as a marker for splitting your file.
How to split Word documents into separate files?
If you have a DOC or DOCX file that you want to split into separate files, the great news is you can do this using Microsoft Word.
Step 1
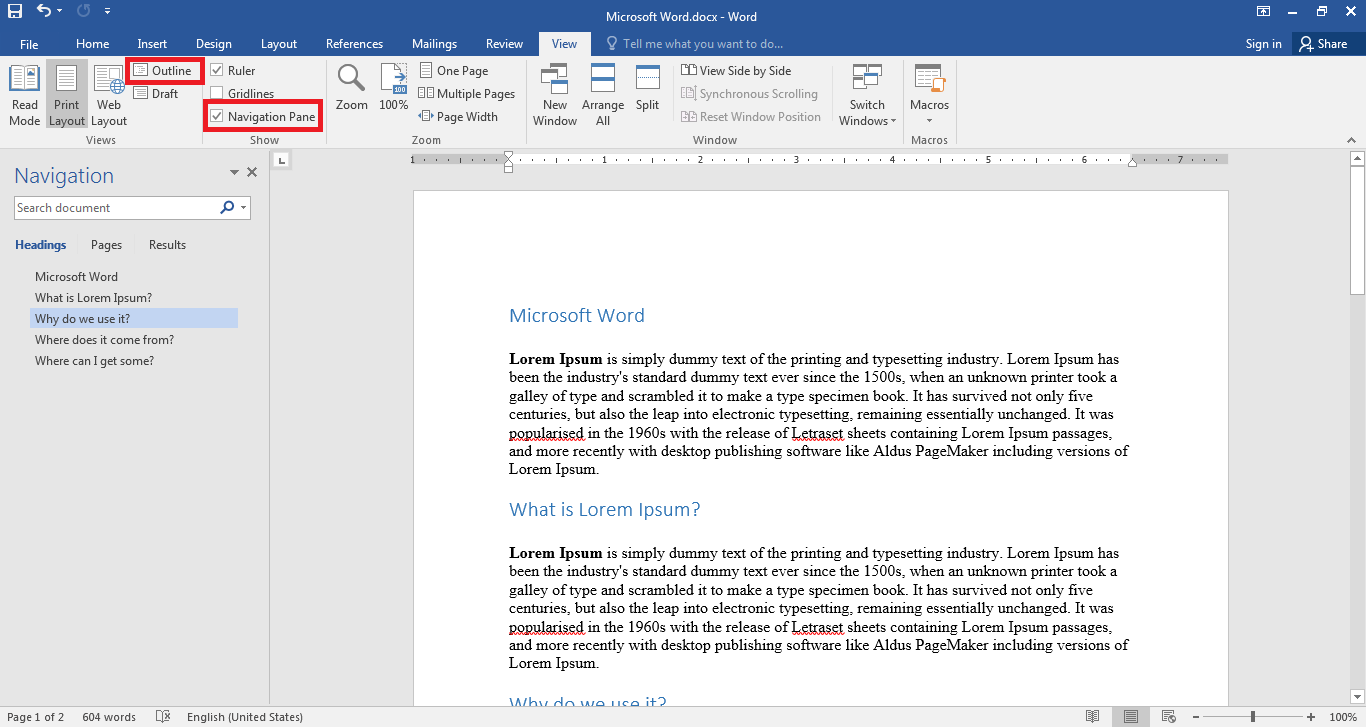
Open your file in Microsoft Word, and in the menu View, select Navigation Pane. That option will show you a hierarchy of all headings in your document on the right side of your window. Since heading 1 is usually a marker for a chapter, you can review into which files you can split Word documents.
Step 2
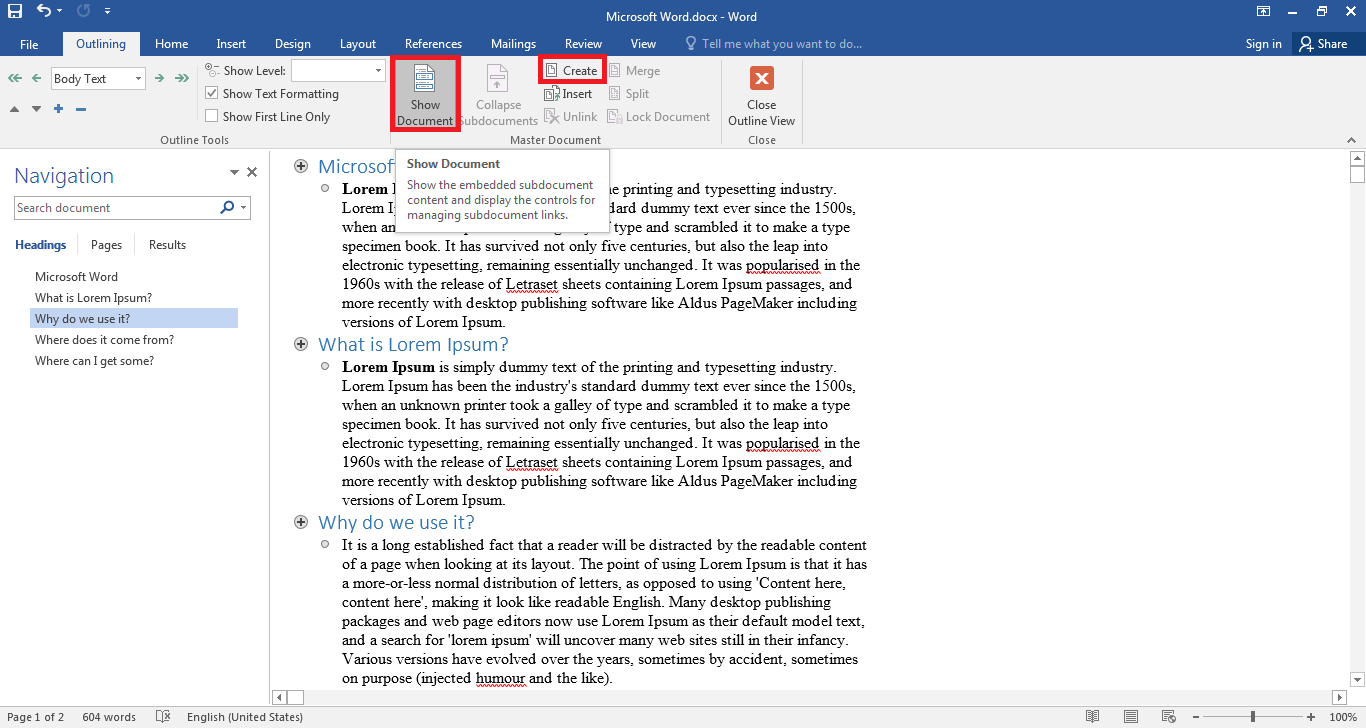
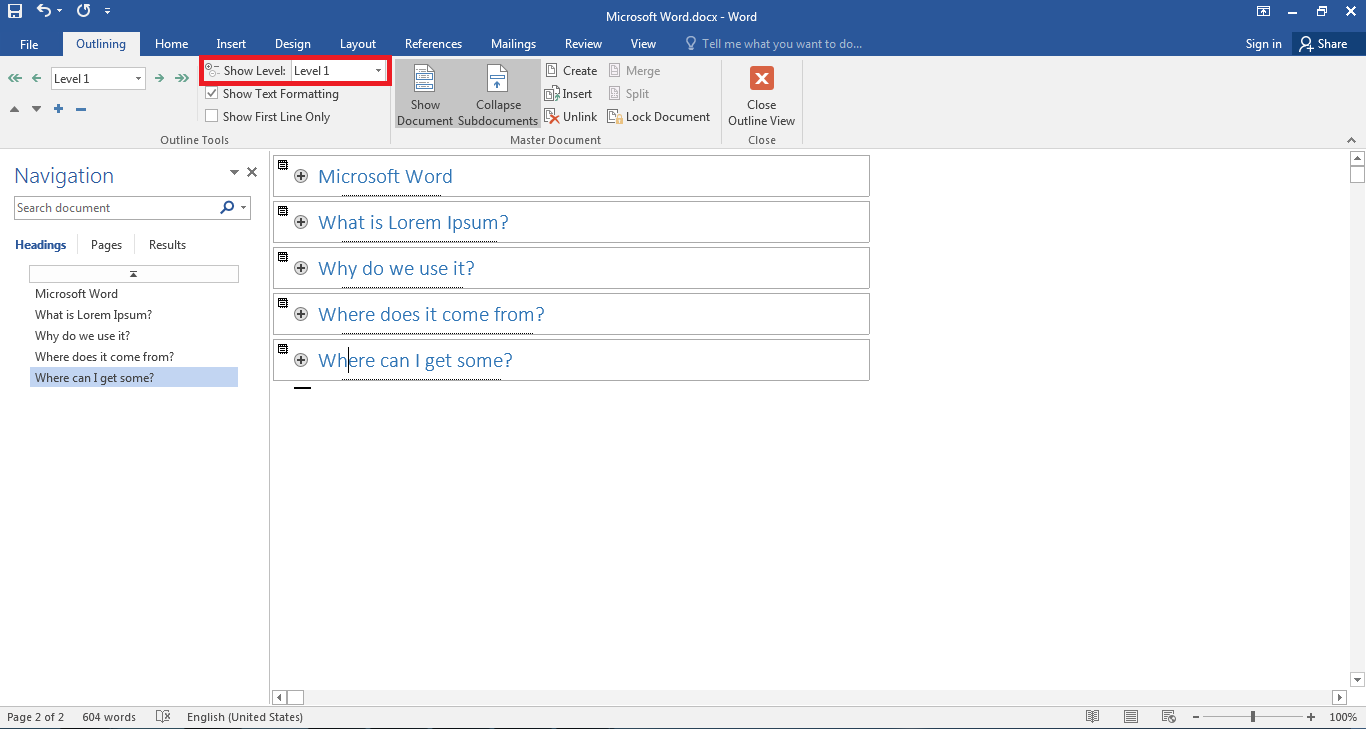
In the menu View, select Outline to access the Outlining menu. Your document will now look a bit different. In the Outlining menu, choose Show Document to open additional options.
Select chapters you need to split as subdocument and press Create from Show Document options. All that is left to do is to save your created subdocument.
Step 3
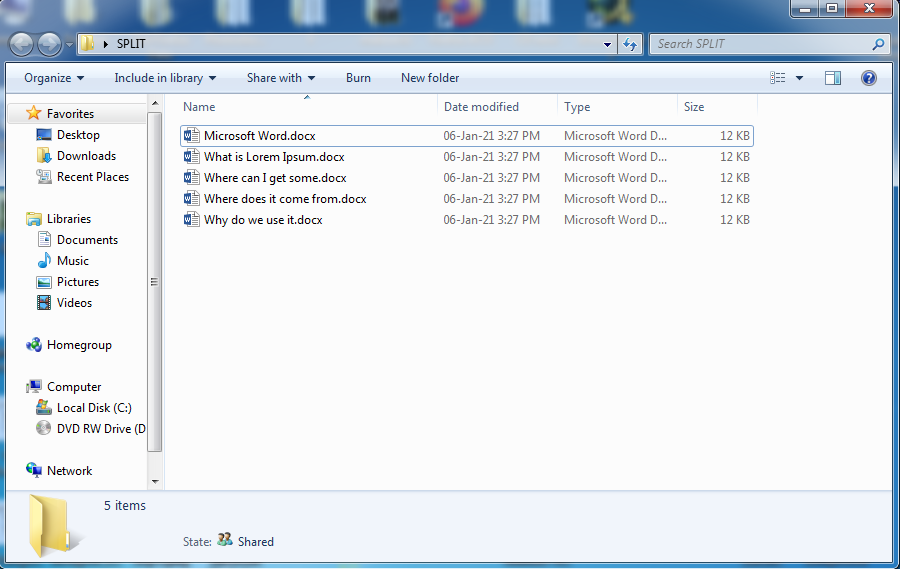
The default destination for saving subdocuments is where the original file is placed. Changing or editing any of the subdocuments is going to affect the original file.
Step 4
To create subdocuments of subdocuments, you can use the same principle. But to get a better view of your document’s headings, you can choose Show Level in the Outlining menu bar. Level 1 will show headings one; Level 2 is for headings two, and so on. This way, you can find specific parts of your file you want as a separate file.
To make a new subdocument, you need to select the chosen heading and repeat Step 2.
Microsoft Word supports wide variety of document formats such as DOCX, DOCM, DOC, DOTX, DOTM, DOT, PDF, XPS, MHT, MHTML, HTM, HTML, RTF, TXT, XML, ODT, and WPS. If you want to split your document file in Microsoft Word, but your file type is not on the list, there is another option you can use.
How to split any document file into separate files?
Not everyone uses Microsoft Word to create documents, and if you come across an unsupported file format, you need to split to separate files; there is an easy way to do this. The fastest solution for your compatibility issue is a free online tool you don’t need to install or register with personal information. As one of the best free online document converters is Converter365, all you need to do is upload your file for conversion and wait a few moments to download the converted file.
What makes Converter365 the best tool to use is support for large files and simultaneous conversion of up to ten files. Also, you can use it whatever your operating system is Windows, Mac, Linux, etc.
When you convert your file to DOC or DOCX file format, you can open your file in Microsoft Word and follow instructions for splitting it into separate files described earlier.
If you want to write a book, you’ll need book writing software that’s up to the task. Yes, you can invest in dedicated book writing programs. But you don’t have to: a great writing tool is likely already at your fingertips, if you know how to write a book using Microsoft Word.
There’s a lot of book writing software out there. Many of these programs claim to offer intuitive use, help with organization, and even say they’ll keep you from distraction. The options can be overwhelming.
There’s still one tried and true option if you’re not interested in all that (or can’t afford the fancier programs): Microsoft Word.
I write most of my books in Microsoft Word, not to mention short stories. Here’s the rundown of how to write a book using Microsoft Word, and why that might be your best choice.
The Benefits of Microsoft Word for Book Writing
You most likely already have it. And so does everybody else. Word is the standard, accepted across platforms, and is easy to access for non-writers (your beta readers). It’s been around forever, so most people know how to use it.
There are book formatting templates. A ton of them. They have them for short story format and for manuscript format. Personally, I don’t use those templates, but they’re a nice baseline for beginners, or even old hats that just want to hurry up and write without setting up their document first.
It’s simple and uncluttered. There are a ton of apps and programs out there that will allow you to keep your plot structure notes close at hand, to rearrange your chapters with the click of a button, and to keep detailed character profiles right in the program. That’s all a little too much for me. I prefer handwritten notes and nothing else blocking my screen while I’m typing and Word gives me that.
It is worth noting that if all that sounds appealing to you, you can do those things in Word as well, it just won’t be as fancy as other programs.
Hey writer: the first step to writing a book is coming up with a great idea. The second step is figuring out the structure of your book. If you have an idea but you need help with the structure, check out our new book The Write Structure. In it, we’ll teach you how to apply timeless story structure principles to write a great book. Get The Write Structure »
How to Navigate Your Book in Microsoft Word
When you have a 90,000-word manuscript, navigating becomes daunting. Luckily there are ways to do it in Word that make it easier if you know where to look.
Chapter Headings
Word doesn’t divide your book into chapters for you like some other programs. There will be no easy way to click and drag to rearrange chapters.
What I recommend is using headings. On Word’s Home page, there are already standard headings listed. Definitely mess with them and change their formatting to something simple.
No one needs giant blue words as their chapter headings. (You can set your simpler formatting as your default style as well, so you don’t have to change it every time.)
Make the title or number of each chapter a heading. Then you can easily bounce around to different chapters through the navigation pane (check the Navigation Pane box under the View menu).
Bookmarks
These basically work the same way as headings, but they’re for anywhere in your document. Have a specific scene you need to do more research on? You can bookmark it and jump back to it later.
Bookmark by going to the Insert menu and clicking Bookmark. Name your bookmark and voilà. You can delete them easily from the popup menu as well.
Find and Replace
CTRL+F brings up a simple search option to find words and phrases in your document. CTRL+H brings up the full gambit. From that dialogue box, you can search, replace certain words with others (i.e. Jennifer now becomes Julia all through the manuscript), and go to any page, section, heading, bookmark, etc. that you need to go to.
Microsoft Word is Great for Editing Your Book
Word has a ton of options for editing your story, including comments, tracking changes, and comparing documents. All of these are under the Review menu.
I use the comments feature to make notes to myself where I need to recheck facts or add description later. It’s easy to navigate through the comments with the search feature or the buttons under the Review menu. Don’t forget to remove them all before saving your document as a PDF or sending it off to an editor.
Tracking changes is awesome and a lot of editors (for short stories anyway) will use this feature to collaborate with you during the editing process. You can accept or reject changes or even revert back to the original.
Finally, make sure you have grammar and spellcheck on! Grammar check even allows you to check style issues (like how to use an ellipsis correctly) and passive voice. It’s invaluable.
Pro tip: To keep you on track while you’re writing, turn off some of the more fine-tuning features of grammar check. There’s nothing that will ruin your flow more than a bunch of underlining you feel like you need to take care of immediately. I recommend running the full check when you’re done (or at least done for the day).
Formatting Your Book in Microsoft Word
Make sure you’re familiar with standard manuscript format for novels and formatting short stories. Take a look at those links and follow their instructions. You don’t want to get rejected out of hand because you tried some weird formatting that’s hard to look at.
One of the biggest gripes I see from editors is writers using spaces to indent paragraphs. Don’t do this. It makes it super hard on them when they’re putting a book together. Instead, use the ruler in Word (under the View menu) or the paragraph settings (under the Home menu) to adjust your tabs. A half inch is standard.
Despite what most of us were taught in school, the standard is now one space after periods, not two. This is another sticking point with editors, so don’t do it. If you’re used to two, there’s a grammar check feature in Word you can turn on to highlight every time you use two spaces.
Finally, use the page break option to break for a new chapter, not enter or a million spaces. You can find the page break under the Insert menu.
Pro tip: When in doubt about your formatting, you can turn on the Show/Hide option under the Home menu (looks like a paragraph symbol) to see all your formatting symbols.
Now That You’ve Mastered Microsoft Word, Go Write Your Book
Don’t let choosing writing software stagnant your writing. Don’t overthink it. You don’t need to keep up with the Joneses with the latest writing technology that’s trotted out on tech forums and in writing chats.
The important thing about writing a book is actually writing it. No fancy book writing software is going to help you with that.
So get writing!
Ever used Word to write a book? Do you have any more tips for how to write a book using Word? Let me know in the comments!
PRACTICE
Take fifteen minutes to write. Just write. Don’t worry about page setup, formatting, or which program you’re going to use. Open up Word or get out a pen and paper if you’d like!
When you’re done, share your writing in the comments. Don’t forget to comment on your fellow writers’ work!

Sarah Gribble
Sarah Gribble is the author of dozens of short stories that explore uncomfortable situations, basic fears, and the general awe and fascination of the unknown. She just released Surviving Death, her first novel, and is currently working on her next book.
Follow her on Instagram or join her email list for free scares.
(for Createspace, Lightning Source, or IngramSpark)
This is a guide to formatting your book in Microsoft Word (2010). We’ll be making a 6″x9″ PDF for print; but you can easily change the document to another size. You can watch these three videos, or go through the guide down below. You can start your own document from scratch, or download our free package of formatting templates to get started quickly.
Part 1: Setting Paragraph Styles
How to format a book for print in MS Word — Tutorial #1
Part 2: setting up headers, page numbers and footings
How to format a book for print in MS Word — Tutorial #2
Part 3: Front matter and back matter suggestions
How to format a book for print in MS Word — Tutorial #3
PS. Our FREE book formatting templates have this stuff built in. Click here to download them now.
A Quick Trick for Outlining your Book
Did you know you can drag and drop whole sections around in MS Word (just like you can in Scrivener)? It helps a ton with organization.
Make your book beautiful… without the headache
Psst… learning to format your own books can be a pain in the ass. It’s easier with our beautifully designed, 100% free templates. They’ve already helped over 20,000 authors publish successfully. Click here to download them all.


Keep scrolling for an in-depth tutorial. You should also check out our NEW book formatting tutorial series (updated in 2017 — don’t worry, it’s free too).


How to format a book in Microsoft Word (with pictures)
Getting started
Open a new document. Click “size”>> “More paper sizes” and set the document to 6”x9” (or your book size).

Then set the margins and gutter. Make sure to apply to the “whole document” instead of “this section.”

I set this one to 1″ margins on the top and bottom (a bit too much on the top). The «Gutter» is extra space on the inside. Recently (2014) I’ve noticed that Createspace book spines are much more glued-together, so the gutter may need to be a little bigger. Copy and paste your text into the document (or, if you’ve already been writing in Word, save the document as a new file (to be safe) and then start formatting.
Setting Paragraphs
Highlight some text and click on the «line options» tab. Set the indent for the first line of paragraphs to .2 or so (I started with .3, but that’s too much).

Make sure there’s no space before or after the paragraph, and justified text. Select the font you want to use. With that text still selected, right click, go to “Styles” and “Update Normal to Match Selection.” Now your whole document is using the “Normal style.”

Then select the first paragraph of your book, click line spacing options again, but set the first line indent at 0.0. This time, right click and “Save the selection as a new style.” Save it as “First Paragraph.” 
Chapter Pages
Next, we’re going to separate all the chapters. This will be really important later when we start adding headers and footers. So put the cursor before any of the text, go to “Page Layout” >> “Breaks” and “Next Page.”

If you’ve done this right, the first page will say “First page Footer, Section 1” and the top of the next page will say “First Page Header, Section 2.”

Click into the headers area (by clicking the space at the top of the page) and make sure you’ve checked «Different First Page” and “Different Odd and Even Pages.”

Because this is the first page of the first chapter, you can begin styling the chapter pages. To make use of Word’s built in Table of Contents function, it’s best to start with Word’s preset “Heading One.”

Just type “Chapter One”, select it, pick “Heading 1” from the styles, then change the size and font, select the text and right-click, then under «styles» click “Update Heading One to match selection.” (I’ve changed the font to no-indent, black, and «Bebas Neue.») You may want to expand the text by bringing up the fonts menu (Ctrl+D on Windows) go to advanced, spacing and “expanded.”
You should also check to make sure there’s no indent on your chapter title, so that it’s really centered.

If you have a “Navigation” window open on the left side, this heading should show up right away.

Now you may want to style the first sentence. Select the first few words, and transform them to uppercase by going to the “Change Case” button on the Home menu.

Then, to add a Dropcap, put the cursor before the first letter of the first sentence, then go to the Insert panel and click the DropCap feature.

You can change the font of the drop cap to stand out even more, but getting the positioning right can be tricky. If you want the Dropcap to take two lines instead of three, choose “Drop Cap options” from the menu.
Now that our first page is ready, move down to the second page and click in the top area to select the header. Up on the menu, the “Link to Previous” is probably selected. You want to click on it to unlink it (just for the first pages, so they don’t link with the front matter. For the remaining pages, you’ll want link to previous selected). I’ll type in “Book Title”, get the style right and then save it as a new quick style (“headers”).

I’ll align right. If you have “gutter” set up, you can see that the “inside” of the page (on the left) has more spacing. You want to align your headers and footers to the outside, so make sure it’s on the side of the page with the smaller margins.
Then I’ll go into the footers area, click “Insert”, then page numbers>>current position>>plain number. This enters a page number field. Mine starts on page 3. If I want to change this, I could go to Insert>>page numbers>>Format page numbers and then choose “start at #…” instead of “continue from previous section.”

Then I can go down to the next page. Because I’ve selected “Different Odd & Even Pages” I can make this page a little different, by aligning left and typing “Author Name.”
Then, instead of inserting the page number again, I can just select and copy the page number field from the previous page, and paste it into the footer of this page – aligning it left like the header. To check my work, I’ll go to “View” and hit the “Two pages” so I can make sure that it looks OK.

There’s a little too much space between my headers and the content… but that’s because I set my top page margins to 1” (a bit much). I’ll leave it for now. The headings and page numbers look fine, so I’ll go back to View>> 100% and continue on. The whole first chapter should look pretty good now.
If I want to style section breaks I could… a simple way is to use the “First Paragraph” style again with all caps on the first few words, but no dropcaps.

When I get down to the bottom of the chapter, I’ll put the cursor below the text, select Page layout>>Breaks >> and hit “Next Page” again.
Because this is the first page of a new section, and we’ve selected “Different First Page” this page should be blank, with no headers and footers, so you can style it like the first Chapter Page. In Word, it’s hard to line up everything exactly.
The best way to get it 100% consistent is to select and copy from just above the first paragraph to the top of the page, including all the spaces and Chapter Header, and then pasting it the first page of the next chapter. That’s also a little faster than redoing everything manually. Then I can just change the text to “Chapter Two”.
The following pages in the book should have the same headers and footers, and the page numbers should be automatic. So all you need to do is skip through and adding «Next Page» breaks between every chapter, and styling the chapter pages. If your page numbers aren’t working for any reason, make sure the “Link to Previous” option is selected. If they still aren’t connecting, go to format page numbers and “continue from previous.”

You can also just select the page number field from the previous section and copy it into the one that’s broken. If you’ve been setting all your quick styles (first paragraph, normal, header, headings, page numbers) going through the chapters like this should be pretty fast.
If you get stuck with anything, it will probably be with the headings and footers and page numbers. When you finish styling your chapters, switch to Two-Pages view so you can check everything over. Right and left-align can be confusing, even if you are viewing it in Two-Pages mode, because Word may not show it as it actually prints.

Just keep in mind the extra wide margins are the inside gutter, so these are aligned on the outside, even though they look like they will be on the inside. If you’ve been using the “Heading 1” style, Word has automatically been adding in your chapters to the navigation, which you should see on the navigation panel on the left.

So let’s go back to the front and add the “front matter”, including the table of contents.
Still here? You’re working too hard.
A lot of this stuff is already done for you in my formatting templates. I made them to help indie authors save time and money, without making amateur book design and formatting mistakes. Seriously, you should download the free package. I’ll also send you my email series on publishing books that sell — I’ve been told it’s life changing.


🔒100% secure download. No spam, ever.
Adding the Copyright Page, Title Page and TOC
Put the cursor before chapter one and add a new “Next Page” break.
You’ll need these pages: 1. Title Page 2. Copyright page 3. Table of Contents 4. Dedication.
Your title page will want to match the cover pretty closely – see if your designer will give you the fonts he used – you may need to space out the lettering quite a bit. If you ask, your designer can probably save you a transparent PNG of the cover text (just like on the cover, but without the art) that you can add into the title page.
Your copyright page will look something like this (you can use this if you want):
TITLE Copyright © 2013 by Author Name.
All rights reserved. Printed in the United States of America. No part of this book may be used or reproduced in any manner whatsoever without written permission except in the case of brief quotations em- bodied in critical articles or reviews.
This book is a work of fiction. Names, characters, businesses, organiza- tions, places, events and incidents either are the product of the author’s imagination or are used fictitiously. Any resemblance to actual persons, living or dead, events, or locales is entirely coincidental.
For information contact; address www.website.com
Book and Cover design by Designer
ISBN: 123456789
First Edition: Month 2013
10 9 8 7 6 5 4 3 2 1
The «10 9 8 7 6 5 4 3 2 1» on the bottom refers to the editions, so if it goes until “1” it means first edition. If this was the fourth edition, you’d write: «10 9 8 7 6 5 4». These numbers should be close to the bottom of the page. It can be centered, left or right aligned, and with much smaller font size (9 or 10).
If you’re indie publishing, the copyright page isn’t a big deal – in fact you can stand out by using something more creative. I tend to use a simple message like “Feel free to share this – just don’t try to pass it off as your own! If you enjoy this book, I really hope you’ll do me the favor of leaving a review. You can connect with me @creativindie.” There’s something to be said for trying to look as professional as possible though, especially with the print book; but I also think it’s fine to «own up to» and even take pride in the fact that you self-published, as some skeptics may feel you’re «trying to hide it» otherwise. Make another “next page” break. Then go to the “references” tab and hit Table of Contents.

You should get an automatic Table of Contents. You may need to delete some areas, or change the fonts and styles (if you do, make sure to save it as a new style… it’s really annoying to keep restyling it if you forget to do this). Because this table is automatic, you can “Update Table” and “Update Page Numbers Only” if you do rewrites or add content later.

For the TOC, you probably need to make the text about 14pt, and add a little more spacing. If this is a novel, you don’t really need a table of contents, but that’s up to you. For the front pages, you’ll probably want to make sure there’s no indents anywhere, so everything is properly aligned.
Be a little careful on these front pages – if a header or footer gets added in, and a later page is set to “link to previous” – then when you delete it on the front pages it will erase the headers and footers throughout the book. Instead, go to the next page with headers and uncheck “link to previous” – then you can delete the headers on the front pages. Also, the copyright page is usually on the back of the title page (on the left hand side), while the dedication, Table of Contents and Chapter One usually starts on the right hand side – this means you’ll have to leave some blank pages in between.

You can zoom way out to see everything together. Sometimes I need to use a real book, or picture the pages on my hand and flip my palm back and forth, to get this right. Note – some books have all chapter pages on the right hand side – if you want to do that, just add an extra blank page by adding more “Next Page” breaks, and make sure they aren’t connected to any headers or footers so they stay blank.
That’s it – I’m going to attach the sample I made for this tutorial, you can download it by clicking these links: Template-sample(.docx) Template-sample (.doc) (They won’t look the same unless you have the same fonts… so the first thing you’ll want to do is change the
Chapter Heading font to something that matches your book. Hopefully you’ve already got a great book cover, but if not, take a look at my huge list of best fonts per genre here.) If you get stuck and are frustrated, I highly recommend finding someone on Fiverr.com. Pay them $10~25 to fix whatever problem you’re stuck on; it’s worth it.
Ps) It can save some time if you learn a few useful keyboard shortcuts for MS Word. There’s a full list here. The one I use the most is «Ctrl+z» which undoes your last action.
Was this useful?
If so, please share it! If you need a book cover, you should check out the sister site, www.diybookcovers.com — it has more free tools and templates to make your book look good. If you haven’t done so yet, you should sign up for my email list. Not only will you get a bunch of professional book design and formatting templates, I’ll also send a free email series on everything I’ve learned after helping launch hundreds of bestsellers (and making a full-time living from my own fiction and non-fiction books).
PS. I’m not just some guy on the internet… I’ve got a PhD in Literature, have spoken on book design at publishing conferences around the world, and was featured in CNN for renting castles to use as writing retreats. You can also check out my main book cover design site, or my blog Creativindie.com where I help authors and artists produce and sell their best work.