
Introduction: How to Make Birthday Cards With Microsoft Word
It is advisable to involve your kids in creating the home made birthday cards. This will save you money and also entertain your kids. Your relatives and friends will always be excited to receive birthday cards that have been made by your kids. In this article we have set down some tips on how to create the perfect birthday card using Microsoft Word.
Step 1: Make Up Your Mind on the Content of Your Card.
It is very important that before you start making your card, you should have in mind the type of things you would like to put down in the birthday card. You should sketch the details down on a piece of paper so as not to forget.
Step 2: Open the Microsoft Office 2010 or Any New Version on Your Computer.
This is pretty basic and you cannot miss it.
Step 3: Lay Out a Template
After opening the Microsoft Word app in your computer, head to the file section > New > Blank document. After that, go to the page layout section and select orientation and then select landscape. Finally, go to the column section and select the number of columns you would like( we recommend two columns ). Using two columns, you can now include images , any text you would like, and any type of decorations you would like to use on the column that is on the right side ( hand ) — this is what will make up the front of your birthday card. The fact that you are using columns means that even if you fold it after printing it, the birthday card will be nicely lined up.
Step 4: You Ought to Change the Color of Your Background.
Click on the page layout section then click on the page color. The page color consists of many different types of colors that you can choose from. When choosing the right color, always consider the receiver’s favorite color and not the color you prefer. You want the card to be perfect so as to make the receiver extremely happy. If you are not sure of the right color, then you necessarily do not have to put a background color. The background color will sometimes use up a lot of your ink, therefore it is not really a must.
Step 5: Add a Border.
At this step, you should go the page layout section and click on page border. Choose any style that is fun and appeals to you ( these styles are available at the bottom in the Art box and it consists of several patterns, different kinds of balloons, stars and even hearts ). You should also choose the type of color.
Step 6: Add the Appropriate Text.
Head to Home and select Word Art section- here you can choose the type of text that you would like to use. You can decide on the text color or text size at this step.
Step 7: Add the Clip Art.
If you are using new version like Office 360, 2013 or 16 then unfortunately Microsoft Office no longer provide clip arts. But if you are using 2010 or earlier version then go to Insert and click on Clip Art. Microsoft Word 2010 consists of many kinds of images you can pick and use. Click on the search section and type the word ‘birthday’.
Step 8: Insert Your Own Pictures.
Go to insert and select pictures. You should have the pictures saved somewhere in a folder in your computer. Click on the folder which has the picture and select the one you are planning to use. You can decide to crop your picture or not. After you are satisfied, save the file.
Step 9: Edit Your Card.
You should go through your card just to make sure everything is in order.
Step 10: Print and Save Your Card.
Printing is done just like the way you print a normal power point file and the save it in your computer.
Step 11: Some Tips on How to Make Adorable Cards:
- The message should be handwritten on the inside of the card. It gives an intimate touch if you have written the person’s name and whom it is from by hand instead of using your computer.
- If you decide on using your computer and printing the birthday cards, it is recommended to utilize quality paper or even the thin cards.
- The front of your birthday card should consist of your own photos. This is advisable even if you decide to use either your hand or your computer.
- Make the card’s outline using the computer and then let your kids do the rest of the decorating work.
- If you are not very familiar with designing a card then use a template so all you will need to do is fill and print it.
Be the First to Share
Recommendations
![]()
Download Article
Step-by-step guide to making your own business cards in Word
![]()
Download Article
- Using a Template
- Creating from Scratch
- Video
- Expert Q&A
|
|
|
If you need to make business cards in a hurry and you don’t have fancy design software, Microsoft Word has the tools you need to make and print business cards. You can use templates to make the process easy but still maintain an individual feel, or you can create the cards completely from scratch. If you are creating cards from scratch, you can use the Table tool to help keep your cards at the proper size. This wikiHow guide will show you how to make business cards in Microsoft Word.
Things You Should Know
- Use a template by going to File > New and searching for «business cards.»
- Create your own card from scratch by going to File > New > Blank document.
- Use a table to organize copies of your business card on a single page.
-
1
Click the File tab and select New. You’ll be creating a new document from a business card template. If you just opened Microsoft Word, you can click New in the left menu.
Tip: Using a template will allow you to quickly make a lot of professional-looking cards at once.
-
2
Search for business card templates. Use the search field in the new document creation window to search for «business card». This will bring up a variety of free templates that you can use for business cards. There are templates for horizontal and vertical cards.
Advertisement
-

3
Click a template that you want to use. You’ll be able to change any element of the template you’d like, including colors, images, font, and layout. Pick the template that most closely matches the vision of your business card in your head.[1]
- Clicking a template will open a window with more information about the template.
-
4
Click the Create button to open the template in Word. This is under the description of the template. This will create a new file with the document template for you to use.
-
5
Fill out the information fields in the first card. If you’re using Office 2010 or newer (and the template was designed for 2010 or newer), you’ll see your text appear in all of the business cards on the page. You’ll only have to fill out information for one card this way. If the template is not designed to automatically fill out successive cards, you’ll need to enter the data for each one manually.
-
6
Change the format of any elements. You can select any of the text on the business card and change the format. You can switch fonts, change colors and size, and more, just like you would regular text.
- Since this is a business card, make sure that the font you choose is easy to read.
-
7
Replace the logo (if necessary). If the business card template has a placeholder logo, you can click it to replace it with your own. Make sure that you resize your logo so that it fits, and that it doesn’t look bad when the size has been changed.
-
8
Proofread the cards. Make absolutely sure that your business cards do not have any typos or other mistakes. Your business card is one of the first impressions people will have of you, so you don’t want to start off on the wrong foot.
- You can have a family member or friend review your cards before printing to make sure they’re free of errors.
-
9
Print the cards on stock, or send the file to a printer. If you’re going to be printing the cards at home, you’ll need high quality stock paper. Stick to white or off-white, and pick your finish. Most business cards don’t have a finish, but some people prefer a glossier card. Many print shops will be able to open your saved business card template and print them for you as well.
- When purchasing paper, make sure that your printer at home can handle it. Check your printer’s documentation or support site for details on the type of paper that it supports.
-
10
Use a precision cutting tool to finish the cards. Once the cards are printed, you’ll need to cut the sheet up. Each sheet will typically have ten cards on it. Don’t use scissors or other methods of cutting that rely on you keeping a straight line. Instead, use a paper guillotine or precision paper cutter. Many print shops have these tools available for customers, or can do the cutting for you.
- Note that the standard business card size varies by country. Here are a few other standards:
- The standard business card size is also 3.5 inches (8.9 cm) x 2 inches (5.1 cm) in Canada.
- In the United Kingdom, the standard size is 8.5 centimetres (3.3 in) x 5.5 centimetres (2.2 in).
- For Australia, the standard size is 9.1 centimetres (3.6 in) x 5.5 centimetres (2.2 in).
Tip: The standard US business card size is 3.5 inches (8.9 cm) x 2 inches (5.1 cm) (or 2 inches (5.1 cm) x 3.5 inches (8.9 cm) for vertical cards).
- Note that the standard business card size varies by country. Here are a few other standards:


Advertisement
-
1
Click New to create a new blank document. If you’d prefer to create your business card yourself, you can use the Table tool to make it easier.
- You can also use photo editing software like Photoshop to make a custom business card.
-
2
Click the Layout tab and click Margins. Select «Narrow» to make the margins a little smaller than the default setting. This will allow you to fit the business cards on the page.
-
3
Click the Insert tab and then click Table. A grid will appear beneath the Table button.
-
4
Create a 2 x 5 table. Use the grid to insert a table that is two cells wide and five cells high.
-
5
Right-click on the table’s selection crosshair and select «Table Properties». This will open the Table Properties window. The selection crosshair appear in the upper-left corner of the table when you hover over it.
-
6
Set the alignment of the table to Center. This will make it easier to make the cards even. This setting is in the Table tab of the «Table Properties» window.
-
7
Click the «Row» tab and check the «Specify height» box. Enter 2" and change the drop-down menu to «Exactly».
- Note that the standard business card size varies by country. The standard US business card size is 3.5 inches (8.9 cm) x 2 inches (5.1 cm). Here are a few other standards:
- The standard business card size is also 3.5 inches (8.9 cm) x 2 inches (5.1 cm) in Canada.
- In the United Kingdom, the standard size is 8.5 centimetres (3.3 in) x 5.5 centimetres (2.2 in).
- For Australia, the standard size is 9.1 centimetres (3.6 in) x 5.5 centimetres (2.2 in).
- Note that the standard business card size varies by country. The standard US business card size is 3.5 inches (8.9 cm) x 2 inches (5.1 cm). Here are a few other standards:
-
8
Click the «Column» tab and check the «Specify width» box. Enter 3.5" and change the drop-down menu to your preferred measurement such as «Inches».
-
9
Examine your table. You should now have a table on your page that is separated into ten identical business card-sized cells. If the table doesn’t fit, you may have to extend your bottom margin by a tenth of an inch.
-
10
Right-click the crosshair again and select AutoFit. Choose «Fixed column width». This will prevent the table from changing shape as you add information to the first cell.
- For double-sided business cards, copy and paste the table onto a second page in the Word document. The second page will be the back of the business card.
-
11
Add your information to the first cell. You can use all of your regular Word formatting tools while typing in the cell. You can insert text boxes and images, change fonts, add color, or perform any other formatting that you’d like.
- Adding pictures to your business card can give it a personal touch and build your brand. You can crop and rotate the images as needed.
- Check out our guide to formatting in Word for more tips!
- If you’re creating a double-sided card, add your additional information to the first cell in the second page table.
-
12
Proofread the card. Before copying the information into each of the other cells, take the time to review it now for any errors or typos. If you proofread later, you’ll have to change each cell instead of just changing the first before copying it.
- You can have a family member or friend review your cards before printing to make sure they’re free of errors.
-
13
Select the entire first cell when you’re satisfied. To do so:
- Move your cursor to the bottom-left corner of the cell until it turns into a diagonal arrow.
- Click and the cell’s contents will be selected.
- Press Ctrl+C (Windows) or ⌘ Cmd+C (Mac) to copy the contents of the cell to the clipboard.
-
14
Click in the next cell and paste the copied information. You can click «Paste» in the Home tab, or you can press Ctrl+V (Windows) or ⌘ Cmd+V (Mac). Your copied information will appear in the cell in the right locations. Repeat this for each of the cells on the page.
- Make sure that your business card organization is minimalistic. You can’t realistically fit everything about your company into a single card—instead, focus on the most important info like your company logo, name, email address, physical address, website, and role in the company.[2]
- Make sure that your business card organization is minimalistic. You can’t realistically fit everything about your company into a single card—instead, focus on the most important info like your company logo, name, email address, physical address, website, and role in the company.[2]
-
15
Right-click the crosshair again and select «Table Properties». Click the «Borders and Shading» button and select «None» for the border. This will ensure that parts of the cell borders don’t appear when the cards are cut.
- Make sure to save your Word document in case you want to edit it later!
-
16
Find good paper for the cards. You’ll want a nice card stock paper to print your new business cards on. Make sure that your printer supports the type of paper that you get. You can also send your completed file off to a printer to have the cards professionally printed.
- To print double-sided cards, make sure to select Print on both sides in the print menu. This will print the second page (the back of the business card) on the back side of the paper.
- Print one test sheet first to make sure everything looks good and that the back side is aligned properly with the front.
-
17
Use a precision cutting tool. Avoid using scissors or other cutting tools that require you to maintain a straight line. Use professional paper cutting tools to make sure your cuts are even and properly measured.


Advertisement
Add New Question
-
Question
How do I print different business cards on the same page?

Kyle Smith is a wikiHow Technology Writer, learning and sharing information about the latest technology. He has presented his research at multiple engineering conferences and is the writer and editor of hundreds of online electronics repair guides. Kyle received a BS in Industrial Engineering from Cal Poly, San Luis Obispo.
wikiHow Technology Writer
Expert Answer
If you’re using a template, you’ll need to choose a template that doesn’t automatically update the rest of the cards. If you’re creating a card from scratch using a table, you can make each cell a different card.
-
Question
How do I put an online photo on my business cards in Microsoft Word?
Kyle Smith is a wikiHow Technology Writer, learning and sharing information about the latest technology. He has presented his research at multiple engineering conferences and is the writer and editor of hundreds of online electronics repair guides. Kyle received a BS in Industrial Engineering from Cal Poly, San Luis Obispo.
wikiHow Technology Writer
Expert Answer
You’ll need to copy or download the online photo. Then, in Microsoft Word, go to Insert > Picture to add a photo to the business card.
-
Question
make one card on a sheet
Kyle Smith is a wikiHow Technology Writer, learning and sharing information about the latest technology. He has presented his research at multiple engineering conferences and is the writer and editor of hundreds of online electronics repair guides. Kyle received a BS in Industrial Engineering from Cal Poly, San Luis Obispo.
wikiHow Technology Writer
Expert Answer
You can make a single card by following the table method above and only filling in one cell. Make sure the table is formatted with the standard business card measurement.

See more answers
Ask a Question
200 characters left
Include your email address to get a message when this question is answered.
Submit
Advertisement
Sample Business Cards
Video
About This Article
Article SummaryX
1. Click the File menu and select New.
2. Search for business card templates.
3. Select a template.
4. Fill out the fields in the first card.
5. Edit format, fonts, and colors.
6. Replace the logo (optional).
7. Proofread the cards.
8. Print the cards to cardstock.
9. Cut the cards.
Did this summary help you?
Thanks to all authors for creating a page that has been read 827,811 times.
Is this article up to date?
The paper greeting cards is not as common as it used be. People nowadays tend to send e-cards by e-mail, which is convenient, fast and environmentally friendly. There are literally tons of templates for greeting cards can be found on Internet, but they are open for everyone, nothing special. If you want an unique greeting card which can show your love and gratitude, why not create one by yourself?
You don’t even need to learn any software for designing. Microsoft Word can already fulfill your basic need to make a card.
1. The first step is apparently to set the page in Word. Click Layout tab, switch Orientation of page to Landscape.

2. Then click Size to choose a template you prefer.

3. If you’re not satisfied with them, click More Paper Size… at the bottom of the drop-down menu.

4. You can then customize the paper size in Page Setup window. Click OK to confirm your setting.

5. It’s time to find a beautiful picture that matches the theme. Save it on your computer. Then click Insert – Pictures to insert the picture to your document.

6. Or if you want the picture to fill up the whole page, try setting it as the background. Switch to Design tab, click Page Color – Fill Effect...

7. Select Picture tab and click Select Picture…

8. Choose From a file. Select the picture you downloaded from Internet and insert it to your document.

9. You can see the preview below Sample. If it’s good for you, click OK to implement it.

10. Now the picture is set as your background. Switch to Insert tab, click WordArt and select a type you like to insert a textbox.


11. Click the textbox to enable the Shape Format tab. You can adjust the color of Text Fill and Text Outline here.

12. For better atmosphere of Christmas, I want this text to glow. So, click Text Effects – Glow to choose a template from Glow Variations.

13. You can also hit Glow Options… to enable advanced settings in Format Shape.

14. Select all the content in WordArt textbox, set the font & size of it in the upper-left corner of Word.

15. And finally you can press the border of the text to adjust its location, or drag the rotation arrow above it to rotate the text till it fulfil your need.

16. Now a simple card is done with the only tool – Microsoft Word. I just shared the basic steps. You can still make adjustments to it according to your preference, like adding borders, or changing color tones. Try making an unique greeting card for the one you love!

Copyright Statement: Regarding all of the posts by this website, any copy or use shall get the written permission or authorization from Myofficetricks.

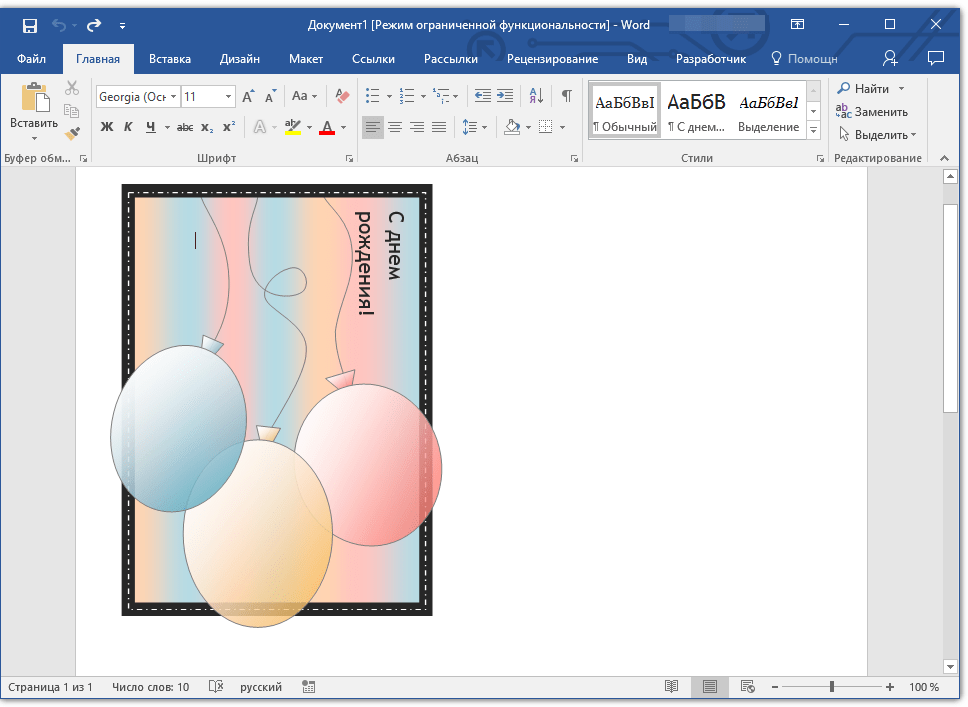
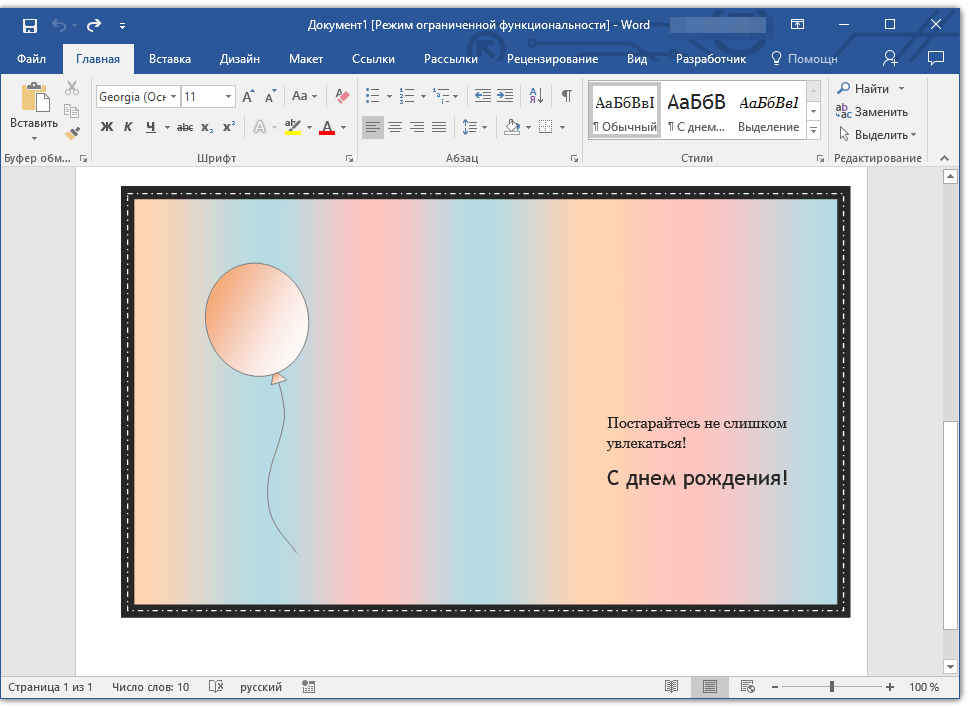
Любой праздник невозможно представить без подарков, всеобщего веселья, музыки, воздушных шаров и прочих радостных элементов. Еще один неотъемлемый компонент любого торжества — поздравительные открытки. Последние можно купить в специализированном магазине, а можно создать самостоятельно, используя для этого один из шаблонов Microsoft Word.
Урок: Как в Ворд создать шаблон
Не зря ведь говорят, что лучший подарок — это тот, что вы сделали собственными руками. Поэтому в данной статье мы расскажем, как самостоятельно сделать открытку в Word.
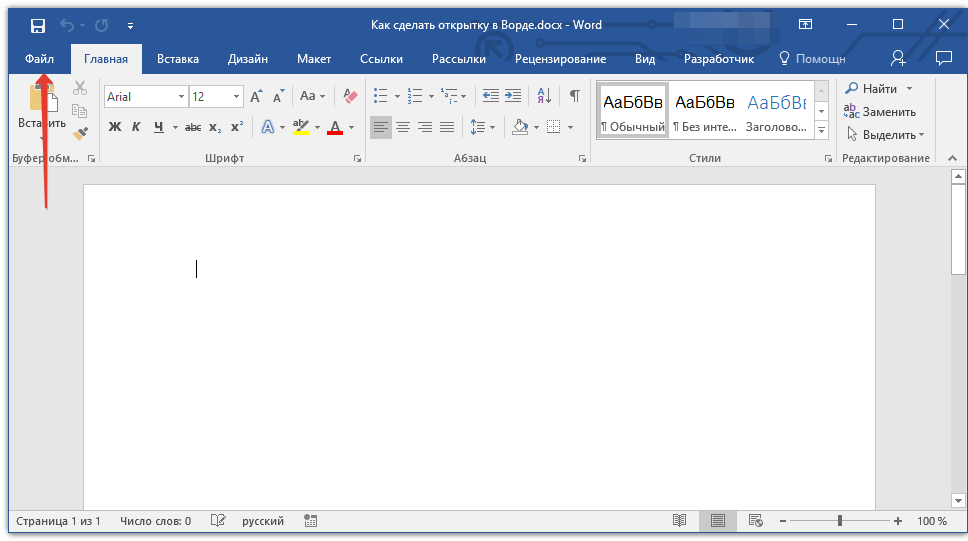
1. Откройте программу MS Word и перейдите в меню «Файл».
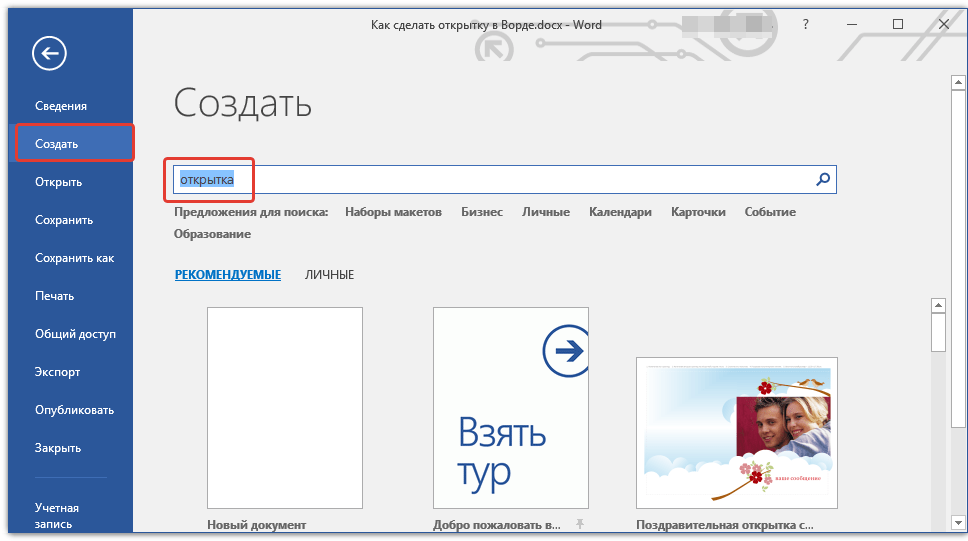
2. Выберите пункт «Создать» и в строке поиска напишите «Открытка» и нажмите «ENTER».
3. В появившемся перечне шаблонов открыток найдите ту, которая вам понравится.
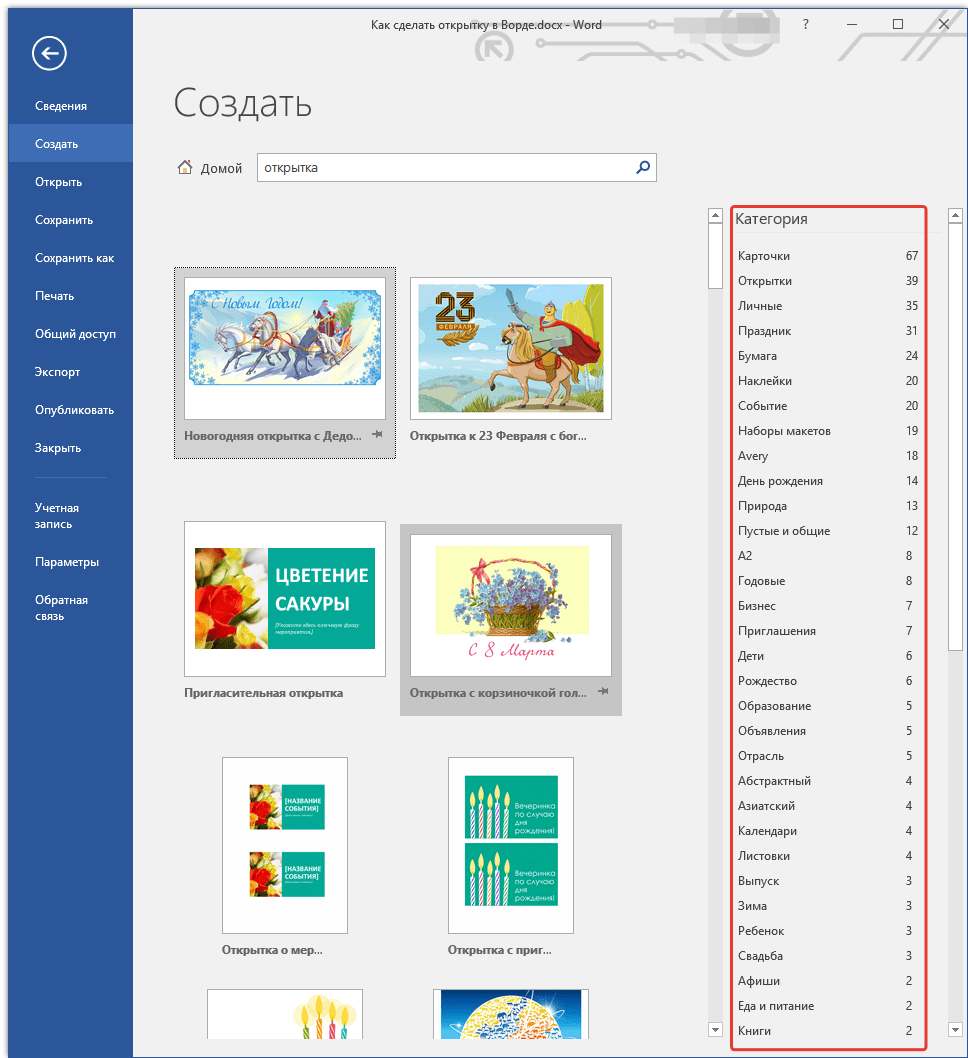
Примечание: В правом боковом списке вы можете выбрать категорию, к которой относится создаваемая вами открытка — годовщина, день рождения, новый год, рождество и т.д..
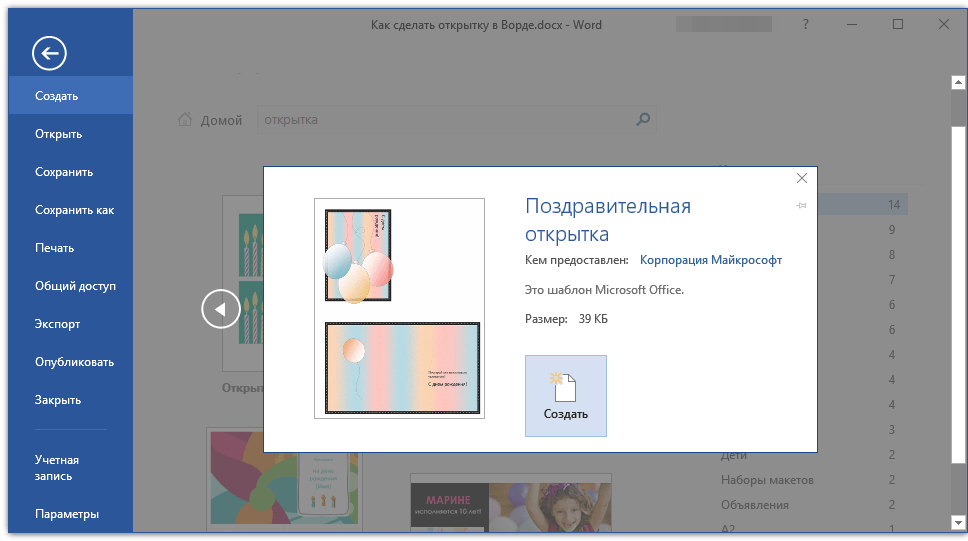
4. Выбрав подходящий шаблон, кликните по нему и нажмите «Создать». Дождитесь, пока этот шаблон будет скачан из интернета и открыт в новом файле.
5. Заполните пустые поля, вписав поздравление, оставив подпись, а также любую другую информацию, которую сами посчитаете нужной. При необходимости, воспользуйтесь нашей инструкцией по форматированию текста.

Урок: Форматирование текста в Ворде
6. Закончив с оформлением поздравительной открытки, сохраните ее и распечатайте.
Урок: Печать документа в MS Word
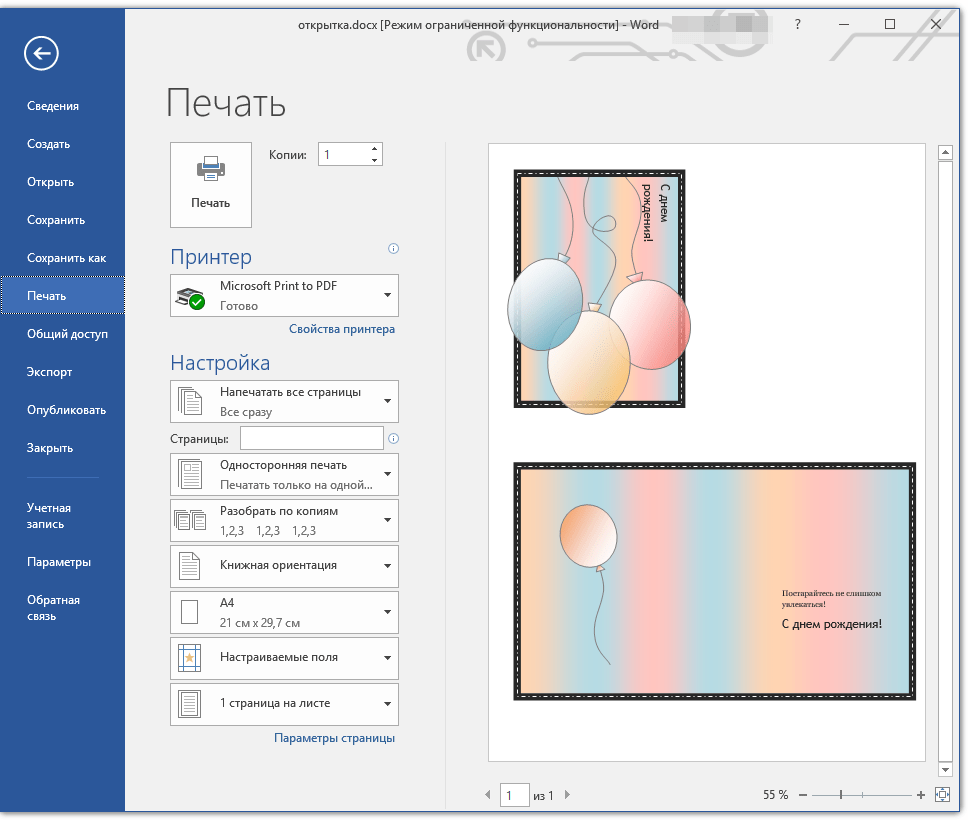
Примечание: На многих открытках на полях указана пошаговая инструкция с описанием того, как распечатать, вырезать и сложить ту или иную открытку. Не игнорируйте эту информацию, на печать она не выводится, а в деле очень даже поможет.
Поздравляем, вы самостоятельно сделали открытку в Ворде. Теперь осталось только подарить ее виновнику торжества. Используя встроенные в программу шаблоны, вы можете создать много других интересных вещей, например, календарь.
Урок: Как сделать календарь в Word
Еще статьи по данной теме:
Помогла ли Вам статья?
When you make a gift yourself, it’s got more personal touch. By making your own greeting card in Microsoft Word, you’re adding a personal touch to your card. Creating a personalized card in Microsoft Word is easy.
You may want to send a card to someone on many different occasions. Whether it’s for a birthday or a simple “thinking of you” card, the receiver can see how much time and care you put into your card.
If you want to learn how to make a greeting card for any occasion in Microsoft Word, then keep reading. You’ll also learn more about Microsoft Word and how to create a greeting card in Word.
How to Create a Greeting Card in Microsoft Word
Greeting cards are a simple way to show someone that you care and are thinking of them. So, let’s look into how to make a greeting card in Microsoft Word:
In this tutorial, I’m using Microsoft Word Version 16.65 on macOS. Depending on your operating system and your version of the software, your steps may be slightly different.
1. Choose the Greeting Card Style
The first step in how to make a card on Microsoft Word is to choose the style of greeting card you want. Next, choose the graphic that you wish to use on your card. This is necessary because your whole card will have a theme based on the graphic.


You also need to have a rough idea of what you want your card to be. So, you must choose the occasion and what you want it to say. You also should choose what orientation you want. This affects what your card looks like.
2. Set Up Orientation


Start by opening a blank Word document.
There are two orientations: landscape and portrait. Automatically your Word document is portrait style. So, if you prefer this style, you can skip this step.
The first step in changing the orientation is to click on the File option in the toolbar at the top of your screen. When you click on this option, a menu drops down. From the menu, click on the Page Setup… option. When you click on Page Setup a window appears.


In this window, there’s an Orientation: field. In this field, there are two options:
- Portrait
- Landscape.
Choose the option you want based on the greeting card style.
3. Change the Background Color


Background color can make your greeting card look nice. Start by clicking on the Design tab to choose a different background color. Next, click on the Page Color button in the toolbar. When you click on this button, a color menu drops down. Choose the color you want.
3. Add a Border


Another optional step in how to make a card in a Word document is to add a border. Borders can add a nice extra element to your card.
First, click on the Design tab above the Word toolbar.
Next, on the far right of the toolbar is a Page Borders button. Click on it. A Borders and Shading window appears when you click on this button. This is where you can choose the border style you want. Under the Style section, there are four fields. They are:
- Style. This is where you choose what you want your border to look like.
- Color. This field is where you choose what color you want your border to be.
- Width. In this field, you can choose how thick you want your border to be.
- Art. If you want little pictures to make up your border, then this is where you choose from different options.
5. Add Graphics
Another step in how to make a card in a Word document is adding graphics. Instead of trying to create your own, it’s easier to use premium graphics.
Before you add the graphic to Microsoft Word, you must ensure that it’s downloaded to your computer.


Next, click on the Insert tab above the toolbar. Then, in the toolbar, click on the Picture button. When you click on this button, a menu drops down.
Choose the right option for you, depending on your file’s location. Double-click on the graphic file. This adds the graphic to your document. Adjust the graphic placement and size as needed.
7. Print Preview


Now that you know how to make a card on Microsoft Word, the last step is to print it. If you want to print, preview your document before it’s printed.
Using Word on macOS makes it easy. The preview automatically shows up in the Print window. To print your document, click on the Print button at the very top of your window.
The Best Source for Premium Digital Elements (With Unlimited Use)
Envato Elements is a valuable deal for you if you’re in a creative field or use digital creative assets frequently. They’ve got premium digital assets such as graphics, images, fonts, and more.
To get access to these creative assets, just pay a low monthly fee to become a subscriber. After you become a subscriber, you automatically get unlimited access.
Explore Greeting Card Graphics


The benefit of unlimited access is that if you download a graphic or other design asset and it doesn’t work for your project, you can immediately download another design asset at no extra cost. This means that you’ve get many options to choose from.
Microsoft Word FAQ (Frequently Asked Questions)
If you want to learn more about Microsoft Word, You can. Here are some frequently asked questions and answers:
1. Can I Change the Margins in Microsoft Word?
Adjusting the margins in Microsoft Word is the easiest way to change the layout of your document. Adjusting the margins controls how far text and numbers sit from the edges of your document. Read this tutorial for an in-depth look at how to change the margins:
2. How Can I Quickly Print Microsoft Word Documents?
You can quickly print a document in Microsoft Word in several different ways. Knowing how to print different documents in Word can make it easier to have a professional result. For more information on how to print in Microsoft Word, read this tutorial:
3. Can I Make My Greeting Card into a Template?
Yes, you can! It’s a good idea if you plan on making greeting cards often. Templates can save you time from needing to start from the first step every time. For a tutorial on how to save your document as a template in Microsoft Word, read this tutorial:
4. Could I Change the Font in Word?
Yes! Changing the font is an easy way to add a fun or personal touch to your document. Also, adding an on-theme font can make your document look more professional and put together. For more information on how to change the font read this tutorial:
5. How Do I Add Clip Art to a Microsoft Word Document?
If you aren’t good at drawing or simply want to save time, you can use clip art to add some art to your document. If you don’t see what you like, you can choose from the hundreds of graphics on Envato Elements. Here’s a tutorial on how to use Microsoft Word clip art:
Create Your Own Greeting Card in Microsoft Word Today!
By following the tutorial above, you can make your own greeting card. After you know how to create a greeting card, it isn’t difficult. Since it’s simple, you can show off your creative side by making any type of card you want.
Envato Elements has many resources that can help you create a better-looking document. Whether you need graphics, images, or other design assets, give Envato Elements a try. Sign up today to take advantage of a great deal.
Did you find this post useful?

Freelance Writer, Dallas Area, USA
Since 2019 Sarah Joy has been a freelance instructor at Envato Tuts+. She has published over 50 informative business tutorials. Sarah has a Communications degree from SNHU. She is also certified in Microsoft Word, Excel, PowerPoint, and Access through Collin College. In addition, Sarah writes about a wide variety of popular business tools and other business topics.