

It is no secret that visuals and symbols are the most effective tools for making your text interactive. Word has supplied several such interactive symbols for the same. Let us get right into a detailed guide to add the mail/envelope symbol in Word in simple steps.
Helping you save time, here is a thorough step-by-step guide to three simple ways to insert the mail/ envelope symbol (✉) to your word document. Windows allows several ways to insert any symbol into your text. These include using shortcuts with Alt Code, copy-pasting the desired symbol, or using the symbol dialog.
- Using Shortcuts with Alt Code
Windows has supplied specific shortcut codes or Alt Codes for all the symbols inserted in a word text. The Alt Code for the mail/envelope symbol is 9993. To use this Alt Code to insert the envelope symbol, follow the steps below:
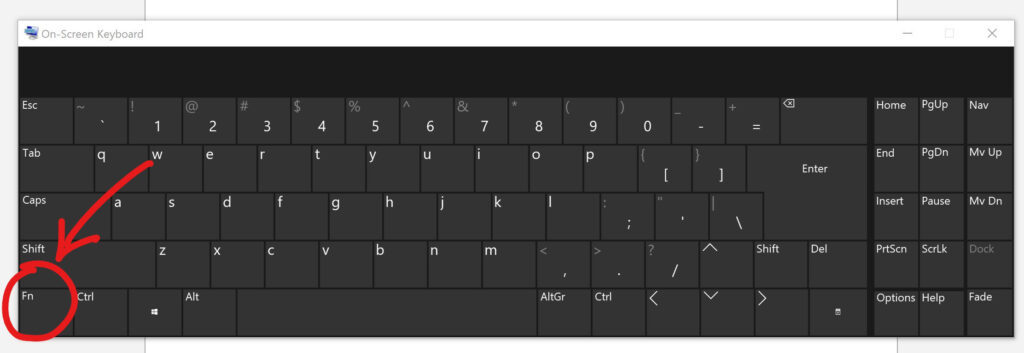
- Press the num lock key enabling the numeric keypad. On laptops, press the Fn key + NumLk key to enabling the numeric keypad.
- Press down on the Alt key and, using the numeric keyboard type the desired Alt code, in this case, 9993.
- Release the Alt key after you have typed the code.
The envelope symbol ✉ should be visible now.
Note: If you are using a tablet with a detachable keyboard like a Windows Surface, then you just need to press the Fn key to enable the numeric keypad.
- Using the Copy-Paste Method
A quite simple way to get any desired symbol to your word text is by using the copy-paste method. You can do this by following the steps below:
- Take your cursor to the mail/envelope symbol here: ✉
- Press down the right side of your mouse to select the symbol, or press down the shift key on your keyboard and press the right arrow key to select the symbol. The symbol should now be highlighted.
- Right-click the highlighted symbol and select copy from the drop-down menu or use the shortcut key Ctrl + C to copy the symbol.
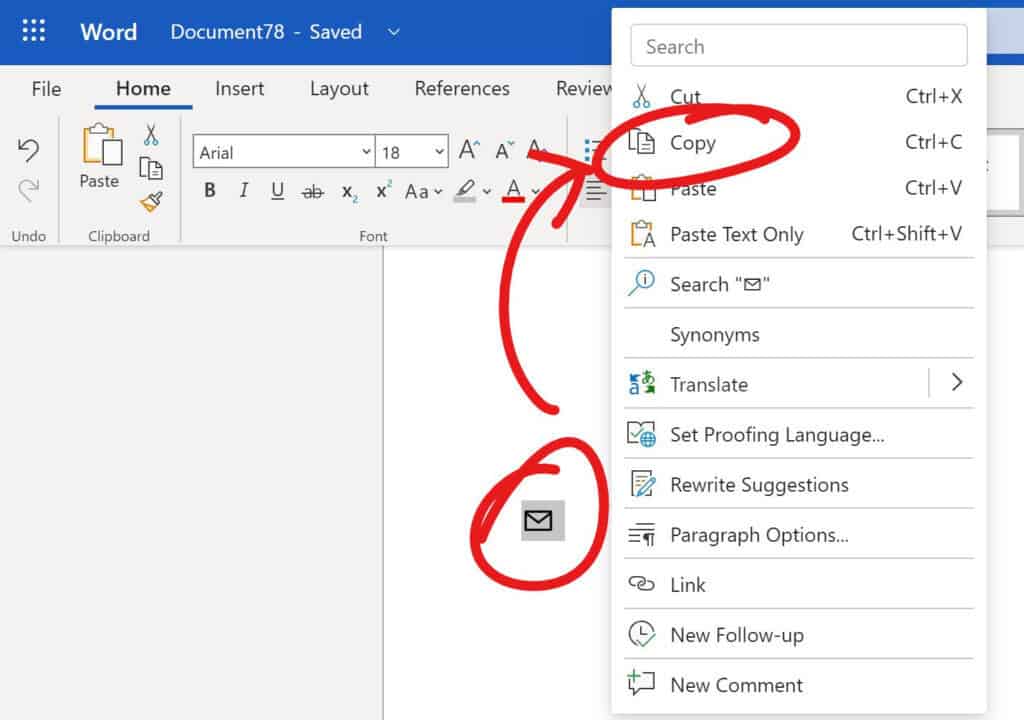
- To paste the copied symbol right click on the desired spot and select paste from the drop-down menu or use the shortcut Ctrl + V to paste in the desired spot.

- Alternatively, you can google search the desired symbol and copy it from there.
Note: Make sure the symbol you google searched is in text format and not an image.
- Using the Insert Symbol Dialog
In comparison to the other two methods, this one is more complicated. But with the very simple steps given below, it is going to be a piece of cake.
- Find the Insert tab on the top left of your word document.
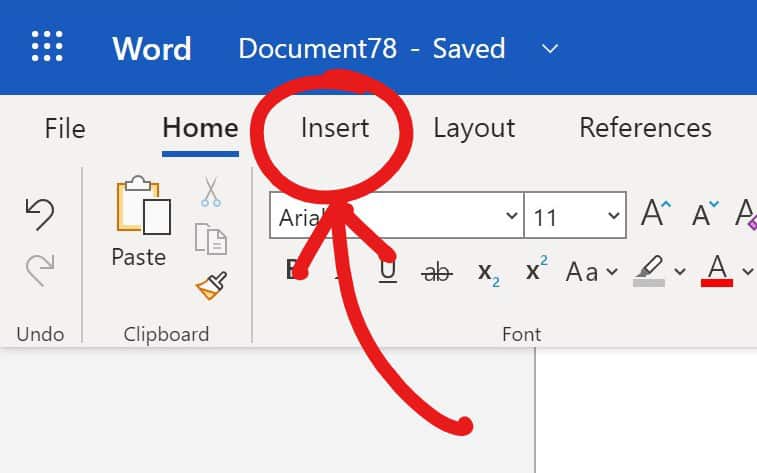
- In the Insert tab, click on the symbol tab and then select More Symbols. The Symbol Dialog Box should now be open.
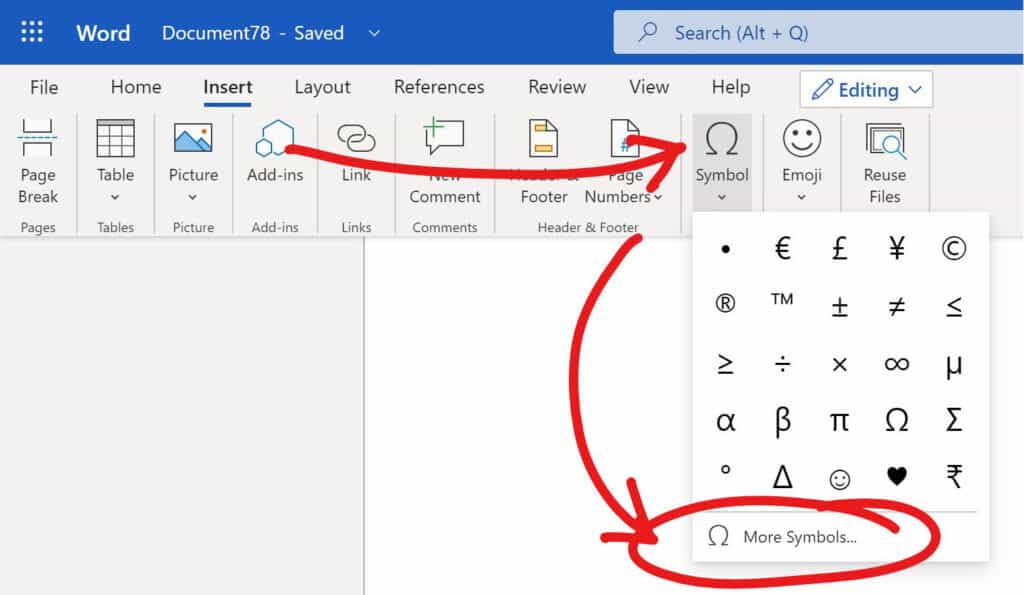
- Locate the desired symbol.
To locate the Envelope symbol in the dialog box, change the option to Wingdings in the Font drop-down. Next, in the bottom right corner of the dialog box, locate the character code field and type 002A. This should select the symbol you want to insert.
- Click the insert button.
- Another way is to double-click the symbol you want to insert if you already see it on the dialog box.
- Click the close button.
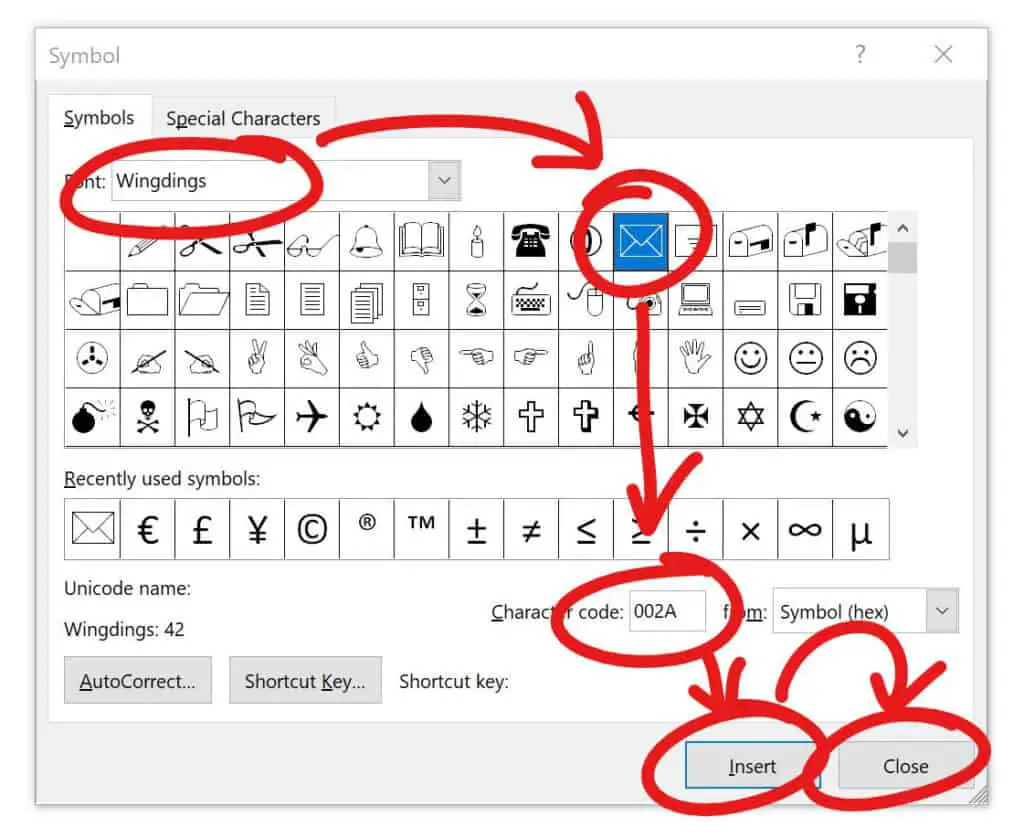
The desired symbol should now be visible on your word document.
Frequently Asked Questions
- Is pressing the Fn key enough on a tablet?
Yes, pressing the Fn key on your detachable keyboard will enable the numeric keyboard. You can find the same Fn key on the on-screen keyboard on your tablet.
- Can I use the same methods in Word online?
Yes, you can use all three methods in word online to insert any symbol. However, it is important to note that only the copy-paste method will work in the student subscription of Word 360. To use the other methods, you need to buy the full subscription.
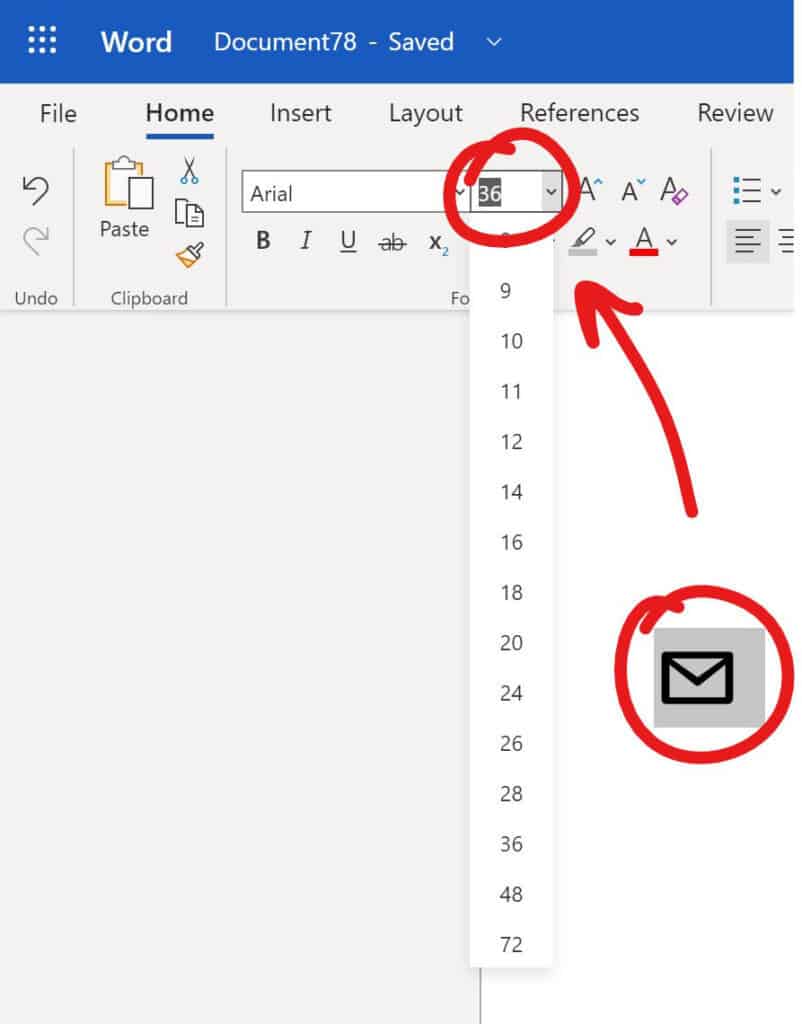
- Can I change the size of the symbol?
Yes. To change the size of the symbol, you can highlight it and choose the size Font Size bar next to the Font Name bar on the top-left side of your word document.
Inserting the Mail/Envelope symbol
If you have reached so far and you are not breathing too hard, then you have successfully followed the simple steps and can see this symbol ✉ on your document. You can use any of the three methods described above to insert any desired symbol according to your need. All three methods are described in detail. You can now easily use the direct shortcuts with the right Alt Code, copy-paste the symbol, or use the Insert Symbol Dialog box. The general exceptions are applied to tabled keyboards only. If you have any general queries or comments, please feel free to use the comment section below and leave them there.
Also read How to Insert a Checkbox In Word (☒) with Screenshots?
HTTA is reader supported. When you buy through links on our site, we may earn an affiliate commission at no extra cost to you. Learn more.
In today’s article, you’ll learn how to use some keyboard shortcuts and other methods to type or insert the Mail/Envelope Symbol (text) in MS Word for Windows.
Just before we begin, I’ll like to tell you that you can also use the button below to copy and paste the Mail/Envelope symbol text into your work for free.
However, if you just want to type this symbol on your keyboard, the actionable steps below will show you everything you need to know.
Mail/Envelope Symbol [✉] Quick Guide
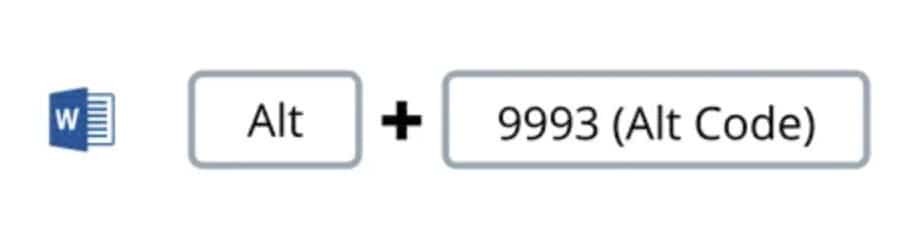
To type the Mail/Envelope Symbol on Word for Windows, simply press down the Alt key and type 9993 using the numeric keypad, then let go of the Alt key. This shortcut can work only on MS Word.
The below table contains all the information you need to type this Symbol on the keyboard on Word for Windows PC.
| Symbol Name | Mail/Envelope |
| Symbol Text | ✉ |
| Alt Code | 9993 |
| Shortcut for Windows | Alt+9993 |

The quick guide above provides some useful shortcuts and alt codes on how to type the Mail/Envelope symbol in Word on Windows.
For more details, below are some other methods you can also use to insert this symbol into your work such as Word or Excel document.
Microsoft Office provides several methods for typing Mail/Envelope Symbol or inserting symbols that do not have dedicated keys on the keyboard.
In this section, I will make available for you 3 different methods you can use to type or insert this and any other symbol on your PC, like in MS Word for Windows.
Without any further ado, let’s get started.
See Also: How to type Therefore Symbol in Word
Using the Mail/Envelope Symbol Alt Code (Windows Only)
The Mail/Envelope Symbol alt code is 9993.
Even though this Symbol has no dedicated key on the keyboard, you can still type it on the keyboard with the Alt code method. To do this, press and hold the Alt key whilst pressing the Mail/Envelope Alt code (i.e. 9993) using the numeric keypad.
This method works on Windows only. And your keyboard must also have a numeric keypad.
Below is a break-down of the steps you can take to type the Mail/Envelope Sign on your Windows PC:
- Place your insertion pointer where you need the Mail/Envelope Symbol text.
- Press and hold one of the Alt keys on your keyboard.
- Whilst holding on to the Alt key, press the Mail/Envelope Symbol’s alt code (9993). You must use the numeric keypad to type the alt code. If you are using a laptop without the numeric keypad, this method may not work for you. On some laptops, there’s a hidden numeric keypad which you can enable by pressing Fn+NmLk on the keyboard.
- Release the Alt key after typing the Alt code to insert the Symbol into your document.
This is how you may type this symbol in Word using the Alt Code method.
Copy and Paste Mail/Envelope Sign ✉ (text)
Another easy way to get the Mail/Envelope Symbol on any PC is to use my favorite method: copy and paste.
All you have to do is to copy the symbol from somewhere like a web page, or the character map for windows users, and head over to where you need the symbol (say in Word or Excel), then hit Ctrl+V to paste.
Below is the symbol for you to copy and paste into your Word document. Just select it and press Ctrl+C to copy, switch over to Microsoft Word, place your insertion pointer at the desired location, and press Ctrl+V to paste.
✉
Alternatively, just use the copy button at the beginning of this post.
Using insert Symbol dialog box (Word, Excel, PowerPoint)
The insert symbol dialog box is a library of symbols from where you can insert any symbol into your Word document with just a couple of mouse clicks.
Obey the following steps to insert this symbol (✉) in Word or Excel using the insert symbol dialog box.
- Open your Word/Excel/PowerPoint document.
- Click to place the insertion pointer where you wish to insert the symbol.
- Go to the Insert tab.

- In the Symbols category, click on the Symbol drop-down and select the More Symbols button.

The Symbol dialog box will appear.
- To easily locate the Mail/Envelope symbol, select Wingdings font type in the Font drop-down at the upper left section of the window. Then type 002A in the character code field at the bottom area of the window. After typing this character code, the Mail/Envelope symbol will appear selected.
- Now click on the Insert button to insert the symbol into your document.

- Close the dialog.
The symbol will then be inserted exactly where you placed the insertion pointer.
These are the steps you may use to insert this Symbol in Word.
Conclusion
As you can see, there are several different methods you can use to type the Mail/Envelope Sign in Microsoft Word.
Using the alt code shortcut for Word makes the fastest option for this task. Shortcuts are always fast.
Thank you very much for reading this blog.
If you have anything thing to say or questions to ask concerning the Mail/Envelope Symbol, please drop it in the comments.
Email symbol is denoted by ✉. It is also referred to as Envelope Symbol. This symbol is available in Unicode at code point U+2709, or 9993 in decimal notation.
For more information about this symbol, continue reading below.
Copy Email Symbol Text
The easiest way to get the Envelope Symbol text is to copy and paste it wherever you need it.
Save yourself some time with the copy button above.
Once it is copied, switch over to where you need this symbol and press Ctrl and V on your keyboard to paste it there.
Email Symbol Information Table
The table below contains some useful information about the Envelope Symbol.
| SYMBOL | ✉ |
| NAME | |
| CATEGORY | Symbols |
| ALT CODE | 9993 |
| SHORTCUT (MS WORD) | Alt + 9993 |
| SHORTCUT (MAC) | Not Available |
| SHORTCUT (MS WORD) | 2709, Alt X |
| SHORTCUT (MAC) | – |
| UNICODE | U+2709 |
| HTML CODE | ✉ |
| HEX CODE | ✉ |
| HTML ENTITY | Not Available |
| CSS CODE | 2709 |
As much as possible, the above table has done a great deal in presenting some useful information about the Email Symbol including keyboard shortcut, Unicode and html code.
The remaining section will explain this table further.
How to Get the Envelope Sign
Even though there’s no dedicated key for the Email symbol on the keyboard, you can still get this symbol using the keyboard.
If you are also using any of the Microsoft Office or Google apps, there are quick navigations you can perform to insert this symbol in Word, Excel, PowerPoint, or Google Docs.
Without any further ado, below are the various ways to get this symbol whether with your keyboard or using the navigation in MS Office or Google Docs.
Symbol for Email Alt Code (Keyboard Shortcut)
The Email Symbol Alt Code is Alt + 9993.
Note: This Alt Code shortcut works in MS Word only.
You can simply use the Alt code method to type this symbol by pressing and holding the Alt key while typing the Symbol Alt code (9993) using the numeric keypad on the right.
Below are detailed steps you may use to type the Symbol for Envelope with your keyboard.
- Open your Word document where you need to type the sign for Email.
- Place your cursor at the desired location.
- Press and hold down the Alt key.
- Whilst holding down the Alt key, press the Email Alt Code (9993).
- After typing the code, release the Alt key.
As soon as you release the Alt key, the symbol (✉) will immediately appear exactly where you place the cursor.
NOTE: Using this Alt Code method, you can type this symbol only in MS Word for Windows.
Insert Email or Envelope Symbol in Word/Excel/PowerPoint
For Microsoft Office users like Word, Excel, or PowerPoint, you can use this simple mouse navigation to quickly insert the Email sign.
Below steps will show you how to insert the Symbol for Email in Word or Excel or PowerPoint.
- Open your Word or Excel or PowerPoint document.
- Go to the Insert tab.

- At the far-right section, you’ll see the Symbols group. Select Symbol > More Symbols.

The Symbol window will appear as below.

- From this window, you can find the symbol (✉). To find it easily, type 2709 in the Character code: box. As soon as you type the character code, the Email sign will appear selected.

- Click the Insert button to insert it into your Word document.
- Close the Symbol dialog.
These are the steps you may use to insert the this (✉) and any other symbol in Microsoft Word or other Office apps in both Windows and Mac OS.
Email Symbol in Google Docs
Google Docs is yet another text editor that people struggle with when it comes to typing or inserting the Sign for Email.
Meanwhile, Google Docs has the easiest way to insert symbols that are not found on the keyboard. Without further ado, let’s see how this is done.
To get the Email Symbol in Google Docs:
- Open Google Docs and place your cursor where you need the symbol.
- Go to Insert > Special Characters.

The Insert special characters window will appear with a search bar and a drawing pad.
- Using the Search bar, search for Email. Then double click on the Symbol for Email in the search results to insert it into Google Docs.

- You can also use the drawing pad below the search bar to draw the Symbol for Email. If Google Docs recognize the drawing, it’ll display the symbol and similar signs in the results box. Then double click the symbol to insert it.
These are the steps you may use to insert this and any other symbol in Google Docs.
Conclusion
As much as possible, we’ve tried to cover a lot of information about the Email Symbol.
Most people find it difficult to type or insert this symbol. So, we’ve broken down the several methods and steps needed to be able to type or get it in Word.
Thanks so much for reading this blog and have a Emailderful day.
this is a very comprehensive guide with various methods you can use to insert or write the mail/envelope symbol or mail symbol signature (✉ ) in microsoft word for windows. you will learn all the simple methods, including the alt code shortcut.
Without wasting too much time, let’s get started.
Reading: Mail symbol in word
quick guide to typing the mail/envelope symbol (✉)
To type the mail/envelope symbol in word, press the alt key and type 9993 using the number pad on the right side of your keyboard.
The following table contains everything you need to know to be able to type this symbol in Microsoft Word for Windows
more details on how to write the mail/envelope symbol
The above information is enough to insert the mail/envelope sign into your microsoft word document.
However, if you’re not satisfied with this quick help, keep reading below as I’ll explain in detail how to get this symbol or any other symbol anywhere in your ms word for windows.
As you may know, there are several dual-purpose keys on the keyboard for both Windows and Mac. that is, symbols are readily available as second keys on the keyboard. by simply pressing two or more keys simultaneously, you can easily insert such symbols into your work. for example, if you press the keys shift + 7 you will get the ampersand (&).
however, other symbols are not printed on the keyboard as second keys. this makes it difficult to write. one of these symbols is the mail/envelope symbol (✉).
writing becomes very difficult for you if you need to add some of these symbols regularly in your work.
but it doesn’t have to be difficult. especially now that you are reading this step-by-step guide.
See also: How Many Stamps Do I Need for International Shipping? (USPS)
In the following sections, I will show you all the easy ways to write or insert this symbol (✉) in your ms word for windows.
In a couple of minutes, I’ll explain various methods you can use to get the (✉) and any other symbols when the need arises.
however, without further ado, the methods are explained in detail below.
1. mail/envelope symbol shortcuts
windows has several shortcuts, some of which only work in microsoft word. the mail/envelope symbol is one of them. the shortcut is the alternate code shortcut which is alt + 9993.
Each symbol in word has a unique code that you can use to insert the symbol into your document. this code is well known as “alt code”.
Below are the steps to type this symbol on your keyboard (using the alt code provided above):
- press the num lock key to enable the numeric keypad. use the fn key + numlk keys to turn on numlock on laptops without a numpad.
- hold down alt and type 9993 using the numpad.
- after typing the alternate code (i.e. 9993), release the [alt] key you pressed.
As soon as you release the alt key, the mail/envelope symbol (✉) should appear in your document.
2. copy and paste mail/envelope symbol
Use the button below to copy and paste the mail/envelope symbol for your work.
My favorite method of inserting symbols is to copy and paste.
With this method, all you need to do is search google for the symbol you need to type and then copy it from one of the provided search results. once you get the symbol in your document, you can always copy and paste it back when the need arises.
use the button above to get this symbol on your clipboard.
3. using the insert symbol dialog box
See also: How to Get a Gmail App for Desktop (Mac or PC) – Blog – Shift
This approach is not as straightforward as the shortcuts. but it’s pretty simple.
and once you get the symbol in your document, you can always copy and paste it back when you need it in your work.
Below are the steps to insert the mail/envelope login in word using the insert symbol dialog.
- Go to the insert tab.
- on the insert tab, click the symbol button and select more symbols…
These few clicks will open the symbol dialog.
- Locate the symbol you want to insert.
to easily find the mail/envelope symbol in the symbols window, click the font dropdown menu and change it to wingdings, then look at the bottom area from the dialog box and type 002a in the character code: field. the symbol you want to insert will be selected after you write the code.
- click the insert button.
Alternatively, double-clicking the symbol will also insert the symbol into your document.
- click the close button.
this is how you can insert this symbol in word using the insert symbol dialog.
conclusion
As you can see, these are the various ways you can insert or type the mail/envelope symbol in word/excel with or without using the keyboard.
My favorite method is to use the copy and paste method followed by the alt code shortcut. the insert symbol method is also very useful.
If you have any comments or questions about this envelope/mail signing guide, please let me know in the comments section below.
thanks for reading.
See also: Mourners pay touching tribute to billionaire heiress, 34, who was kidnapped and killed last week | Daily Mail Online
An E-Mail icon you can insert into Word using the icon menu is very easy. A meaningful Symbol in many cases is better, because it will find the reader easier your Mail falls address with a view to.
E-Mail insert Symbol in Word
This guide is created primarily for Office 365 Home 2016, however, you can apply this solution on any other versions of Word:
- Click in the top horizontal menu bar item «Insert» and then right click «Symbol».
- Press at the bottom of the open menu on the «More symbols». Then the window that you can see in the Screenshot appears.
- Set the Font to «Wingdings». In the first line, you should now see the entries that you can use as the E-Mail icon. In the Screenshot, the mail icon is selected for example.
- You have chosen an image, you need to select it with the left mouse button and click Insert. The icon will then appear at the point where your Cursor is currently located.
E-mail icon in Word to insert

This is a very detailed tutorial that explains in different ways how to insert or type a mail/vertical symbol or a mail signature (✉) into Microsoft Word for Windows. You’learns all the simple methods, including the Alt-key combination.
Let’s start without wasting time.
Mail/Conversion Quick Installation Guide (✉)
To enter a letter/symbol in Word, press the Alt key and enter 9993 using the numeric keypad on the right side of the keyboard.
The following table contains everything you need to know to type this character in Microsoft Word for Windows
| Name symbol | Shelf / envelope |
| Symbol text | ✉ |
| Alt code symbol | 9993 |
| Summary in Word | Old + 9993 |
Additional information about the Mail/Convert character set
The above information is sufficient to insert the mail/conversion bookmark in a Microsoft Word document.
However, if you are not satisfied with this quick help, please read the following, because I will explain in detail how to place this or any other character somewhere in your MS Word for Windows.
As you may already know, the keyboard has dual-use keys for Windows and Mac. This means that the keyboard has symbols that are easily accessible as a second key. By simply pressing two or more buttons at the same time, you can easily insert these characters into your work. For example, if you press Shift + 7, the ampere mark (&) will appear.
However, the other characters are not entered as the second key on the keyboard. It makes it hard to hit. One of these symbols is the postmark/envelope symbol (✉).
Entering text becomes very difficult if you regularly need to add some of these characters to your work.
But it doesn’t have to be difficult. Especially now that you are reading this guide step by step.
To insert an envelope symbol in Word/Excel
In the following paragraphs I will show you all the simple ways to enter or insert this symbol (✉) in MS Word for Windows.
In a few minutes I will explain some methods to (✉) and if necessary to get a different character.
To help you quickly enter the Mail/Convert character on the keyboard, press the Alt key and enter the 9993 alpha code on the numeric keypad.
However, the methods are explained in detail in the following paragraphs.
1. Letterbox/Conversion symbol
Windows has several shortcuts, some of which only work with Microsoft Word. The mail/envelope symbol is one of them. Key combination – Alt + 9993.
Mail / Envelope (✉) The code 9993 of the symbol Alt.
Each character in Word has a unique code that you can use to insert a character into your document. This code is known as the Alt code.
Below are the steps to enter this character on your keyboard (using the Alt code shown above):
- Press the number lock key to activate the numeric keypad. Use the Fn + NumLk keys to activate the numeric lock on laptops without a numeric keypad.
- Press and hold the Alt key and enter 9993 using the numeric keypad.
- After entering the Alt code (i.e. 9993), release the [Alt] key.
As soon as you release the Alt key, the item/envelope symbol should appear in your document (✉).
2. Copy and paste the mail/conversion symbol
Use the button below to copy and paste the Mail/Envelope icon for your work.
I prefer to copy and paste.
With this method you just type in a Google icon and copy it from one of the specified search results. After inserting a symbol into a document, you can copy and paste it at any time if necessary.
Use the button above to place this character in the clipboard.
3. Using thedialog to insert characters
This approach is not as simple as the quick methods. But it’s very simple.
And once you’ve inserted a symbol into a document, you can copy and paste it into your work whenever you need it.
Below are the steps for inserting the Mail/Convert symbol into a word using the Insert Symbols dialog box.
- On the Insert tab, press the Symbols button and select More Symbols…..
These few clicks bring up the symbol’s dialog box.
- Find the symbol you want to insert.
To easily find the Post/Develope icon in the symbol window, click on the Font drop-down list box and change it to Wings, then look at the bottom of the dialog box and type 002A in the Character Code field: (Symbol code:). The symbol you want to insert is selected after entering the code.
- Click on the Insert button.
It is also possible to insert a symbol into the document by double clicking on a symbol.
Allows you to insert this character into Word using the Insert character dialog box.
Conclusion
As you can see there are several ways to insert or enter the Mail/Excel symbol into Word/Excel with or without a keyboard.
I prefer to copy and paste, followed by a short code. The method of inserting symbols is also very useful.
If you have any comments or questions about this Letter and Envelope Signing Guide, please send them to me in the comments section below.
Thank you for reading it.
phone symbol text,website symbol text,e-mail symbol unicode,location symbol in word,alt code mailbox,camera alt symbol,email alt code,map alt code,phone keyboard symbol,globe symbol in word,internet symbol in word,how to insert location symbol in word,microsoft word symbols list,microsoft word symbols download,enter key symbol unicode,alt codes complete list pdf,how to insert symbols in word using keyboard,linkedin symbol in word,phone symbol in word,telephone shape for word,download symbols for word,flight symbol in word,microsoft word symbols and meanings,what are special characters in word,you can add a date to a document by,how to add accent marks on google docs,how do i type é on my keyboard?,how to add accents in word mac,what is the alt code for e,how to type in spanish on microsoft word,how to put a symbol above a letter in word,symbol fonts in word,symbol font character map,keyboard shortcut to use thesaurus is-,interleaf symbols font,power symbol font,this is placed in body paragraphs and points,diameter symbol alt code,plus minus symbol keyboard shortcut mac,diameter symbol revit,diameter symbol autocad,depth symbol,symbol for radius,how to insert envelope symbol in word,email symbol in word,email symbol text,telephone symbol in word,address symbol text
Вставка знаков мобильного и стационарного телефона в MS Word
Как часто вы работаете в Microsoft Word и как часто вам приходится добавлять в этой программе различные знаки и символы? Необходимость поставить какой-либо знак, отсутствующий на клавиатуре, возникает не так уж и редко. Проблема в том, что не каждый пользователь знает, где нужно искать тот или иной знак или символ, особенно, если это знак телефона.
Хорошо, что в Microsoft Word есть специальный раздел с символами. Еще лучше, что в широком обилии шрифтов, доступных в этой программе, есть шрифт «Windings». Написать слова с его помощью у вас не получится, а вот добавить какой-нибудь интересный знак — это вы по адресу. Можно, конечно, выбрать этот шрифт и нажимать подряд все клавиши на клавиатуре, пытаясь найти необходимый знак, но мы предлагаем более удобное и оперативное решение.
Урок: Как изменить шрифт в Ворде
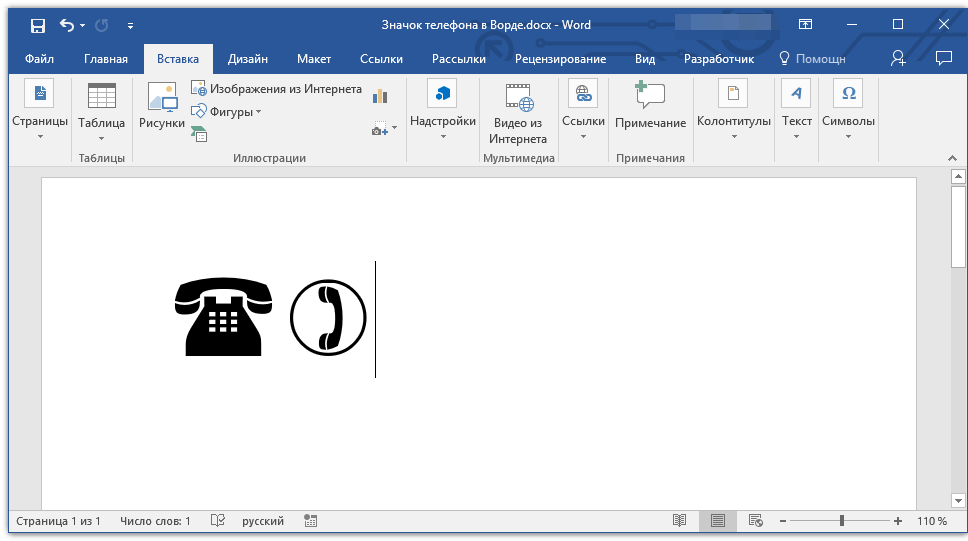
1. Установите курсор там, где должен будет находиться знак телефона. Перейдите во вкладку «Вставка».
2. В группе «Символы» разверните меню кнопки «Символ» и выберите пункт «Другие символы».
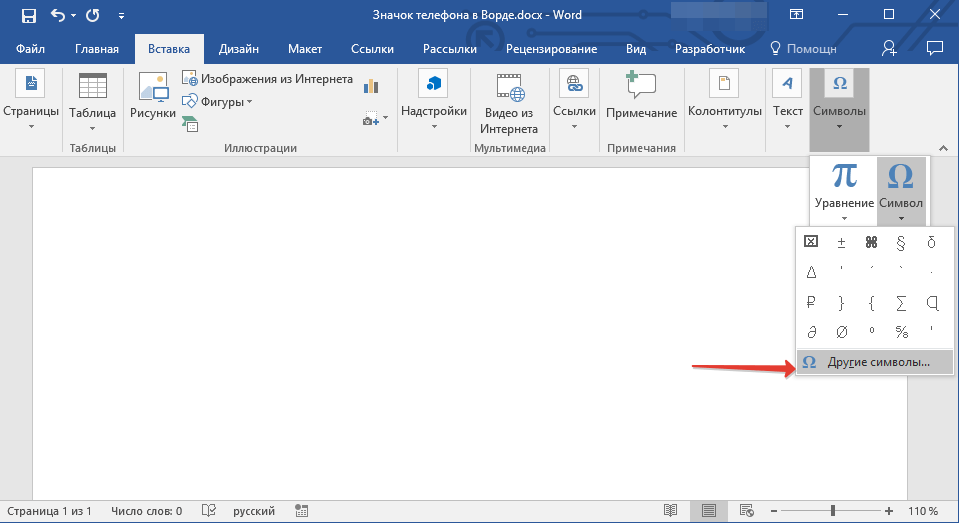
3. В выпадающем меню раздела «Шрифт» выберите «Windings».
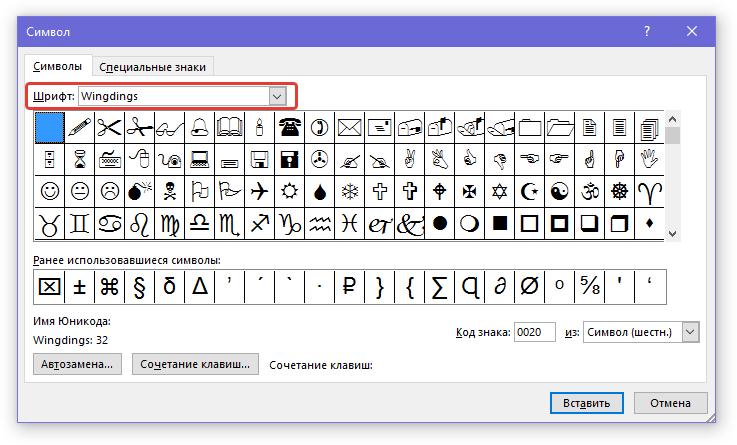
4. В изменившемся списке символов вы сможете найти два знака телефона — один мобильного, другой — стационарного. Выберите тот, который вам нужен, и нажмите кнопку «Вставить». Теперь окно символ можно закрыть.
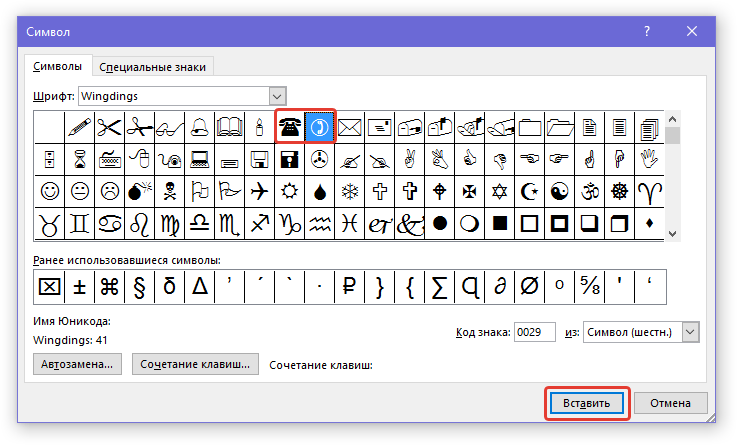
5. Выбранный вами знак будет добавлен на страницу.
Каждый из этих знаков можно добавить и с помощью специального кода:
1. Во вкладке «Главная» измените используемый шрифт на «Windings», кликните в том месте документа, где будет находиться значок телефона.
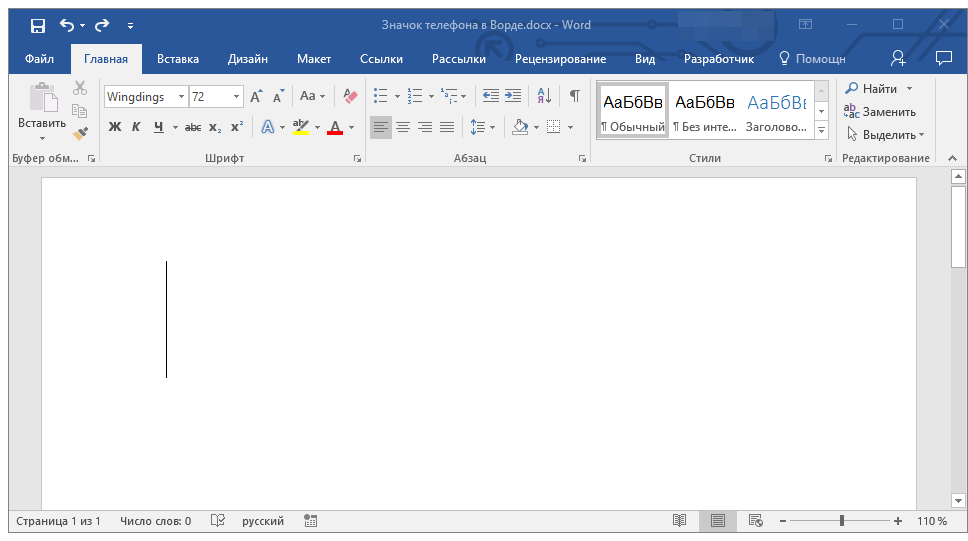
2. Зажмите клавишу «ALT» и введите код «40» (стационарный телефон) или «41» (мобильный телефон) без кавычек.
3. Отпустите клавишу «ALT», знак телефона будет добавлен.
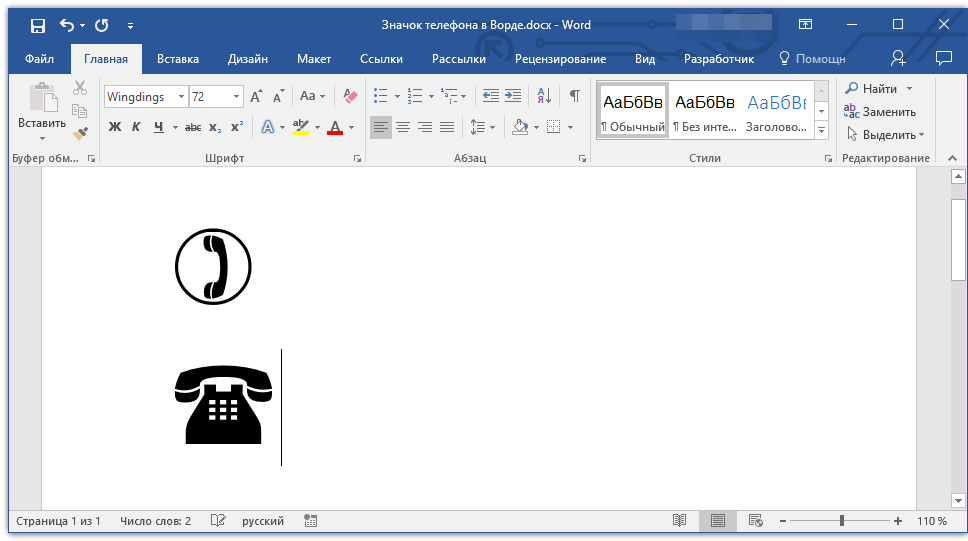
Вот так просто можно поставить знак телефона в Microsoft Word. Если вы часто сталкиваетесь с необходимостью добавления в документ тех или иных символов и знаков, рекомендуем изучить стандартный набор символов, доступных в программе, а также знаки, входящие в состав шрифта «Windings». Последних, к слову, в Ворде аж три. Успехов и обучении и работе!
Отблагодарите автора, поделитесь статьей в социальных сетях.
Символы, специальные знаки и картинки в Word

Без знания редактора Word, ни о каком заработке копирайтеру не стоит и мечтать, ведь одних школьных знаний синтаксиса и грамматики мало, и сегодня надо уметь правильно оформить текст, вставить символы, специальные знаки и картинки в Word.
Не будут эти знания лишними и в редакторском багаже веб-мастера, который ещё не вышел на уровень, когда можно лишь считать деньги и задумчиво смотреть вдаль.
Приведу несколько примеров по работе с текстом. Кое-что о знаках, символах и горячих клавишах.
Специальные знаки в Word
Для грамотного оформления текста мало стандартных возможностей клавиатуры и нередко надо использовать специальные знаки Word, добраться к которым можно через панель управления текстовым редактором. Символы €, ∞, ®, специальные знаки ©,™ и другие, в том числе классическое тире можно вставить в документ за пару секунд, а в перспективе есть возможность настроить «быстрые клавиши» и вставлять знаки ещё быстрее.
Итак, где находятся в редакторе Word символы и специальные знаки? Путь проще, чем дорога по джунглям великого путешественника Миклухо-Маклая. Идём по пути:
Вставка – Символы – Другие символы
И выбираем там нужно, после этого нажимая «вставить». Если вам нужны специальные знаки, то путь на один шаг длинней:
Вставка – Символы – Другие символы – Специальные знаки
Если вы хотите назначить знакам и символам сочетание «быстрых клавиш» , то перейдите во вкладку «сочетание клавиш» наберите на клавиатуре нужное сочетание и нажмите назначить (рисунок 1). Не советую для всех более-менее применяемых символов и знаков Word выбирать «быстрые клавиши», так как их сложно запомнить, особенно если ими пользуются не чаще раза в месяц.
Как вставить картинку в Word
Давайте ещё быстренько глянем, как вставить картинку в Word. Дело это нужное не только для автора и веб-мастера, но и для всех тех, кто просто оформляет письма для отправки по электронной почте в Word и желает красиво иллюстрировать своё послание. Идём по полузнакомому уже пути:
И выбираете на жёстком диске то изображение, которое вам по сердцу. Однако возможности Word гораздо больше и редактор позволяет вам прямо в документе отредактировать картинку. Для этого кликаем по ней правой кнопкой мышки и нажимаем «форматирование рисунка». Здесь можно отредактировать месторасположение картинки, выполнить заливку, настроить контрастность (рисунок 2) и ещё много чего можно сделать прямо при оформлении письма (текста), без переключения в сторонние фоторедакторы.
Помните, красиво оформленный текст это большой плюс и для автора, который желает заработать на биржах контента и для веб-мастера, желающего удержать посетителя на страницах своего сайта и даже для счастливого влюбленного, пишущего письма своей возлюбленной.
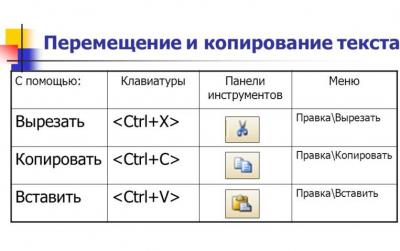
Горячие клавиши

Напоследок горячие клавиши Word, с помощью которых ускоряется работа и пьют пиво нервные клетки.
Добавление специальных символов в Word
Количество символов, включая буквы, цифры и знаки препинания, отображенные на клавиатурах обычных компьютеров или ноутбуков хоть и способно удовлетворить большее количество работающих людей, все равно относительно мало, особенно, когда речь заходит о специализированных знаках, часто использующихся в математике, физике, типографском деле и так далее. Их можно вставлять с помощью специальных комбинаций клавиш, однако запомнить таковые достаточно сложно. Поэтому в большинстве текстовые редакторов, включая Microsoft Word, есть функции, с помощью которых можно вставить любой необходимый символ в документ.
Для добавления символа в Word необходимо перейти на вкладку «Вставка» и в крайнем правом разделе «Символы» выбрать пункт «Символ». Появится выпадающее меню с 20 самыми используемыми, а нажав на «Другие символы…» откроется большое диалоговое окно, где будут отображены все возможные варианты. Для того чтобы добавить любой из символов, нужно выбрать его в таблице и нажать «Вставить».

Над таблицей вы можете выбрать любой шрифт, чтобы посмотреть, есть ли необходимые символы в предложенном наборе и, в случае наличия, добавить в документ. Пункт «Набор» поможет быстрее разобраться с тем, символы какого типа вам нужны. Их действительно очень много, поэтому пользуйтесь меню, чтобы облегчить свою работу.
Во второй вкладке «Специальные знаки» вы можете ознакомиться со списком специальных символов, которые используются для расширенного форматирования текста. Там же будет перечень горячих клавиш, которые используются для их быстрого добавления, чтобы не заходить каждый раз в меню.

Выбрав один из символов на любой вкладке вы можете нажать на «Сочетание клавиш…» в нижней части окна и придумать собственную комбинацию, с помощью которой будете быстро добавлять этот символ впоследствии. Если вы выберете занятое сочетание, программа уведомит вас об этом.
Второй пункт «Автозамена…» позволит назначить определенные символы, при наборе которых в документе, они будут заменяться на необходимый вам символ. Для примера, из заданных изначально, комбинация (с) заменяется на © — знак копирайта. Вы вольны задать подобные сочетания самостоятельно, особенно если используете символы часто.

Вышеописанные инструкции применимы для Word 2007 и старше. Чтобы добавить специальные символы в Word 2003, перейдите «Вставка» «à» «Символ». Остальные настройки идентичны. Вы также можете выбрать любой знак и назначить для него специальные комбинации клавиш.
Вставка знаков мобильного и стационарного телефона в MS Word
Как часто вы работаете в Microsoft Word и как часто вам приходится добавлять в этой программе различные знаки и символы? Необходимость поставить какой-либо знак, отсутствующий на клавиатуре, возникает не так уж и редко. Проблема в том, что не каждый пользователь знает, где нужно искать тот или иной знак или символ, особенно, если это знак телефона.
Хорошо, что в Microsoft Word есть специальный раздел с символами. Еще лучше, что в широком обилии шрифтов, доступных в этой программе, есть шрифт «Windings». Написать слова с его помощью у вас не получится, а вот добавить какой-нибудь интересный знак — это вы по адресу. Можно, конечно, выбрать этот шрифт и нажимать подряд все клавиши на клавиатуре, пытаясь найти необходимый знак, но мы предлагаем более удобное и оперативное решение.
Урок: Как изменить шрифт в Ворде
1. Установите курсор там, где должен будет находиться знак телефона. Перейдите во вкладку «Вставка».
2. В группе «Символы» разверните меню кнопки «Символ» и выберите пункт «Другие символы».
3. В выпадающем меню раздела «Шрифт» выберите «Windings».
4. В изменившемся списке символов вы сможете найти два знака телефона — один мобильного, другой — стационарного. Выберите тот, который вам нужен, и нажмите кнопку «Вставить». Теперь окно символ можно закрыть.
5. Выбранный вами знак будет добавлен на страницу.
Каждый из этих знаков можно добавить и с помощью специального кода:
1. Во вкладке «Главная» измените используемый шрифт на «Windings», кликните в том месте документа, где будет находиться значок телефона.
2. Зажмите клавишу «ALT» и введите код «40» (стационарный телефон) или «41» (мобильный телефон) без кавычек.
3. Отпустите клавишу «ALT», знак телефона будет добавлен.
Вот так просто можно поставить знак телефона в Microsoft Word. Если вы часто сталкиваетесь с необходимостью добавления в документ тех или иных символов и знаков, рекомендуем изучить стандартный набор символов, доступных в программе, а также знаки, входящие в состав шрифта «Windings». Последних, к слову, в Ворде аж три. Успехов и обучении и работе!
Отблагодарите автора, поделитесь статьей в социальных сетях.
Где взять символы для «Ворда» и как их вставить в текст
При наборе текста в программе «Майкрософт Ворд» многие пользователи испытывают потребность во вставке специального символа и знака, но не каждый знает, как это сделать. Забегая вперед, скажем, что существует не один способ выполнения поставленной задачи. В статье будет представлено шесть самых известных и легко выполнимых.
Способ 1: таблица символов в программе
Сейчас будет разобран самый традиционный метод, как вставить символ в «Ворде». Подразумевает он использование встроенной в программу утилиты «Таблица символов». Итак, вот что необходимо сделать, чтобы открыть ее:
- Откройте программу и перейдите во вкладку под названием «Вставка».
- На панели инструментов отыщите группу «Символы», где нажмите по кнопке «Символ».
- В появившемся подменю выберите строку «Другие символы».
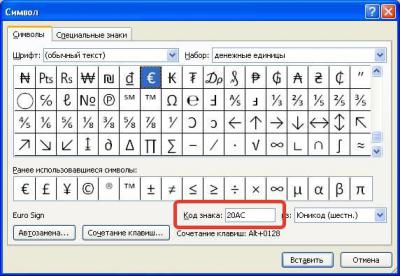
После выполнения этих действий появится новое окно с соответствующим названием. В нем вы можете найти практически все известные символы и знаки. Для быстрой навигации вы можете выбрать отдельный набор из одноименного выпадающего списка. Теперь давайте разберемся, как произвести вставку символа евро. Его мы будем использовать в качестве примера.
- В выпадающем списке «Набор» выберите «Денежные единицы».
- Среди всех прочих знаков отыщите символ евро и выделите его.
- Нажмите кнопку «Вставить».
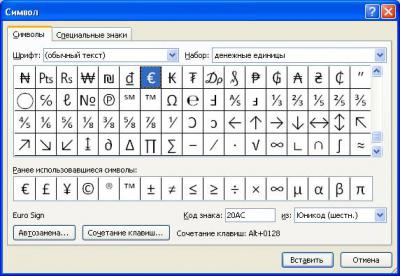
После этого выбранный символ будет вставлен в текст. Обратите внимание, что вписывается он непосредственно в то место, где был установлен курсор, поэтому предварительно установите его в нужную часть текста.
Способ 2: горячие клавиши
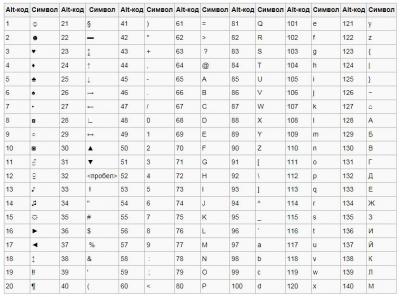
Первый способ, как вставить символ в «Ворде», некоторым может показаться слишком долгим, ведь необходимо проделать немало действий, чтобы выполнить вставку интересующего символа. Куда проще и быстрее будет использовать для этих целей специальные горячие клавиши. Все, что необходимо знать, — это специальный код нужного символа. Чтобы его посмотреть, необходимо в «Таблице символов» выделить нужный знак и обратить внимание на поле «Код знака», именно там и расположен нужный код.
Чтобы вставить символ с помощью горячих клавиш, необходимо:
- Поставить курсор в ту часть текста, где будет произведена вставка.
- Ввести код, например, символа евро — 20AC.
- Нажать клавиши Alt+X.
После этого код будет заменен на знак евро.
Способ 3: таблица символов на компьютере
Есть «Таблица символов» для «Ворда», но также на компьютере есть ее аналог, который носит такое же название. С его помощью без труда удастся вставить необходимый знак как в текстовом редакторе, так и в любом другом текстовом поле. Для начала рассмотрим, как запустить эту утилиту:
- Откройте меню «Пуск».
- Перейдите в меню всех приложений.
- Отыщите папку «Стандартные» и откройте ее.
- В ней запустите приложение «Таблица символов».
Итак, таблица запущена, можно переходить непосредственно к вставке необходимого символа.
- В списке всех символов выделите необходимый.
- Нажмите кнопку «Выбрать».
- Если вам необходимо вставить несколько символов подряд, то можете таким же образом добавить еще.
- Нажмите кнопку «Копировать», чтобы поместить выбранные символы в буфер обмена.
- Установите курсор в текстовое поле, в ту часть, куда нужно вставить символы.
- Нажмите ПКМ и выберите опцию «Вставить».

Также заметьте, что в таблице можно выбирать шрифты. Если текстовое поле поддерживает данное форматирование, то в него будет вставлен символ выбранного вами шрифта.
Способ 4: альт-коды
Как было уже выяснено, символы для «Ворда» можно брать за пределами самой программы. Сейчас будет рассказано об альт-кодах и том, как ими пользоваться. Но сразу стоит пояснить, что данный метод работает лишь на операционных системах под руководством Windows.
Итак, у каждого символа есть собственный код, зная который, можно выполнить его вставку в любое место текста. Полный перечень кодов знаков вы можете посмотреть в «Википедии», мы же рассмотрим принцип их использования. Например, вы решили вставить символ «Стрелка» в «Ворде», код которого — «26». Чтобы произвести вставку, вам необходимо:
- Зажать и удерживать клавишу Alt, находящуюся в левой части клавиатуры.
- Ввести код символа, в данном примере — «26».
- Отпустить клавишу Alt.
После этого на месте курсора появится выбранный вами знак.
Способ 5: таблица символов в интернете
Для «Ворда» символы можно брать из таблицы в интернете. Например, для этого подойдет сайт unicode-table.com. Пользоваться данным способом так же просто, как третьим. Вот что вам нужно:
- Откройте сайт с таблицей символов.
- Выберите из огромного списка необходимый вам знак.
- Нажмите кнопку «Копировать», чтобы поместить его в буфер обмена.
- Установите курсор в ту часть текста, куда необходимо вставить символ.
- Нажмите ПКМ и выберите из меню «Вставить».
Символ будет вставлен.
Способ 6: обычное копирование
Было уже разобрано пять способов, как вставить символ в «Ворде». Некоторые из них подходят даже для вставки вне рамок приведенной программы. К ним относится и этот. По названию раздела уже можно догадаться, что данный метод подразумевает использование опции обычного копирования. То есть вам необходимо:
- Зажав ЛКМ, выделить в тексте нужный вам символ.
- Нажать ПКМ и выбрать опцию «Копировать».
- Установить курсор в ту часть текста, куда предполагается осуществить вставку скопированного символа.
- Нажать ПКМ и выбрать «Вставить».
Конечно, этот метод не самый лучший, но если вы делаете рерайт какого-то текста, и вам необходимо написать символ, который есть в нем, то куда проще и быстрей будет сделать это именно таким способом.
Заключение
В завершение статьи скажем, что символы для «Ворда» могут браться не только из предустановленных приложений и утилит, но и со сторонних ресурсов. Например, со специального сайта, который был представлен в пятом способе, или вообще из случайного текста в Сети или на компьютере, как было продемонстрировано в шестом методе. Надеемся, статья помогла вам в решении поставленной задачи.