
There are many secrets, features, and magic that are kept in MS Word. These tips and tricks in word help you make your document work faster and easier.
So, there is no doubt that you don’t know all these secrets. I challenge you. You may be aware of some of these, but not all of them. I hope you must read this Magical Shortcut Keys and Hidden Secrets from scratch to the end to get a clear idea.
Table of Contents
- Video tutorial on Magical and Hidden Secrets in MS Word
- Getting Started with Magical and Hidden Secrets
- Secrets to Insert Different Lines:
- Tricks to Create a Numbered and Bulleted List:
- Tricks to Insert a Table:
- Inserting Copyright and registration Symbols:
- Inserting Smiley ad Sad Symbols:
- Secrets to Insert Arrow Symbols:
- Magic to Insert All other Symbols:
- Tips and Tricks to Insert Arrow Keys:
Secrets to Insert Different Lines:
→ Press minus key more than 3 times (– – -), then press Enter to get a thin straight line as given below.

→ Press and hold down the Shift key and press minus key more than 3 times (– – – ), then press Enter to get a thick straight line as given below.

Press the = key more than 3 times (=== ), then press Enter to Draw a thin double line.

Press the * key more than 3 times (*** ), then hit Enter to draw a dotted line.

To Draw a Straight Curved Line Using Shortcut Key, press and hold down the Shift key and press the ~ key more than 3 times (~~~), then press Enter.

To draw a thick straight line between the thin lines, Press and hold down the Shift key and press the # key more than 3 times (### ), then press Enter.

Tricks to Create a Numbered and Bulleted List:
There are many ways to create a numbered and bulleted list in a Word document. But, in these magical shortcuts and hidden secrets, creating a numbered and bulleted list is a very simple task to create. Carefully, follow the list given below.
Type the number beginning number (1) followed by a dot (.) and press the Space bar, then type something you want, and then strike the Enter key to create a numbered list. If you do this as many times as you want, you can create a number list as given below.
1. MBA
2. MCA
3. M-Tech
Type the letter A followed by a dot (.) and press Spacebar, then type something you want, and then strike the Enter key, do like this as much as you want.
A. MBA
B. M-Tech
C. MCA
Type the letter a. and press the Space bar, then type something you want to create a number list, and then strike the Enter key, do like this as much as you want.
a. MBA
b. M-Tech
c. MCA
Press * and press the Space bar, then type something you want to create a bulleted list, and then strike the Enter key, do like this as much as you want.
· MBA
· M-Tech
· MCA
Press – and press the Space bar, then type something you want to create a bulleted list, and then strike the Enter key, do like this as much as you want.
– MBA
– M-Tech
– MCA
Press – – and press the Space bar, then type something you want to create a bulleted list, and then strike the Enter key, do this as many times as you want.

Tricks to Insert a Table:
Press +—+—-+———-+ or press + + + + as much as you want, then strike the Enter key to insert a table, If you would like to insert more rows, position your cursor at the last column, and then press the Tab key.
Note: Table width is based upon the number of – (minus) signs or spaces between the + signs.

Inserting Copyright and registration Symbols:
→ Ctrl + Alt + C
(or)
→ Press and hold down the Shift key, then press ( C and again press and hold down the Shift key, and then press )

→ Ctrl + Alt + R
(or)
→ Press and hold down the Shift key, then press ( R and again press and hold down the Shift key, and then press )


To insert a smiley face as in the screenshot above, press and hold down the Shift key, then press : (
To insert a frowning face as in the screenshot above, press and hold down the Shift key, then press : )
To insert a neutral face as in the screenshot above, press and hold down the Shift key, then press
Secrets to Insert Arrow Symbols:
Press and hold down the Shift key and press > (less than) key, after that release these keys, and then press – – (press minus key two times) to get the left arrow (Like the first arrow in the screenshot above).
Press – – (press minus key two times) and press and hold down the Shift key, then press < (greater than) to get the right arrow (Like the second arrow in the screenshot above).
Press and hold down the Shift key and press > key, then release the Shift key, and then press == to get the left thick arrow (Like the third arrow in the screenshot above).
Press = = (press the equal key two times) and press and hold down the Shift key, then press < (greater than) to get the right thick arrow (Like the fourth arrow in the screenshot below).
Press Shift + <, then press =, and then Press Shift + > to get the double-headed arrow (Like the fifth arrow in the screenshot above).
Magic to Insert All other Symbols:
Press Alt +1 (1 on the numeric keyboard) to get the smile emoji as below.

Press Alt + 2 (2 on the numeric keyboard) to get the smile emoji as above.
Press Alt + 3 (3 on the numeric keyboard) to get the heart emoji as above.
Press Alt and 4 ( on the numeric keyboard) to get the diamond emoji as above.
Press Alt+5, Alt+6, Alt+7, and so on to get more results.
Tips and Tricks to Insert Arrow Keys:
There are many ways to insert arrow directions in a word document. But, in these magical shortcuts and hidden secrets, inserting an arrow is very simple. Simply, follow the list given below.
Press Alt + 24 (on the numeric keyboard) to get the up arrow as below.
↑
Press Alt + 25 (on the numeric keyboard) to get the down arrow as below.
↓
Press Alt + 26 (on the numeric keyboard) to get the right arrow as below.
→
Press Alt + 27 (on the numeric keyboard) to get the left arrow as below.
←
For more symbols, Press Alt and 1, Alt and 2, Alt and 3, Alt and 4, Alt and 5, 6, 7, 8, 9, 10 or 11…etc. on the numeric keyboard at a time.
Are there any hidden secrets, magics, and tips and tricks in MS Word?
Yes, there are many secrets, features, and magics that are kept in MS Word. These tips and tricks in word help you make your document work faster and easier. So, there is no doubt that you don’t know all these secrets.
Learn how to do simple magic without using any special skills in Microsoft Word.

Here we are not going to explain or tell you about the magic which are performed by intelligence or requires special skills. This trick is the simple magic which you can perform on computer using Microsoft Office’s Word.
To do this follow these simple steps:
- Open Microsoft Word.
- Write the following code into it:
=rand(10,5)
- Press Enter.
- Now check the Microsoft Word Magic.
Now you will be getting approx 797 words information or guideline on Video, Picture etc. Just give it a try and see.
So this is the simple trick though which you can do Magic in Microsoft Word.
Magic in Microsoft word
Hi friends, I hope you are enjoying my tips and tricks. Today I am going to tell you a trick to be used in microsoft word. It is just like a magic.
Read more »
Popular posts from this blog
Arduino Wire Library for I2C communication

The Wire Library allows developer to communicate with I2C / TWI devices. On the Arduino boards with the R3 layout (1.0 pinout), the SDA (data line) and SCL (clock line) are on the pin headers close to the AREF pin. The Arduino Due has two I2C / TWI interfaces SDA1 and SCL1 are near to the AREF pin and the additional one is on pins 20 and 21. remark: TWI stands for Two Wire Interface and for most marts this bus is identical to I²C. The name TWI was introduced by Atmel and other companies to avoid conflicts with trademark issues related to I²C.
Arduino Due code example: Serial communication — Rx
Simple example run on Arduino Due to read data from Serial, then send back to Serial. void setup() { //Setup Serial Port with baud rate of 115200 Serial.begin(115200); } void loop() { if(Serial.available() > 0){ Serial.println((char)(Serial.read())); } }
Ethernet shield Guide for arduino (Arduino Ethernet Shield)

Ethernet shield Guide for arduino Arduino Ethernet Shield The Arduino Ethernet shield allows an Arduino board to connect to the internet using the Ethernet library and to read and write an SD card using the SD library . Connecting the Shield To use the shield, mount it on top of an Arduino board (e.g. the Uno). To upload sketches to the board, connect it to your computer with a USB cable as you normally would. Once the sketch has been uploaded, you can disconnect the board from your computer and power it with an external power supply. Connect the shield to your computer or a network hub or router using a standard ethernet cable ( CAT5 or CAT6 with RJ45 connectors). Connecting to a computer may require the use of a cross-over cable (although many computers, including all recent Macs can do the cross-over internally). Network Settings The shield must be assigned a MAC address and a fixed IP address using the Ethernet.begin() function. A MA
Description
Formatting Magic with Word is your comprehensive guide to the document formatting options in Microsoft Word. Over two decades of experience writing Word documents, flyers, certificates, signs and more packed into over 540 pages.
- Word 365, Word 2021, 2019 and 2016 for Windows
- Full Color
- over 540 pages
- Table of contents with links. Fast Find.
- PDF format compatible with Windows, Mac, Apple and Android tablets and pretty much anything else including, of course, iPads!
- <g>Gluten free, Calorie controlled, Low kilojoules / calories, Caffeine free, 100% fat free, Zero sugar, No animal cruelty, Dolphin friendly, CFC free, Not radioactive, No asbestos </g>.
Change Word defaults
How to change the default font in Word? It’s a staple of ‘Word Tips’ columns. Sure, we’ll show you how to do that, but we’ll also show how to change other Word defaults like page size, line spacing, paragraph settings and more.
Better than Galleries
Modern Office has many Galleries, lists of pre-set designs and options that are quick and easy to use. Perhaps too quick and too easy because too many documents look the same even when they come from different authors.
Formatting Magic with Word looks beyond those Galleries and shows how to change and adapt those designs into unique and different looks.
All the buttons and more …
The book goes through all the common options for fonts and paragraphs that you’ll find on the Home tab, but also many other choices that can help you make your documents really stand out and look professional.
In other words, in-depth with the Word choices that are hidden behind the simple ribbon choices.
Lists, Lists and more lists
So many list options in Word:
- Bullet
- Numbered
2.a Multilevel
All the options to make lists that suit you, your boss or teacher. Also list features and tricks that might surprise you.
SmartArt is a graphic way to display lists that’s worth considering.
Positioning images and objects on a page can be confusing. Formatting Magic in Word explains wrapping, anchors and the many other settings.
Borders and Framing there are many options to change the look or border an image or graphic. The quick gallery is just a glimpse into what’s possible.
All about the many different graphic options available, especially in Word 365. Icons, SVG graphics, Cutout People and more.
Cover Pages, a specially formatted first page to a document. Word has automatic options but there’s a problem with the defaults. There’s also a lot more formatting choice available.
Formatting Tricks
So many possibilities to make your documents look great.
Mirror, Reverse and Flipping text.

Handwriting fonts.


Drop Caps with many choices including fancy lettering, colors and even pictures.

Chalkboard and Whiteboard effects

Adding a text or shape over an image
Some ‘copycat’ looks from Star Wars, Thunderbirds, Friends, Law and Order, I ❤️… logo, London Tube Sign, Wordle and more

Highlighting isn’t just for marking up a document.
Tables and Text Boxes
Word Tables are intended to present grids of information, but they have another use in solving difficult formatting problems.
Similarly, Text Boxes are a lot more powerful than the name suggests. The name ‘Text Boxes’ is a lie. They can contain a lot more than just text and don’t have to be boxes!

Styles
Then we’ll show you an easy way to use those formats. Word has a great way to standardize the look of your documents, but it’s been so clouded in mystery and confusion that even the name scares people away: Styles.
Styles can be your friend .. no honestly they can … there’s no need to run screaming at the very mention of styles. Formatting Magic in Word makes it easy.
We’ll take you through the basics of styles and why they are good for you. We’ll also tell you about parts of styles that are good for experts but best for us mere mortals to avoid (at least at first).
As usual with Office-Watch.com books, we don’t limit ourselves to the narrow topic. There’s useful extra coverage in this book that will help you make better Word documents.

Formatting Magic with Word, 5th edition
Expand All Collapse All
Change Word defaults
- Changing Settings
- Changing defaults for ‘blank document’
- Styles in a Template
- Edit the template directly
Font
- Font Style
- Size
- Font Color
- Underline Style
- Underline Color
- Effects
- Character Spacing
- OpenType Features
- Animations
Text Effects
- Fast Text Effects
- Keep it simple
- Options
- Styles
- Some Live Preview
- PowerPoint
Highlighting
- Word
- Outlook
- PowerPoint
- Excel
Paragraph
- Indents and Spacing
- Line and Page Breaks
Tabs
- Tab Stop position
- Default tab stops
- Alignment
- Leader
- Ruler
- View Tabs
- Tables instead of tabs
Borders
- Setting
- Style
- Color
- Width
- Preview
- Apply to: Paragraph or Text
- Options
- Page Border
- Shading
- Horizontal Line
Lists
- List Styles
- Other Numbering Options
Bullet Lists
- Define new bullet
Numbered Lists
- Advanced Numbering Tricks
- Hidden Numbering Options
MultiLevel Lists
SmartArt
- Text Formatting
- Styles
- Color changes
- Picture Designs
Text Boxes
- Not just boxes
- Misleading Text
- Insert
- Gallery
- Drawing Tools
- Change Shape
- Text Direction
- Vertical Alignment
- Edit Text
- Caption
- Linked Text Boxes
Tables
- Using hidden tables
- Beyond the Gallery
- With Footnotes
- Excel worksheet to Word table
Drop Caps
- The ‘missing’ Drop Cap option
- Word or Letter
- Remove a Drop Cap
- Settings
- More choices
- Styles and Consistency
- Images
- When to use a Drop Cap
Cover Pages
Mirror, Reverse, Flip
- Mirror horizontal
- Reverse vertically
- Both effects together
- Mirror vertically
- Vertical Text
- Mirror text only
- Any way you like
- Printer options
Styles 101
- Inheritance
- Making a style
- Changing style setting
- Applying an existing style
- What’s Next
Be More Stylish
- Character Styles
- Table styles
- List styles
- Word 2007 etc. changes
Special Formatting Tricks
- Chalkboard / Blackboard
- Whiteboard
- Handwriting fonts
- Text or Shape Overlay on picture
- Star Wars
- Thunderbirds
Monday, 7 January 2013

Hi friends, I hope you are enjoying my tips and tricks. Today I am going to tell you a trick to be used in microsoft word. It is just like a magic.
Here we go…..
1. Open Microsoft ord.
2.Type «=Rand(200, 99)» without quotes and hit Enter.
3. See the magic.
You can even alter the parameter passed within braces and see different effects.
I hope you enjoyed this trick.
Enjoy hacking,
Keep on reading my blogs.
![]()
Posted by
Dan’s
|
Hi friends, I hope you are enjoying my tips and tricks. Today I am going to tell you a trick to be used in microsoft word. It is just like a magic.
Read more »


Posted by
Dan’s
![]()
0
comments:
Post a Comment
Newer Post
Older Post
Home
Subscribe to:
Post Comments (Atom)
Friday, August 10, 2012
Magic in Microsoft word
Hi friends, I hope you are enjoying my tips and tricks. Today I am going to tell you a trick to be used in microsoft word. It is just like a magic.
Here we go…..
1. Open Microsoft ord.
2.Type «=Rand(200, 99)» without quotes and hit Enter.
3. See the magic.
You can even alter the parameter passed within braces and see different effects.
I hope you enjoyed this trick.
Enjoy hacking,
Keep on reading my blogs.
No comments:
Post a Comment
We appreciate your valuable comments.
Just as magician David Blaine impresses passers-by in his TV series Street Magic, allow me to demonstrate to you some startling tricks that are hidden within Microsoft Word.
In my opinion David Blaine is one of the best magicians of recent times. He did court controversy in later years with some of the stunts he performed, but the early series’ of Street Magic are about as good as it gets and the intimacy of having the audience right there participating adds to the wonder. Memorable tricks include an astounded driver whose watch moved very mysteriously and the sheer delight on the face of a down-and-out as his cup of coffee literally overflowed with coins. Watching a re-run of Street Magic has given me inspiration so prepare to be dazzled as I mingle among you to demonstrate the magic of Microsoft Word.
You are working away on a Word document with several other documents open for reference purposes. You feel that you would work better with a little music and so decide to access your preferred player, which sits on your desktop. Don’t waste time minimising each window individually to get to the desktop, simply hold down the Windows key and press M and every window will disappear at a stroke. After you have selected your tunes and you want to get back to your document, hold down Shift with the Windows key, and press M again. You’ll be back right where you left off, with all of your other windows restored too.
So back at your document you continue typing with great industry. You type the line ‘I’d like to go, but…’, and you want to put the word ‘like’ in italics for emphasis. The usual way to do this would be to highlight the word and click on the Italics icon on the Formatting toolbar. Performing this task in this manner takes your hands away from the keyboard, which interrupts your flow, but there is a neat way to format your text on the fly, without the sometimes tricky operation of highlighting a single word with the mouse. Simply place the insertion pointer anywhere within the word you want to format and then, to italicise, press Ctrl + I and, hey presto, the word will magically comply. Ctrl + B will apply bold text and Ctrl + U will underline. If this does not work for you, go to Tools/Options, and click the Edit tab. Check the ‘When selecting, automatically select entire word’ box and click OK.
Looking at your document you feel that it would read better if one of the paragraphs was repositioned to an earlier point. A common way to do this is to highlight the paragraph to be moved and then copy and delete it, and paste it in its new position. This is unnecessarily time wasting as there is a far quicker and easier way to move blocks of text around. Simply place the insertion pointer anywhere within the paragraph you want to move, and hold down Shift and Alt. Now press the up and down arrow keys and, your paragraph will move accordingly.
This next trick shows how to perform a task you may never have to do in reality, but it looks unusual, rather like a cigarette being passed through a pound coin. You know that Word allows you to select text by dragging the insertion pointer up and down and left and right, but it always highlights horizontally along the lines. Well if you place the insertion pointer on the left side of the document and hold down Alt, you will see that you can select text vertically. I have yet to find a use for this function, but I’m sure there are some out there.
Of course these tricks will not astound you to the point that you run away screaming like some of Mr Blaine’s street audience. But picking up little tit-bits of information on those lesser-used aspects of Word helps build a greater understanding of how this tremendous application works.

Your documents, spreadsheets, and presentations cry out for great images–a creative company logo, compelling charts, and luscious photos. Microsoft’s Office applications have cool tools for using images in your documents, but these features aren’t immediately obvious.
In this article, I’ll share some tips and tricks for dressing up images in your Office work, from replacing Excel chart columns with stacked images, to creating a simple one-click image animation in PowerPoint, to making circle and heart-shaped images in Microsoft Word.
These instructions are designed for Office 2010, but earlier editions of Office have similar tools.
1. Tame Word’s Bad Image Behavior
Word 2010 includes the new graphics engine that Excel 2007 and PowerPoint 2007 had, but Word 2007 did not.
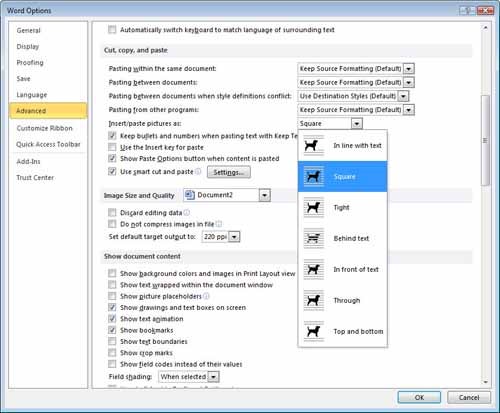
Annoyingly, however, Word continues to insert images as “in line with text”–the one setting you’ll probably never want to use unless you’re inserting an image into a table cell. This setting makes images behave like text characters so they don’t move around the page properly. You can rotate the images, but the text doesn’t wrap around them properly, so you’ll have to change the image wrap setting before you can continue.
Rather than configuring the wrap setting for each individual image, I suggest that you change the Word setting that controls how images are inserted. To do this, before you insert an image, choose File, Options, Advanced. From the Cut, Copy, and Paste options, locate Insert/Paste Picture As and set it to anything except ‘In line with text’. I recommend the Square option as a good choice. Next, click OK.
In the future, when you insert an image into a Word document, text will wrap around the image neatly. You can change this, if necessary, for a particular image, but most of the time this is the exact setting you’ll want.
If you prefer, you can change the settings for each individual image after you have inserted it into your document. To do this, click the image to select it, choose Picture Tools, Format, and then click the Wrap Text dropdown list. From here you can select a wrapping option; again, Square is a good choice.
2. Insert Images into a Circle, a Heart, or Any Shape
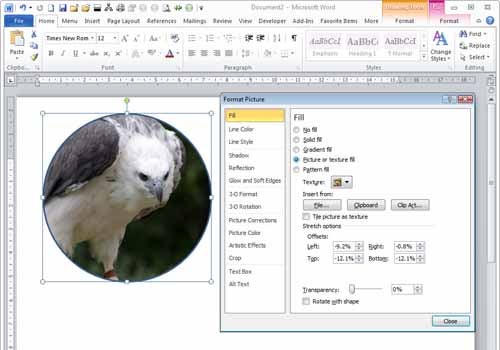
You can create an image embedded in nearly any kind of shape in Microsoft Word. To see this feature at work, choose Insert, Shapes and select a shape–say, the ellipse. Hold the Shift key as you do this, to draw a perfect circle. Once you’ve selected the shape, the Drawing Tools tab appears. From the Format tab, select Shape Fill, Picture; select a picture to use; and click Insert. You can do this with any built-in shape. You can also create your own custom shapes by using the Curve or Freeform tools and then fill them with images, too.
If your image looks out of proportion inside the shape, select the shape, right-click it, and choose Format Shape. Click the Crop option and, if your image is stretched so that everything is taller than it should be, increase the Picture Position: Width setting. Likewise, if the image is stretched so that it is wider than it should be, increase the Picture Position: Height setting. If you increase both the Width setting and the Height setting, you can adjust the position of the image in the shape by using the Offset options. Deselect Rotate with Shape if you want the image to remain horizontal even if you rotate the shape.
Click one of the Fill options in the ‘Picture or texture fill area’ to alter the image transparency inside the shape.
3. Wrap Text Around or Through an Image
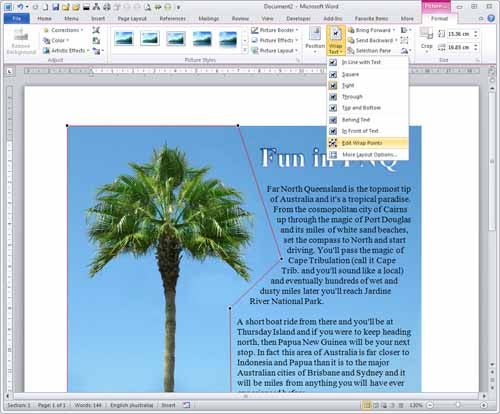
When you have an image’s wrap set to Square or to Tight, the text will wrap around the image. As most images are rectangular, the wrap will be a rectangle too, but you can change this if you wish. Select the image, choose Picture Tools, Format, and then select Wrap Text, Edit Wrap Points.
By adjusting the nodes that control how text wraps around the image, you can set text to flow across the image or keep it away from the image edge on one or more sides. To add more nodes, click and drag anywhere on the line. To remove a node, hold down the Control key and click the node.
When you’re done, click outside the marquee area to make the handles disappear. To apply the same feature to a shape filled with an image, select the shape, choose Drawing Tools, Format, and then select Edit Shape, Edit Points.
4. Use Signatures and Logos as Clip Art
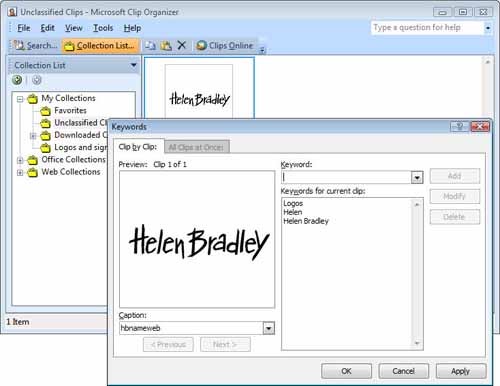
It’s easy to add an image of your company logo or your scanned signature as a clip art image. To do this, choose Start, Programs, Microsoft Clip Organizer, and then choose File, Add Clips to Organizer, On My Own. Next, browse to find the file that contains your signature or logo, and click Add.
From the dropdown list to the right of the image, select Edit keywords and then add keywords to the image to help you locate it in future. Click Apply to apply the changes; to finish, click OK and close the Clip Organizer.
In the future, to add the logo or signature to a document, choose Insert, Clip Art; type one of the keywords that you added to the image; disable Include Office.com content; select Illustrations and Photographs; and click Go. When the image appears in the panel, click it to insert it into your document.
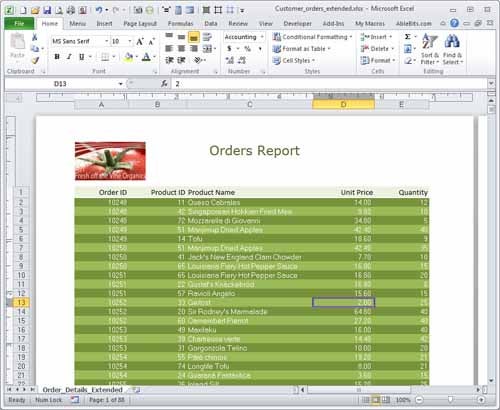
5. Use Picture Charts in Excel
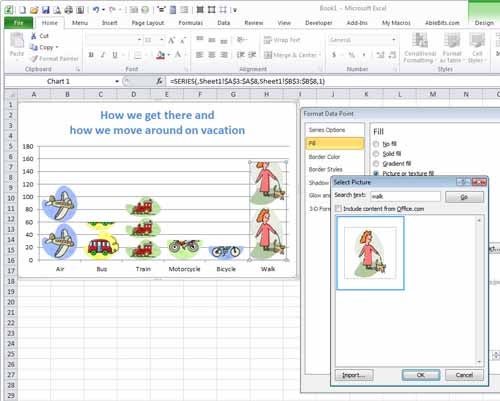
Instead of filling your 2D column or bar charts with solid colors or boring patterns, you can fill them with images. To do this, select the column or bar that you want to change, and right-click the mouse. Choose Format Data Series, Fill and select Picture or texture fill. Select an image to use from your disk, your Clip Art collection, or from the Clipboard. Simple line-art images are a good choice. Click Stacked to ensure that the images are stacked and not stretched, and click Close.
You can add a single image to an entire data series, or you can click a single bar or column and use Format Data Point to add a different image to each column or bar.
6. Add Pictures Behind Charts and Workbooks
In addition to replacing bars and columns, you can add a picture behind a chart or behind the plot area of a chart. To do this, click the chart somewhere, and then choose Chart Tools, Layout. From the dropdown list in the upper left corner of the ribbon toolbar, choose Chart Area or Plot Area, as desired. Click the Format Selection link immediately below this selector; choose Fill, Picture or Texture Fill; and select an image to use. Here you can alter the transparency of the image if you wish so that the chart is visible through the image. Finally, click Close.
If you add an image to the Chart Area and if your Plot Area has a solid fill, you won’t be able to see the image underneath. To correct this problem, repeat the process but this time after selecting Plot Area, Format Selection, choose Fill, No Fill. Alternatively, choose Solid Fill, pick a fill color, and then set the Transparency to a high value.
7. Add Your Logo to an Excel Printout
You can easily add your company logo or other image to the header of an Excel worksheet so that it prints on every page of the sheet. To do this, choose Insert, Header & Footer and then click one of the boxes at the top of the sheet. Click the Picture button, and choose an image to insert.
If the image is larger than the header, it will appear around and below the worksheet, so checking its size is a crucial step. To do this, click I and enable the Lock Aspect Ratio checkbox so that the image will be scaled in proportion.
Now, set its Height value to around 0.75 inch or to a size that will fit in the header area. To check the result, choose View, Page Layout. To adjust the header margin to make it bigger, choose Page Layout, Margins, Custom Margins, and set the Header Margin value; or drag downward on the marker in the vertical ruler to enlarge it.
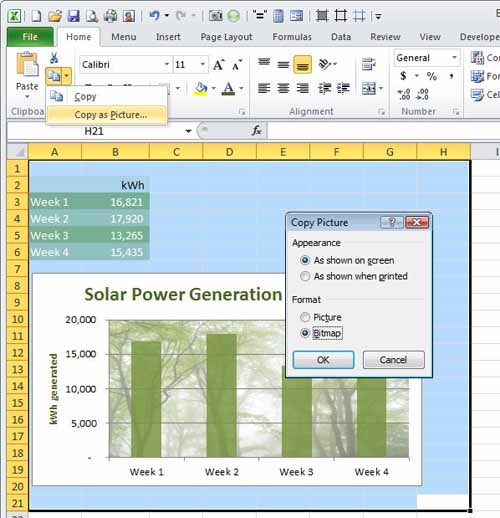
8. Save a Worksheet as a Picture
If you need a picture of a worksheet or a chart–to use as a thumbnail or in a cover page, for instance–you can do this from inside Excel. Start by selecting the data range in the cells you want to convert to a picture. In the case of a chart, select the chart itself. From the Copy dropdown list on the Home tab of the ribbon toolbar, select Copy as Picture.
You can then choose to capture the image either as it appears on the screen or as it will appear when printed. Select Picture or Bitmap if those options are available, and then click OK. Now you can paste the picture into the application of your choice.
9. Make Image Maps in PowerPoint
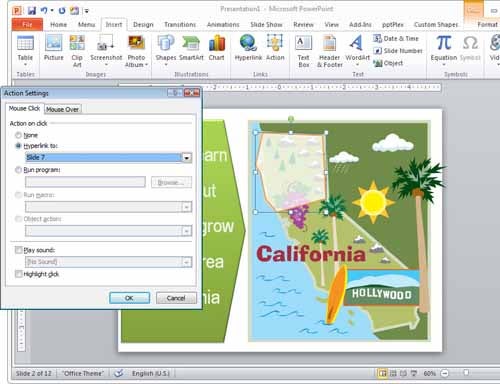
If you place an image on a PowerPoint slide, you can add clickable hotspots to it, much as you might create a clickable image map for a website. Start by adding an image to a blank slide: Choose Insert, Shapes and select a shape that suits what you want to make clickable. Draw the shape over the image.
Once again select Drawing Tools, Format, followed by Shape Fill, No Fill, and then Shape Outline, No Outline, so that the shape is not visible. With the shape still selected, choose Insert, Action and select the action that you want to occur when the user clicks the shape–such as going to a different slide or to a URL. Select Highlight Click, and click OK.
You can add multiple clickable shapes to this slide and test them by running the presentation. When you hold your mouse over a clickable area and click, the action will take place.
If you like, you can arrange for shapes to be colored in or partially transparent, to have outlines, and even to include text prompts.
10. Create a Simple Image Animation
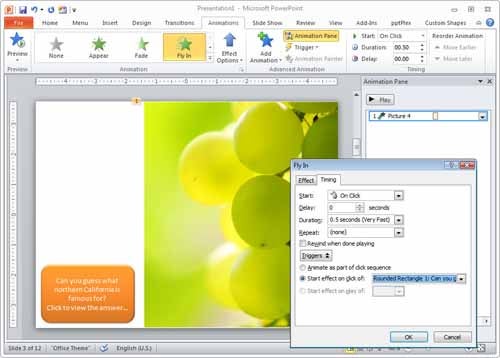
To create a simple animation in PowerPoint, first add a shape and a picture to a slide. Select Animations, click the picture, and then click an option such as Fly In.
Click the Animation Pane button. From the pane, click the dropdown list that appears beside the picture animation entry. Choose Effect Options. From the Timing tab, click Triggers, select Start Effect, select the shape name in the list, and click OK. When you play the slide, the picture won’t appear until you click the shape.
There are lots of hidden secrets for working with graphics inside Microsoft Office applications. Using these tips and tricks, you can achieve a range of effects when illustrating your business presentations, worksheets, and documents with images.