
Excel for Microsoft 365 Word for Microsoft 365 Outlook for Microsoft 365 PowerPoint for Microsoft 365 Access for Microsoft 365 Excel 2021 Word 2021 Outlook 2021 PowerPoint 2021 Access 2021 Visio Professional 2021 Visio Standard 2021 Excel 2019 Word 2019 Outlook 2019 PowerPoint 2019 Access 2019 Visio Professional 2019 Visio Standard 2019 Excel 2016 Word 2016 Outlook 2016 PowerPoint 2016 Access 2016 Visio Professional 2016 Visio Standard 2016 Excel 2013 Word 2013 Outlook 2013 PowerPoint 2013 Access 2013 Visio Professional 2013 Visio 2013 Excel 2010 Word 2010 Outlook 2010 PowerPoint 2010 Access 2010 Visio Premium 2010 Visio 2010 Visio Standard 2010 Excel Starter 2010 More…Less
A macro is a series of commands used to automate a repeated task and can be run when you have to perform the task. Macros can automate frequently used tasks to save time on keystrokes and mouse actions.
However, some macros can pose a security risk. Macros are often used by people with malicious intent to quietly install malware, such as a virus, on your computer or into your organization’s network.
Warning: Never enable macros in a Microsoft 365 file unless you’re sure what those macros do. Unexpected macros can pose a significant security risk. You don’t have to enable macros to see or edit the file; only if you want the functionality provided by the macro. For more information see Protect yourself from macro viruses.
Change macro settings in the Trust Center
Macro settings are located in the Trust Center. However, if your device is managed by your work or school the system administrator might prevent anyone from changing settings.
Important: When you change your macro settings in the Trust Center, they are changed only for the Microsoft 365 program that you are currently using. The macro settings are not changed for all your Microsoft 365 programs.
-
Click the File tab.
-
Click Options.
-
Click Trust Center, and then click Trust Center Settings.
-
In the Trust Center, click Macro Settings.

-
Make the selections that you want, then click OK.
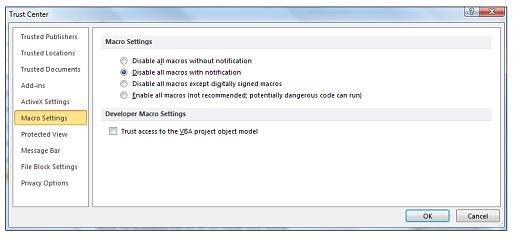
Note: The options are slightly different in Excel, we’ll call those out as we go.
-
Disable all macros without notification Macros and security alerts about macros are disabled.
In Excel this option is Disable VBA macros without notification and it only applies to VBA macros.
-
Disable all macros with notification Macros are disabled, but security alerts appear if there are macros present. Enable macros on a case-by-case basis.
In Excel this option is Disable VBA macros with notification and it only applies to VBA macros.
-
Disable all macros except digitally signed macros Macros are disabled, and security alerts appear if there are unsigned macros present. However, if the macro is digitally signed by a trusted publisher, the macro just runs. If the macro is signed by a publisher you haven’t trusted yet, you are given the opportunity to enable the signed macro and trust the publisher.
In Excel this option is Disable VBA macros except digitally signed macros and it only applies to VBA macros.
-
Enable all macros (not recommended, potentially dangerous code can run) All macros run without confirmation. This setting makes your computer vulnerable to malicious code.
In Excel this option is Enable VBA macros (not recommended, potentially dangerous code can run) and it only applies to VBA macros.
-
Excel also has a checkbox for Enable Excel 4.0 macros when VBA macros are enabled. If you select this checkbox all of the above settings for VBA macros will also apply to Excel 4.0 (XLM) macros.
If this checkbox is not selected XLM macros are disabled without notification.
-
Trust access to the VBA project object model Disallow or allow programmatic access to the Visual Basic for Applications (VBA) object model from an automation client. This security option is for code written to automate a Microsoft 365 program and manipulate the VBA environment and object model. It is a per-user and per-application setting, and denies access by default, hindering unauthorized programs from building harmful self-replicating code. For automation clients to access the VBA object model, the user running the code must grant access. To turn on access, select the check box.
Note: Microsoft Publisher and Microsoft Access have no Trust access to the VBA project model object option.
For info on creating macros please see Quick start: Create a macro.
For info on using macros on a machine running Windows S see Block suspicious macros in Office on Windows 10 S.
See Also
Change macro security settings in Excel
How malware can infect your PC
Need more help?
Want more options?
Explore subscription benefits, browse training courses, learn how to secure your device, and more.
Communities help you ask and answer questions, give feedback, and hear from experts with rich knowledge.
I’ve been there…
I found a new macro that promised to automate a particularly annoying task, save me a ton of time and make me significantly more efficient in Excel. I tried to run the macro. And then…
Something like this happened:

Sigh…
The first time I saw such a message in Excel, several questions popped immediately in my head:
- What security settings is this message referring to?
- What does it mean that macros have been disabled?
- Did I disable macros in Excel by mistake?
- How do I enable macros in Excel?
 Needless to say, I eventually learned how to enable macros in Excel. Otherwise, I wouldn’t be writing this Excel tutorial now.
However, since I know that I’m not the first (or last) one to raise those questions, I decided to write this post.
My purpose with this tutorial is to answer the questions above and explain to you the most important things you need to know regarding how (and when) to enable macros in Excel. This way, when Excel displays a dialog saying that macros have been disabled and you need to enable macros, you’ll know exactly what to do.
More precisely, in this Excel tutorial we’ll cover the following topics:
I assume that, if you’re reading this Excel tutorial, the version of Excel you’re working on still has its default settings. Therefore, let’s start by understanding…
Excel’s Default Macro Security Setting: Disable Macros With Notification
Excel’s default setting is to disable all macros with a notification. This is the reason why, if you open an Excel workbook that contains macros, you may see a message warning you that “macros have been disabled”.

You can generally modify the macro security settings of Excel to determine what happens when you open an Excel workbook by determining:
- Which macros can run.
- Under which circumstances can macros run.
In any case, please note the following:
- As explained by Microsoft, you’re not able to change the macro security settings if an administrator in your organization has changed the default settings with the purpose of preventing modifications. If this is the case, get in touch with this administrator.
- Any changes that you make to the macro security settings in Excel are only applicable to Excel. They don’t apply to other Microsoft Office applications.
The first question you may have is…
Why Are Excel Macros Not Enabled By Default?
This may sound like ancient history to most of you, but:
Once upon a time, Excel (along with the other Microsoft Office applications) enabled macros by default. But then:
Kwyjibo came.
In case you’re a Simpsons fan and are wondering whether I’m referring to Homer Simpson…
The answer is no. Sorry 😳 . I’m also a little bit disappointed. I also like the Simpsons and would’ve enjoyed writing about them.
I’m referring to the Melissa virus, also known by other names such as Kwyjibo. This was a macro virus that propagated via a Word document sent as an email attachment. The virus became famous back in 1999. Certain large corporations (including Microsoft itself) were affected.
What do you think was the consequence of this?
That’s right. As explained in Excel 2013 VBA and Macros by Excel experts Bill Jelen and Tracy Syrstad, Microsoft changed the default security settings of the Microsoft Office applications. Under the current setting macros are, by default, not enabled.
Nowadays, macro security is very important. The reason for this, as explained by Excel authority John Walkenbach in Excel VBA Programming for Dummies is that VBA is a very powerful language. Walkenbach goes on to explain that:
A macro can delete files, send information to other computers, and even destroy Windows so that you can’t even start your system.
Therefore, you want to understand what you’re doing when enabling macros. This way you’ll be able to enjoy the benefits of macros while minimizing the risk of having your computer infected with dangerous VBA code.
Let’s assume, that you want to enable macros in Excel because you want to start creating macros now. The following sections explain the different ways in which you can enable macros in Excel and the most important aspects of macro security settings you’ll need to understand in order to be reasonably protected from macro viruses.
How To Change Your Global Macro Security Settings In Order To, Among Others, Enable Macros In Excel By Default
Excel allows you to determine whether macros are enabled or disabled automatically. You determine these default settings through the Trust Center, which is where you can see and set all the security and privacy settings for Excel.
If you enable macros in Excel through the Trust Center, those settings become the new default and apply globally. If you want to enable macros for only certain Excel workbooks, you can do so by saving them in a trusted location, as I explain in the next section of this Excel tutorial.
Let’s see how to change your global macro security settings in 2 easy steps. This allows you to, for example, enable macros in Excel by default.
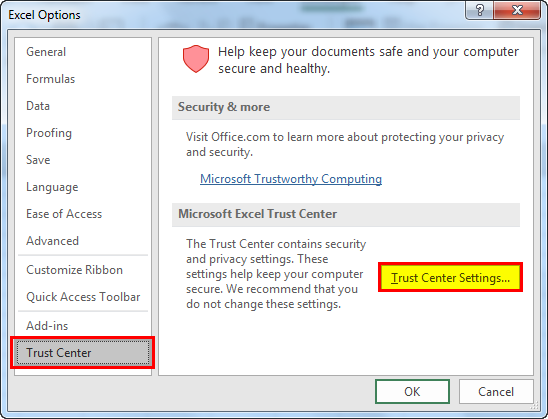
Step #1: Access Excel’s Trust Center
The easiest way to access Excel’s Trust Center is by simply clicking on “Macro Security” in the Developer tab of the Ribbon.

Alternatively, you can get to the Trust Center through the Excel Options dialog. Do this in the following 4 simple steps.
Step #1: Access the Excel Options dialog.
You can get Excel to display the Excel Options dialog by:
- Clicking on the File tab of the Ribbon.

- Click on “Options” on the left side of the Backstage View.


You can also access the Excel Options dialog using keyboard shortcuts such as:
- Alt + T + O.
- Alt + F + T.
Step #2: Go to the Trust Center tab.
When Excel displays the Excel Options dialog, click on “Trust Center” on the left bar of the Options Dialog.

Step #3: Click on “Trust Center Settings…”.
Once you’re in the Trust Center tab, simply click on the “Trust Center Settings…” button on the right side of the Excel Options dialog. This takes you to the Trust Center.

Step #4: Go to the Macro Settings tab.
Once you’re inside the Trust Center, make sure you’re on the Macro Settings tab. This tab appears on the left side.
If you’re not already there, click on “Macro Settings”.

Step #2: Select The Macro Setting You Want To Enable
At the top of the Macro Settings tab in the Trust Center, you’ll find the “Macro Settings”. Excel allows you to choose 1 out of 4 separate settings to set whether Excel enables or disables macros.

To choose the macro setting you want to enable, simply click on the circle on the left side of it and, then, click on the OK button on the lower right corner of the Trust Center.

Let’s take a look at what each of these options means and does.
Option #1: Disable All Macros Without Notification

This option is self-explanatory. It:
- Disables all macros, excluding those in trusted locations.
- Doesn’t notify you that a macro has been disabled.
As you may’ve guessed, this is not the option you want to choose. As explained by Mr. Excel (Bill Jelen) and Tracy Syrstad in Excel 2013 VBA and Macros:
This setting is for people who never intend to run macros.
Note that this macro doesn’t prevent absolutely all macros from running. As I mention above, macros in trusted locations can still run without going through the checks of the Trust Center system.
Option #2: Disable All Macros With Notification

As you’ve probably noticed the difference between this option and option #1 is that, now, Excel notifies you that a macro has been disabled. This is the default option in Excel and, as explained in Excel 2013 VBA and Macros, it’s also the recommended setting.
Excel’s notification that macros are not enabled allows you to determine, on a case-by-case basis, whether you want to enable macros for a particular Excel workbook.
More precisely, if you open a file that has macros (and the Visual Basic Editor isn’t open), you’ll see the following message below the Ribbon.

If at the time of opening the workbook with macros the Visual Basic Editor is also open, Excel displays a security notice:

Regardless of which of the 2 messages you see, you have 2 options.
Option #1: Enable Macros.
You have 2 possible ways to enable macros.
Possibility #1:
Simply click on “Enable Content” or “Enable Macros”.


Which of the 2 options above applies depends on whether the Visual Basic Editor is open or not. If the VBE is open, you’ll see the Microsoft Excel Security Notice that appears in the second screenshot above. Otherwise, you’ll see the security warning that appears in the first image.
Possibility #2:
Enable the macros using the Backstage View by following the 3-step process below.
- Step #1: Click on the File tab in the Ribbon.
- Step #2: Once you’re in the Backstage View, make sure that you’re in the Info tab. You can get there by clicking on “Info” on the left navigation pane.

- Step #3: You’ve probably noticed the prominent security warning which mentions that macros have been disabled. To enable macros, click on the Enable Content button on the left side of the warning and, in the drop-down menu that expands, select “Enable All Content”.


Option #2: Keep Macros Disabled.
If the VBE is not open, ignore the message or close it by clicking on the cross at the right side of the security warning (as shown in the image below).

If the VBE is open, click on “Disable Macros” or close the security notice.

In all of these cases, the macros are not enabled.
What Happens If You Ignore Or Dismiss The Security Warning Without Enabling Macros And, Later, Try To Run A Macro?
If you try to run a macro even though you’ve not enable them, Excel displays the following dialog box to inform you about this:

In order to solve this issue, follow the indications that appear in the dialog. Namely:
- Step #1: Close the Excel workbook.
- Step #2: Open the workbook again.
- Step #3: When the security warning informing you that macros are not enabled appears again, click on “Enable Content”.


What Happens The Next Time You Open An Excel Workbook In Which You Have Enabled Macros.
Excel remembers when you enable macros in an Excel workbook. Therefore, if you enable the content of such workbook following the process described in this section, the next time you open it all the macros are automatically enabled. In other words, that particular Excel file becomes a trusted document.
You can enable the macros in a particular Excel file for a single time, without turning that Excel workbook into a trusted document, by following the process I explain below.
As explained by Microsoft here, there are some situations in which you can’t make a particular Excel workbook a trusted document. In those cases, macros are not automatically enabled the next time you open the relevant Excel file. Some of the reasons why a file can’t be made a trusted document include:
- That particular file was opened from a location that is deemed unsafe, such as the Temp Folder.
- The system administrator of your organization has disabled certain content or has turned off the trusted document feature.
- The file is a template, usually identified by the extensions .dot, .dotx or .dotm.
When a file can’t be made a trusted document, the macros that you enable by following the steps described above are only enabled for a single time. When you open the file again, Excel shows the security warning or security notice again and ask if you want to enable the content (as explained above).
Option #3: Disable All Macros Except Digitally Signed Macros

This option, just as the previous 2, generally disables macros automatically. However, in this case, the process is slightly more complicated due to the existence of an exception for digitally signed macros. If you choose this setting, Excel proceeds as follows when you open an Excel workbook with macros:
- Macros that are digitally signed by a publisher that you’ve already trusted are automatically enabled.
- In the case of macros that are digitally signed by a publisher that you’ve not yet trusted, Excel notifies you. This allows you to enable the signed macros or add the publisher to your list of trusted publishers.
- Unsigned macros are not enabled and there is no notification.
The question is, then, when should you choose this option?
In Excel 2013 VBA and Macros, Excel authorities Mr. Excel (Bill Jelen) and Tracy Syrstad provide a good general rule to determine whether you should choose or not to disable all macros except those that are digitally signed:
- This macro setting may be useful if you’re planning to create and somehow distribute add-ins to third parties, or if you use add-ins from third parties.
- Despite the above, this option is likely unnecessary (and even annoying) if the macros that you’ll be creating are for your own use and you only use the macros you create.
Option #4: Enable All Macros

This setting enables all macros automatically. However, notice the clear warning that Microsoft includes within the parenthesis:

If you remember the explanation I provide above as to why Excel macros are not enabled by default, you’ll see the problem with enabling absolutely all macros automatically. This macro setting leaves your computer vulnerable to macro viruses.
In other words, unless you have a very compelling reason to do otherwise, its best to avoid option #4.
How to Enable Macros For Certain Excel Files
In addition to setting global settings to determine whether macros are enabled or not, you can determine the individual macro settings for particular Excel workbooks. You do this through creating and managing trusted locations, which are particular folders in your hard disk or network.
As explained by Microsoft here, Microsoft Office creates several trusted locations during the installation process. Excel expert Ankit Kaul, at Excel Trick, lists the 4 locations:
- Program FilesMicrosoft OfficeTemplates.
- Program FilesMicrosoft OfficeOffice12Startup.
- Program FilesMicrosoft OfficeOffice12Library.
- Program FilesMicrosoft OfficeOffice12XLSTART.
Excel files that are in a trusted location are not checked according to the security settings of the Trust Center. Therefore, the macros of all the Excel workbooks that are saved in trusted locations are automatically enabled.
In Excel VBA Programming for Dummies, Excel guru John Walkenbach writes that designating one or more folders as trusted locations is:
Perhaps the best way to handle macro security.
You can add a trusted location by following these 8 easy steps.
Step #1: Access The Trusted Locations Tab In The Trust Center
You can access the Trusted Locations tab in 2 simple steps.
Step #1: Enter The Trust Center.
The most straightforward way to get to the Trust Center is by clicking on the Macro Security button in the Developer tab of the Ribbon.

You can also access the Trust Center through the Excel Options dialog, as I explain above.
Step #2: Go To The Trusted Locations Tab.
Once you’re inside the Trust Center, make sure that you’re on the Trusted Locations tab. Otherwise, you can get there by clicking on “Trusted Locations” on the left navigation pane.

Step #2: Set Whether You Want To Allow Trusted Locations On Network
Trusted locations can be both on your hard drive and on a network location.
Microsoft’s suggestion is that you don’t have trusted locations on your network as locations outside your computer are less safe. The default setting reflects this. Additionally, according to Microsoft, you should avoid adding public folders on network shares as trusted locations.
You can, however, choose to trust locations on your network by selecting “Allow Trusted Locations on my network”.

Step #3: Click The Add New Location Button
This step is self-explanatory. Click on the Add new location… button on the lower part of the Trust Center.

Step #4: Click The Browse Button
After you’ve clicked the Add New Location button, Excel displays the Microsoft Office Trusted Location dialog.

Here, you’ll want to click on “Browse”.

Step #5: Select The Folder You Want To Add As A Trusted Location
After you’ve clicked on the Browse button, Excel opens the Browse dialog.

This probably looks familiar. This is the dialog box you’ll use to select the folder you want to add to your trusted locations. You do this by following 3 steps:
- Step #1: Browsing to the folder that is the parent of that which you want to add as a trusted location.
- Step #2: Selecting the relevant folder to be added as a trusted location.
- Step #3: Clicking the OK button.
The following screenshot shows how the Browse dialog looks if, for example, you wanted to add the Trusted Locations folder which is stored in the Examples folder:

Step #6: Set Whether You Want To Trust Subfolders Of The Selected Location
After you’ve selected the folder to be added as a trusted location, Excel takes you back to the Microsoft Office Trusted Location dialog.
Excel allows you to trust the subfolders of the location that you’ve selected in step #5 above by selecting “Subfolders of this location are also trusted”.

If you want, you can also add a description of the trusted location, using the Description field on the lower part of the dialog. Adding a description is optional.

Step #7: Click The OK Button
Once you’ve completed the 6 steps explained above, you’re ready to go back to the Trust Center. To close the Microsoft Office Trusted Location dialog and go back to the Trust Center, click the OK button on the lower right corner.

Step #8: Click The OK Button
Once you’re back in the Trust Center, you’ll notice that the location that you’ve selected by following the 7 steps above has been added to the list of trusted sources for opening files.

You’ve pretty much completed the process to add a trusted location. Simply click the OK button on the lower right corner to finish.

When To Use And When Not To Use Trusted Locations
You’re probably already aware of the following, but I’ll say it anyway:
You should be very careful when selecting which locations you add to the list of trusted sources for opening files in Excel. Remember that all Excel workbooks that are stored in trusted locations have their macros enabled automatically, regardless of what the global setting for macro security is.
As explained at exceltrick.com, trusted locations can “act as loopholes in your security setting and any hacker can easily take advantage of those loopholes”.
One example of something you don’t want to do appears in Excel 2013 VBA and Macros. Here, the authors explain how Outlook stores email attachments that you double-click in a temporary folder. This temporary folder is within the local drive C:. If you were to add C: and all its subfolders as trusted sources for opening files, your computer would be quite vulnerable to a macro virus.
In a similar vein, Microsoft suggests that you avoid designating your entire Documents or My Documents folders as trusted locations. In this case, is better to create subfolders and add those subfolders alone to the list of trusted locations.
So when does it make sense to add a trusted location?
In the webpage I link to above, Microsoft provides a good rule of thumb. Basically, it may make sense to use trusted locations when you have certain Excel workbooks that you don’t want the Trust Center security feature to check before opening. Doing this is safer than changing your default macro security settings in the Trust Center to something less safe.
For example, let’s assume that:
- Your default macro security setting is Disable all macros without notification.

- However, you have a few (very few) Excel workbooks with macros that you want to use.

In this case, instead of changing your global macro security setting to Disable all macros with notification, it may make more sense for you to create a trusted location. You can then save your few Excel workbooks with macros on that trusted location and, when you open them, their macros are automatically enabled.
How To Enable Macros For A Single Time
What can you do if you receive an Excel workbook that contains macros which you want to use but you don’t want to do any of the following?
- Modify your global macro security settings.
- Turn the Excel file into a trusted document where, in future opportunities, macros are automatically enabled.
- Use trusted locations.
The answer is that you enable the macros for a single time in 3 easy steps, as explained below.
Note that this process only works if Excel has notified you that macros have been disabled. If you have, for example, disabled all macros without notification, you’ll need to change your default settings before being able to enable macros for a single time. A similar thing happens if you have disabled all macros except digitally signed ones, and open a book containing unsigned macros (in which case there is no notification).
If you follow this process, Excel enables macros for as long as you keep the Excel workbook open. Since the Excel workbook doesn’t become a trusted document in this scenario, if you close the file and later re-open it, the macros are not automatically enabled.
Step #1: Access The Backstage View
Go to the Backstage View by clicking on the File tab in the Ribbon.

Step #2: Click On The Enable Content Button And Select Advanced Options
Once you’re in the Backstage View, you’ll notice the prominent security warning which Excel uses to inform you that macros have been disabled.
Click on the Enable Content button that is to the right of the security warning. Excel displays a drop-down menu. Select “Advanced Options”.

Step #3: Select “Enable content for this session” And Click The OK Button
After you’ve clicked on “Advanced Options”, Excel displays the Microsoft Office Security Options dialog.

Select “Enable content for this session” and click “OK”.

That’s it, macros are now enabled for that particular session.
Conclusion
The quote in the image at the beginning of this Excel tutorial (from Excel authority John Walkenbach) states that Visual Basic for Applications is a powerful language. Both good and bad consequences stem from this power:
- On the one hand, macros are extremely useful for automating repetitive tasks and improving your efficiency and productivity when using Excel.
- On the other hand, they can create a lot of damage when used inappropriately.
Should the potential risk of using macros stop you from using them?
Generally, no. As explained by technology writer Chris Hoffman at How-To Geek:
Macros are still potentially dangerous. But, like a lion at the zoo, you’d have to go out of your way to be hurt by them.
This Excel tutorial has explained the most important things you need to know regarding how and when to enable macros. Therefore, by now, you probably have a good understanding of what activities and macro security settings are most appropriate for your particular situation.
Additionally, you’ve also seen how you can enable macros in Excel in different situations, ranging from having them always enabled to enabling them for a single time. These different methods to enable a macro should be able to cover most of the situations that you find in your day to day work.
Books Referenced In This Excel Tutorial
- Jelen, Bill and Syrstad, Tracy (2013). Excel 2013 VBA and Macros. United States of America: Pearson Education, Inc.
- Walkenbach, John (2013). Excel VBA Programming for Dummies. Hoboken, NJ: John Wiley & Sons Inc.
To enable macros simply means to run or execute a macro in a particular file in order to save the time spent on repetitive actions. To enable macros, select “enable all macros” from the “trust center” of the File tab (in the “options” button).
It is risky to enable macros because there is a possibility of running into errors while opening a macro-enabled worksheet. Consequently, on account of security reasons, Excel disables macros from external sources.
Table of contents
- Enable Macros in Excel
- How to Enable Macros in Excel (2007, 2010, 2013, and 2016)?
- How to Enable all Macro Files in Excel Permanently?
- The Cautions While Enabling Macros
- Frequently Asked Questions
- Recommended Articles
How to Enable Macros in Excel (2007, 2010, 2013, and 2016)?
At the foremost, the user should decide the extent of permission to be given while enabling macros. The consent can be partial, complete or zero (no permission).
Once decided on the extent of permission, follow the listed steps to enable excel macros:
- In the File tab, click “options.”

- In the “Excel options” dialog box, click “trust center settings” in the “trust center” option.

- From the “macro settings,” select the extent of permission to be granted. Depending on the requirement, the user can choose one of the following options (shown in the succeeding image):
• “Disable all macros without notification” does not send any notifications regarding the disabled macros.
• “Disable all macros with notification” sends notifications stating that macros of the current file are disabled.
• “Disable all macros except digitally signed macros” stops the usage of all macros except the digitally signed ones.
• “Enable all macros” gives full permission to run all macros.Click “Ok” to apply the selected macro settings.
Note: The option “enable all macros” is selected only if the source is trusted.

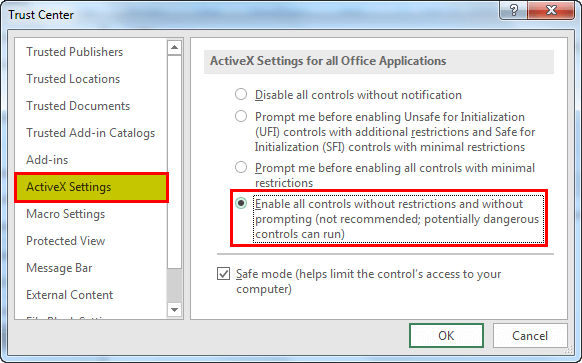
- In the “ActiveX settings” option (under “trust center settings”), select “enable all controls without restrictions and without prompting.”
The ActiveX controls are activated to enable macros properly. These controls are necessary for the object of macros.

How to Enable all Macro Files in Excel Permanently?
If a file received from a trusted source contains a macro or VBA content, the macros need to be enabled for using the file. In such cases, the macros are enabled permanently to save time.
The steps to enable macros in Excel permanently are listed as follows:
Step 1: In the File tab, click “options.”
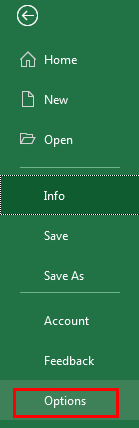
Step 2: In the “Excel options” dialog box, click “trust center settings” in the “trust center” option.
Step 3: In the “macro settings” option, select “enable all macros.” Click “Ok” to apply the selected macro settings.

The Cautions While Enabling Macros
The following points must be remembered while enabling macros:
- The file containing VBA codeVBA code refers to a set of instructions written by the user in the Visual Basic Applications programming language on a Visual Basic Editor (VBE) to perform a specific task.read more must be saved as “macro-enabled workbook.” Saving the file with some other extension does not save the VBA code and thus, does not enable the macros.
- The option “enable all macros” runs all macros without any further warning or consent. Since the macros of both trusted and non-trusted sources are enabled, it might become dangerous.
- The option “disable all macros without any notification” does not inform the reason behind why macros are not running. Hence, select “disable all macros with notification” to view the warnings.
Frequently Asked Questions
1. How to enable macros in 2007, 2010, 2013, and 2016?
a. For Excel 2007, 2010, 2013, and 2016
• In “options” under the File tab, click “trust center.”
• In “trust center settings,” click “macro settings” and choose any of the four options depending on the extent of permission to be granted. Click “Ok.”
b. For Excel 2010, 2013, and 2016
• Via the security warning bar
o Click “enable content” on the warning bar.
• Via the security warning area
o In the File tab, click “enable content” in the security warning area.
o In “advanced options,” click “enable content for this session” (under “Microsoft office security options” dialog box). Click “Ok.”
Note: This feature (security warning area) enables macros for the current session. Closing and reopening the file will display the warning again.
2. Why should macros in Excel be enabled?
Excel Macros are a set of commands or instructions that automate repetitive actions performed by the user. To enable macros implies running a macro with or without the user confirmation.
Macros are enabled to quickly complete tasks and minimize the time spent on keystrokes. Such tasks can be formatting data, creating pre-defined programs, executing specially designed functions, and so on.
Note: The macros must be enabled only if they are from a trusted and authentic source.
3. Is it safe to enable macros in Excel?
It is safe to enable only those macros that come from trusted sources or have been self-recorded by the user. All other macros that come from unknown and non-trusted sources pose an inherent security risk.
Running a malicious macro may damage the hard drive, corrupt installation of MS Office or delete essential data files. On account of this reason, the default setting is “disable all macros with notification” in Excel.
Hence, though enabling macros can be beneficial for the user, running unknown macros can be equally harmful.
Recommended Articles
This has been a guide to enable macros in Excel 2007, 2010, 2013, and 2016. Here we discuss how to enable macros in Excel for different types of permission along with examples. You may also look at these useful functions in Excel –
- Excel Dynamic ConsolidateConsolidate is an inbuilt function in excel which is used to consolidate data from different workbooks which are opened at the same time. It allows to select multiple data from different workbooks and consolidate it in a final workbook.read more
- Record Macros in Excel
- Consolidate Data in Excel
- VBA MacrosVBA Macros are the lines of code that instruct the excel to do specific tasks, i.e., once the code is written in Visual Basic Editor (VBE), the user can quickly execute the same task at any time in the workbook. It thus eliminates the repetitive, monotonous tasks and automates the process.read more
- Drawing in ExcelDrawing in Excel means making a shape in Excel. Now, Excel has provided us with many tools for drawing. Some of them are the predefined drawings or predefined shapes, and also, there is an option for a free form of drawing where the user can design a drawing by using a mouse. It is available in the “Shapes” in Excel’s “Insert” tab.read more
Reader Interactions
This Excel tutorial explains how to solve the problem of Excel Security Warning – Macros have been disabled.

This Excel Security Warning is one of the most annoying warnings in Excel. If you click on the Options button, you will see the below message.
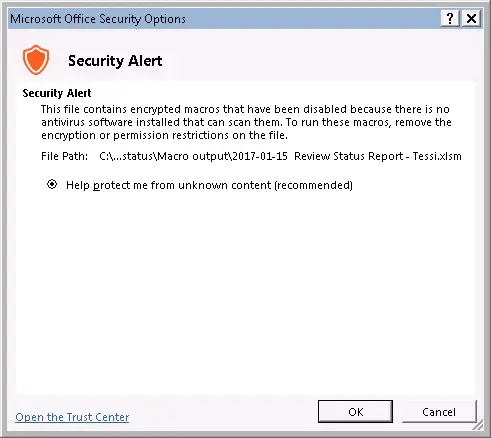
In fact, this message does say something about the reason for this alert, it explained that this error is caused by encrypted Macro. What it means encrypted is that the Workbook contains a Macro and the Workbook is password protected.
If you remove the password, the Workbook will not display this message, and you will be able to run the Macro. But this does not really resolve the problem, because sometimes it is necessary to add a password to the Workbook.
Solution – Macros have been disabled
I don’t know if installing anti-virus as suggested in the message box would really solve the problem, but we can have a quicker solution.
Navigate to Excel Option > Trust Center > Trust Center Settings > Trusted Locations > Add a new location to the folder path where the Workbook locates

Now you can have a password protected Workbook with Macro inside. Unfortunately this setting is configured only in your computer, but not the receiver of the file. If it still cannot resolved your problem, you can click here to view more solution suggested by Microsoft.
Macros can be defined as a set of instructions that can be used to perform some specific tasks in Microsoft Office applications. The availability of macros is very helpful for the users as they can create user defined programs and functions specifically designed to perform their tasks.
Although macros are so useful, but if misused they can play a havoc with your data or even with your computer. If unknowingly you run some malicious macro, then it could corrupt your Microsoft Office installation or give you other sorts of problems. And because of this reason Microsoft has disabled external (or un-trusted) macros by default.
Today in this post I will let you know how to enable macros in excel:
Enabling Macros in Excel 2000 and 2003:
- First of all navigate to ‘Tools’ tab > ‘Macro’ > ‘Security’.
- After clicking on the ‘Security’ option, a Security window will open. It will show you all the security levels that you can select for your macros.

- My suggestion would be, never choose ‘Low Security’. ‘Medium Security’ is better as it will ask your permission each time before running a macro.
Enable Macros in Excel 2007:
- With an excel file opened click on the ‘Office’ button.
- Then click on ‘Excel Options’ (present at the bottom).
- Next select the ‘Trust Center’ > ‘Trust Center Settings’.

- In the trust centre settings click on the ‘Macro Settings’ .And from there you can choose the security level for running macros.
Enabling Macros in Excel 2010 and 2013:
- Open a Microsoft Excel file, and navigate to ‘File’ > ‘Options’ > ‘Trust Center’. And then click ‘Trust Center Settings’.

- In the Trust Center Settings window select the ‘Macro Settings’ option. And choose the security setting that you want to be applicable on macro execution.
Detailed Explanation of Macro Settings (For Excel 2007, 2010 and 2013):
The various security options in Microsoft excel 2007, 2010 and 2013 are not very clear. So, here I will explain these options in detail:
1. Disable all macros without notification: If you select this option then it will block all the macros and won’t give you any notifications about it.
2. Disable all macros with notification: In this settings the macros are disabled but still each time when you open an excel sheet with a macro it will ask you if you want to run the macro or not.
![]()
3. Disable all macros except digitally signed macros: This is same as the second option except the difference that it automatically allows the macros that are signed by trusted publishers.
4. Enable all macros (not recommended, potentially dangerous code can run): This setting will allow all the macros to run without prompting you. Generally you should avoid using this option.
How to Run a Macro Even if Running Macros is disabled:
You can run macros even if your security settings are not allowing you to do so. This method will only work in Excel 2007 and later versions. Microsoft Excel treats certain locations as trusted zones. This means if you store your excel files (obviously I am talking about macro enabled ones) on these trusted locations and then try to run macros. Excel will omit all the macro checks and will run the macro.
By default these trusted Locations are:
- Program FilesMicrosoft OfficeTemplates
- Program FilesMicrosoft OfficeOffice12Startup
- Program FilesMicrosoft OfficeOffice12Library
- Program FilesMicrosoft OfficeOffice12XLSTART
You can also add any location on your computer to trusted zone. To do so simply follow below steps:
- In Excel navigate to ‘File’ > ‘Options’ > ‘Trust Center’> ‘Trust Center Settings’ > ‘Trusted Locations’.

- Next, using the ‘Add New Location’ button you can add any location to the Trusted Locations.
Note: Before adding any location to trusted location list make sure the location is really a safe location. Because these locations can act as loopholes in your security setting and any hacker can easily take advantage of such loopholes.
So, this was all about how to enable macros in Excel.