
Excel for Microsoft 365 Word for Microsoft 365 Outlook for Microsoft 365 PowerPoint for Microsoft 365 Access for Microsoft 365 Excel 2021 Word 2021 Outlook 2021 PowerPoint 2021 Access 2021 Visio Professional 2021 Visio Standard 2021 Excel 2019 Word 2019 Outlook 2019 PowerPoint 2019 Access 2019 Visio Professional 2019 Visio Standard 2019 Excel 2016 Word 2016 Outlook 2016 PowerPoint 2016 Access 2016 Visio Professional 2016 Visio Standard 2016 Excel 2013 Word 2013 Outlook 2013 PowerPoint 2013 Access 2013 Visio Professional 2013 Visio 2013 Excel 2010 Word 2010 Outlook 2010 PowerPoint 2010 Access 2010 Visio Premium 2010 Visio 2010 Visio Standard 2010 Excel Starter 2010 More…Less
A macro is a series of commands used to automate a repeated task and can be run when you have to perform the task. Macros can automate frequently used tasks to save time on keystrokes and mouse actions.
However, some macros can pose a security risk. Macros are often used by people with malicious intent to quietly install malware, such as a virus, on your computer or into your organization’s network.
Warning: Never enable macros in a Microsoft 365 file unless you’re sure what those macros do. Unexpected macros can pose a significant security risk. You don’t have to enable macros to see or edit the file; only if you want the functionality provided by the macro. For more information see Protect yourself from macro viruses.
Change macro settings in the Trust Center
Macro settings are located in the Trust Center. However, if your device is managed by your work or school the system administrator might prevent anyone from changing settings.
Important: When you change your macro settings in the Trust Center, they are changed only for the Microsoft 365 program that you are currently using. The macro settings are not changed for all your Microsoft 365 programs.
-
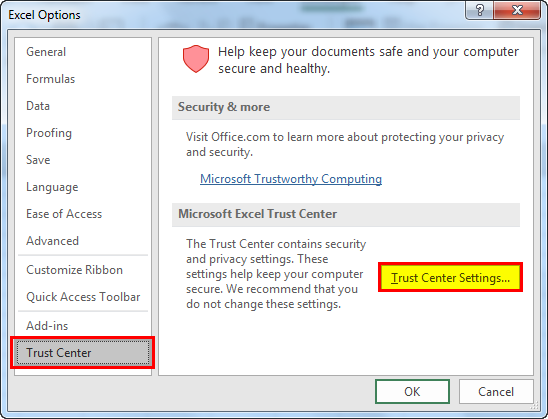
Click the File tab.
-
Click Options.
-
Click Trust Center, and then click Trust Center Settings.
-
In the Trust Center, click Macro Settings.

-
Make the selections that you want, then click OK.
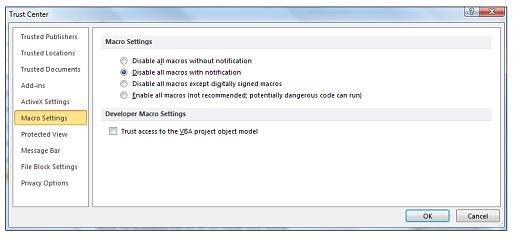
Note: The options are slightly different in Excel, we’ll call those out as we go.
-
Disable all macros without notification Macros and security alerts about macros are disabled.
In Excel this option is Disable VBA macros without notification and it only applies to VBA macros.
-
Disable all macros with notification Macros are disabled, but security alerts appear if there are macros present. Enable macros on a case-by-case basis.
In Excel this option is Disable VBA macros with notification and it only applies to VBA macros.
-
Disable all macros except digitally signed macros Macros are disabled, and security alerts appear if there are unsigned macros present. However, if the macro is digitally signed by a trusted publisher, the macro just runs. If the macro is signed by a publisher you haven’t trusted yet, you are given the opportunity to enable the signed macro and trust the publisher.
In Excel this option is Disable VBA macros except digitally signed macros and it only applies to VBA macros.
-
Enable all macros (not recommended, potentially dangerous code can run) All macros run without confirmation. This setting makes your computer vulnerable to malicious code.
In Excel this option is Enable VBA macros (not recommended, potentially dangerous code can run) and it only applies to VBA macros.
-
Excel also has a checkbox for Enable Excel 4.0 macros when VBA macros are enabled. If you select this checkbox all of the above settings for VBA macros will also apply to Excel 4.0 (XLM) macros.
If this checkbox is not selected XLM macros are disabled without notification.
-
Trust access to the VBA project object model Disallow or allow programmatic access to the Visual Basic for Applications (VBA) object model from an automation client. This security option is for code written to automate a Microsoft 365 program and manipulate the VBA environment and object model. It is a per-user and per-application setting, and denies access by default, hindering unauthorized programs from building harmful self-replicating code. For automation clients to access the VBA object model, the user running the code must grant access. To turn on access, select the check box.
Note: Microsoft Publisher and Microsoft Access have no Trust access to the VBA project model object option.
For info on creating macros please see Quick start: Create a macro.
For info on using macros on a machine running Windows S see Block suspicious macros in Office on Windows 10 S.
See Also
Change macro security settings in Excel
How malware can infect your PC
Need more help?
Want more options?
Explore subscription benefits, browse training courses, learn how to secure your device, and more.
Communities help you ask and answer questions, give feedback, and hear from experts with rich knowledge.
To enable macros simply means to run or execute a macro in a particular file in order to save the time spent on repetitive actions. To enable macros, select “enable all macros” from the “trust center” of the File tab (in the “options” button).
It is risky to enable macros because there is a possibility of running into errors while opening a macro-enabled worksheet. Consequently, on account of security reasons, Excel disables macros from external sources.
Table of contents
- Enable Macros in Excel
- How to Enable Macros in Excel (2007, 2010, 2013, and 2016)?
- How to Enable all Macro Files in Excel Permanently?
- The Cautions While Enabling Macros
- Frequently Asked Questions
- Recommended Articles
How to Enable Macros in Excel (2007, 2010, 2013, and 2016)?
At the foremost, the user should decide the extent of permission to be given while enabling macros. The consent can be partial, complete or zero (no permission).
Once decided on the extent of permission, follow the listed steps to enable excel macros:
- In the File tab, click “options.”

- In the “Excel options” dialog box, click “trust center settings” in the “trust center” option.

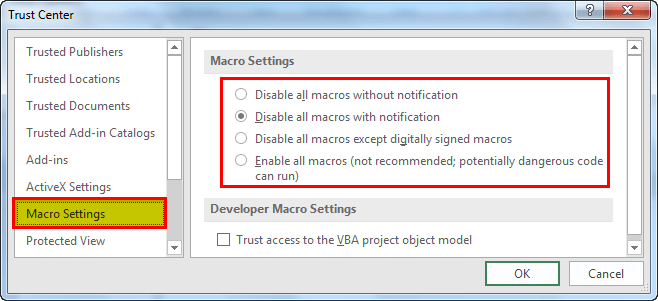
- From the “macro settings,” select the extent of permission to be granted. Depending on the requirement, the user can choose one of the following options (shown in the succeeding image):
• “Disable all macros without notification” does not send any notifications regarding the disabled macros.
• “Disable all macros with notification” sends notifications stating that macros of the current file are disabled.
• “Disable all macros except digitally signed macros” stops the usage of all macros except the digitally signed ones.
• “Enable all macros” gives full permission to run all macros.Click “Ok” to apply the selected macro settings.
Note: The option “enable all macros” is selected only if the source is trusted.

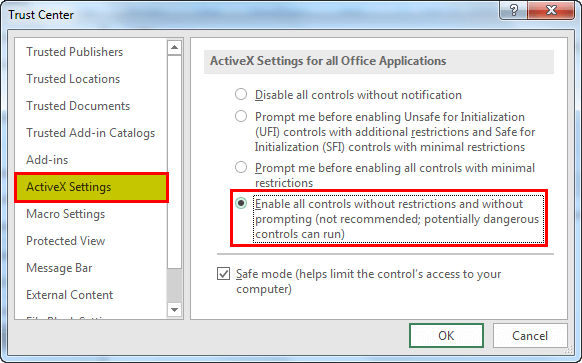
- In the “ActiveX settings” option (under “trust center settings”), select “enable all controls without restrictions and without prompting.”
The ActiveX controls are activated to enable macros properly. These controls are necessary for the object of macros.

How to Enable all Macro Files in Excel Permanently?
If a file received from a trusted source contains a macro or VBA content, the macros need to be enabled for using the file. In such cases, the macros are enabled permanently to save time.
The steps to enable macros in Excel permanently are listed as follows:
Step 1: In the File tab, click “options.”
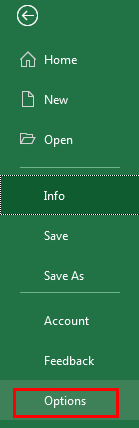
Step 2: In the “Excel options” dialog box, click “trust center settings” in the “trust center” option.
Step 3: In the “macro settings” option, select “enable all macros.” Click “Ok” to apply the selected macro settings.

The Cautions While Enabling Macros
The following points must be remembered while enabling macros:
- The file containing VBA codeVBA code refers to a set of instructions written by the user in the Visual Basic Applications programming language on a Visual Basic Editor (VBE) to perform a specific task.read more must be saved as “macro-enabled workbook.” Saving the file with some other extension does not save the VBA code and thus, does not enable the macros.
- The option “enable all macros” runs all macros without any further warning or consent. Since the macros of both trusted and non-trusted sources are enabled, it might become dangerous.
- The option “disable all macros without any notification” does not inform the reason behind why macros are not running. Hence, select “disable all macros with notification” to view the warnings.
Frequently Asked Questions
1. How to enable macros in 2007, 2010, 2013, and 2016?
a. For Excel 2007, 2010, 2013, and 2016
• In “options” under the File tab, click “trust center.”
• In “trust center settings,” click “macro settings” and choose any of the four options depending on the extent of permission to be granted. Click “Ok.”
b. For Excel 2010, 2013, and 2016
• Via the security warning bar
o Click “enable content” on the warning bar.
• Via the security warning area
o In the File tab, click “enable content” in the security warning area.
o In “advanced options,” click “enable content for this session” (under “Microsoft office security options” dialog box). Click “Ok.”
Note: This feature (security warning area) enables macros for the current session. Closing and reopening the file will display the warning again.
2. Why should macros in Excel be enabled?
Excel Macros are a set of commands or instructions that automate repetitive actions performed by the user. To enable macros implies running a macro with or without the user confirmation.
Macros are enabled to quickly complete tasks and minimize the time spent on keystrokes. Such tasks can be formatting data, creating pre-defined programs, executing specially designed functions, and so on.
Note: The macros must be enabled only if they are from a trusted and authentic source.
3. Is it safe to enable macros in Excel?
It is safe to enable only those macros that come from trusted sources or have been self-recorded by the user. All other macros that come from unknown and non-trusted sources pose an inherent security risk.
Running a malicious macro may damage the hard drive, corrupt installation of MS Office or delete essential data files. On account of this reason, the default setting is “disable all macros with notification” in Excel.
Hence, though enabling macros can be beneficial for the user, running unknown macros can be equally harmful.
Recommended Articles
This has been a guide to enable macros in Excel 2007, 2010, 2013, and 2016. Here we discuss how to enable macros in Excel for different types of permission along with examples. You may also look at these useful functions in Excel –
- Excel Dynamic ConsolidateConsolidate is an inbuilt function in excel which is used to consolidate data from different workbooks which are opened at the same time. It allows to select multiple data from different workbooks and consolidate it in a final workbook.read more
- Record Macros in Excel
- Consolidate Data in Excel
- VBA MacrosVBA Macros are the lines of code that instruct the excel to do specific tasks, i.e., once the code is written in Visual Basic Editor (VBE), the user can quickly execute the same task at any time in the workbook. It thus eliminates the repetitive, monotonous tasks and automates the process.read more
- Drawing in ExcelDrawing in Excel means making a shape in Excel. Now, Excel has provided us with many tools for drawing. Some of them are the predefined drawings or predefined shapes, and also, there is an option for a free form of drawing where the user can design a drawing by using a mouse. It is available in the “Shapes” in Excel’s “Insert” tab.read more
Reader Interactions
Macros can be defined as a set of instructions that can be used to perform some specific tasks in Microsoft Office applications. The availability of macros is very helpful for the users as they can create user defined programs and functions specifically designed to perform their tasks.
Although macros are so useful, but if misused they can play a havoc with your data or even with your computer. If unknowingly you run some malicious macro, then it could corrupt your Microsoft Office installation or give you other sorts of problems. And because of this reason Microsoft has disabled external (or un-trusted) macros by default.
Today in this post I will let you know how to enable macros in excel:
Enabling Macros in Excel 2000 and 2003:
- First of all navigate to ‘Tools’ tab > ‘Macro’ > ‘Security’.
- After clicking on the ‘Security’ option, a Security window will open. It will show you all the security levels that you can select for your macros.

- My suggestion would be, never choose ‘Low Security’. ‘Medium Security’ is better as it will ask your permission each time before running a macro.
Enable Macros in Excel 2007:
- With an excel file opened click on the ‘Office’ button.
- Then click on ‘Excel Options’ (present at the bottom).
- Next select the ‘Trust Center’ > ‘Trust Center Settings’.

- In the trust centre settings click on the ‘Macro Settings’ .And from there you can choose the security level for running macros.
Enabling Macros in Excel 2010 and 2013:
- Open a Microsoft Excel file, and navigate to ‘File’ > ‘Options’ > ‘Trust Center’. And then click ‘Trust Center Settings’.

- In the Trust Center Settings window select the ‘Macro Settings’ option. And choose the security setting that you want to be applicable on macro execution.
Detailed Explanation of Macro Settings (For Excel 2007, 2010 and 2013):
The various security options in Microsoft excel 2007, 2010 and 2013 are not very clear. So, here I will explain these options in detail:
1. Disable all macros without notification: If you select this option then it will block all the macros and won’t give you any notifications about it.
2. Disable all macros with notification: In this settings the macros are disabled but still each time when you open an excel sheet with a macro it will ask you if you want to run the macro or not.
![]()
3. Disable all macros except digitally signed macros: This is same as the second option except the difference that it automatically allows the macros that are signed by trusted publishers.
4. Enable all macros (not recommended, potentially dangerous code can run): This setting will allow all the macros to run without prompting you. Generally you should avoid using this option.
How to Run a Macro Even if Running Macros is disabled:
You can run macros even if your security settings are not allowing you to do so. This method will only work in Excel 2007 and later versions. Microsoft Excel treats certain locations as trusted zones. This means if you store your excel files (obviously I am talking about macro enabled ones) on these trusted locations and then try to run macros. Excel will omit all the macro checks and will run the macro.
By default these trusted Locations are:
- Program FilesMicrosoft OfficeTemplates
- Program FilesMicrosoft OfficeOffice12Startup
- Program FilesMicrosoft OfficeOffice12Library
- Program FilesMicrosoft OfficeOffice12XLSTART
You can also add any location on your computer to trusted zone. To do so simply follow below steps:
- In Excel navigate to ‘File’ > ‘Options’ > ‘Trust Center’> ‘Trust Center Settings’ > ‘Trusted Locations’.

- Next, using the ‘Add New Location’ button you can add any location to the Trusted Locations.
Note: Before adding any location to trusted location list make sure the location is really a safe location. Because these locations can act as loopholes in your security setting and any hacker can easily take advantage of such loopholes.
So, this was all about how to enable macros in Excel.
I’ve been there…
I found a new macro that promised to automate a particularly annoying task, save me a ton of time and make me significantly more efficient in Excel. I tried to run the macro. And then…
Something like this happened:

Sigh…
The first time I saw such a message in Excel, several questions popped immediately in my head:
- What security settings is this message referring to?
- What does it mean that macros have been disabled?
- Did I disable macros in Excel by mistake?
- How do I enable macros in Excel?
 Needless to say, I eventually learned how to enable macros in Excel. Otherwise, I wouldn’t be writing this Excel tutorial now.
However, since I know that I’m not the first (or last) one to raise those questions, I decided to write this post.
My purpose with this tutorial is to answer the questions above and explain to you the most important things you need to know regarding how (and when) to enable macros in Excel. This way, when Excel displays a dialog saying that macros have been disabled and you need to enable macros, you’ll know exactly what to do.
More precisely, in this Excel tutorial we’ll cover the following topics:
I assume that, if you’re reading this Excel tutorial, the version of Excel you’re working on still has its default settings. Therefore, let’s start by understanding…
Excel’s Default Macro Security Setting: Disable Macros With Notification
Excel’s default setting is to disable all macros with a notification. This is the reason why, if you open an Excel workbook that contains macros, you may see a message warning you that “macros have been disabled”.

You can generally modify the macro security settings of Excel to determine what happens when you open an Excel workbook by determining:
- Which macros can run.
- Under which circumstances can macros run.
In any case, please note the following:
- As explained by Microsoft, you’re not able to change the macro security settings if an administrator in your organization has changed the default settings with the purpose of preventing modifications. If this is the case, get in touch with this administrator.
- Any changes that you make to the macro security settings in Excel are only applicable to Excel. They don’t apply to other Microsoft Office applications.
The first question you may have is…
Why Are Excel Macros Not Enabled By Default?
This may sound like ancient history to most of you, but:
Once upon a time, Excel (along with the other Microsoft Office applications) enabled macros by default. But then:
Kwyjibo came.
In case you’re a Simpsons fan and are wondering whether I’m referring to Homer Simpson…
The answer is no. Sorry 😳 . I’m also a little bit disappointed. I also like the Simpsons and would’ve enjoyed writing about them.
I’m referring to the Melissa virus, also known by other names such as Kwyjibo. This was a macro virus that propagated via a Word document sent as an email attachment. The virus became famous back in 1999. Certain large corporations (including Microsoft itself) were affected.
What do you think was the consequence of this?
That’s right. As explained in Excel 2013 VBA and Macros by Excel experts Bill Jelen and Tracy Syrstad, Microsoft changed the default security settings of the Microsoft Office applications. Under the current setting macros are, by default, not enabled.
Nowadays, macro security is very important. The reason for this, as explained by Excel authority John Walkenbach in Excel VBA Programming for Dummies is that VBA is a very powerful language. Walkenbach goes on to explain that:
A macro can delete files, send information to other computers, and even destroy Windows so that you can’t even start your system.
Therefore, you want to understand what you’re doing when enabling macros. This way you’ll be able to enjoy the benefits of macros while minimizing the risk of having your computer infected with dangerous VBA code.
Let’s assume, that you want to enable macros in Excel because you want to start creating macros now. The following sections explain the different ways in which you can enable macros in Excel and the most important aspects of macro security settings you’ll need to understand in order to be reasonably protected from macro viruses.
How To Change Your Global Macro Security Settings In Order To, Among Others, Enable Macros In Excel By Default
Excel allows you to determine whether macros are enabled or disabled automatically. You determine these default settings through the Trust Center, which is where you can see and set all the security and privacy settings for Excel.
If you enable macros in Excel through the Trust Center, those settings become the new default and apply globally. If you want to enable macros for only certain Excel workbooks, you can do so by saving them in a trusted location, as I explain in the next section of this Excel tutorial.
Let’s see how to change your global macro security settings in 2 easy steps. This allows you to, for example, enable macros in Excel by default.
Step #1: Access Excel’s Trust Center
The easiest way to access Excel’s Trust Center is by simply clicking on “Macro Security” in the Developer tab of the Ribbon.

Alternatively, you can get to the Trust Center through the Excel Options dialog. Do this in the following 4 simple steps.
Step #1: Access the Excel Options dialog.
You can get Excel to display the Excel Options dialog by:
- Clicking on the File tab of the Ribbon.

- Click on “Options” on the left side of the Backstage View.


You can also access the Excel Options dialog using keyboard shortcuts such as:
- Alt + T + O.
- Alt + F + T.
Step #2: Go to the Trust Center tab.
When Excel displays the Excel Options dialog, click on “Trust Center” on the left bar of the Options Dialog.

Step #3: Click on “Trust Center Settings…”.
Once you’re in the Trust Center tab, simply click on the “Trust Center Settings…” button on the right side of the Excel Options dialog. This takes you to the Trust Center.

Step #4: Go to the Macro Settings tab.
Once you’re inside the Trust Center, make sure you’re on the Macro Settings tab. This tab appears on the left side.
If you’re not already there, click on “Macro Settings”.

Step #2: Select The Macro Setting You Want To Enable
At the top of the Macro Settings tab in the Trust Center, you’ll find the “Macro Settings”. Excel allows you to choose 1 out of 4 separate settings to set whether Excel enables or disables macros.

To choose the macro setting you want to enable, simply click on the circle on the left side of it and, then, click on the OK button on the lower right corner of the Trust Center.

Let’s take a look at what each of these options means and does.
Option #1: Disable All Macros Without Notification

This option is self-explanatory. It:
- Disables all macros, excluding those in trusted locations.
- Doesn’t notify you that a macro has been disabled.
As you may’ve guessed, this is not the option you want to choose. As explained by Mr. Excel (Bill Jelen) and Tracy Syrstad in Excel 2013 VBA and Macros:
This setting is for people who never intend to run macros.
Note that this macro doesn’t prevent absolutely all macros from running. As I mention above, macros in trusted locations can still run without going through the checks of the Trust Center system.
Option #2: Disable All Macros With Notification

As you’ve probably noticed the difference between this option and option #1 is that, now, Excel notifies you that a macro has been disabled. This is the default option in Excel and, as explained in Excel 2013 VBA and Macros, it’s also the recommended setting.
Excel’s notification that macros are not enabled allows you to determine, on a case-by-case basis, whether you want to enable macros for a particular Excel workbook.
More precisely, if you open a file that has macros (and the Visual Basic Editor isn’t open), you’ll see the following message below the Ribbon.

If at the time of opening the workbook with macros the Visual Basic Editor is also open, Excel displays a security notice:

Regardless of which of the 2 messages you see, you have 2 options.
Option #1: Enable Macros.
You have 2 possible ways to enable macros.
Possibility #1:
Simply click on “Enable Content” or “Enable Macros”.


Which of the 2 options above applies depends on whether the Visual Basic Editor is open or not. If the VBE is open, you’ll see the Microsoft Excel Security Notice that appears in the second screenshot above. Otherwise, you’ll see the security warning that appears in the first image.
Possibility #2:
Enable the macros using the Backstage View by following the 3-step process below.
- Step #1: Click on the File tab in the Ribbon.
- Step #2: Once you’re in the Backstage View, make sure that you’re in the Info tab. You can get there by clicking on “Info” on the left navigation pane.

- Step #3: You’ve probably noticed the prominent security warning which mentions that macros have been disabled. To enable macros, click on the Enable Content button on the left side of the warning and, in the drop-down menu that expands, select “Enable All Content”.


Option #2: Keep Macros Disabled.
If the VBE is not open, ignore the message or close it by clicking on the cross at the right side of the security warning (as shown in the image below).

If the VBE is open, click on “Disable Macros” or close the security notice.

In all of these cases, the macros are not enabled.
What Happens If You Ignore Or Dismiss The Security Warning Without Enabling Macros And, Later, Try To Run A Macro?
If you try to run a macro even though you’ve not enable them, Excel displays the following dialog box to inform you about this:

In order to solve this issue, follow the indications that appear in the dialog. Namely:
- Step #1: Close the Excel workbook.
- Step #2: Open the workbook again.
- Step #3: When the security warning informing you that macros are not enabled appears again, click on “Enable Content”.


What Happens The Next Time You Open An Excel Workbook In Which You Have Enabled Macros.
Excel remembers when you enable macros in an Excel workbook. Therefore, if you enable the content of such workbook following the process described in this section, the next time you open it all the macros are automatically enabled. In other words, that particular Excel file becomes a trusted document.
You can enable the macros in a particular Excel file for a single time, without turning that Excel workbook into a trusted document, by following the process I explain below.
As explained by Microsoft here, there are some situations in which you can’t make a particular Excel workbook a trusted document. In those cases, macros are not automatically enabled the next time you open the relevant Excel file. Some of the reasons why a file can’t be made a trusted document include:
- That particular file was opened from a location that is deemed unsafe, such as the Temp Folder.
- The system administrator of your organization has disabled certain content or has turned off the trusted document feature.
- The file is a template, usually identified by the extensions .dot, .dotx or .dotm.
When a file can’t be made a trusted document, the macros that you enable by following the steps described above are only enabled for a single time. When you open the file again, Excel shows the security warning or security notice again and ask if you want to enable the content (as explained above).
Option #3: Disable All Macros Except Digitally Signed Macros

This option, just as the previous 2, generally disables macros automatically. However, in this case, the process is slightly more complicated due to the existence of an exception for digitally signed macros. If you choose this setting, Excel proceeds as follows when you open an Excel workbook with macros:
- Macros that are digitally signed by a publisher that you’ve already trusted are automatically enabled.
- In the case of macros that are digitally signed by a publisher that you’ve not yet trusted, Excel notifies you. This allows you to enable the signed macros or add the publisher to your list of trusted publishers.
- Unsigned macros are not enabled and there is no notification.
The question is, then, when should you choose this option?
In Excel 2013 VBA and Macros, Excel authorities Mr. Excel (Bill Jelen) and Tracy Syrstad provide a good general rule to determine whether you should choose or not to disable all macros except those that are digitally signed:
- This macro setting may be useful if you’re planning to create and somehow distribute add-ins to third parties, or if you use add-ins from third parties.
- Despite the above, this option is likely unnecessary (and even annoying) if the macros that you’ll be creating are for your own use and you only use the macros you create.
Option #4: Enable All Macros

This setting enables all macros automatically. However, notice the clear warning that Microsoft includes within the parenthesis:

If you remember the explanation I provide above as to why Excel macros are not enabled by default, you’ll see the problem with enabling absolutely all macros automatically. This macro setting leaves your computer vulnerable to macro viruses.
In other words, unless you have a very compelling reason to do otherwise, its best to avoid option #4.
How to Enable Macros For Certain Excel Files
In addition to setting global settings to determine whether macros are enabled or not, you can determine the individual macro settings for particular Excel workbooks. You do this through creating and managing trusted locations, which are particular folders in your hard disk or network.
As explained by Microsoft here, Microsoft Office creates several trusted locations during the installation process. Excel expert Ankit Kaul, at Excel Trick, lists the 4 locations:
- Program FilesMicrosoft OfficeTemplates.
- Program FilesMicrosoft OfficeOffice12Startup.
- Program FilesMicrosoft OfficeOffice12Library.
- Program FilesMicrosoft OfficeOffice12XLSTART.
Excel files that are in a trusted location are not checked according to the security settings of the Trust Center. Therefore, the macros of all the Excel workbooks that are saved in trusted locations are automatically enabled.
In Excel VBA Programming for Dummies, Excel guru John Walkenbach writes that designating one or more folders as trusted locations is:
Perhaps the best way to handle macro security.
You can add a trusted location by following these 8 easy steps.
Step #1: Access The Trusted Locations Tab In The Trust Center
You can access the Trusted Locations tab in 2 simple steps.
Step #1: Enter The Trust Center.
The most straightforward way to get to the Trust Center is by clicking on the Macro Security button in the Developer tab of the Ribbon.

You can also access the Trust Center through the Excel Options dialog, as I explain above.
Step #2: Go To The Trusted Locations Tab.
Once you’re inside the Trust Center, make sure that you’re on the Trusted Locations tab. Otherwise, you can get there by clicking on “Trusted Locations” on the left navigation pane.

Step #2: Set Whether You Want To Allow Trusted Locations On Network
Trusted locations can be both on your hard drive and on a network location.
Microsoft’s suggestion is that you don’t have trusted locations on your network as locations outside your computer are less safe. The default setting reflects this. Additionally, according to Microsoft, you should avoid adding public folders on network shares as trusted locations.
You can, however, choose to trust locations on your network by selecting “Allow Trusted Locations on my network”.

Step #3: Click The Add New Location Button
This step is self-explanatory. Click on the Add new location… button on the lower part of the Trust Center.

Step #4: Click The Browse Button
After you’ve clicked the Add New Location button, Excel displays the Microsoft Office Trusted Location dialog.

Here, you’ll want to click on “Browse”.

Step #5: Select The Folder You Want To Add As A Trusted Location
After you’ve clicked on the Browse button, Excel opens the Browse dialog.

This probably looks familiar. This is the dialog box you’ll use to select the folder you want to add to your trusted locations. You do this by following 3 steps:
- Step #1: Browsing to the folder that is the parent of that which you want to add as a trusted location.
- Step #2: Selecting the relevant folder to be added as a trusted location.
- Step #3: Clicking the OK button.
The following screenshot shows how the Browse dialog looks if, for example, you wanted to add the Trusted Locations folder which is stored in the Examples folder:

Step #6: Set Whether You Want To Trust Subfolders Of The Selected Location
After you’ve selected the folder to be added as a trusted location, Excel takes you back to the Microsoft Office Trusted Location dialog.
Excel allows you to trust the subfolders of the location that you’ve selected in step #5 above by selecting “Subfolders of this location are also trusted”.

If you want, you can also add a description of the trusted location, using the Description field on the lower part of the dialog. Adding a description is optional.

Step #7: Click The OK Button
Once you’ve completed the 6 steps explained above, you’re ready to go back to the Trust Center. To close the Microsoft Office Trusted Location dialog and go back to the Trust Center, click the OK button on the lower right corner.

Step #8: Click The OK Button
Once you’re back in the Trust Center, you’ll notice that the location that you’ve selected by following the 7 steps above has been added to the list of trusted sources for opening files.

You’ve pretty much completed the process to add a trusted location. Simply click the OK button on the lower right corner to finish.

When To Use And When Not To Use Trusted Locations
You’re probably already aware of the following, but I’ll say it anyway:
You should be very careful when selecting which locations you add to the list of trusted sources for opening files in Excel. Remember that all Excel workbooks that are stored in trusted locations have their macros enabled automatically, regardless of what the global setting for macro security is.
As explained at exceltrick.com, trusted locations can “act as loopholes in your security setting and any hacker can easily take advantage of those loopholes”.
One example of something you don’t want to do appears in Excel 2013 VBA and Macros. Here, the authors explain how Outlook stores email attachments that you double-click in a temporary folder. This temporary folder is within the local drive C:. If you were to add C: and all its subfolders as trusted sources for opening files, your computer would be quite vulnerable to a macro virus.
In a similar vein, Microsoft suggests that you avoid designating your entire Documents or My Documents folders as trusted locations. In this case, is better to create subfolders and add those subfolders alone to the list of trusted locations.
So when does it make sense to add a trusted location?
In the webpage I link to above, Microsoft provides a good rule of thumb. Basically, it may make sense to use trusted locations when you have certain Excel workbooks that you don’t want the Trust Center security feature to check before opening. Doing this is safer than changing your default macro security settings in the Trust Center to something less safe.
For example, let’s assume that:
- Your default macro security setting is Disable all macros without notification.

- However, you have a few (very few) Excel workbooks with macros that you want to use.

In this case, instead of changing your global macro security setting to Disable all macros with notification, it may make more sense for you to create a trusted location. You can then save your few Excel workbooks with macros on that trusted location and, when you open them, their macros are automatically enabled.
How To Enable Macros For A Single Time
What can you do if you receive an Excel workbook that contains macros which you want to use but you don’t want to do any of the following?
- Modify your global macro security settings.
- Turn the Excel file into a trusted document where, in future opportunities, macros are automatically enabled.
- Use trusted locations.
The answer is that you enable the macros for a single time in 3 easy steps, as explained below.
Note that this process only works if Excel has notified you that macros have been disabled. If you have, for example, disabled all macros without notification, you’ll need to change your default settings before being able to enable macros for a single time. A similar thing happens if you have disabled all macros except digitally signed ones, and open a book containing unsigned macros (in which case there is no notification).
If you follow this process, Excel enables macros for as long as you keep the Excel workbook open. Since the Excel workbook doesn’t become a trusted document in this scenario, if you close the file and later re-open it, the macros are not automatically enabled.
Step #1: Access The Backstage View
Go to the Backstage View by clicking on the File tab in the Ribbon.

Step #2: Click On The Enable Content Button And Select Advanced Options
Once you’re in the Backstage View, you’ll notice the prominent security warning which Excel uses to inform you that macros have been disabled.
Click on the Enable Content button that is to the right of the security warning. Excel displays a drop-down menu. Select “Advanced Options”.

Step #3: Select “Enable content for this session” And Click The OK Button
After you’ve clicked on “Advanced Options”, Excel displays the Microsoft Office Security Options dialog.

Select “Enable content for this session” and click “OK”.

That’s it, macros are now enabled for that particular session.
Conclusion
The quote in the image at the beginning of this Excel tutorial (from Excel authority John Walkenbach) states that Visual Basic for Applications is a powerful language. Both good and bad consequences stem from this power:
- On the one hand, macros are extremely useful for automating repetitive tasks and improving your efficiency and productivity when using Excel.
- On the other hand, they can create a lot of damage when used inappropriately.
Should the potential risk of using macros stop you from using them?
Generally, no. As explained by technology writer Chris Hoffman at How-To Geek:
Macros are still potentially dangerous. But, like a lion at the zoo, you’d have to go out of your way to be hurt by them.
This Excel tutorial has explained the most important things you need to know regarding how and when to enable macros. Therefore, by now, you probably have a good understanding of what activities and macro security settings are most appropriate for your particular situation.
Additionally, you’ve also seen how you can enable macros in Excel in different situations, ranging from having them always enabled to enabling them for a single time. These different methods to enable a macro should be able to cover most of the situations that you find in your day to day work.
Books Referenced In This Excel Tutorial
- Jelen, Bill and Syrstad, Tracy (2013). Excel 2013 VBA and Macros. United States of America: Pearson Education, Inc.
- Walkenbach, John (2013). Excel VBA Programming for Dummies. Hoboken, NJ: John Wiley & Sons Inc.
Содержание
- Вкладка «Разработчик»
- Вставляем код VBA в книгу Excel
- Как запустить макросы в Excel
- Создание макросов
- Отображение вкладки “Разработчик” в ленте меню
- Как запустить макрос из редактора Visual Basic?
- Абсолютная и относительная запись макроса
- Метод 1: Записываем макрос в автоматическом режиме
- Пример записи простого макроса
- Разрешение выполнения макросов Excel 97-2003
- Работа с макросами
- Включение/выключение макросов с помощью меню разработчика
- Как запустить макрос из панели быстрого доступа?
- Активация и выключение макросов во вкладке Разработчика
- Включение и отключение макросов через меню разработчика
- Как включить макросы в Эксель
- Включение и отключение макросов в других версиях Excel
- Как запустить макрос из приложения?
- Описание параметров макросов
- Включение и отключение макросов через параметры программы
- Что нельзя сделать с помощью макрорекодера?
- Как включить или отключить макросы в Excel 2010
- Расширение файлов Excel, которые содержат макросы
- Как включить или отключить макросы в Excel 2007
- Как вставить макрос в Excel
- Корректируем макрос
- Назначение макроса кнопке
- Заключение
Вкладка «Разработчик»
Запись макроса осуществляется встроенным рекордером, кнопка запуска которого находится на вкладке «Разработчик» главного меню программы Excel. По умолчанию эта вкладка не отображается. Добавить вкладку на панель можно следующим образом:
Excel 2010-2016
Переходим по пути: Файл — Параметры — Настроить ленту. В разделе «Настроить ленту» справа в списке «Основные вкладки» устанавливаем флажок «Разработчик» и нажимаем кнопку «OK».
Excel 2007
Переходим по пути: значок «Microsoft Office» — Параметры Excel — категория «Основные», в категории «Основные» устанавливаем флажок «Показывать вкладку «Разработчик» на ленте» и нажимаем кнопку «OK».
Excel 2000-2003
Здесь ничего отображать не надо: кнопки по работе с макросами и редактором VBA находятся в главном меню на вкладке «Сервис» — «Макрос».
На самом деле в Excel для работы с макросами используются не кнопки, а пункты меню, но, для удобства, продолжу называть их кнопками.
Вставляем код VBA в книгу Excel
В этом примере мы будем использовать VBA макрос, который удаляет переносы строк из ячеек текущего листа Excel.
-
- Открываем рабочую книгу в Excel.
- Нажатием Alt+F11 вызываем окно редактора Visual Basic
- На панели Project-VBAProject кликаем правой кнопкой мыши по имени рабочей книги (в левой верхней части окна редактора) и в контекстном меню выбираем Insert > Module.
- Копируем код VBA (с веб-страницы или из другого источника) и вставляем его в правую область редактора VBA (окно Module1).Подсказка: Как увеличить скорость выполнения макроса?
В самом начале кода Вашего макроса VBA должны содержаться строки:
Application.ScreenUpdating = FalseApplication.Calculation = xlCalculationManualЕсли таких строк нет, то обязательно добавьте следующие строки в свой макрос, чтобы он работал быстрее (см. рисунок выше):
- В самое начало кода после всех строк, начинающихся с Dim (если строк, начинающихся с Dim нет, то вставляем сразу после строки Sub):
Application.ScreenUpdating = FalseApplication.Calculation = xlCalculationManual - В самый конец кода, перед End Sub:
Application.ScreenUpdating = TrueApplication.Calculation = xlCalculationAutomatic
Эти строки, как можно понять из их содержания, отключают обновление экрана и пересчёт формул рабочей книги перед выполнением макроса. После выполнения кода эти параметры снова включаются. Данный приём приводит к ускорению выполнения макроса от 10% до 500% (да, макрос может работать в 5 раз быстрее, если манипуляции над ячейками происходят без лишних остановок).
- В самое начало кода после всех строк, начинающихся с Dim (если строк, начинающихся с Dim нет, то вставляем сразу после строки Sub):
- Сохраняем рабочую книгу, как книгу Excel с поддержкой макросов. Для этого нажмите Ctrl+S и в окне с предупреждением Следующие компоненты невозможно сохранить в книге без поддержки макросов (The following features cannot be saved in macro-free workbook) нажмите Нет (No).Откроется диалоговое окно Сохранение документа (Save as). В выпадающем списке Тип файла (Save as type) выбираем Книга Excel с поддержкой макросов (Excel macro-enabled workbook) и нажимаем кнопку Сохранить (Save).


 Подсказка: Как увеличить скорость выполнения макроса?
 Откроется диалоговое окно Сохранение документа (Save as). В выпадающем списке Тип файла (Save as type) выбираем Книга Excel с поддержкой макросов (Excel macro-enabled workbook) и нажимаем кнопку Сохранить (Save).
- Нажимаем Alt+Q, чтобы закрыть окно редактора VBA и вернуться к книге Excel.
Теперь рассмотрим, как выполняются все созданные ранее макросы в документе Excel.
Если макрос был вставлен в модуль, то он запускается пользователем. У меня такой макрос объединяет несколько ячеек в одну без потери данных.
Выделяем ячейки, которые нужно объединить, затем переходим на вкладку «Разработчик» и кликаем по кнопочке «Макросы».

Откроется диалоговое окно «Макрос». В списке, выбираем нужное имя макроса: «MergeCell», и жмем «Выполнить».

Макрос выполнился: нужные ячейки объединены, и текст в них сохранен.

Если макрос был вставлен в рабочий лист, то запускаться он будет автоматически, в зависимости от действий пользователя. У меня макрос добавляет значения из выпадающего списка в ячейки справа. В код вставлен то диапазон ячеек, в котором находятся выпадающие списки.


Теперь, когда я выбираю из выпадающего списка значение, оно вписывается в ячейки, расположенные справа от той ячейки, в которой находится сам список. Это свидетельствует о выполнении макроса.

Если макрос вставлен в рабочую книгу, он также выполняется автоматически, когда пользователь производит определенные действия над книгой: закрывает ее, или сохраняет.
Если Вы создали пользовательскую функцию, то вставлять в документ ее также надо как функцию. У меня такая функция должна рассчитывать НДС.
Например, применим ее к ячейке А1, со значением «100». Выделяем ячейку, в которую будет вписан результат. Затем переходим на вкладку «Формулы» и нажимаем кнопочку «Вставить функцию».

Откроется окно «Мастер функций». В поле «Категория» выбираем из выпадающего списка «Определенные пользователем», в поле «Выберите функцию» выбираем название из списка: «NDS». Нажимаем «ОК».

Затем выделяю ячейку, для которой нужно посчитать НДС, и нажимаю «ОК».

Включить макросы в документе Excel 2010 совершенно не сложно. Надеюсь, Вы также разобрались, как вставить макрос в Excel, а затем выполнить его.
Создание макросов
В Эксель создать макросы можно вручную или автоматически. Последний вариант предполагает запись действий, которые мы выполняем в программе, для их дальнейшего повтора. Это достаточно простой способ, пользователь не должен обладать какими-то навыками кодирования и т.д. Однако, в связи с этим, применить его можно не всегда.
Чтобы создавать макросы вручную, нужно уметь программировать. Но именно такой способ иногда является единственным или одним из немногих вариантов эффективного решения поставленной задачи.
Отображение вкладки “Разработчик” в ленте меню
Перед тем как записывать макрос, нужно добавить на ленту меню Excel вкладку “Разработчик”. Для этого выполните следующие шаги:
- Щелкните правой кнопкой мыши по любой из существующих вкладок на ленте и нажмите «Настроить ленту». Он откроет диалоговое окно «Параметры Excel».
- В диалоговом окне «Параметры Excel» у вас будут параметры «Настроить ленту». Справа на панели «Основные вкладки» установите флажок «Разработчик».
- Нажмите «ОК».


В результате на ленте меню появится вкладка “Разработчик”

Как запустить макрос из редактора Visual Basic?
Для того чтобы запустить макрос, необходимо открыть приложение, для которого он написан. Из открытого приложения перейти в редактор VisualBasic сочетанием клавиш Alt+F11 (Alt с левой стороны клавиатуры). В обозревателе проектов (окно ProjectExplorer по умолчанию находится в левом верхнем углу редактора) найти проект, а в проекте модуль, в котором записан макрос. Двойной клик левой кнопкой мыши по выбранному модулю отображает все макросы (процедуры, функции), которые в нем хранятся. Остается отыскать макрос с нужным именем, установить курсор в любое место между ключевыми словами Sub и End Sub, после чего нажать кнопку Run Sub в меню редактора либо кнопку F5 на клавиатуре.
Абсолютная и относительная запись макроса
Вы уже знаете про абсолютные и относительные ссылки в Excel? Если вы используете абсолютную ссылку для записи макроса, код VBA всегда будет ссылаться на те же ячейки, которые вы использовали. Например, если вы выберете ячейку A2 и введете текст “Excel”, то каждый раз – независимо от того, где вы находитесь на листе и независимо от того, какая ячейка выбрана, ваш код будет вводить текст “Excel” в ячейку A2.
Если вы используете параметр относительной ссылки для записи макроса, VBA не будет привязываться к конкретному адресу ячейки. В этом случае программа будет “двигаться” относительно активной ячейки. Например, предположим, что вы уже выбрали ячейку A1, и вы начинаете запись макроса в режиме относительной ссылки. Теперь вы выбираете ячейку A2, вводите текст Excel и нажмите клавишу Enter. Теперь, если вы запустите этот макрос, он не вернется в ячейку A2, вместо этого он будет перемещаться относительно активной ячейки. Например, если выбрана ячейка B3, она переместится на B4, запишет текст “Excel” и затем перейдет к ячейке K5.
Теперь давайте запишем макрос в режиме относительных ссылок:
- Выберите ячейку A1.
- Перейдите на вкладку “Разработчик”.
- В группе “Код” нажмите кнопку “Относительные ссылки”. Он будет подсвечиваться, указывая, что он включен.
- Нажмите кнопку “Запись макроса”.
- В диалоговом окне “Запись макроса” введите имя для своего макроса. Например, имя “ОтносительныеСсылки”.
- В опции “Сохранить в” выберите “Эта книга”.
- Нажмите “ОК”.
- Выберите ячейку A2.
- Введите текст “Excel” (или другой как вам нравится).
- Нажмите клавишу Enter. Курсор переместиться в ячейку A3.
- Нажмите кнопку “Остановить запись” на вкладке “Разработчик”.


Макрос в режиме относительных ссылок будет сохранен.
Теперь сделайте следующее.
- Выберите любую ячейку (кроме A1).
- Перейдите на вкладку “Разработчик”.
- В группе “Код” нажмите кнопку “Макросы”.
- В диалоговом окне “Макрос” кликните на сохраненный макрос “ОтносительныеСсылки”.
- Нажмите кнопку “Выполнить”.
Как вы заметите, макрос записал текст “Excel” не в ячейки A2. Это произошло, потому что вы записали макрос в режиме относительной ссылки. Таким образом, курсор перемещается относительно активной ячейки. Например, если вы сделаете это, когда выбрана ячейка B3, она войдет в текст Excel – ячейка B4 и в конечном итоге выберет ячейку B5.
Вот код, который записал макрорекодер:

Sub ОтносительныеСсылки() ' ' ОтносительныеСсылки Макрос ' ' ActiveCell.Offset(1, 0).Range("A1").Select ActiveCell.FormulaR1C1 = "Excel" ActiveCell.Offset(1, 0).Range("A1").Select End Sub
Обратите внимание, что в коде нет ссылок на ячейки B3 или B4. Макрос использует Activecell для ссылки на текущую ячейку и смещение относительно этой ячейки.
Не обращайте внимание на часть кода Range(«A1»). Это один из тех случаев, когда макрорекодер добавляет ненужный код, который не имеет никакой цели и может быть удален. Без него код будет работать отлично.
Метод 1: Записываем макрос в автоматическом режиме
Чтобы иметь возможность записать макросы автоматически, для начала нужно их активировать в параметрах Эксель.
Узнать, как это можно сделать, можно в нашей статье – “Как включать и отключать макросы в Excel”.
После того, как макросы включены, можно перейти к нашей основной задаче.
- Переключаемся во вкладку “Разработчик”. В группе инструментов “Код” щелкаем по значку “Записать макрос”.

- На экране появится окошко, в котором мы можем выполнить настройки записи. Здесь указывается:
- имя макроса – любое, но должно начинаться с буквы (не с цифры), не допускаются пробелы.
- комбинация клавиш, которая будет использоваться для запуска макроса. Обязательной является Ctrl, а вторую мы можем назначить в специальном поле. Допустим, пусть это будет клавиша “r”. Если нужно использовать заглавную букву, нужно зажать клавишу Shift, которая будет добавлена в сочетание клавиш.
- место хранения макроса. Стандартно – это будет текущая книга, но, если требуется, можно выбрать новую книгу или личную книгу макросов. В нашем случае оставляем стандартный вариант.
- При желании можно добавить описание к макросу.
- По готовности кликаем OK.

- Теперь в созданный макрос будут записываться все действия, которые мы будем выполнить в книге. И так до тех пор, пока мы не остановим запись.
- Допустим, давайте давайте в ячейке D2 выполним умножение двух ячеек (B2 и B3):
=B2*B3. - После того, как выражение готово, нажимаем клавишу Enter, чтобы получить результат. Затем останавливаем запись макроса, нажав на значок “Стоп” (появилась вместо кнопки “Записать макрос”) в группе инструментов “Код”.


Пример записи простого макроса
Выполните следующие действия:
Excel 2007-2016
- Откройте книгу Excel или создайте новую и сохраните ее как книгу с поддержкой макросов (.xlsm).
- На вкладке «Разработчик» нажмите кнопку «Запись макроса».
- В окне «Запись макроса» нажмите кнопку «OK», оставив параметры по умолчанию.
- Перейдите на вкладку «Главная» и выберите любой цвет заливки ячеек.
- Нажмите кнопку «Остановить запись».
Excel 2000-2003
- Откройте книгу Excel или создайте новую и сохраните ее с расширением по умолчанию (.xls).
- Включите запись макроса, пройдя по пунктам меню «Сервис» — «Макрос» — «Начать запись».
- В окне «Запись макроса» нажмите кнопку «OK», оставив параметры по умолчанию.
- На панели инструментов выберите любой цвет заливки ячеек.
- Нажмите кнопку «Остановить запись».
В результате будет записан простейший макрос окрашивания фона выделенной ячейки или диапазона.
Откройте список макросов, выберите записанный макрос и нажмите кнопку «Изменить». Вы увидите код вашего макроса:
|
1 2 3 4 5 6 7 8 9 10 11 12 13 14 |
Sub Макрос1() ‘ ‘ Макрос1 Макрос ‘ ‘ With Selection.Interior .Pattern = xlSolid .PatternColorIndex = xlAutomatic .Color = 5296274 .TintAndShade = 0 .PatternTintAndShade = 0 End With End Sub |
Выберите на активном листе любую ячейку или диапазон, вернитесь в редактор VBA и нажмите клавишу «F5» (курсор должен находиться в любом месте внутри кода запускаемого макроса). На активном листе выделенный диапазон окрасится в выбранный при записи макроса цвет.
Рекордер макросов может записывать много лишних строк, без которых можно обойтись. Точно также макрос будет работать и в такой редакции:
|
Sub Макрос2() Selection.Interior.Color = 5296274 End Sub |
Скопируйте этот код и вставьте его внизу, под вашим макросом, в редакторе VBA (числовое значение цвета можете изменить на свое или оставить, как в примере). Проверьте его работоспособность, выбрав незакрашенные ячейки и запустив макрос клавишей «F5», не забыв о том, что курсор должен находиться внутри этого макроса.
Имена макросов должны различаться в пределах одного модуля, но еще лучше – всем макросам одной книги давать уникальные имена.
Разрешение выполнения макросов Excel 97-2003
В меню «Сервис» выберите «Макрос», в открывшемся вложенном меню нажмите «Безопасность…». В открывшемся окне установите средний или низкий уровень безопасности.
При выборе среднего уровня – решение о запуске макросов придется каждый раз принимать пользователю, при выборе низкого уровня – Excel будет автоматически запускать все макросы.
После установки уровня безопасности полностью закройте Excel и запустите снова, чтобы изменения вступили в силу.
Работа с макросами
Если вы не уверены в источнике, с которого скачали файл, то лучше не использовать макросы, так как они могут заразить ПК вирусным ПО. Именно по этой причине разработчики утилиты предусмотрели возможность включения и отключения макросов. Ниже будет подробно рассматриваться работа с этими программными алгоритмами.
Включение/выключение макросов с помощью меню разработчика
В этой статье преимущественно будет рассматриваться работа с автоматическими алгоритмами в Excel 2010, так как на сегодня именно эта версия является самой популярной у пользователей.
Проще всего работать с макросами с помощью меню разработчика, но эта опция обычно отключена в программе по умолчанию. Для того чтобы ее активировать, выполните такие действия:
- Зайдите в блок «Файл» и откройте раздел «Параметры».
- В боковом меню нажмите на строку «Настройки ленты», после чего в правой области окна поставьте флажок напротив пункта «Разработчик».
- Для сохранения внесенных изменений кликните «ОК».
- В верхнем меню у вас должен будет появиться новый блок «Разработчик». Перейдите в него и кликните по иконке с изображением восклицательного знака в желтом треугольнике.
- Перед вами отобразится центр управления безопасностью. Перейдите в раздел «Параметры макросов» и поставьте флажок напротив пункта «Включить все макросы…». Обратите внимание, вы активируете опцию на свой страх и риск.
- Кликните «ОК», для того чтобы сохранить настройки.


Отключение программных алгоритмов осуществляется в той же вкладке. На выбор пользователя предлагается 3 варианта. Вы можете отключить все макросы без уведомления и с соответствующим оповещением или разрешить утилите работать с файлами, которые имеют цифровую подпись. Для внесения изменений необходимо нажать «ОК».
Как запустить макрос из панели быстрого доступа?
В версиях Microsoft Office 2007 и выше есть так называемая панель быстрого доступа, которая может располагаться как над, так и под лентой. В настройках панели быстрого доступа есть пункт меню «Другие команды». Если в поле «Выбрать команды из:» из выпадающего списка выбрать пункт «Макросы», навести курсор на имя какого-либо макроса и нажать кнопку «Добавить», в панели быстрого доступа появится иконка, нажатие на которую будет запускать макрос. В окне настроек панели быстрого доступа можно изменить отображаемое имя макроса, которое всплывает при наведении курсора мыши на иконку, а также можно изменить изображение на кнопке, выбрав одну из предложенных картинок. И в Word и в Excel эта возможность реализована одинаково.
Активация и выключение макросов во вкладке Разработчика
Сразу стоит отметить, что в процессе выполнения этой задачи некоторые пользователи могут столкнуться с трудностями. Все из-за того, что вкладка “Разработчик” по умолчанию выключена и ее, для начала, нужно активировать.
- Щелкаем левой кнопкой мыши по меню «Файл».

- Затем, внизу раскрывшегося списка выбираем пункт «Параметры».

- В параметрах программы нас интересует пункт «Настройка ленты». Далее ставим галочку напротив вкладки “Разработчик”. Теперь подтверждаем действие нажатием кнопки «OK».


По завершении этих действий вкладка «Разработчик» будет активирована. Теперь можно приступить к включением макросов.
- Щелкаем по вкладке “Разработчик”. В левом углу будет находиться требуемый раздел, где нажимаем кнопку «Безопасность макросов» в виде восклицательного знака.

- В появившемся окне с настройками можно активировать сразу все макросы. Для этого необходимо выбрать из всех предложенных параметров вариант “Включить все макросы”. Нажатием кнопки “OK” подтверждаем внесенные изменения и выходим из параметров.
 Однако, следует обратить внимание на то, что разработчики Microsoft не рекомендуют выбирать этот вариант, так как есть вероятность запуска опасной программы, что может навредить компьютеру. Поэтому, выполняя эту операцию, помните, что вы действуете на свой страх и риск.


Деактивация макросов происходит в том же диалоговом окне. Однако, при выключении пользователю будет предложено сразу три варианта с разной степенью безопасности.

Как следует из названия, в самом нижнем варианте исправно будут работать все макросы, имеющие цифровую подпись. А в двух первых вариантах они будут отключены полностью. После того, как мы сделали выбор, нажимаем кнопку «OK».
Включение и отключение макросов через меню разработчика
Основное внимание мы уделим процедуре включения и отключения макросов в самой популярной и распространённой на сегодня версии программы — Excel 2010. Потом, более бегло поговорим о том, как это сделать в других версиях приложения.
Включить или отключить макросы в Microsoft Excel можно через меню разработчика. Но, проблема состоит в том, что по умолчанию данное меню отключено. Чтобы его включить, переходим во вкладку «Файл». Далее, кликаем по пункту «Параметры».

В открывшемся окне параметров, переходим в раздел «Настройка ленты». В правой части окна данного раздела устанавливаем галочку около пункта «Разработчик». Жмем на кнопку «OK».

После этого, на ленте появляется вкладка «Разработчик».
Переходим во вкладку «Разработчик». В самой правой части ленты расположен блок настроек «Макросы». Чтобы включить или отключить макросы, кликаем по кнопке «Безопасность макросов».

Открывается окно центра управления безопасностью в разделе «Макросы». Для того, чтобы включить макросы, переставляем переключатель в позицию «Включить все макросы». Правда, данное действие разработчик не рекомендует выполнять в целях безопасности. Так что, всё выполняется на свой страх и риск. Жмем на кнопку «OK», которая расположена в нижнем правом углу окна.

Отключаются макросы тоже в этом же окне. Но, существует три варианта отключения, один из которых пользователь должен выбрать в соответствии с ожидаемым уровнем риска:
- Отключить все макросы без уведомления;
- Отключить все макросы с уведомлением;
- Отключить все макросы, кроме макросов с цифровой подписью.
В последнем случае, макросы, у которых будет иметься цифровая подпись, смогут выполнять задачи. Не забываем жать на кнопку «OK».

Как включить макросы в Эксель
- Для активации необходимо запустить программу, в верхней левой части нажать на «Файл».

- Откроется окно, остановитесь на «Параметры».

- В левой части запустившегося меню, отыщите «Безопасность».

- Справа кликните по «Параметры центра управления».

- Страница перегрузится, и справа, в верхнем столбце, нужно установить галочку рядом с «Включить все».

- Обязательно подтвердите действия, выбрав в нижней части окна «Ок».

Прежде чем приступить к активации, следует запомнить, что:
- Макрорекордер запишет все действия пользователя, в том числе и ошибки.
- Записываться будут только те действия, которые выполняются в Microsoft Excel. При переключении на другую программу запись остановится.
- Макрорекордер способен записать действия, выполняемые серфером вручную.
Чтобы Макрос работал корректно, не допуская оплошностей, обязательно продумайте действия перед началом записи.
Включение и отключение макросов в других версиях Excel
В других версиях программы Excel процедура отключения макросов несколько отличается от указанного выше алгоритма.
В более новой, но менее распространенной версии программы Excel 2013, несмотря на некоторую разницу в интерфейсе приложения, процедура включения и отключения макросов происходит по тому же алгоритму, который был описан выше, а вот у более ранних версий он несколько отличается.
Для того, чтобы включить или отключить макросы в программе Excel 2007, нужно сразу кликнуть по логотипу Microsoft Office в верхнем левом углу окна, а затем в нижней части открывшейся страницы нажать на кнопку «Параметры». Далее, открывается окно Центра управления безопасностью, и дальнейшие действия по включению и отключению макросов практически ничем не отличаются от описанных для Excel 2010.
В версии Excel 2007 достаточно просто последовательно перейти по пунктам меню «Сервис», «Макрос» и «Безопасность». После этого, откроется окно, в котором нужно выбрать один из уровней безопасность работы макросов: «Очень высокая», «Высокая», «Средняя» и «Низкая». Эти параметры соответствуют пунктам параметров макросов более поздних версий.
Как видим, включить макросы в последних версиях программы Excel несколько сложнее, чем это было в предыдущих версиях приложения. Это связано с политикой разработчика на увеличение уровня безопасности пользователя. Таким образом, макросы может включить только более или менее «продвинутый» пользователь, который способен объективно оценить риски от выполняемых действий.
Как запустить макрос из приложения?
Чтобы запустить макрос из приложения, для которого он написан, прежде всего, необходимо открыть приложение, затем нажать сочетание клавиш Alt+F8 на клавиатуре, в диалоговом окне «Макрос» отыскать нужный макрос по имени, навести на него курсор и нажать кнопку «Выполнить», либо дважды кликнуть по имени левой кнопкой мыши.
Описание параметров макросов
- Отключить все макросы без уведомления. Этот параметр отключает макросы и связанные с ними оповещения безопасности.
- Отключить все макросы с уведомлением. Этот параметр отключает макросы без отключения оповещений системы безопасности, которые будут появляться при их наличии. Это позволяет включать макросы, когда это требуется.
- Отключить все макросы кроме макросов с цифровой подписью. Этот параметр отключает макросы без отключения оповещений системы безопасности, которые будут появляться при их наличии. Однако при наличии у макроса цифровой подписи надежного издателя он запускается, если этому издателю выражено доверие. В противном случае выводится уведомление о необходимости включить макрос, содержащий цифровую подпись, и выразить доверие издателю.
- Включить все макросы (не рекомендуется, возможен запуск опасной программы). Если задан этот параметр, выполняются все макросы. Компьютер становится уязвимым для потенциально опасных программ.
Чтобы избежать заражения компьютера, проверяйте файлы, скачанные из неизвестных источников, антивирусной программой. Архивные файлы перед проверкой антивирусом лучше не распаковывать, чтобы случайно не запустить самораспаковывающийся архив до проверки.
Включение и отключение макросов через параметры программы
Существует ещё один способ включения и отключения макросов. Прежде всего, переходим в раздел «Файл», и там жмем на кнопку «Параметры», как и в случае включения меню разработчика, о чем мы говорили выше. Но, в открывшемся окне параметров, переходим не в пункт «Настройка ленты», а в пункт «Центр управления безопасностью». Кликаем по кнопке «Параметры центра управления безопасностью».

Открывается то же самое окно Центра управления безопасностью, в которое мы переходили через меню разработчика. Переходим в раздел «Параметры макросов», и там включаем или отключаем макросы тем же способом, как делали это в прошлый раз.

Что нельзя сделать с помощью макрорекодера?
Макро-рекордер отлично подходит для вас в Excel и записывает ваши точные шаги, но может вам не подойти, когда вам нужно сделать что-то большее.
- Вы не можете выполнить код без выбора объекта. Например, если вы хотите, чтобы макрос перешел на следующий рабочий лист и выделил все заполненные ячейки в столбце A, не выходя из текущей рабочей таблицы, макрорекодер не сможет этого сделать. В таких случаях вам нужно вручную редактировать код.
- Вы не можете создать пользовательскую функцию с помощью макрорекордера. С помощью VBA вы можете создавать пользовательские функции, которые можно использовать на рабочем листе в качестве обычных функций.
- Вы не можете создавать циклы с помощью макрорекордера. Но можете записать одно действие, а цикл добавить вручную в редакторе кода.
- Вы не можете анализировать условия: вы можете проверить условия в коде с помощью макрорекордера. Если вы пишете код VBA вручную, вы можете использовать операторы IF Then Else для анализа условия и запуска кода, если true (или другой код, если false).
Как включить или отключить макросы в Excel 2010
Запуск макросов в Excel 2010 аналогичен Excel 2007 в связи с этим мы рассмотрим другой способ открыть окно Параметры макросов для возможности включать или отключать макросы.
Для этого необходимо перейти в раздел Разработчик | Безопасность макросов | Параметры макросов | Включить все макросы (не рекомендуется, возможен запуск опасной программы)

Стоит отметить, что раздел панели инструментов Разработчик в Excel 2007 доступен по умолчанию, а в Excel 2010 его необходимо включить. Это особенно полезно сделать тем пользователям, которые будут часто работать с макросами. Чтобы включить панель инструментов Разработчик в Excel 2010 необходимо запустить Файл | Параметры | Настройка ленты после этого необходимо с правой стороны необходимо поставить галочку напротив надписи Разработчик

Очень надеемся, что наша статья помогла вам в решении вашей проблемы. Будем благодарны, если вы нажмете +1 и/или Мне нравится внизу данной статьи или поделитесь с друзьями с помощью кнопок расположенных ниже.
Расширение файлов Excel, которые содержат макросы
Когда вы записываете макрос или вручную записываете код VBA в Excel, вам необходимо сохранить файл с расширением файла с поддержкой макросов (.xlsm).
До Excel 2007 был достаточен один формат файла – .xls. Но с 2007 года .xlsx был представлен как стандартное расширение файла. Файлы, сохраненные как .xlsx, не могут содержать в себе макрос. Поэтому, если у вас есть файл с расширением .xlsx, и вы записываете / записываете макрос и сохраняете его, он будет предупреждать вас о сохранении его в формате с поддержкой макросов и покажет вам следующее диалоговое окно:

Если вы выберете “Нет”, Excel сохранить файл в формате с поддержкой макросов. Но если вы нажмете “Да”, Excel автоматически удалит весь код из вашей книги и сохранит файл как книгу в формате .xlsx. Поэтому, если в вашей книге есть макрос, вам нужно сохранить его в формате .xlsm, чтобы сохранить этот макрос.
Как включить или отключить макросы в Excel 2007
В Excel 2007 включить или отключить макросы можно таким же способом, но данное меню находится в другом месте. В Excel 2007 это можно сделать в окне Параметры макросов. Чтобы попасть в данное меню вам необходимо перейти в Меню | Параметры Excel

В открывшемся окне необходимо запустить Центр управления безопасностью | Параметры центра управления безопасностью | Параметры макросов

В окне параметров макроса выберете пункт Включить все макросы (не рекомендуется, возможен запуск опасной программы).
После этого вам также необходимо закрыть и открыть файл Excel, чтобы изменения вступили в силу. В дальнейшем макросы будут запускаться в Excel 2007 автоматически.
Как вставить макрос в Excel
Важно понимать, что макрос можно вставить в модуль, рабочий лист, рабочую книгу, или они могут являться частью пользовательской формы.
Вставим код макроса в модуль
Например, нужно объединить несколько ячеек в одну без потери данных. Как известно, Excel может объединять ячейки, сохраняя данные только из левой верхней ячейки. Чтобы сохранить все данные из объединяемых ячеек, будем использовать VBA-код.
Открываем редактор VBА: переходим на вкладку «Разработчик» и кликаем по кнопочке «Visual Basic», также можно воспользоваться комбинацией «Alt+F11».

С левой стороны редактора, в окне «Project», выделяем мышкой рабочую книгу. Рабочая книга – это Ваш открытый документ Excel, в который нужно вставить макрос. У меня он называется «Книга1».
Кликаем по выбранному пункту правой кнопкой мыши и выбираем из меню «Insert» – «Module».

В окне «Project» появилась новая папка «Modules», а в ней наш первый модуль с названием «Module1».
Справа появится поле для ввода VBA-кода. С помощью комбинации «Ctrl+V», вставляю в него код, который будет объединять несколько ячеек, без потери данных. Название макроса «MergeCell».
Следите за тем, куда Вы вставляете код, это будет написано или в заголовке редактора, или в заголовке окна для вставки кода. Мы вставляем код в модуль, соответственно надпись – «Modul1(Code)».

Сохраняем изменения, нажав комбинацию «Ctrl+S». Если Вы используете Excel 2007 и выше, появится окно сохранения документа. В нем, в поле «Тип файла», выберите из выпадающего списка «Книга Excel с поддержкой макросов» и нажмите «Сохранить».

Вставим код макроса в рабочий лист
Например, у нас есть выпадающий список. Нужно сделать так, чтобы при выборе нескольких значений из него, они появлялись в ячейках справа.
Открываем редактор VBA и в окошке «Project» выделяем нужный лист, если их в рабочей книге несколько, на котором должен работать макрос: «Лист1 (Лист1)». Кликаем по нему два раза мышкой.
Справа появиться окошко для ввода кода. Обратите внимание, мы вставляем код в рабочий лист, соответственно в заголовке написано «Лист1(Code)». Сохраните изменения в документе, как было описано выше.

Чтобы вставить код макроса в рабочую книгу, кликните два раза мышкой по пункту «ЭтаКнига» и вставьте код в появившуюся область.

Создадим пользовательскую функцию
Например, создадим функцию, которая будет рассчитывать НДС. В окне «Project» кликаем по рабочему листу правой кнопкой мыши и выбираем «Insert» – «Module».

В папке «Modules», появляется второй модуль с названием «Module2». Прописываем VBA-код в соответствующее окно, и сохраняем его, нажав «Ctrl+S». Называться функция будет «NDS».
Корректируем макрос
Созданный макрос можно изменить. Самая распространенная причина, которая приводит к такой необходимости – сделанные при записи ошибки. Вот как можно отредактировать макрос:
- Нажимаем кнопку “Макросы” (или комбинацию Ctrl+F8).
- В появившемся окошке выбираем наш макрос и щелкаем “Изменить”.

- На экране отобразится окно редактора “Microsoft Visual Basic”, в котором мы можем внести правки. Структура каждого макроса следующая:
- открывается с команды “Sub”, закрывается – “End Sub”;
- после “Sub” отображается имя макроса;
- далее указано описание (если оно есть) и назначенная комбинация клавиш;
- команда “Range(“…”).Select” возвращает номер ячейки. К примеру, “Range(“B2″).Select” отбирает ячейку B2.
- В строке “ActiveCell.FormulaR1C1” указывается значение ячейки или действие в формуле.

- Давайте попробуем скорректировать макрос, а именно, добавить в него ячейку B4 со значением 3. В код макроса нужно добавить следующие строки:
Range("B4").Select
ActiveCell.FormulaR1C1 = "3" - Для результирующей ячейки D2, соответственно, тоже нужно изменить начальное выражение на следующее:
ActiveCell.FormulaR1C1 = "=RC[-2]*R[1]C[-2]*R[2]C[-2]".Примечание: Обратите внимание, что адреса ячеек в данной строке (ActiveCell.FormulaR1C1) пишутся в стиле R1C1. - Когда все готово, редактор можно закрывать (просто щелкаем на крестик в правом верхнем углу окна).
- Запускаем выполнение измененного макроса, после чего можем заметить, что в таблице появилась новая заполненная ячейка (B4 со значением “3”), а также, пересчитан результат с учетом измененной формулы.
- Если мы имеем дело с большим макросом, на выполнение которого может потребоваться немало времени, ручное редактирование изменений поможет быстрее справиться с задачей.
- Добавив в конце команду
Application.ScreenUpdating = Falseмы можем ускорить работу, так как во время выполнения макроса, изменения на экране отображаться не будут. - Если потребуется снова вернуть отображение на экране, пишем команду:
Application.ScreenUpdating = True.
- Добавив в конце команду
- Чтобы не нагружать программу пересчетом после каждого внесенного изменения, в самом начале пишем команду
Application.Calculation = xlCalculationManual, а в конце –Application.Calculation = xlCalculationAutomatic. Теперь вычисление будет выполняться только один раз.


Назначение макроса кнопке
Теперь давайте назначим записанный макрос (любой из двух) кнопке, добавленной на лист Excel из раздела «Элементы управления формы»:
Excel 2007-2016
- На вкладке «Разработчик» нажмите кнопку «Вставить» и в разделе «Элементы управления формы» кликните по изображению кнопки.
- Переведите курсор на табличную область листа, курсор примет вид крестика, и кликните левой кнопкой мыши.
- В открывшемся окне «Назначить макрос объекту» выберите один из новых макросов и нажмите кнопку «OK». Если нажать кнопку «Отмена», новая кнопка будет создана без назначенного макроса. Его можно будет назначить позднее, кликнув по ней правой кнопкой мыши и выбрав в контекстном меню «Назначить макрос…»
Excel 2000-2003
-
- Отобразите панель инструментов «Формы», пройдя по пунктам меню «Вид» — «Панели инструментов» — «Формы».
- Кликните по Кнопке на панели инструментов «Формы», затем переведите курсор на табличную часть рабочего листа, нажмите левую кнопку мыши и, не отпуская ее, нарисуйте прямоугольник (контур кнопки) нужного размера, затем отпустите кнопку мыши.
- В открывшемся окне «Назначить макрос объекту» выберите один из новых макросов и нажмите кнопку «OK». Если нажать кнопку «Отмена», новая кнопка будет создана без назначенного макроса. Его можно будет назначить позднее, кликнув по ней правой кнопкой мыши и выбрав в контекстном меню «Назначить макрос…»
Кнопка создана. Выберите ячейку или диапазон и нажмите созданную кнопку. Цвет фона изменится.
Вы можете записать еще один такой же макрос, только выбрать на палитре «Нет заливки», создать еще одну кнопку и назначить ей вновь созданный макрос. Теперь, первая кнопка будет окрашивать выделенный диапазон, а вторая очищать его от заливки.
Сокращенный вариант кода по очистке фона будет выглядеть так:
|
Sub Макрос3() Selection.Interior.Pattern = xlNone End Sub |
Чтобы отредактировать кнопку – изменить надпись, шрифт, размер, переместить и т.д. – используйте контекстное меню и маркеры, появляющиеся после клика по ней правой кнопкой мыши. Если вы хотите, чтобы кнопка не уезжала из зоны видимости при прокрутке листа, закрепите верхнюю строку и разместите кнопку на ней.
Заключение
Благодаря отключению макросов разработчики пытаются обезопасить пользователей от возможных рисков. Однако, в некоторых случаях, их все же, требуется включить. В зависимости от версии программы, и даже в одной и той же версии это может выполняться по-разному. Но независимого от выбранного способа, процедура достаточно проста и не требует глубоких знаний и навыков работы с ПК.
Источники
- https://vremya-ne-zhdet.ru/vba-excel/makrosy/
- https://office-guru.ru/excel/kak-v-excel-2010-ili-2013-vstavit-i-zapustit-kod-vba-rukovodstvo-dlja-nachinayuschih-439.html
- http://comp-profi.com/rabota-s-makrosami-v-excel/
- https://MicroExcel.ru/sozdanie-makrosov/
- https://micro-solution.ru/excel/vba/first-macros
- http://macros-vba.ru/knigi/vba/281-kak-zapustit-makros
- https://vremya-ne-zhdet.ru/ofisnaya-rabota/vypolneniye-makrosov-excel/
- https://public-pc.com/kak-vklyuchit-ili-otklyuchit-makrosy-v-excel/
- https://MicroExcel.ru/vklyuchenie-i-otklyuchenie-makrosov/
- https://lumpics.ru/how-to-enable-or-disable-macros-in-excel/
- https://luchiy-brayzer.ru/programmy-na-pk/instruktsiya-kak-vklyuchit-makrosy-v-eksel-i-ego-opredelenie/
- https://sirexcel.ru/makrosi_vba/kak-vklyuchit-ili-otklyuchit-makrosy-v-excel-2003-2007-i-2010/