
Если есть необходимость обратиться к данным, хранящимся в текстовом файле приложения Word, или наоборот, передать данные из Excel в такой файл, то возникнет необходимость запуска приложения, в формате которого сохранен файл. Ниже приведен программный код макроса VBA для Microsoft Excel, запускающий приложение Word.
Если для передачи данных из Excel в Word необходим новый документ, можно воспользоваться примером кода, приведенного ниже. Макрос проверяет запущен ли Word и если он запущен, то добавляет новый документ, если же не запущен, то сначала запускает Word, а затем добавляет новый документ.
Sub Zapusk_Word_iz_Excel_01()
    Dim objWrdApp As Object
    Dim objWrdDoc As Object
    On Error Resume Next
    Set objWrdApp = GetObject(, "Word.Application")
        If objWrdApp Is Nothing Then
            Set objWrdApp = CreateObject("Word.Application")
            Set objWrdDoc = objWrdApp.Documents.Add
            objWrdApp.Visible = True
        End If
    Set objWrdDoc = objWrdApp.Documents.Add
    Set objWrdDoc = Nothing
    Set objWrdApp = Nothing
End Sub
Для того, чтобы перенести этот программный код на свой компьютер, наведите курсор мыши на поле с программным кодом, нажмите на одну из двух кнопкок ![]() в правом верхнем углу этого поля, скопируйте программный код и вставьте его в модуль проекта на своем компьютере (подробнее о том, как сохранить программный код макроса).
в правом верхнем углу этого поля, скопируйте программный код и вставьте его в модуль проекта на своем компьютере (подробнее о том, как сохранить программный код макроса).
Макрос, запускающий Word из Excel и открывающий существующий документ
Если для передачи данных из Word в Excel, необходимо открыть файл с заданным именем, то можно использовать аналогичный код, в котором вместо добавления нового документа открывается документ существующий:
Sub Zapusk_Word_iz_Excel_02()
    Dim objWrdApp As Object
    Dim objWrdDoc As Object
    On Error Resume Next
    Set objWrdApp = GetObject(, "Word.Application")
        If objWrdApp Is Nothing Then
            Set objWrdApp = CreateObject("Word.Application")
            Set objWrdDoc = objWrdApp.Documents.Open("C:Doc1.doc")
            objWrdApp.Visible = True
        End If
    Set objWrdDoc = objWrdApp.Documents.Open("C:Doc1.doc")
    Set objWrdDoc = Nothing
    Set objWrdApp = Nothing
End Sub
При копировании этого кода на свой компьютер, не забудьте изменить путь к файлу и его имя. Запуск приложения можно сделать невидимым, если в коде изменить True на False.
Макрос для передачи данных из Excel в Word
Ниже приведен программный код макроса, копирующий в активной рабочей книге Excel диапазон с данными A1:E2 и вставляющий его в открытый документ Word. После передачи данных из Excel в Word производится закрытие документа с сохранением изменений и выход из приложения.
Sub Peredacha_Dannyh_iz_Excel_v_Word()
    Dim objWrdApp As Object
    Dim objWrdDoc As Object
    On Error Resume Next
    Set objWrdApp = GetObject(, "Word.Application")
        If objWrdApp Is Nothing Then
            Set objWrdApp = CreateObject("Word.Application")
            Set objWrdDoc = objWrdApp.Documents.Open("C:Doc1.doc")
            objWrdApp.Visible = False
        End If
    Set objWrdDoc = objWrdApp.Documents.Open("C:Doc1.doc")
    Range("A1:E2").Copy
    objWrdDoc.Range(0).Paste
    objWrdDoc.Close True
    'True - с сохранением, False - без сохранения
    objWrdApp.Quit
    Set objWrdDoc = Nothing
    Set objWrdApp = Nothing
End Sub
Другие материалы по теме:
This post is the second in a series about controlling other applications from Excel using VBA. In the first part we looked at the basics of how to reference other applications using Early Binding or Late Binding. In this post, we will look at how we can automate Word from Excel even though we don’t know any VBA code for Word… yet. The process we will use for this is as follows:
- Enable the Word Developer menu
- Record a Word macro
- Add the code to Excel VBA and amend
- Record macros in Excel if necessary
- Repeat the previous steps until macro complete
I am not an Excel VBA expert (I’m more of an Excel VBA tinkerer), and I am certainly not a Word VBA expert. The process I am about to show you may not create the most efficient code, but I know this process works, because I have used it myself to automate lots tasks using Microsoft Word.
Enable the Word Developer menu
If you have enabled the Excel Developer menu it is the same process in Word.
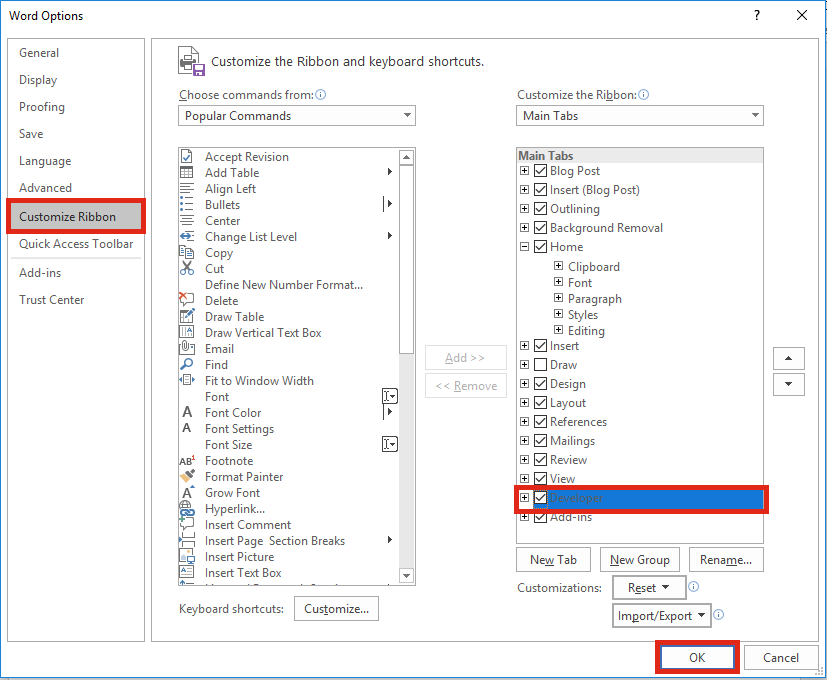
In Word: File -> Options -> Customize Ribbon
Then tick the Developer Ribbon option, OK.
Record a Word Macro
The key to the success of this method is taking small sections of code and building up a complex macro bit by bit. Using the Word Macro Recorder is again, similar to the Excel Macro recorder.
Click on: Developer -> Record Macro

For the example in this post, we will create a macro which will open a new Word document, then copy a chart from Excel and paste it into that Word document. We will tackle this one stage at a time. Firstly, lets create the macro to open a new word document.
Click – Developer -> Record Macro. The Record Macro window will open.
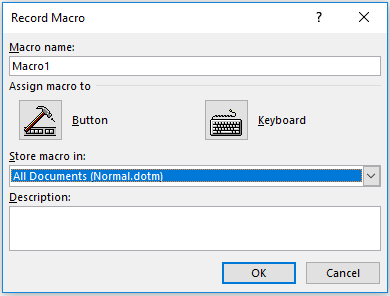
Make a note of the “Store macro in” option, as we will need to know where to find the recorded code later. Normal.dotm is fine for now. Click OK – the Macro Recorder is now running.
Open a new Word Document – File -> New -> Blank Document
Stop the Macro from recording – Developer -> Stop Recording

We can now view the code for opening a new Word Document in the Visual Basic Editor. Click: Developer -> Visual Basic.

Find the location of your recorded code in the Visual Basic Editor. In this example: Normal -> Modules -> NewMacros.
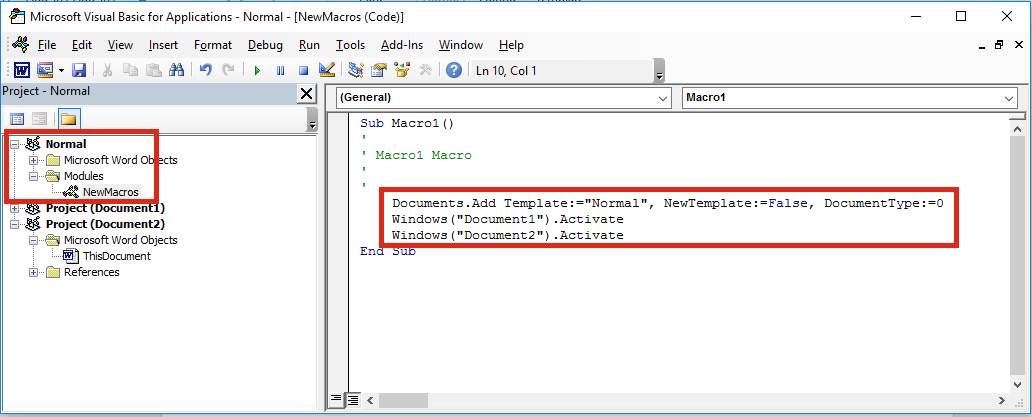
Your code should look like the following. It may be slightly different, but not significantly.
Sub Macro1()
'
' Macro1 Macro
'
'
    Documents.Add Template:="Normal", NewTemplate:=False, DocumentType:=0
    Windows("Document1").Activate
    Windows("Document2").Activate
End Sub
Add the code to Excel VBA and amend
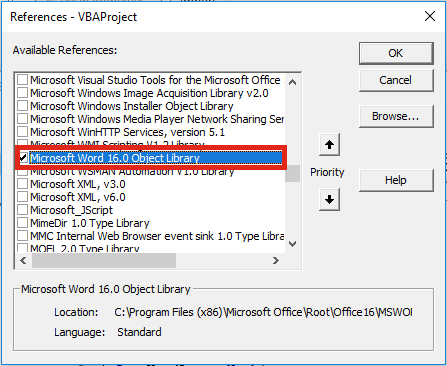
Let’s head back to the Excel VBA Editor and use the Early Binding method to control to Microsoft Word. In the Visual Basic Editor click Tools -> References select Microsoft Word x.xx Object Library. Then click OK.
As we are using Early Binding we need to declare the Application as a variable as follows:
Dim WordApp As Word.Application
Set WordApp = New Word.Application
Now copy and paste the code from the Word VBA Editor into the Excel VBA Editor.
The Word VBA code started with Documents.Add, all we have to do is add our application variable to the front of that line of code. Now becomes WordApp.Documents.Add . . .
Often, Selecting and Activating Objects is not required in VBA code, so I have not copied those statements into the code below.
Sub CreateWordDocument()

'Connect using Early Binding.
'Remember to set the reference to the Word Object Library
'In VBE Editor Tools -> References -> Microsoft Word x.xx Object Library
Dim WordApp As Word.Application
Set WordApp = New Word.Application

WordApp.Documents.Add Template:="Normal", NewTemplate:=False, DocumentType:=0
WordApp.Visible = True 'New Apps will be hidden by default, so make visible

Set WordApp = Nothing 'release the memory

End Sub
A point to note, when an application is opened with VBA, it is normally opened in the background. To make the Word document visible I have added the following code:
WordApp.Visible = True
Record macros in Excel (if necessary)
If we want to copy Excel content into a Word document, we will need to copy that content using Excel VBA. We can use the Macro Recorder in Excel to obtain the VBA code for copying, then we can use the Word Macro Recorder to obtain the VBA code for pasting.
Macro Recording from Excel – selecting a worksheet and copying chart
Sheets("Sheet1").Select
ActiveSheet.ChartObjects("Chart 1").Activate
ActiveChart.ChartArea.Copy
Macro Recording from Word – pasting a chart into a document
Selection.PasteSpecial Link:=False, DataType:=wdPasteEnhancedMetafile, _
        Placement:=wdInLine, DisplayAsIcon:=False
We can add both Macro recordings into our Excel macro. Remember to add WordApp. at the start of each statement of Word VBA code.
Sub CreateWordDocument()

'Connect using Early Binding.
'Remember to set the reference to the Word Object Library
'In VBE Editor Tools -> References -> Microsoft Word x.xx Object Library
Dim WordApp As Word.Application
Set WordApp = New Word.Application

WordApp.Documents.Add Template:="Normal", NewTemplate:=False, DocumentType:=0
WordApp.Visible = True 'New Apps will be hidden by default, so make visible

'code copied from Excel Macro recorder
Sheets("Sheet1").Select
Selection.ChartObjects("Chart 1").ChartArea.Copy

'code copied from Word Macro recorder with WordApp. added to the front.
WordApp.Selection.PasteSpecial Link:=False, DataType:=wdPasteEnhancedMetafile, _
        Placement:=wdInLine, DisplayAsIcon:=False

Set WordApp = Nothing 'release the memory

End Sub
This code is not particularly efficient; it contains a few unnecessary sections code. However… it works!
Repeat the previous steps until macro complete
By repeating the same steps above; recording short actions, then transferring the code into Excel, we can slowly build up much more complex Macros. The key is to keep the actions short, if you do too many actions with the Macro Recorder, code starts to look long and scary.
If you’ve you tried to use the Macro Recorder before you will know that this is not as easy as it seems. And this simple tutorial may make you think it is easy, when it’s not. Sometimes, it can be quite frustrating trying to find out where the issues and errors are. The key to success is recording very short actions, such as those below and copying them into the Visual Basic Editor.
'Pressing the Enter Key to move to a new line in Word
WordApp.Selection.TypeParagraph

'Turn on/off Bold Text
WordApp.Selection.Font.Bold = wdToggle

'Change Font Size
WordApp.Selection.Font.Size = 16

'Type some text
WordApp.Selection.TypeText Text:="Here is some text"
You will soon build up a standard library of code that you can use to control Word for most basic tasks.
In recorded VBA code from Word, the word “Selection” in the code often refers to the document itself. It is possible to make the code a little bit more efficient by declaring the document as a variable. If we were opening a specific document, we could include this at the start, just below the declaration of the application.
'Declare a specific document as a variable
Dim WordDocument As Object
Set WordDocument = WordApp.Documents.Open(sourceFileName)
Or, if we created a new document we could include the following below the declaration of the application variable.
'Delcare a new document as a variable
Dim WordDocument As Object
Set WordDocument = WordApp.Documents.Add Template:="Normal", _
NewTemplate:=False, DocumentType:=0
If we have created the document as a variable we can then reference the specific document. This code:
WordApp.Selection.TypeParagraph
Would become this code:
WordDocument.TypeParagraph
Or this code:
WordApp.Selection.TypeText Text:="Here is some text"
Would become this code:
WordDocument.TypeText Text:="Here is some text"
This method is much better, as it doesn’t rely on the Selection of the user being in the right place.
Conclusion
We have seen in this post that it is possible to create complex Macros to automate Word from Excel using VBA. By understanding how to declare variables for the application and documents we can create much more robust macros, even without knowing a lot of VBA code.
Related Posts:
- 5 quick ways to embed a Word document in Excel
- Controlling Powerpoint from Excel using VBA
- Edit links in Word using VBA
- How to link Excel to Word

About the author
Hey, I’m Mark, and I run Excel Off The Grid.
My parents tell me that at the age of 7 I declared I was going to become a qualified accountant. I was either psychic or had no imagination, as that is exactly what happened. However, it wasn’t until I was 35 that my journey really began.
In 2015, I started a new job, for which I was regularly working after 10pm. As a result, I rarely saw my children during the week. So, I started searching for the secrets to automating Excel. I discovered that by building a small number of simple tools, I could combine them together in different ways to automate nearly all my regular tasks. This meant I could work less hours (and I got pay raises!). Today, I teach these techniques to other professionals in our training program so they too can spend less time at work (and more time with their children and doing the things they love).
Do you need help adapting this post to your needs?
I’m guessing the examples in this post don’t exactly match your situation. We all use Excel differently, so it’s impossible to write a post that will meet everybody’s needs. By taking the time to understand the techniques and principles in this post (and elsewhere on this site), you should be able to adapt it to your needs.
But, if you’re still struggling you should:
- Read other blogs, or watch YouTube videos on the same topic. You will benefit much more by discovering your own solutions.
- Ask the ‘Excel Ninja’ in your office. It’s amazing what things other people know.
- Ask a question in a forum like Mr Excel, or the Microsoft Answers Community. Remember, the people on these forums are generally giving their time for free. So take care to craft your question, make sure it’s clear and concise. List all the things you’ve tried, and provide screenshots, code segments and example workbooks.
- Use Excel Rescue, who are my consultancy partner. They help by providing solutions to smaller Excel problems.
What next?
Don’t go yet, there is plenty more to learn on Excel Off The Grid. Check out the latest posts:
Updated: 12/31/2020 by

A macro helps improve efficiency when creating documents and spreadsheets, adding or maintaining information, or creating forms for other people to fill out. Microsoft Word and Excel are popular software where people utilize macros to make data entry and retention easier. Macros in Word and Excel are created using the Visual Basic programming language or by recording actions performed.
To create a macro in Microsoft Word or Microsoft Excel, select from the list below and follow the instruction.
Create a macro in Microsoft Word
To create a macro in Microsoft Word, choose how you want to create it, either manually or by recording actions, and follow the steps provided.
Create macro manually with Visual Basic
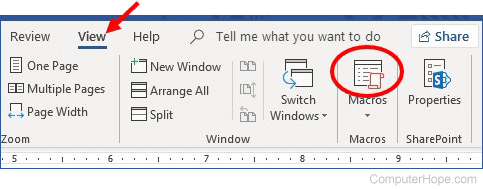
- In Microsoft Word, click the View tab in the menu bar.
- Click the Macros option.
- In the Macros window, type a name for the new macro in the Macro name text field.
- Click the Create button.
- The Microsoft Visual Basic for Applications program opens, where you can create the macro by typing the Visual Basic code manually.
- When you have completed the creation of the macro, click the Save icon in the menu bar and close the Visual Basic program.
Create macro by recording actions
- In Microsoft Word, click the View tab in the menu bar.
- Click the arrow below the Macros option and select the Record Macro option.

- In the Record Macro window, type a name for the new macro in the Macro name text field.
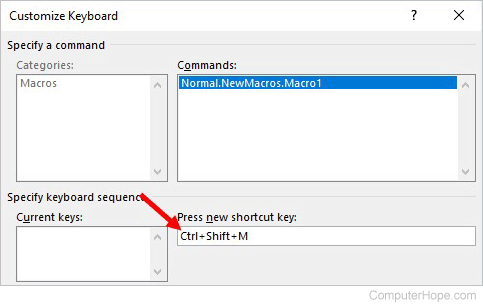
- Click the keyboard icon to assign a key combination to execute the macro.
- In the Customize Keyboard window, click in the Press new shortcut key field, then press the combination of keys you want to use for executing the macro in Microsoft Word. For example, you could press the keys Ctrl+Shift+M, and that key combination will be entered into the field automatically.
- Click the Assign button in the lower-left corner, then click the Close button.
- Recording of the macro begins immediately after clicking the Close button. Perform the actions you want to record and have the macro execute. You can type text, format the text, create a table, add shapes or pictures, and other actions.
- When you completed all the actions you want to include in the macro, on the View tab, click the arrow below the Macros option and select Stop Recording.
Create a macro in Microsoft Excel
To create a macro in Microsoft Excel, choose how you want to create it, either manually or by recording actions, and follow the steps provided.
Create macro manually with Visual Basic
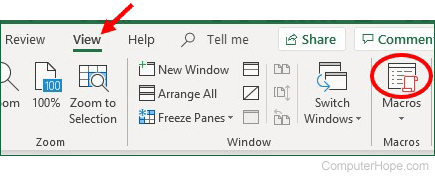
- In Microsoft Excel, click the View tab in the menu bar.
- Click the Macros option.
- In the Macros window, type a name for the new macro in the Macro name text field.
- Click the Create button.
- The Microsoft Visual Basic for Applications program opens, where you can create the macro by typing the Visual Basic code manually.
- When you have completed the creation of the macro, click the Save icon in the menu bar and close the Visual Basic program.
Create macro by recording actions
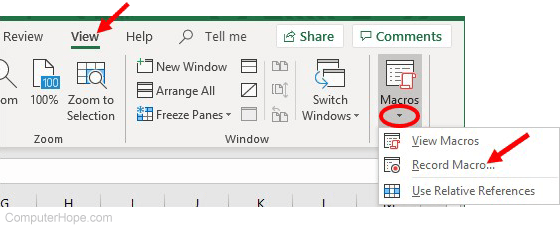
- In Microsoft Excel, click the View tab in the menu bar.
- Click the arrow below the Macros option and select the Record Macro option.
- In the Record Macro window, type a name for the new macro in the Macro name text field.
- Click the keyboard icon to assign a key combination to execute the macro.
- In the Customize Keyboard window, click in the Press new shortcut key field, then press the combination of keys you want to use for executing the macro in Microsoft Excel. For example, you could press the keys Ctrl+Shift+M, and that key combination will be entered into the field automatically.
- Click the Assign button in the lower-left corner, then click the Close button.
- Recording of the macro begins immediately after clicking the Close button. Perform the actions you want to record and have the macro execute. You can enter data, format the data, create a chart or graph from the data, add formulas, and other actions.
- When you completed all the actions you want to include in the macro, on the View tab, click the arrow below the Macros option and select Stop Recording.
Skip to content
Как из Word перевести в Excel
На чтение 4 мин. Просмотров 7k.
Что делает макрос: Если вы обнаружите, что вы постоянно копируете данные и вставляете в Microsoft Word, вы можете использовать макрос, чтобы автоматизировать эту задачу.
Содержание
- Как макрос работает
- Код макроса
- Как этот код работает
- Как использовать
Как макрос работает
Перед тем как использовать макрос, очень важно к этому подготовиться. Чтобы подготовиться к процессу, вы должны иметь созданный шаблон Word . В этом документе, указать закладку, где вы хотите, чтобы ваши данные из Excel разместились.
Чтобы создать закладку в документе Word, поместите курсор в нужное место, выберите вкладку Вставка — Закладка. Это активизирует диалоговое окно Закладка, где вы назначаете имя
для закладки. После того, как назначено имя, нажмите кнопку Добавить.
Один из файлов образцов для этой части является документ под названием PasteTable.docx. Это документ представляет собой простой шаблон, который содержит одну закладку под названием DataTableHere. В этом примере кода вы скопируете диапазон к этому
шаблону PasteTable.docx, используя закладку DataTableHere, чтобы указать, где вставить скопированный диапазон.
Кроме того, необходимо установить ссылку на библиотеку объектов Microsoft Word.
Код макроса
Sub OtpravitDannieIzExcelVWord()
'Шаг 1: Объявляем переменные
Dim MyRange As Excel.Range
Dim wd As Word.Application
Dim wdDoc As Word.Document
Dim WdRange As Word.Range

'Шаг 2: Скопируйте определенный диапазон
Sheets("таблица доходов").Range("B4:F10").Copy

'Шаг 3: Откройте целевой документ Word
Set wd = New Word.Application
Set wdDoc = wd.Documents.Open _
(ThisWorkbook.Path & "" & "PasteTable.docx")
wd.Visible = True

'Шаг 4: Установить фокус на целевую закладку
Set WdRange = wdDoc.Bookmarks("DataTableHere").Range

'Шаг 5: Удалить старую таблицу и вставить новую
On Error Resume Next
WdRange.Tables(1).Delete
WdRange.Paste 'вставить в таблицу

'Шаг 6: Отрегулируйте ширину столбца
WdRange.Tables(1).Columns.SetWidth _
(MyRange.Width / MyRange.Columns.Count), wdAdjustSameWidth

'Шаг 7: Вставьте закладку
wdDoc.Bookmarks.Add "DataTableHere", WdRange

'Шаг 8: Очистка памяти
Set wd = Nothing
Set wdDoc = Nothing
Set WdRange = Nothing

End Sub
Как этот код работает
- Шаг 1 объявляет четыре переменные: MyRange содержит целевой диапазон Excel; WD является переменной, которая предоставляет объект Application Word; wdDoc является переменной объекта, которая выставляет объект Word Document; wdRange является переменной объекта, которая выставляет объект Range Word.
- Шаг 2 копирует диапазон таблицы рабочего листа. В этом примере, диапазон жёсткий, но мы всегда можем сделать этот выбор в нечто более переменное.
- Шаг 3 открывает существующий целевой документ Word, который служит в качестве шаблона. Обратите внимание, что мы устанавливаем свойство Visible приложения Word, в True.
Это гарантирует, что мы можем увидеть действие в Word, как работает код. - Шаг 4 использует объект Range в Word, чтобы установить фокус на целевой закладке. Это по существу выбирает закладку в виде диапазона, что позволяет принимать меры в этом диапазоне.
- Шаг 5 удаляет любую таблицу, которая может существовать внутри закладки, а затем вставляет скопированный диапазон Excel. Если мы не будем удалять любые существующие таблицы, скопированный диапазон добавится к существующим данным.
- Когда вы копируете диапазон Excel в документ Word, ширина столбцов не всегда соответствуют содержанию в клетках. Шаг 6 устраняет эту проблему путем регулировки ширины столбцов. Здесь, ширина каждого столбца установлена как число, которое равно общей ширине таблицы, разделенной на число столбцов в таблице.
- Когда мы копируем диапазон Excel для целевой закладки, мы, по существу, перезаписываем закладку. Шаг 7 воссоздает закладку, чтобы гарантировать, что в следующий раз, когда вы запустите этот код, закладка будет.
- Очистка памяти
Как использовать
Для реализации этого макроса, вы можете скопировать и вставить его в стандартный модуль:
- Активируйте редактор Visual Basic, нажав ALT + F11.
- Щелкните правой кнопкой мыши имя проекта / рабочей книги в окне проекта.
- Выберите Insert➜Module.
- Введите или вставьте код.
-
Что такое макрос простыми словами
-
Что такое макросы в Word, как настроить и найти макрос
-
Что такое макросы в Excel, как настроить
-
Как работать с макросами
-
Как создать запись макроса
-
Применение макросов в документе Ворд и Excel
-
Заключение
В статье рассмотрим вопрос, что такое макросы в Word и в программе Excel. На практике будет показано, как использовать макросы. С помощью макросов вы сможете упростить работу с документами Майкрософт Офис Ворд.
Что такое макрос простыми словами
 Здравствуйте, друзья! Начинающие пользователи программы Майкрософт Офис Ворд и других программ, задаются вопросом, что такое макрос? Ведь об этом названии впервые услышали, и хотелось бы рассмотреть его подробно.
Итак, макрос – это программа на основе программного кода, которая встроена в Ворде, Excel, Пауер Поинт. Она написана на языке перечисленных программ и имеет набор команд. С помощью макроса можно записать какое-либо действие в документе и автоматически его воспроизвести в другом файле.
Если вы часто работаете с объемными документами, заполняете таблицы, то макросы здесь просто необходимы. Иногда мы пишем в документах одну и ту же нумерацию, проставляем различные списки. Если работать с макросами – этого труда можно избежать. Зато вы сэкономите свое время.
Далее рассмотрим работу с макросами в Ворде и в программе Excel.
к оглавлению ↑
Что такое макросы в Word, как настроить и найти макрос
Что такое макросы в Word? Как говорилось ранее, это инструмент для записи действий (их программирование). Чтобы пользоваться макросом, необходимо его настроить и найти на панели управления в Ворде.
Для настройки макросов в Ворде откройте программу Word 2007 на компьютере или другую версию. Далее нажмите вверху слева на логотип программы и кликните по кнопке Параметры Word (скрин 1).

В основных настройках установите маркер перед словом «Показывать вкладку Разработчик на ленте» (скрин 2).

Это позволит вам найти инструмент Макросы. Также они находятся во вкладке «Вид».
Далее нажимаете кнопку «Центр управления безопасностью» и активируете раздел «Включить все макросы», внизу устанавливаете галочку – «Доверять доступ к объектной модели VBA» (скрин 3).

Данные настройки помогут избежать ошибок во время работы с макросами. В других версиях Ворда, макросы настраиваются по схожему принципу.
к оглавлению ↑
Что такое макросы в Excel, как настроить
Макросы в программе Excel работают и настраиваются так же, как и в программе Ворд. Вы можете один раз произвести настройку макросов в Ворде и эта настройка перенесется в в Excel или Пауер Поинт.
Далее поработаем с макросами на практике.
Как работать с макросами
Работу с макросами можно разделить на два способа: сторонними программами и автоматическую. Если говорить о первом варианте, то для этого нужно установить специальные программы на компьютер. Если не хотите разбираться с программами, можно воспользоваться встроенной программой в Майкрософт Офис Ворд по работе с макросами. Давайте ее разберем.
Итак, чтобы записать макрос в Ворде или в Excel, следуйте инструкции:
- Настройте макросы.
- Откройте документ.
- Нажмите по разделу разработчик и нажмите Записать макрос.
- Далее напишите что-нибудь в документе.
- После чего нажмите «Остановить запись».
- Затем откройте другой документ жмите на раздел «Разработчик» далее «Макросы».
- Выберите нужный макрос из списка и кликните кнопку «Выполнить». После чего программа вставит записанный текст автоматически.
Далее эту инструкцию разберем пошагово.
к оглавлению ↑
Как создать запись макроса
Чтобы записать макрос, запустите пустой текстовый документ или с текстом. Далее нажмите по разделу «Разработчик», затем кнопку «Запись макроса» (скрин 4).

В открытом окне пропишите имя макроса, установите кнопку «OK», чтобы началась запись. В процессе записи вы можете написать что-нибудь, например, Привет как дела? Далее нажмите кнопку «Остановить запись» и сохраните документ.
Программа Excel работает с макросами так же, как и Ворд. Нажимаете на вкладку «Разработчик», далее «Запись макроса» (скрин 5).

Затем заполняете таблицу, останавливаете запись макроса и снова сохраняете документ.
Далее разберем, как записанный макрос применять в Ворде и Excel.
к оглавлению ↑
Применение макросов в документе Ворд и Excel
Итак, чтобы применить макросы в Ворде, нажмите раздел «Разработчик» в новом документе. Далее кликните «Макросы». Из списка макросов выберите тот, который ранее использовали и нажмите кнопку «Выполнить» (скрин 6).

После этого записанный текст макросом будет вставлен в документ.
Как работает макрос в Excel? Все просто. Также нажимаете кнопку «Разработчик» далее «Макрос». Выбираете макросы и жмете по ним. Затем, надо нажать кнопку «Выполнить», чтобы записанный текст или числа вставились в таблицу.
к оглавлению ↑
Заключение
Сегодня был показано на практике, что такое макросы в Word и программе Excel. Аналогично, макросы работают и Power Point. Макрос – это простой инструмент для записи действий в документах. Вы можете один раз записать какой-нибудь текст, чтобы потом его не переписывать заново. Это намного лучше, чем тратить время на лишнюю работу.
Спасибо за внимание!
С уважением, Иван Кунпан.
Статьи по Ворду:
Рисование в Ворде, нумерация таблиц в Ворде, как создать диаграмму в Ворд, как пронумеровать строки в Ворде.
Просмотров: 7787