
Excel for Microsoft 365 Excel for Microsoft 365 for Mac Excel 2021 Excel 2021 for Mac Excel 2019 Excel 2019 for Mac Excel 2016 Excel 2016 for Mac Excel 2013 Excel 2010 Excel 2007 More…Less
You can use a Form control button or a command button (an ActiveX control) to run a macro that performs an action when a user clicks it. Both these buttons are also known as a push button, which can be set up to automate the printing of a worksheet, filtering data, or calculating numbers. In general, a Form control button and an ActiveX control command button are similar in appearance and function. However, they do have a few differences, which are explained in the following sections.
|
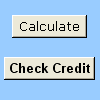
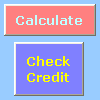
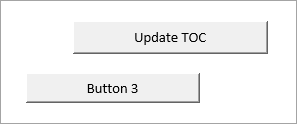
Button (Form control)
|
Command button (ActiveX control)
|
In the sections below, learn how to add a macro to a button in Excel—for Windows or the Mac.
Note: ActiveX controls are not supported on the Mac.
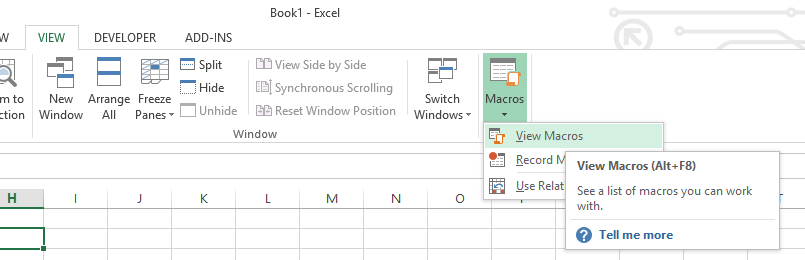
Macros and VBA tools can be found on the Developer tab, which is hidden by default.
The first step is to enable it. For more information, see the article: Show the Developer tab.

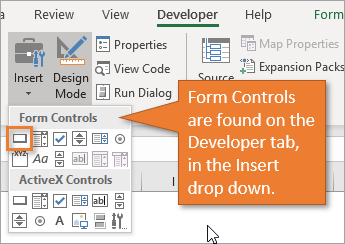
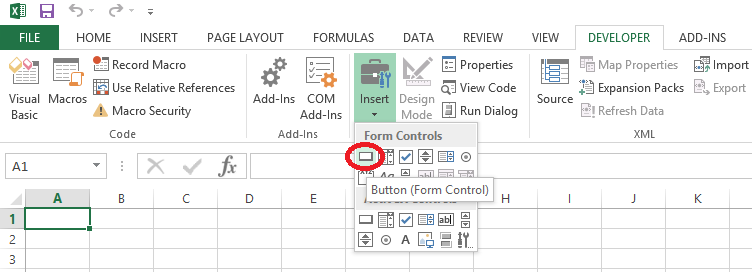
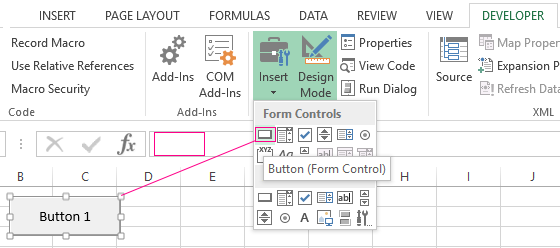
Add a button (Form control)
-
On the Developer tab, in the Controls group, click Insert, and then under Form Controls, click Button
 .
. -
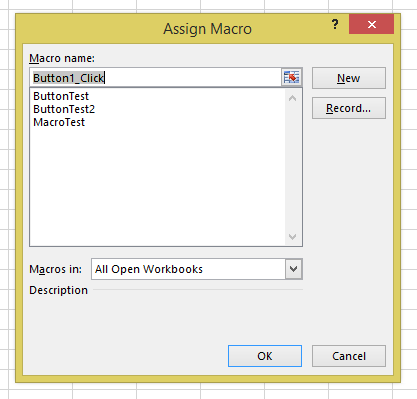
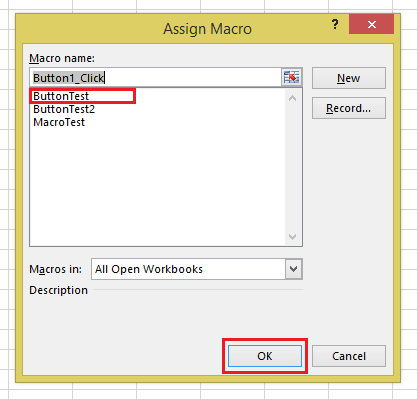
Click the worksheet location where you want the upper-left corner of the button to appear. The Assign Macro popup window appears.
-
Assign a macro to the button, and then click OK.
-
To specify the control properties of the button, right-click the button, and then click Format Control.
 .
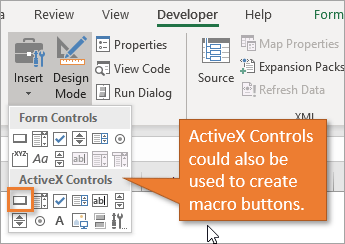
.Add a command button (ActiveX control)
-
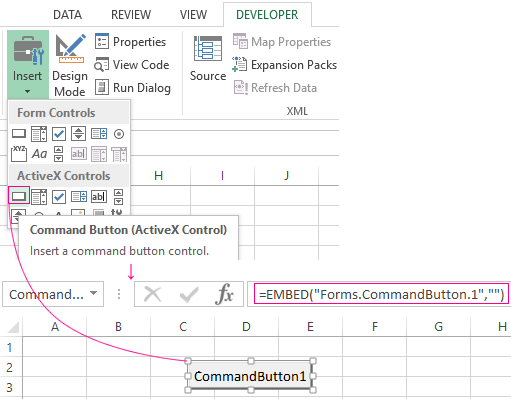
On the Developer tab, in the Controls group, click Insert, and then under ActiveX Controls, click Command Button
. -
Click the worksheet location at which you want the upper-left corner of the command button to appear.
-
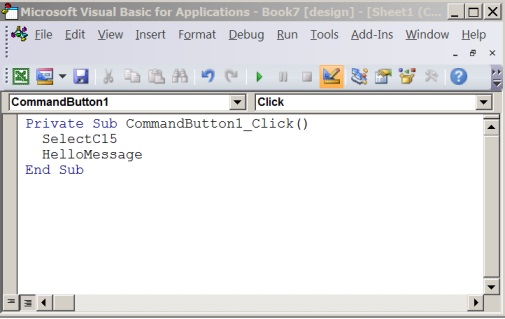
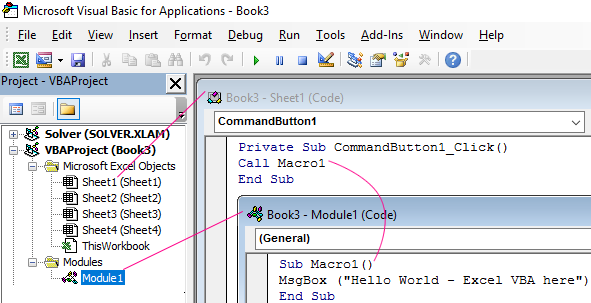
In the Controls group, click View Code. This launches the Visual Basic Editor. Ensure that Click is chose in the drop-down list on the right. The sub procedure CommandButton1_Click (see the figure below) runs these two macros when the button is clicked: SelectC15 and HelloMessage.
-
In the subprocedure for the command button, do either of the following:
-
Enter the name of an existing macro in the workbook. You can find macros by clicking Macros in the Code group. You can run multiple macros from a button by entering the macro names on separate lines inside the subprocedure.
-
As necessary, add your own VBA code.
-
-
Close the Visual Basic Editor, and click Design Mode
to ensure design mode is off. -
To run the VBA code that is now part of the button, click the ActiveX command button that you just created.
-
To edit the ActiveX control, make sure that you are in design mode. On the Developer tab, in the Controls group, turn on Design Mode.
-
To specify the control properties of the command button, on the Developer tab, in the Controls group, click Properties
. You can also right-click the command button, and then click Properties.Note: Before you click Properties, make sure that the object for which you want to examine or change properties is already selected.
The Properties box appears. For detailed information about each property, select the property, and then press F1 to display a Visual Basic Help topic. You can also type the property name in the Visual Basic Help Search box. The following table summarizes the properties that are available.
 to ensure design mode is off.
 . You can also right-click the command button, and then click Properties.
|
If you want to specify |
Use this property |
|---|---|
|
General: |
|
|
Whether the control is loaded when the workbook is opened. (Ignored for ActiveX controls.) |
AutoLoad (Excel) |
|
Whether the control can receive focus and respond to user-generated events. |
Enabled (Form) |
|
Whether the control can be edited. |
Locked (Form) |
|
The name of the control. |
Name (Form) |
|
The way the control is attached to the cells below it (free floating, move but do not size, or move and size). |
Placement (Excel) |
|
Whether the control can be printed. |
PrintObject (Excel) |
|
Whether the control is visible or hidden. |
Visible (Form) |
|
Text: |
|
|
Font attributes (bold, italic, size, strikethrough, underline, and weight). |
Bold, Italic, Size, StrikeThrough, Underline, Weight (Form) |
|
Descriptive text on the control that identifies or describes it. |
Caption (Form) |
|
Whether the contents of the control automatically wrap at the end of a line. |
WordWrap (Form) |
|
Size and Position: |
|
|
Whether the size of the control automatically adjusts to display all the contents. |
AutoSize (Form) |
|
The height or width in points. |
Height, Width (Form) |
|
The distance between the control and the left or top edge of the worksheet. |
Left, Top (Form) |
|
Formatting: |
|
|
The background color. |
BackColor (Form) |
|
The background style (transparent or opaque). |
BackStyle (Form) |
|
The foreground color. |
ForeColor (Form) |
|
Whether the control has a shadow. |
Shadow (Excel) |
|
Image: |
|
|
The bitmap to display in the control. |
Picture (Form) |
|
The location of the picture relative to its caption (left, top, right, and so on). |
PicturePosition (Form) |
|
Keyboard and Mouse: |
|
|
The shortcut key for the control. |
Accelerator (Form) |
|
A custom mouse icon. |
MouseIcon (Form) |
|
The type of pointer that is displayed when the user positions the mouse over a particular object (standard, arrow, I-beam, and so on). |
MousePointer (Form) |
|
Whether the control takes the focus when clicked. |
TakeFocusOnClick (Form) |
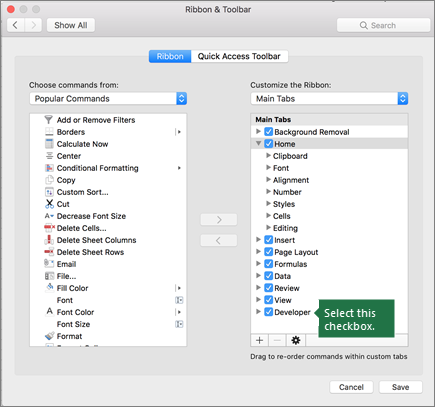
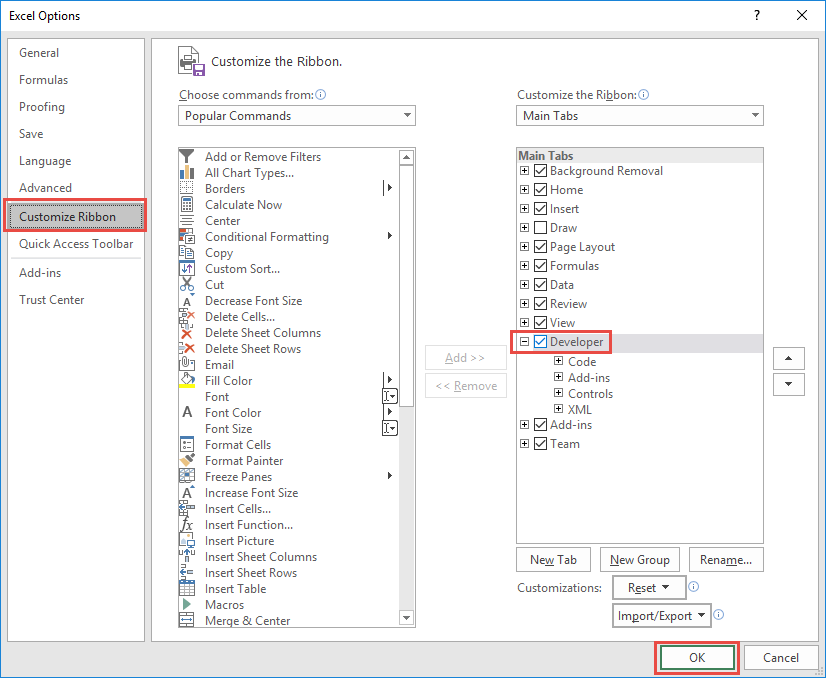
Macros and VBA tools can be found on the Developer tab, which is hidden by default, so the first step is to enable it
-
Go to Excel > Preferences… > Ribbon & Toolbar.
-
In the Customize the Ribbon category, in the Main Tabs list, select the Developer check box, and then click Save.
Add a button (Form control)
Follow these steps:
-
On the Developer tab, click Button
. -
Click the worksheet location where you want the upper-left corner of the button to appear. The Assign Macro popup window appears.
Note: If you have already inserted a button, you can right-click on it, and select Assign Macro.
-
Assign a macro to the button and click OK.
-
To specify the control properties of the button, right-click it, and then select Format Control….
Add a command button (Visual Basic control)
-
On the Developer tab, click Button
. -
Click the worksheet location where you want the upper-left corner of the command button to appear.
Note: If you have already inserted a button, you can right-click on it, and select Assign Macro.
-
In the Assign Macro dialog box, select New, which will open the Visual Basic Editor (VBE) to a pane with the following code:
  Sub ButtonX_Click()

  End Sub
-
In the subprocedure for the command button, between the Sub and End Sub lines, do either of the following:
-
Enter the name of an existing macro in the workbook. You can run multiple macros from a button by typing the macro names on separate lines inside the sub procedure
-
Add your own VBA code.
-
-
Click Design Mode
to ensure that design mode is off, then close the Visual Basic Editor window. -
To edit the button, right-click it and choose Visual Basic.
-
To specify the control properties of the button, right-click it, and then select Format Control….
Need more help?
You can always ask an expert in the Excel Tech Community or get support in the Answers community.
See Also
-
Add or edit a macro for a control on a worksheet
-
Enable or disable macros in Office files
-
Enable or disable ActiveX settings in Office files
Need more help?
Want more options?
Explore subscription benefits, browse training courses, learn how to secure your device, and more.
Communities help you ask and answer questions, give feedback, and hear from experts with rich knowledge.
Bottom Line: Learn how to create macro buttons in a worksheet that run VBA code when clicked. Includes how to format buttons and prevent them from moving and resizing on the sheet.
Skill Level: Intermediate
Video Tutorial
Download the Excel File
Here’s the Excel workbook that I use in the video so you can follow along and practice what you’re learning.
Making User-Friendly Macro Buttons in Your Spreadsheets
Macros make life easier. Buttons make life easier. It’s only natural to marry the two and make the processes you repeatedly have to perform as simple as possible.
You can literally run through a hundred steps with just one small click using macros and buttons–which, of course, is both empowering and gratifying.
Kristen, a member of our VBA Pro Course, loves to add buttons to her spreadsheets for this reason.
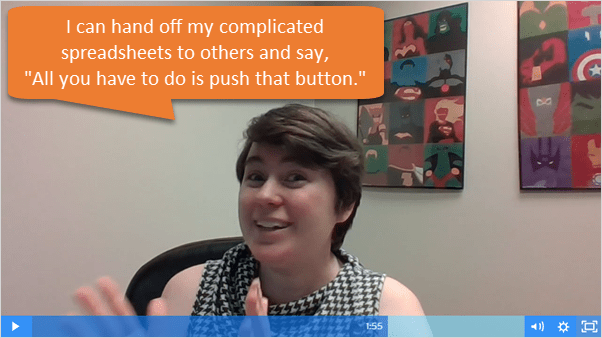
You can watch the entire video to learn more about Kristen’s story with learning VBA, and how she uses macro buttons.
For this tutorial, we’re using macros that have already been created. If you don’t know how to create macros yet, then checkout one of my free webinars to learn the basics getting started with macros & VBA.
So let’s take a look at how to create a button and assign a macro to it.
3 Types of Macro Buttons for Worksheets
In this post I explain three different types of buttons you can place on a worksheet.
- Shapes
- Form Control Buttons
- ActiveX Control Buttons
We’ll start with my favorite…
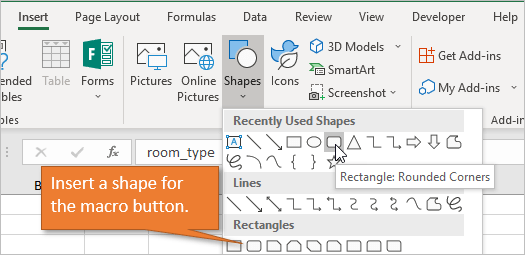
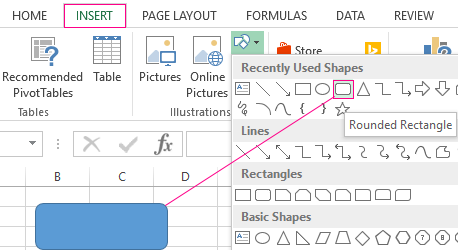
1. Using Shapes to Create Macro Buttons
In my opinion, the best way to create macro buttons is to use shapes. Shapes give us the most styling/formatting options, and we can make them look like buttons you click every day on modern web pages.
Below, we will create the button on a worksheet and assign a macro to it. Here are the steps to create the macro button:
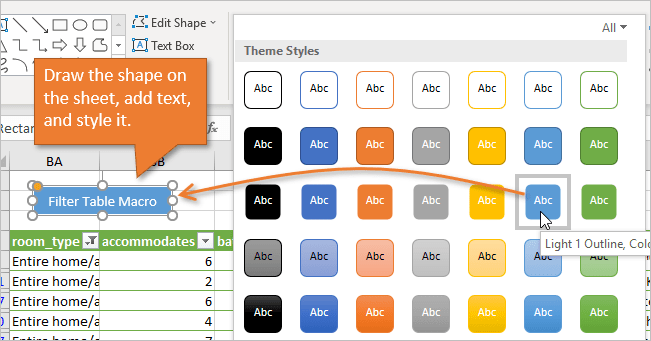
1. Draw a shape on the sheet (Insert tab > Shapes drop-down > Rectangle shape).
2. Add text to the shape (Right-click > Edit Text | or double-click in the shape).
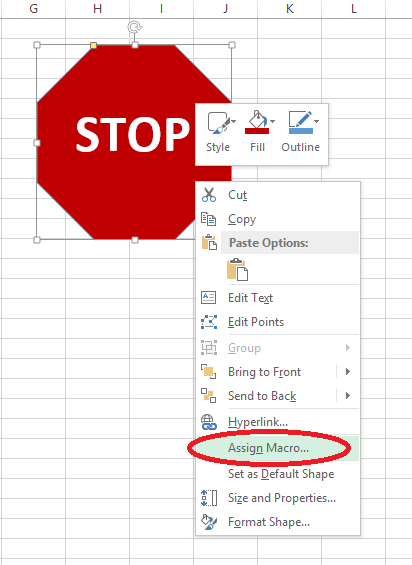
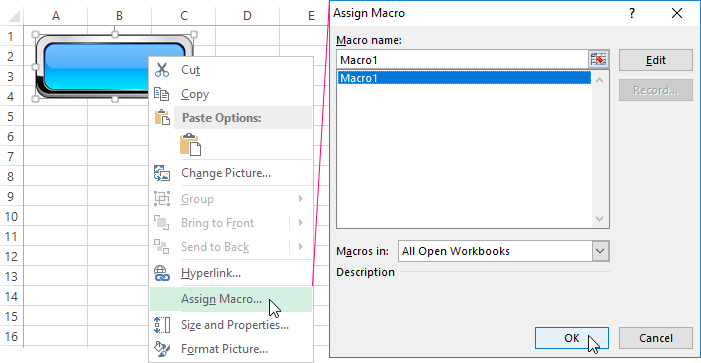
3. Assign the macro (Right-click the border of the shape > Assign Macro…)
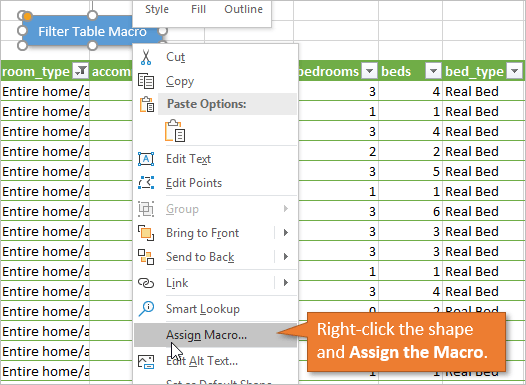
4. Select the macro from the list. It’s important to note that the macro should be selected from the This Workbook list so that when you share the workbook with other users, the macro will be shared as well.
If you assign the macro from another workbook, the button will not work for the people you share the workbook with.
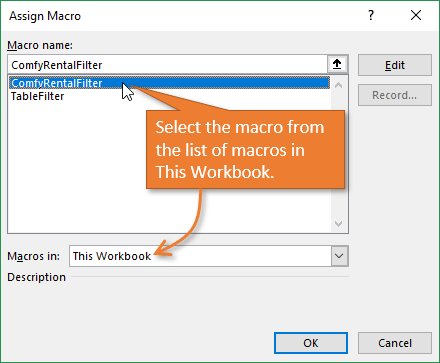
5. Press OK.
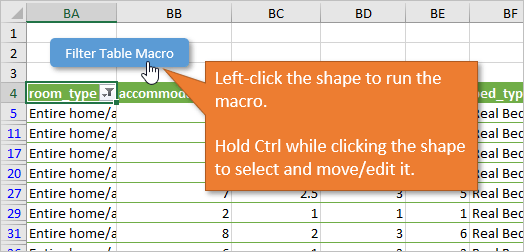
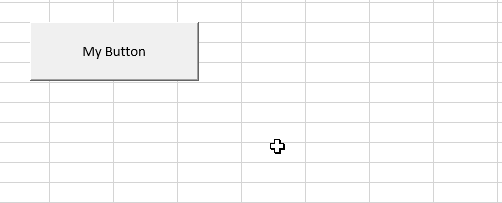
When you hover your mouse over the shape it will now turn into the hand pointer cursor. Clicking the shape will run the macro.
That’s it! That’s how you assign a macro to a button that you’ve created right on the worksheet.
Modifying the Button
If you need to select the shape to change its look or move it, hold the Ctrl key while clicking the shape. This will prevent the macro from running and allow you to modify the shape. Excel offers a ton of options on the Format tab for changing the shape style, shape effects, font color or size, etc.
Preventing the Button from Resizing with Cell Changes
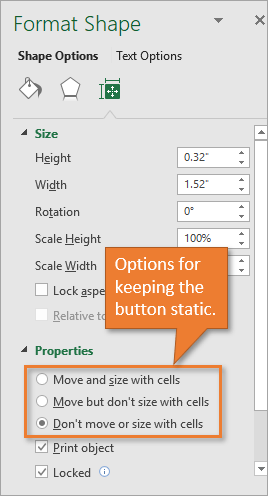
Depending on your settings, it’s likely that when you change the size of the column or row that your button is on, the button size will change as well. If you don’t want that to happen, you can easily adjust the settings to keep the button static.
First, just right click on the button and choose Size and Properties…
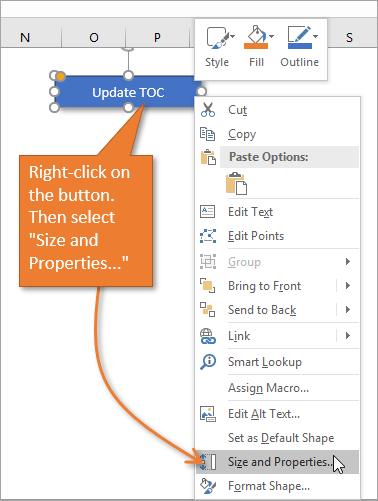
This will bring up the Format Shape pane. There are options for you to choose from in the Properties section, depending on whether or not you want the button to move or resize when changes are made to your sheet.
2. Using Form Controls to Create Macro Buttons
The next option for macro buttons is Form Controls. They are essentially the same in terms of set-up.
The difference between Controls and Shapes is the styling.
Form Control buttons do give the appearance of being pressed when you click on them, which is kind of cool. However, they unfortunately look like a button you’d find on an early version of Windows.
We cannot change the color of the button either. The only formatting options are for the font type, size, and color.
Insert a Form Control Button
To add a Form Control button, just go to the Developer tab and click on the Insert button. A drop-down gives you options under Form Controls.
3. Using ActiveX Controls for Macro Buttons
The last option is ActiveX Control buttons.
The ActiveX Control buttons do have more formatting options and you can change the button color.
They also require you to add an event macro in the sheet module that will run when the button is clicked. This is done by right-clicking the button and choosing View Code.
You can add other event triggers like double-click. This could perform a different action/macro when the button is double-clicked.
However, I don’t recommend the ActiveX Control buttons. In my experience they are glitchy in terms of consistent appearance. They can end up really big or really small when changes are made to the sheet or when the file is shared back and forth between users.
Placing Buttons in the Ribbon or Toolbar Instead
Another option is to place your macro buttons on any of the tabs in the Excel Ribbon or Quick Access Toolbar.
This is video #3 in my 4-part video series on the Personal Macro Workbook. This technique is best for macros that you will only run on your computer because the ribbon button customizations do not travel with the workbook.
If you do want the ribbon buttons to travel with the workbook then you can use XML code to customize the ribbon. I’ll write an article on that in the future, and I do cover extensively in my VBA Pro Course, along with how to create add-ins.
Related Tutorials
I have a couple other posts for you to check out on this topic. Take a few minutes to give them a look!
- How to Create VBA Macro Buttons for Filters in Excel
- Macro Buttons to Add Fields to Pivot Tables
- How to Add a Yes No Pop-up Message Box to a Macro Before It Runs
- How to Enable the Developer Tab in Excel
Conclusion
My overall recommendation is to keep it simple and stick to using shapes for macro buttons. They give you the most formatting options, and are easy to setup and modify.
What will you create macro buttons for? I’d love to hear how you plan to put these buttons to work. If you have any comments or questions about running a macro button that you’ve created, please leave a comment below.
Thank you! 🙂
Excel Buttons
In Excel, Buttons are used to call Macros. This tutorial will cover how to create Excel buttons, assign Macros to them, adjust their properties, and more.
By default, Excel macros are accessible in a list via the “Macros” button on the View ribbon.
Often though, you’ll want to provide easy access to a particular macro directly on your worksheet. This can be achieved using a Button control.
A Button control looks like a Microsoft Windows button, and runs a macro when clicked. It’s a much handier way to access your most commonly used macros, and is an easy way to expose custom functionality to other users of your workbook.
Run a Macro From a Button
To run a Macro from a button in Excel, simply click the button:
The Excel Developer Tab
Buttons are accessible via the Developer Tab.

Unfortunately, Excel hides the Developer tab by default. If you don’t see the Developer Ribbon, follow these steps:
- Click File > Options in the list on the left-hand border
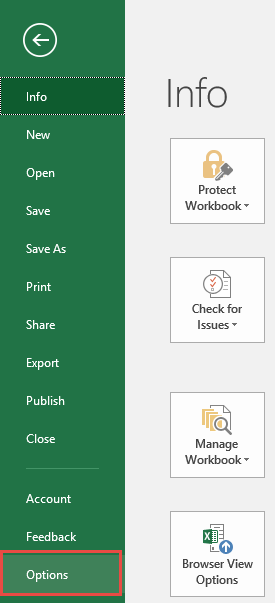
- In the Options dialog select Customize Ribbon > Customize the Ribbon > Main Tabs and add a check-mark in the box for “Developer”, and click OK.
Add a Macro Button
In Excel, select the Developer tab, then click on the “Insert” dropdown in the Controls section. There are several types of controls divided into two sections, “Form Controls” and “ActiveX Controls”.
For now, just click on the Button control under “Form Controls”. Next, move the mouse anywhere over the worksheet surface, then hold left-click and drag the mouse to draw the outline of a rectangle. When you release left-click, a new dialog will appear titled “Assign Macro”.

Assigning a Macro to a Button
Here you can assign an existing Macro to the button, record a new macro, create a new macro from scratch using VBA, or click “Cancel” and return to your button later.
Assign Existing Macro to a Button
To assign an existing Macro, you simply select the macro’s name in the list, then click OK.
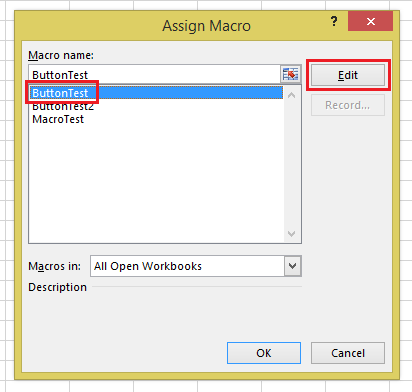
Edit an Existing Macro Before Assigning to a Button
To edit a macro before assigning it to the button, select the macro’s name in the list and click the “Edit” button (the “New” button text changes to “Edit”).
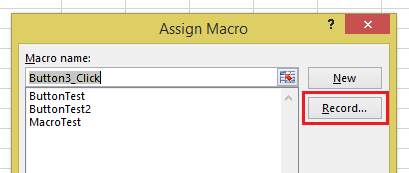
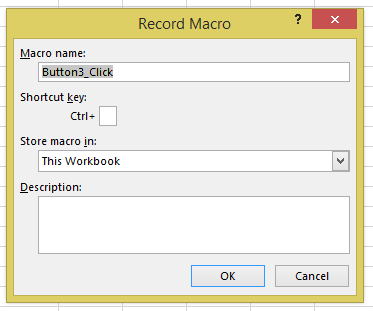
Record a Macro and Assign to Button
To record a new macro and assign it to the button, click “Record…”. This brings up the Record Macro dialog, where you specify a name and click “OK”. The button will be assigned that macro. Meanwhile, Excel will remain in a recording state until you click “Stop Recording” in the “Code” section of the Developer tab.
Write VBA Procedure and Assign to Button
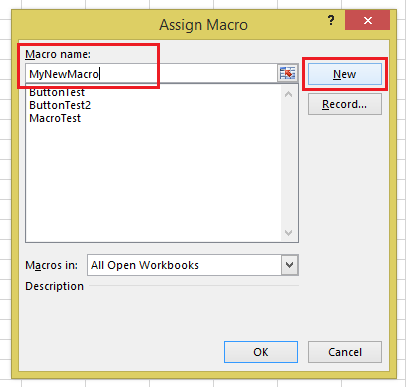
To write a new macro for the button, type a new name for your macro in the textbox at the top of the dialog, then click “New”. Excel will bring up the VB Editor, in which you’ll see a new empty macro procedure with the name you entered. This procedure will be stored in a new module, visible in the Project window.
Change Macro Assigned to Button
To change the Macro that’s assigned to a button, simply right-click the button and select Assign Macro:
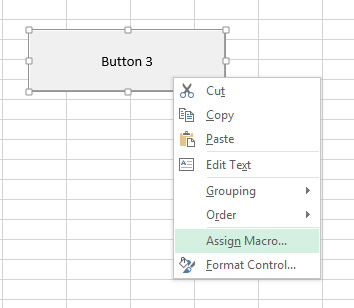
Here you can see the assigned Macro and make any desired changes.

How to Adjust Button Properties in Excel
Move or Resize Excel Button
After you’ve placed a button, you can easily move or resize it. To perform any of these actions, right-click on the button. Then you can left-click and drag the button to your desired location or resize it.
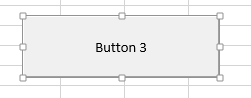
Rename Button
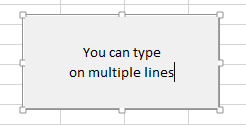
With the button selected, left-click on the button text to edit.
To add multiple lines, simple press the ENTER key.
Format Button
To format other button properties, Right-Click > Format Control
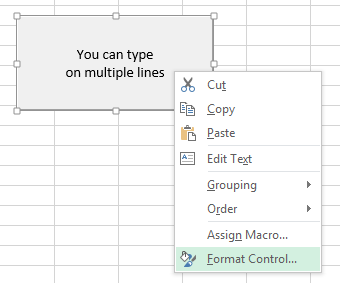
Here you can adjust font sizes, and many other button properties:

Of particular note is the “Properties” tab, which changes how the button behaves as surrounding rows and columns are inserted, deleted, resized, or hidden/unhidden.
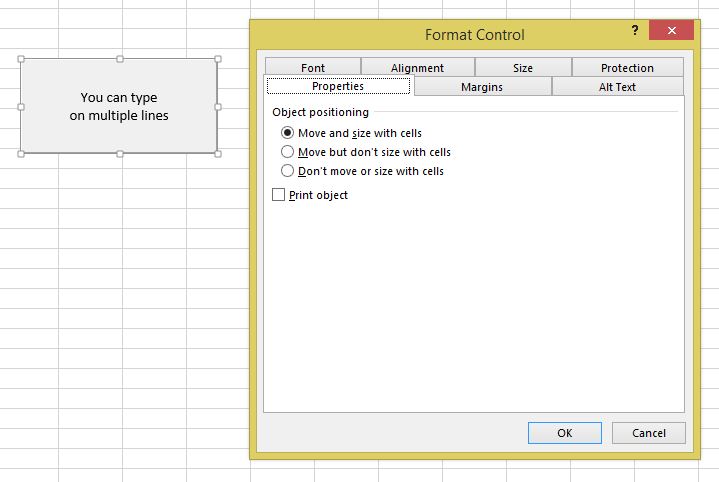
- Move and size with cells: The button will move and resize when rows and columns are changed.
- Move but don’t size with cells: The button will move, but not resize.
- Don’t move or size with cells: The button will not move or resize.
- Finally, Print Object can set the object to appear on printouts. This is unchecked by default, but can be toggled on if desired.
Assign a Macro to a Shape
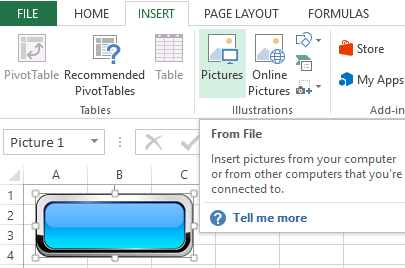
Besides buttons, macros can assigned to other objects like Pictures, Textboxes, and Shapes. With a Picture or Shape, you can make a button that looks any way you like. Excel includes a wide variety of customizable Shapes including polygons, arrows, banners, and more that may be better suited to your worksheet than a regular button control.
Shapes are accessed from the Insert tab:
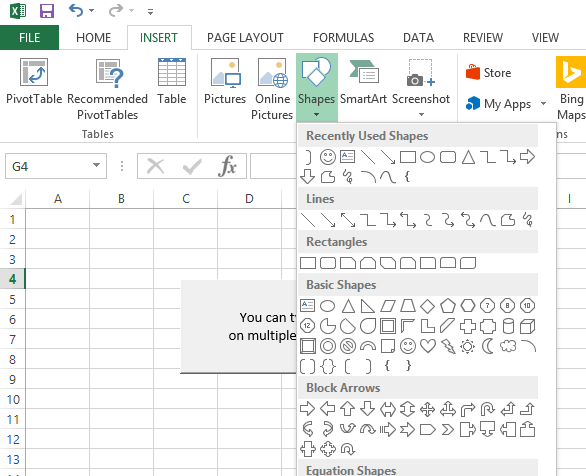
Select the shape you want from the Shape dropdown, draw it onto your worksheet as you would a button control, then right-click it and select “Assign Macro…” from the pop-up dialog. The options are the same as assigning a macro to a button.
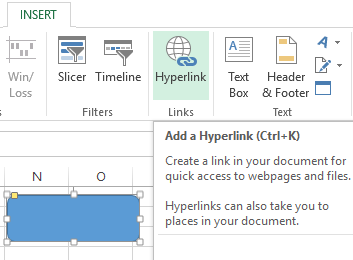
Assign a Macro to a Hyperlink
Macros can also be assigned to hyperlinks by using VBA Events. Events are procedures that are triggered when certain actions are performed:
- Open/Close/Save Workbook
- Activate / Deactivate Worksheet
- Cell Values Change
- Click Hyperlink
- and more.
Events require knowledge of VBA. To learn more about events, visit our VBA Tutorial.
Button in Excel as a link to a cell, a tool, or a created macro, makes the work in the program much easier. Most often, it is a graphic object with an assigned macro or a hyperlink. Let’s consider how to make such a button in Microsoft Excel program.
How to make a button on the Excel sheet
The essence of the work lies in creating a graphic object and assigning a macro or hyperlink to it. Let’s consider the order of actions in detail.
Ways to create a graphic object in Excel:
- An ActiveX control command button. Go to the «DEVELOPER» tab. Press the «Insert» ActiveX button. The menu with a set of items to insert will open. You need to select the first ActiveX element, that is depicted in in the form of a gray brick. Now draw the button of the required size using the cursor.
- A Form control button. Again, go to the «DEVELOPER» tab. Open the menu of the «Insert» tool. Now select the «Button (Form Control)» element from the first group (the same gray-colored brick). Then draw the button. The window for assigning a macro opens immediately: you can assign it right now or later at your option.
- A shape button. Go to the «INSERT» tab. In the «Recently Used Shapes» menu, select the appropriate shape. Draw this shape. You can right-click the finished shape and change its formatting.
- A picture button. Go to the «INSERT» tab. In the «Illustrations» menu, select the «Pictures» tool. The options that are available on the computer will be offered to choose from.
The graphic object has been created. Now you need to make it “able to work”.
How to make a button with macro in Excel
For example, you have created a macro to perform a specific task. To run it, you need to go to the «DEVELOPER» menu every time, which is inconvenient. It is much easier to create a special button.
If you have used an ActiveX control, then:
For other graphic objects, the macro is assigned in the same way. The procedure is even simpler. You need to right-click on the drawn button or picture and select the «Assign Macro» tool.
Other options of using buttons
With the help of buttons, you can not only execute created macros, but also move to a certain cell, another document, or another sheet in Excel program. Let us consider this matter in detail.
Draw a graphic object and highlight it. Find the «Hyperlink» on the «INSERT» tab.
After clicking, a window will be opened. This window is intended for creating a connection between the button and a file, web page, e-mail, new document, and location in the current Excel document.
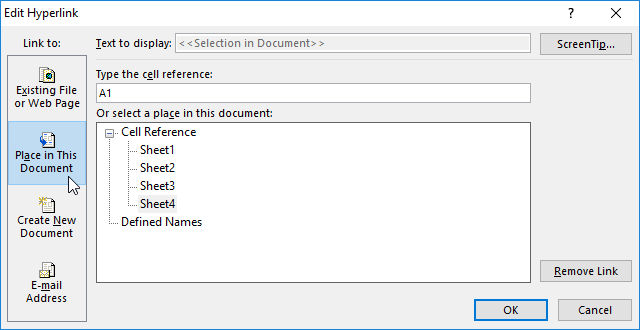
It is enough to choose the desired option and specify the path to it. This method doesn’t require writing macros and provides the user with a wide range of opportunities.
Similar tasks can be performed with the help of macros. For example, for a user to go to a certain cell (M6) when clicking the button, the following code should be written:
Sub Macro1()
Range(«M6»).Select
End Sub
Similarly, you can assign a macro to a chart, WordArt and SmartArt objects.
How to make the sort button for tables in Excel
For an illustrative example, create a test table as in the figure:
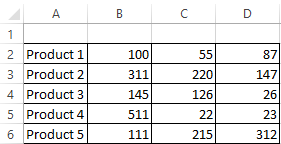
- Instead of the table column headers, add shapes that will serve as buttons for sorting by the columns of the table.
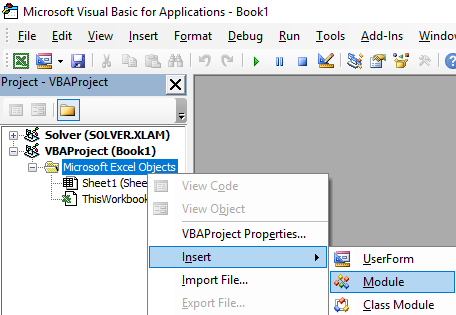
- In the Visual Basic mode (ALT + F11), insert the new module (Module1) in the Modules folder. To do this, right-click on the folder and choose Insert-Module.
- Double click on Module1 and enter the following code into it:
Sub Macro1()
    ActiveWorkbook.Worksheets("Sheet1").Sort.SortFields.Clear
    ActiveWorkbook.Worksheets("Sheet1").Sort.SortFields.Add Key:=Range("A2:A6"), _
        SortOn:=xlSortOnValues, Order:=xlAscending, DataOption:=xlSortNormal
    With ActiveWorkbook.Worksheets("Sheet1").Sort
        .SetRange Range("A2:D6")
        .Apply
    End With
End Sub
Sub Macro2()
    ActiveWorkbook.Worksheets("Sheet1").Sort.SortFields.Clear
    ActiveWorkbook.Worksheets("Sheet1").Sort.SortFields.Add Key:=Range("B2:B6"), _
        SortOn:=xlSortOnValues, Order:=xlDescending, DataOption:=xlSortNormal
    With ActiveWorkbook.Worksheets("Sheet1").Sort
        .SetRange Range("A2:D6")
        .Apply
    End With
End Sub
Sub Macro3()
    ActiveWorkbook.Worksheets("Sheet1").Sort.SortFields.Clear
    ActiveWorkbook.Worksheets("Sheet1").Sort.SortFields.Add Key:=Range("C2:C6"), _
        SortOn:=xlSortOnValues, Order:=xlDescending, DataOption:=xlSortNormal
    With ActiveWorkbook.Worksheets("Sheet1").Sort
        .SetRange Range("A2:D6")
        .Apply
    End With
End Sub
Sub Macro4()
    ActiveWorkbook.Worksheets("Sheet1").Sort.SortFields.Clear
    ActiveWorkbook.Worksheets("Sheet1").Sort.SortFields.Add Key:=Range("D2:D6"), _
        SortOn:=xlSortOnValues, Order:=xlDescending, DataOption:=xlSortNormal
    With ActiveWorkbook.Worksheets("Sheet1").Sort
        .SetRange Range("A2:D6")
        .Apply
    End With
End Sub
Note. Red text indicates different parameters for each column.
- Assign to each shape its own macro: Macro1 for «NAME» Macro2 for «May», and so on.
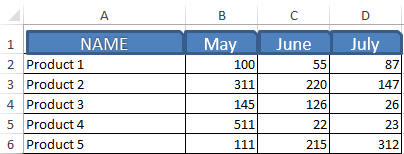
That’s all, now you just need to click on the header and the table will sort the data to a particular column. For convenience, Macro1 sorts the column «NAME» in ascending order due to Order:=xlAscending parameter. All other columns have assigned macros (2,3,4) with Order:=xlDescending parameter, which sets the sort type in descending order. This is done in order to show the user in which month more goods have been sold.
Download example of the sort button
Note. Such simple macros can be created in automatic mode without programming or without writing VBA (Visual Basic for Application) code, using the «Record Macro» tool.
![]()
Download Article
![]()
Download Article
- Excel 2003
- Excel 2007
- Excel 2010
- Excel 2013
- Video
- Tips
- Warnings
|
|
|
|
|
|
Macros in Excel can save a great deal of time with repetitive tasks. By assigning macros to custom buttons, you can save even more time by bringing your macro only one-click from execution.
-
1
Click Tools → Customize.
-
2
Click the Toolbars tab.
Advertisement
-
3
Click the New button.
-
4
Type a name for your new toolbar.
-
5
Click OK.
-
6
Click the Commands tab.
-
7
Select Macros from the list on the left.
-
8
Click and drag the Custom Button icon from the list on the right to your new toolbar. The new button is represented by a smiley face.
-
9
Right-click on the newly added button.
-
10
Rename the button to your liking or leave the default name in the Name: field.
-
11
Click Edit Button Image… and change the image for your button or leave it the same. The Button Editor has controls similar to the Windows Paint program.
-
12
Click «Assign Macro.«
-
13
Select a macro you created from the list.
-
14
Click OK.
-
15
Click Close on the Customize dialog box.


Advertisement
-
1
Click the little arrow pointing down on the Quick Access Toolbar.
-
2
Click More Commands.
-
3
Select Macros from the Choose commands from list box.
-
4
Select your macro from the left hand column and click the Add button.
-
5
Select the macro that you just added from the right hand column and click the Modify button.
-
6
Click the button image you want to represent your macro, type the display name you want in the Display name text box and click the ‘OK’ button.


Advertisement
-
1
Make sure the Developer tab is displayed. The Developer tab is a tab in the Ribbon at the top of Excel. If it is not displayed, follow these directions in order to display it:
- Click File → Options → Customize Ribbons
- Find the Developer check box in the Main Tabs section and click it. Press «OK» when you are done.
-
2
Add «New Group» under the Developer Tab to create a custom group for the command/button that will be created.
-
3
Still in the Customize Ribbon, click on the dropdown menu to choose command. Select Macro. Thereafter, all recorded macros will appear in the left box.
-
4
Select the desired macro for button creation (make sure the newly added group is highlighted, you will know if the macro was added when it appear in the right box under your new group).
-
5
You may now customize your button. Right-click and select Rename.
-
6
If everything is set, Click «OK»


Advertisement
-
1
Make sure the Developer tab is displayed. The Developer tab is a tab in the Ribbon at the top of Excel. If it is not displayed, follow these directions[1]
in order to display it:- Go to Excel → Preferences → Ribbon (Under Sharing and Privacy)
- Under Customize, check the box next to the Developer tab, and press «OK»
-
2
Click on the Developer tab and click Button. The Button icon is under the Form Controls group in the Developer tab and looks like a rectangular button.
-
3
Place your button. Place your cursor where you’d like the button to go and drag to select the size of the button. You can make the button as small or as large as you’d like, given your needs. If you wish, you can move the button around after placement.
-
4
Assign a macro when prompted. Excel should automatically prompt you to assign a macro to your button after you finish placing it. Once you’ve selected your macro, click «OK.»
- If you are unfamiliar with what macros are or how to record them, read more. You should have a macro already built before you create the button.
-
5
Format the button. Right-click on the newly created button and select «Format Control.» Select Properties → Don’t move or size with cells → OK. This helps you maintain the size and placement of your button. If you don’t have this property chosen, your button size and placement will change if you have it add, delete, or move cells.
-
6
Rename the button. Change the text in the button to say whatever you’d like it to.


Advertisement
Ask a Question
200 characters left
Include your email address to get a message when this question is answered.
Submit
Advertisement
Video
-
Try using the 2003 method for Excel versions earlier than 2003.
-
Alternatively, you may add your macro button to an existing toolbar in versions 2003 and earlier.
-
If you prefer, it will let you assign a shortcut key in the dialog box. This can prevent wrist strain and save time.
Thanks for submitting a tip for review!
Advertisement
-
The user interface on versions earlier than 2003 may be different so the 2003 method may not be exactly the same for those versions.
-
If you want a different button image than what version 2007 offers, you will need to download additional software that specializes in modifying user interfaces for Microsoft Office.
Advertisement
About This Article
Thanks to all authors for creating a page that has been read 479,461 times.