
There are few experiences as universally familiar as losing a Word document. Everyone from high schoolers with Catcher in the Rye book reports to business executives with quarterly earnings knows the panic of their work disappearing when it’s just a few crossed-t’s away from being completed.
Fortunately, there are dependable ways to recover Word documents quickly and reliably. Whether your work was accidentally deleted, lost in a Microsoft Word crash, or simply disappeared, here’s a simple guide on how to recover unsaved Word documents.
And remember, if all else fails, installing a data recovery program like Acronis Revive or falling back on a recent file or system backup may help get your documents back (at least in a workably recent state).
Can I retrieve a Word document that wasn’t saved?
Whether you rely on Word for personal or business tasks, losing an unsaved document sucks.
If you don’t save your Word documents manually, your files can fall victim to an unexpected crash. If you’ve already experienced such loss, chances are you have a habit of pressing the «Save» button once (or twice) every so minutes. However, not many users have that habit.
Nonetheless, even if your system crashes with an unsaved document open, you can still recover it through several options.
You can recover unsaved files through Temporary Files, AutoRecover Files, Document Recovery, Recycle Bin, and Data Recovery solutions. We’ll explore all of those options more deeply a bit later in the article.
Does Word keep backup files?
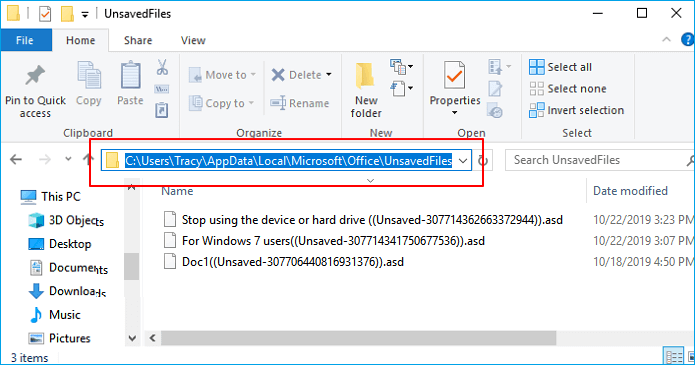
Like most programs in its class, Microsoft Word has an in-built «auto-save» feature to automatically back up your progress every few minutes. The default auto-save folder to support this function is the AppData folder.
Examples of the file path to harvest copies of your work are:
C:UsersYour_UsernameAppDataLocalMicrosoftWord
Or
C:UsersYour_UsernameAppDataLocalTemp
Or
C:UsersYour_UsernameAppDataLocalMicrosoftOfficeUnsavedFiles
Word backup files carry the «.wbk» extension. If you haven’t disabled the backup option in Word, the program will make copies of your documents regularly.
To check if the backup option is active, go to «File» -> «Options» -> «Advanced»; then scroll down to the «Save» section -> select «Always create backup copy».
Can Word save to the Cloud?
Yes, it can. If you rely on the native Windows option, your documents will be uploaded to OneDrive.
Having your documents on the cloud enables easier sharing and improves collaboration. It also allows easier mobile access (from a PC, laptop, smartphone, or tablet) and enhances data protection.
To save files to the cloud, do the following:
1. Select the «File» menu and go for the «Save As» option;
2. Choose «OneDrive»;
3. Choose a descriptive file name and go for «Save».
You can save personal and payment information to OneDrive – Personal, with work-related files going to a company OneDrive. You can also pick an alternative location in the list or «Add a Place» of your preference.
If you’re using a third-party backup solution like Acronis Cyber Protect Home Office, you can upload backup files to the Acronis cloud. Storing your files with a dedicated cloud backup service provides improved cybersecurity via backup encryption, automated backups, and concrete data recovery processes.
How do I restore a permanently deleted file?
Multitasking on a device may lead to losing critical data. (files, documents, images, audio, video, etc.)
Sometimes, you can get distracted and accidentally delete files and folders. The most common reasons for an accidental deletion are:
· Accidentally emptying your Recycle Bin;
· Erasing documents via «Shift+Delete» keys;
· Deleting files via the command line;
· Deleting files with the «Do not move deleted files to Recycle Bin» option enabled
File deletion or corruption can also result from malware or virus infection on your device.
Fortunately, you can recover perma-deleted data and documents in several feasible ways. Not all of them are guaranteed to recover permanently deleted documents, but you may try all of them in order when needed.
You can still recover seemingly perma-deleted files due to how your hard drive operates. Every file on your device resides on a specific portion of the hard drive. When you delete a file from your hard drive, the drive removes the deleted data and marks the space it used to occupy as «free» for writing new data.
However, the file can be restored to its original location unless you write new data on the newly available space. Remember, you need to act quickly – even if you don’t save new data to the hard drive manually, your computer can initiate updates or save system data on the newly available space.
In such a scenario, recovering permanently deleted files becomes close to impossible.
How to recover deleted Word documents via Backup?
Windows 10 and 11 pack a new feature called Backup and Restore.
The option enables users to create backups of their data to restore them later if needed. To recover permanently deleted files via Backup and Restore, you’d need to have enabled the option on your Windows device.
Here’s how to do it:
· Connect the external media carrier holding the backup to your primary device
· Go to «Control Panel» -> select «System and Security» -> click «Backup and Restore (Windows 7)» option
· Once in the Backup and Restore menu, go for the «Restore my files» option -> a Restore wizard will pop up to start file recovery
· If you can’t find the «Restore my files» option, go for the «Select another backup to restore files» option. Again, a wizard will pop up to assist you with your recovery
Recovering via Backup and Restore will replace all data on your Windows device with backed-up data. So, to avoid further data loss, make sure the backup contains all your crucial data.
How to recover deleted Word documents via Previous Windows 10/11 version?
Windows 10 and 11 offer another convenient feature to restore permanently deleted files – the «File History» option. If you had enabled the option before deleting a document, you could use it to recover permanently deleted files without additional software.
To do so:
· Type «File History» in the Start menu or the Windows search bar
· Select «File History Settings»
· From the left panel on the pop-up window, choose «Restore personal files»
· Navigate the feature to the backup you wish to restore. You can do that via the left and right navigation buttons at the bottom of the window. While you switch between backups, you can preview backup dates and the folders within them
· Once you’ve located the specific backup storing the deleted documents, press the «Restore» button to recover the files to their original location
· If Windows suggests it already carries a file with the same name in the destination folder, go for the «Replace the file in the destination» option
Lastly, close the window and check if the recovery is successful.
How to recover deleted Word documents via Command Prompt?
Sometimes, files and folders can be hidden due to the «Hidden files and folders» feature in Windows. You can use the Command Prompt to try and recover them.
To do so:
· Type in «cmd» in the Search Bar on the Start menu
· Choose the «Run as administrator» option
· Type chkdsk *: /f in the Command Prompt. The * represents the letter of your hard drive, so replace it properly. Once you do, hit «Enter»
· Type ATTRIB -H -R -S /S /D D:*.* in the Command Prompt window. Here, replace the «D» with the letter corresponding to your hard drive. Once you do, hit «Enter» again
A recovery process should start immediately if you’ve followed the above steps successfully. Let it finish and check if your files have been restored.
How to recover deleted Word documents via System Restore?
If you’re running Windows 10 or 11, you can opt for a System Restore to recover permanently deleted files. As System Restore takes regular (automated) snapshots of your whole OS, you can revert any unwanted changes to your system by reverting it to a previous point in time.
However, you’d need to have activated the System Restore option beforehand.
To recover perma-deleted files via System Restore, you need to:
· Type in «create a restore point» in the Start menu or Windows search bar, and click «Enter»
· Select «System Restore»
· Go through potential system restore points in time and select the most appropriate to recover the deleted document; then, click «Next»
· Confirm the specific restore point and choose «Finish»
· Your PC or laptop will then restart to allow Windows to apply the changes
Although this option is convenient, you must remember that System Restore may affect recently installed drives, programs, and browser updates. As its primary goal is to repair your Windows environment, it will revert your device to an older version of itself. And that older version may not have some programs or apps installed or updated correctly.
Nonetheless, before the System Restore process starts, the feature will show you a window containing all programs that will be affected by it. This way, you can back up all potentially affected programs and files before you revert your system.
How to recover deleted Word documents via System Image Recovery?
System Image backup enables users to back up the entirety of a Windows 10 or 11 OS. However, the feature doesn’t allow single file and folder backup, so you wouldn’t be able to restore individual documents if needed.
Here, it’s either recover everything or don’t recover anything.
To recover documents via System Image Recovery, you need to:
· Type «settings» in the Start menu or Windows search bar, and click «Enter»
· Browse and select «Update & Security»
· From the options list on the left, go for «Recovery»
· Save the progress on any open documents or programs
· Then, go for the «Restart now» button (you can find it under «Advanced Startup»)
· Afterward, select “Troubleshoot” -> “Advanced Options” -> “See more recovery options” -> “System Image Recovery”
· Browse through the list of System Image backup files and select the one containing the deleted document, then click «Next»
· Choose additional restore options, then click «Next»
· Review all System Image properties and click on «Finish» to start the restoration process
Once the restoration is complete, the deleted document should be restored to its original location. (or an alternative location, if you’ve chosen so in the Restore settings)
How to recover deleted Word documents via a third-party Backup solution?
If you’re using a dedicated backup solution, you can initiate data recovery and restore permanently deleted files from your device.
For example, Acronis Backup and Recovery enables users to initiate efficient backups with over 20 supported platforms. Via the cloud, your data is securely stored in physical, cloud, virtual, and mobile environments.
If you need to recover files from Acronis backup, you can do it via the user-friendly interface.
To do so:
· Start Acronis Cyber Protect Home Office -> select «Backup» on the sidebar
· Select the backup containing the deleted documents from the backup list
· On the panel to the right, select «Recovery»
· The interface will present you with possible recovery models for the selected backup; depending on the backup’s type, you’d be able to choose from «Entire PC», «Disks», «Partitions», and «Files» options. To recover one or more documents, select «Files»
· Cyber Protect Home Office will display the backup’s properties and the data inside it. Then, select a specific version of the backup based on the date and time. The default option here is the latest backup
· The panel on the left lets you navigate the files you wish to restore in the panel on the right; after you select all needed documents, press «Next»
· Choose a recovery destination on your device to place the selected documents after restoration. Here, you have two options – recover the data to its original location or choose a new location via the «Browse» button
· You can customize the recovery settings for the current session via the «Recovery options» menu.
· Once you’re done with the settings, go for the «Recovery now» button.
You can terminate recovery via the «Cancel» button at any time. However, aborted recoveries can still cause changes in the selected destination folder, so only go for the option if absolutely necessary.
Tips on preventing your Word Files from being deleted or unsaved
How to recover Unsaved Word Document?
We rely heavily on autosaves, yet huge chunks of progress and entire versions of documents can be lost when we don’t manually save our work. The good news is, this problem is so common that Microsoft has made it easy to recover unsaved Word documents:
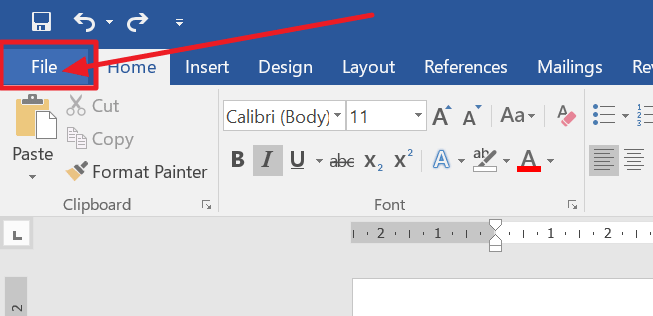
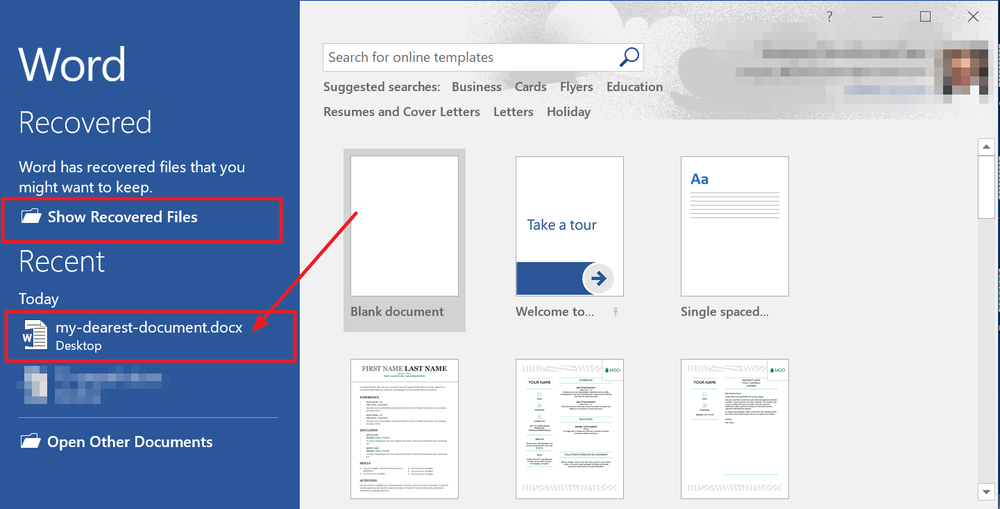
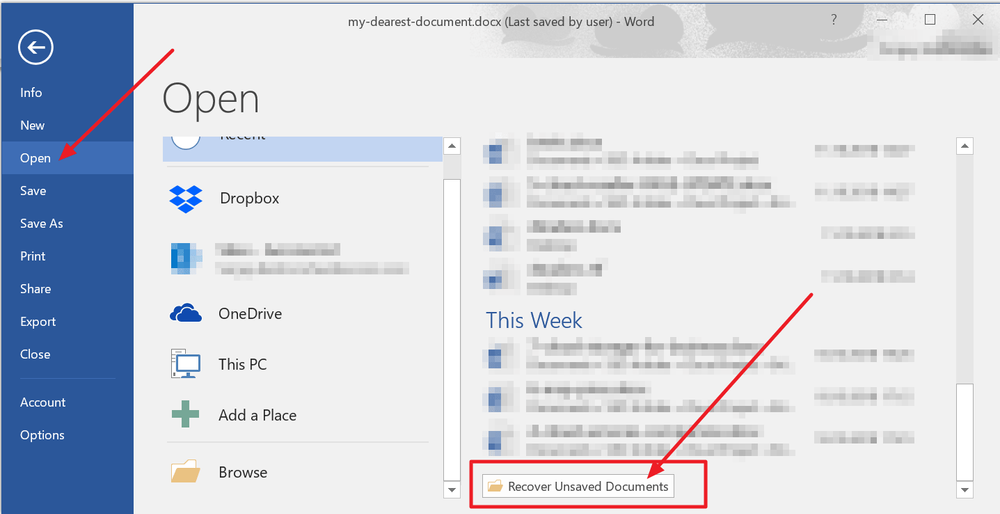
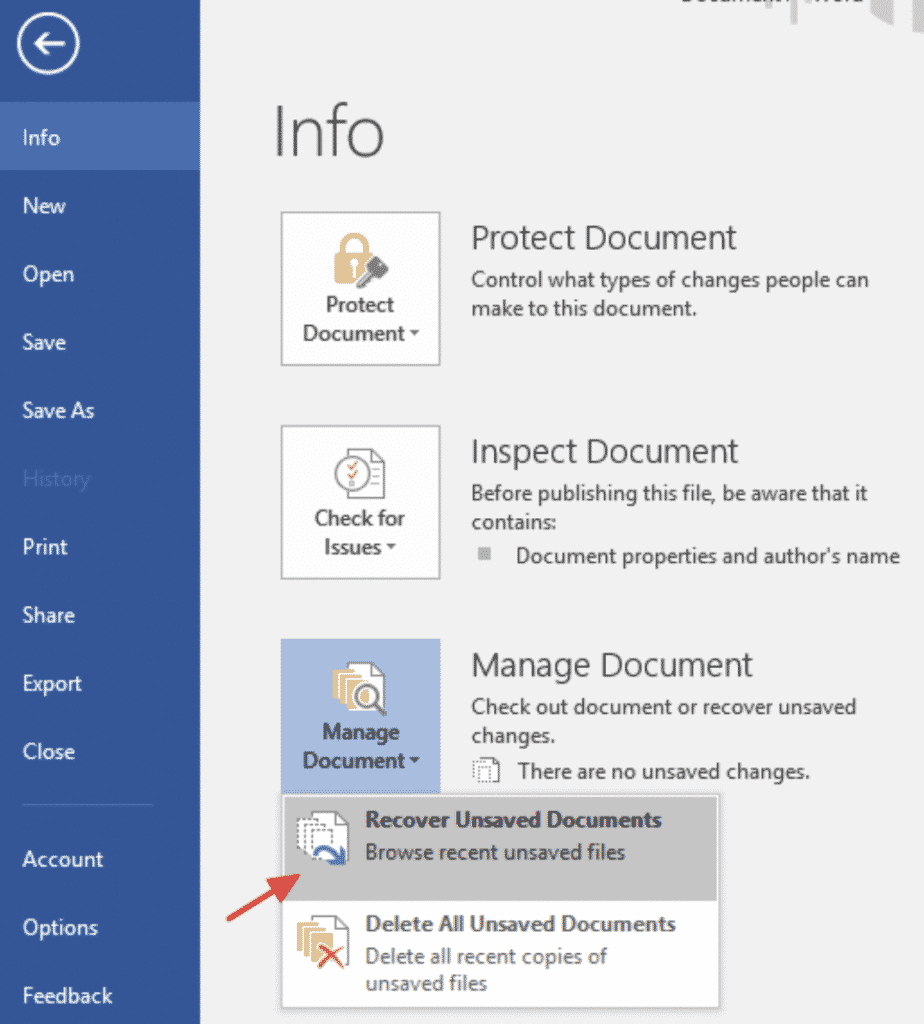
1. In MS Word, click the File Tab in the upper left.
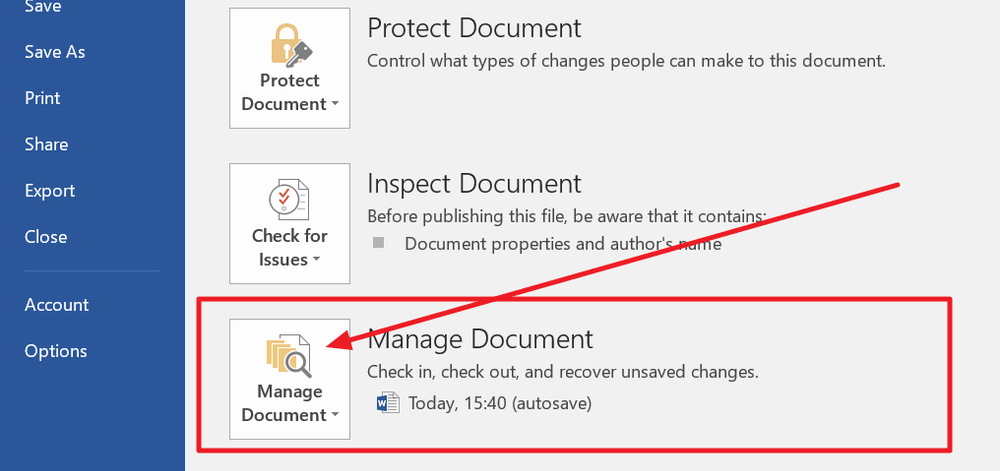
2. Click Manage Document and select Recover Unsaved Documents from the drop-down list.
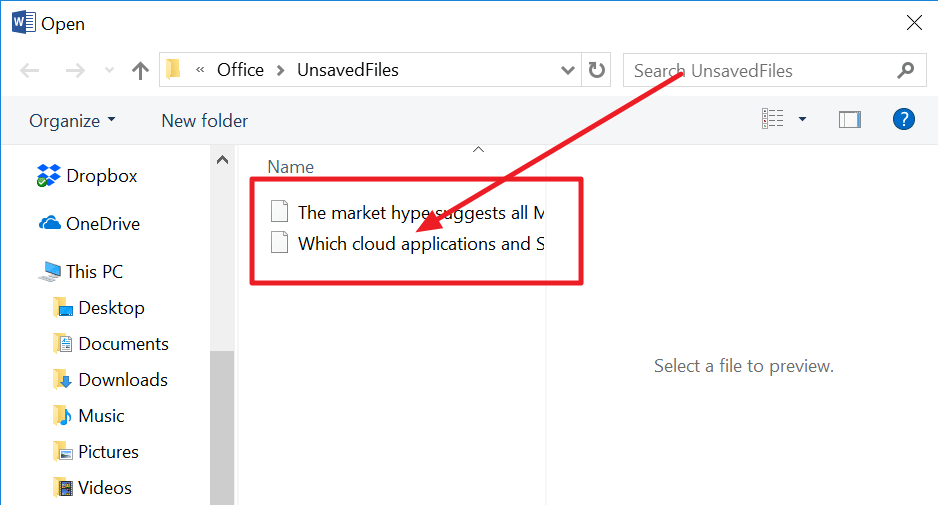
3. Check for your missing file in the dialog box. If it was a recent loss it should appear.
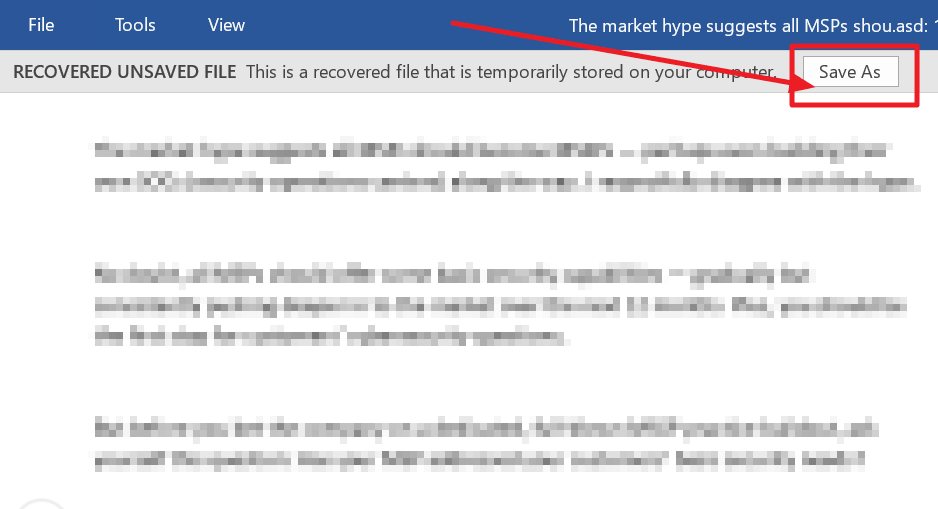
4. Open the recovered Word document and click the Save As button in the top banner.
Did You Know?
You can update the frequency with which Microsoft Word autosaves your documents. Click File > Options > Save and change the number of minutes to ensure you have a recoverable version of all your docs available in case you need to recover Word documents in the future.
Knowing how to recover deleted Word documents will make you seem like a wizard to many of the people in your office, but it’s not complicated at all. Whether you’re trying to recover MS Word documents that were accidentally deleted or compromised by malware, there are a few easy steps that could help you get it back.
1. On your desktop, open the Recycle Bin
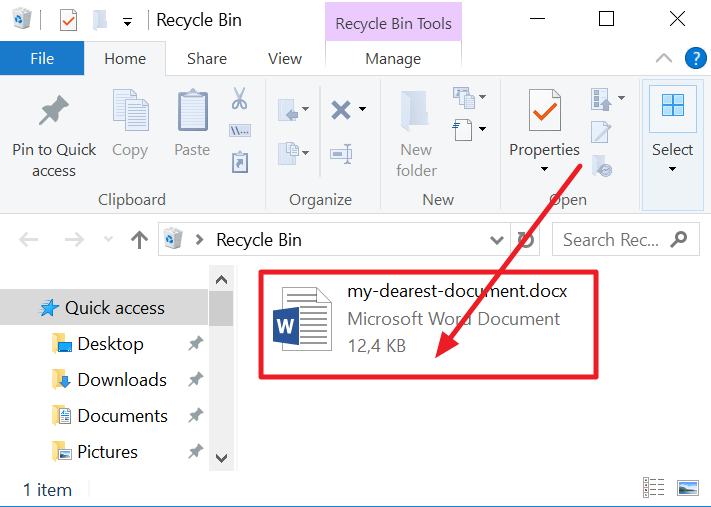
2. Search for your file by document name, file type, or date deleted. If you find your missing file, note the Original Location. When you recover deleted Word documents, they automatically are restored to that location.
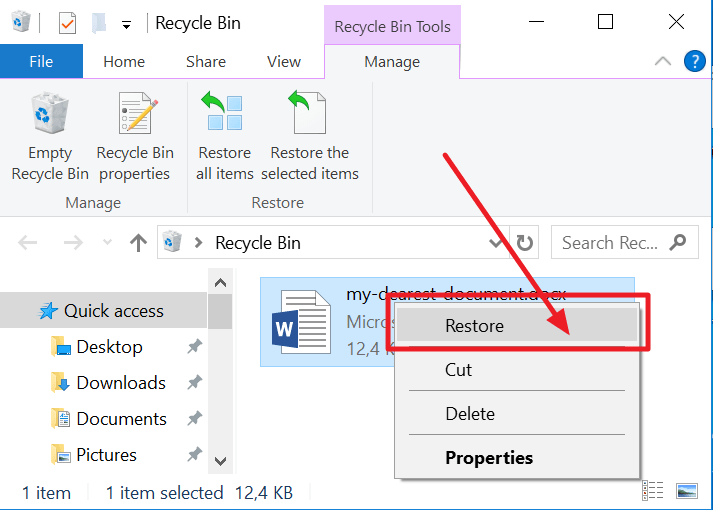
3. Restore the deleted document and either find it in its original location or click Quick Access to find it in the Recent Files list.
Did You Know?
When a file is deleted you’re actually just removing a marker that points to where the file was stored on the disc. The file actually exists on the disc until its space is overwritten by new information. Until that happens, you have a chance to recover Word documents.
How to recover Word Documents after a Crash?
Recovering Word documents that didn’t save doesn’t always stem from user errors. Whether your system unexpectedly went down or Microsoft Word crashed, Word documents can be recovered if you quickly search for the lost files before other files can take their disk space.
1. When your system comes back online, reopen Microsoft Word. The program automatically recovers unsaved Word documents in most cases.
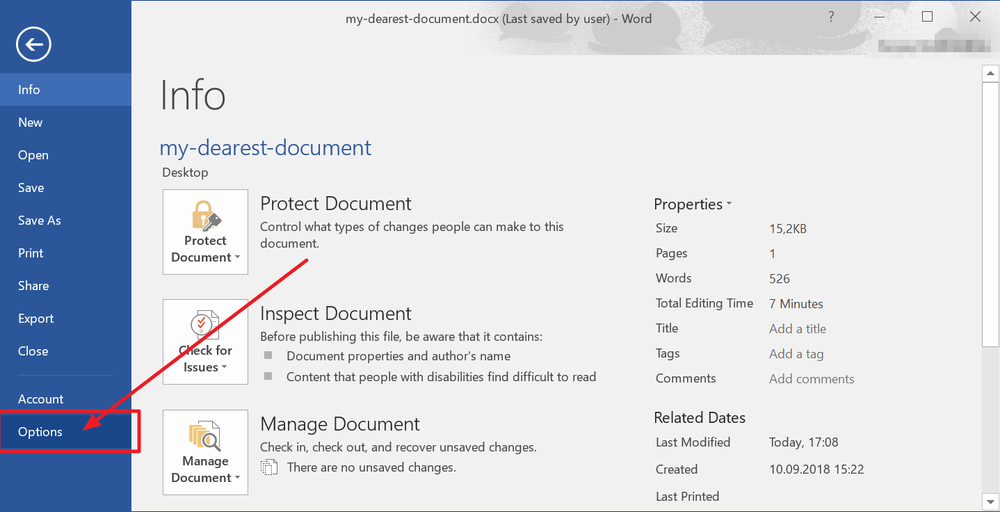
2. If your document doesn’t appear in the AutoRecover list, click on File, then Options, then Save.
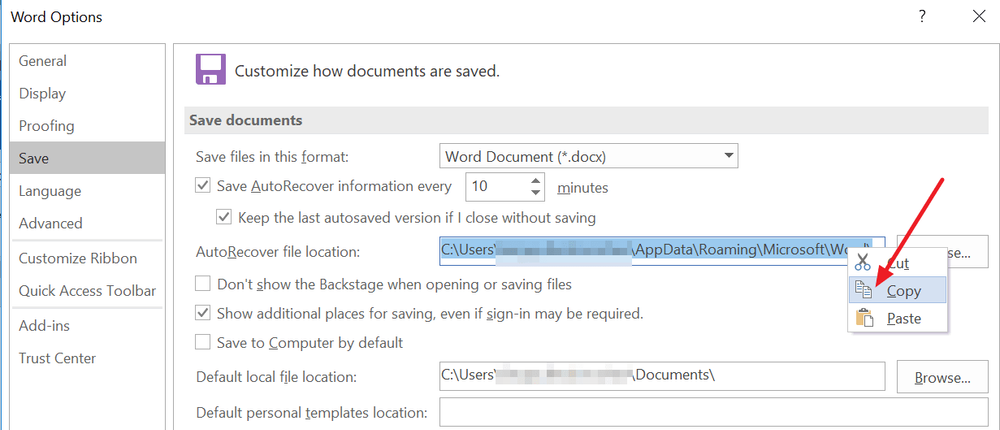
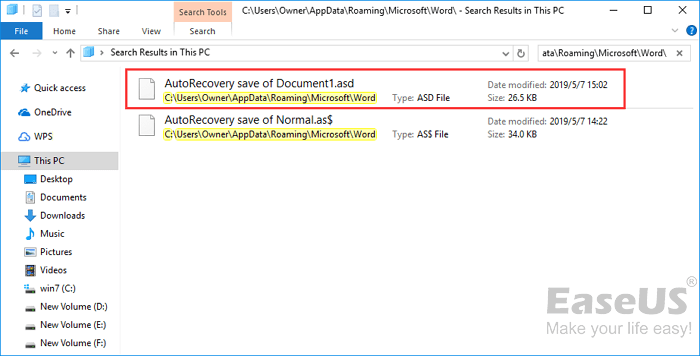
3. Copy the AutoRecover file location filepath and paste it into File Explorer.
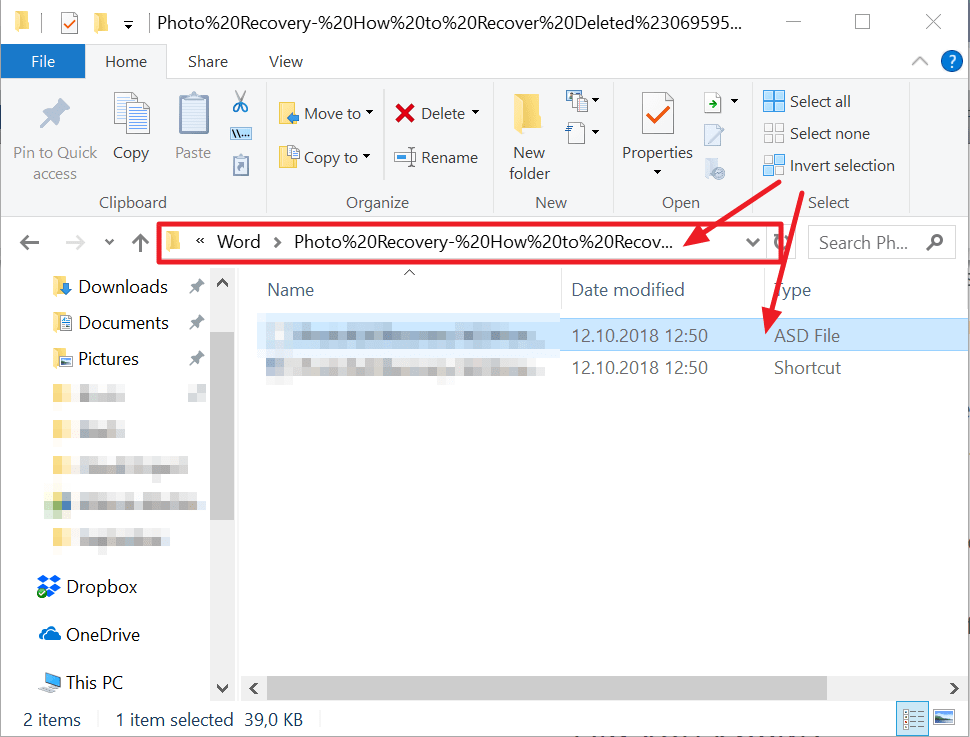
4. Open the folder with your document’s name and copy the .asd file with the most recent modification date and time.
5. Return to MS Word, click File, then Open, then scroll to the bottom of the recent documents list and click Recover Unsaved Documents.

6. Paste the copied file into the folder that pops up and open the file to recover it.
Did You Know?
One of the most common reasons for Microsoft Word crashing is corrupt add-on or template. If your program consistently crashes, try running Word without any of these features loaded to see if that helps to improve reliability.
Can I recover a permanently deleted word doc without a backup?
Recovering a permanently deleted file via backup is the easiest and most reliable option. However, sometimes, users don’t have the chance to add a specific document to the backup. If they then accidentally delete the document, recovery gets a hell of a lot more complicated.
In such a scenario, you have two primary options.
The first one is to use data recovery software. Nowadays, many recovery tools claim to have an exceptionally high rate of recovering permanently deleted files. Usually, such solutions can recover over 1000 file types and formats and claim to restore data even from corrupted partitions or bad sectors on your hard drive.
They typically operate by collecting the lost data bit-by-bit until they can fully restore its original state. Such an approach can prove handy occasionally, but that depends heavily on the state of your computer’s hard drive.
If you lose a document due to a bad sector on your hard drive, the software may not be able to recover all of the document’s pieces successfully. This may lead to an altered version of the document or may not be able to restore it at all. In such a case, the document would be lost unless you have it stored in some form of backup.
This leads us to the second option.
Suppose a user perma-deletes a document by accident. In that case, most often, their reaction is to panic, especially if they don’t have the document stored in a backup outside their primary device.
However, we live in a technologically webbed world – anyone can send documents to multiple recipients via email, social media platforms, or free cloud services.
You can go through old emails, check DropBox or OneDrive shared storage, or go through your correspondence on Facebook and Instagram to find the deleted file. Nonetheless, if you’re 100% sure you haven’t sent the document to anyone, you can opt for the data recovery software option.
As we’ve mentioned, AutoSave is an in-built feature available in Word, Excel, and PowerPoint. (given you have a Microsoft 365 subscription)
AutoSave saves the progress on your Word files every few seconds unless you tell it otherwise. If you store your Word files on OneDrive, SharePoint, or OneDrive for Business, AutoSave is enabled by default.
To save a copy of your work before implementing any changes, it’s better to use the command «File -> Save a Copy» rather than «File -> Save As». That way, AutoSave will not overwrite the original document with the changes you make afterward.
If you skip that step and end up with an overwritten document, you can still restore the original via Version History. To do so:
· Open the Word file you wish to restore to a previous version
· At the top of the windows, click on the filename and go for «Version History»
· Review the dates and times of all versions to find the one you wish to restore -> click «Open Version»
· An additional window will pop up and show you the specific version of the document
· Once you’ve made sure this is the version you want to restore, click «Restore»
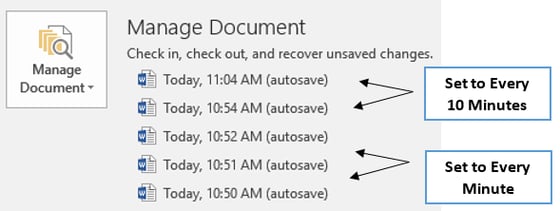
Whenever you open a Word document and make first changes, AutoSave will save those changes by adding a new file version to Version History. Afterward, AutoSave will regularly save changes to the document but only add new versions to Version History about every 10 minutes until you terminate the session. (ending the session means closing the Word document)
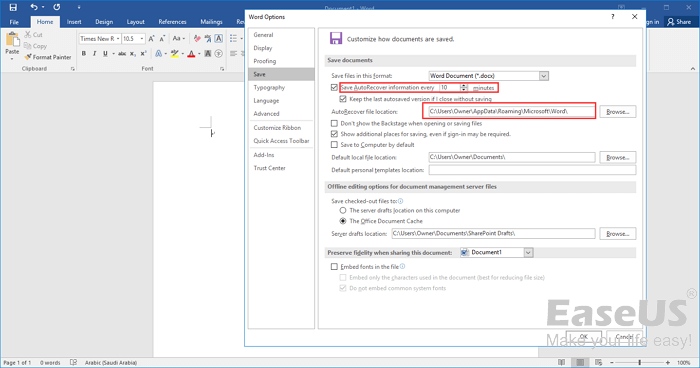
How do I get Microsoft Word to save AutoRecover versions every minute?
If you’re handling critical information via Word documents, saving a version of the file every 10 minutes may seem risky. However, Microsoft has thought of that – you can change the AutoRecover frequency to any number that suits you.
Here’s how to do it:
· Open Word and go to File -> Options -> Save
· You’ll see a settings section labeled «Save documents»
· Under the «Save documents» line, type your chosen number (of minutes) in the «Save AutoRecover information every (…)» box
· Once done, press «OK»
If you want to change the location for AutoRecover documents, go to:
· File -> Options -> Save
· Under the «Save documents» line, browse or type in the save path for saved documents in the «AutoRecover file location» field
· Once done, press «OK»
The AutoRecover settings window allows you to also:
· Disable AutoSave for OneDrive and SharePoint online files by default
· Change the cache location for AutoRecover files. The default should be «C:UsersYour_UsernameAppDataRoamingMicrosoft[OFFICEAPPFOLDER]
· Enable AutoSave on the computer by default
According to Microsoft, however, there is no option to use AutoSave locally in Office 2019 or 2021. Nonetheless, the AutoRecovery feature is still active to periodically save copies of your Word files to negate accidental data loss due to a crash.
Can I turn on AutoRecover in Word for Mac?
As with Windows, AutoRecover is available for Mac to protect the progress on your Word documents. Its default function here is the same – it makes a copy of your document every 10 minutes.
To enable AutoRecover and set the timeframe for making copies, you need to:
· With Word open on your Mac, go to the «Word» submenu on the top
· Choose «Preferences»
· Choose the «Save» option
· Choose «Save Auto-Recovery Information» and type in the duration you wish to set for AutoRecover copy creation
Microsoft advises users not to rely on AutoRecover as a substitute for manually saving their documents. (by clicking on the «Save» icon)
The most optimal way to preserve changes to your document is by manually saving it after every significant change. Nonetheless, it doesn’t hurt to set the AutoRecover timer to 5 minutes instead of 10 to guarantee you won’t lose progress due to a crash.
Keep in mind, when you manually save a document, its previous AutoRecover versions are removed.
On the other hand, AutoSave is a feature that saves your documents as you work on them. It works as if you’ve manually saved your progress. For Mac, AutoSave is available in Word, Excel, and PowerPoint for Mac and Microsoft 365 subscribers.
If you have AutoSave enabled, it’s less likely you’d need to rely on AutoRecover files.
Where is Autosave in Word located on Mac?
The AutoSave and AutoRecover features are linked in the Word menu. The path to enable AutoSave follows the same steps as with AutoRecover. However, you’ll have a few extra steps to complete before AutoSave is active for Word on your Mac.
Here’s how to do it:
· Open Word
· From the top menu, choose «Word» -> «Preferences»
· Click on the «Save» icon
· Tick the checkbox labeled «Turn on AutoSave by default»
· From the Word document, enable the AutoSave toggle to save your progress to the cloud (OneDrive or SharePoint)
· Explore more options from the AutoSave tab and select the «Automatically Save» option
· The AutoSave toggle will appear on the top side of the Word toolbar
· Name the document you’re working on and choose OneDrive or SharePoint as the storage location of the Word file
· Click «Save» to enable AutoSave to store changes in your desired location in real-time
· Your document will then be uploaded to the chosen location
·Once that’s done, AutoSave is on, and all changes you make to the document will be saved to OneDrive or SharePoint
Where can I find AutoSave Word documents on my computer?
If a power failure or a crash occurs, AutoRecover will typically recover the last version of your Word document automatically when you launch the app. Once AutoRecover opens the existing recovery file, it’s best to save it before editing or closing it immediately.
However, you may need to find AutoRecover files on your computer for other reasons. To do so:
· Switch to Finder
· Click «Go»
· Click «Go to Folder» (you can also use the SHIFT + COMMAND + G combo)
· Enter the specific folder path corresponding to Word, Excel, or PowerPoint
For Word:
/Users/Your_Username/Library/Containers/com.Microsoft/Data/Library/Preferences/AutoRecovery
For Excel:
/Users/Your_Username/Library/Containers/com.microsoft.Excel/Data/Library/Application Support/Microsoft
For PowerPoint: /Users/Your_Username/Library/Containers/com.Microsoft.Powerpoint/Data/Library/Preferences/AutoRecovery
Just a reminder: Replace «Your_Username» with your actual username.
As the AutoRecovery folder is hidden, typically, you won’t be able to find it by navigating in Finder. That’s why you need to use the «Go to Folder» feature and type in the full path to reach the folder.
Additionally, if you close a Word document and click «Don’t Save», the AutoRecover option won’t be active. The feature will delete the AutoRecover file because it assumes everything is okay and you wouldn’t need the AutoRecover file.
Can Microsoft Word recover previous versions of my document?
If you have turned the AutoRecover option on, it will automatically save versions of your documents regularly. (usually, at 10-minute intervals)
Once you have the AutoRecover files for your document, you can recover them depending on when you saved them.
There are two options: recover a saved file or an unsaved one.
If you have saved the document, you have to:
· Open the document you were working on
· Select “File” -> “Info”
· Find «Manage Documents» and choose the file labeled (when I closed without saving)
· A bar on the top of the file will appear; choose «Restore» to overwrite any previously saved versions
You can also compare AutoRecover versions by choosing «Compare» instead of «Restore».
If you haven’t saved the document, you have to:
· Open Word and go for “File” -> “Info” -> “Manage Document” -> “Recover Unsaved Documents”
· Select the specific file and click «Open»
· In the top file bar, choose «Save As» to save the document
If you have stored AutoRecover files in OneDrive or SharePoint in Microsoft 365, you can view all historical versions of a document.
To do so in Office 365:
· Open the file you want to inspect
· Select “File” -> “Info” -> “Version History”
· Browse through versions and select them to open them in a separate window
· If you want to restore the document to one of the previous versions, choose «Restore»
Keep in mind, if you operate via a Microsoft account, you’d be able to retrieve the last 25 versions of a document. If you sign in with a school or work account, the retrievable version volume will depend on your library configuration.
To view AutoRecover versions in Office 2019-2016:
· Open the document you want to inspect
· Click “File” -> “History”
· Choose a version to open in a separate window
If you can’t locate the «History» tab on the Word navigation pane, you may have a subscription version of Microsoft Office. If that’s the case, click the «Info» button and try accessing Version History from there.
To view AutoRecover versions on Mac:
· Open the document you want to view
· If you are using Microsoft 365 for Mac, choose the name of the document from the app’s title bar -> click «Browse Version History»
If you’re running Office 2016 or 2019 for Mac, go for «File» -> «Browse Version History»
· Browse AutoRecover versions and choose which ones to open in a separate window.
To view AutoRecover versions on the web:
· Open the document you want to view
· Go for “File” -> “Info” -> “Version History”
· Browse through AutoRecover versions and open the ones you want in a separate window
· When you find the version you’re looking for, choose «Restore»
If you use SharePoint in Microsoft 365 to handle documents, you can track AutoRecover versions, share them with others, and check recycle bin storage if you accidentally delete a file.
How to search for Word doc which I know I saved?
If you’re sure you have saved a Word document but haven’t been able to locate it, worry not. There are several ways to unfold saved documents, even when you’re computer is swamped with Word files.
You can search a file via the taskbar, the Documents tab, or File Explorer.
To find a Word document via the taskbar, type in the document’s name (if you remember it correctly) into the search box on the Windows taskbar. If you don’t know the full name of the document, you can use a keyword from it.
You can get results even if you remember a keyword from the text body of the document. (and not its name)
Once you type the name or keyword, Windows will show all matches on your device and OneDrive.
You can select the Documents tab if you wish to narrow your search. Once you do, your search results will only show documents.
Moreover, you can open File Explorer from a taskbar shortcut or right-click the Windows Start menu and choose File Explorer. Afterward, you can select a location on your hard drive from the left window pane.
You can then search or browse to find the document you need. You can search your entire device by selecting «This PC», or go for «Documents» and only look for files stored there.
How to search for Word backup files?
Although Word backup is seamless once set up for users, finding specific Word backups may be difficult without preparation. Luckily, you can learn how to pinpoint different Word backups below.
Check Word settings
If you remember how to open the AutoSave settings in Word, you can skip the next set of instructions. If not, you need to:
· Start Word -> click on «File»
· Choose «Options» and then click on «Save» on the left
· Ensure that the «Save AutoRecover information» option is enabled
Once you reach the settings window, go to the AutoRecover File Location field. Here, you can check the current AutoSave directory location.
By default, it would be «C:UsersYour_UsernameAppDataRoamingMicrosoftWord»
Once you locate the AutoSave directory location, you need to:
· Launch Word
· Navigate to the AutoSave directory
· Look for the version of the automatically saved backup and double-click it; the file will open in Word
As we’ve mentioned, the AutoSave directory may be a hidden folder on your computer, primarily if it resides in the AppData folder. However, you can bypass that by pasting the directory location in File Explorer’s address bar.
Nevertheless, you can navigate to the folder manually if you follow the path. Just make sure to reveal hidden items to be able to see the AppData folder. Once that’s done, you should easily find your way to the AutoSave directory.
Check the AppData folder
As we’ve said, the AppData folder is the default location for AutoSave backups. The pathing to the AutoSave directory can vary; the most common places to look are:
C:UsersYour_usernameAppDataLocalMicrosoftWord
and
C:UsersYour_usernameAppDataLocalTemp
Sometimes, the most recent AutoSave versions may use a different location. Most often, you’d be able to find them in
C:UsersYour_usernameAppDataLocalMicrosoftOfficeUnsavedFiles
As with previously shown paths, replace «Your_Username» with the username corresponding to your user account.
Regardless of which folder holds your Word backups, the AutoSave files have weird-looking names, especially for a casual user. They typically have a tilde before their name and the «.tmp» extension alongside a 4-digit number assigned to them.
Below are some examples of what Word backup files look like in different scenarios:
· ~wrdxxxx.tmp – such a name relates to a Word document within an AutoSave folder;
· ~wrfxxxx.tmp – such a name relates to a temporary document file;
· ~wraxxxx.tmp – such a name relates to an AutoRecovery file;
Complete AutoRecovery files won’t carry the «.tmp» extension but rather the «.wbk» extension. Once you locate them, you can double-click them to open the document in Word. An important note is always to save the file after you open it.
How to use the Recover unsaved documents option?
Sometimes, you’re sure you’ve saved a Word document, but your PC crashes, and you can’t locate the file afterward.
In such cases, you can still recover the document from the AutoSave location. To do so:
· Open Word and go to «File»
· Click «Recent», then select «Recover Unsaved Documents»
· You will be redirected to the AutoSave location folder; you can browse the documents here and find the one you’re looking for
Another path to reach the AutoSave folder is as follows:
“File” -> “Info” -> “Manage Versions” -> “Recover Unsaved Documents”
After you open the file, make sure to save it.
Check the Documents directory
To check the Documents directory, you should:
· Start Word
· Select «File», then choose «Open»
· Go for «Browse» and navigate to the directory you suspect holds the document
· Ensure to change the File Type of the folder from «All Word documents» to «All Files»
· If you’ve opened the correct folder, you should be able to see all corresponding backup files; you should easily spot the specific file as it is typically titled «Backup of (…)»
· Once you find the backup, you can open and save it
How to search your Windows temporary files manually?
In some instances, finding a backup file via traditional methods is more challenging, especially if you can’t find the AutoSave folder.
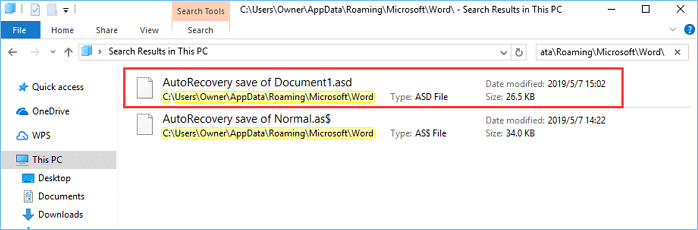
However, you can manually search for temporary files by tracking their extensions. Autosaved Word files usually carry the .asd or .wbk file extension.
To search for those, you should:
· Press the Windows Key + E on your keyboard; this will launch the File Explorer
· Once it’s up, click on the search bar on the top right
· Type in «.asd» or «.wbk» (without the quotes)
· Press «Enter»
· Windows will now search for all .asd and .wbk extensions
· Once the search is complete, you can browse through the matches and find the file you’re looking for
· Upon finding the specific file, right-click it and choose «Open File Location»; this will open the AutoSave directory location so that you can see all automatically saved backup files
If searching for .asd and .wbk extensions doesn’t bear any fruits, you can search for .tmp extensions. However, .tmp files aren’t necessarily all Word files. Many of them can support files from other applications, so you’d have to do some sorting.
How to recover Word Documents through Data Recovery Programs?
If none of these methods help you recover unsaved Word documents, your best bet is either backup software or data recovery software.
As always, the most secure and reliable way to recover data is with regular full image backups. Whether you use a Windows PC, a Mac, or a mobile device, having up-to-date backups ensure that you don’t lose your files – no matter what.
That said, if you didn’t have a backup plan in-place and active when you lost your Word document, you won’t have a backup to restore the file from.
In this case, personal cyber protection solutions like Acronis Cyber Protect Home Office are the best way to help you recover Word documents. Acronis Cyber Protect Home Office is an easy-to-use software solution that allows you to backup up the entire contents of your system so in the event of a disaster, you can locate a lost file and restore the MS Word document with just a few clicks.
Final Thought
Whether your Word doc was deleted, encrypted by malware or corrupted when it was saved on a faulty partition, you can recover it with Acronis Cyber Protect Home Office. When armed with regular backups, your docs can be recovered quickly and easily so you never have to worry about losing a Word doc or any other file ever again.
Applied to: Microsoft Office Word 2020, 2019, 2016, 2013, 2010, 2007, and 2003
Closing the Word accidentally or a program/system crash may cause the unsaved Word document to disappear. Luckily, there is still a chance to recover unsaved Word documents in Windows 10/11 from Temporary Files, AutoRecover, or Word Document Recovery.
Besides, if your saved Word document gets deleted, you can restore deleted Word documents from the Recycle Bin or by using one of the best data recovery software.
| Workable Solutions | Step-by-step Troubleshooting |
|---|---|
| Fix 1. Recover unsaved Word from Temporary Files | Open Word program, click «File» > «Info» > «Manage Document» > «Recover Unsaved Documents»…Full steps |
| Fix 2. Restore unsaved Word documents from AutoRecover | Open Word > click «File» > «Options» > «Save» > copy AutoRecover file location path and paste it…Full steps |
| Fix 3. Retrieve unsaved Word with Document Recovery | When your system comes back online, reopen Word, click available files under Document Recovery…Full steps |
| Fix 4. Restore deleted Word from Recycle Bin | Go to the Recycle Bin. Check if the deleted word file is still there. If you don’t know the name…Full steps |
| Fix 5. Recover lost Word documents with Data Recovery Software | Choose the hard disk drive or a specific folder where the Word document was saved, click «Scan»…Full steps |
Have you accidentally closed your Word application without saving the document you had been working for a few hours? Have you lost the Word file unsaved due to a sudden program crash? Or mistakenly deleted some saved and essential Word document? If you are looking for an effective solution, you’ve come to the right place.
In this article, we will show you the most useful ways to recover unsaved Word documents. Furthermore, we also introduce you to a renowned office file recovery tool — EaseUS Data Recovery Wizard to help you restore deleted or permanently deleted Word documents in a few clicks. It is also competent to repair corrupted DOCX/DOC files as well as other documents.
Solution 1. Recover Unsaved Word Document from Temporary Files
Unsaved Word documents vanishing is a very unpleasant problem. Take it easy. There are three possible ways to find a Word document that is not saved. The following operations use Word 2016 edition as an example. The steps for Word 2013-2019 are similar.
Recovering unsaved Word documents requires you to turn on AutoSave in advance. If this feature is turned on, you can find the unsaved files through the following path:
C:UsersOwnerAppDataLocalMicrosoftOfficeUnsavedFiles
Or you can follow the steps given below to do it.
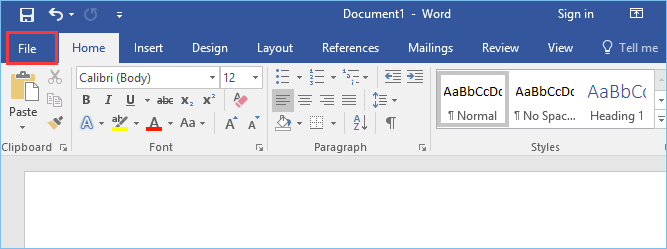
Step 1. In MS Word, click the «File» tab in the upper left.
Step 2. Click «Manage Document» and select «Recover Unsaved Documents» from the drop-down list.
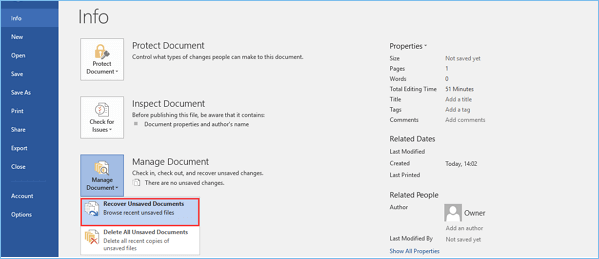
Step 3. Check for your missing File in the dialog box. If it was a recent loss, it should appear.
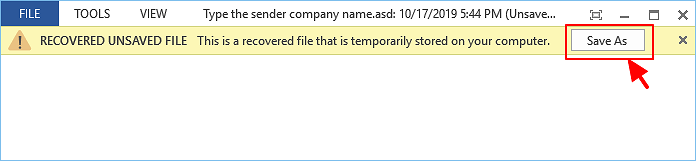
Step 4. Open the recovered Word document and click the «Save As» button in the top banner.
Additional Help — How to Turn on AutoRecover
Many of us have experienced a situation where we have created a Word document and then accidentally closed it out without saving it. To avoid this kind of situation, you’d better enable AutoRecove.
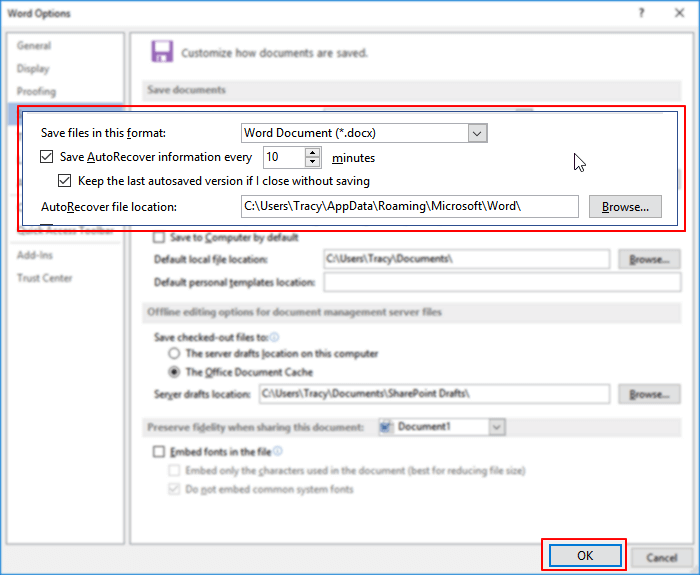
Step 1. Open Word, go to «File» > «Options» > «Save».
Step 2. Tick the box of «Save AutoRecover information every * minutes» and «Keep the last autosaved version if I close without saving».
Step 3. Click «OK» to save the changes.
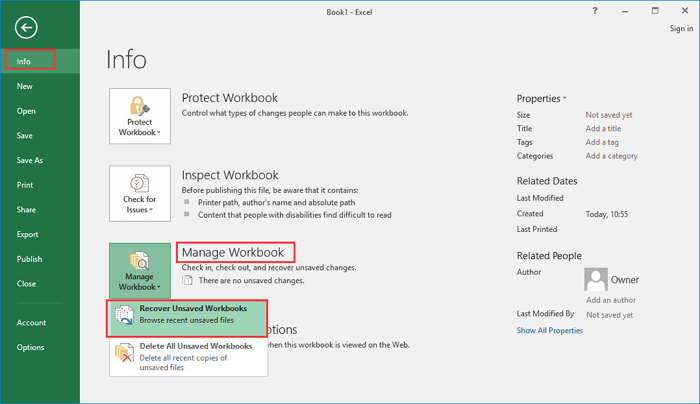
Excel, like Word, is an indispensable office software. If you lose an unsaved Excel document, you can use the methods we recommend to retrieve it.
![]()
Solution 2. How to Recover Unsaved Word Document from AutoRecover
Another way to get back an unsaved Word document is by using AutoRecover. AutoRecover file names end in the .asd file name extension. By default, Word searches for AutoRecover files every time that it starts, and then it displays any data found in the Document Recovery task pane. If the Document Recovery pane does not open, manually search for auto-recovered files. To do this, use one of the following procedures according to your Word version:
For Word 2010 — 2019:
Step 1. Open the Word program, and click «File» > «Options». In the left navigation pane, click «Save». Copy the AutoRecover file location path and paste it into File Explorer.
Tip: You can change the time of AutoSave interval in «Save AutoRecover information every xx minutes» and click OK.
Step 2. Go to the File Explorer, find the unsaved document, and copy the .asd file.
Step 3. Go to your Word app, click «File» > «Open» > «Recover Unsaved Documents» at the bottom.

Step 4. Paste the copied .asd file into the File Name box popping up. Open the Word file recover it.

If Word warns that «Word experienced an error…», repeat the steps and click «Open and Repair» at the open Unsaved Document window.

For Word 2002 — 2007:
| Versions | Steps |
|---|---|
| Word 2007 |
1. Click the Microsoft Office Button, and then click «Word Options» > «Save». 2. In the AutoRecover file location box, note the path, and then click «Cancel» and close Word. 3. Open the folder that you noted in step 2. 4. Look for the Word document that you are looking for ends in .asd (AutoRecover files). Then, double-click it to open and save it immediately. |
| Word 2003 & 2002 |
1. On the «Tools» menu, click «Options». 2. Click the File Locations tab, double-click AutoRecover files, note the path, click «Cancel», and then click «Close». Note: In the Modify Location dialog box, you may have to click the down arrow in the Folder name list to see the whole path to your AutoRecover files. Close Word. 3. Look for files whose names end in .asd (AutoRecover files) after locating the AutoRecover file location. 4. Double-click the Word document to open it. Next, save it immediately. |
Then, you can check the file content and save it as a new Word file at another secure location.
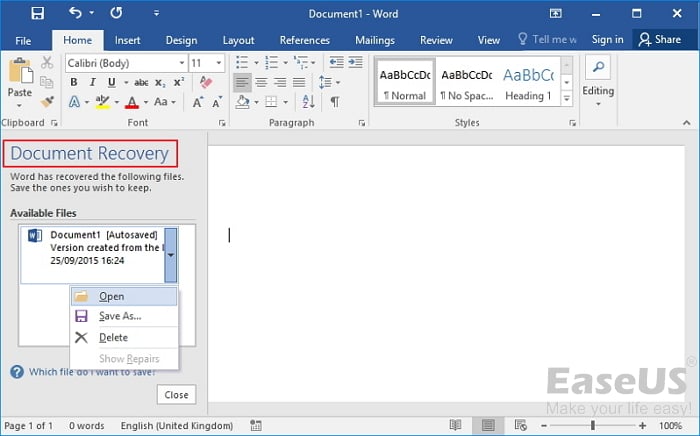
Solution 3. How to Restore Unsaved Word with Document Recovery
If your Word crashes or closes abruptly, it will automatically restore unsaved Word documents in most cases when it comes back online. You can find the unsaved Word documents on the left panel, under Document Recovery.
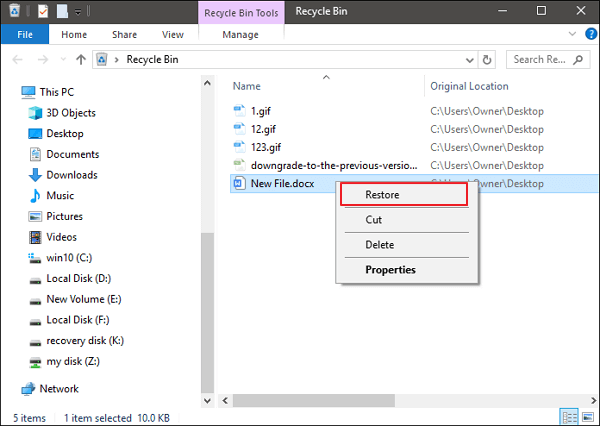
Solution 4. How to Recover Word Document from Recycle Bin
If you deleted a Word document without emptying the Recycle Bin, you could undelete the Word document with simple clicks.
Step 1. Go to the Recycle Bin. Check if the deleted word file is still there. If you don’t know the name, look for file types such as DOC, DOCX, DOT, etc.
Step 2. Select the Word file and click «Restore» to recover it.
If you have emptied the recycle bin after deleting files, the deleted Word file may have been permanently removed. If you are in the same case, follow the next solution to restore deleted Word documents with a data recovery program.
Solution 5. How to Recover a Word Document with Word File Recovery Software
If you have lost saved Word documents because of careless deletion, hard drive formatting, or system errors, the above ways won’t work. At this time, you have to resort to a professional hard drive recovery software — EaseUS Data Recovery Wizard.
With this capable tool, you can recover deleted files in Windows 11/10/8/7 in various formats, including documents, videos, audio files, emails, ZIP, and more.
Note: This solution can be only used to recover deleted or lost Word documents that were saved on your computer before.
Step 1. Choose the Word file location
Choose the drive or a specific folder and click the «Scan» button.
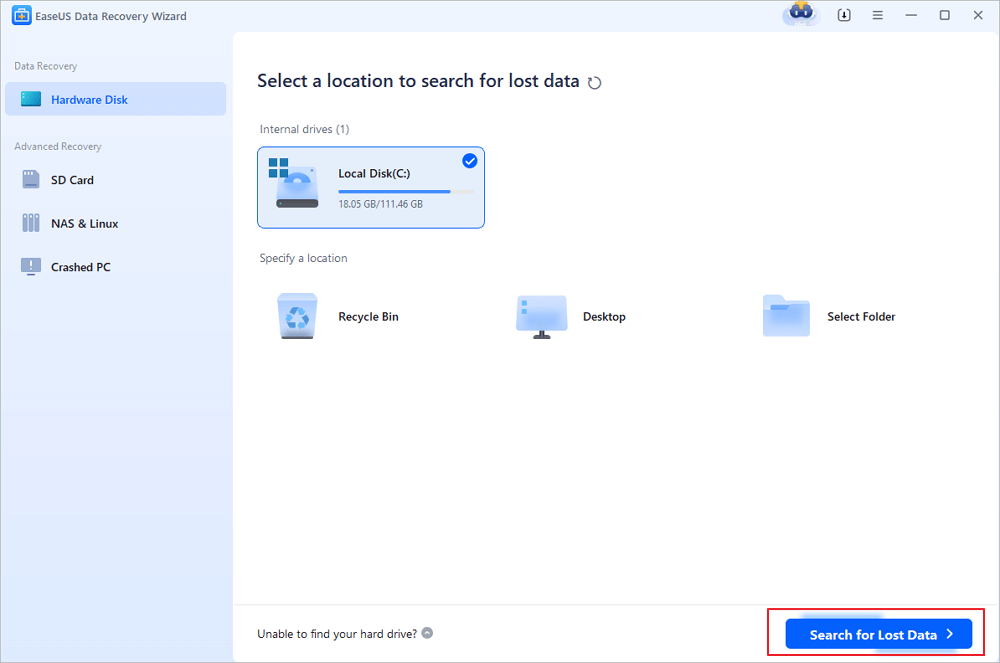
Step 2. Locate your Word files
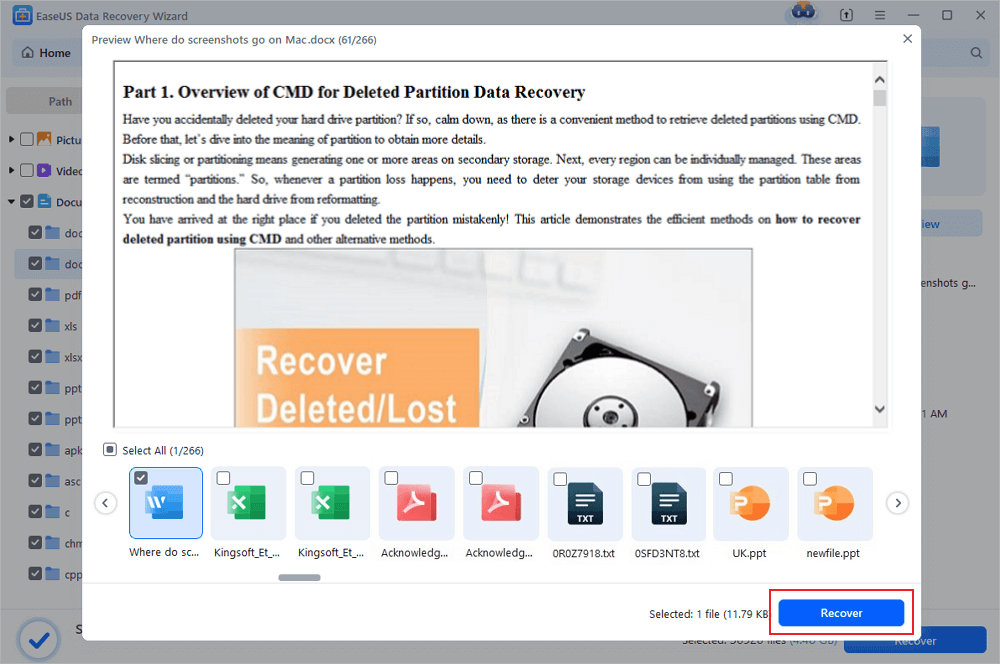
The software will start immediately scanning all lost data on the selected drive. After the scan, click the «Documents» option in the left panel. Choose «Word» from the category bar. Then, click «Preview».
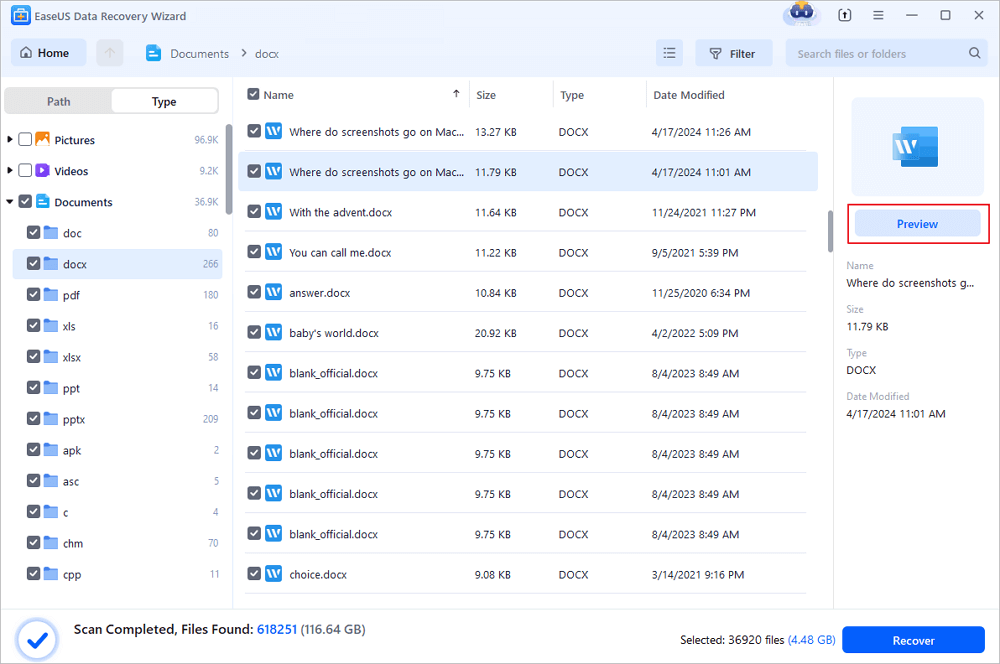
Step 3. Recover Word files
After previewing the lost Word files, select the desired Word files and click «Recover». Then, select a folder to store the Word files.
- Important
- We don’t recommend you try any data recovery software to recover unsaved Word documents. This type of program only helps you recover lost saved Word document due to accidental deletion, disk formatting, virus attack, partition loss, etc. Namely, there needs to be an original file saved before on your computer or storage media.
How to Recover Unsaved Word Document on Mac in 2 Ways
On Mac, AutoRecover is turned on by default. Take the two methods below to recover unsaved Word on Mac by using the AutoRecover function.
Solution 1. Restore Unsaved Word Document in Finder
Step 1. Start your Mac and open the Finder window.
Step 2. Search for AutoRecovery in the search bar. A list of files Word documents named «AutoRecovery save of» will appear.
Step 3. Find and open the Word document you want to recover.
Step 4. Click the «File» menu and choose «Save As». Rename the restored files and click the Save button.
Solution 2. Restore Unsaved Word Document with Terminal
The unsaved Word document can be recovered from the temporary folder by using Terminal.
Step 1. Open your Mac and go to «Applications» > «Utilities» > «Terminal».
Step 2. Type open $TMPDIR and find the TemporaryItems folder on the list.
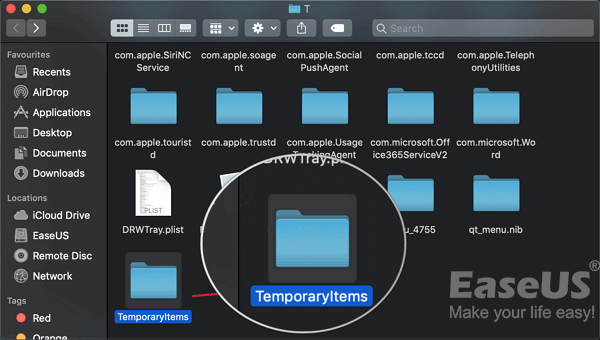
Step 3. Find the file you need. Open and save it to recover unsaved Word documents.
Conclusion
In this tutorial, you can learn five ways to recover unsaved Word documents on Windows and Mac devices. With the help of EaseUS file recovery software, you can restore lost Word documents, whether they are deleted, encrypted by malware, or corrupted when it was saved on a faulty partition.
Hope these solutions can help you get back any lost Word documents.
Recover Unsaved Word Document Frequently Asked Questions
If you still have some Word recovery problems, you can read the following questions and answers to get more help.
How do I recover an unsaved Word document Windows 10?
Step 1. Click the «File tab», then choose «Info», then select «Manage Documents».
Step 2. Select «Recover Unsaved Documents» from the drop-down menu.
Step 3. Click «Open» when you have selected the document you want to recover.
Step 4. Click the «Save As» button and save your Word document.
How to recover unsaved Word document from USB?
If you have unsaved changes to a Word document that is stored on a USB drive, you can recover your work in two ways:
One way is to try opening the document from the Recent Documents list in Microsoft Word. To do this, open Word and click on the File menu. Then, click on Open and select Recent Documents. If your unsaved document is listed, you should be able to open it and recover your work.
Another way to recover an unsaved Word document from a USB drive is to use the Autosave feature. To do this, open the document that you were working on and look for the Autosave folder. If you find the file, you can recover your work by opening it in Word.
How to recover unsaved Word document 2016?
Try these methods to restore unsaved Word document in Word 2019, 2016, 2013, or 2010:
- Check your recently opened documents
- Try opening a temporary file
- Use the AutoRecover tool
Where are unsaved Word documents stored?
These Word files can be found via «File> Open» and click the «Recover Unsaved Documents» button at the very bottom of the Recent File List.
The heart-sinking feeling when you exit a document and realise you didn’t press ‘save’. The document is now gone, into the ibis and you have frantically googled ‘how to recover a lost Word document’.
Or you know that forgetting to press save is something you’ve done in the past, so this time you didn’t forget. You quickly pressed ‘save’ after made some changes to ensure you don’t lose your precious work, before realising you just saved over the last version of the document because you didn’t ‘save as’ as new file. WHY?!?

How do you recover your lost document?
How do you recover the document you just saved over before someone else in the team realises what you just did?
Well, you’ve come to the right place, in this article we will show you how to recover a lost Microsoft Word Document, saving you from a world of stress.
Recovering a lost Microsoft Word Document
- Open a new Word Document
- Click the File Tab
- Click Manage Document
- Select Recover Unsaved Documents
- Look for your missing file in the box
- Find and Click your missing file
You have now successfully found and opened your lost Microsoft Word File.
Now that you have the file back, press ‘save’ and continue working. Turning on AutoSave is a fantastic way to ensure you never lose a document again.
How to prevent losing a Microsoft Word Document
Microsoft Word now has an AutoSave function that will save your document every few minutes for you, to ensure you never lose another edit again.
Here’s how to turn AutoSave on in Word:
- Open Word
- Find and click the tab next to AutoSave

- Upload/store the document in your preferred ‘Place’
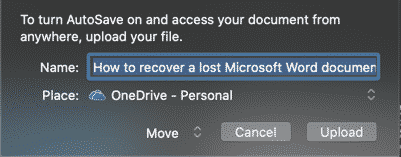
- Press Upload
AutoSave has now successfully been turned on and you can continue working without having to worry about pressing ‘save’ every 30 minutes.
Looking for an easier way to keep track of your Microsoft Word Documents?
Keeping track of your document can be challenging, especially when you are saving multiple versions of a file and collaborating with your team.
When you are working in a shared drive, without remote access your team may even pull a document out of the shared drive, save it to their desktop and work on this while they are offline.
Once back in the office, it seems simple enough to then drop the update file back into the shared drive and continue collaborating as normal.
But what if someone else had made changes to the live shared file in the time this colleague had taken a version offline, made changes and then re-saved it to the shared drive. This would leave you with two different ‘updated’ versions of the same document and no way of knowing which one is the most recent file or when the changes were made.
Your team may need to access the files offline for a number of reasons, maybe they are travelling, working from home, from an airport or an aeroplane where there is no internet connection. There are a number of reasons a team member may need to work offline leaving us open to disjointed file management more frequently than we’d like to admit.

Lucky for us, there are now some great purpose-built tools on the market such as Simul Docs that not only manage version control for you but allow you to work offline, or from anywhere without losing track of any edits, changes or updates.
Simul knows that when you are making changes to an existing document you will want it saved as a new file, and probably don’t want to have to remember to press ‘save as’ before you start editing and then ‘save’ every 30 minutes.
So Simul will automatically create a new version every time an edit is made to an existing document, saves as you go, word by word and gives you access to your documents anywhere, anytime.
You can access your documents offline on Simul, make changes and re-format knowing that the moment your computer or device is back online Simul will update the file for the rest of your team to see and save it in line with the version history.

If two team members happen to be working on the same document, offline, at the same time Simul has your back here too.
Each team members file will be saved as a new version, uploaded when they are back online, and an alert is sent to the document owner that there are two new versions available to their review.

The document owner can then review the documents and merge them together at the click of a button.
Simul allows you to collaborate from anywhere, anytime without worrying about saving your work or accidentally over-riding a colleagues file.
Its collaboration made easy and Simul knows you needed it.
So, give it a try, with Simul on your side you’ll never search for a lost document again.

on
August 15, 2018, 9:48 PM PDT
How to find and recover a lost Microsoft Word document
If you are trying to track down a missing Word document, these tips and tricks might be helpful.
We may be compensated by vendors who appear on this page through methods such as affiliate links or sponsored partnerships. This may influence how and where their products appear on our site, but vendors cannot pay to influence the content of our reviews. For more info, visit our Terms of Use page.

You’ve been working on an important document in Microsoft Word, and now it’s missing. You’ve searched your default document location, your entire hard drive, and the Recycle Bin, but the Word document is still nowhere to be found. Is it gone for good? Do you have to recreate the document from scratch? No, at least not yet. You may still be able to locate and revive the Word document by taking certain precautions ahead of time and looking for the right files in the right places.
SEE: Software usage policy (Tech Pro Research)
Your Word documents, like other files, can lose their way. Sometimes you may create or revise a document and simply forget to save it; other times, your computer may freeze, crash, or otherwise hiccup, preventing your document from saving properly. In these cases, you may lose the entire Word document or just the latest changes, or the file itself may become corrupted and unreadable. Whatever the scenario, you can often recover the entire file–complete with the latest changes.
To start, let’s assume you’ve already checked your hard drive and your Recycle Bin for the file, either by the specific name or a wildcard combination, but you came up empty. Here’s one tip: Do you use File History in Windows 10 to back up important folders, including those for your Word documents? If so, open your backup drive to look for the document in the proper location.
Here’s another tip: Do you sync your documents through OneDrive or another online service? Most cloud-based storage sites offer a Recycle Bin or Trash folder where you can restore deleted files. In the case of OneDrive, open your online storage space. You can search across all folders for your document by name or wildcard combination. Otherwise, click the entry for Recycle Bin. OneDrive and other storage sites hold onto your deleted files for up to 30 days–you can sort your deleted files by name, location, deleted date, or size. If you find the document, select it, and click the Restore button (Figure A).
Figure A

Next, there are steps you can take in Word before you lose a document so that you can more easily find a backup version of it. In Word, open the File menu, select Options, and then click Advanced. Scroll down the Advanced screen until you see the section for Save. Check the option for Always Create Backup Copy (Figure B).
Figure B

If a document ever goes missing, open your default document location. Browse or search for files that start with the name Backup of and have the extension wbk. If you find the appropriate backup of your lost document, just double-click it to open it in Word (Figure C).
Figure C

Here’s another setting in Word that should be enabled. Return to the Word Options menu and click Save. Make sure the option to save AutoRecover information is checked–this option can come to your rescue if a document is ever saved without its latest changes. Set the number of minutes to save the file. Note the AutoRecover file location (Figure D).
Figure D

If you find your lost document but without the latest changes, click the File menu in Word (2016 or 2013). Click the Manage Document button and select Recover Unsaved Documents (Figure E).
Figure E

In the Open window, look for any files with an ASD extension. Open the right file in Microsoft Word to see if your document appears with the latest changes (Figure F).
Figure F

Through File Explorer, you can also check the AutoRecover file location, which is typically C:Users[your username]AppDataRoamingMicrosoftWord. Look for and open a folder with the name of your document. You can open the ASD file itself in Word, or more easily click on the shortcut with the docx extension to open the recovery file (Figure G).
Figure G

Sometimes a lost or unsaved Word document may still exist as a temp file. Open File Explorer and search your hard drive for *.tmp files. Switch the view to Details so you can sort the files. After all the results appear, click the Date Modified header to sort the files by date, starting with the latest ones first. Look for files tagged with the date your document went missing. Avoid any files with a size of 0KB. Open each potential file in Word to see if you find your lost document (Figure H).
Figure H

Also See
-
Microsoft acknowledges price increases coming for Office 2019 and Windows 10 Enterprise users
(ZDNet) -
10 all-purpose keyboard shortcuts to boost your Word efficiency (free PDF)
(TechRepublic) -
10 time-saving tips to speed your work in Word
(TechRepublic) -
5 ways to modify and customize styles in Microsoft Word
(TechRepublic) -
10 things you should never do in Word
(TechRepublic)
-
Microsoft
-
Software
 Many of us have experienced a situation where we have created a Word document and then accidentally closed it out without saving it. Is it lost forever? Do I have to recreate the entire document over? Those are just a few of the questions that will be flying around in your head. Take a deep breath, and follow the steps below to recover your document.
How to recover an unsaved Word document using Microsoft Word 2010, Word 2013, and Word 2016
- Click the File tab / Manage Documents.

- Click the Manage Document button.

- From the drop down list, click Recover Unsaved Documents.

- The Open dialog box opens displaying a list of your unsaved recoverable Word documents. Select the Word document you wish to recover and click the Open button.

- The recovered Word document is now open and displays an information banner across the top recommending that you Save the file.

- Click the Save As button and save your Word document.


Not only have you recover your document quickly but it is also saved for future access.
There are few things as frustrating as having to redo work that you just did. If you like these tips, check out our video on 10 amazingly useful features in Word. We love to help people have “AHA!” moments!

Closing an existing Word document without saving it
Another situation you might find yourself in: accidentally closing out of a previously saved document but failing to save the latest changes. Microsoft Word will help you recover up to the last 10 minutes of your work. You can also change the amount of time you would like Word to save a recoverable copy of your work. In the screen shot below you will see that I had Word save a temporary copy of my document every minute. I then changed it back to the default setting of 10 minutes.
- Click the File tab / Manage Documents.
- Locate and click on the latest autosave version to recover the latest changes made to your document. Don’t forget to Save your recovered Word document.
Change the save AutoRecover information time
If you would like change the frequency with which Microsoft Word automatically saves a recoverable copy of your document, follow the steps below. The default time is set to 10 minutes.
- Click the File tab / Options.
- In the Options dialog box click the Save option located on the left side.

- Under Save documents change the minutes to how often you would like Word to save a recoverable version of your document.

- When finished click OK


Here’s hoping that you are able to recover all of your work!
You might also like…
![]()
Download Article
A step-by-step guide to recover unsaved or damaged Word documents and restore previous versions
![]()
Download Article
- Recover Unsaved Documents (PC)
- Recover Damaged Documents (PC)
- Restore Previous Revisions (PC)
- Recover Unsaved Documents (Mac)
- Recover Damaged Documents (Mac)
- Restore Previous Revisions (Mac)
- Video
- Expert Q&A
- Tips
|
|
|
|
|
|
|
|
Did you close Microsoft Word without saving your document? You’re definitely not alone! Don’t panic—Microsoft Word has plenty of built-in options that can help you recover documents on your PC or Mac. This wikiHow teaches you how to restore unsaved or damaged Word documents, as well as how to go back to previous revisions. If you can’t recover your Word document using these tools, you’ll need to use data recovery software or restore from a backup to recover the document.
Things You Should Know
- If a document you need is damaged or corrupted, you can repair it using the Open and Repair feature in Word.
- If you save your documents to OneDrive or SharePoint, you can restore them to previous versions.
- If you forgot to save, find the file in /Preferences/AutoRecovery on a Mac or using Recover Unsaved Documents on a PC.
-

1
Open Microsoft Word. You’ll find it in the Windows Start menu.
- If Word crashed before you could save your document, you may see a panel called «Document Recover» in the left side menu upon opening the app. If this panel opens, click your unsaved file in the panel to open it, and then go to File > Save As to save it now. If this worked for you, there’s no need to continue with this method.
-
2
Click the File menu. It’s at the top-left corner of Word.
Advertisement
-
3
Click Info. It’s near the top of the left panel.
-
4
Click the Manage Document icon. It’s in the right panel and looks like a sheet of paper with a magnifying glass. A small menu will expand.
-
5
Click Recover Unsaved Documents on the menu. This opens the Unsaved Files folder, in which you’ll see a list of recently backed-up files that were automatically saved by Word but not yet officially saved by you.
-
6
Select the document and click Open. This opens the document in Word.
- If you didn’t see your document in the folder, it’s possible that you saved it to your Documents or Desktop folder.
-
7
Save your recovered document. So you don’t lose the document again, click the Save As button in the gray bar running across the top of the document and save it to a folder you’ll remember (such as Documents). If you don’t see this option, click File and select Save As.


Advertisement
-
1
Open Microsoft Word. If you can’t open your Word document because it’s damaged or corrupted, you can usually use the built-in repair tool to recover the document.[1]
You’ll find Word in your Windows Start menu. -
2
Click the File menu. It’s at the top-left corner.
-
3
Click Open. It’s in the left panel toward the top.
-
4
Click Browse. It’s at the bottom of the «Open» column in the center. This opens your computer’s file browser.
-
5
Navigate to the location of the damaged file. For example, if it’s in your Documents folder, navigate to that location.
-
6
Click the file once to select it. Don’t double-click it.
-
7
Click the down-arrow next to «Open.» A menu will expand.
-
8
Click Open and Repair. It’s toward the bottom of the menu. If the file is repairable, Word will repair it now.
- If the document isn’t repairable, you can usually extract the text without the formatting and images. To do this, select Recover Text from Any File from the «File Type» drop-down menu at the bottom-right corner and then click Open. At this point, you can either save the file by clicking File > Save As or paste it into a new file.


Advertisement
-
1
Open Microsoft Word. As long as you saved your document to your OneDrive or SharePoint in Microsoft 365, you can return to a previous version of the document. You’ll find Microsoft Word in your Windows Start menu.
-
2
Open the file you want to revert. To do this, click the File menu, select Open, navigate to and select the file, and then click Open.
-
3
Click the File menu. It’s at the top-left corner.
-
4
Open your version history. This lets you see different saved revisions of the document organized by date. The steps to do this are different by version:
- Word 365: Click Info in the left panel, and then select Version history (the clock icon) in the center panel.
- Word 2019 or 2016: Click History on the menu. If you don’t see it, it’s usually because you have a subscription to Microsoft 365. In this case, click Info in the left panel and then select Version history in the center panel.
-
5
Click the version you want. All versions now appear in the right panel under «Version history.» Clicking a version opens it in a separate Word window.
-
6
Click Restore to switch back to the selected version. This will undo any changes you’ve made since the revision you selected.


Advertisement
-
1
Open Finder
. It’s the two-toned smiley face icon on the left side of the Dock.
-
2
Click the Go menu. It’s in the menu bar that runs along the top of the screen. A menu will expand.
-
3
Click Go to Folder on the menu. It’s near the bottom of the menu.
-
4
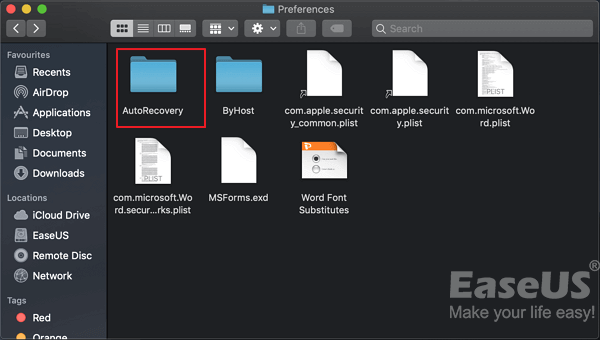
Enter the path to the AutoRecovery folder. To do this, type or paste the following path into the box (replacing username with the username you use to log into your Mac): /Users/username/Library/Containers/com.Microsoft/Data/Library/Preferences/AutoRecovery
-
5
Click the Go button. This opens a folder that contains files that were automatically saved by Word.[2]
Files in this folder begin with the word «AutoRecover.»- You won’t see the file here if you selected Don’t Save when closing Word. Unfortunately, there’s no way to recover a document if you selected that option.
-
6
Double-click the file you want to recover. This should open it in Word.
- If it doesn’t open in Word, click the file once, press Return, and then type .doc at the end of the file name. Press Return again to save the new file name and follow any confirmation requests.
- If you are prompted to select an application, click Open With and choose Microsoft Word.
-
7
Press Command to save the file. This opens the Save As dialog window, which allows you to save the document with any file name (and to any location) you wish.
-
8
Select a saving location and click Save. If you don’t see a list of folders to save to, click the On My Mac button to browse for a folder on your Mac first.[3]


Advertisement
-
1
Open Microsoft Word on your Mac. If you can’t open your Word document in Word on your Mac because it’s damaged or corrupted, you can usually use the built-in recovery tool to recover the text within. You’ll find Word on your Launchpad and/or in the Applications folder.
-
2
Click the Word menu. It’s in the menu bar at the top of the screen.
-
3
Click Preferences on the menu. A dialog window will appear.
-
4
Click the General icon under «Authoring and Proofing Tools.» It’s near the top-left corner.
-
5
Check the box next to «Confirm file format conversation at Open.» It’s the first option.
-
6
Return to Word and click the File menu. It’s near the top-left corner of the screen.
-
7
Click Open on the menu. The option to open a file will appear.
-
8
Select Recover Text from the «Open» menu. It’s the menu near the bottom-right.
-
9
Select the document and click Open. This opens the text from the document, and hopefully some or all of the original formatting. You may lose some non-text details, but the text should be intact.


Advertisement
-
1
Open Microsoft Word on your Mac. If you accidentally saved changes to your Word document and want to revert to a previous version, you can do so easily in Word 365, 2019, or 2016 for Mac.[4]
You’ll find the program on the Launchpad and/or in the Applications folder.- This method only works for files saved to your OneDrive or SharePoint in Microsoft 365.
-
2
Open the file you want to revert. To do this, click the File menu, select Open, navigate to and select the file, and then click Open.
-
3
Browse the version history. This will let you view different saved revisions of the document organized by date. The steps to do this are different by version:
- Word 365: Click the click the name of the document in the title bar of Word (at the top), and then select Browse version history.
- Word 2019 & 2016: Click the File menu and select Browse Version History.
-
4
Click the version you want. The version list appears in a panel on the right side of Word. Clicking a document version opens it in a separate window.
-
5
Click Restore to switch back to the selected version. It’s at the top of the document. This will undo any changes you’ve made since the revision you selected.


Advertisement
Add New Question
-
Question
Can I retrieve a Word document that wasn’t saved?

Spike Baron
Network Engineer & Desktop Support
Spike Baron is the Owner of Spike’s Computer Repair based in Los Angeles, California. With over 25 years of working experience in the tech industry, Spike specializes in PC and Mac computer repair, used computer sales, virus removal, data recovery, and hardware and software upgrades. He has his CompTIA A+ certification for computer service technicians and is a Microsoft Certified Solutions Expert.
Network Engineer & Desktop Support
Expert Answer
If it isn’t in your recovered files folder and you aren’t in a corporate environment, it may be gone for good. If you are in a corporate setting, there’s going to be an exchange server somewhere and there will be a copy of your file on that.
-
Question
By mistake, I deleted the file data, after the delete I saved the file. How can I get the data back?
Go to the recycle bin icon on your desktop and right click it. A menu will show up, click on restore.
-
Question
How do I recover documents deleted from my PC that are permanently deleted and are not in my recycle bin?
This will be difficult, but you will need to look for a recovery program.

Ask a Question
200 characters left
Include your email address to get a message when this question is answered.
Submit
Advertisement
Video
-
You can increase the rate at which AutoRecover saves backups of your Word file by clicking File (or Word on Mac), clicking Options (or Preferences on Mac), clicking Save, and lowering the number next to the «Save AutoRecover information every» text line.[5]
-
If you deleted your Microsoft Word document, look for it in your PC’s Recycle Bin (sometimes called Trash) folder or your Mac’s Trash folder. If it’s not there, you may be able to restore it from a backup or use a data recovery tool.
Advertisement
About This Article
Article SummaryX
1. Open Word.
2. Go to File > Info > Manage Document.
3. Click Recover Unsaved Documents.
4. Select the document and click Open.
5. Click Save As to save the document.
Did this summary help you?
Thanks to all authors for creating a page that has been read 270,906 times.
Is this article up to date?
Don’t worry if you don’t know how to recover unsaved Word document? This post will show you two wonderful solutions to work things out after losing a Word document due to accidental deletion, formatting, program crash, or unknown reasons. One is recovering lost Word document through Microsoft Word and the other is using MiniTool Power Data Recovery.
People are used to saving personal information, business data and study materials in Word documents, Excel files and PowerPoint files mainly because of its convenience. It is possible to lose the Word document due to different reasons no matter where it is stored (in the internal hard drive, external hard drive, USB flash drive, or other places).
- The document is deleted accidentally
- The document is lost due to system crash or Microsoft Word crash
- Other reasons
How To Retrieve Deleted Files On PC — Step By Step Tutorial.
You’re lucky if you do have back of the lost/unsaved Word document. But, in most cases, users don’t have the latest backup for the Word document. So they are wondering can I retrieve a Word document that wasn’t saved.
How to recover unsaved Word document at this time? In brief, you have two choices:
- Use MiniTool Power Data Recovery to recover lost Word document.
- Recover previous version of Word document through Microsoft Word.
In fact, unexpected file loss is a common problem that lots of people are facing with or have ever met. Most of them struggle to know how do I recover an unsaved Word document on my computer, instead of recreating a new document with almost the same content.
In this part, you’ll learn how to recover an unsaved Word document with MiniTool Power Data Recovery in different platforms.

Learn Practical Ways To Recover Missing Files On Windows 10.
Tip: Just open the backup file and find your needed Word document directly if you have backed up the latest version of the unsaved Word document. Click here if you want to do backup but has no idea of which tool to choose.
How Do I Recover an Unsaved Word Document
How do I recover an unsaved Word document in Windows 10 or other Windows systems? There are mainly three steps to complete.
Note: If you want to recover a deleted Word document, please open Recycle Bin to check first. If it is contained in the Recycle Bin, please drag it out directly; if it is not here, please click here to see how to recover deleted documents missing from Recycle Bin.
How do I recover a permanently deleted Word document?
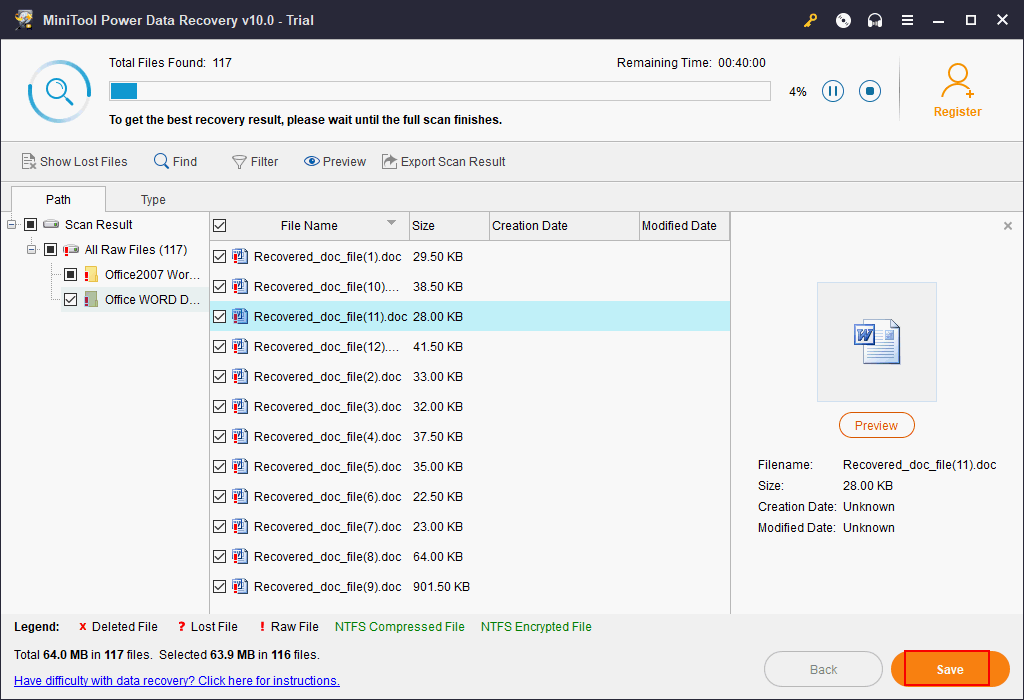
Step 1: get & install MiniTool Power Data Recovery to your computer. Then, launch it to see the main interface. Now, you are supposed to choose one from the four function options displayed in the left-hand panel.
Free Download
Tips on choosing a suitable one for your case:
- If the deleted/lost Word document was saved on a local partition, please select Logical Drives.
- If your document is included in a USB flash drive/SD card, please connect the device to your computer and choose Devices. (How to fix when USB flash drive not recognized or external hard drive not showing up)
- If you want to recover corrupt Word files from an inaccessible hard disk, you should also choose Devices and select your hard disk.

Step 2: select the target partition/disk to scan and click on the Scan button in the lower right corner.
If you want to search for only Word files, please do the following things:
- Click on the Scan Settings icon on the left side.
- Check only Office WORD Document (*.doc) and Office2007 Word Document (*.docx) under Extra search for known file types.
- Click on the OK button to confirm changes.
- Click on the Scan button to start detecting Word documents.

Step 3: check all the Word documents you want to recover from the scan result. Then, you should click on the Save button to choose a storage path for them. At last, click on the OK button to confirm and wait for the recovery to complete.
That’s how to recover the documents you have deleted or the corrupt files on Windows platform. If you have deleted a Word document from USB and want to recover it, please connect the USB device to your computer before running the Power Data Recovery software.
What if you have lost files on a Windows Server system? Please read this page:
How to Recover Unsaved Word Document Mac
To recover lost Word document on your Mac, you should use Stellar Data Recovery for Mac.
The recovery steps are:
- Get & install the software properly.
- Launch it to start Mac Word files recovery. Please select Documents; toggle the switch to On.
- Select the partition/disk that contains the unsaved Word document and click on the Scan button to search for lost Word documents.
- Wait for the scan and check all the Word documents you want to recover from Mac. Click on the Recover button to set a safe location for storing recovered Word documents. Then, click Save and wait for the recovery to finish.

That’s how to recover a Word document on Mac. To know more about Mac file recovery, please read:
Click to Tweet
Recover Unsaved Word Document with AutoSave Feature
Definitely, there is an AutoSave function built-in Microsoft Word that can be used to help you recover Word document easily from the automatically saved versions or unsaved files. If you’d like to learn the way to recover lost Word document by using the built-in AutoSave feature in different cases, just keep reading.
How to Recover a Word Document That Was Saved Over
You should recover previous version of Word document when you need a Word document that was saved over. The recovery steps are:
- Keep the certain Word document opening.
- Click on the File button located in the upper left corner of the pane.
- The file window will appear and the Info option will be chosen by default.
- Three sections are provided under Info: Permissions, Prepare for Sharing and Versions. All the versions saved automatically will be shown to you here according to the saving time.
- Look at the save time of them and figure out which is the version you want.
- Click on a version and Microsoft Word will open a new Word window for you.
- In the new window, two options are available: Compare and Restore.
- Click on the Restore button to overwrite the last saved version with the version you choose.

How Do You Recover a File You Didn’t Save
The situation seems to get worse if you have made many changes to a document, then you close it without saving any changes. When you open the Word document again, you won’t be able to see any automatically saved versions in the Info window after clicking the File menu. How can you recover the unsaved document under such circumstances?
Well, you can rely on the Recover Unsaved Documents feature or open the AutoRecover file location to check.
Where is the Recover Unsaved Documents feature?
- Open the Word document on your computer.
- Click on the File menu in the upper left corner.
- Find Manage Document option under Info.
- Click on Manage Document and choose Recover Unsaved Documents.
- Browse the recent unsaved files.
- Select a file to open.
- Click on the Save As button at the top of the file to save the changes.

How to open asd file?
You can also open the AutoRecover file location and check whether your need documents are contained here. Generally, the AutoSaved Word document files will be stored in the computer with a name formed by the original file name, Unsaved tag and some special symbols & numbers (please see the picture below). The AutoRecover files are saved as asd files and they are read-only.

Where are AutoRecover files saved?
You can find the location of AutoRecover files by the following steps:
- Click on the File option in the menu bar.
- Choose Options from the left-hand pane of the window.
- Select Save in the Word Options window you see.
- Navigate to the Save documents section on the right-hand pane.
- Find the AutoRecover file location and look at the storage path after it. The default path is: C:UsersUsernameAppDataRoamingMicrosoftWord and you can change it according to needs.
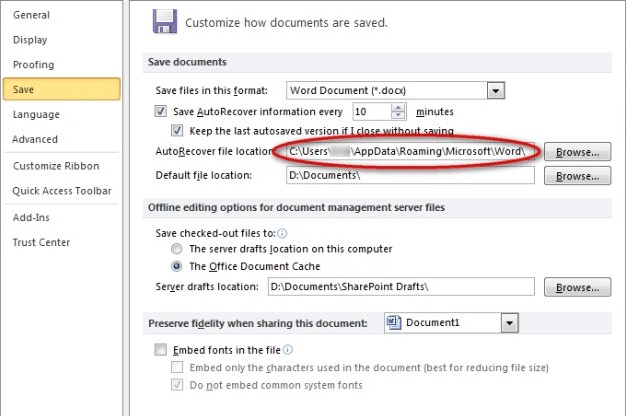
When you finally find your needed document in that location, please double click to open the asd file in Microsoft Office Word. Also, two choices are available: Compare and Restore. If it is the one you need, please select Restore to recover the unsaved Word document.
Now, you know exactly where Word saves AutoRecover files.
How do I turn on AutoRecover in Word?
Actually, the AutoRecover feature will be enabled by default. The Save AutoRecover information every _ minutes and Keep the last autosaved version if I close without saving options under Save documents section are both checked by default. You can uncheck these two options as you need.
Can I change the time interval of AutoRecover?
In fact, the time interval is set to 10 minutes by default and you can change it to an integer ranging from 1 to 120.
- The timer will be initialized every time when the new modification has been made to the Word document after the completion of the last auto-save/manual saving. And when the specified time interval is reached, a new version of the current Word document will be generated.
- If you would like to save current changes manually by pressing the Save button, the timer will be cleared and stop working until new changes have been made to the document.
How Can You Recover an Unsaved Word Document after Crash
Sometimes, you may suffer from a sudden Microsoft Office Word app crash or a system crash while you’re working on a Word document. What’s the right thing to do at this time? Definitely, you should do the following things to recover unsaved Word document after the crash:
- Restart the Microsoft Office Word or the restart the computer.
- Go to the original place to find and open the correct Word document.
- Take a look at the Document Recovery section located in the left-hand pane of Word.
- There may be many files that Word has recovered for you and they are available in the list; you should make sure which one you need.
- Right click on the file and choose Save As.
- Choose a location for it and click on the Save button.
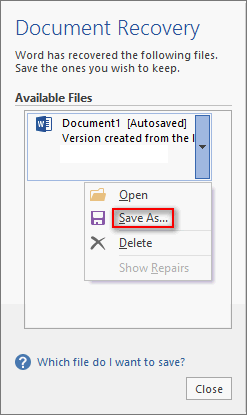
Please note:
- If you see many files in the list and you don’t know which one to save, you may look at the date and creation time under the name of each file (that may give a clue).
- If you see multiple versions of the same file, it’s better for you to choose the one with the most recent time since it often contains the most recent changes.
- To see the detailed content and changes, you can click on a file to open the document directly. You can continue working with the file you choose or save it first.
- Please close the Document Recovery pane when you are sure you have recovered all the documents you need.
All in all, if you find your Word document with very important information stored in is missing, you should react immediately by following the suggestions gave in the previous content to recover Unsaved Word document all by yourself.
Click to Tweet
The steps to recover unsaved excel file and the process to recover unsaved PowerPoint are basically the same. You can also watch the following demonstration video guide. If you would like to recover a pdf file, please click here.
Bottom Line
Word document missing seems to be inevitable and non-ignorable. Almost all users have ever been stuck in Word document loss issues. What a pity!
But the loss of an important Word document is actually not the end of the world; on the contrary, you can recover the unsaved/deleted/lost Word document in different ways.
For instance, both MiniTool Power Data Recovery software and the built-in AutoSave function can be used to help you find back the lost Word document information. They can be useful in most of the case.
What you should do is choosing the proper method according to your actual situation to complete the Word document recovery work at once.
Recommendations:
- Download Microsoft Template for Word. Excel, PowerPoint, and more.
- Create a template for Microsoft Word, Excel, and PowerPoint
Recover Unsaved Word Document FAQ
Can I retrieve a Word document that wasn’t saved?
Of course, you can. And there are three ways available for you: recover the unsaved Word document by using previous version; recover the Word document by using data recovery software; and recover the file by checking the AutoRecover file location.
Where does word save AutoRecover files?
The default AutoRecover directory is: C:UsersuserAppDataRoamingMicrosoftWord. Users can go to check by clicking File, selecting Options, choosing Save in left sidebar and looking at the AutoRecover file location.
Does Word save backup files?
That depends on whether you have configured the Word program to create backup copy. You can go to check through these steps: click File -> choose Options -> select Advanced -> scroll down to find Save section -> look at Always create backup copy option.
How do I recover temporary files?
- Open a Word document.
- Click the File menu in the upper left corner.
- Select Info from the left sidebar.
- Click Manage Document from the right pane.
- Choose Recover Unsaved Documents.
- Choose the correct asd file and click Open.
![]()
How to Recover Unsaved Word Document — Applies to deleted word document
Accidentally exiting Microsoft Word, experiencing an application crash, or having your computer run into an unexpected error may cause a Word document you’re working on to disappear unsaved. You’ll need to take steps to recover unsaved Word document.
This often leads to a loss of data, time, and effort. Fortunately, there are a few ways to attempt to recover an unsaved Word document.
Don’t give up just yet! You might be able to bring your work back onto your computer in one piece.
This article goes into the details of all the possible ways how you can recover unsaved Word document that you forgot to save, or lost because of an unpredictable error. Let’s get started right away.
Let’s get started.
Recovering Unsaved Word Document
Summary to recover unsaved Word document:
- In MS Word, click the File Tab in the upper left.
- Click Manage Document and select Recover Unsaved Documents from the drop-down list.
- Check for your missing file in the dialog box.
- Open the recovered Word document and click the Save As button in the top banner.
Please note that the various sections and instructions in this article apply to Word 2019, Word 2016, Word 2013, Word 2010, Word for Mac, and Word for Office 365.
If you’re working with other versions of Word, such as Word Online or Word 2007, there’s no known way to recover a document that wasn’t saved.
How to recover unsaved Word document: Pre-Recovery
Temporary files may allow you to recover an unsaved Word document. Multiple recovery methods exist, but no one method is guaranteed to work in every situation. You can enable auto-saving in Microsoft Word’s settings to prevent losing your work.
Here are 7 ways to recover unsaved work documents:
1. Search for Word documents to recover unsaved Word documents
Try searching for the Word document in Windows to recover the unsaved document:
- Select Start, type the document name (in Windows 8.1, type the name in the Search box), and then press Enter.
- If the Documents list (or Files list in Windows 8.1) contains the document, double-click the document to open it in Word.
If the search results don’t contain the file, go to the next method.
2. Searching for Word backup files to recover deleted Word document
All Word backup file names have a «.wbk» extension. If you have the «backup copy» option selected in Word, there might be a backup copy of the file on your PC.
If you want to check whether this option is on, select File > Options > Advanced, then scroll down to the Save section, and select Always create backup copy.
If you’re using Microsoft 365 subscription, you can check these two folder locations for the backup file:
- C:UsersAppDataRoamingMicrosoftWord
- C:UsersAppDataLocalMicrosoftOfficeUnsavedFiles
Note: In these paths, replace <UserName> with your username.
To find your Word document’s backup copy, select Start > enter .wbk in the Search box > then press Enter. If there are any files with the name «Backup of» followed by the name of the missing file, that’s your file. Just double-click the file name to open it.
If you still don’t find a backup file for the document, go to the next method.
3. Use the Recover Unsaved Documents function in Word
Microsoft has added an option that may potentially save your unsaved documents from permanent deletion. This can be accessed in Word itself by following the steps outlined below.
- Open Microsoft Word and navigate to the File menu using the header interface on top of your window.

- Click on the Manage Document button to extend its options, then choose Recover Unsaved Documents from the drop-down menu. This will open up a separate window where you can see a list of unsaved documents Word is aware of.

- Select the unsaved file you want to recover from the displayed list, then click the Open button.

- Your file will open in Word, where you can proceed to save it using either the File menu or the Ctrl + S keyboard shortcut.


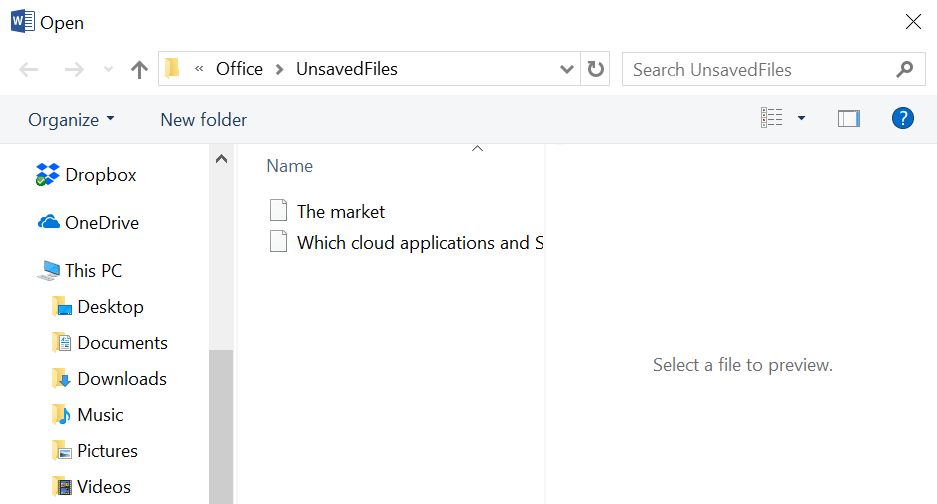
4. Recover unsaved Word document from your temporary files manually
Windows keeps hundreds of temporary files on your computer for various optimization reasons. If you don’t want to use the recovery option directly from Word, you can manually find a copy of your unsaved Word document here, which you can move and save manually in order to restore it.
- Open your File Explorer and navigate to the following folder:C:UsersUserAppDataLocalMicrosoftOfficeUnsavedFilesMake sure to replace User with your local Windows username, or else the path will be incorrect. You can also paste this string into the Run application (opened by pressing the Windows + R keys at the same time.)
- Similarly to the first method, you’ll see all of the files Word has automatically saved for you. Select all the files you want to recover.
- Right-click on one of the selected files and click the Copy option from the context menu. You can also use the Ctrl + C keyboard shortcut.
- Navigate to the location where you want to keep your restored files. Right-click anywhere inside the folder, then press the Paste option. You may also use the Ctrl + V keyboard shortcut.
- Wait for your files to finish copying. Voila! You’ve successfully restored your unsaved documents to a safe place. You can simply open them and work with them again without having to fear that they’ll be deleted.
5. Restore deleted Word documents from the Recycle Bin
If you accidentally deleted a document, it’s possible to restore it from the Recycle Bin on your desktop if it hasn’t been emptied yet. The steps below guide you through checking whether your document is in the Bin, and how you can restore the document if it is.
- Navigate to your desktop and check if your Recycle Bin has any contents by double-clicking on it. A new window will open up, displaying everything currently in your bin.
- If you see contents, locate your accidentally deleted Word document and select it.
Pro-tip, the Recycle Bin has a search feature that allows you to locate files way easier.
- Select your Word document and keep holding the mouse button. Drag and drop the file onto your Desktop (or any other folder that isn’t the Recycle Bin.)
- You’ve successfully restored your unsaved documents to a safe place. You can simply open them from the new location and work with them again without having to fear that they’ll be deleted.
6. Prevent future losses with AutoSave and AutoRecover
Two extremely useful features work together in Word to ensure you never run into problems with unsaved or lost documents. This section describes how you can turn these features on to ensure you never come across an issue like this in the future, even if you experience similar unexpected errors.
AutoSave
AutoSave works when Office 365 subscribers choose to save their documents to OneDrive or SharePoint. It automatically saves your document as you work on it, without you ever having to worry about manually saving all the time. This feature drastically decreases the chances of data loss and is highly recommended for people who work with Word on a daily basis.
As mentioned above, this is a feature exclusive to Office 365 subscribers. If you wish to work with AutoSave enabled, look into how you can become a subscriber by visiting Microsoft’s official website.
AutoRecover deleted Word document
For non-subscribers, there’s a feature that may save you from future loss of data if used correctly. Here’s how you can turn it on when working on a Windows operating system:
- Go to the File tab, then select the Options menu from the pane on the left side. A new window will appear, listing the many settings of Word.
- Switch to the Save tab in the left pane.
- Select the Save AutoRecover Information Every X Minutes checkbox, then manually enter the number of minutes you want in between each saves. Many people recommend inputting somewhere between 5 and 10 minutes.
- Make sure that the Keep the Last AutoRecovered Version if I Close Without Saving option is selected. This is what will make it possible to recover files in the future even if Word or your computer encounters a sudden error.
- Click the OK button to finalize the change. You now have AutoRecover turned on for the future!
7. Recover an unsaved Word document on Mac
On macOS versions of Word, the process of restoring files including unsaved Word documents is slightly different.
Unlike some Windows versions, the AutoRecover feature is turned on by default for Mac users. This makes the process slightly different, but more efficient as you don’t have to worry about losing unsaved files at all unless the feature was manually turned off previously.
To recover deleted Word document in Mac:
- Open the Finder window on your Mac, then:
- Type in “AutoRecovery” in the search bar and hit the enter key. Doing this will search your device for the default Word AutoRecovery folder.

- Alternatively, click the Go option from the header and select Go to folder (shift + ⌘ + G) Paste in the following path and hit enter: Library/Containers/com.microsoft.Word/Data/Library/Preferences/AutoRecovery.
- You’ll see all of the files Word has automatically saved for you. Select all the files you want to recover.
- Right-click on one of the selected files and click the Copy option from the context menu. You can also use the ⌘ + C keyboard shortcut.
- Navigate to the location where you want to keep your restored files. Right-click anywhere inside the folder, then press the Paste option. You may also use the ⌘ + V keyboard shortcut.
- Wait for your files to finish copying. Voila! You’ve successfully restored your unsaved documents to a safe place. You can simply open them and work with them again without having to fear that they’ll be deleted.

Final Thoughts
That’s it. We’ve highlighted 7 ways to recover unsaved Word documents. We hope that this article was useful in teaching you how to recover an unsaved Word document on various platforms.
If you ever run into issues with your Word documents getting lost, feel free to return to our article in the future.
You can also check our cheat sheet for MS Word here. Check out our help center for many other tips and tricks about Microsoft Word documents.
Further Reading
> How to Unfreeze Word on Mac Without Losing Work
> 9 Ways to Fix Windows 10 Won’t Shut Down
> Fixed: Print Spooler Keeps Stopping on Windows 10